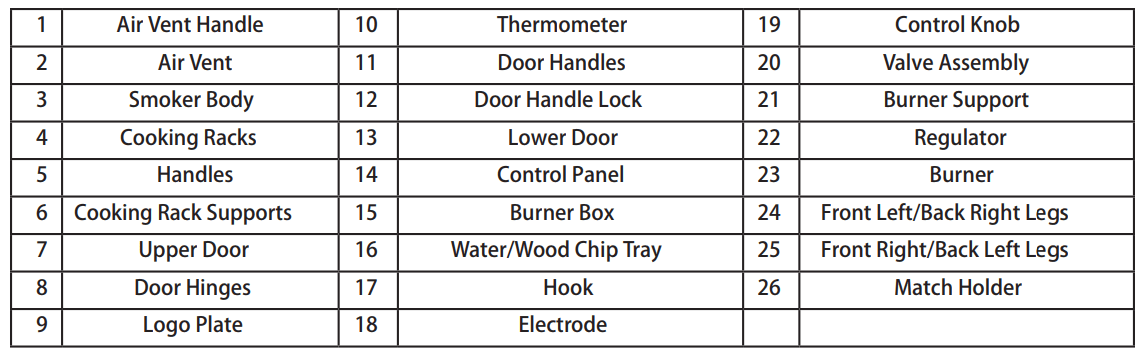
Turn smoker body upside down. Use screws (AA) to connect legs to the bottom of the smoker body. Match legs with stickers to the stickers on the smoker body.)
Step 2:
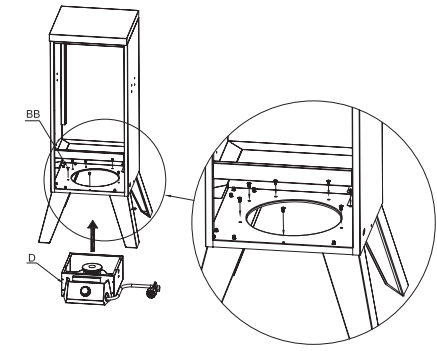
Flip smoker right-side up. Use screws (BB) to connect burner box to smoker.
Step 3:
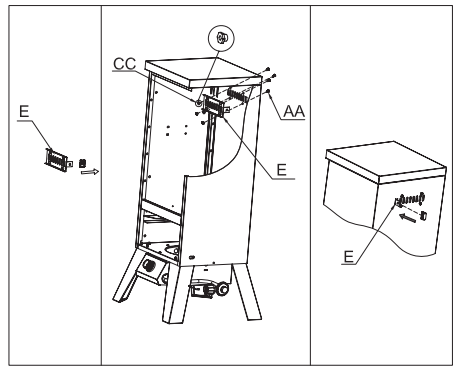
Remove Air rent handle from vent and screws(AA) and nuts(CC) to connect the vent to the smoker. Then insert the air vent handle onto the air vent.
Step 4:
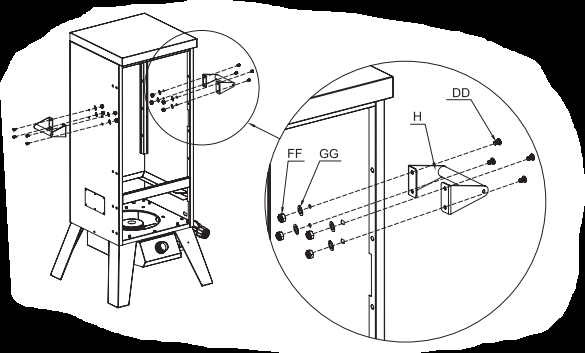
Use screws (DD), nuts (FF) and washers (GG) to connect han dles to smoker.
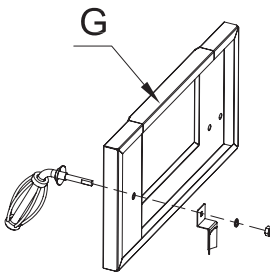
Step 5:
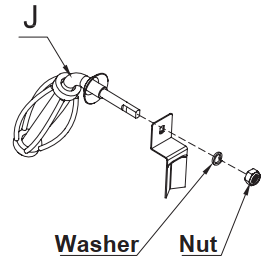
a. Remove door handle lock (with washer and nut) from door handle.
b. Insert door handle shaft through door handle hole. Reattach door handle lock (with washer and nut) to door handle shaft.
Step 6:
Repeat step 5 for bottom door.
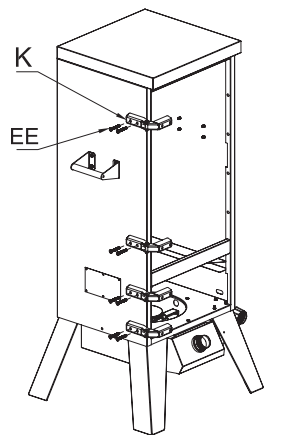
Step 7:
Use screws (EE) to connect hinges to smoker body.
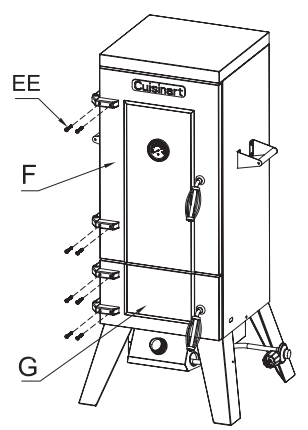
Step 8:
Use screws (EE) to connect upper door to hinges. Use screws (EE) to connect lower door to hinges.
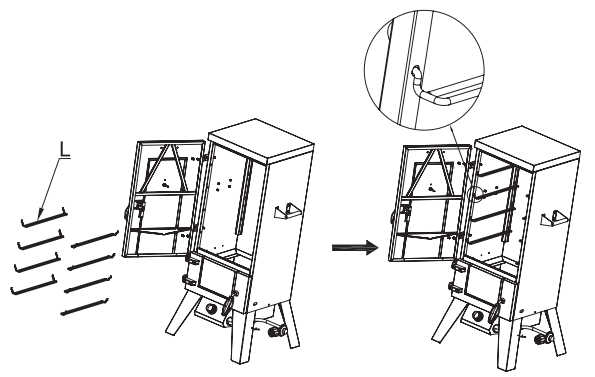
Step 9:
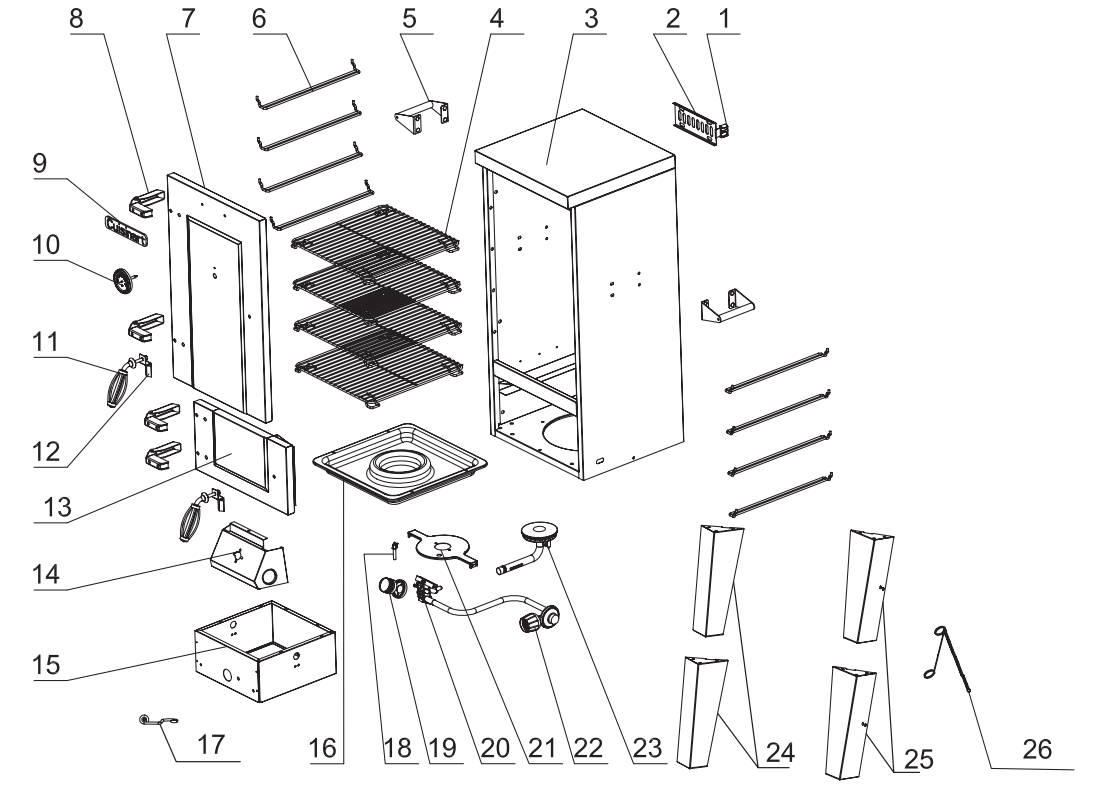
Insert cooking rack supports into smoker box holes and angle downward until they sit flat (see zoomed in image to the right). Insert four cooking rack supports per side.
Step 10:
Slide cooking racks onto cooking rack supports.
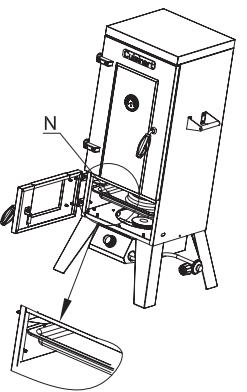
Step 11:
Open bottom door and slide water/wood chip tray onto built in brackets.
Step 12:
Use screws (AA) to secure the hook on the front right leg. Then put the gas hose on it.
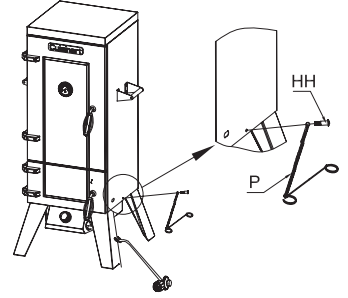
Step 13:
Connect the match holder to the smoker body using screw (HH).
Operating Your Smoker
1. Select a Proper Location
Note: The use and installation of this product must conform to local codes. In absence of local codes, use the National Gas and Propane Installation Code, CSA B149.1; Propane Storage and Handling, CSA B149.2 .
1. Never use this outdoor smoker inside any building, garage, shed or breezeway, or inside any boat, trailer or recreational vehicle and/or boat, to prevent possible fire and to prevent the possibly or carbon monoxide poisoning or asphyxiation.
2. Always place your smoker on a hard and level surface far away from combustible materials and structures.
3. Do not use this smoker under an overhead combustible surface or
covered area ( e.g., awnings, umbrellas, porches or gazeboes ). Keep all combustible surfaces at least 3ft(91cm) away.
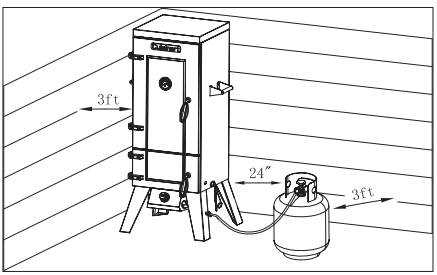
4. Locate the smoker away from any combustible and non-combustible material or construction by at least 3ft(91cm) from back and 3ft (91cm) from side. (See the diagram)
5. Never store or use gasoline or other flammable or volatile substances in the vicinity of this smoker or in the vicinity of any other heat
6. The cylinders can be disconnected when the appliance is not in use.
2. Special Instructions for the Use of Regulator and Propane Cylinder
GAS HOOK-UP Only the pressure regulator and hose assembly supplied with the smoker should be used. Any replacement pressure regulator and hose assembly must be specified by the somker manufacturer. This smoker is configured propane. Do not use a Natural Gas supply.
LIQUID PROPANE CYLINDER REQUIREMENTS: (20-lb Cylinder) A dented or rusty Liquid Propane cylinder may be hazardous and should be checked by your supplier. Never use a cylinder with a damaged valve. The Liquid Propane cylinder must be constructed and marked in accordance with the specifications for Liquid Propane cylinders by the United States Department of Transportation (DOT) or the National Standard of Canada, CAN/CSA-B339, Cylinders, Spheres and Tubes for Transportation of Dangerous Goods Commission. The 20-lb cylinder must have a shut off valve terminating in a valve outlet specified, as applicable, for connection type QCC1 in the standard for compressed gas cylinder valve outlet and inlet connection ANSI/CGA-V-1. Storage of an outdoor cooking gas appliance indoor is permissible only if the cylinder is disconnected and removed from the outdoor cooking gas appliance. The cylinder system must be arranged for vapor withdrawal. The cylinder must include a collar to protect the cylinder valve. Manifold pressure: (operating) 11 inches water column (W.C.), (non-operating) 11.2 inches water column (W.C.). The Liquid Propane cylinder must be fitted with an overfill protection device (OPD). Remove the plastic valve cover from the Liquid Propane cylinder. Make sure the smoker gas hoses do not contact the grease pan or smoker firebox when the Liquid Propane cylinder is placed into the cart.
CONNECTING THE LIQUID PROPANE CYLINDER: To connect the Liquid Propane gas supply cylinder: The cylinder valve should be in the “OFF” position. If not, turn the valve clockwise until it stops. Make sure the cylinder valve has the proper type-1 external male thread connections per ANSI Z21.81. Make sure the burner valves are in the “OFF” pos - i tion. Inspect the valve connections, port and regulator assembly. Remove debris and inspect the hose for damage. When connecting the regulator assembly to the valve, use your hand to tighten the nut clockwise until it stops. Use of a wrench could damage the quick coupling nut and result in a hazardous situation Open the cylinder valve fully by turning the valve counterclockwise. Before lighting the smoker, use a soap and water solution to check all the connections for leaks. If a leak is found, turn the cylinder valve “OFF” and do not use the smoker until a local Liquid Propane dealer can make repairs.
WARNING!
• The gas cylinder must be placed vetically. It is unsafer to operate if it was not.
• Keep the fuel supply hose away from any heated surface(s)
• The gas cyliner is placed as per the right picture.
• The distance between gas cyliner & this appliance is 24" at least.
• Do not store a spare LP gas cylinder under or near this appliance.
• Never fill the cylinder beyond 80 percent full.
• if the instructions are not followed exactly, a fire causing death or serious injury may occur.
WARNING!Never attempt to use damaged or obstructed equipment. See your local Liquid Propane dealer for repair.
DISCONNECTING THE LIQUID PROPANE CYLINDER Turn the smoker burner valves “OFF” and make sure the smoker is cool. Turn the Liquid Propane cylinder valve “OFF” by turning clockwise until it stops. Detach the regulator assem bly from the cylinder valve by turning the quick coupling nut counterclockwise. Place dust cap on cylinder valve outlet whenever the cylinder is not in use. Only install the type of dust cap on the cylinder valve outlet that is provided with the cylinder valve. Other types of caps or plugs may result in leakage of propane.
3. Checking for Gas Leak
LEAK TESTING GENERAL: Although gas connections on the smoker are leak tested prior to shipment, a complete leak test must be performed at the installation site. Before each use, check all gas connections for leaks using the procedures listed below. If the smell of gas is detected at any time, you should immediately check the entire system for leaks.
BEFORE TESTING: Make sure all packing materials have been removed from the smoker
Make a solution of one part liquid detergent and one part water. You will need a spray bottle, brush, or rag to apply the solution to the fittings. For the initial leak test, make sure the Liquid Propane cylinder is full.
TO TEST
1. Turn the burner valves off.
2. Turn the Liquid Propane cylinder valve counterclockwise to open the valve.
3. Apply the soap solution to all gas fittings. Soap bubbles will appear where a leak is present.
4. If a leak is present, immediately turn the gas supply “OFF” and tighten leaky fittings.
5. Turn the gas back “ON” and recheck.
6. Should the gas continue to leak from any of the fittings, turn the gas supply “OFF” and contact customer service at 866-994-6390 or email [email protected]
7. If there is evidence of excessive abrasion or wear, or the hose is cut, it must be replaced prior to the outdoor cooking gas appliance being put into operation. Only those parts recommended by the manufacturer should be used on the smoker. Substitutions will void the warranty.
WARNING!
Do not store smoker indoors unless the cylinder is disconnected. Do not store cylinder in a building, garage, or any other enclosed area, and keep area, and keep out of reach of children at all times.
INSTALLER FINAL CHECK Maintain specified clearance of 36 inches from combustible materials and construction.
• All internal packaging has been removed.
• The hose and regulator are properly connected to the Liquid Propane cylinder.
• The unit has been tested and is free of leaks.
• The gas supply shutoff valve has been located.
• All burners are installed.
• Keep the instruction manual for future reference
4. Lighting the Smoker
1. Make sure the propane cylinder is tightly threaded into the regulator (hand tighten only).
2. Open bottom door. Always open bottom door when lighting.
3. Push and turn control knob slowly counterclockwise to IGNITE/HI. Burner should light immediately.
4. If ignition does not occur in 3-5 seconds, turn the control knob “OFF”. Wait 5 minutes before attempting to re-light the smoker. If the smoker fails to ignite after the third attempt, call customer service at 1-866-994-6390 for assis tance. With burner lit, gently close the bottom door and allow the smoker to warm up for prior to use.
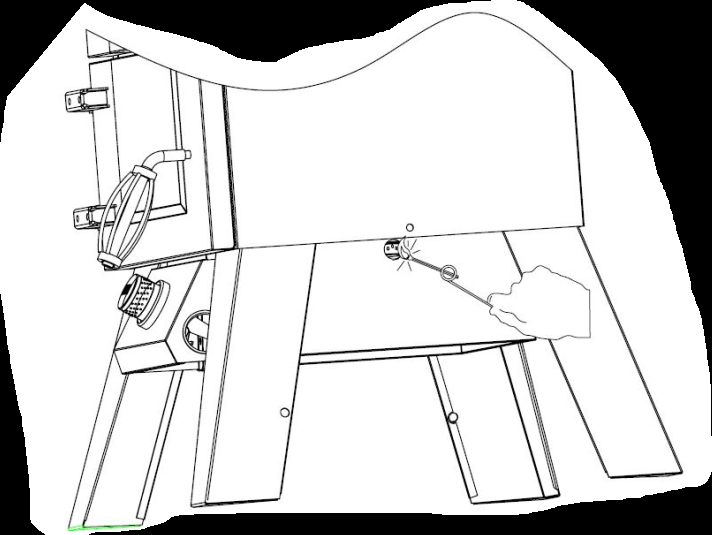
Note: If the knob can’t spark, insert a match into the match holder. Ignite the match and insert though the hole in the burner box.
WARNING!
If buner flame goes out during operation, immediately turn off the valve, gas cylinder and control knob etc. Make sure operation is safe before re-lighting.
TURNING THE SMOKER OFF
1. Turn knob to “OFF” position.
2. Turn the propane cylinder control knob to the “OFF” position. Caution: Do not attempt to re-light the smoker with-out following all the lighting instructions.
3. Allow the smoker body to cool at least 30 minutes before attempting to move or transport. 5.5 Match lighting
IMPORTANT
1.Read all instructions before lighting.
2. Make sure the gas control knob is in “OFF” position.
3. Open doors during lighting.
4. Strike a long wooden match and position the burning match to the burner box. Place the flame near the bottom edge of the burner.
5. Push down and turn the control knob counterclockwise to the high setting.
6. The burner should light. The flame will carry around the burner.
CAUTION:Do not touch any hot smoker parts. The outside of the smoker bottom especially becomes very hot during use. Use protective gloves to handle any parts that might become hot during use.
6. Using the Smoker
• Add wood chips to bowl portion (inner ring) of water/wood chip bowl. If you presoak wood chips for 30 minutes in water, drain, and then add to wood chip bowl, wood chips will last longer before burning up
• Fill the rest of the tray with water-this will add moisture to the air to keep food from drying out. Water also helps maintain a consistent air temperature. Add juice, beer, or vinegar to the water bowl to add additional flavor to whatever you’re smoking as the liquid evaporates
• Follow lighting instructions to light smoker
• Close smoker doors and let smoker heat to desired temperature before adding food
• Wood chips are necessary to provide smoke
• Keep doors closed at all times except when adding wood chips or water or adding/removing/checking on food. Opening doors will lose smoke and heat and can cause the wood to flare up
• Adjust control knob and air vent to control temperature (if temperature is getting too high even after making adjustments-add more water to water tray)
• Open lower door to slide water/wood chip bowl out to refill
• Clean out wood chip bowl after each use to prevent ash buildup
• It is normal for smoke to quickly create a brown/black buildup along the inside of the smoker
Care and Maintenance
Care
Regular care of your smoker will help keep it operating properly. All maintenance should be done only when the smoker is cool and with the fuel supply turned off. Occasionally inspect and tighten hardware that may become loose.
WARNING!Do not disassemble or alter the fuel supply system. Improper assembly can result in a hazardous condition. Seek qualified professional assistance if repairs are required.
Cleaning And Maintenance
WARNING! : Do not clean any cooking surface while smoker is operating. Let smoker cool to a safe temperature prior to cleaning.
• Disconnect the fuel supply and remove the fuel supply cylinder prior to cleaning.
• Cleaning should be done where detergent won’t harm work surface or lawn.
Exterior Cleaning
• Clean smoker exterior surfaces with warm soapy water.
• Wash drip tray in warm soapy water – do not run through dishwasher.
Interior Cleaning
• Cooking grate can be cleaned with a smoker brush. For best results, cooking grate should be warm (warm, not hot – never brush with smoker operating, or when interior is very hot). If desired, cool cooking grate can be removed from smoker and cleaned with warm soapy water.
• Clean appliance, including special surfaces, with recommended cleaning agents, if necessary.
WARNING! :
• DO NOT APPLY ANY CLEANERS OR LIQUIDS TO BURNER ELEMENT OR ATTEMPT TO CLEAN IN ANY WAY.
• DO NOT USE WATER OR LIQUIDS TO CLEAN SMOKER INTERIOR
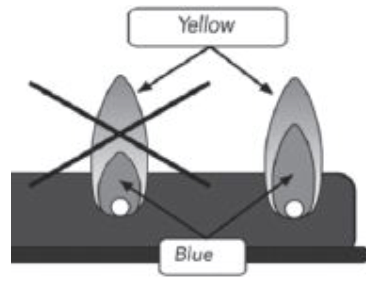
General Maintenance
• Visually check burner flames, with representations as per the right picture:.
• Donot obstruct the flow of combustion and ventilation air
• Keep the ventilation opening(s) of the cylinder enclosure free and clear from debris.
• Check and clean burner/venturi tubes for insects and insect nests. A clogged tube can lead to a fire beneath the appliance.
• Keep appliance area clear and free from combustible materials, gasoline and other flammable vapors and liquids.
FAQ and Troubleshooting
Frequently Asked Questions
Should I use wood chips or wood chunks?
You can use wood chips or wood chunks. Wood chunks will take longer to produce smoke.
Should I presoak the wood chips or use them dry?
Both are acceptable options. The dry chips with burner faster with a more intense smoke. The pre-soaked chips will burn slower.
Is it O.K. to use the smoker with no water in the water bowl?
Yes. But, water will help control the temperature and the steam from the water will keep the food moist. Filling the water bowl with cold water will help lower the smoker temperature.
How much wood should I put in the wood chip bowl?
Fill the wood chip bowl about half an inch above the rim of the bowl. Refill wood chips when chips stop producing smoke.
Can I use the smoker in my garage?
No. Do not use smoker in any enclosed or covered areas. Keep smoker 10+ feet from any building.
Troubleshooting
Burner Won’t Light
-Be sure LP tank still has fuel in it
-Ensure LP tank is correctly threaded into hose (not cross threaded) and fully tightened
- Check to see that burner orifice holes are clear. If obstructed, with gas tank disconnected, gently brush orifice holes with a small brush
-Check to see that igniter is producing a spark against the burner (best checked in shady spot). -Ensure that LP tank supply valve is open (turned counterclockwise until stop)
-Ensure that the orifice at the end of the hose is not obstructed or damaged
-Straighten sharp kinks in hose
Smoker doesn’t reach high enough temperature (using 20lb LP tank with conversion hose)
Your LP tank has a safety device that is intended to reduce gas flow in the event of a leak. When this device is active, it is commonly called “”bypass””. This device can be inadertantly activated by not following proper lighting procedures. Should you experience low flame, you should do the following:
1) shut off smoker
2) close tank valve fully
3) remove hose from tank for one minute to relieve pressure, then re-attach
Then, restart the smoker (and start the smoker each time) using the proper procedure:
1) ensure the smoker fuel knob is turned to OFF
2) slowly open the gas tank valve fully
3) WAIT 15 SECONDS
4) follow the smoker lighting steps (printed on smoker, and in owner’s manual)