User Manual for Air Fryer Toaster Oven
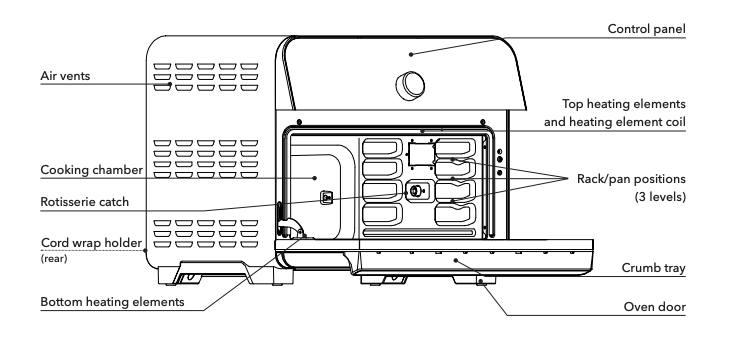
Product, parts and accessories
Before using your amazing new toaster oven, make sure that everything is present and accounted for.
Toaster Oven
Accessories
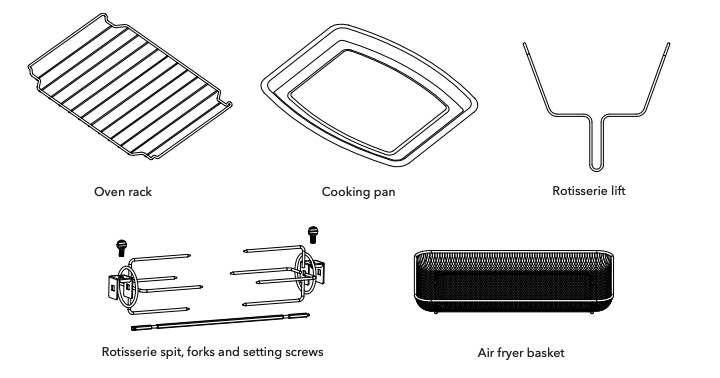
Illustrations in this document are for reference only and may differ from the actual product. Always refer to the actual product.
Get started
Initial set up
 “We all eat, and it would be a sad waste of opportunity to eat badly.” — Anna Thomas
01 Pull that Omni Plus out of the box!
02 Remove all the packaging material from in and around the toaster oven.
 Don’t remove any safety warning stickers or the rating label from the oven.
03 You may be tempted to put the Omni Plus on your stovetop for quick use — but don’t do it! Place it on a stable, level surface, away from combustible material and external heat sources. Wipe the heating element with a soft, dry cloth to make sure there are no stray packaging particles left in the multicooker base.
Make sure to leave at least 13 cm / 5" of space above and around all sides of the appliance.
04 Remove the crumb tray and check the cooking chamber for loose debris.
05 Follow the Care, cleaning and storage instructions to wash your new toaster oven before using it.
CAUTION
- Read the Important safeguards before using the appliance. Failure to read and follow those instructions for safe use may result in damage to the appliance, property damage or personal injury.
- Do not place the appliance on a stovetop, upon on another appliance, or in a heated oven. Heat from an external source will damage the appliance.
- To avoid the risk of fire, property damage, and/or personal injury, do not place anything on top of the appliance, and do not block the air vents.
Initial test run
Do you have to do the test run? No — but getting to know the ins and outs of your Omni Plus prepares you for success in the kitchen! Take a few minutes to get to know how this little beauty works
|
Stage 1: Setting up for cooking
01 Open the oven door. Slide the cooking pan onto the bottom rack position, and into the cooking chamber. Close the door.
02 Plug the power cord into a 120 V power source. The oven is in standby mode and the display shows OFF.
03 Push the dial to wake the oven. Touch the temperature field. Air Fry and the temperature field will flash. The temperature field shows 400°F.
Don’t change the temperature during the test run.
04 Touch the time field to select the cooking time.
05 Turn the dial to adjust the time to 20 minutes (00:20).
06 Touch Start to begin. The display shows On while the oven preheats.
|
|
Stage 2: “Cooking” (…but not really, this is just a test!)
01 When the oven reaches the perfect temperature, it beeps and begins the cooking countdown.
Don’t cook food during the test run.
02 Partway through cooking, the display shows turn Food. Wait 10 seconds for the program to resume automatically, or, open and close the oven door to pause and resume the program manually.
When the oven door is open, the display shows OPEN.
03 The oven counts down the last minute of the cooking time in seconds and beeps when finished. The oven will enter the Keep Warm state and once the program finishes, the display shows End.
04 Open and close the oven door to return to standby mode and start cooking for real!
If you forget this last step, the toaster oven will beep to remind you about it.
|
CAUTION Metal, glass surfaces and accessories will be hot during and after cooking. To avoid burn injury, do not touch the appliance, or attempt to insert or remove accessories without proper hand protection.
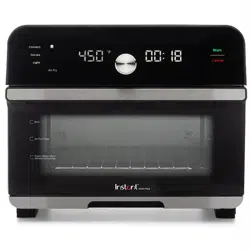
Control panel
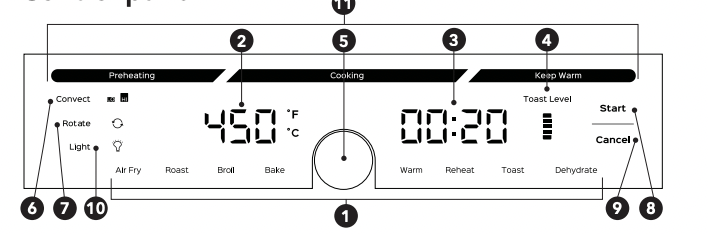
| 1 |
Smart programs |
• Air Fry
• Bake
• Roast
• Broil
|
• Warm
• Reheat
• Toast
• Dehydrate
|
| 2 |
Temperature field |
Shows the cooking temperature in different Smart Programs and modes.
Touch the temperature field to select it.
|
| 3 |
Time field |
Shows the cooking time, reminders, and error messages. Touch the time field to select it. |
| 4 |
Toast level |
Toasting darkness levels; see Cooking: Toast |
| 5 |
Control dial |
Turn the dial to toggle through options.
Push the dial like a button to confirm selections, and to wake the oven.
|
| 6 |
Convect |
Touch to toggle between Hi (High) and Lo (Low) convection fan speeds.
Only applicable during Roast, Broil, Bake, Reheat and Dehydrate.
|
| 7 |
Rotate |
Touch to turn rotisserie mode on and off.
Only applicable during Air Fry, Bake and Roast
|
| 8 |
Start |
Touch to begin a selected smart program. |
| 9 |
Cancel |
Touch to stop a smart program at any time and go back to standby mode |
| 10 |
Light |
Touch to turn the oven light on and off any time. |
| 11 |
Status bar |
Shows the cooking status in different Smart Programs and modes |
Settings
| To do this… |
Do this! |
| Wake the toaster oven. |
The display shows OFF to let you know that the Omni is in standby mode, ready for action. Press the dial to access the Smart Programs. |
| Turn the oven light on and off. |
Touch Light to turn the oven light on and off.
The oven light turns off automatically after 1 minute.
|
| Turn sounds on and off. |
In standby mode, press and hold the dial for 3 seconds. The display changes to S On when the sound is on, and SOFF when the sound is off.
Error alerts cannot be silenced
|
| Change temperature scale (°C or °F). |
Select any Smart Program, then touch and hold the temperature field for 3 seconds. The temperature scale changes to display in Celsius (°C) or Fahrenheit (°F). |
| Save a custom cooking time or temperature. |
Select a smart program, adjust the time and temperature as you like, then touch Start to save the changes to the toaster oven’s memory. |
| Make on-the-fly changes to the cooking time or temperature. |
Once a Smart Program has started, touch the time field or the temperature field, then turn the dial to adjust the cooking time or temperature as needed.
Touch Start to resume cooking with your changes.
Changes made during cooking will not be saved.
|
| Reset an individual smart program. |
In function selection mode, touch and hold the smart program key you want to reset (for example: Air Fry) for 3 seconds. The cooking time and temperature for that Smart Program are restored to the factory default setting |
| Reset all smart programs. |
In function selection mode, touch and hold Cancel for 3 seconds. The cooking times and temperatures for all Smart Programs are restored to the factory default settings. |
Status messages
 The Omni Plus is in standby mode and ready to go!
 A smart program is in the preheat stage.
Only applies to Air Fry, Roast and Bake.
 The oven door is open. If the oven door remains open for over 5 minutes during cooking and/or 30 seconds during program selection, the oven returns to standby mode.
 The display shows the cooking time and on-screen messages
 Shows the oven's target cooking temperature.
Toast level  Shows the active toasting darkness level from 1 to 5.
 Food is ready to be flipped or rotated, as recommended by your recipe.
Only applies to Air Fry, Roast and Bake, and won’t appear if the rotisserie is on.
 The Smart Program has finished!
Status bar

| 1 |
Preheating |
The Omni Plus is heating up to the perfect temperature to cook your meal.
Only applies to Air Fry, Roast and Bake.
|
| 2 |
Cooking |
Cooking is in progress. |
| 3 |
Keep Warm |
Cooking has finished and the oven enters into the Keep Warm state. |
Cooking
The Omni Plus is a powerhouse countertop oven that you can trust to cook evenly and deeply.
| What we love about it |
What you should know about it |
| By combining rapid air circulation with innovative golden quartz heating elements, the Omni Plus heats up quickly, and cooks way faster than regular ovens. |
The Omni Plus has a bit of a learning curve. Golden quartz elements use infrared light to cook, which produce more heat, much faster than a regular element. |
| Instant Tip: Try reducing your recipes’ cooking time and/or temperature by up to 25% to get the results you like best. The Omni Plus will remember the changes you make! |
Check out the cooking timetables for guidance, or visit our recipe site for fun, easy-tofollow instructions. You can also download the free Instant Pot app to search recipes, save favorites and more.
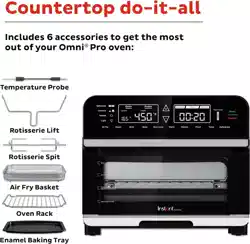
Cooking accessories
The oven rack is perfect for toasting bread and bagels, and baking pizza and big ol’ baked potatoes. You can place any oven-safe cookware on the oven rack, the same as you would in a regular oven.
Do not cover the oven rack when cooking.
Place the oven rack or cooking pan on the top, middle, or bottom positions as your recipe recommends, or however you see fit!
The cooking pan should be used for messy foods, like chicken tenders, herb roasted veggies and cheesy garlic bread.
Instant Tip: Line the pan with parchment paper instead of aluminum foil. Optionally, spray the pan or basket with non-stick cooking spray before adding food to help prevent sticking.
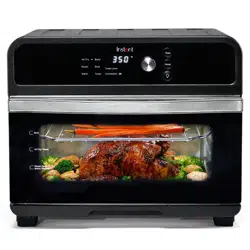
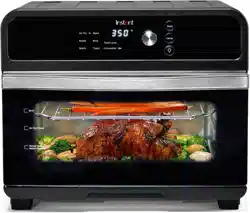
The air fryer basket is perforated for airflow and can be used for most air fried or roasted foods, like chicken wings and coconut shrimp, or buffalo cauliflower bites and garlicky Brussels sprouts. Always place the air fryer basket on the cooking pan when inserting it into the oven.
|
|


|
CAUTION To avoid risk of fire, property damage and/or personal injury, do not spray oil into the cooking chamber, and never use aluminum foil.
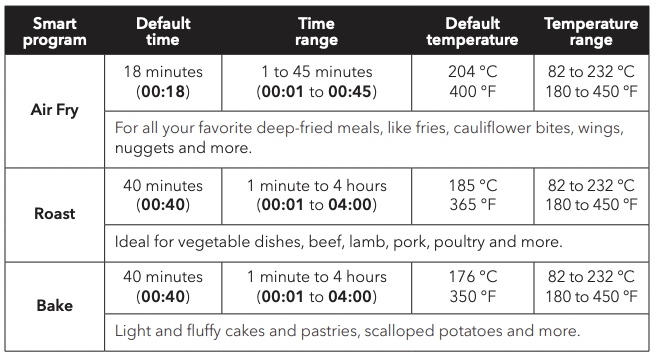
Air Fry, Roast and Bake
These programs use convection cooking to give your meals rich, crispy flavor with little to no oil, so you can say, “See ya!” to the greasy mess and extra calories! The cooking times and temperatures below are recommendations only. Play with the presets to get the results you like best!
| Stage 1: Setting up for cooking |
|
Stage 2: “Cooking” |
|
01 Plug the power cord into a 120 V power source. The oven is in standby mode and the display shows OFF.
02 Push the dial to wake the oven.
03 Select the Smart Program you want to use: Air Fry, Bake or Roast.
04 Touch the temperature field to select it then turn the dial to adjust the cooking temperature.
05 Touch the time field to select it then turn the dial to adjust the cooking time
06 Touch Start to begin. The display shows On while the oven preheats.
|
|
01 When the oven reaches the perfect temperature, it beeps and begins the cooking countdown. Open the oven door and carefully place your food items inside.
You can put food in the oven before or after preheating, as your recipe recommends.
02 Partway through cooking, the display shows turn Food. Open the oven door if you want to turn or toss your food items. Close the oven door to resume the cooking program.
If your food doesn’t need to be flipped, wait 10 seconds for the program to resume automatically, or, open and close the oven door to pause and resume the program manually
03 When the oven enters into the Keep Warm state or the display shows End, carefully open the door, and, using proper hand protection, remove your food from the cooking chamber.
Once cooking finishes, the Omni Plus will remind you to touch Cancel or remove your meal every 5 minutes for up to 1 hour.
|
Cooking tips
Give all your favorite fresh and frozen snacks a fighting chance!
• Air Fry, Bake and Roast preheat as an important step, and most foods benefit from a preheated oven. Wait for the countdown to appear before adding food to the cooking chamber.
• When baking cake, pie, quiche, and other treats, any oven-safe baking dish will do! If you’re worried about overcooking, cover it with any oven-safe lid.
• For coated food, like onion rings or deep-fried pickles, use an egg wash with bread-crumbs rather than liquid-based batters to make sure that batter sticks to the food.
• Spray food items with cooking oil before adding seasoning to get the seasoning to stick well.
• For super crispy fries, soak your freshcut potato sticks in ice water for 15 minutes, then pat them dry and toss them lightly with oil before cooking.
• Patting dry moist food items before cooking prevents excess steam and splatter, and gives you crispier results.
• Air frying can cause oil and fat to drip from foods. To prevent excess smoke, watch the oil levels and carefully remove and drain the cooking pan and/or crumb tray as needed.
Check out the cooking timetables, download the Instant Pot app, or, visit our recipe site for fun, easy-to-follow recipes.
CAUTION The toaster oven and accessories will be hot during and after cooking. To avoid risk of burn injury, do not touch hot surfaces with unprotected hands. Always use proper hand protection and exercise extreme caution when adding or removing food from the hot cooking chamber.
Toast
Toast up to 6 slices of bread or bagel halves at a time — no flipping required!
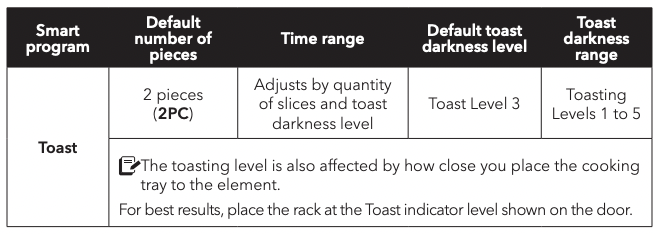
01 Plug the power cord into a 120 V power source. The oven is in standby mode and the display shows OFF.
02 Open the oven door and place your food items inside. Close the door.
03 Push the dial to wake the oven. Touch Toast.
04 Touch the field indicating the number of pieces. When the field flashes, use the dial to select the number of slices you’re toasting, from 1 piece (1PC) to 6 pieces (6PC). The toasting time adjusts automatically.
05 Touch the Toast Level bar to select it. When it flashes, use the dial to select a darkness level, from 1 to 5.
06 Touch Start. The display starts to count down right away.
07 To add time, touch the time field, then turn the dial to add to the cooking time. Touch Start to resume cooking.
08 When the display shows End, carefully open the door, and, using proper hand protection, remove your food from the cooking chamber.
If you forget this last step, the toaster oven will beep to remind you every 5 minutes for up to 1 hour.
CAUTION The toaster oven and accessories will be hot during and after cooking. To avoid risk of burn injury, do not touch hot surfaces with unprotected hands. Always use proper hand protection and exercise extreme caution when adding or removing food from the hot cooking chamber.
Broil, Warm, Reheat and Dehydrate
These cooking times and temperatures are recommendations only. Play with the presets to get the results you like best!
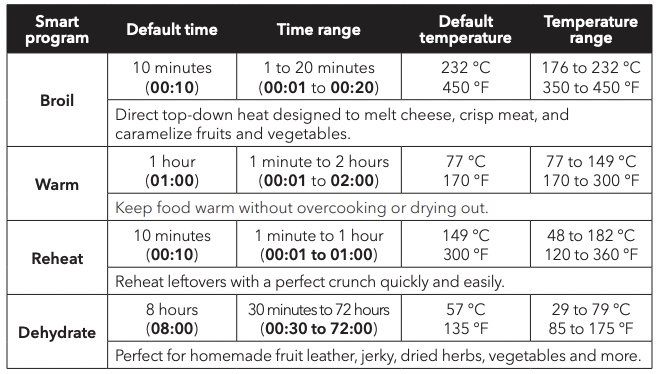
01 Plug the power cord into a 120 V power source. The oven is in standby mode and the display shows OFF.
02 Open the oven door and place your food items inside. Close the door.
03 Push the dial to wake the oven.
04 Select the Smart Program you want to use: Broil, Warm, Reheat, or Dehydrate.
05 Touch the temperature field to select it, then use the dial to adjust the cooking temperature.
06 Touch the time field to select it, then use the dial to adjust the cooking time
07 Touch Start to begin. The cooking countdown starts right away.
08 When the display shows End, carefully open the door, and, using proper hand protection, remove your food from the cooking chamber.
If you forget this last step, the toaster oven will beep to remind you every 5 minutes for up to 1 hour.
CAUTION When cooking meat, always use a meat thermometer to ensure the internal temperature reaches a safe minimum temperature. Refer to the USDA’s Safe Minimum Internal Temperature Chart.
Rotisserie cooking
The rotisserie spit and forks are perfect for roasting whole chicken, tenderloin and much more. Follow the steps below to prepare your food, then turn on the rotisserie to get crispy, gorgeous, golden-all-over results!
Always insert the rotisserie spit and food into the cooking chamber before preheating the toaster oven.
| Stage 1: Setting up the rotisserie spit |
|
Stage 2: Positioning the rotisserie spit |
|
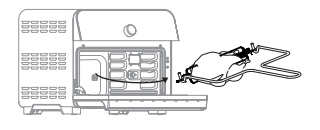
01 Unscrew the 2 setting screws from the forks and set aside.
02 Push your food item onto the spit.

03 Slide the forks onto both ends of the spit, making sure the prongs are inserted into the food item securely on both sides.

04 When you're happy with the positioning, insert and tighten the setting screws to hold the forks in place.

|
|
01 Open the oven door.
02 Insert the pointed end of the rotisserie spit into the rotisserie catch on the right side of the cooking chamber.

03 Lower the square end of the rotisserie spit into the notch on the left. Close the oven door.

Stage 3: Setting up the Omni for rotisserie cooking
01 Connect the power cord to a 120 V power source. The oven is in standby mode and the display shows OFF.
02 Push the dial to wake the oven and select the Smart Program you want to use: Air Fry, Roast or Bake.
|
01 Touch the temperature field. When the temperature field flashes, use the dial to adjust the cooking temperature.
02 Touch the time field to select it then turn the dial to adjust the cooking time.
03 Touch Start.
04 To turn the rotisserie feature on and off, touch Rotate.
Rotisserie mode will turn on automatically when Roast begins.
Removing rotisserie cooked food
01 Open the oven door. Position the rotisserie lift hooks beneath the left and right arms of the rotisserie spit where the indents are located.
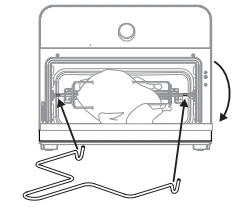
02 Lift the left side of the rotisserie spit slightly, then move the spit to the left to remove it from the catch on the right.

03 Carefully pull the rotisserie spit towards you to remove your food from the cooking chamber, then place your food on a tray or heatresistant surface.
04 Using heat protection for your hands, unscrew the setting screws and remove the forks from the food, then remove the food from the spit.

CAUTION The rotisserie spit, forks and basket will be hot during and after cooking. To avoid risk of burn injury, always use the rotisserie lift to remove the spit, and exercise extreme caution when removing hot items from the cooking chamber. Always use proper hand protection when handling and/or disassembling hot rotisserie accessories.
Care, cleaning and storage
Clean your Instant Omni Plus and accessories after each use. Always unplug the toaster oven and let it cool to room temperature before cleaning. Never use harsh chemical detergents, scouring pads, or powders on any of the parts or components. Let all surfaces dry thoroughly before use, and before storage.
Dishwasher safe
| Part or accessory |
Notes |
| Cooking pan |
• Optionally, prior to use, line with parchment paper or spray with nonstick cooking spray for easier cleaning. |
| Air fryer basket |
• For best results, use a bristled brush rather than a sponge or cloth. |
| Oven rack |
• Remove for cleaning. |
| Rotisserie spit, forks and screws |
• Disassemble before cleaning.
• If machine washing, place small parts in washable mesh bag
|
| Rotisserie lift |
• Clean as needed. |
| Crumb tray |
• Remove for cleaning.
• To prevent smoking, make sure grease and food debris is fully removed.
|
Damp cloth only and mild dish soap
| Part or accessory |
Notes |
| Cooking chamber |
• Always check the heating coil and cooking chamber walls for oil spatter and food debris, and clean as needed.
• You may use any commercial oven cleaner to remove stubborn grease residue.
• Use care when cleaning around the top and bottom heating elements.
|
| Exterior |
• After cleaning, wipe down with a dry cloth to prevent streaking. |
| Power cord |
• Clean as needed.
• When storing, use the power cord holder at the back of the toaster oven. Do not fold the power cord.
|
Some discoloration may occur after machine washing, but this will not affect the appliance's safety or performance.
WARNING
To avoid risk of electrical shock and personal injury:
• Do not immerse the appliance in water.
• Do not rinse the appliance under a tap.
• Do not wet prongs of the power cord.
Without proper cleaning, food and grease splatter may build up around the heating elements, causing the risk of smoke, fire, and personal injury.
If you see or smell smoke, touch Cancel, unplug the appliance, and allow it to cool. Follow instructions on the previous page to clean the appliance and accessories.
Troubleshooting
Register your Instant Omni Plus today!
If your issue persists or you have any additional questions, get in touch with a Customer Care Advisor through our chat widget at instantappliances#chat, by email at supportinstantpot or by phone at 1-800-828-7280.
| Problem |
Possible reason |
Try this |
| The toaster oven is plugged in but will not turn on. |
The appliance is not properly plugged in. |
Ensure the power cord is plugged firmly into a 120 V outlet. |
| Bad power connection or no power. |
Plug in another appliance to the same outlet to check the outlet for power. |
| Move the toaster oven to another outlet to ensure there is nothing else plugged in on the same circuit or in the general area. |
| Inspect the power cord for damage. If you see damage, discontinue use and contact Customer Care. |
| Condensation is forming on countertops. |
Toaster oven does not have proper ventilation. |
Make sure the toaster oven has at least 5" / 13 cm of space around all sides while in use. |
| Water is dripping from under the door. |
| Oven light will not turn on. |
Toaster oven is not plugged in. |
Ensure that the toaster oven is plugged in securely. |
| Oven light has burnt out. |
Contact Customer Care |
| Black smoke is coming from the toaster oven. |
Caution : Stop cooking immediately. Touch Cancel, then unplug the appliance and allow it to cool to room temperature. |
| Using an oil with a low smoke point. |
Choose a neutral oil with a high smoke point, such as avocado, canola, soybean, safflower, or rice bran oil. |
| Food particles on the heating elements, or, food residue in the cooking chamber or on the accessories. |
Remove all accessories from the cooking chamber and clean the area as well as all accessories thoroughly. |
| Faulty circuit or heating element. |
Contact Customer Care.
Do not attempt to repair the appliance.
|
White smoke is coming from the toaster oven.
|
Cooking foods with a high fat content, such as bacon, sausage, and hamburger. |
Avoid air frying foods with a high fat content. |
| Check the cooking pan for excess oil or fat, and carefully remove as needed after cooking. |
| Water is vaporizing, producing thick steam. |
Pat dry moist food ingredients before air frying.
Do not add water or other liquid to the cooking chamber when air frying.
|
| Seasoning on food has blown into the heating element. |
Be mindful when seasoning food.
Spray vegetables and meats with oil before seasoning to better help the seasoning stick.
|
| Error code appears on display |
E1 |
Sensor error |
Contact Customer Care.
Do not attempt to repair the appliance.
|
| |
E2 |
| |
E3 |
| |
E6 |
| |
E7 |
Any other servicing must be performed by an authorized representative.