Owner Manual Brushless Circular Saw
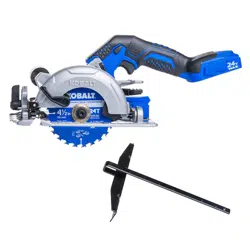
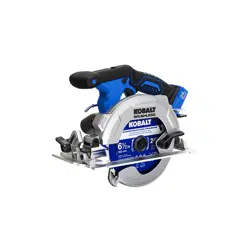
PACKAGE CONTENTS

WARNING
- Remove the tool from the package and examine it carefully. Do not discard the carton or any packaging material until all parts have been examined.
- If any part of the tool is missing or damaged, do not attach the battery pack or use the tool until the part has been repaired or replaced. Failure to heed this warning could result in serious injury.
OPERATING INSTRUCTIONS
1. Battery Pack
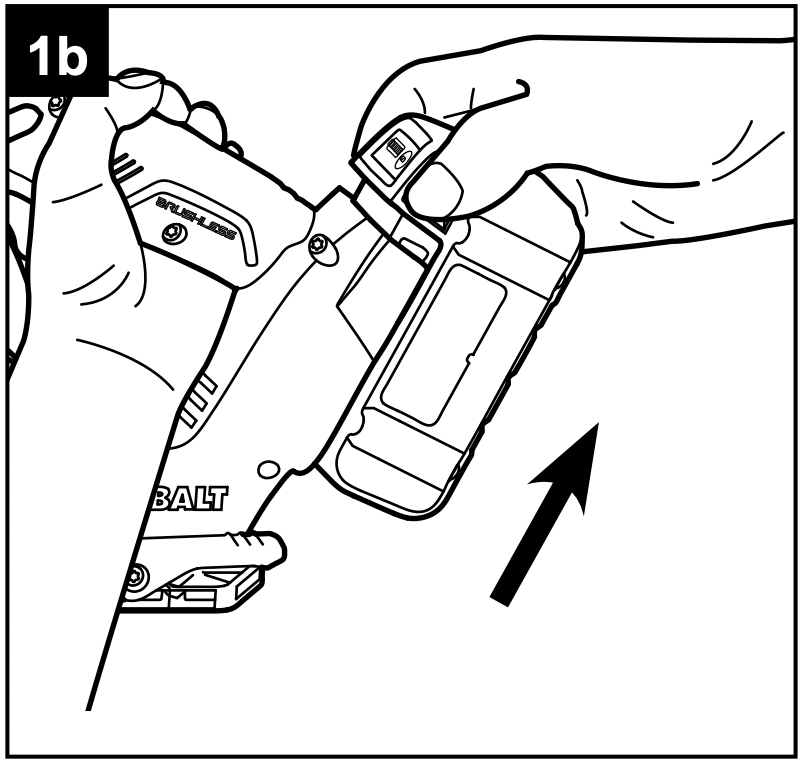
To Attach Battery Pack
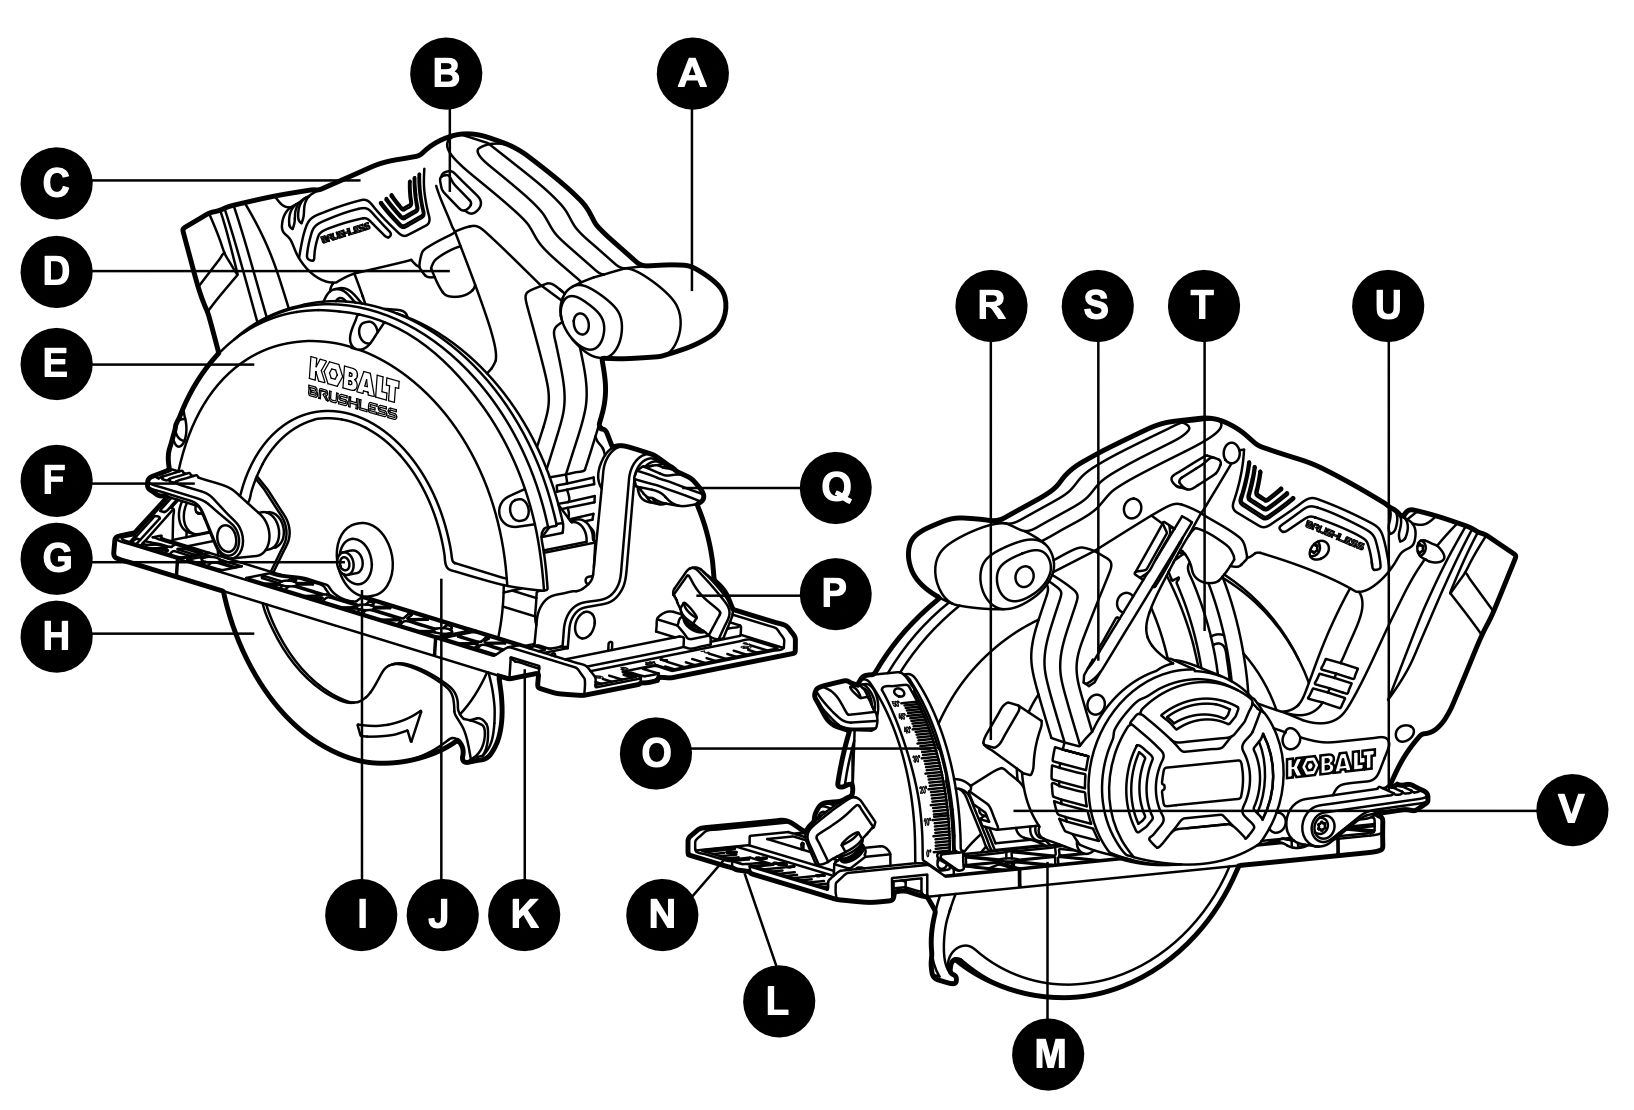
a. Ensure that the trigger switch (D) is in the “OFF” position.
b. Align the raised portion on the battery pack with the grooves on the bottom of the tool, then slide the battery pack onto the saw as shown.
c. Make sure that the latches on the battery pack snap into place and the battery pack is secured to the tool before beginning operation.
NOTICE: When placing the battery pack on the tool, be sure that the raised rib on battery pack aligns with the groove on the tool and the latches snap into place properly. Improper assembly of the battery pack can cause damage to internal components.
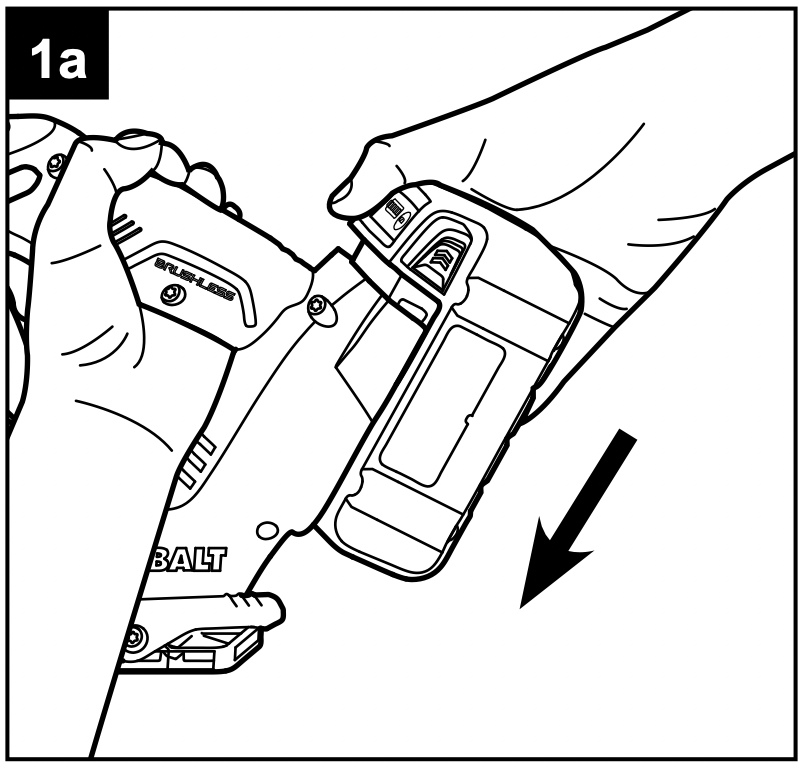
To Detach Battery Pack
a. Ensure that the trigger switch (D) is in the “OFF” position.
b. Press the battery-release buttons to release the battery pack.
c. Pull forward on the battery pack to remove it from the tool.
2. Trigger Switch
a. To turn the saw ON, press the lock-off button (B), then squeeze the trigger switch (D).
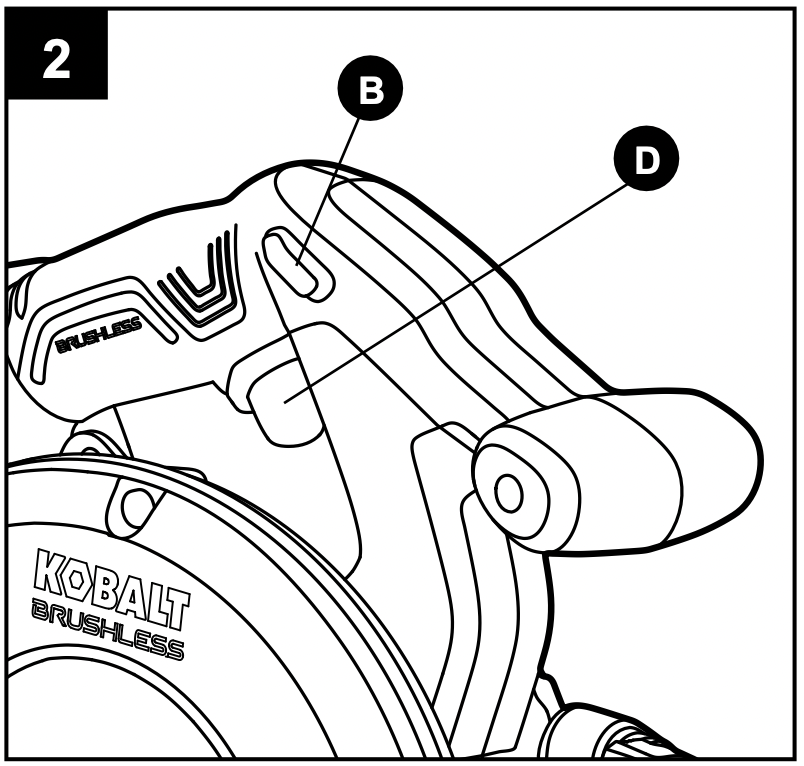
WARNING: The blade should reach full speed before it comes into contact with the workpiece.
b. To turn the saw OFF, release the trigger switch and allow the blade to come to a complete stop.
Electric Brake
The circular saw is equipped with an electric brake. When the trigger switch is released, the electric brake engages automatically to quickly stop the rotation.
3. Blade Guard System
The lower blade guard (H) on the circular saw is there for the operator’s protection and safety. Do not alter it for any reason.
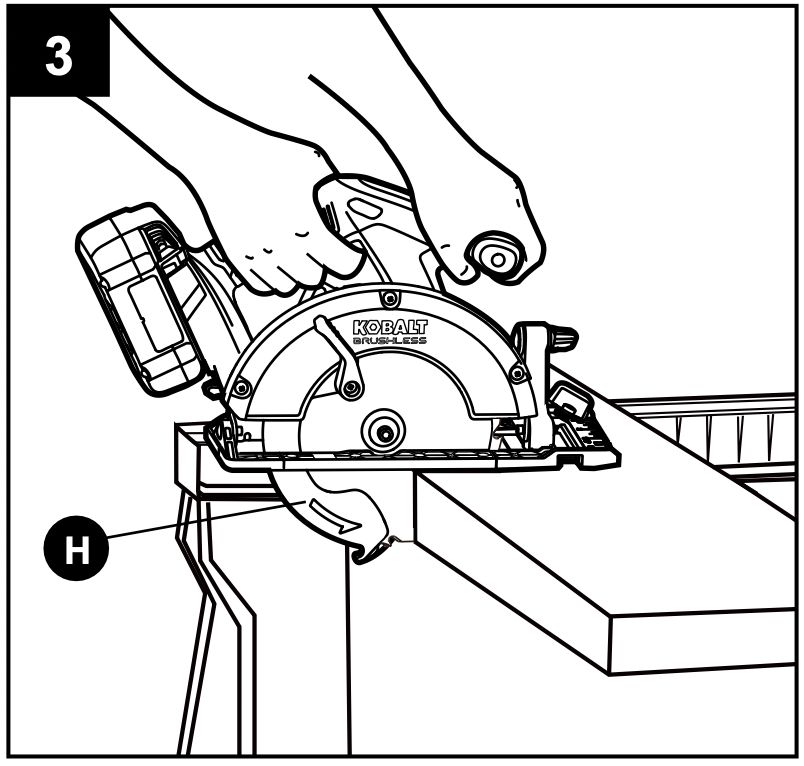
If the lower blade guard becomes damaged or if the blade begins to run slowly or sluggishly, DO NOT operate the saw until the damaged part has been repaired or replaced. ALWAYS leave the guard in its correct operating position when using the saw.
DANGER: When sawing through a workpiece, the lower blade guard does not cover the blade on the underside of the workpiece. ALWAYS keep hands and body away from the cutting area. Serious injury will result if any part of the body comes into contact with the moving blade.
WARNING: To avoid possible serious injury, never use the saw when the lower blade guard is not operating correctly. Check the lower blade guard for correct operation before each use. It should move freely and instantly return to the closed position. If the saw is dropped, check the lower blade guard and bumper for damage at all depth settings before using it.
If the lower blade guard does not snap closed at any time, take it to a qualified service technician for repair.
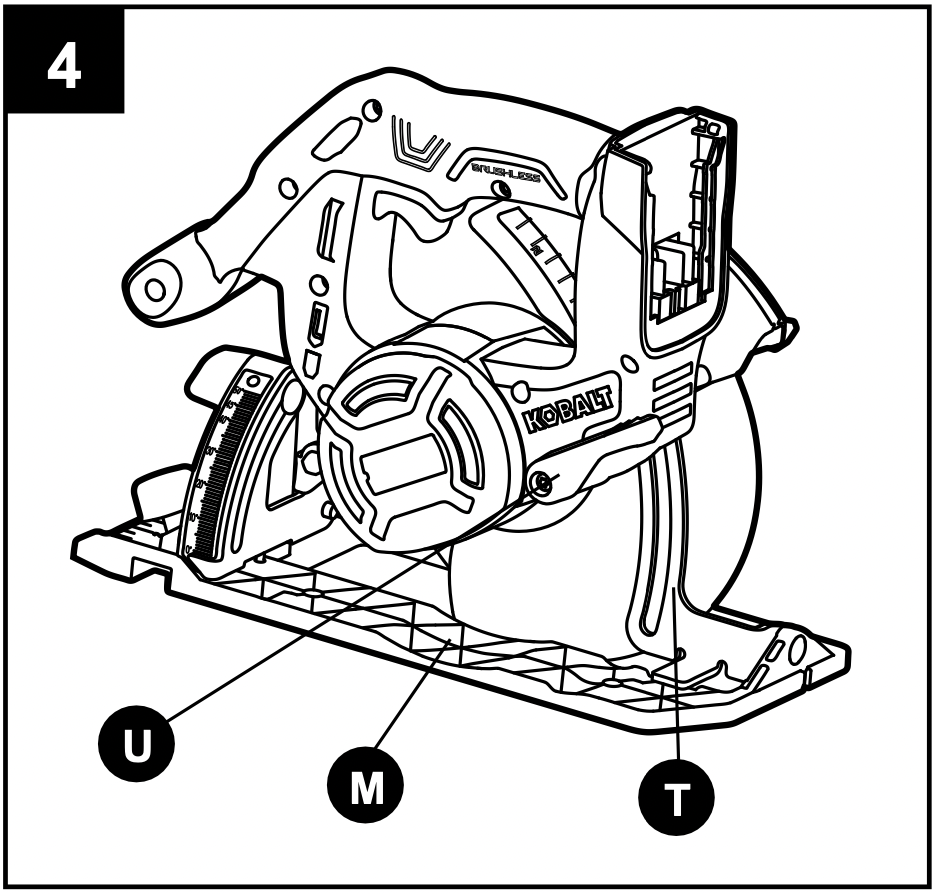
4. Adjusting the Cutting Depth
WARNING: Always maintain the correct blade-depth setting.
The correct blade-depth setting for all cuts should not exceed the thickness of the material being cut by more than 1/4 in. (6.5 mm). Greater blade depth will increase the chance of kickback and cause the cut to be rough.
a. Remove the battery pack from the saw.
b. Raise the depth-locking lever (U) to release it.
c. Hold the base shoe (M) against the workpiece and raise or lower the saw until the indicator mark on the saw aligns with the desired depth on the depth scale (T).
d. Lower the depth-locking lever to lock it into position.
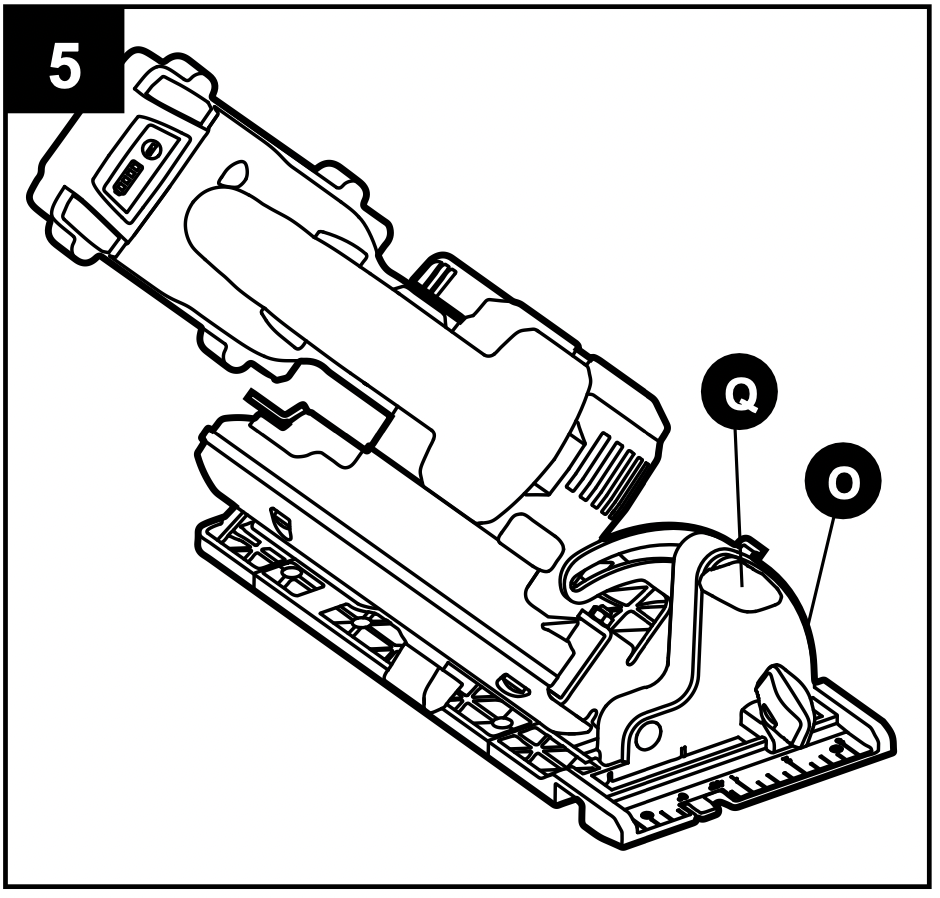
5. Adjusting the Cutting Angle
a. Remove the battery pack from the saw.
b. Loosen the bevel-locking knob (Q), located on the 0°-50° bevel scale (O).
c. Tilt the body of the saw until the indicator mark on the saw aligns with the required angle on the bevel-angle scale.
d. Tighten the bevel-locking knob to secure the saw.
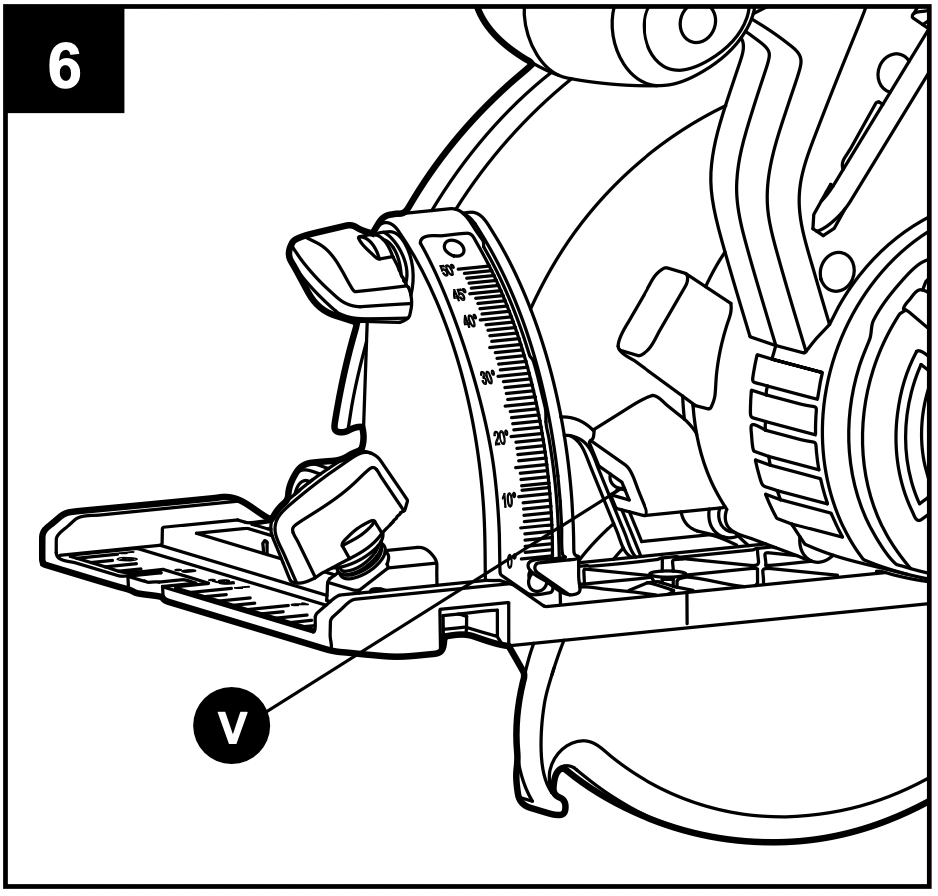
6. LED worklight
The circular saw is equipped with an LED worklight (V) that will illuminate when the trigger switch is depressed. This provides additional light on the surface of the workpiece for operation in lower-light areas.
The LED worklight will turn off after the trigger switch is released.
a. The LED worklight will blink rapidly if the tool has stopped working in order to protect internal circuits; please wait for the tool to cool down, at which point it can be started again.
b. The LED worklight will blink slowly to indicate that the battery charge is very low.
7. Saw Blades
The best saw blades will not cut efficiently if they are not kept clean, sharp, and properly set. Using a dull blade will place a heavy load on the saw and increase the danger of kickback. Keep extra blades on hand so sharp blades are always available.
Gum and resin on blades will slow the saw down. Follow the instructions for removing a saw blade, then use gum and resin remover, hot water, or kerosene to remove the accumulations.
WARNING: Do not use gasoline to clean the blade.
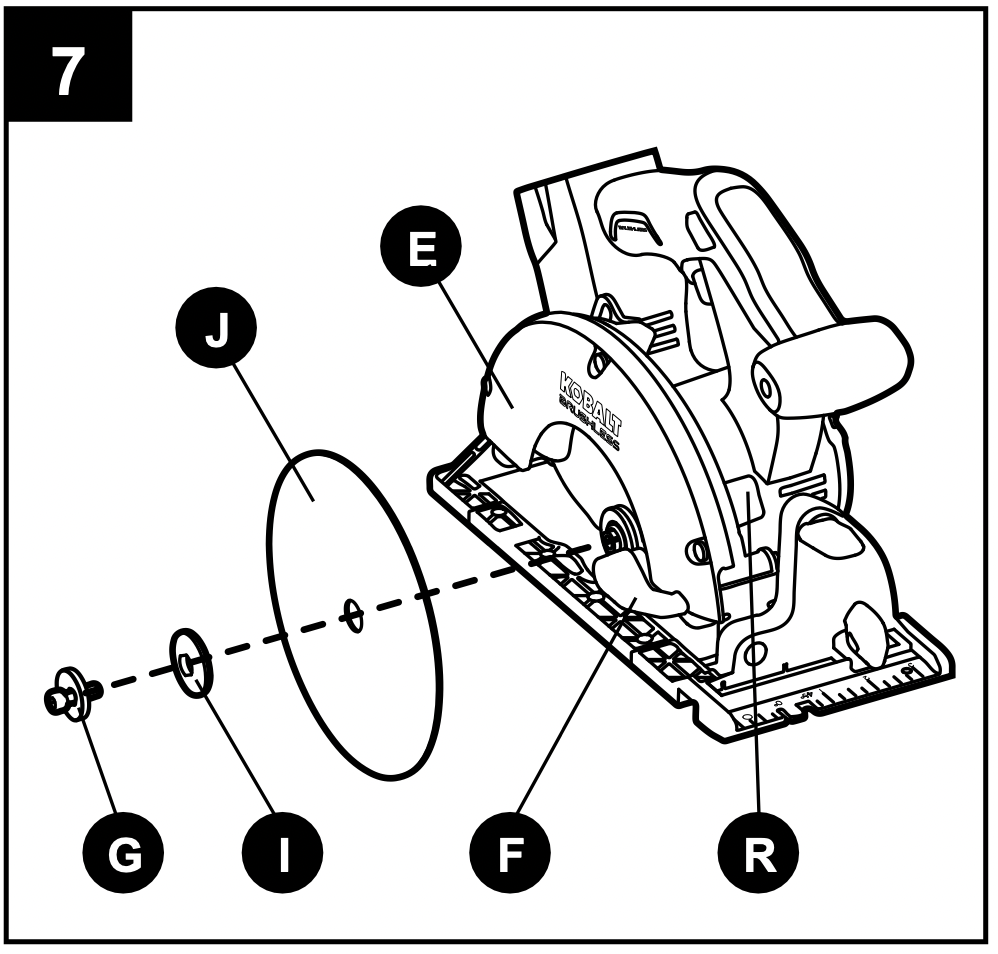
Installing a Saw Blade
a. Remove the battery pack from the saw.
b. Depress and hold the spindle-lock button (R).
c. Loosen the blade bolt (G) by turning it counterclockwise with the blade wrench (S) (included).
d. Remove the blade bolt, washer and outer flange (I).
WARNING: If the inner flange has been removed, replace it before placing the blade on the spindle.
Failure to do so will prevent the blade from tightening properly and could result in serious personal injury.
e. Use the blade-guard lever (F) to retract the lower blade guard (H) into the upper blade guard (E).
f. Fit the saw blade (J) inside the lower blade guard and onto the spindle. Verify that the saw teeth, the arrow on the saw blade and the blade-rotation indicator arrow on the blade guard are all pointing in the same direction.
NOTICE: The saw teeth should point upward at the front of the saw.
g. Replace the outer blade flange with the protuberant facing outward.
h. Depress and hold the spindle-lock button, and replace the washer and blade bolt.
i. Tighten the blade bolt securely by turning it clockwise with the blade wrench.
NOTICE: Never use a blade that is too thick to allow the outer blade flange to engage with the flat section of the spindle.
WARNING: To prevent personal injury, always remove the battery pack before installing or removing the saw blade.
Removing the Saw Blade
a. Remove the battery pack from the saw.
b. Depress and hold the spindle-lock button (R).
c. Loosen the blade bolt (G) by turning it counterclockwise with the blade wrench (S).
d. Remove the blade bolt and outer blade flange (I).
e. Lift the lower blade guard (H) and then remove the blade (J).
8. Cutting With the Circular Saw
Refer to the figures in this section to learn the correct and incorrect ways of handling the saw.
WARNING: To make sawing easier and safer, always maintain proper control of the saw. Loss of control could cause an accident resulting in serious injury.
DANGER: When lifting the saw from the workpiece, the blade is exposed on the underside of the saw until the lower blade guard (H) closes. Make sure that the lower blade guard is closed before setting the saw down.
To make the safest and best possible cut, follow these helpful hints:
a. Hold the saw firmly with both hands.
b. Avoid placing your hand on the workpiece while making a cut (Fig. 8a).

c. Support the workpiece so that the cut is always to the operator’s side and not directly in line with the operator’s body.
d. Support the workpiece near the cut.
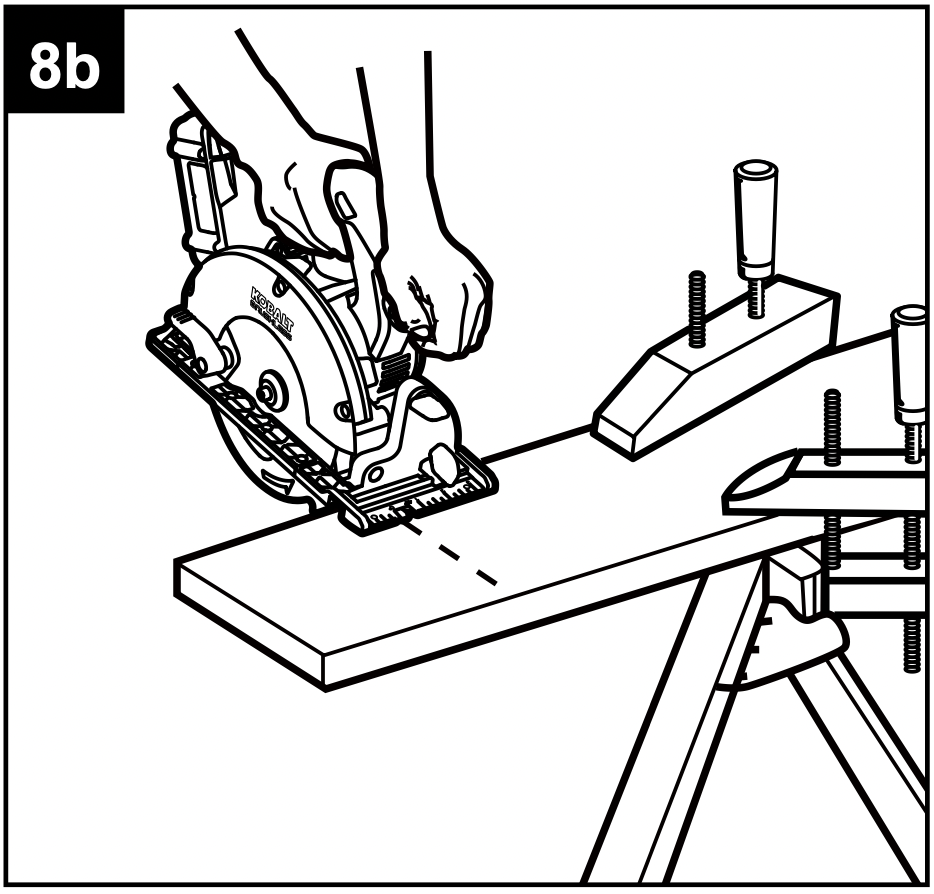
e. Clamp the workpiece securely so that the workpiece will not move during the cut (Fig. 8b).
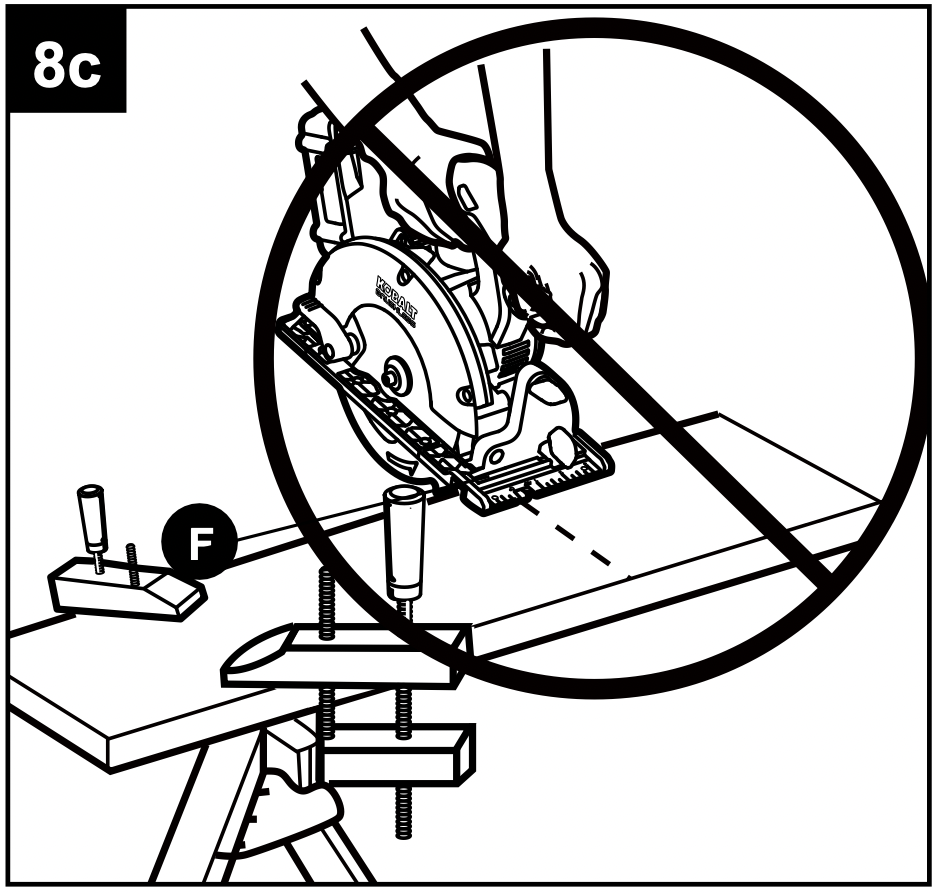
f. Always place the saw on the portion of the workpiece that is supported and not on the “cut off” piece (Fig. 8c).
g. Place the workpiece with the “good” side down.
h. Draw a guideline along the desired cutting line before beginning the cut.
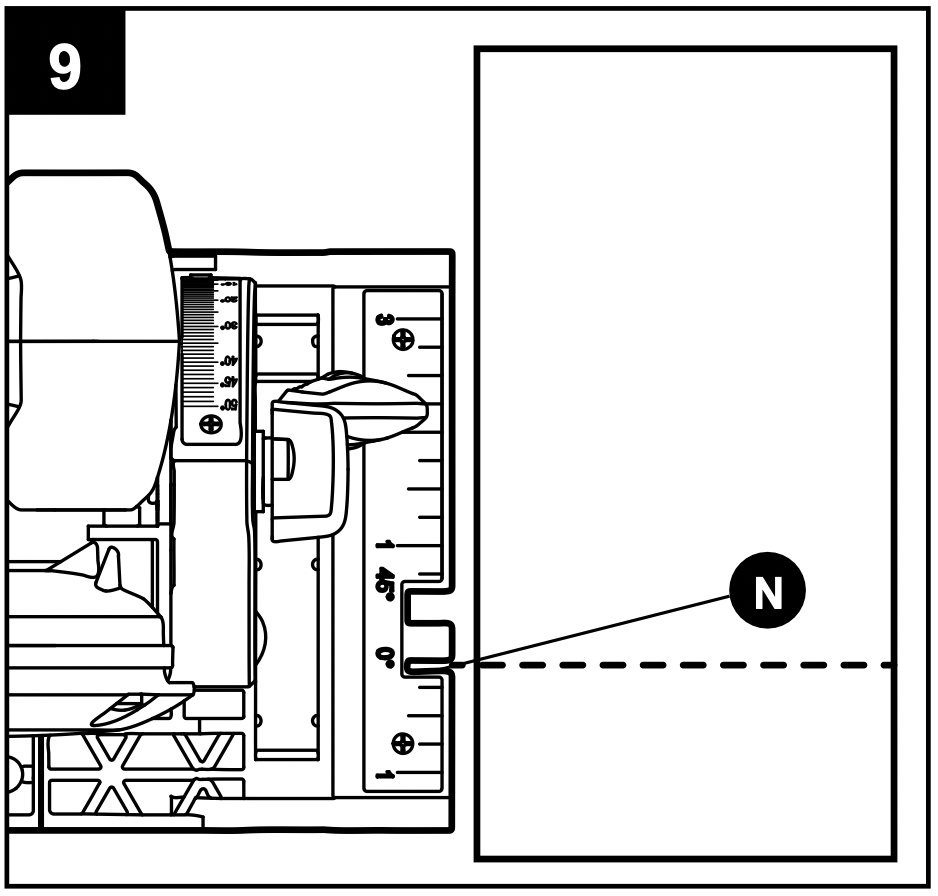
9. Cross-Cutting/Rip Cutting
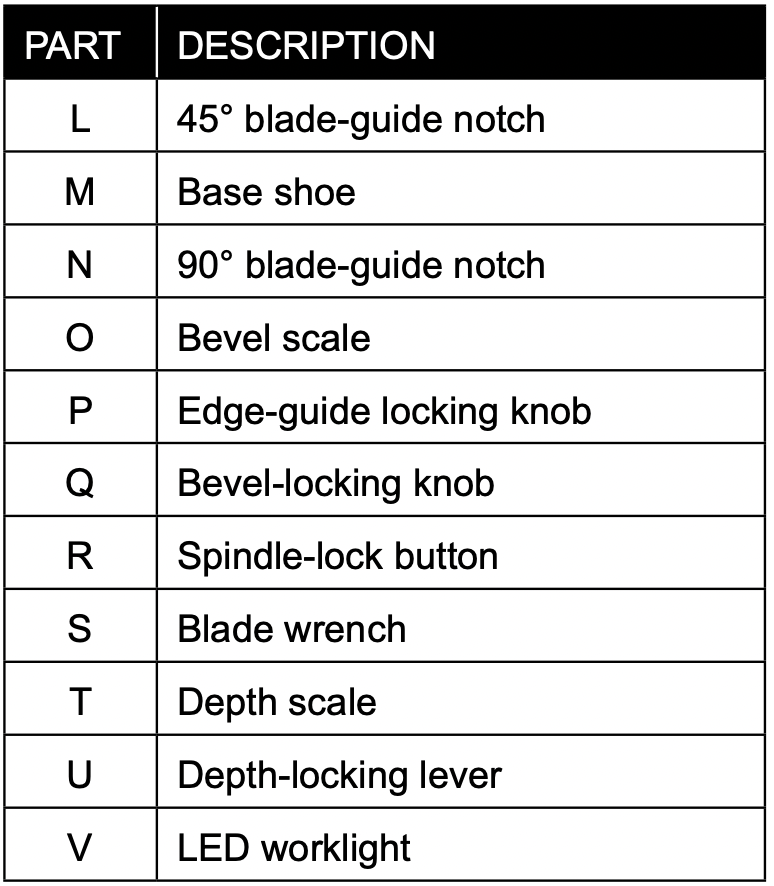
When making a cross-cut or a rip cut, align the guideline with the 90˚ blade-guide notch (N) on the base shoe (T). The distance from the saw blade to the saw base is approximately 3-5/8 in. (9.2 cm) on the left side of the saw and 1-1/2 in. (3.7 cm) on the right side.
Blade thicknesses vary, so you should always make a trial cut in scrap material along a guideline to determine how much the guideline must be offset from the guide to produce an accurate cut.
NOTICE: Use a guide when making long or wide rip cuts.
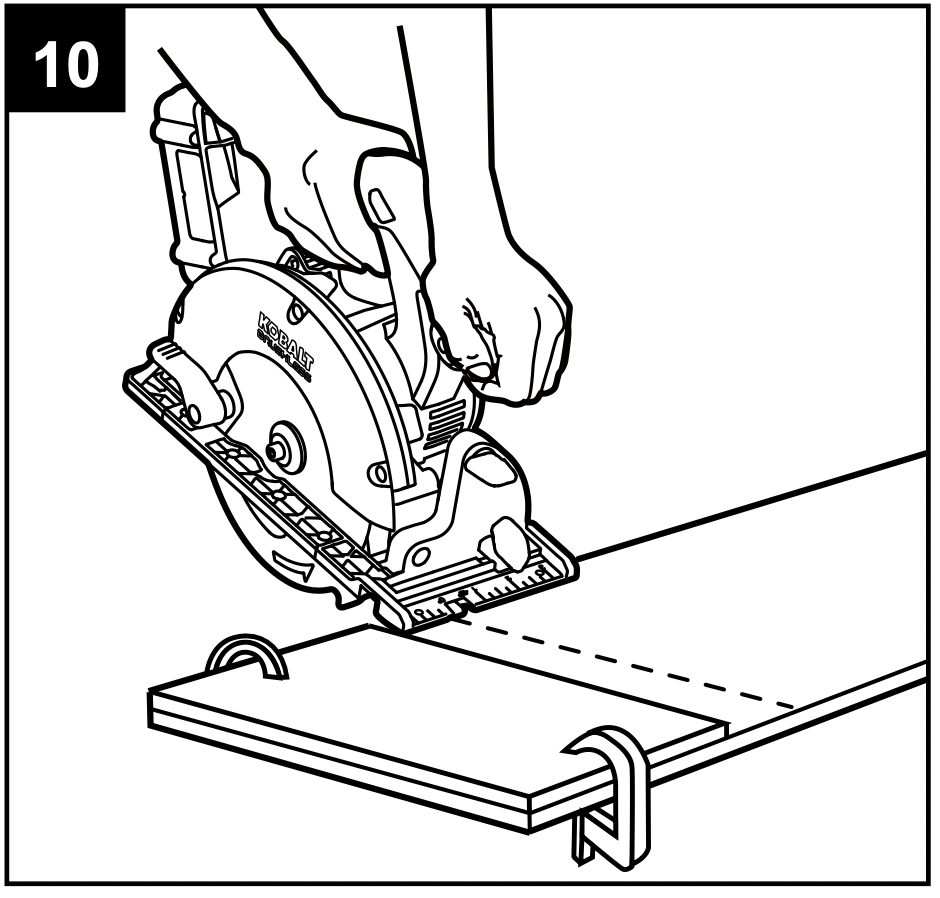
10. Rip Cutting Using a Straight Edge
a. Secure the workpiece.
b. Clamp a straight edge to the workpiece using C-clamps (not included).
NOTICE: Position the C-clamps so that they will not interfere with the saw housing during the cut.
c. Press the lock-off button (B) and depress the trigger switch (D) to start the saw.
d. Allow the blade (J) to reach full speed, then guide the saw into the workpiece and make the cut.
e. Saw along the straight edge to achieve a straight rip cut.
f. Release the trigger switch and allow the blade to come to a complete stop.
g. Lift the saw from the workpiece.
NOTICE: Do not bind the blade in the cut.
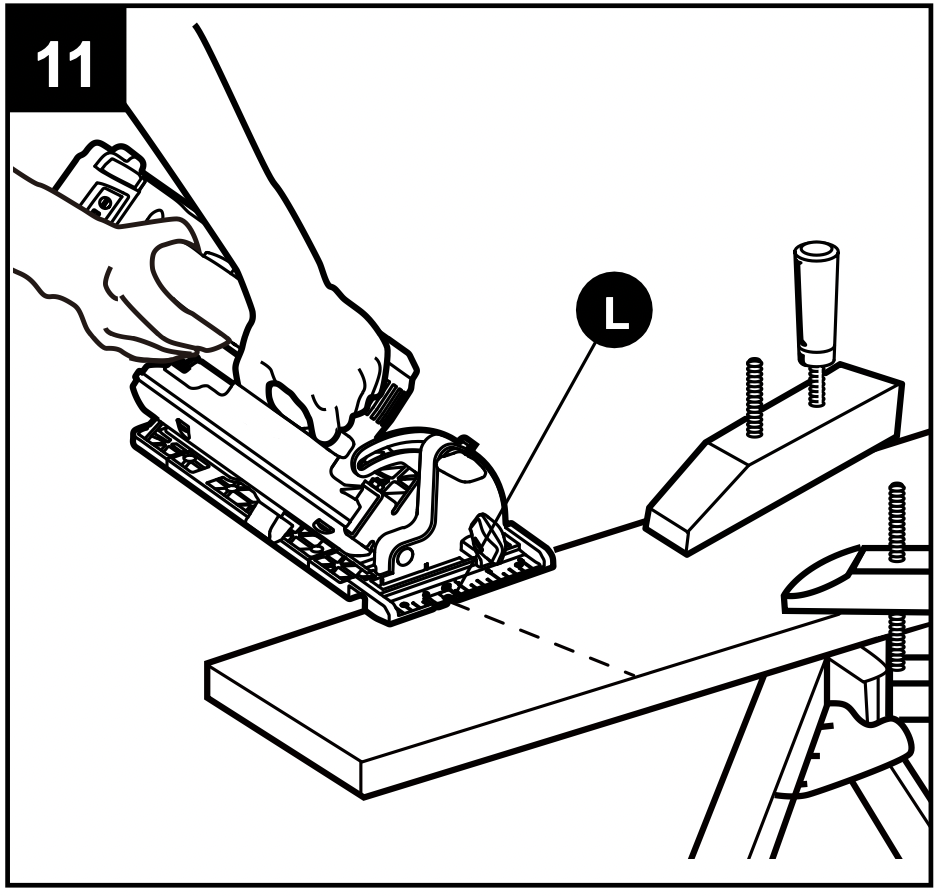
11. Bevel Cutting
a. Remove the battery pack.
b. Adjust the angle of cut to any desired setting between 0° and 50°. Securely tighten the bevel-locking knob (Q).
c. Replace the battery pack.
d. Align the cutting line with the 45° blade-guide notch (L) on the base shoe (M) when making 45° bevel cuts.
e. Make a trial cut in scrap material along a guideline to determine the amount to offset the guideline on the cutting material.
WARNING: Attempting a bevel cut without having the bevel-locking knob securely locked in place can result in serious injury.
f. Hold the saw firmly with both hands, as shown.
g. Rest the front edge of the base shoe on the workpiece without touching the blade to the workpiece.
h. Start the saw and allow the blade to reach full speed.
i. Guide the saw into the workpiece and make the cut.
j. Release the trigger switch and allow the blade to come to a complete stop.
k. Lift the saw from the workpiece.
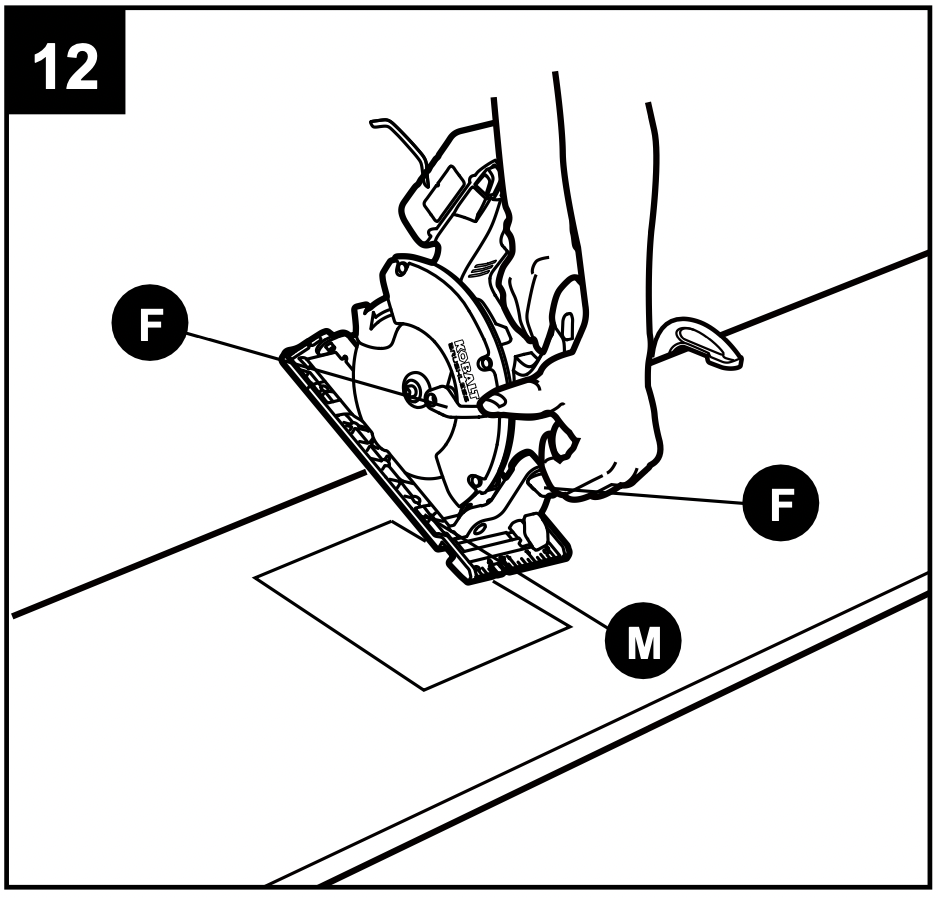
12. Pocket Cutting
WARNING: Always adjust the bevel setting to 0° before making a pocket cut. Attempting a pocket cut at any other setting can result in loss of control of the saw and possible serious injury.
a. Adjust the bevel setting to 0° and tighten the bevel-locking knob (Q).
b. Set the blade to the correct blade cutting depth.
c. Swing the lower blade guard (H) up using the blade-guard lever (F).
d. Hold the lower blade guard in place with the blade-guard lever.
e. Rest the front of the base shoe (M) against the workpiece, with the rear of it raised so that the blade (J) does not touch the workpiece.
f. Press the lock-off button (B) and depress the trigger switch (D) to start the saw.
g. Allow the blade to reach full speed, then guide the saw into the workpiece and make the cut.
h. Release the trigger switch and allow the blade to come to a complete stop.
i. Lift the saw from the workpiece.
WARNING
- Always cut in a forward direction when pocket cutting. Cutting in the reverse direction could cause the saw to climb up on the workpiece and kick back toward the operator.
- As the blade starts cutting the material, release the blade-guard lever immediately. When the foot of the guard rests flat on the surface being cut, proceed cutting in a forward direction to the end of the cut.
- Never tie the lower blade guard in a raised position. Leaving the blade exposed could lead to serious injury.
CARE AND MAINTENANCE
WARNING: All maintenance should only be carried out by a qualified service technician.
Cleaning
Before cleaning or performing any maintenance, remove the battery pack from the circular saw. For safe and proper operation, always keep the tool and its ventilation slots clean.
Always use only a soft, dry cloth to clean your circular saw; never use detergent or alcohol.
TROUBLESHOOTING
WARNING: Turn the switch to the “OFF” position and remove the battery pack from the circular saw before performing troubleshooting procedures.
|
PROBLEM
|
POSSIBLE CAUSE
|
CORRECTIVE ACTION
|
|
The circular saw does not work.
|
Battery is depleted.
|
Charge the battery.
|
|
Blade binds, jams, or burns the wood.
|
- Improper operation.
- Dull blade.
- Improper blade.
|
- See “OPERATING INSTRUCTIONS” section.
- Replace or sharpen blade.
- Replace blade.
|
|
Saw vibrates or shakes.
|
- Improper blade.
- Improper operation of installing blade.
|
- Replace blade.
- Remove the blade and reinstall it, ensuring no part was missed.
|
|
The LED worklight blinks rapidly.
|
The tool has stopped working to protect internal circuits.
|
Release the trigger switch, wait for the tool to cool down, then and start the tool again.
|
|
The LED worklight blinks slowly.
|
The battery charge is very low.
|
Charge the battery.
|