
1080P ProStream HD Webcam
User Manual
Model: AWC205-B

Thank you for purchasing an Amcrest Webcam!
We wanted to personally reach out and thank you for
purchasing from our Amazon store. Selling on Amazon is
what we do to support our family, and product reviews
are the lifeblood of our business. It would mean the world
to us if you could take one minute of your time to help
share the love by leaving us an honest review using the
link below:
www.amazon.com/ryp
Thank you again for being one of our amazing customers!
Sincerely,
Amcrest Team
Getting Started
Thank you for purchasing an Amcrest Webcam!
This guide is designed to help you setup and better use
your Amcrest webcam. If you have questions before you
start or just want to learn more about Amcrest, please
visit us at: amcrest.com
-1-
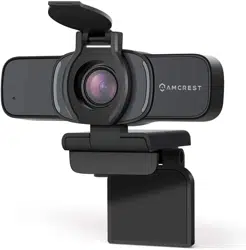
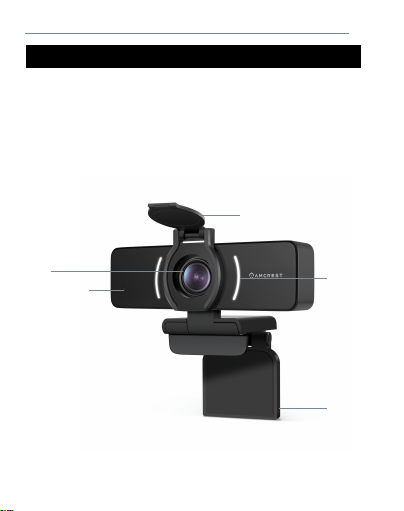
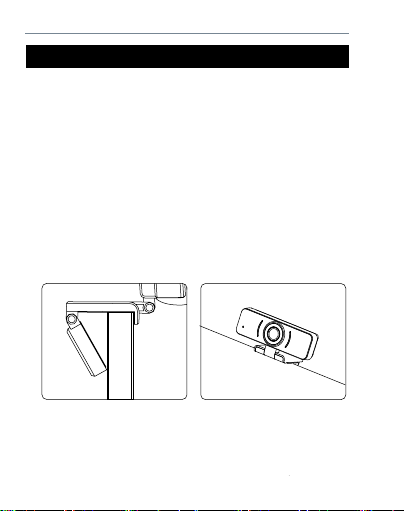
Product Overview
3.
2.
1.
4.
5.
1. 1080P HD Lens
2. Microphone
3. Activity LEDs
4. Adjustable Clip/Base
5. Privacy Cover
Getting Started
-2-
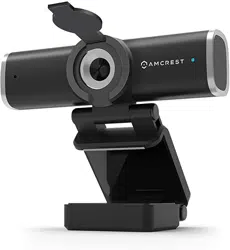
1. Placing Your Webcam
The webcam has an adjustable clip base which allows
the device to be secured to a monitor, or desktop, or
tripod.
Placement on a Monitor
- Grasp the webcam, as displayed in the image below,
and open the clip base.
- Place the opened clip base onto the monitor making
sure the foot of the clip base is flush with the back of
the monitor.
Setting Up Your Webcam
Getting Started
-3-
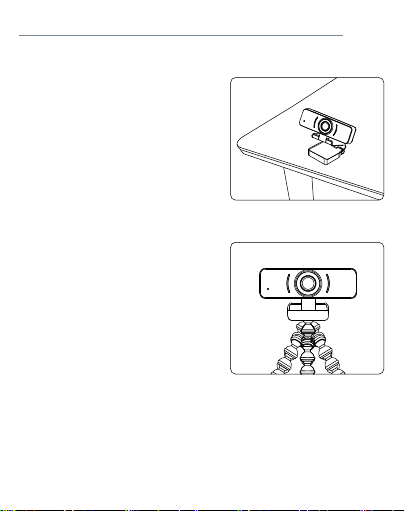
Placement on a Tripod
Place the 1/4”20 tripod screw
on the bottom of the
adjustable clip base to the
male end of a tripod and twist
the base allowing it to be
secured to the tripod (sold
separately).
Placement on a Flat Surface
Place the camera on a flat
surface and use the adjustable
clip base to move and adjust
the camera according to your
preference.
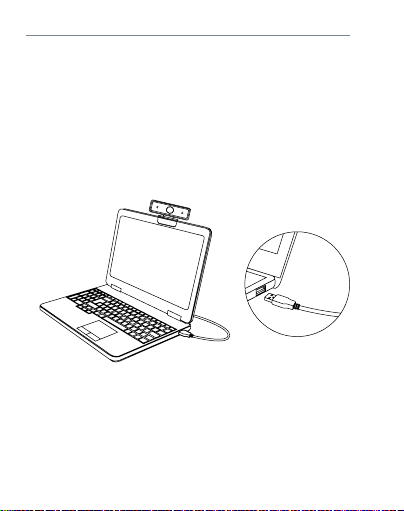
Connecting the Webcam
-4-
The webcam is compatible with Windows, Linux, and
Mac operating systems. For more information on
connecting your webcam, please refer to the information
below.
1) Connect the webcam’s USB cable to a USB port on
your computer. The status indicator on the camera will
illuminate indicating the webcam is properly connected.
2) Allow any drivers or other software to load and open
a video chat or recording software of your choice to
open the camera.
Amcrest NetDesk
Amcrest NetDesk is a video communications tool,
provided by Amcrest, which can be used along with your
Amcrest webcam. For more information on Amcrest
NetDesk, please visit:
https://www.netdesk.com/

-5-
Connecting the Webcam
Model
Image Sensor
Video Resolution
Lens
Angle of View
Privacy Cover
AWC205-B
1/3” CMOS Imaging Sensor
1920 * 1080 / 1280*720 / 640 * 480
3.6mm
70°
Supported
Tripod Attachment
1/4” diameter, 20 threads per inch
Microphone
Built-in high sensitivity microphone
USB
USB 2.0 Plug and Play
Compatibility Windows XP/Win7 /Win 8/Win10, Mac, etc.
Dimensions
3.54” x 3.34” x 0.94”
Cable Length
5.90ft (1.8m)
How do I Improve Audio Quality?
If you are experiencing issues with audio on your
webcam, the audio quality can be optimized using third
party software such as Equalizer APO. The Equalizer APO
software can be optimized as well using the Peace GUI
equalizer extension.
For more information on how to improve microphone
quality, visit: https://amcrest.com/audio
Technical Specifications
www.amcrest.com
© 2020 Amcrest. All rights reserved. Amcrest, the Amcrest logo, and other
Amcrest marks are owned by Amcrest and may be registered. Microsoft,
Windows, and the Windows logo are trademarks of the Microsoft group of
companies. All other trademarks are the property of their respective owners.
Amcrest assumes no responsibility for any errors that may appear in this
manual. Information contained herein is subject to change without notice.