User manual Soundbar
Connecting the Product
You can enjoy a richer sound by connecting the sound bar to the wireless subwoofer
Connecting the wireless subwoofer automatically
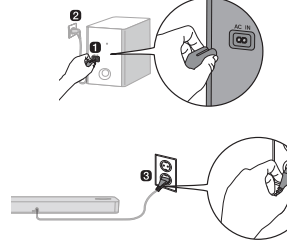
After completing installation, the wireless subwoofer will automatically be connected to the sound bar. Connect the sound bar to the subwoofer in the following order.
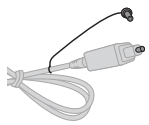
- Plug the power cable into the wireless subwoofer.
- Plug the power cable connected to the wireless subwoofer into an outlet.
- Plug the sound bar power cable into an outlet.
4. When the connection is automatically established, you will see the LED on the back of the wireless subwoofer light up in green.
Checking the connection with the LED on the back of the wireless subwoofer
You can check the connection status by looking at the LED on the back of the wireless subwoofer.
- Blinking green: Connecting in progress
- Green: Connected successfully
- Red: Bad connection, or the subwoofer is in standby
- Off: Power cable not connected
Connecting the wireless subwoofer manually
If you see a red LED on the back of the wireless subwoofer, it means that the sound bar is not connected to the subwoofer. If this is the case, connect them in the following order.
1. Press the Power  button on the sound bar to turn it off.
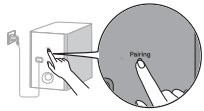
2. Press the Pairing button on the back of the wireless subwoofer. Check if the LED on the back of the subwoofer is blinking green. If you still see a red LED on the wireless subwoofer, press and hold the button on the back of the subwoofer again.
3. Press the Power button on the sound bar to turn it on.
4. When the connection is established, you will see the LED light on the back of the wireless subwoofer light up in green.
Note
- Install the sound bar as close to the wireless subwoofer as possible. The closer the distance between the sound bar and the wireless subwoofer, the better the sound quality.
- Please ensure there are no obstacles between the sound bar and the wireless subwoofer.
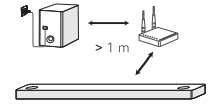
- To prevent wireless interference, maintain a distance of at least 1 m between the sound bar or the wireless subwoofer and any peripheral devices that generate strong electromagnetic waves (ex. wireless routers, microwave ovens, etc.).
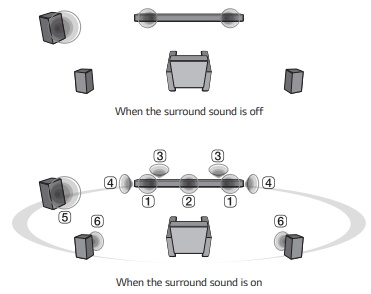
Setting up surround sound
The surround sound function allows you to hear immersive 3D sound produced by multiple audio channels from the speakers, regardless of the channels in the originally recorded content.
For example, if you listen to music recorded in 2.0 channels with standard sound effects while the wireless rear speakers are connected, you can hear the following difference.
Note
Speaker positions are as follows.
- Front speakers
- Centre speaker
- Top speakers
- Side speakers
- Subwoofer
- Rear speakers
Turning surround sound on/off
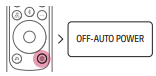
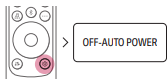
1. Press Settings  button. The product enters the setting mode and you can see “OFF-AUTO POWER” or “ON-AUTO POWER”.
2. While the “OFF-AUTO POWER” or “ON-AUTO POWER” is scrolling in the status display, press Left/ Right button to select the surround sound setting. You can see the status of the surround sound, “OFFSURROUND” or “ON-SURROUND”.

3. While the “OFF-SURROUND” or “ON-SURROUND” is scrolling in the status display, press Up/Down button to turn on or off the surround sound.

Connecting with a Smartphone via LG Wi-Fi Speaker app
You must connect the product to the smartphone via Wi-Fi on the LG Wi-Fi Speaker app to use network services. The app installation method differs depending on the smartphone.
1. Find and tap the LG Wi-Fi Speaker app installed on your smartphone.
2. Follow the instructions on the LG Wi-Fi Speaker app. You will need to agree to the terms of service, Chromecast guide screen, and location permission settings. Turn on Wi-Fi and Bluetooth.
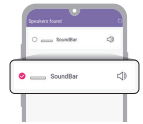
3. Select the product to connect. This product will be indicated as “SoundBar”.
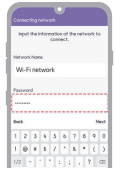
4. Select a Wi-Fi network and enter the password.
5. After completing product connection on the LG Wi-Fi Speaker app, you will see “CONNECTED” appear on the status display on the product.
Note
- You can register the product on Google Home app.
- You can create a speaker group with Google Home app and add up to 4 devices as a speaker group. Adding too many devices may become inconvenient when listening to music.
- If you want to check or change the registered home’s nickname or the product name, connect to the Google Home app and tap the Device Settings
 button.
- You cannot configure or control the product with the LG ThinQ app
Resetting the Product
If the product is frozen and does not work, or if the network connection is unstable, you will need to reset it. If the Wi-Fi network has been changed, you will need to reset the product and connect it to your smartphone again.
How to reset
- Press and hold the Wi-Fi
 button on the top of the product until you hear a sound signal.
- You will see “RESET” appear on the status display, and all wireless network settings on the product will be cleared.
Note: Once you reset the product, you will also need to reconnect the product to the smartphone via Wi-Fi on the LG Wi-Fi Speaker app.
Exploring the Product
Front
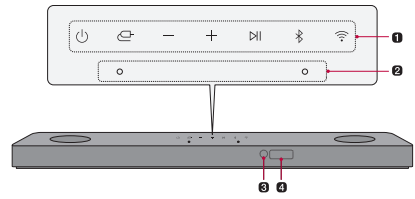
1. Power
This turns the product on/off
- If you press and hold the Power button for longer than 3 seconds, Wi-Fi will disconnect and the product will no longer emit sound. Press the Power button quickly to maintain the Wi-Fi connection for future use.
Function 
Press the button repeatedly to select the desired function or input mode.
- WI-FI Connects the product via Wi-Fi
- BT Connects the product via Bluetooth
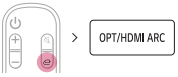
- OPT/HDMI ARC Connects the product to a TV that supports an optical cable, ARC, E-ARC, or LG Sound Sync
- HDMI Connects the product to an HDMI input port
- USB Connects the product to a USB storage device
Volume 
This adjusts the speaker volume with levels 0 to 40.
Play/Pause 
This allows you to pause or play music.
If you are using the LG Wi-Fi Speaker app, or if an external device like a USB storage device or Bluetooth is connected, this will play or pause the music.
Bluetooth pair 
It allows you to pair your Bluetooth device such as a smartphone to this product for three minutes. (-> See “Connecting via Bluetooth” on page 37.)
Wi-Fi
It goes to the Wi-Fi function directly.
2. Built-in microphone
This uses when operating the AI room calibration on LG Wi-Fi Speaker app
3. Remote Control Receiver
This receives wireless signals from the remote control.
4. Status display
Options such as input mode and volume are displayed in text.
- If there is no active input for 15 seconds, the status display will automatically dim. When you press the button, the status display will light up again.
Note: To reduce power consumption, the product will automatically turn off after 15 minutes of no input signal from an external device.
Back
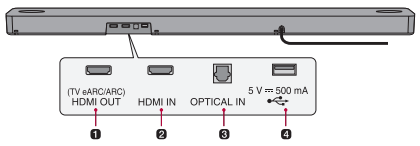
- HDMI OUT (TV eARC/ARC) Plug in an HDMI cable to connect the TV to the product.
- HDMI IN Plug in an HDMI cable to connect an external device to the product.
- OPTICAL IN Plug in an optical cable to connect the TV to the product.
- USB port Plug in a USB storage device to play music with the product.
Controlling the product with your TV’s remote control
The product volume can be adjusted with LG TV Remote control as well as other brands.
Functions controllable with a TV remote control
Volume, mute on/off
TV brands supported
LG, Panasonic, Philips, Samsung, Sharp Electronics, Sony, Toshiba, Vizio
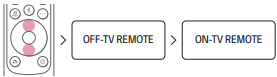
Activating/Deactivating this function
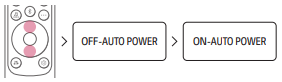
1. Press Settings  button. The product enters the setting mode and you can see “OFF-AUTO POWER” or “ON-AUTO POWER”.
2. While the “OFF-AUTO POWER” or “ON-AUTO POWER” is scrolling in the status display, press Left/Right button to select the TV remote setting. You can see the status of the TV remote, “ON-TV REMOTE” or “OFFTV REMOTE”.

3. While the “ON-TV REMOTE” or “OFF-TV REMOTE” is scrolling in the status display, press Up/Down button to turn on or off the TV remote.
Note
- Press the Settings button on the TV remote control to check if the TV's audio output is set to [External Speaker].
- You cannot control the product with the LG TV's Magic Remote Control.
- When the SIMPLINK or Sound Sync functions of the TV are turned on, this function may not work properly. Press the Settings button on the TV remote control to turn off this function.
- This function may not work well when the unit and the TV are connected with an HDMI cable.
Using Auto Power
This function automatically turns the product on or off when the TV or external device is turned on or off.
When the connected device is turned on, the product turns on automatically and selects a function according to the input signal.
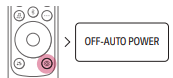
Activating/Deactivating the Auto Power function
1. Press Settings button. The product enters the setting mode and you can see “OFF-AUTO POWER” or “ON-AUTO POWER”.
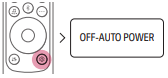
2. While the “OFF-AUTO POWER” or “ON-AUTO POWER” is scrolling in the status display, press Up/Down button to turn on or off the Auto Power function.
Using Night Time
This reduces the general sound volume, but raises the volume of soft and delicate sounds. This is useful when enjoying music or a movie late at night.
Activating/Deactivating the Night Time function
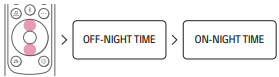
1. Press Settings button. The product enters the setting mode and you can see “OFF-AUTO POWER” or “ON-AUTO POWER”.
2. While the “OFF-AUTO POWER” or “ON-AUTO POWER” is scrolling in the status display, press Left/Right button to select the Night time setting. You can see the status of the Night time, “ON-NIGHT TIME” or “OFF-NIGHT TIME”.

3. While the “ON-NIGHT TIME” or “OFF-NIGHT TIME” is scrolling in the status display, press Up/Down button to turn on or off the Night time.
Connecting to the TV
Enjoy a rich, high-quality sound by connecting the product to a TV or a beam projector. It has been designed to enhance the realism of your favourite programming, such as dramas and sports broadcasts.
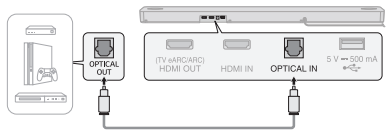
Connecting with an Optical Cable
Transmit your TV’s audio to the product by connecting it to the TV with an optical cable. You can add a variety of 3D effects to the original audio to fill the room with a deep, rich sound.
Watching TV after connecting with an optical cable
1. a If the digital cable terminal has a cover, first remove the covers from both ends
2. Using an optical cable, connect the OPTICAL IN terminal on the back of the product to the Optical Digital Output (OPTICAL OUT) terminal on the TV as shown in the picture.
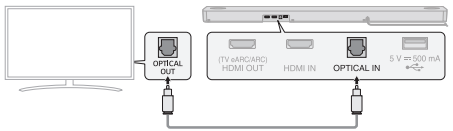
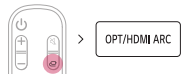
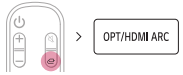
3. Press the Function  button repeatedly until “OPT/HDMI ARC” appears on the status display.
4. Press the Settings button on the TV remote control to enter the [Speaker] menu and set the output speaker to [Optical] or [External Speaker]. Settings and menu items may vary depending on the TV manufacturer.
Note If the optical input signal and the ARC signal attempt to connect at the same time, the ARC signal will take priority.
Connecting with an HDMI Cable
You can transmit TV audio to the product by connecting the TV to the product with an HDMI cable. Add a variety of 3D effects to the original audio to fill the room with a deep, rich sound.
Watching TV after connecting with an HDMI cable
- Use a certified cable with the HDMI logo. If your TV does not have an HDMI cable, you will need to purchase it separately.
- Using the HDMI cable, connect the HDMI OUT (TV eARC/ARC) terminal on the back of the product to the HDMI IN (ARC) terminal on the TV as shown in the picture.
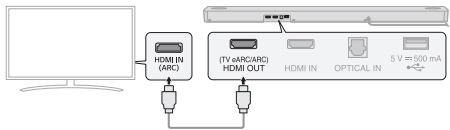
3. Press the Function button repeatedly until “OPT/HDMI ARC” appears on the status display.
4. Press the Settings button on the TV remote control to enter the [Speaker] menu and set the output speaker to [HDMI ARC]. Settings and menu items may vary depending on the TV manufacturer.
5. When the TV is properly connected to the product, “ARC” or “E-ARC” will appear on the status display
Note
- E-ARC supports high-quality audio such as DTS-HD Master Audio™, DTS:X®, Dolby TrueHD, and Dolby Atmos®.
- If you wish to use Dolby Atmos® or DTS:X®, the connected device and its content should support Dolby Atmos® or DTS:X®.
- Ensure that your TV supports the eARC function before you turn on eARC from the Settings menu. For more information on how to use this function, please refer to your TV’s user manual. Settings may vary depending on the TV
Connecting via Bluetooth
Bluetooth is a technology that wirelessly connects electronic products around you.
Connect the product to a TV via Bluetooth and enjoy your TV audio in high quality.
Watching TV after connecting it wirelessly
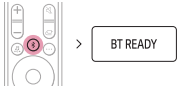
1. Press the Bluetooth pair  button. After a moment, “BT READY” appears on the status display.
2. Press the Settings button on the TV remote control and enter the [Speaker] menu to set the output speaker to [Bluetooth].
3. Find and tap “LG_Speaker_SP9YA_XXXX” or the name you registered on the Google Home app.
4. When the product is connected to the TV via Bluetooth, you can see the status display change from “PAIRED” [ “Connected TV name” [ “BT”

Note
- View or change the name of the product in the Settings menu on the first screen of the Google Home app. If you assigned the nickname “Living Room Cinema” in the Google Home app, it will be displayed on TV as “Living Room Cinema”.
- For Bluetooth devices, characters that cannot be displayed (ex. Korean Hangul) are shown as ‘-’ on the product status display.
- Press the Information
 button on the remote control to check the name of the connected Bluetooth device. You will see the name of the connected Bluetooth device appear on the status display.
Connecting to an External Device
Experience movies and games in more realism by connecting the product to a device such as a game console or a Blu-ray player
Connecting with an HDMI Cable
You can connect your TV or external device to the product with an HDMI cable for a deep, magnificent sound.
Connecting an external device via HDMI
1. Use a certified cable with the HDMI logo. If your TV does not have an HDMI cable, you will need to purchase it separately.
2.Connect an external device such as a DVD or Blu-ray player. Following the picture below, connect the HDMI OUT terminal of the device to the HDMI IN terminal on the back of the product.
3. Using the HDMI cable, connect the HDMI OUT (TV eARC/ARC) terminal on the back of the product to the HDMI IN (ARC) terminal on the TV
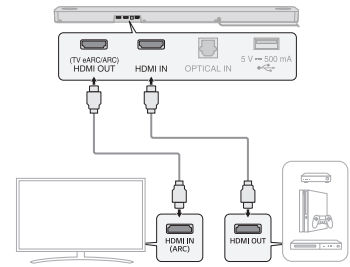
4. Press the Function button repeatedly until “HDMI” appears on the status display
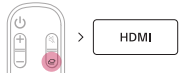
5. When the external device is properly connected to the product, you can listen to the sound of the device. When playing the video with Dolby Atmos® or DTS:X® technology, either “DOLBY ATMOS” or “DTS:X” will appear on the status display.
Note
- Dolby Atmos® or DTS:X® audio supports 5.1.2 channels. When the wireless rear speakers are connected, 7.1.2 channels are supported.
- Please check the audio output settings in the Settings menu of your external device (ex. Bluray player or TV). The audio output should be set to [No encoding], [Bitstream], [Auto], or [Pass through]. For more information on how to set the output, please refer to your external device’s user manual.
Connecting with an Optical Cable
You can connect a TV or external device to the product with an optical cable for a deep, magnificent sound.
Connecting an external device via optical cable
1. Find the optical cable included in the product package.
2. Use the optical cable to connect the OPTICAL IN terminal on the back of the product to the OPTICAL OUT terminal of your external device (ex. TV, Blu-ray player) as shown in the picture.
3. Press the Function button repeatedly until “OPT/HDMI ARC” appears on the status display
4. When the external device is properly connected to the product, “OPT” will appear on the status display
Using the Product as an Audio System
Using the LG Wi-Fi Speaker app
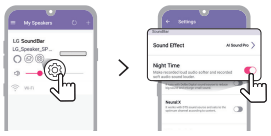
Controlling device functions
Run the LG Wi-Fi Speaker app and tap the Settings button on the first screen.
You can easily set [Sound Effect] and [Night Time] and adjust the level of each speaker without a remote control.
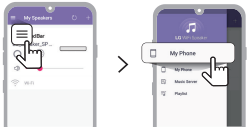
Listening to music from smartphone and home network server
Run the LG Wi-Fi Speaker app and tap the Menu  button on the top left of the first screen.
You can tap [My Phone] and listen to music stored on the smartphone.
Or you can tap [Music Server] and listen to music on your home network server.
Compatible with Google Assistant
This unit can be controlled using just your voice with Google.
If you have a Google Assistant-enabled speaker, simply add this device in your Google Home app. You will be able to play, skip, or stop music, and change the volume - just ask Google.
Requirements
- Google Assistant-enabled device (Sold Separately)
- This product must be connected to the Internet.
- This product must be registered in the Google Home app.

Works with Apple AirPlay
This product allow you to listen to the music from your iOS device through AirPlay.
Note
- Make sure that this product and your iOS device are connected to the same Wi-Fi network.
- Make sure that your iOS device is running iOS 11.4 or later.
- The AirPlay 2–Enabled Speakers are needed to stream to multiple speakers.
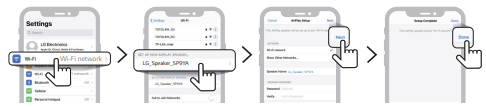
Wi-Fi network setting with iOS device
- Turn on the product by pressing the Power
 button.
- On your iOS device, select the Settings and then Wi-Fi.
- Select “LG_Speaker_SP9YA” on the SET UP NEW AIRPLAY SPEAKER.
- Make sure your home router is selected. In this step, you can change the product’s name of your choice and also you can set up a password. After completing the settings, select the Next.
- Select Done.
Stream music through AirPlay
From the Control Centre:
- Open the Control Centre on your iOS device.
- Tap AirPlay (
 ).
).
- Choose your product to listen to music. You can choose one or more AirPlay 2 -enabled speakers.
From a music player app:
- Open a music player app.
- Tap AirPlay ().
- Choose your product to listen to music. You can choose one or more AirPlay 2 -enabled speakers.

Apple®, AirPlay®, iPad®, iPad Air®, iPad Pro® and iPhone® are trademarks of Apple Inc., registered in the U.S. and other countries.
Use of the Works with Apple badge means that an accessory has been designed to work specifically with the technology identified in the badge and has been certified by the developer to meet Apple performance standards.
To control this AirPlay 2–enabled speaker, iOS 11.4 or later is required.
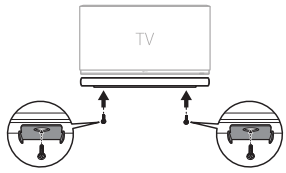
Mounting the Product to a Wall
Mounting the Product to a Wall
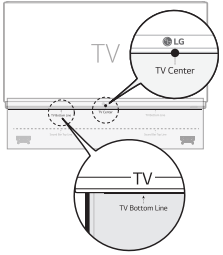
1. Find the wall bracket installation guide in the product package.
2. Align the “TV Bottom Line” on the wall bracket installation guide with the bottom of the TV, and attach it to the wall. Align the centre of the wall-mounted TV with the part marked “TV Center” in the installation guide.
3. With a pen, mark screw holes on the installation guide where the wall brackets will be attached.
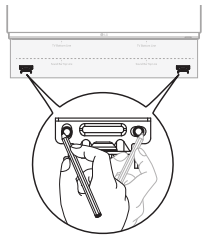
4. Drill screw holes in the marked positions on the installation guide.
5. Remove the wall bracket installation guide from the wall.
6. Fix the brackets firmly to the wall using the wall plugs and screws.
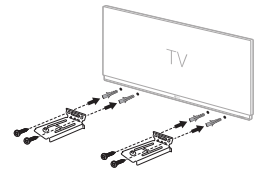
7. Place the product on the brackets. Position the product on the brackets so the screw holes on the bottom of the product align with the screw holes on the wall bracket.

8. Firmly attach the product to the wall brackets using the screws provided.
Before Reporting Product Malfunction
Troubleshooting
If you experience the following issues while using the product, please perform several checks, as they may not be malfunctions.
The product does not work properly
- Unplug the power cables and any external devices such as your TV, subwoofer, or amplifier from the product, then plug them in again.
- After resetting the product, connect your smartphone and Wi-Fi again. ( -> See "Connecting with a Smartphone via Wi-Fi" on page 15.)
- Please beware that previous product settings may be lost.
The power does not turn on
- Is the power cord plugged into the outlet properly?
Connect the power plug to the outlet correctly
There is no sound
- Is the volume set to minimum?
Press the Volume  button on the remote control to turn up the volume.
If you are using an external device such as a set-top box, portable device, or Bluetooth device, adjust the volume of the external device.
- Is the mute function activated?
If “MUTE” appears on the status display, the mute function is on. Press the Mute  button to unmute.
- Is the correct product function selected according to the external device connected?
Press the Function  button to check if you selected the correct function.
The subwoofer does not produce sound
- Is the product properly connected to the wireless subwoofer?
If the LED on the back of the wireless subwoofer is blinking green or lit in red, it means it is not connected. If the connection is established, a green light will appear. Reconnect the product to the wireless subwoofer. ( -> See "Connecting the Product" on page 6.)
The remote control does not work properly
- When using the remote control, point it at the front of the product.
- Use the remote control within a 7-m radius of the product.
- Replace the batteries with new ones as needed.
The Auto Power function does not work
- Check connection to external devices (ex. set-top box, portable device, Bluetooth device).
LG Sound Sync does not work
- Check whether your TV supports LG Sound Sync.
- Check if the TV is properly connected to the product via an optical cable.
Press the Settings button on the TV remote control to check if the function is turned on in [LG Sound Sync].
The product volume is low
- Check the following and change the settings accordingly
Run the LG Wi-Fi Speaker app, tap the Settings  button on the first screen, and change the [DRC] function to [Off] on the next screen.
When the product is connected to a TV, press the Settings button on the TV remote control, select the [Speaker] menu, and change the [Digital Sound Output] setting from [PCM] to [AUTO] or [BITSTREAM].
If the product is connected to a playback device such as a DVD player or Blu-ray disc player, go to the connected device's Settings menu. Change the [Digital Sound Output] setting from [PCM] to [PRIMARY PASS-THROUGH] or [BITSTREAM]. Set the [DRC] of the connected device to [OFF].
If the product's Night Time mode is on, turn it off by pressing the Settings  button and Left/Right and then Up/Down.
The product fails to recognise a USB storage device
- The product may not support the file format of the USB storage device. Format the USB storage device and reconnect it. When formatting, refer to the USB storage device formats supported by the product and select an appropriate file format. (-> See "Connecting to a USB Storage Device" on page 40.)
A Bluetooth device cannot be paired
- Press the Settings button on the Bluetooth device and check whether the Bluetooth function is enabled. If Bluetooth is enabled, turn it off and on, then try again.
- Remove any obstacles between the product and the Bluetooth device.
- Bluetooth pairing (connection) may not work properly depending on the Bluetooth device type or the surrounding environment.
Network Connection Errors
The product cannot be connected to the LG Wi-Fi Speaker app
- The connection may not be smooth when disturbed by other electric appliances that use radio waves, such as microwave ovens and medical equipment. Install the product 1 m away from other home appliances.
- Turn off your wireless router and turn it on again.
- Check if your smartphone's Wi-Fi function is turned on. You can check the Wi-Fi connection status in your smartphone's settings.
- Check if the product and smartphone are on the same Wi-Fi network.
The product does not connect to the Wi-Fi network
- Did you turn off the wireless router and turn it on again?
Turn off the product and then turn it on again.
- Have you installed a new wireless router?
You will need to reconfigure the network settings of the product. (-> See "Connecting with a Smartphone via Wi-Fi" on page 15.)
App Errors
The app is not working properly
- Do you get an error when running the app?
Check if the power of the device is turned on.
Check if the app you wish to run supports the operating system of your smartphone. You can visit the app manufacturer's website to confirm supported operating systems.
Check if you have the latest version of the app. Search for the app on Google Play or the App Store and check if an Update button appears next to it. If it is not the latest version, tap the Update button.
Problems in Wireless Connection
There is radio interference
- Install the product and the wireless subwoofer as close to each other as possible.
- Do not install the product on metal furniture.
- Wireless communication may not work properly in weak signal areas.
The Bluetooth connection is causing a malfunction or making noise
- Do you hear noise or experience malfunctions when using Bluetooth?
Do not let any part of your body contact the transceiver of the Bluetooth device or the product.
Do not install the Bluetooth device on a wall or in a secluded spot.
Remove any obstacles between the product and the Bluetooth device.
Install the Bluetooth device near the product.
- When the Bluetooth device is too far from the product, Bluetooth may be disconnected or malfunctions may occur.
Install the Bluetooth device 1 m away from devices that use the same frequency as the product, such as wireless routers, medical equipment, and microwave ovens.
Turning off the Demo Mode
The remote control does not work
- Does the text on the status display remain unchanged, even if you press the Function button several times?
- Do you only see the text “DEMO” in the status display?
The demo mode may be activated on the product. Unplug the product's power cable and plug it back in.
If the remote control still does not work, press the Volume button on the product to set the volume level at 2, the press and hold the Function button for about 5 seconds. If the currently selected function appears on the status display, it means that demo mode has been turned off