Documents: Go to download!
User Manual
- User Manual - (English, French, Spanish)
- Prop65 Warning Label - (English)

- COMPONENTS
- OPERATION
- MAINTENANCE
Table of contents
INSTRUCTION MANUAL ELECTRIC CHAIN SAW
COMPONENTS
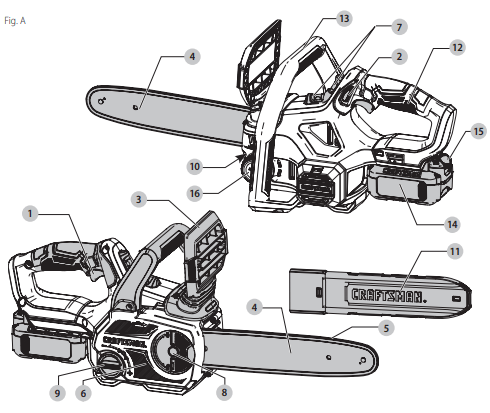
1 ON/OFF trigger switch
2 Lock-off lever
3 Chain brake/front handguard
4 Guide bar
5 Saw chain
6 Sprocket cover
7 Bubble Level
8 Bar adjust locking knob
9 Chain tensioning knob
10 Oil level indicator
11 Guide bar cover
12 Rear handle
13 Front handle
14 Battery
15 Battery release button
16 Oil cap
WARNING: Read all safety warnings and all instructions. Failure to follow the warnings and
instructions may result in electric shock, fire and/or serious injury.
WARNING: Never modify the product or any part of it. Damage or personal injury could result.
WARNING: To reduce the risk of injury, read the instruction manual.
Intended Use
This chain saw is designed for pruning applications and cutting logs up to 10" (254 mm) in diameter.
DO NOT use under wet conditions or in presence of flammable liquids or gases.
DO NOT let children come into contact with the tool.
Supervision is required when inexperienced operators use this tool.
ASSEMBLY AND ADJUSTMENTS
WARNING: To reduce the risk of serious personal injury, turn unit off and remove the battery pack
before making any adjustments or removing/ installing attachments or accessories. An
accidental start-up can cause injury.
Installing the Guide Bar and Saw Chain (Fig. A, B–D)
CAUTION: Sharp chain. Always wear protective gloves when handling the chain. The chain is sharp
and can cut you when it is not running.
WARNING: Sharp moving chain. To prevent accidental operation, ensure that battery is removed
from the tool before performing the following operations. Failure to do this could result in serious
personal injury.
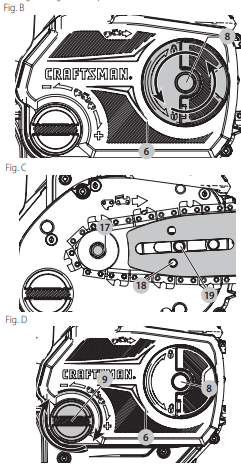
If the saw chain 5 and guide bar 4 are packed separately in the carton, the chain has to be attached to the bar, and both must be attached to the body of the tool.
1. Place the saw on a flat, firm surface.
2. Flip up locking lever and rotate the bar adjust locking knob 8 counterclockwise as shown in Figure B to
remove sprocket cover 6 .
3. Wearing protective gloves, grasp the saw chain 5 and wrap it around the guide bar 4 , ensuring the teeth are facing the correct direction.
4. Ensure the chain is properly set in the slot around the entire guide bar.
5. Place the saw chain around the sprocket 17 . While lining up the slot on the guide bar with chain tensioning pin 18 , and the bolt 19 , on the base of the tool.
6. Once in place, hold the bar still, replace sprocket cover 6 . Make sure tool-free tension assembly bolt
hole on the cover lines up with the bolt 19 , in the main housing. Flip up locking lever and rotate the bar
adjust locking knob 8 clockwise until it clicks, then loosen knob one full turn, so that the saw chain can be
properly tensioned.
7. Rotate the chain tensioning knob 9 clockwise to increase tension as shown in Figure D. Make sure the
saw chain 5 is snug around the guide bar 4 . Tighten the bar adjust locking knob until it clicks. The bar is secure after three audible clicks are heard. Further tightening is not required.
Adjusting Chain Tension (Fig. A, E )
CAUTION: Sharp chain. Always wear protective gloves when handling the chain. The chain is sharp and can cut you when it is not running.
WARNING: Sharp moving chain. To prevent accidental operation, ensure that battery is removed from the tool before performing the following operations. Failure to do this could result in serious personal injury.
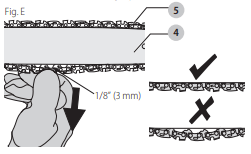
1. With the saw on a flat, firm surface, check the saw chain 5 tension. The tension is correct when the chain snaps back after being pulled 1/8" (3 mm) away from the guide bar 4 with light force from the index finger and thumb as shown in Figure E. There should be no “sag” between the guide bar and the chain on the underside as shown in Figure E.
2. To adjust saw chain tension, flip up locking tab and rotate the bar adjust locking knob 8 counterclockwise one full turn. Rotate the chain tensioning knob 9 clockwise until the chain tension is correct as instructed above.
3. Do not over-tension the chain as this will lead to excessive wear and will reduce the life of the bar and chain.
4. Once chain tension is correct, securely tighten bar adjust locking knob.
NOTE: The bar adjust locking knob has a detent tightening system. The sprocket cover is secure after three audible clicks are heard. Further tigtening is not required.
5. When the chain is new, check the tension frequently (after removing battery) during the first 2 hours of use as a new chain stretches slightly. Fig. E 1/8” (3 mm)
Replacing the Saw Chain (Fig. A, F)
CAUTION: Sharp chain. Always wear protective gloves when handling the chain. The chain is sharp and can cut you when it is not running.
WARNING: Sharp moving chain. To prevent accidental operation, ensure that battery is removed from the tool before performing the following operations. Failure to do this could result in serious personal injury.
1. Flip up locking tab and rotate the bar adjust locking knob 8 counterclockwise to release chain tension.
2. Remove sprocket cover 6 as described in Installing the Guide Bar and Saw Chain section.
3. Lift the worn saw chain 5 out of the groove in the guide bar 4 .
4. Place the new chain in the slot of the guide bar, making sure the saw teeth are facing the correct direction by matching the arrow on the chain with the graphic on the sprocket cover 6 shown in Figure F.
5. Follow instructions for Installing the Guide Bar and Saw Chain.
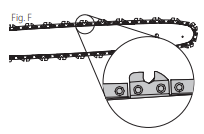
Replacement chain and bar are available from your nearest authorized service center.
• This chain saw requires replacement 12” (305 mm) chain CMZCSC12. Replacement 12” (25.4 mm) bar CMZCSB12.
Saw Chain and Guide Bar Oiling (Fig. G)
Auto Oiling System
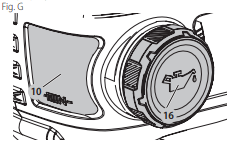
This chain saw is equipped with an auto oiling system that keeps the saw chain and guide bar constantly lubricated. The oil level indicator 10 shows the level of the oil in the chain saw. If the oil level is less than a quarter full, remove the battery from the chain saw and refill with the correct type of oil. Always empty oil tank when finished cutting.
NOTE: Use a high quality bar and chain oil for proper saw chain and bar lubrication. As a temporary substitute, a nondetergent SAE30 weight motor oil can be used. The use of a vegetable based bar and chain oil is recommended when pruning trees. Mineral oil is not recommended because it may harm trees. Never use waste oil or very thick oil. These may damage your chain saw.
Filling the Oil Reservoir
1. Unscrew counterclockwise and then remove the oil cap 16 . Fill the reservoir with the recommended bar and chain oil until the oil level has reached the top of the oil level indicator 10 .
2. Refit the oil cap and tighten clockwise. 3. Periodically switch the chain saw off and check the oil level indicator to ensure the bar and chain are being properly oiled.
Transporting Chain Saw (Fig. A, H)
• Always remove the battery from the tool and cover the guide bar 4 with the guide bar cover 11 (Figure H) when transporting the saw.
• Engage chain brake by pushing chain brake/front hand guard 3 forward.

OPERATION
WARNING: To reduce the risk of serious personal injury, turn unit off and remove the battery pack before making any adjustments or removing/ installing attachments or accessories. An accidental start-up can cause injury.
Installing and Removing the Battery Pack (Fig. I)
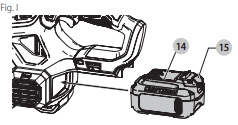
NOTE: For best results, make sure your battery pack is fully charged. To install the battery pack 14 into the tool handle, align the battery pack with the rails inside the tool’s handle and slide it into the handle until the battery pack is firmly seated in the tool and ensure that it does not disengage.
To remove the battery pack from the tool, press the release button 15 and firmly pull the battery pack out of the tool handle. Insert it into the charger as described in the charger section of this manual.
Proper Hand Position (Fig. A, J)
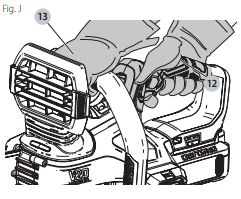
WARNING: To reduce the risk of serious personal injury, Always use proper hand position as shown. WARNING: To reduce the risk of serious personal injury, always hold securely in anticipation of a sudden reaction.
Proper hand position requires the left hand on the front handle 13 , with the right hand on the rear handle 12 .
Operating the Chain Saw (Fig. A)
WARNING: Read and understand all instructions. Failure to follow all instructions listed below may result in electric shock, fire and/or serious personal injury.
- Guard Against Kickback which can result in severe injury or death. See General Power Tool Safety Warnings and Causes and Operator Prevention of Kickback and Kickback Safety Features, to avoid the risk of kickback.
- Do not overreach. Do not cut above chest height. Make sure your footing is firm. Keep feet apart. Divide your weight evenly on both feet.
- Use a firm grip with your left hand on the front handle 13 and your right hand on the rear handle 12 so that your body is to the left of the guide bar.
- Do not hold chain saw by chain brake/front hand guard 3 . Keep elbow of left arm locked so that left arm is straight to withstand a kickback.
WARNING: Never use a cross-handed grip (left hand on the rear handle and right hand on the front handle).
WARNING: Never allow any part of your body to be in line with the guide bar 4 when operating the chain saw.
- Never operate while in a tree, in any awkward position or on a ladder or other unstable surface. You may lose control of saw causing severe injury.
- Keep the chain saw running at full speed the entire time you are cutting.
- Allow the saw chain to cut for you. Exert only light pressure. Do not put pressure on chain saw at end of cut.
WARNING: When not in use always have the chain brake engaged and battery removed.
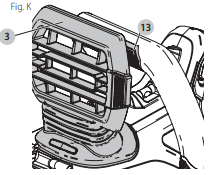
Setting the Chain Brake (Fig. K)
Your chain saw is equipped with a motor chain braking system which will stop the chain quickly in case of kickback.
- Remove the battery from the tool.
- To engage the chain brake, push the chain brake/front hand guard 3 forward until it clicks into place.
- Pull the chain brake/front hand guard 3 towards the front handle 13 into the “set” position as shown in Figure K.
- The tool is now ready to use.
NOTE: In the event of kickback, your left hand will come in contact with the front guard, pushing it forward, toward the workpiece. This will stop the tool.
Testing the Chain Brake
Test the chain brake before every use to make sure it operates correctly.
1. Place the tool on a flat, firm surface. Make sure the saw chain 5 is clear of the ground.
2. Grip the tool firmly with both hands and turn the chain saw on.
3. Rotate your left hand forward around the front handle 13 so the back of your hand comes in contact with the chain brake/front hand guard 3 and push it forward, toward the workpiece. The saw chain should stop immediately.
NOTE: If saw does not stop immediately, stop use of tool and bring it to an authorized service center nearest you.
WARNING: Make sure to set chain brake before cutting.
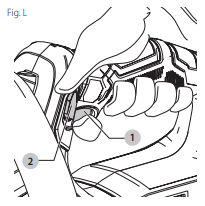
ON/OFF Switch (Fig.L)
Always be sure of your footing and grip the chain saw firmly with both hands with the thumb and fingers encircling both handles.
To turn the unit on, ensure chain brake is not engaged. Push the lock off lever 2 and squeeze the On/Off trigger switch 1 . Once the unit is running, you may release the lock off lever.
In order to keep the unit running you must continue to squeeze the trigger. To turn the unit off, release the trigger.
NOTE: If too much force is applied while making a cut the saw will turn off. To restart saw, you must release the On/Off trigger switch 1 before the saw will restart. Begin your cut again this time with less force. Allow the saw to cut at its own pace.
WARNING: Never attempt to lock a switch in the ON position.
Bubble Level (Fig. A, Q)
WARNING: Do not operate above shoulder height Align bubble levels prior to making a cut.
Ideal for horizontal cutting to ensure a straight, flat cut for fencing, decking or railing posts.
1. Align both bubble levels 7 .
2. Always start a cut with the saw chain running at full speed.
3. Place the bottom spike 20 of the chain saw behind the area of the initial cut.
4. Once a cut has begun and a notch is established in the material, do not change the angle of the cut.
NOTE: Changing the angle will cause the bar to bend.
Common Cutting Techniques (Fig. A, M–S) Felling
The process of cutting down a tree. Be sure battery is fully charged before felling a tree so you can finish on a single charge. Do not fell trees in high wind conditions.
WARNING: Felling can result in injury. It should only be performed by a trained person.
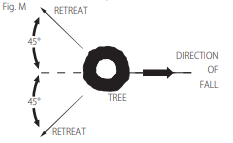
• A retreat path should be planned and cleared as necessary before cuts are started. The retreat path should extend back and diagonally to the rear of the expected line of fall (Figure M).
• Before felling is started, consider the natural lean of the tree, the location of larger branches and the wind direction to judge which way the tree will fall. Have wedges (wood, plastic or aluminum) and a heavy mallet handy. Remove dirt, stones, loose bark, nails, staples, and wire from the tree where the felling cuts are to be made.
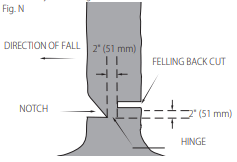
• Notching Undercut - Make the notch 1/3 of the diameter of the tree, perpendicular to the direction of the fall. Make the lower horizontal notching cut first. This will help to avoid pinching of either the saw chain or the guide bar when the second notch cut is being made (Figure N).
• Felling Back Cut - Make the felling back cut at least 2" (51 mm) higher than the horizontal notching cut. Keep the felling back cut parallel to the horizontal notching cut. Make the felling back cut so enough wood is left to act as a hinge. The hinge wood keeps the tree from twisting and falling in the wrong direction. Do not cut through the hinge ((Figure N).
• As the felling cut gets close to the hinge the tree should begin to fall. If there is any chance that the tree may not fall in the desired direction or it may rock back and bind the saw chain, stop cutting before the felling cut is complete and use wedges to open the cut and drop the tree along the desired line of fall. When the tree begins to fall remove the chain saw from the cut, stop the motor, put the chain saw down, then use the retreat path planned. Be alert for overhead limbs falling and watch your footing.
Limbing
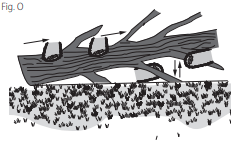
Removing the branches from a fallen tree. When limbing, leave larger lower limbs to support the log off the ground. Remove the small limbs in one cut. Branches under tension should be cut from the bottom of the branch towards the top to avoid binding the chain saw as shown in Figure O. Trim limbs from opposite side keeping tree stem between you and saw. Never make cuts with saw between your legs or straddle the limb to be cut.
Bucking
WARNING: Recommend that first time users should practice cutting on a saw horse.
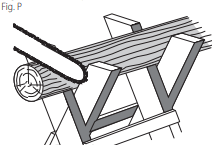
Cutting a felled tree or log into lengths. How you should cut depends on how the log is supported. Use a saw horse (Figure P) whenever possible.
1. Always start a cut with the saw chain running at full speed.
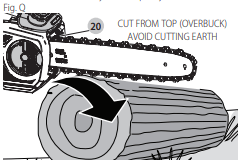
2. Place the bottom spike 20 of the chain saw behind the area of the initial cut as shown in Figure Q.
3. Turn the chain saw on then rotate the saw chain and bar down into the tree, using the spike as a hinge.
4. Once the chain saw gets to a 45° angle, level the chain saw again and repeat steps until you cut fully through.
5. When the tree is supported along its entire length, make a cut from the top (overbuck), but avoid cutting the earth as this will dull your saw quickly.
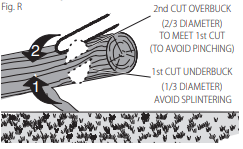
- Figure R- When supported at one end first, cut 1/3 the diameter from the underside (underbuck). Then make the finishing cut by overbucking to meet the first cut.
- Figure S- When supported at both ends. First, cut 1/3 down from the top overbuck. Then make the finished cut by underbucking the lower 2/3 to meet the first cut.
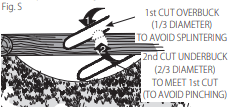
- • When on a slope always stand on the uphill side of the log. When “cutting through”, to maintain complete control reduce the cutting pressure near the end of the cut without relaxing your grip on the chain saw handles. Don’t let the chain contact the ground. After completing the cut, wait for the saw chain to stop before you move the chain saw. Always stop the motor before moving from cut to cut.
MAINTENANCE
WARNING: To reduce the risk of serious personal injury, turn unit off and remove the battery pack before making any adjustments or removing/ installing attachments or accessories. An accidental start-up can cause injury.
Regular maintenance ensures a long effective life for your chain saw.
Accessories
WARNING: Since accessories, other than those offered by CRAFTSMAN, have not been tested with this product, use of such accessories with this tool could be hazardous. To reduce the risk of injury, only CRAFTSMAN recommended accessories should be used with this product.
Recommended accessories for use with your tool are available at extra cost from your local dealer or authorized service center. If you need assistance in locating any accessory, please contact CRAFTSMAN, call 1-888-331-4569.
Versatrack™ (Fig. W)
WARNING: To reduce the risk of serious personal injury, turn unit off and remove the battery pack before making any adjustments or removing/ installing attachments or accessories. An accidental start-up can cause injury.
WARNING: To reduce the risk of serious personal injury, do not use a damaged Versatrack™ integral hang hook or Versatrack™ Trackwall. A damaged Versatrack™ integral hang hook or Versatrack™ Trackwall will not support the weight of the tool.
WARNING: To reduce the risk of serious personal injury, DO NOT suspend tool overhead or suspend objects from the integral hang hook. ONLY suspend tool on the Versatrack™ Trackwall using the integral hang hook.
WARNING: The Versatrack™ integral hang hook is intended to mount the tool onto a Versatrack™ Trackwall rail. Do not use the integral hang hook to mount the tool to any other surface.
WARNING: The Versatrack™ integral hang hook is not a belt hook.
WARNING: When hanging objects on a Versatrack™ Trackwall rail, adequately space the tools in order to not exceed 75 lb (35 kg) per linear foot.
WARNING: Before using the tool make sure that the Versatrack™ integral hang hook is returned to its original position
IMPORTANT: Versatrack™ accessories mount compatible tools securely to the Versatrack™ Trackwall system.
1. Turn tool off, remove the battery pack and remove accessories.
CAUTION: Any product with exposed cutting teeth must have them covered securely if it is to be on the Versatrack™ Trackwall.
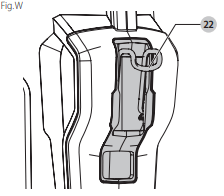
2. Flip or pull open the integral hang hook 22 . It clicks when locked into position.
3. Mount the integral hang hook to the Versatrack™ Trackwall.
NOTE: Versatrack™ accessories for use with your tool are available at extra cost from your local dealer or authorized service center. If you need assistance in locating any accessory, please contact CRAFTSMAN, call 1-888-331-4569.
Repairs
The charger and battery pack are not serviceable. There are no serviceable parts inside the charger or battery pack.
WARNING: To assure product SAFETY and RELIABILITY, repairs, maintenance and adjustment (including brush inspection and replacement, when applicable) should be performed by a CRAFTSMAN factory service center or a CRAFTSMAN authorized service center. Always use identical replacement parts.
Saw Chain Sharpening
CAUTION: Sharp chain. Always wear protective gloves when handling the chain. The chain is sharp and can cut you when it is not running.
WARNING: Sharp moving chain. To prevent accidental operation, ensure that battery is removed from the tool before performing the following operations. Failure to do this could result in serious personal injury.
NOTE: The cutters will dull immediately if they touch the ground or a nail while cutting.
To get the best possible performance from your chain saw it is important to keep the teeth of the saw chain sharp. Follow these helpful tips for proper saw chain sharpening:
1. For best results use a 4.5 mm file and a file holder or filing guide to sharpen your saw chain. This will ensure you always get the correct sharpening angles.
2. Place the file holder flat on the top plate and depth gauge of the cutter.
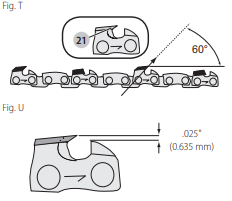
3. Figure T- Keep the correct top plate 21 filing angle line of 30° on your file guide parallel with your chain (file at 60° from chain viewed from the side).
4. Sharpen cutters on one side of the chain first. File from the inside of each cutter to the outside. Then turn your saw around and repeat the processes (2, 3, 4) for cutters on the other side of the chain.
NOTE: Use a flat file to file the tops of the rakers (portion of chain link in front of the cutter) so they are about .025" (.635 mm) below the tips of the cutters as shown in Figure U.
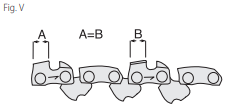
5. Figure V- Keep all cutter lengths equal. 6. If damage is present on the chrome surface of the top plates or side plates, file back until such damage is removed.
CAUTION: After filing, the cutter will be sharp, use extra caution during this process.
NOTE: Each time the chain is sharpened, it loses some of the low kickback qualities and extra caution should be used. It is recommended that a saw chain be sharpened no more than four times.
Cleaning
WARNING: Blow dirt and dust out of all air vents with clean, dry air at least once a week. To minimize the risk of eye injury, always wear ANSI Z87.1 approved eye protection when performing this procedure.
WARNING: Never use solvents or other harsh chemicals for cleaning the non-metallic parts of the tool. These chemicals may weaken the plastic materials used in these parts. Use a cloth dampened only with water and mild soap. Never let any liquid get inside the tool; never immerse any part of the tool into a liquid.
Saw Chain and Guide Bar
After every few hours of use, remove the sprocket cover, guide bar and chain and clean thoroughly using a soft bristle brush. Ensure oiling hole on bar is clear of debris. When replacing dull chains with sharp chains it is good practice to flip the chain bar from bottom to top.
Register Online
Thank you for your purchase. Register your product now for:
• WARRANTY SERVICE: Registering your product will help you obtain more efficient warranty service in case there is a problem with your product.
• CONFIRMATION OF OWNERSHIP: In case of an insurance loss, such as fire, flood or theft, your
registration of ownership will serve as your proof of purchase.
• FOR YOUR SAFETY: Registering your product will allow us to contact you in the unlikely event a safety
notification is required under the Federal Consumer Safety Act.
See other models: CMCCSP20M1 41CY4218793 CMXGSAMNN4214 CMXGNAM1130050 CMXGNAM1130054
