User manual Lawn Mower for Pulsar PTG12205BM
Setup
Important: Remove and discard the protective plastic sheet that covers the engine.
Unfolding the Handle
Folding or unfolding the handle improperly can damage the cables, causing an unsafe operating condition.
- Do not pinch or bend cables when folding or unfolding the handle.
- If a cable is damaged, Contact an Authorized Service Center by calling 866-591-8921
Remove the handle knobs from the mower deck. Important: Route the cables to the outside of the handle as you install the handle.
- Handle knob (2)
- Move the handle to the operating position.
- Install and tighten the handle knobs that you removed in step 1. (Figure 1)

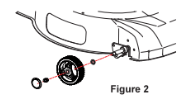
2.Attaching Wheels (See Figure 2)
- Parts needed - 2 front wheels (7"), 2 rear wheels (11"), 4 washers and 4 nuts.
- Install the washer into wheel axle then put on the wheel into wheel axle.
- Screw lock nut into the end of the thread of the wheel axle until it locks into place.
- Then place wheel cover by tapping it in.
- Repeat process on the other side of the lawn mower to install the other three wheels.
2. Filling the Engine with Oil
Your mower engine does not come filled with oil. Use SAE 30 weight engine oil (not included)
1. Remove the dipstick.(Figure 3)
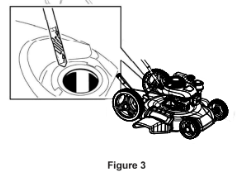
2. Slowly pour oil into the dipstick/fill hole until the oil level reaches the full range on the dipstick. Do not overfill. Max 13.5oz. (0.4L), type: SAE 30 weight engine oil with an API service rating of SF or higher.
Product Overview
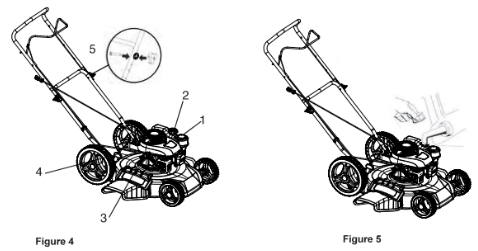
1. Air Filter
2. Fuel Tank Cap
3. Oil Fill / Dipstick
4. Height Adjustment
5. Handle Loosening Knob
Operation
Attachments/Accessories
A selection of Pulsar approved attachments and accessories are available for use with the machine to Enhance and expand its capabilities. Contact your Authorized Service Center or Distributor 1-866-591-8921.
Filling the Fuel Tank
WARNING
- Gasoline is extremely flammable with explosive vapors. A fire or explosion from gasoline can burn you or others.
- To prevent a static charge from igniting the gasoline, place the container and/or mower directly on the ground before filling, not in a vehicle or on an object.
- Fill the tank outdoors when the engine is cold; wipe up spills.
- Do not handle gasoline while smoking or near open flame or sparks.
- Store gasoline in an approved fuel container, out of the reach of children.
Fill the fuel tank with fresh unleaded regular gasoline from a filling station. (Figure 5)
Important: To reduce starting problems, add fuel stabilizer to the fuel, mixing it with gasoline less than 30 days old. (Figure 5)
Checking the Engine Oil Level
Service Interval: Before each use.
1. Remove dipstick, wipe it clean, and fully re-insert it, check to see if oil is needed by the oil mark that is left the dipstick. (Figure 6)
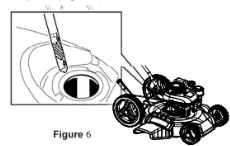
2. Remove the dipstick and check the oil level (Figure 6). If the oil level is low on the dipstick, slowly pour oil into the oil fill hole to raise the oil level to the full range on the dipstick. Do not overfill. Max fill 13.5oz (0.4 L), type SAE 30 weight oil with an API service rating of SF or higher.
3. Install the dipstick and tighten the screw threads.
Cutting Height Adjustment
WARNING
- Adjusting the cutting height may bring you into contact with the moving blade, causing serious injury.
- Stop the engine and wait for all the moving parts to stop.
- Do not put your fingers under the housing when adjusting the cutting height.
- Do not exceed cutting height adjustment limited location, or it will causing serious injury or death.
WARNING
If the engine has been running, the muffler will be hot and can severely burn you. Keep away from the hot muffler.
Adjust the cutting height as desired. Set all four wheels to the same height.
Note: To lower the mower, move the cutting height levers forward; to raise the mower, move them towards the rear. (Figure 7)
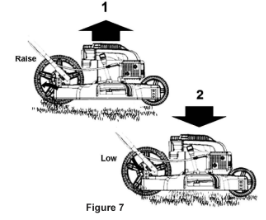
1. Raise the Mower
2.Lower the Mower
Note: Height adjustment. 1"-3"
Starting the Engine
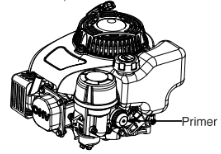
1.Press the primer three times
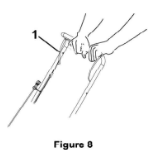
2. Hold the blade control bar (Figure 8) against the handle.
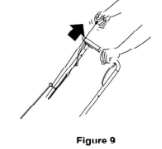
3. Hold blade control bar then pull the pull start to start the mower. (Figure 9)
Note: If the mower does not start after several attempts, please contact your authorized service center.
Stopping the Engine
To stop the engine, release the blade control bar (Figure 10)
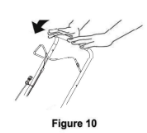
Important: When you release the blade control bar, both the engine and the blade should stop within 3 seconds. If they do not stop properly, stop using your mower immediately and contact an authorized service center.
Mulching the Clippings
Your mower comes mulch ready. If you have a grass catcher please remove it before mulching.
Bagging the Clippings (Not Included) Use the grass catcher when you want to collect grass and leaf clippings from the lawn.
Operating Tips
General Mowing Tips
- Clear the area of sticks, stones, wire, branches, and other debris that the blade may hit.
- Avoid striking solid objects with the blade. Never deliberately mow over an object.
- If the mower strikes an object or starts to vibrate, immediately stop the engine, disconnect the spark plug and examine the mower for damage.
- Replace the blade when necessary with an AVVIX replacement blade.
Cutting Grass
- Cut only a third of the grass blade at a time. Do not cut bellow the 1.75 inch setting unless the grass is sparse or it is late in the fall when grass growth begins to slow down.
- When cutting grass over 6 inches tall, mow at the highest cutting height setting and walk slower. Then adjust your adjustment height lever to the desired height and mow again. If the grass is to tall it will be more difficult to navigate and could get stuck and cause the engine to stall.
- Alternate the mowing direction. This helps disperse the clippings over the lawn for even fertilization.
- If the finished lawn is unsatisfactory, try one or more of the following.
Replace the blade or have it sharpened.
Walk at a slower pace while mowing.
Raise the cutting height on your mower.
Cut the grass more frequently.
Overlap cutting swaths instead of cutting a full swath with each pass.
Set the cutting height on the front wheel one notch lower than the rear wheels. For example, set the front wheels at 2 inches and the rear at 2-1/2 inches
High Altitude Operation
Most small engines with carburetors are designed to work efficiently from sea level to around 5,000 feet elevation. As altitude increases, the air becomes thinner with less available oxygen. This causes the air/fuel mixture to become overly rich which can cause reduced performance, spark plug fouling, difficult starting and increased emissions.
A competent small engine shop can modify the carburetor by installing different 'jets' that are designed for high altitude operation. If your lawn mower is typically operated at an altitude of 5,000 feet or above, you should ask your dealer to 're-jet' the carburetor and calibrate the air fuel mixture to maximize performance at the altitude where it is to be used. You will realize better overall performance, while reducing excess emissions that occur when the air/fuel mixture is too rich. This modification need only be done once and should last for the life of the mower.
Keep in mind that any engine, even with properly calibrated carburetor jets, will realize a decrease in horsepower of about 3.5% for every 1,000 feet (300 meter) increase in altitude, simply due to thinner air. But an engine with a properly jetted carburetor will always run cleaner and more efficiently at high altitude than an identical unit with standard jets.
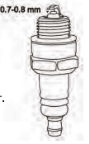
Spark Plug Maintenance
- Once the engine has cooled, remove the spark plug wire.
- Remove the spark plug using a spark plug wrench.
- Clean the spark plug with a wire brush (not supplied).
- Using a feeler gauge set the gap to 0.75mm.
- Install the spark plug carefully by hand, to avoid cross-threading.
- After the spark plug is seated, tighten with the spark plug wrench to compress the washer.
Maintenance
Note: Determine the left and right sides of the machine from the normal operating position.
After the first 5 hours
Before each use or daily
- Check the engine oil level.
- Ensure that the engine stops within 3 seconds after releasing the blade control bar.
- Clean grass clippings and dirt from under the mower.
Every 25 hours
- Replace the air filter replace it more frequently in dusty operating conditions.
Before storage
- Empty the fuel tank before repairs as directed and before annual storage.
Yearly
- Change the engine oil.
- Replace the blade or have it sharpened (more frequently if the edge dulls quickly).
- Refer to your Engine Operator's Manual for any additional yearly maintenance procedures.
Important: Refer to your Engine Operator's Manual for additional maintenance procedures.
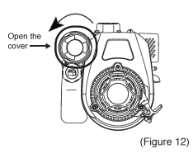
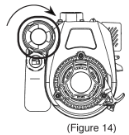
Replacing the Air Filter
Service Interval: Every 25 Hours
1. Turn left to open cap of the air filter. (Figure 12)
2. Replace the air filter.(Figure 13)
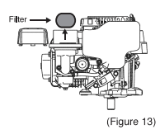
3. Align cap, three tabs, with base. Press down and turn right to secure.(Figure 14)
Changing the Engine Oil
Service Interval: After the first 5 hours. Yearly.
Change the engine oil after the first 5 operating hours change it yearly thereafter.
Run the engine a few minutes before changing the oil. Warm oil flows better and carries more contaminants.
1. Perform the Pre-Maintenance procedures. Refer to preparing for maintenance.
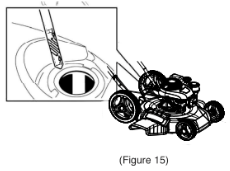
2. Remove the dipstick. (Figure 15)
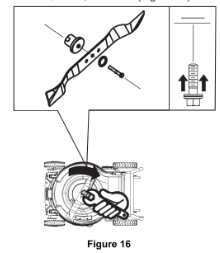
3. Tip the mower onto its side, with the dipstick down, to drain the used oil out through the oil fill tube.(Figure 16) (Figure 12)

4. Slowly pour oil into the oil deposit until the oil level reaches the full line on the dipstick. (Figure 15) Do not overfill. (Max 13.5oz. (0.4 L), type: SAE 30 detergent oil with an API service of SF, SG, SH, SJ, SL, or higher.). Note: If you overfill the engine, pour some oil out of it as directed in Changing the Oil.
5. Install the dipstick securely.
6. Dispose of the used oil properly at a local recycling.
Replacing the Blade
Service Interval: Yearly
Important: You will need a torque Wrench to install the blade properly. If you do not have a torque Wrench or are uncomfortable performing this procedure, contact an Authorized Service Center.
Examine the blade whenever the mower runs out of fuel. If the blade is damaged or cracked, replace it immediately. If the blade edge is dull or nicked, have it sharpened or replace it.
7. Install new blade with all mounting hardware; tighten blade bolt by turning clockwise. (Figure 16).
Cleaning the Mower
Service Interval: Before each use or daily
1. With the engine running on a flat paved surface,spray a stream of water in front of the right rear wheel(Figure 17). The water will splash into the path of the blade,cleaning out the clippings.

2. When no more clippings come out, stop the water and move the mower to a dry area.
3. Run the engine for a few minutes to dry the housing to prevent.
Storage
Store the mower in a cool, clean, dry place.
Preparing the Mower for Storage
4. Always add fuel atabilizer to the fuel as directed by the fuel stabilizer manufacturer.
5. Remove spark plug and spray a light fog of penetrating oil, such as WD-40 into the spark plug hole; Then pull the starter rope........
6. Install the spark plug and tighten it with a wrench 8. Use a torque Wrench to tighten the blade bolt to to 15 ft-lb (20 N-m). 30-38 ft-lb (40-50 N-m).
7. Tighten all nuts, bolts, and screws.
8. Leave spark plug cable disconnected. important. Use proper tools only!
Folding the Handle
1. Loosen the handle knobs until you can move the handle freely.