Carefully remove the machine from its packaging and check that the following parts are complete:
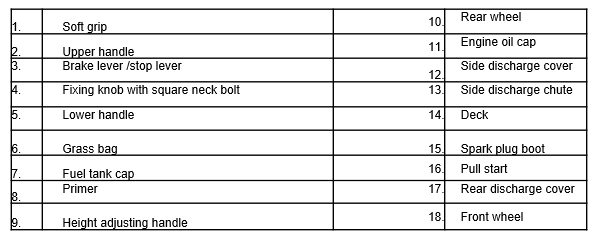
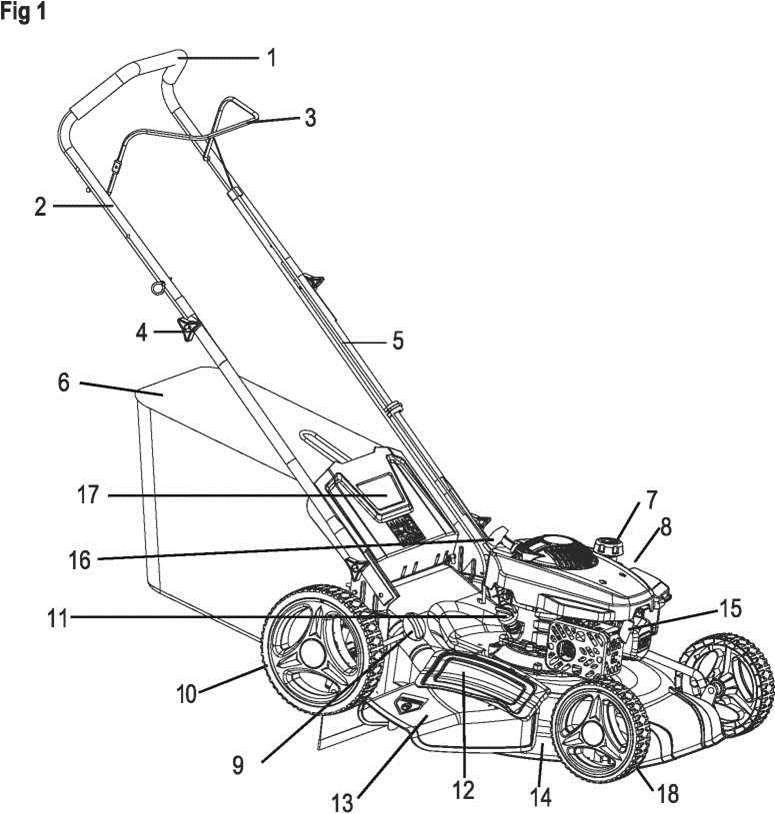
A. Main mower deck (with upper handle and lower handle) 1 pc
B. Cable clip 1pc
C. Grass bag assembly
D. Side discharge chute 1 pc
E. Manual 1pc
F. Knob with bolt M8 2pc (Lower hanle)
G. Knob with bolt M8 2pc (Upper hanle)
H. SparkPlug Wrench 1 pc
I. Plastic mulching plug 1 pc (inside the mower)
WARNING: If any parts are damaged or missing, do not operate this tool until the missing parts are replaced. Failure to heed this warning could result in serious personal injury.
NOTE! Always recycle the packaging in accordance with local recycling laws
WARNING: This item requires a two person lift to remove from the packaging. Make sure that you have sufficient space to put the lawn mower down. Keep your feet apart so that you have a stable position, bend at the knees and keep your back straight.
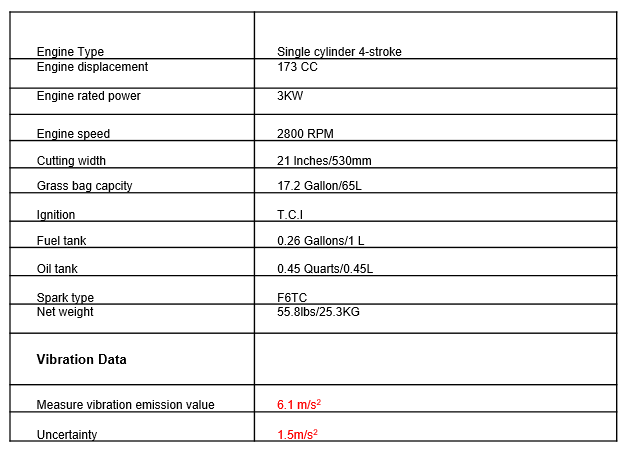
TECHNICAL SPECIFICATIONS
INTENDED USE
This gas powered lawn mower has been designed for cutting lawn areas in private house and hobby gardens.
The machine is to be used only for its prescribed purpose. Any other use is deemed to be a case of misuse. The user/operator and not the manuafacturer will be liable for any damage or injuries of any kind caused as a result of this.
Please note that our equipment has not been designed for use in commercial, trade or industrial applications. Our warranty will be voided if the machine is used in commercial, trade or industrial businesses or for equivalent purposes.
ADJUSTMENT
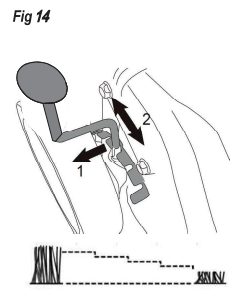
Setting The Cutting Height
As shown in Fig 14
CAUTION! Adjust the cutting height only when the engine is shut off and the spark plug boot has been pulled.
The cutting height is centrally adjusted with the cutting height adjusting handle. Different cutting heights can be selected.
Pull the adjusting handle out and select the desired cutting height. The handle snaps into the desired position.
From position 1 to position 7
Setting Required Function
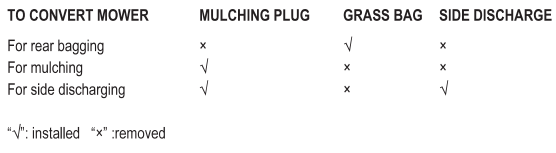
CAUTION! This lawn mower has three functions. These functions can be converted by changing accessory setting. Please see the following chart for detail setting
OPERATION
Starting Stopping The Engine
WARNING: The blade begins to rotate as soon as the engine is started.
WARNING: Do not operate the machine in enclosed or poorly ventilated areas as the exhaust gas contains toxic substance. Keep hands, feet, and clothing away from all the moving parts of the machine. The exhaust and other parts of the machine will become hot during use. Make sure that the blade is securely fastened before starting the engine.
NOTE: To start the engine, make sure that the spark plug boot is located on the plug and the machine is filled with sufficient oil and fuel.
To Start The Engine
As shown in Fig 15-16
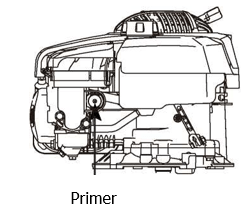
1. When starting a cold engine, press down the primer fully 3-5 times.
WARNING! Pressing the primer bulb too many times may cause the engine to flood. When starting a warm engine, the primer does not need to be used. If the engine stops due to a lack of fuel, refill and press down the primer 3 to 5 times.
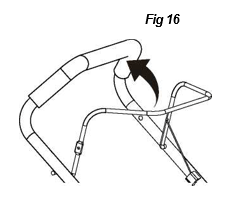
2. Stand behind the mower. Pull the engine Start/Stop lever toward upper handle with one hand and place the other hand on the pull start.
3. Pull the pull start out approx. 4-6 inches until you feel a resistance and then start the engine with a sharp pull.
NOTE: If the engine fails to start after three pulls, repeat the process.
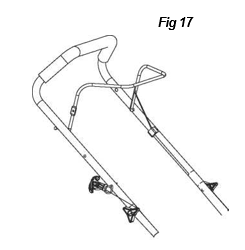
4. Once the engine is running, put the starter rope Into the rope guide. As shown in Fig 17
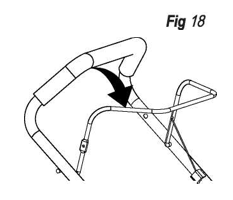
Stopping The Engine
As shown in Fig 18
Release the engine start/stop lever, it will return to its Initial position, the engine will automatically switches oft.
To Clean A Flooded Engine
NOTE: If the engine won’t start after you have pulled the starter several times, the with excess fuel. Use following procedure flooded engine.
1. Release the engine start/stop lever to stop engine.
2. Remove the spark plug, dry it, and then reinstall it.
NOTE: Install the spark plug carefully by hand, to avoid cross-threading. After the plug is seated tighten 1/8 to 1/4 turn with socket spanner of spark plug to compress the washer.
3. Pull the engine start/stop lever toward upper handle.
4. Operate the pull start as described above.
Mowing
WARNING: Always observe the strictest safety procedures when using the lawnmower. Carefully read the safety instructions of this manual before using the lawnmower.
WARNING: Never open the ejector flap when the grass bag has been detached (to be emptied) and the engine is still running. The rotating blade can cause serious injuries!
Select your required setting.
2Start the engine and allow it run for a minute or 2.
Keep a firm grip on the upper handle with engine stop/start lever and walk along with it to start mowing.
Working Advices
As soon as grass clippings start to trail the lawn mower, it is time to empty the grass bag.
NOTE: Before taking off the grass bag, switch off the engine and wait until the blade has come to a stop.
To take off the grass bag, use one hand to lift up ejector flap and the other to grab onto the carry handle. The ejector flap automatically falls down after removing the grass bag and closes off the rear chute opening.
Empty the grass debris in the grass bag, and refit grass Bag.
NOTE: If any grass residue is caught in the discharge chute, clean it using a brush. Do not remove grass debris in the mower casing or on the blade by hand or with your feet. Instead use suitable tools such as a brush or broom. To ensure that the cut grass can be collected into a grass bag, the discharge opening and inside the mower casing must be cleared of any blockage
High Altitude Operation
If operating lawn mower regularly at altitudes over 5,000 feet, the carburetor’s air-fuel mixture will be too rich and emmissions may increase. On engines not built for the United States the carburetor can be adjusted to operate under this condition. The carburetor should be returned to its normal setting if regular operation is less than 5,000 feet.
Contact your service center to modify the carburetor.
STORING AND MAINTENANCE
Cleaning
WARNING: Before performing any maintenance or cleaning work, switch Off the engine and wait until the blade has come to a stop.
General Cleaning
The lawnmower should be cleaned thoroughly every time after it has been used. Always clean your lawnmower immediately after use. Do not allow grass cuttings and other debris to become dry and hard on any of the mower surfaces. Dried grass remnants and dirt may impair the mowing operation.
Check that the grass chute is free of any residual grass. Remove any such residue. Check the underside of the lawn mower and the blade mount .Tilt the lawn mower onto its left side (opposite the oill filler neck)
NOTE: Before placing the lawnmower on its side, fully drain the fuel tank using a fuel extraction pump.
Do not tilt the lawnmower by more than 90 degrees
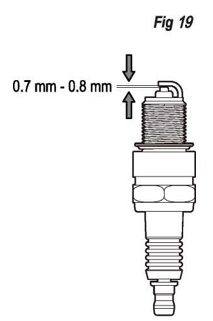
Maintenance Of The Spark Plug
Once the engine has cooled, pull off the spark plug with a twist.
Remove the spark plug using a spark plug wrench.
Clean the spark plug with a wire brush (not supplied).
Using a feeler gauge set the gap to 0.75mm.
Install the spark plug carefully by hand, to avoid cross-threading.
After the spark plug is seated, tighten with the spanner to compress the washer
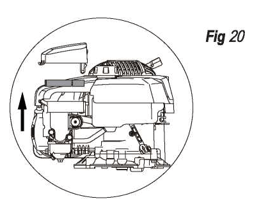
How to Service the Air Filter
As shown in Fig 20
Soiled air filters reduce the engine output by supplying too little air to the carburetor. Ff the air contains a lot of dust, the air filter should be checked more frequently
WARNING: Never run the engine without the air filter element installed
Remove the air cleaner outside cover. Becareful to prevent dirt and debris from falling into the air cleaner assembly.
Separate the Air Filter from the Air Filter Housing .
Inspect the air filter. Clean dirty air filter with warm water and mild soap. Allow air filter to dry thoroughly before re-installation
Install the air filter assembly onto the carburetor and secure with screw.
NOTE: Do not use pressurized air or solvents to clean the filter. Pressurized air can damage the filter and solvents will dissolve the filter.
Changing The Engine Oil
Tilt the lawnmower towards the oil filler, have a container ready to catch the oil and remove the dipstick. Once the oil has been emptied, replace the dipstick and wipe clean any spillages.
Refill with 17 oz./500ml SAE30 oil or equivalent i. e SAE5W/30, SAE10W/30. When the dipstick is rested on the filler pipe (i. e. not turn in pace), the oil level must be between the min and max marks on the dipstick.
See “Checking the engine oil level and filling with engine oil ”
Start the engine and allow it to run briefly.
Stop the engine, wait one minute and check the oil level. Top up if necessary.
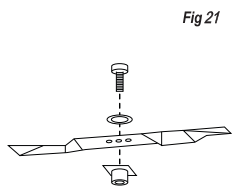
Replacing The Blade
For safety reasons you should only ever have your blade sharpened, balanced and mounted by an authorised service workshop. For optimum results it is recommended that the blade should be inspected once a year.
WARNING: Before you remove the grass collection bag, stop the engine and wait until the blade stops completely. You will need garden gloves (not provided) and a spanner wrench(not provided) to remove the blade.
NOTE: Don’t invert the mower. Tip it slightly towards the oil filler pipe and reach under the deck
WARNING: Always handle the blade with care, sharp edges could cause injury USE GLOVES. Renew your metal blade after 50Hrs mowing or 2yrs whichever is sooner regardless of condition. If the blade is cracked or damaged replace it with a new one. Don’t hold the blade with your bare hand.
NOTE: Maintain the sharpness of the blade when cutting grass. If the blade is worn, pitted and blunt, it should be replaced or sharpened. The sharpness of the blade will affect of the lawnmower.
For safety reasons we recommend that the blade only be changed by someone qualified and authorized to do so.
Hold the blade and unscrew the blade bolt counterclockwise using a spanner wrench. Remove the washer and the blade.
Fit a new blade or re-sharpen the blade, locate the blade on the two studs on the blade flan and then replace the washer and bolts. Make sure the blade is correctly located, and then firmly tighten the bolt. Do not over tighten. The up turn of the blade must project into the motor compartment.
Storing the Lawnmower for Short Periods
The lawnmower can be stored for short periods of time (less than 15 days) without performing any storage maintenance. Before placing the lawnmower into storage always carry out the following:
Allow the engine to fully cool.
Ensure the grass bag is empty.
Clean all debris from under the mower deck.
Store the lawnmower on flat and level surface with the mower upright.
Store in a safe place which is not accessible by children or people who are not familiar with operation.
Storing the Lawnmower for Extended Periods
If the lawnmower is to be place into storage for more than 15 days, storage maintenance must be performed on the lawnmower. If the following steps are not carried out, when you next operate the lawnmower it may not start correctly and may need to be serviced.
CAUTION: Do not empty the fuel tank in enclosed areas, near fire or when smoking. Gasoline fumes can cause explosions and fire
Empty the gas tank with a gasoline suction pump if available.
Start the engine and let it run until any remaining gasoline has been used up.
Change the oil at the end of every season. To do so, remove the used engine oil from a warm engine and refill with fresh oil.
Clean the cooling fins of the cylinder and the housing
Be sure to clean the entire machine to protect the paint.
Store the machine in a well-ventilated place.
Maintenance Schedule
Performing routine maintenance correctly on your lawnmower will ensure you get years of trouble free use.
Please keep this manual safe for future reference.
It is recommended that the following maintenance schedule is adhered to. This will ensure the lawnmower operated correctly and is safe to use.
12 HOURS OF USE
24 HOURS OF USE
36 HOURS OF USE
Air Filter
Clean
Clean
Replace
Spark Plug
Check
Clean
Replace
Engine Oil
Check
Replace
Check
The Engine oil should be changed after the fist 8 hours.
Transport
Empty the gas tank.
Always let the engine run until it has used up the remainder of gas in the tank. Empty the engine oil from the warm engine.
Remove the spark plug boot from the spark plug.
Clean the cooling fins of the cylinder and the housing.
Use the original packaging to ship whenever possible.
TROUBLESHOOTING
WARNING: Before performing any maintenance or cleaning work, switch off the engine and wait until the blade has come to a stop.
CAUTION: Improper repairs can result in the product functioning unsafely. This may endanger yourself and other.
Problems which cannot be fixed with the aid of following table may be fixed by a qualified service center. Please call 1-866-591-8921 for the nearest service center in your area.
Please be aware that any improper repairs will also invalidate the warranty and additional costs may be incurred.
Use only genuine spare parts. Only these spare parts are designed and suitable for the product. The use of other spare parts not only voids the warranty, you can also endanger yourself and others.
FAULT/MALFUNCTION
CAUSE
SOLUTION
Loud while running, machine vibrates heavily
Screws are loose
Blade fasteners are loose
Blade is unbalanced
Check screws
Check blade fasteners
Replace blade
Engine does not start
Start/stop lever not pressed
Spark plug is defective
Fuel tank is empty
Engine may be flooded
Replace spark plug
Call customer service center
Refill with fuel
Remove plug and dry
Engine runs unsteadily
Air filter is soiled
Spark plug is soiled
Clean the air filter
Clean the spark plug
Uneven mowing results
Blade is blunt
Cutting height is too low
Sharpen the blade
Set correct height
Grass bag is not filled
Blade is worn
Grass bag is clogged
Cutting height is right?
The lawn / grass is wet ?
Does the discharge channel/ housing blocked ?
Does underside of the mower deck have been clogged?