Model#PTG1221ARM
Lawn Mower
OPERATOR’S MANUAL
Warning: The Engine Exhaust from this product contains chemicals known to
the State of California to cause cancer, birth defects or other reproductive harm.

INTRODUCTION
Date of Purchase:
Model Number:
Serial Number:
The emissions control system for this lawn mower is compliant with all standards set by the U.S. Agency.
SAVE THIS MANUAL FOR FUTURE REFERENCE
This manual contains important information regarding safety, operation, and maintenance.
Item Number:
Thank you for purchasing this superior quality lawn mower from Pulsar Products Inc. When operating and
maintaining this product as instructed in this manual, your lawn mower will give you many years of reliable service.
PULSAR PRODUCTS INC.
8676 Rochester Ave.
Rancho Cucamonga, CA 91730
866-591-8921
How to contact us:
To order parts, receive warranty assistance, or other service inquiries, contact us at: 866.591.8921,
or support@pulsar-products.com
Save your original sales receipt and record the following information below for service or warranty assistance.

TABLE OF CONTENTS
Description of Product Parts………………………………………………………………………………………………3
Technical Specifications…………………………………………………………………………………………………...5
Intended use………………………………………..……………………………………………………………………....6
Safety Information…………………………………..……………………………………………………………………...7
Assembly……………………………………………..……………………………………………………………………..11
Adjustment …………………………………………..……………………………………………………………………..15
Operation……………………………………………..……………………………………………………………………..16
Storing and Maintenance…………………………..……………………………………………………………………...19
Troubleshooting ……………………………………..……………………………………………………………………...24
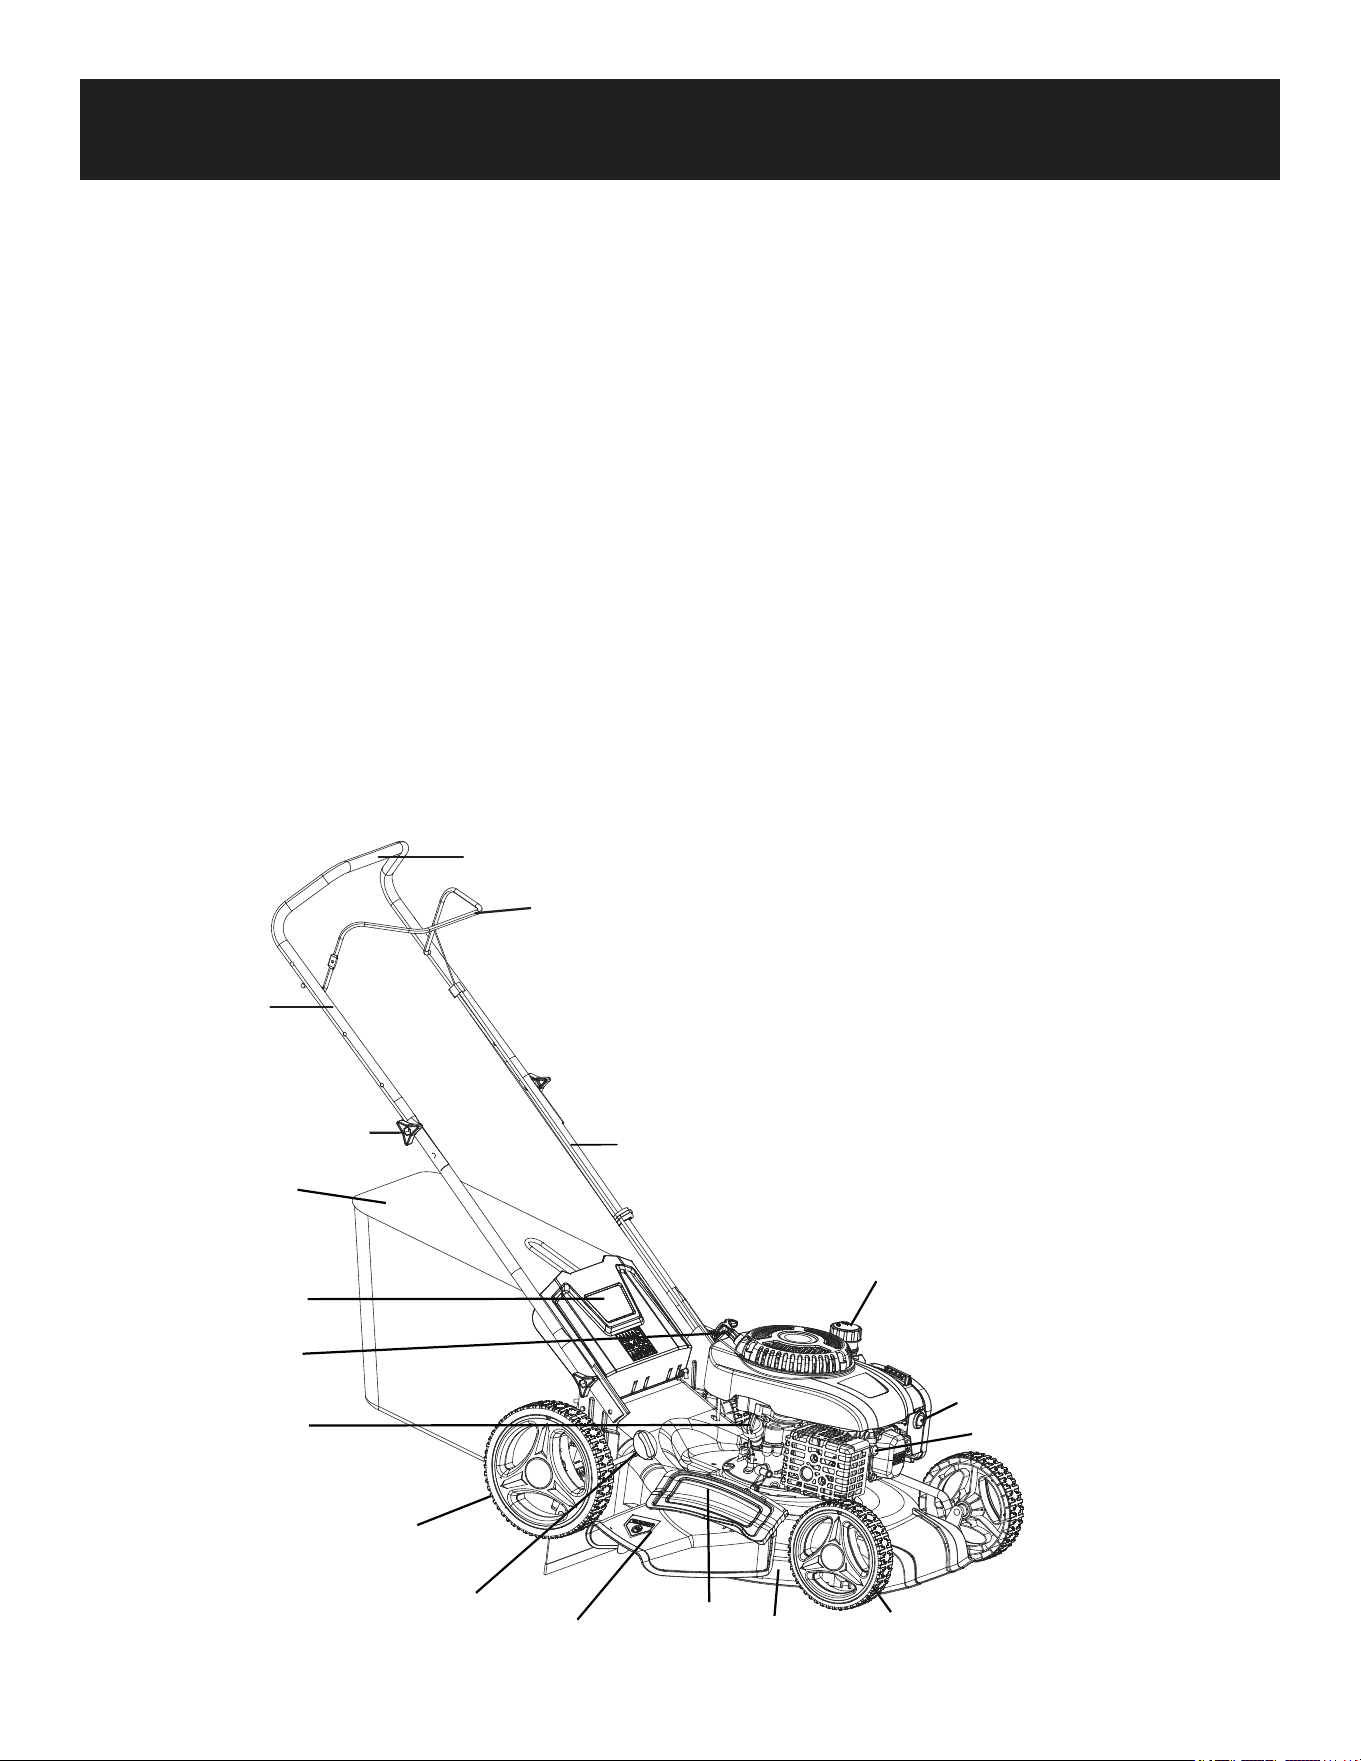
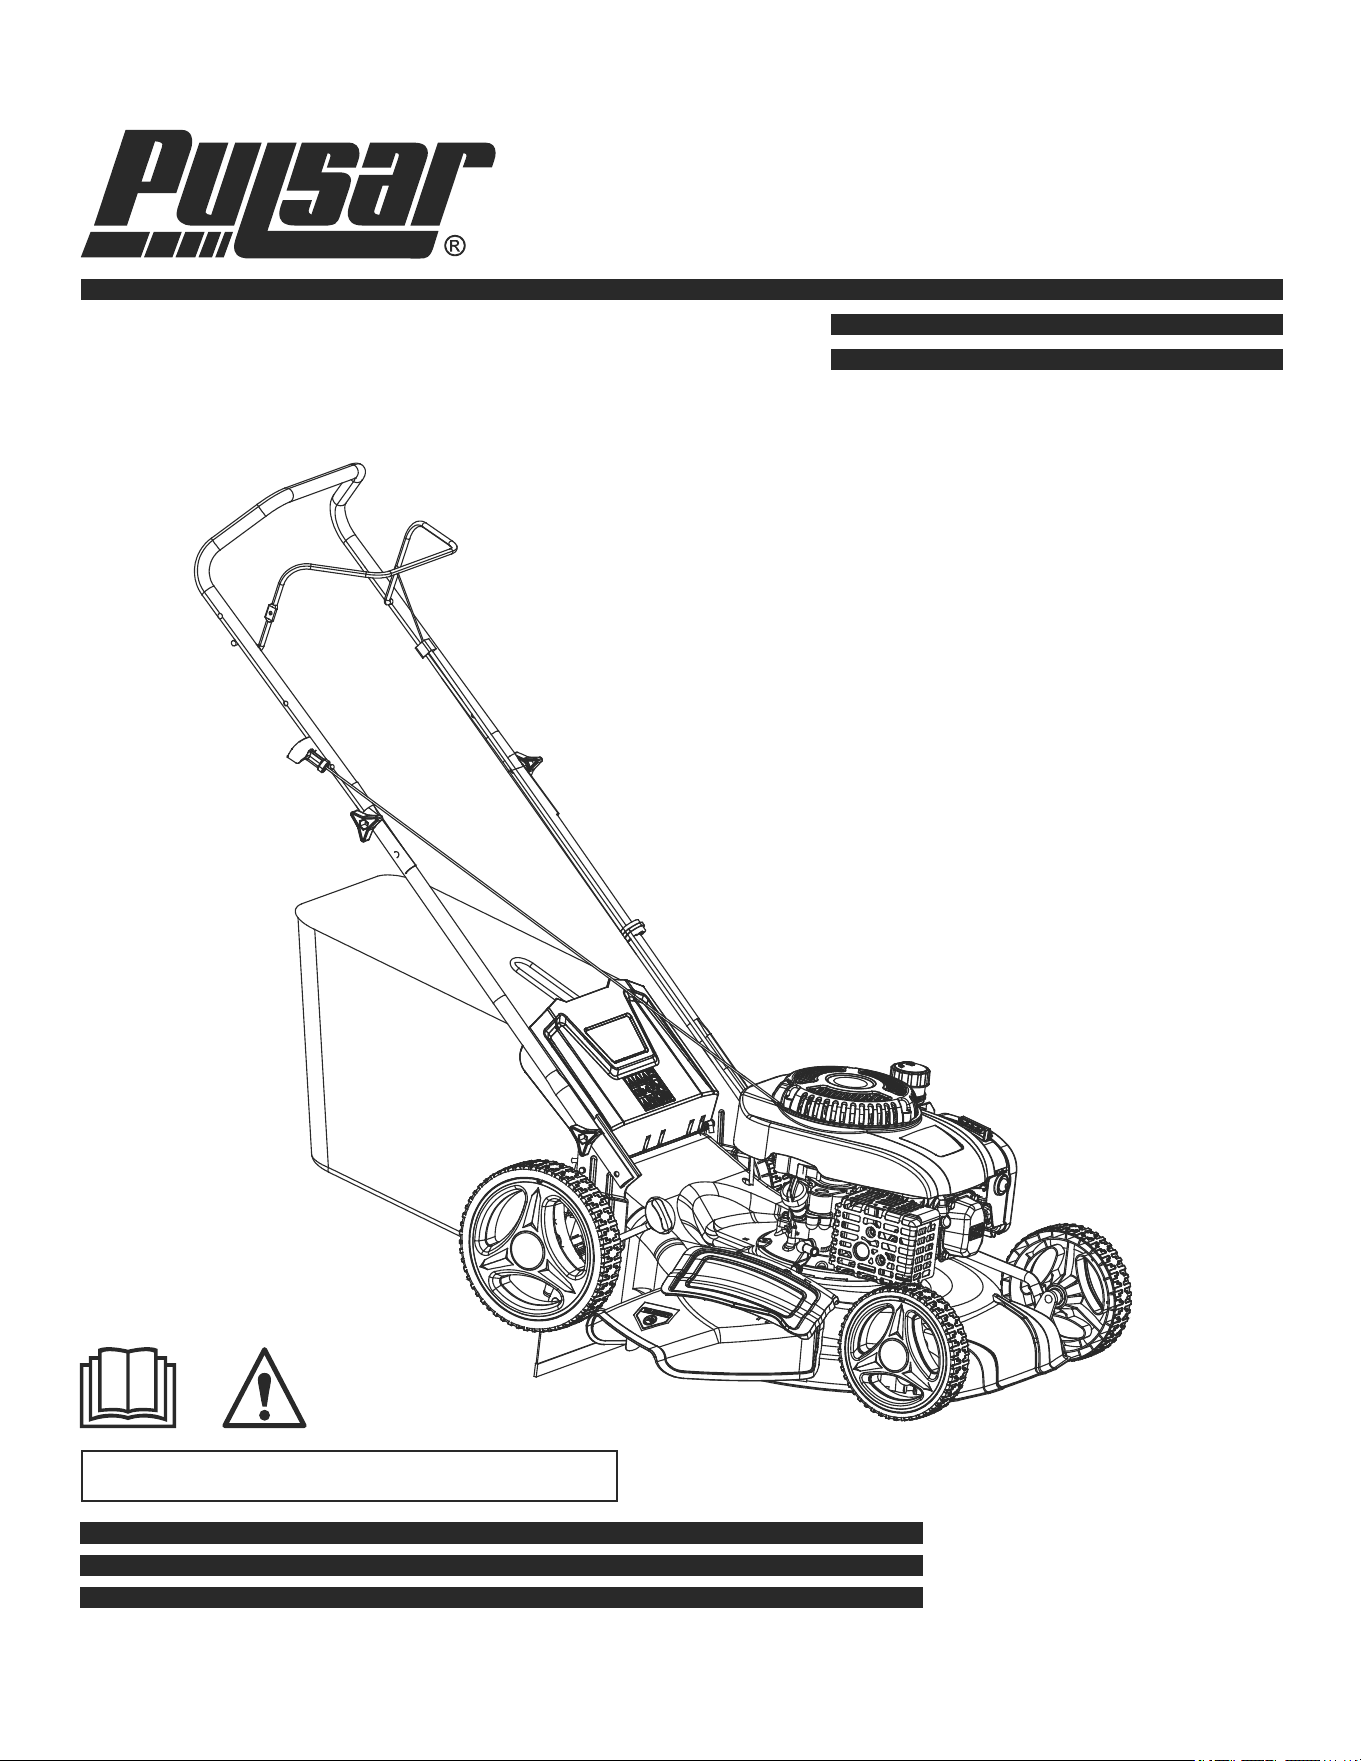
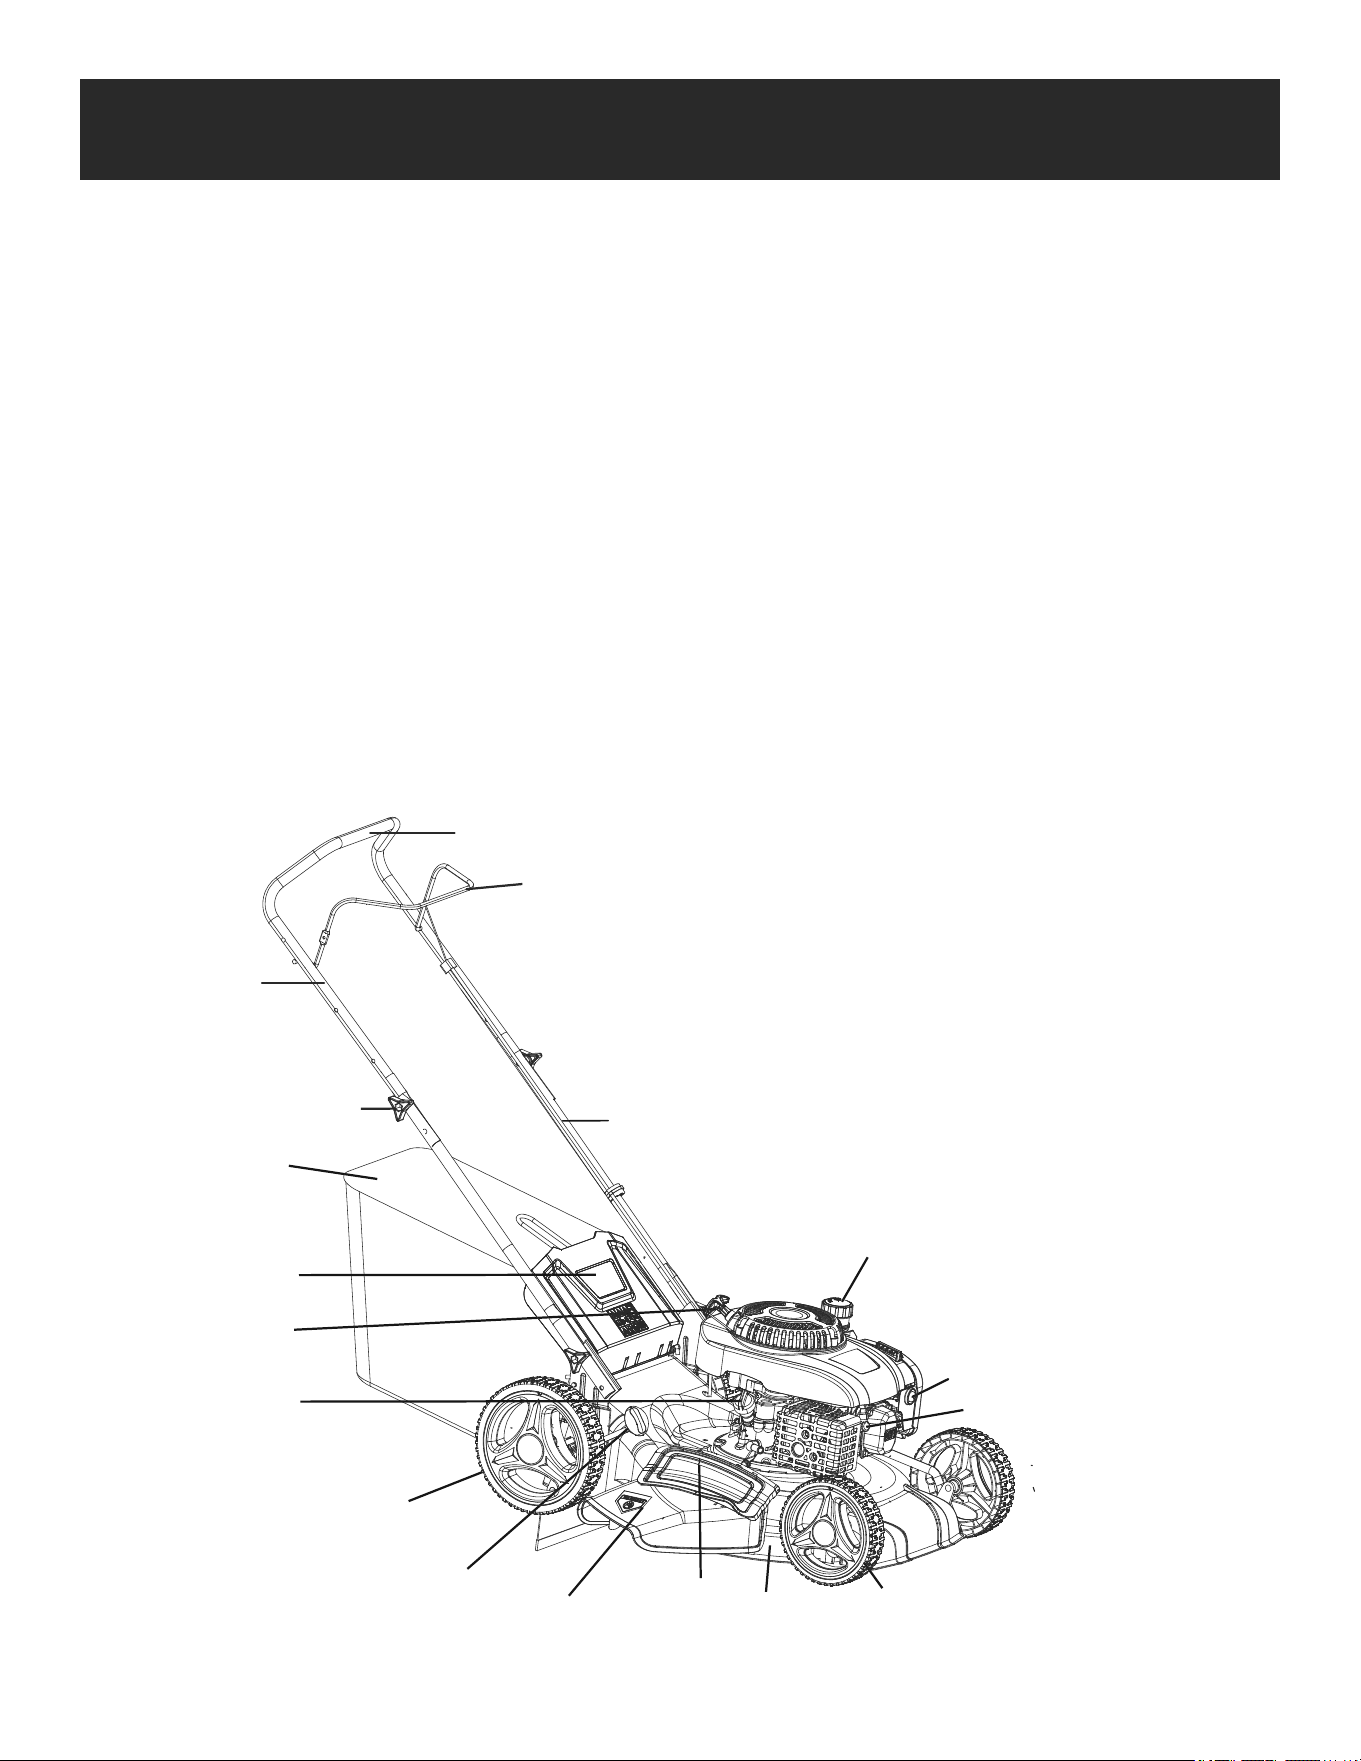
DESCRIPTION OF PRODUCT PARTS
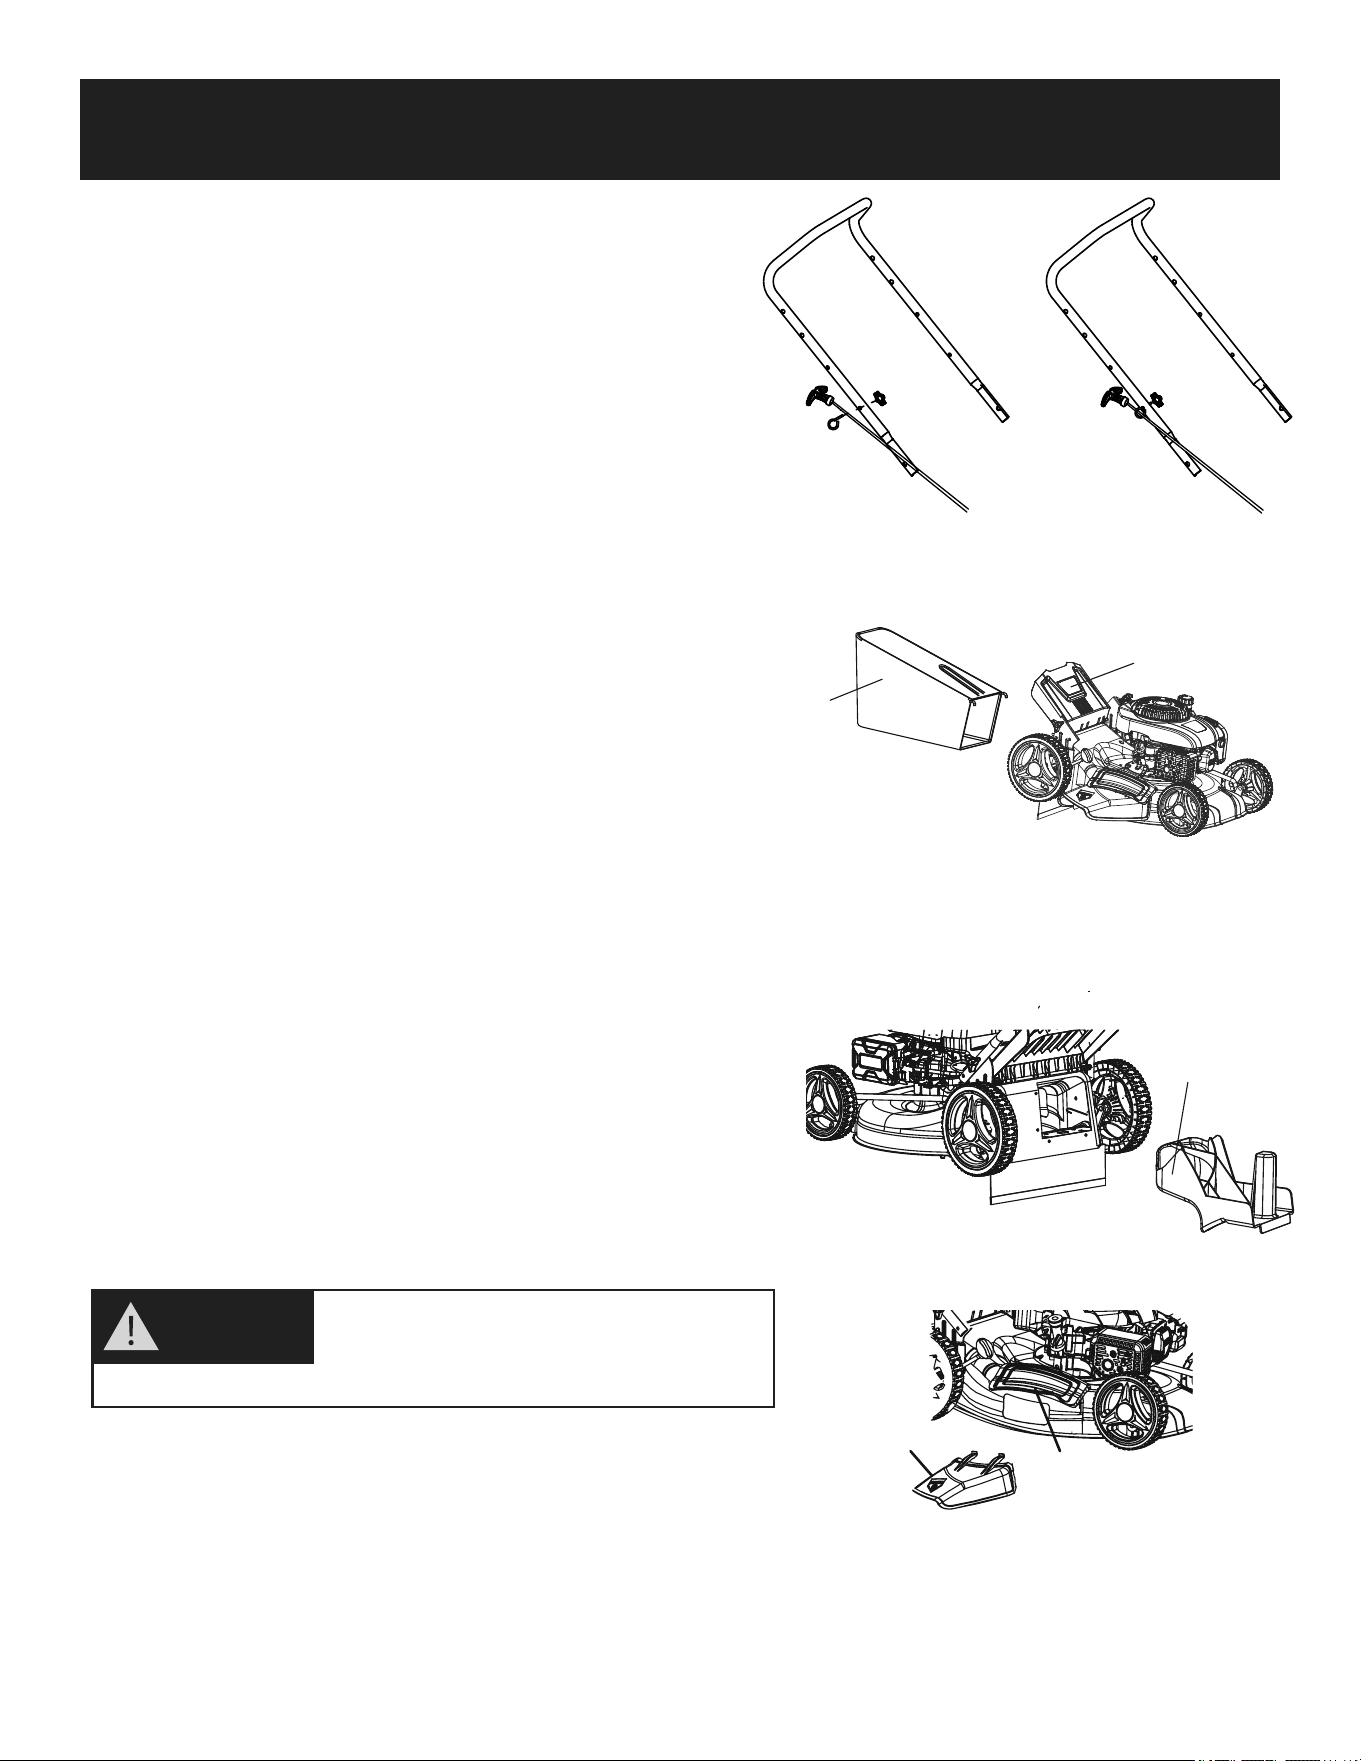
As shown in Fig 1
1. Soft grip foam grip
2. Upper handle
3. Start Lever
4. Fixing knob with square neck bolt
5. Lower handle
6. Grass bag
7. Fuel tank cap
8. Primer
9. Height adjusting handle
10. Rear wheel
11. Engine oil cap
12. Side discharge cover
13. Side discharge chute
14. Deck
15. Spark plug boot
16. Pull start
17. Rear discharge cover
18. Front wheel
Fig 1
1
3
2
4
5
6
7
17
16
8
11
15
10
9
13
12
14
18
3
B
C
I
H
E
F
D
A
G
Fig 2
4
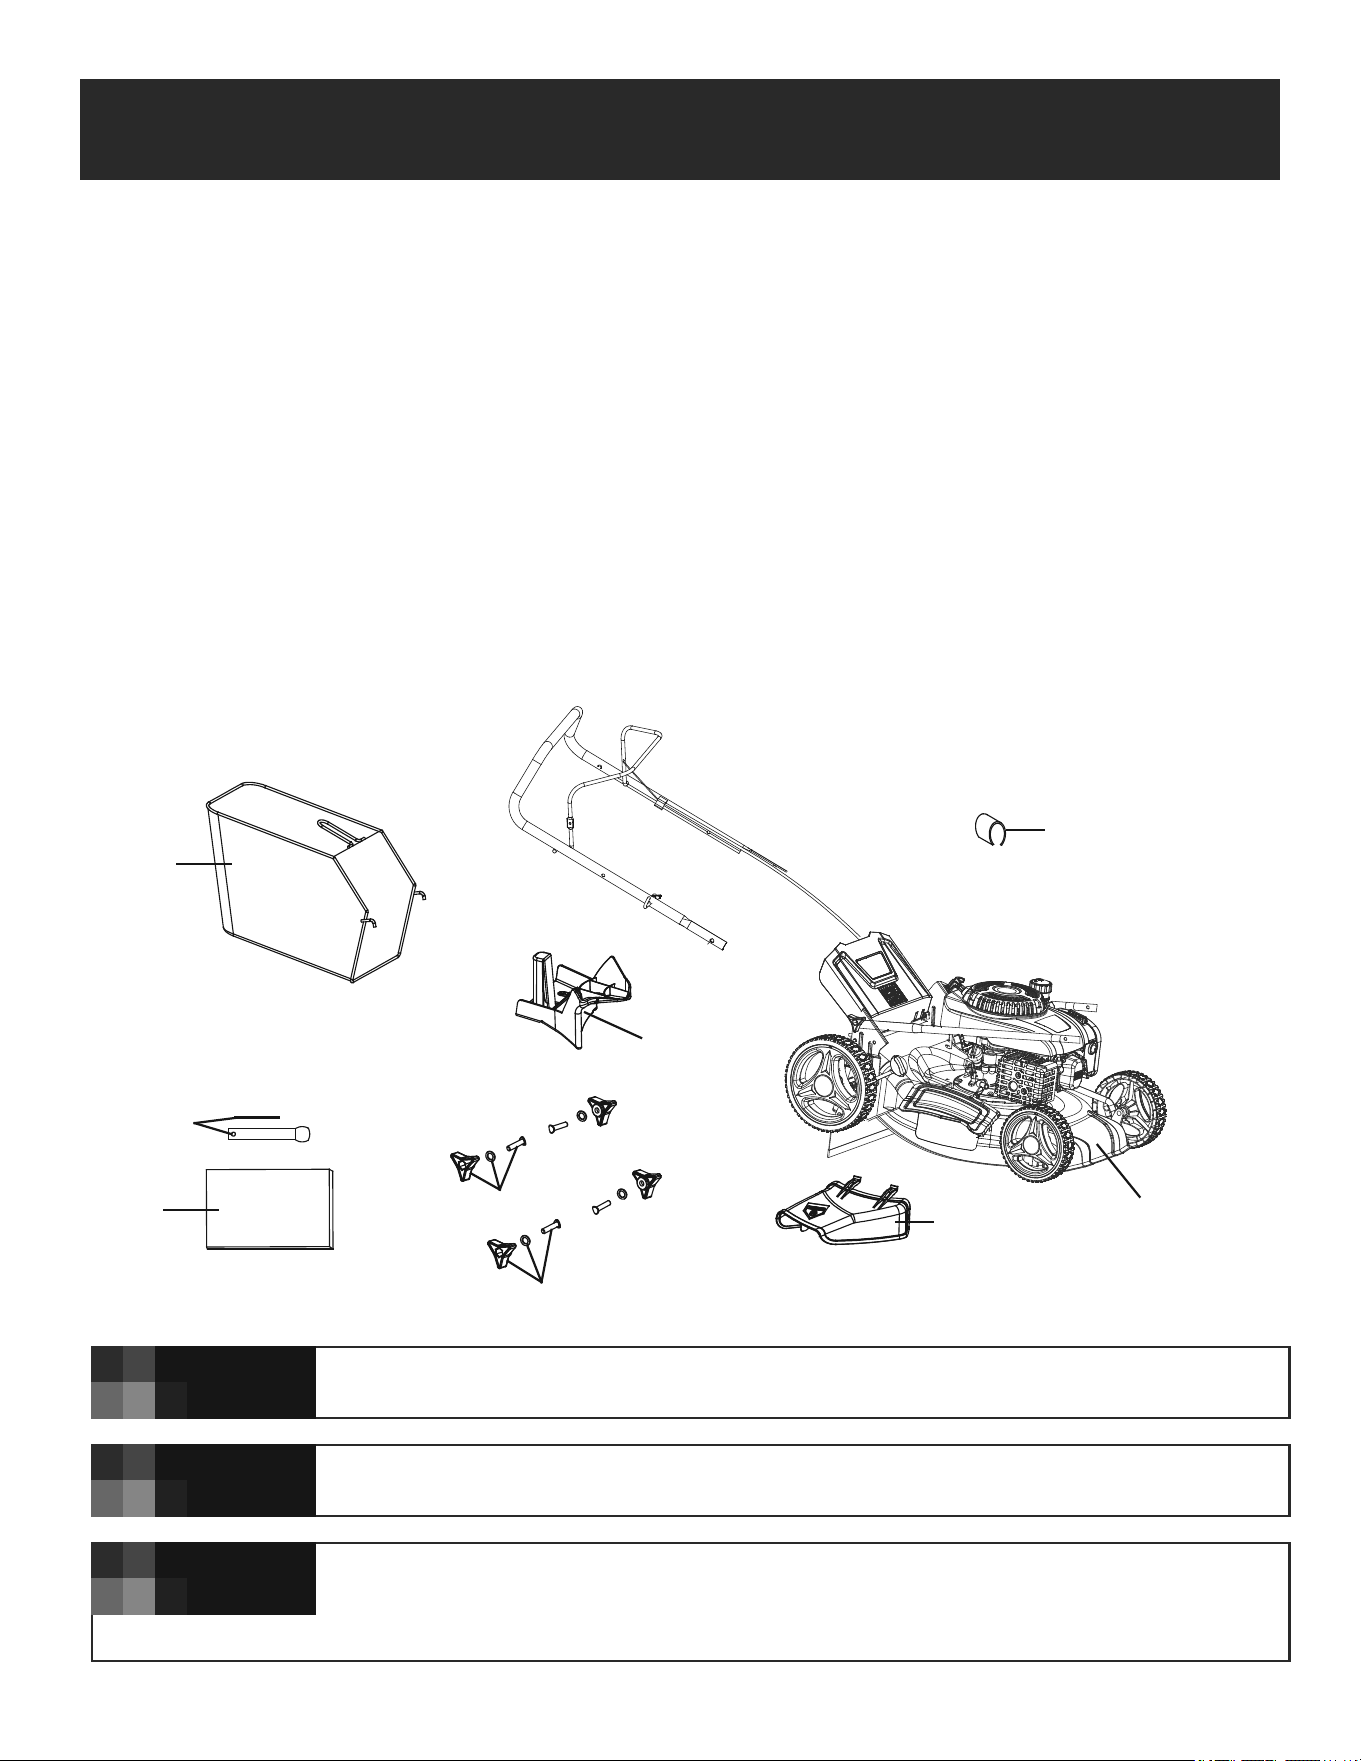
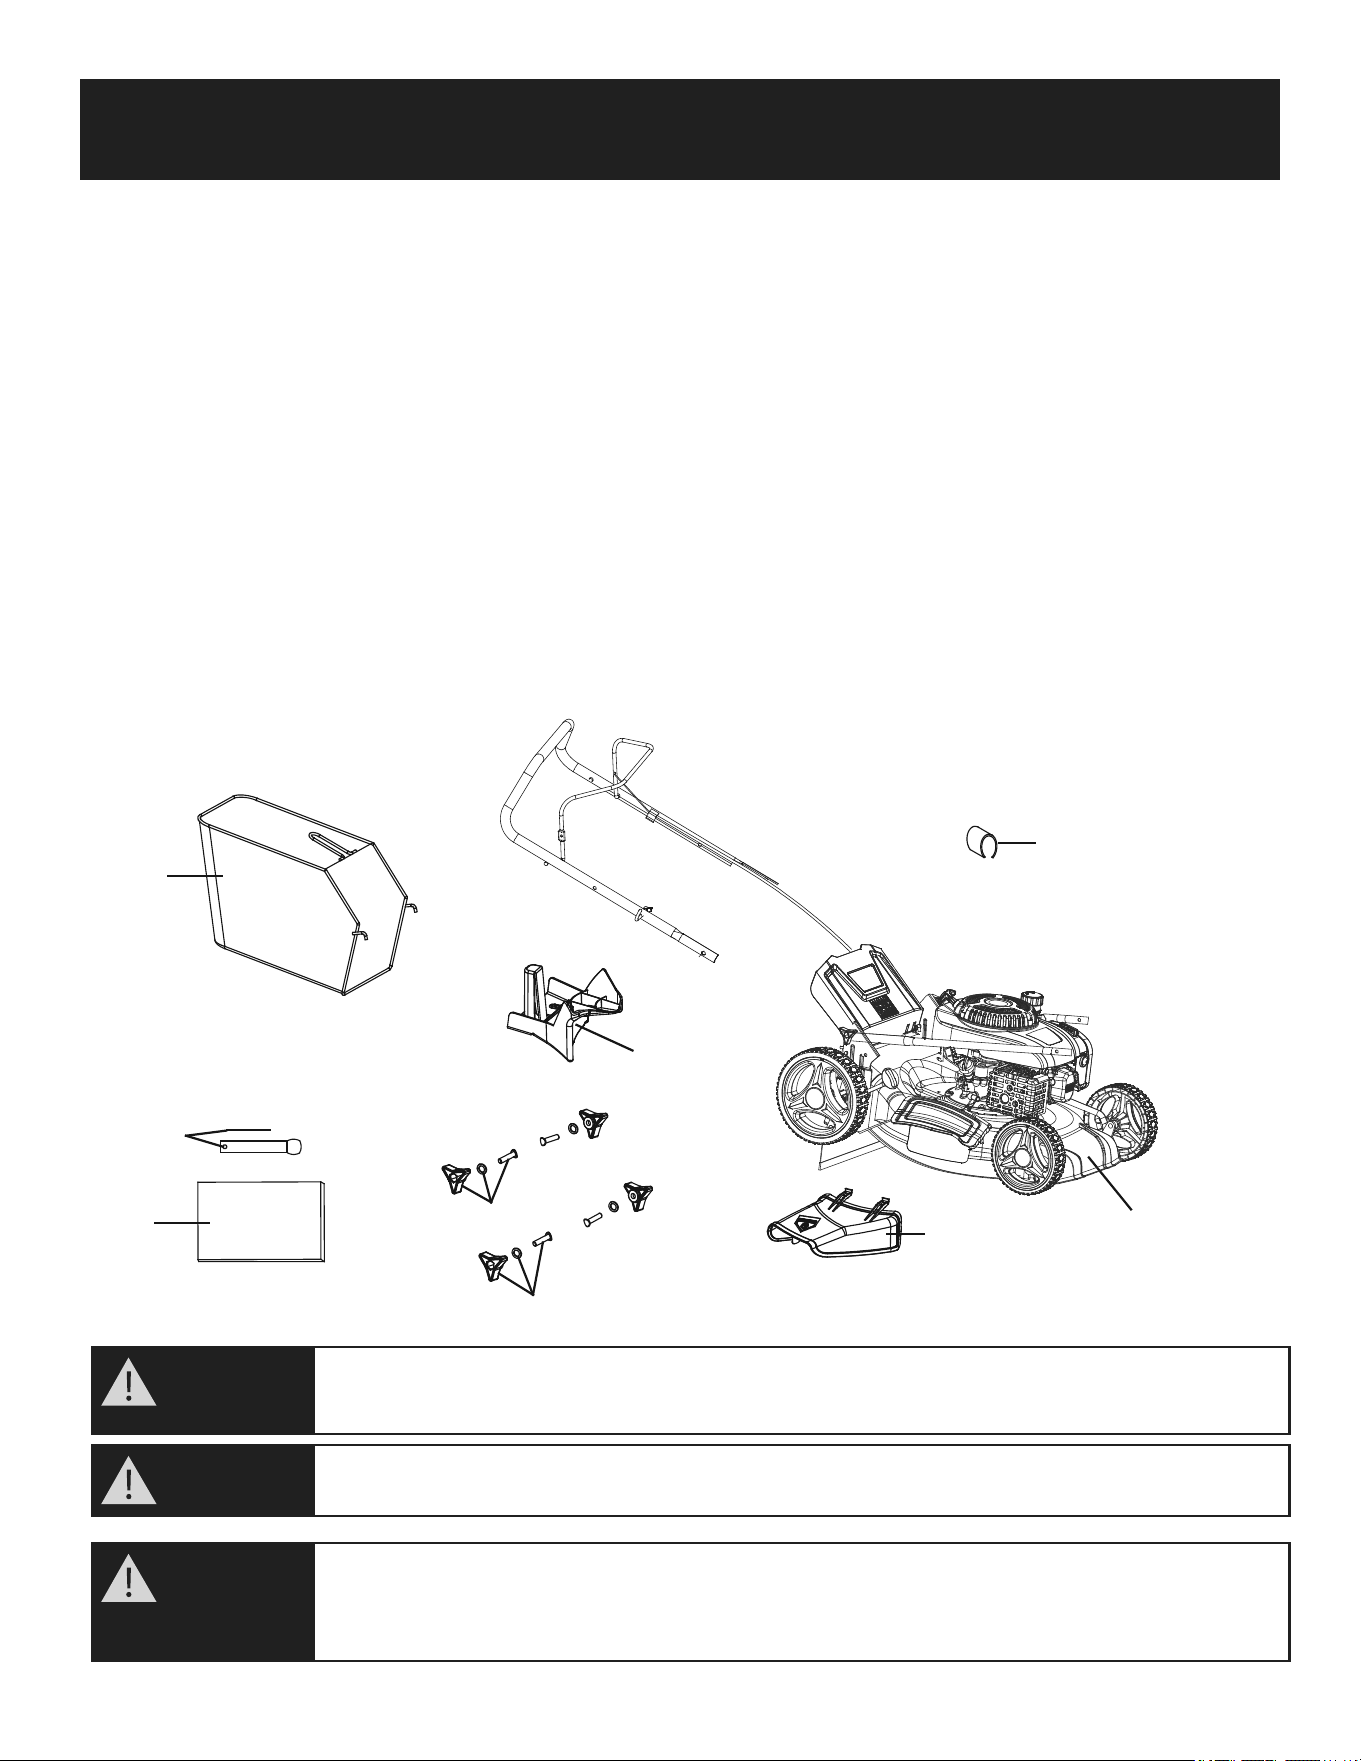
DESCRIPTION OF PRODUCT PARTS
As shown in Fig 2
Carefully remove the machine from its packaging and check that the following parts are complete:
If any parts are damaged or missing, do not operate this tool until the missing parts are
replaced. Failure to heed this warning could result in serious personal injury.
WARNING!
This item requires a two person lift to remove from the packaging. Make sure that you have
sufficient space to put the lawn mower down. Keep your feet apart so that you have a stable
position, bend at the knees and keep your back straight.
WARNING!
NOTE! Always recycle the packaging in accordance with local recycling laws.
NOTE!
A. Main mower deck (with upper handle and lower handle) 1pc
B. Cable clip 1pc
C. Grass bag assembly
D. Side discharge chute 1pc
E. Manual 1pc
F. Knob with bolt M8 2pc(Lower hanle)
G.Knob with bolt M8 2pc(Upper hanle)
H. Spark Plug Wrench 1pc
I. Plastic mulching plug 1pc (inside the mower)
5
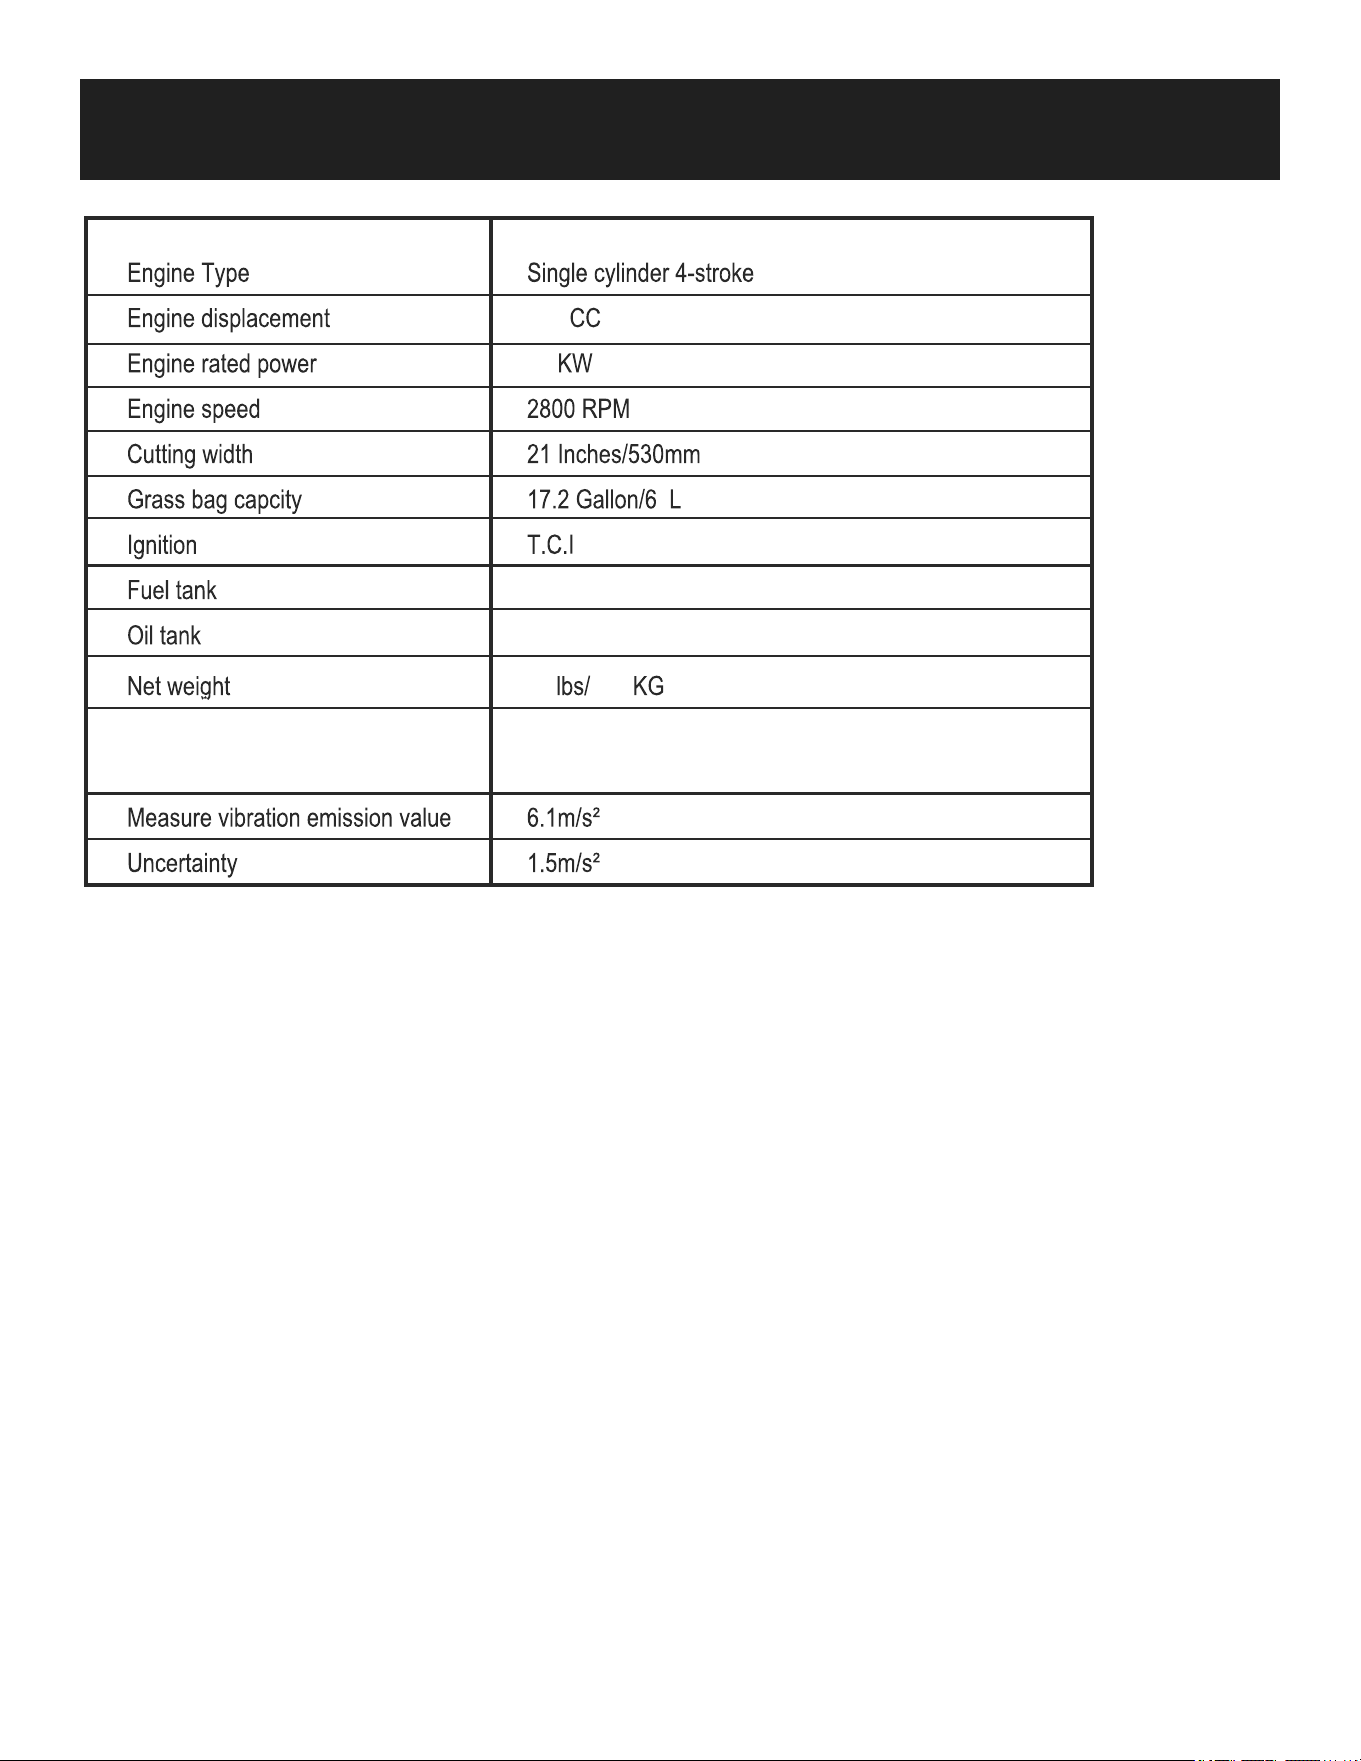
TECHNICAL SPECIFICATIONS
200
3.8
5
0.4 Gallons/1.5L
0.38 Quarts/0.4L
60 27.2
Vibration Data

6
INTENDED USE
This gas powered lawn mower has been designed for cutting lawn areas in private house and hobby gardens.
The machine is to be used only for its prescribed purpose. Any other use is deemed to be a case of misuse. The
user/operator and not the manuafacturer will be liable for any damage or injuries of any kind caused as a result of this.
Please note that our equipment has not been designed for use in commercial, trade or industrial applications. Our
warranty will be voided if the machine is used in commercial, trade or industrial businesses or for equivalent purposes.

7
SAFETY INFORMATION
IMPORTANT
Please read these instructions fully before assembling and operating.
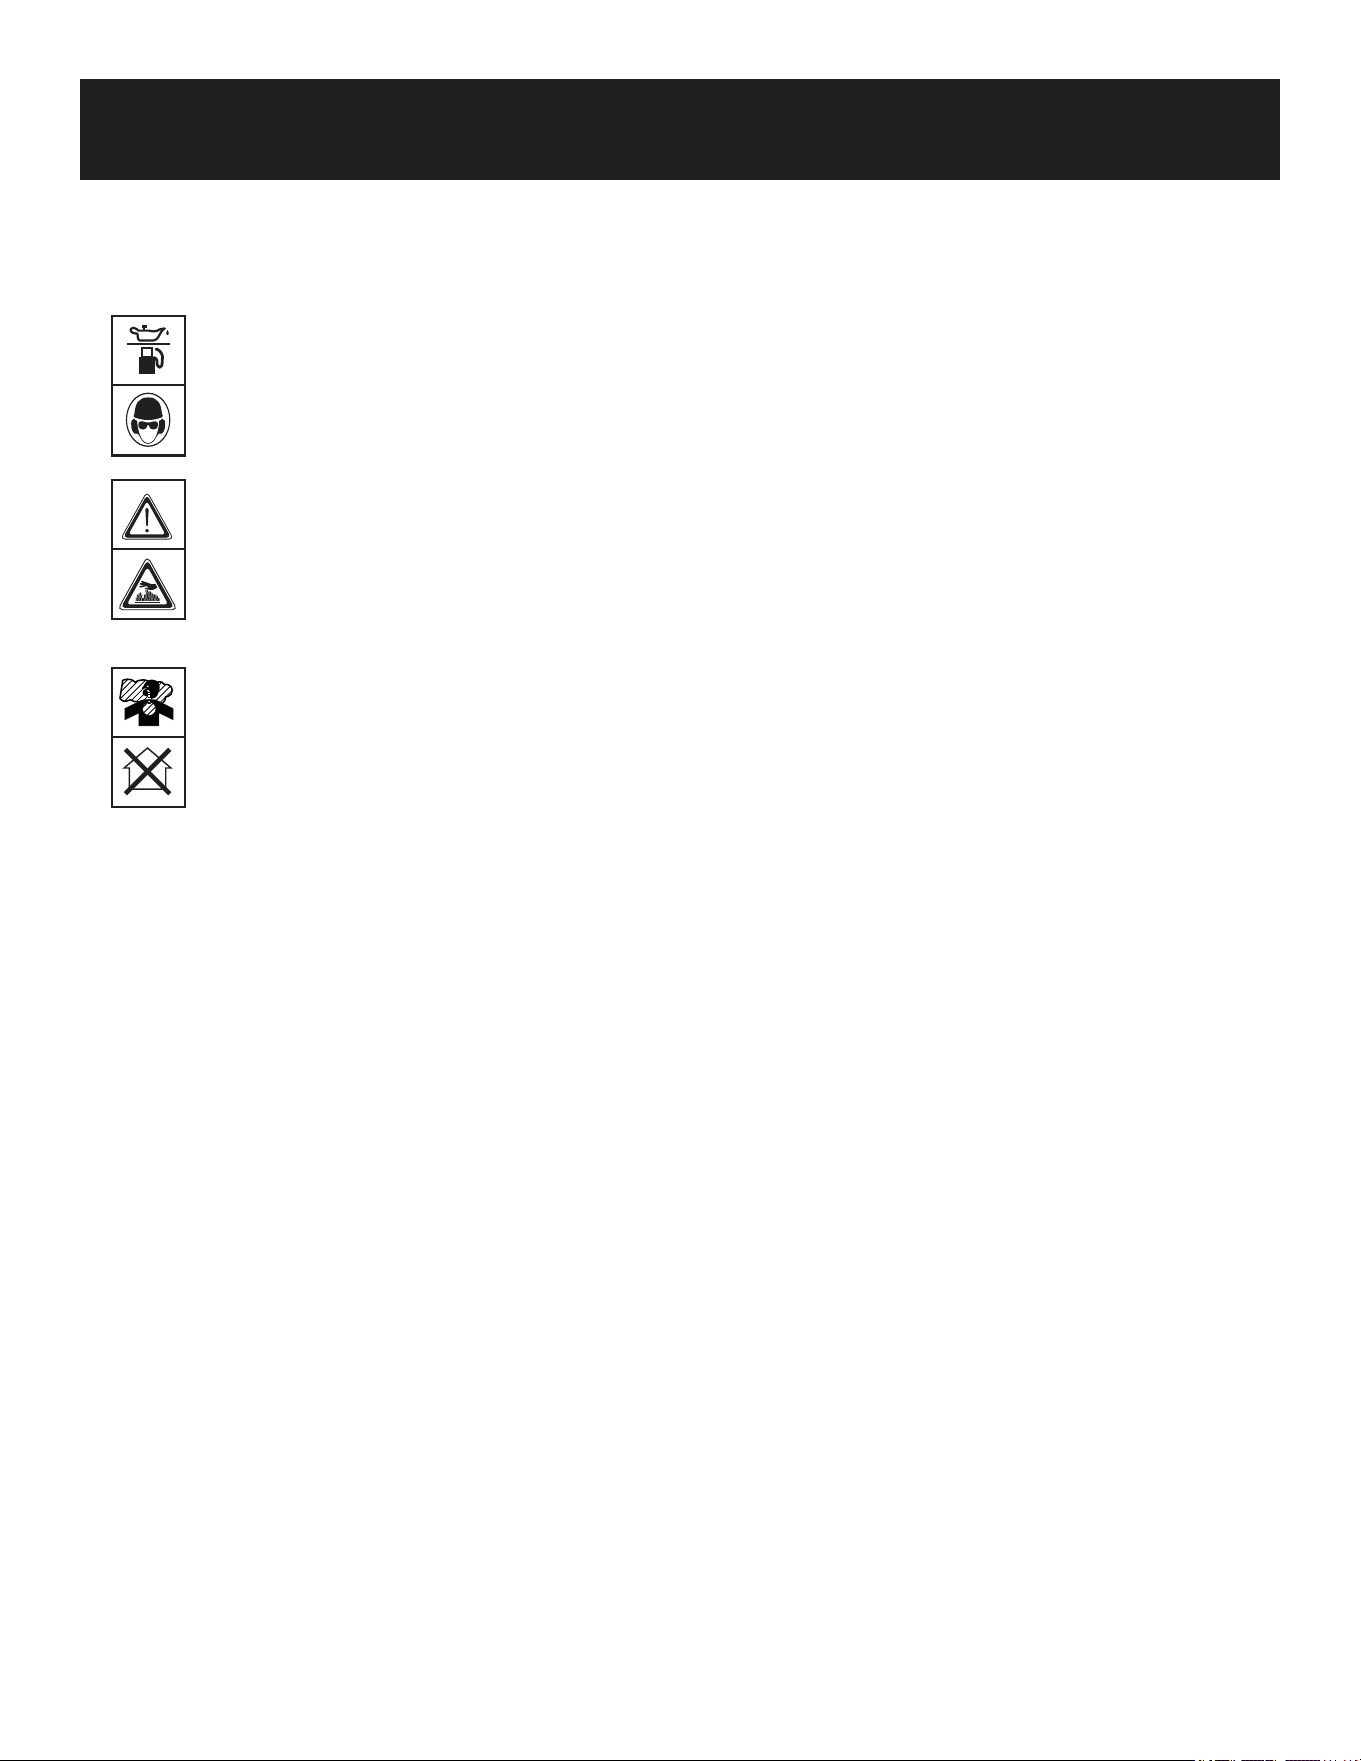
Description Of Symbols
Symbols are used in this manual to attract your attention to possible risks. The safety symbols and the explications which
accompany them must be perfectly understood. The warning themselves do not prevent the risks and cannot be a
substitute for proper methods of avoiding accidents.
Warning Symbols On The Machine
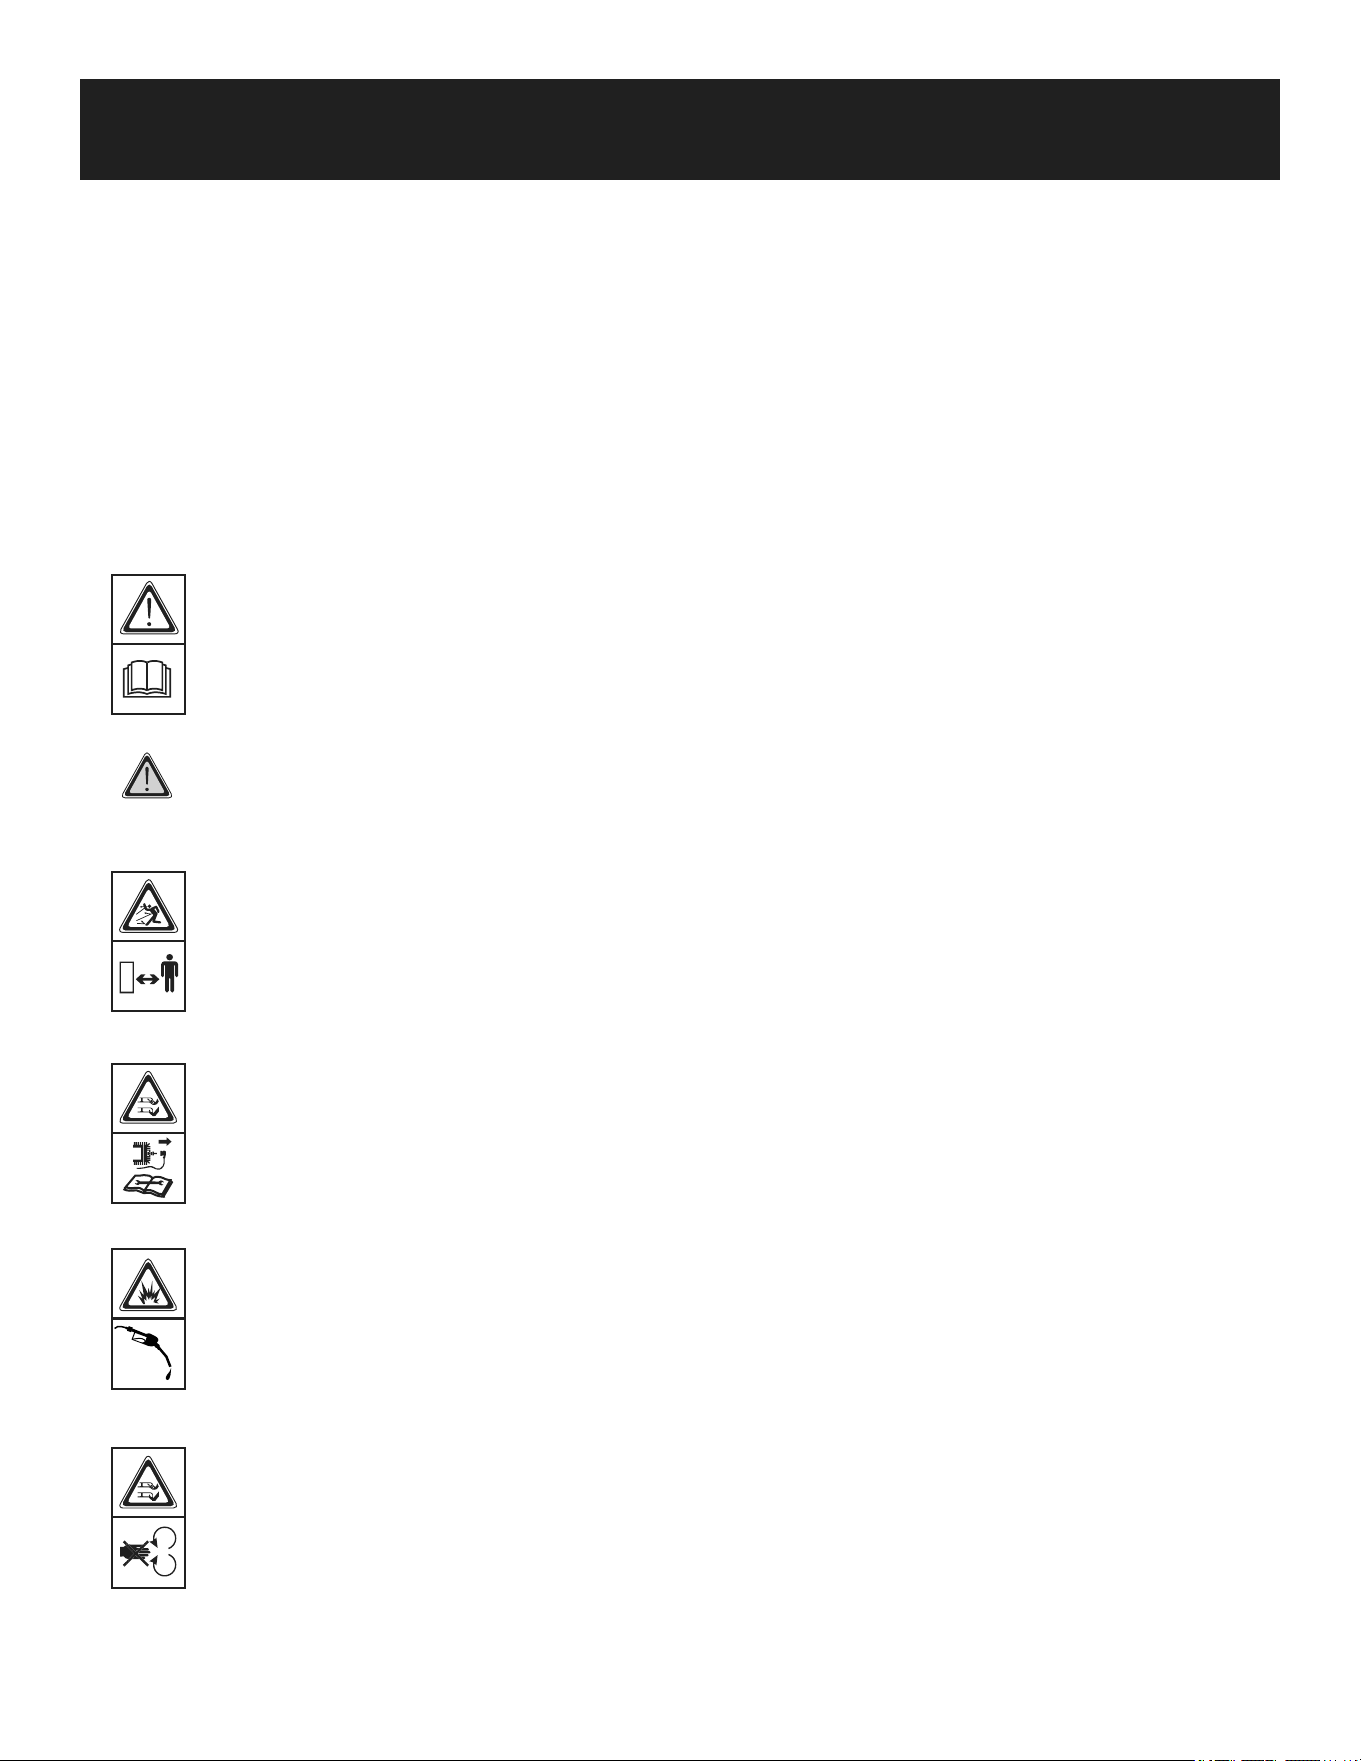
WARNING- To reduce the risk of injury,u ser must read instruction manual.
This symbol, before a safety comment, indicates a precaution, a warning or a danger. Ignoring this
warning can lead to an accident for yourself or for others. To limit the risk of injury, fire, or electrocution
always apply the recommendations indicated.
Keep bystanders away
Beware of sharp blades –remove spark plug before maintenance
Never refuel while the engine is running
Risk of injury. Do not open or remove safety shields while engine is running.
8
SAFETY INFORMATION
Warning Symbols On The Machine
Wearing ear protection, eye protection when operating.
Hot surfaces will burn fingers or palms
Warning! The lawnmower exhaust gas contains toxic substances . Do not run the engine in closed or
poorly ventialted areas.

9
SAFETY INFORMATION
Training
1. Read the instructions carefully. Be familiar with the controls and the proper use of the equipment.
2. Never allow children or people unfamiliar with these instructions to use the lawnmower. Local regulations can restrict
the age of the operator.
3. Never mow while people, especially children, or pets are nearby.
4. Keep in mind that the operator or user is responsible for accidents or hazards occurring to other people or their property.
Preparation
1. While mowing, always wear substantial footwear and long trousers. Do not operate the equipment when barefoot or
wearing open sandals.
2. Thoroughly inspect the area where the equipment is to be used and remove all objects which can be thrown by the
machine.
3. Warning - gasoline is highly flammable.
• Store fuel in containers specifically designed for this purpose.
• Refuel outdoors only and do not smoke while refueling.
• Add fuel before starting the engine. Never remove the cap of the fuel tank or add gas while the engine is running
or when the engine is hot.
• If fuel is spilled, do not attempt to start the engine but move the machine away from the area of spillage and avoid
creating any source of ignition until petrol vapours have dissipated.
• Replace all fuel tank and container caps securely.
4. Replace faulty silencers.
5. Before using, always visually inspect to see that the blades, blade bolts and cutter assembly are not worn or
damaged. Replace worn or damaged blades and bolts in sets to preserve balance.
6. On multi-bladed machines, take care as rotating one blade can cause other blades to rotate.
Operation
1. Do not operate the engine in a confined space where dangerous carbon monoxide fumes can collect.
2. Mow only in daylight or in good artificial light.
3. Avoid operating the equipment in wet grass, where feasible.
4. Always be sure of your footing on slopes.
5. Walk, never run.
6. For wheeled rotary machines, mow across the face of slopes, never up and down.
7. Exercise extreme caution when changing direction on slopes.
8. Do not mow excessively steep slopes.
9. Use extreme caution when reversing or pulling the lawnmower towards you.
10. Stop the blade(s) if the lawnmower has to be tilted for transportation when crossing surfaces other than grass, and
when transporting the lawnmower to and from the area to be mowed.
WARNING!
Gasoline is highly flammable.

10
SAFETY INFORMATION
11. Never operate the lawnmower with defective guards, or without safety devices, for example deflectors and/or grass
catchers, in place.
12. Do not change the engine governor settings or over speed the engine.
13. Disengage all blade and drive clutches before starting the engine.
14. Start the engine or switch on the motor carefully according to instructions and with feet well away from the blade(s).
15. Do not tilt the lawnmower when starting the engine or switching on the motor, except if the lawnmower has to be tilted
for starting. In this case, do not tilt it more than absolutely necessary and lift only the part which is away from the
operator.
16. Do not start the engine when standing in front of the discharge chute.
17. Do not put hands or feet near or under rotating parts. Keep clear of the discharge opening at all times.
18. Never pick up or carry a lawnmower while the engine is running.
19. Stop the engine and disconnect the spark plug wire, make sure that all moving parts have come to a complete stop
and, where a key is fitted remove the key.
• Before clearing blockages or unclogging chute.
• Before checking, cleaning or working on the lawnmower.
• After striking a foreign object. Inspect the lawnmower for damage and make repairs before restarting and
operating the lawnmower.
• If lawnmower starts to vibrate abnormally (check immediately).
20. Stop the engine and disconnect the spark plug wire, make sure that all moving parts have come to a complete stop
and, where a key is fitted remove the key.
• Whenever you leave the lawnmower.
• Before refueling.
21. Reduce the throttle setting during engine shut down and if the engine is provided with a shut-off valve, turn the fuel
off at the conclusion of mowing.
22. Go slow when using a trailing seat.
Maintenance and storage
1. Keep all nuts, bolts and screws tight to be sure the equipment is in safe working condition.
2. Never store the equipment with gas in the tank inside a building where fumes can reach an open flame or spark.
3. Allow the engine to cool before storing in any enclosure.
4. To reduce the fire hazard, keep the engine, silencer, battery compartment and petrol storage area free of grass,
leaves, or excessive grease.
5. Check the grass catcher frequently for wear or deterioration.
6. Replace worn or damaged parts for safety.
7. If the fuel tank has to be drained, this should be done outdoors.
11
ASSEMBLY
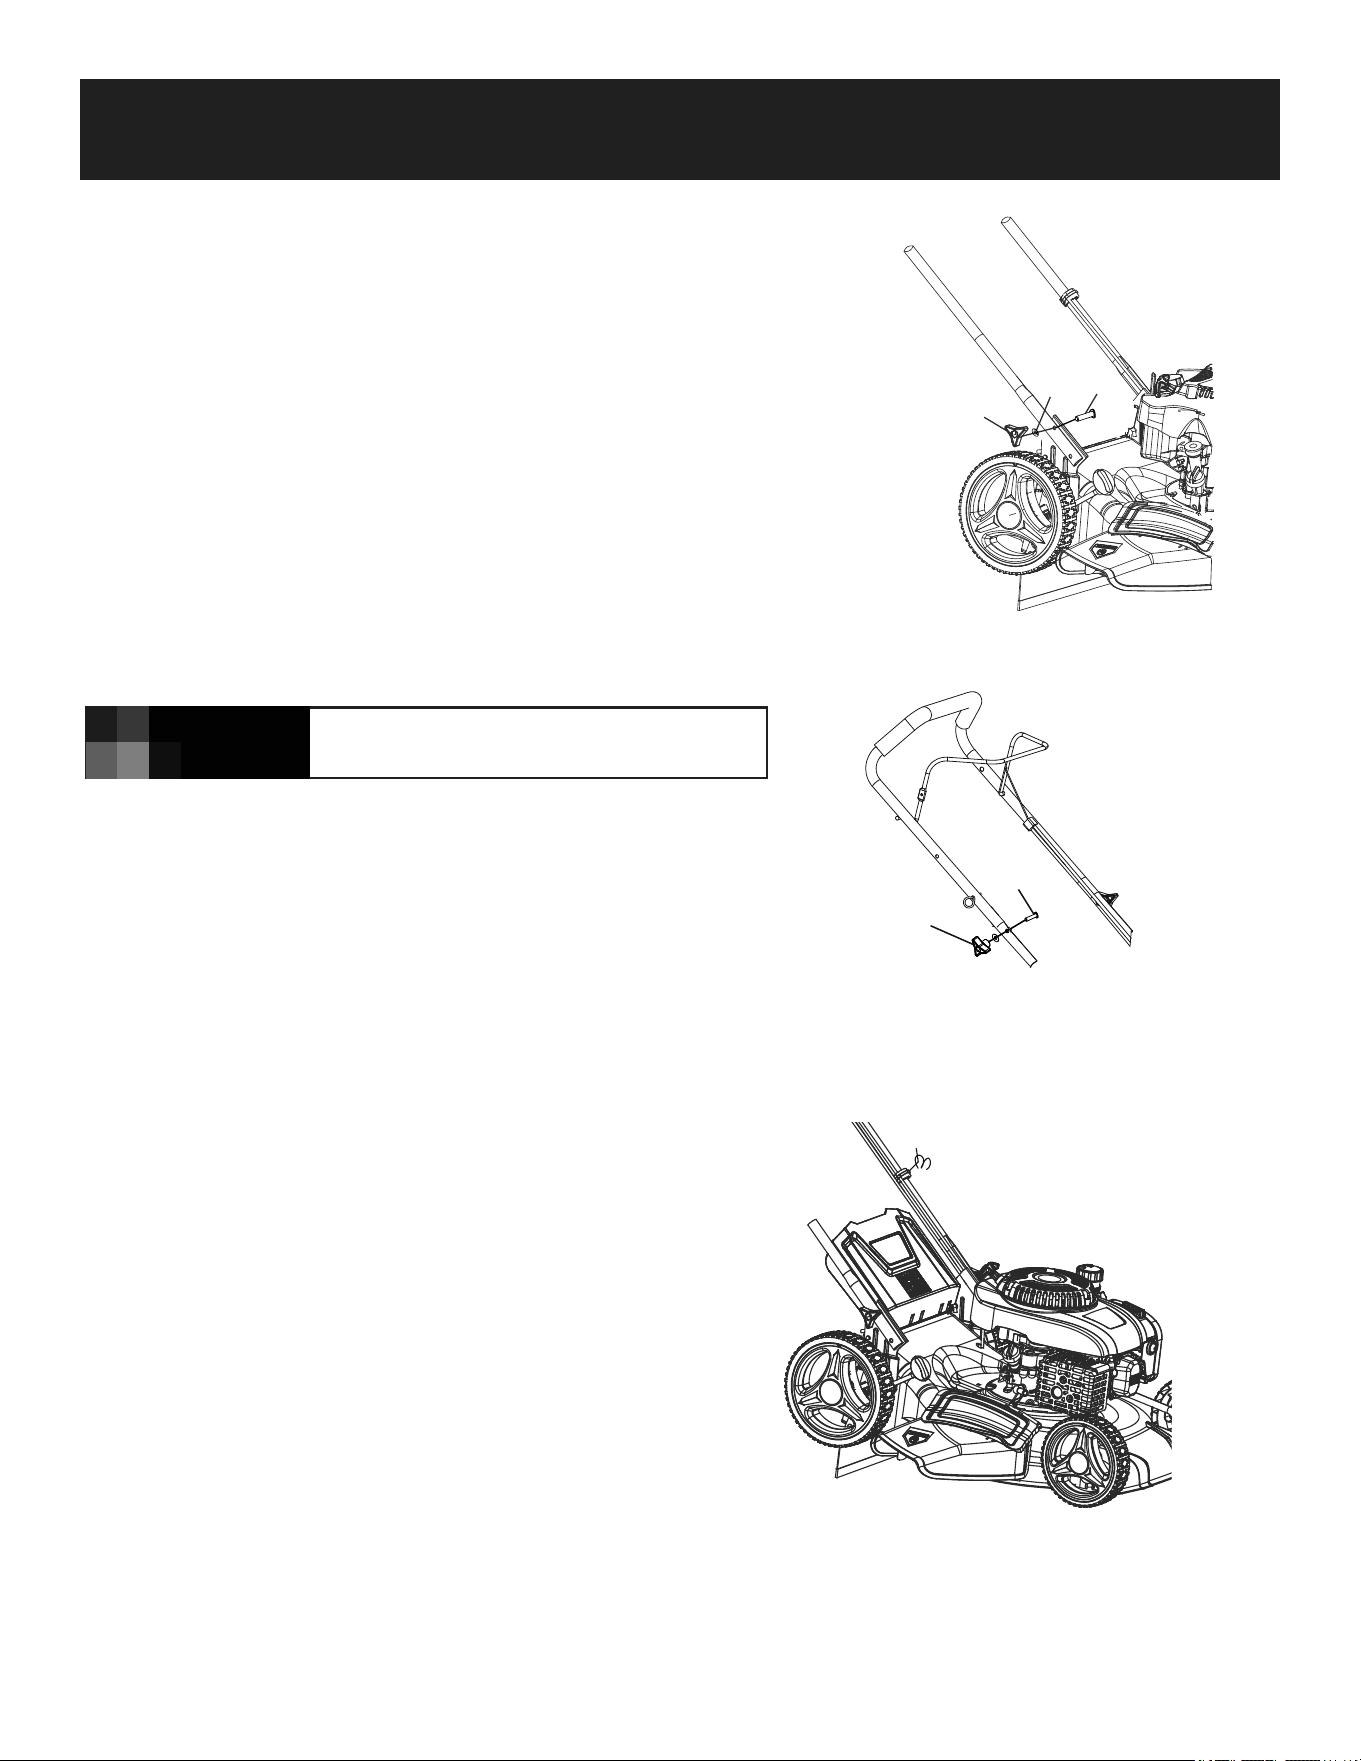
Assembling The Handle
As shown in Fig 3&4
1. Fasten the lower handle to
the mower deck by using two bolts and
two small knobs on each side. Fig. 3
2. Unfold the upper handle and attach it to the lower handle.
Secure it by using two bolts and two small knobs. Fig 4
Tidy The Connection Cord
As shown in Fig 5
Clip the connection cord to the handle
with the cord clip (supplied).
Make sure the rope guide is on the right
handle, when you stand behind the mower.
NOTE!
Fig 3
Washer
Bolt
Knobs
Fig 4
Bolt
Knob
Washer
Fig 5
Clip
12
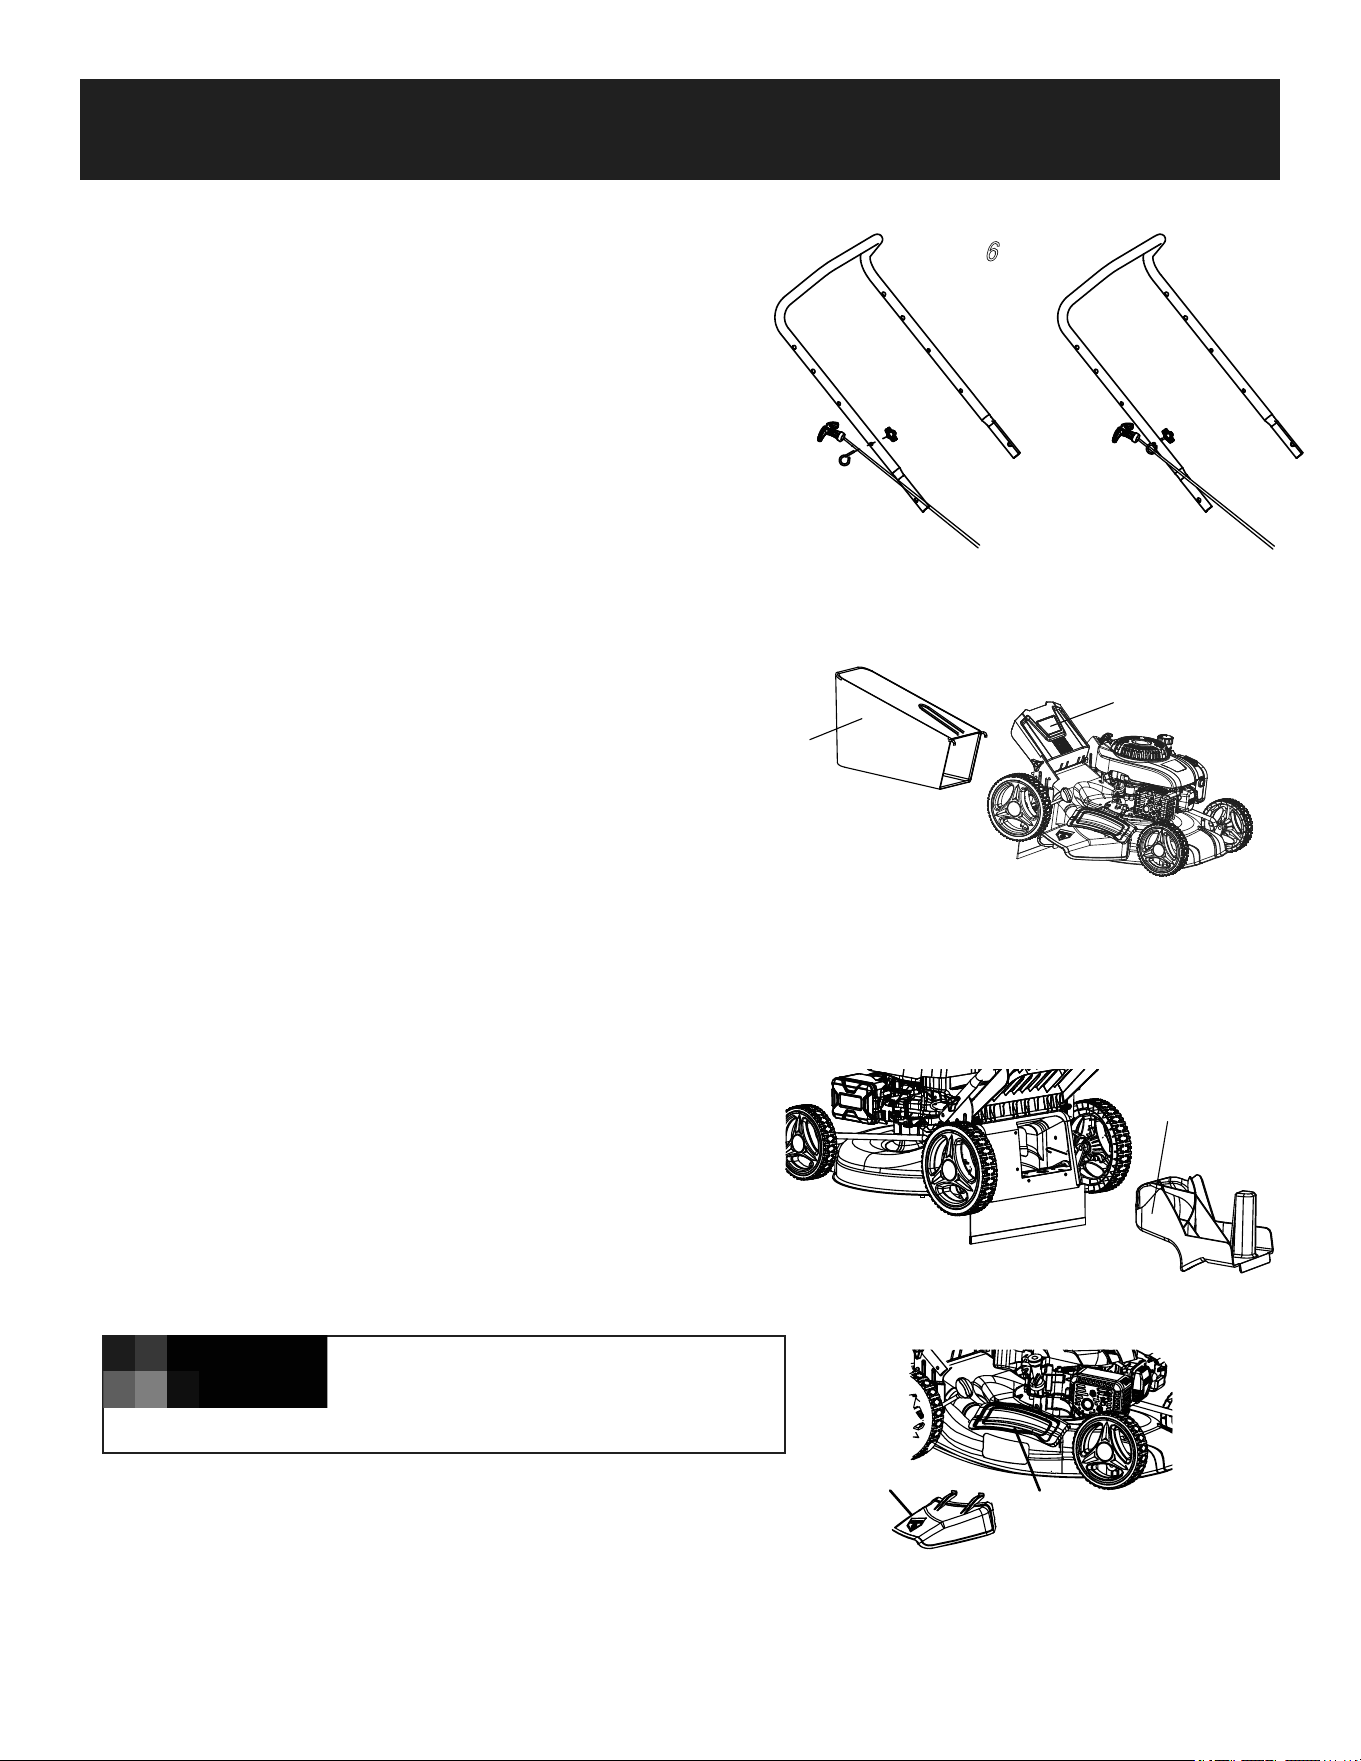
ASSEMBLY
Assembling The Grass Bag Onto The Mower
As shown in Fig
7
1. Lift the rear discharge cover with one hand
and hook in the grass bag .
2. Release the rear discharge cover to secure
the grass bag in position
Assembling the mulching plug
As shown in Fig
8
1. Remove the grass bag
2. Push the plastic mulching plug Into the discharge chute
until it is locked in place.
3. Then release the flap, it will close back to cover the mulching plug.
Assembling the side discharge chute
As shown in Fig
9
1. Lift the side discharge cover with one hand and hook in the side
discharge duct with the other hand.
2. Release the side discharge cover to secure the duct in position.
When using the side discharge function.
You need to first remove the grass bag
NOTE!
and plug the mulching plug.
Assembling Pull Start Hook
As shown in Fig
6
.kooh eht hguorht epor eht lluP .1
2. Insert the hook through the pre-drilled hole on the frame.
3. Secure the hook with the nut.
Fig
6
Fig 9
Fig 8
Mulching plug
Side discharge chute
Side discharge cover
Fig 7
Rear discharge cover
Grass bag
13
ASSEMBLY
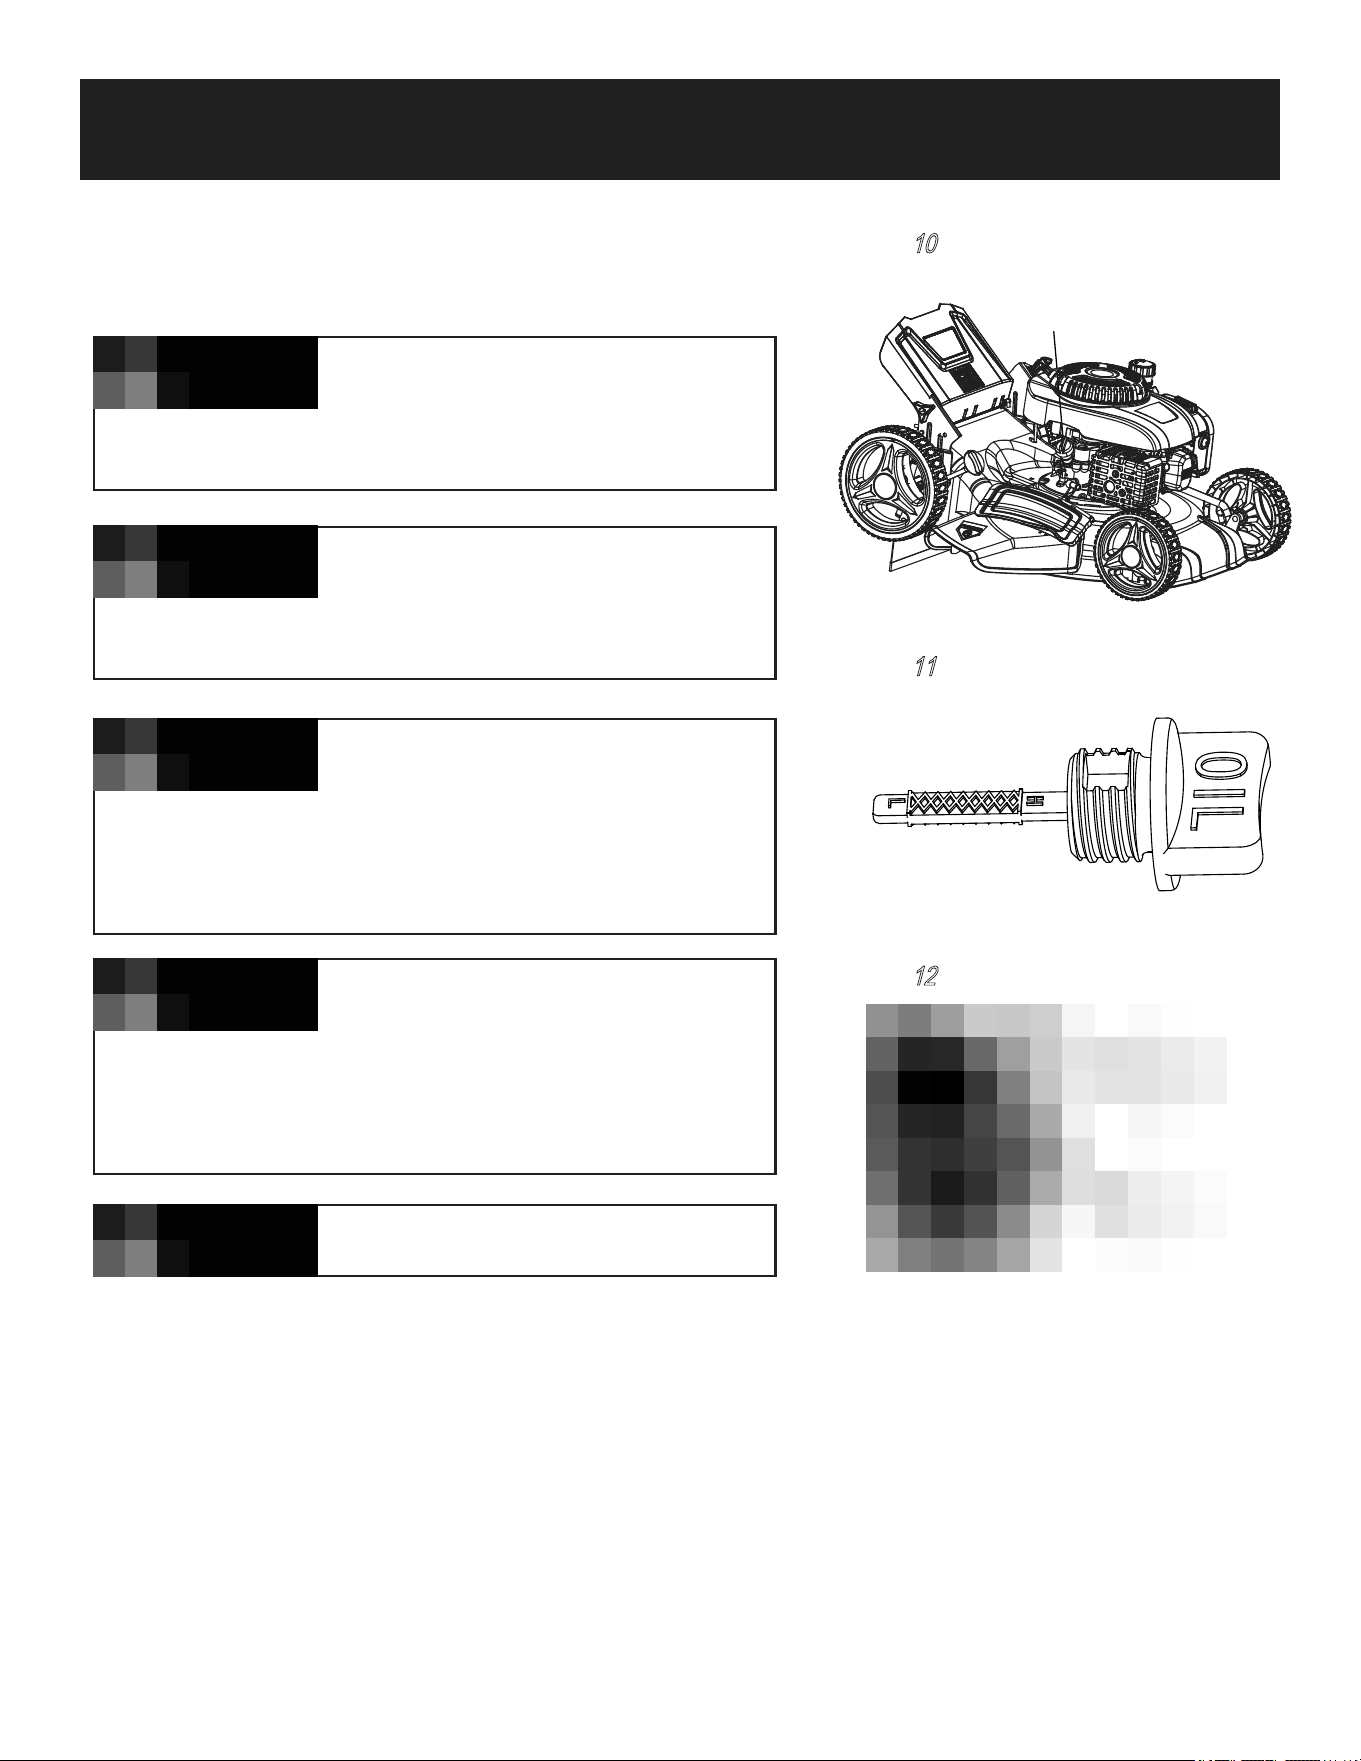
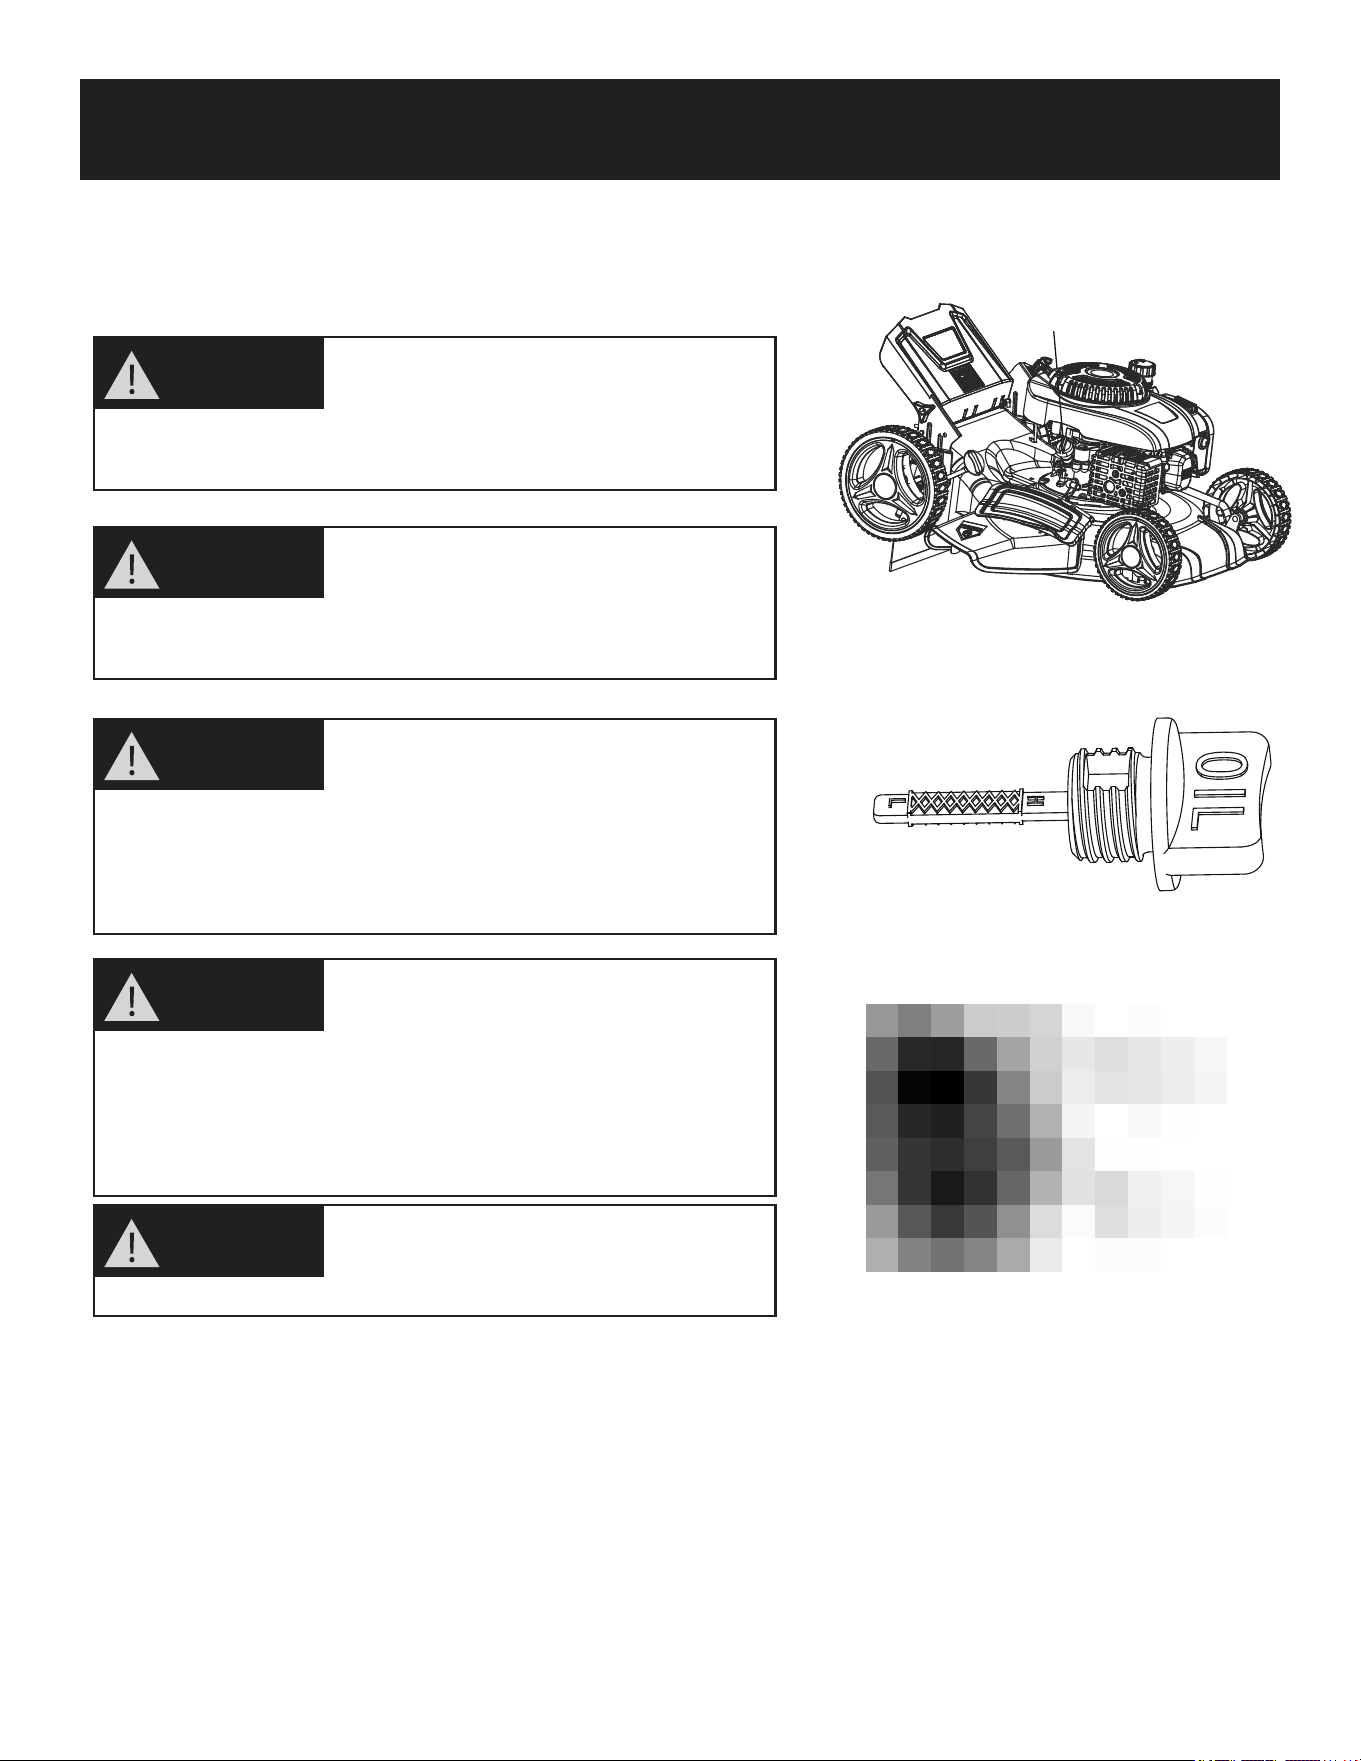
Filling Engine Oil
As shown in Fig
10
-
13
1. Remove the oil filler dipstick and wipe oil from it with a clean cloth.
2. Insert the dipstick into the oil filler neck, but don’t turn it.
3. Then remove the dipstick and check the oil level. The oil level must be between the Min. and Max. marks on the
dipstick. If near the lower level, fill to upper level with the recommended oil (SAE30 or equivalent). Do not overfill.
Wipe away any spilt oil.
4. Align the ribs of the cap with the groove of the filler neck, then rotate 1/4 turn to secure it.
The following procedures and
adjustments must be performed before
CAUTION!
Fig
10
Fig
12
the engine is started. Do not attempt to make any of these
adjustments while the engine is running.
To prevent engine damage the
engine is shipped without oil or fuel.
CAUTION!
The engine must be filled with the correct grade of oil and
fuel before starting the engine.
To Check the engine oil level ,stop engine
and place the mower on a level surface.
NOTE!
Running the engine with a low oil level
will cause engine damage. It is
NOTE!
recommend that high detergent, premium quality 4-stroke
engine oil used. Using non-detergent oil can shorten the
engine’s service life and using 2-stroke oil will damage the
engine.
Always use high quality detergent
oil classified SAE30 oil (or equivalent e.
CAUTION!
g SAE 10W/30, often termed as 4 Stroke lawn mower oil).
Never use additives with recommended oil. To prolong the life
of your engine it is important that the oil is changed after the
first 5 hours of use.
Fig
11
Engine oil filler neck

14
ASSEMBLY
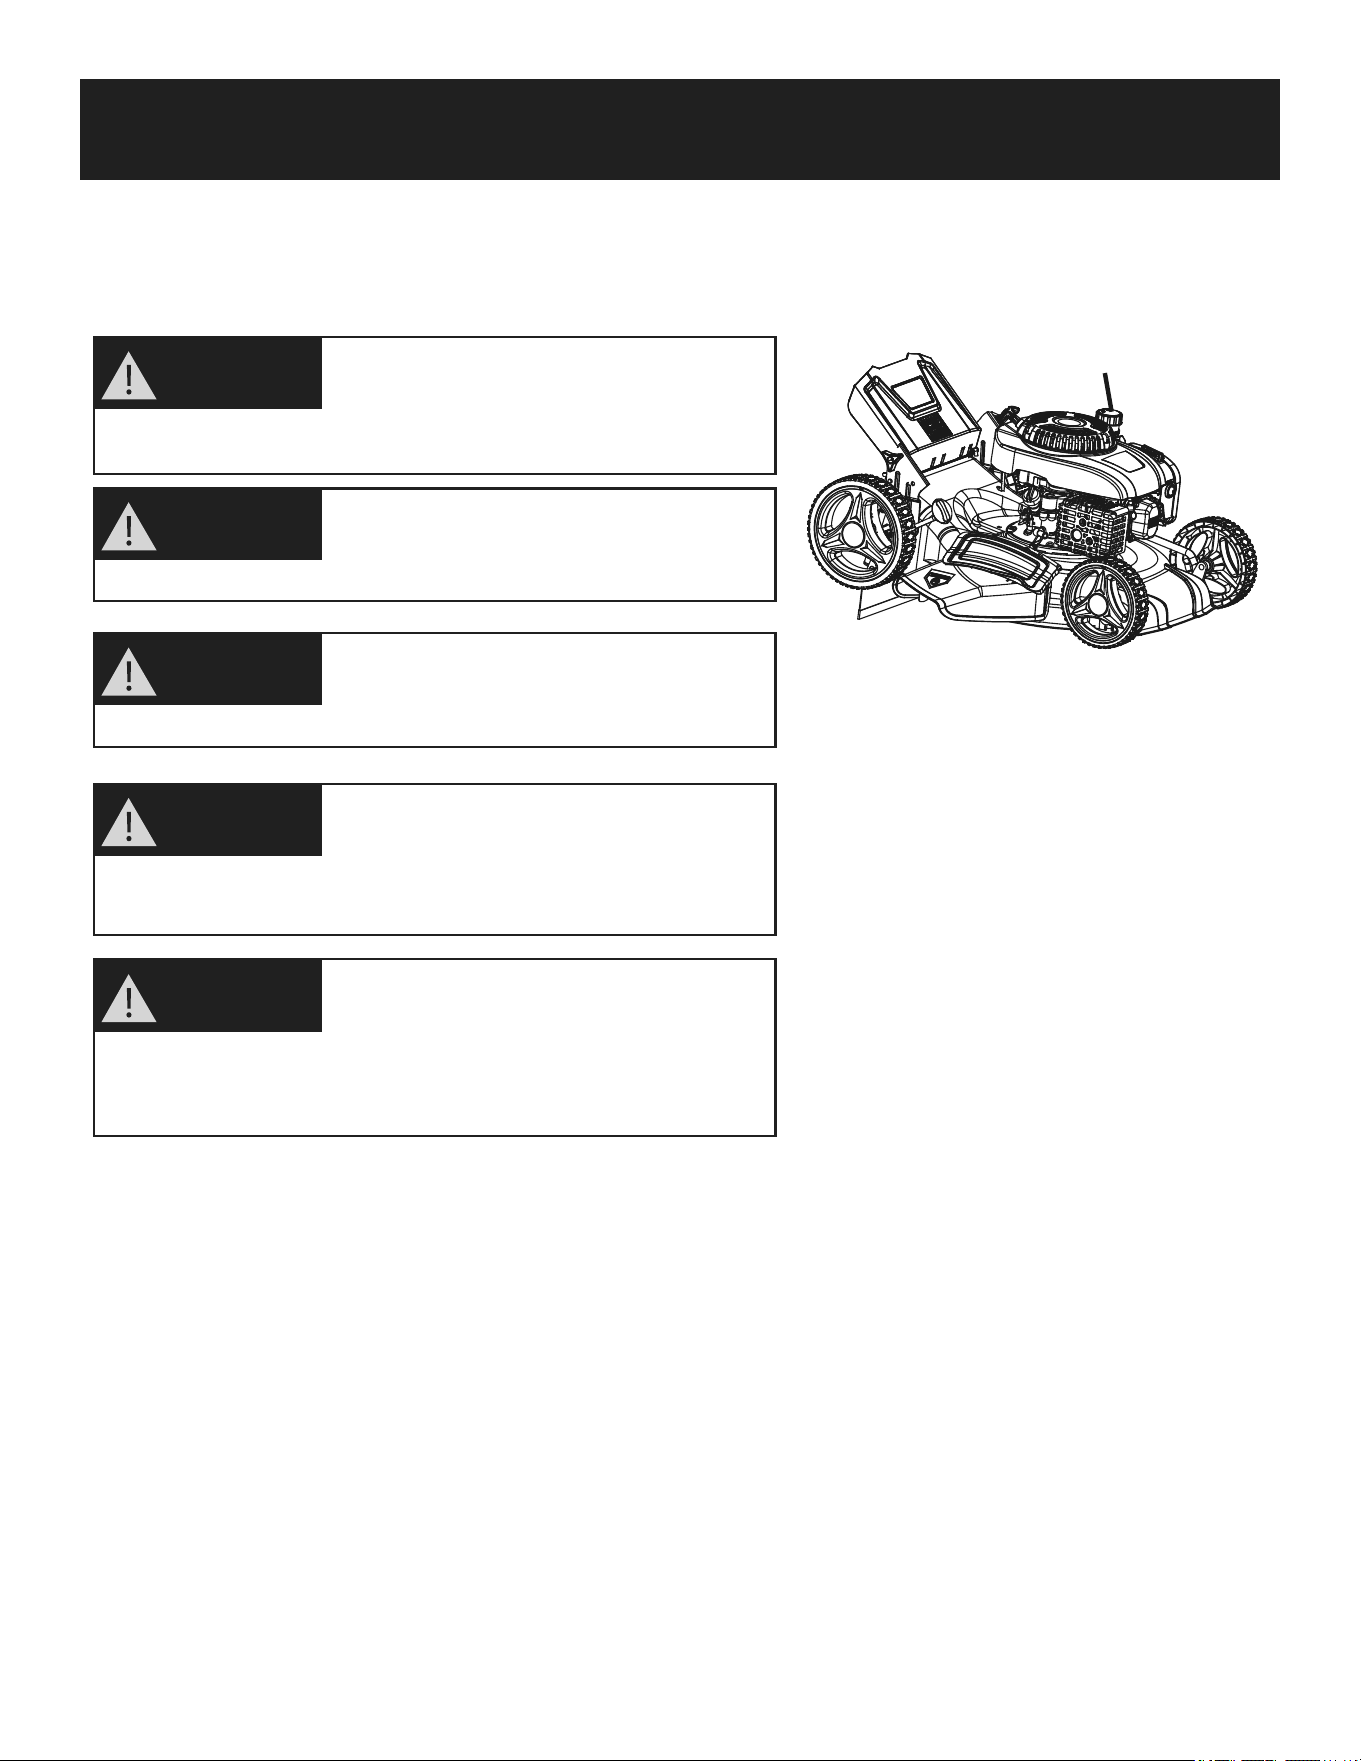
Filling Engine Fuel
As shown in Fig
13
1. Clean the area around the gas filler cap before removing the cap. Remove the warning tag, check the fuel level.
2. Refill the tank if the fuel level is low.
3. Refuel carefully to avoid overfilling or spilling fuel. There should be no fuel in the filler neck.
4. Clean up any overflow or splashes of fuel before starting the engine.
5. Tighten the filler cap after filling.
Always use clean, fresh unleaded fuel.
Purchase fuel in quantities that can be
CAUTION!
Fig
13
Do not fill into the base of neck to allow
for fuel expansion. Do not overfill the
CAUTION!
GASOLINE is highly flammable and
extreme precaution must be taken when
WARNING!
Refuel in a well-ventilated area with the
engine stopped. Do not smoke or allow
WARNING!
used within 30 days. Never mix oil with gasoline.
fuel tank.
To prevent engine damage the engine is
shipped without oil or gas. The engine
CAUTION!
must be filled with the correct grade of oil and gasoline before
starting the engine.
handling or working with it. Keep out of reach of children.
flame or sparks in the area where the engine is refueled or
where gasoline is stored. Avoid repeated or prolonged contact
with skin or inhalation of vapor.
Fuel filler neck

15
ADJUSTMENT
Setting The Cutting Height
As shown in Fig
14
The cutting height is centrally adjusted with the cutting height adjusting handle.
Different cutting heights can be selected.
Pull the adjusting handle out and select the desired cutting height.
The handle snaps into the desired position.
From position 1 to position 7.
Setting Required Function
Adjust the cutting height only
when the engine is shut off and the spark
CAUTION!
plug boot has been pulled.
This lawn mower has three functions. These functions can be converted by changing
accessory setting. Please see the following chart for detail setting.
CAUTION!
TO CONVERT MOWER MULCHING PLUG GRASS BAG SIDE DISCHARGE
For rear bagging × √ ×
For mulching √ × ×
For side discharging √ × √
“√”: installed “×” :removed
Fig
14
16
OPERATION
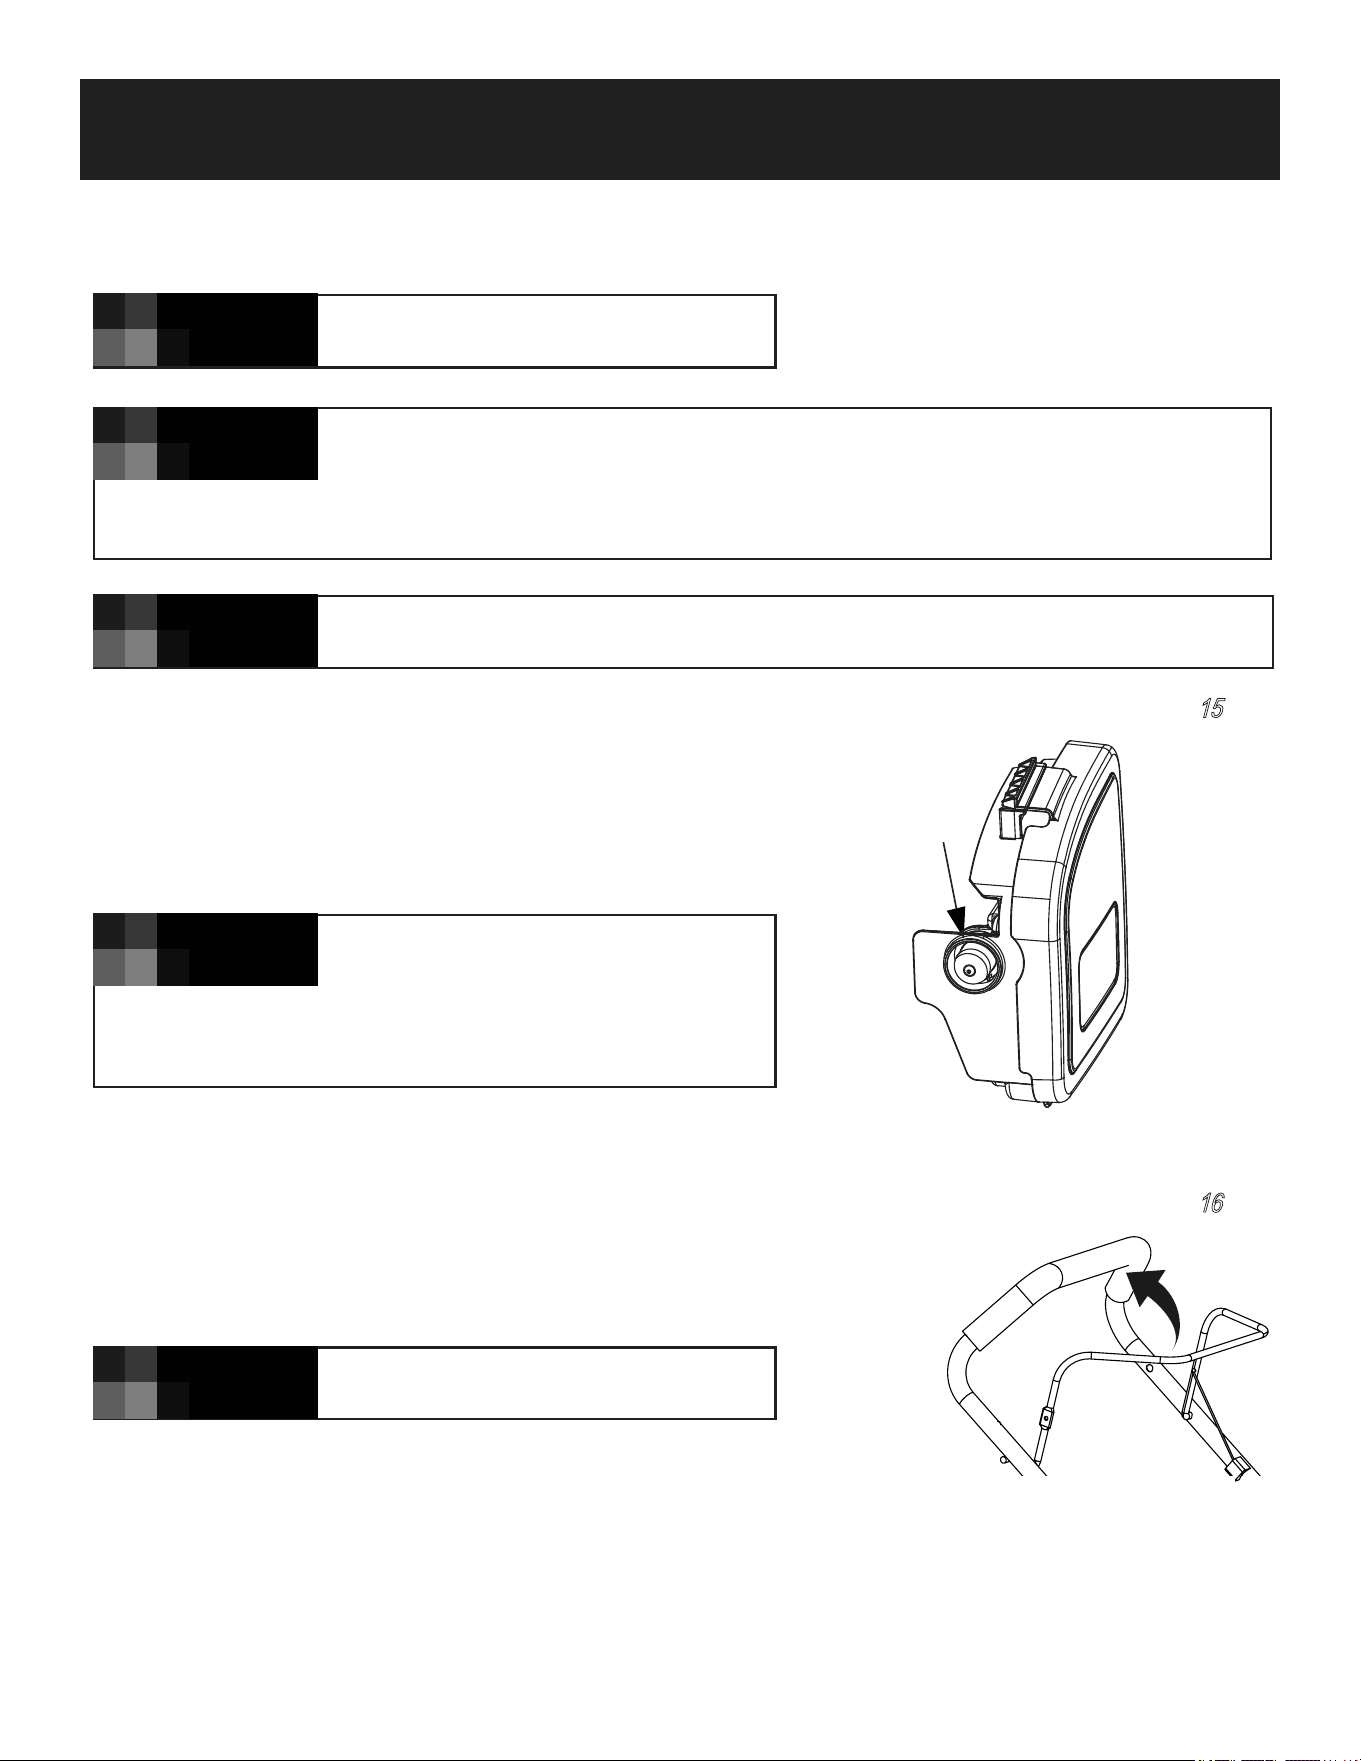
Starting and Stopping The Engine
To Start The Engine
As shown in Fig
15
-
16
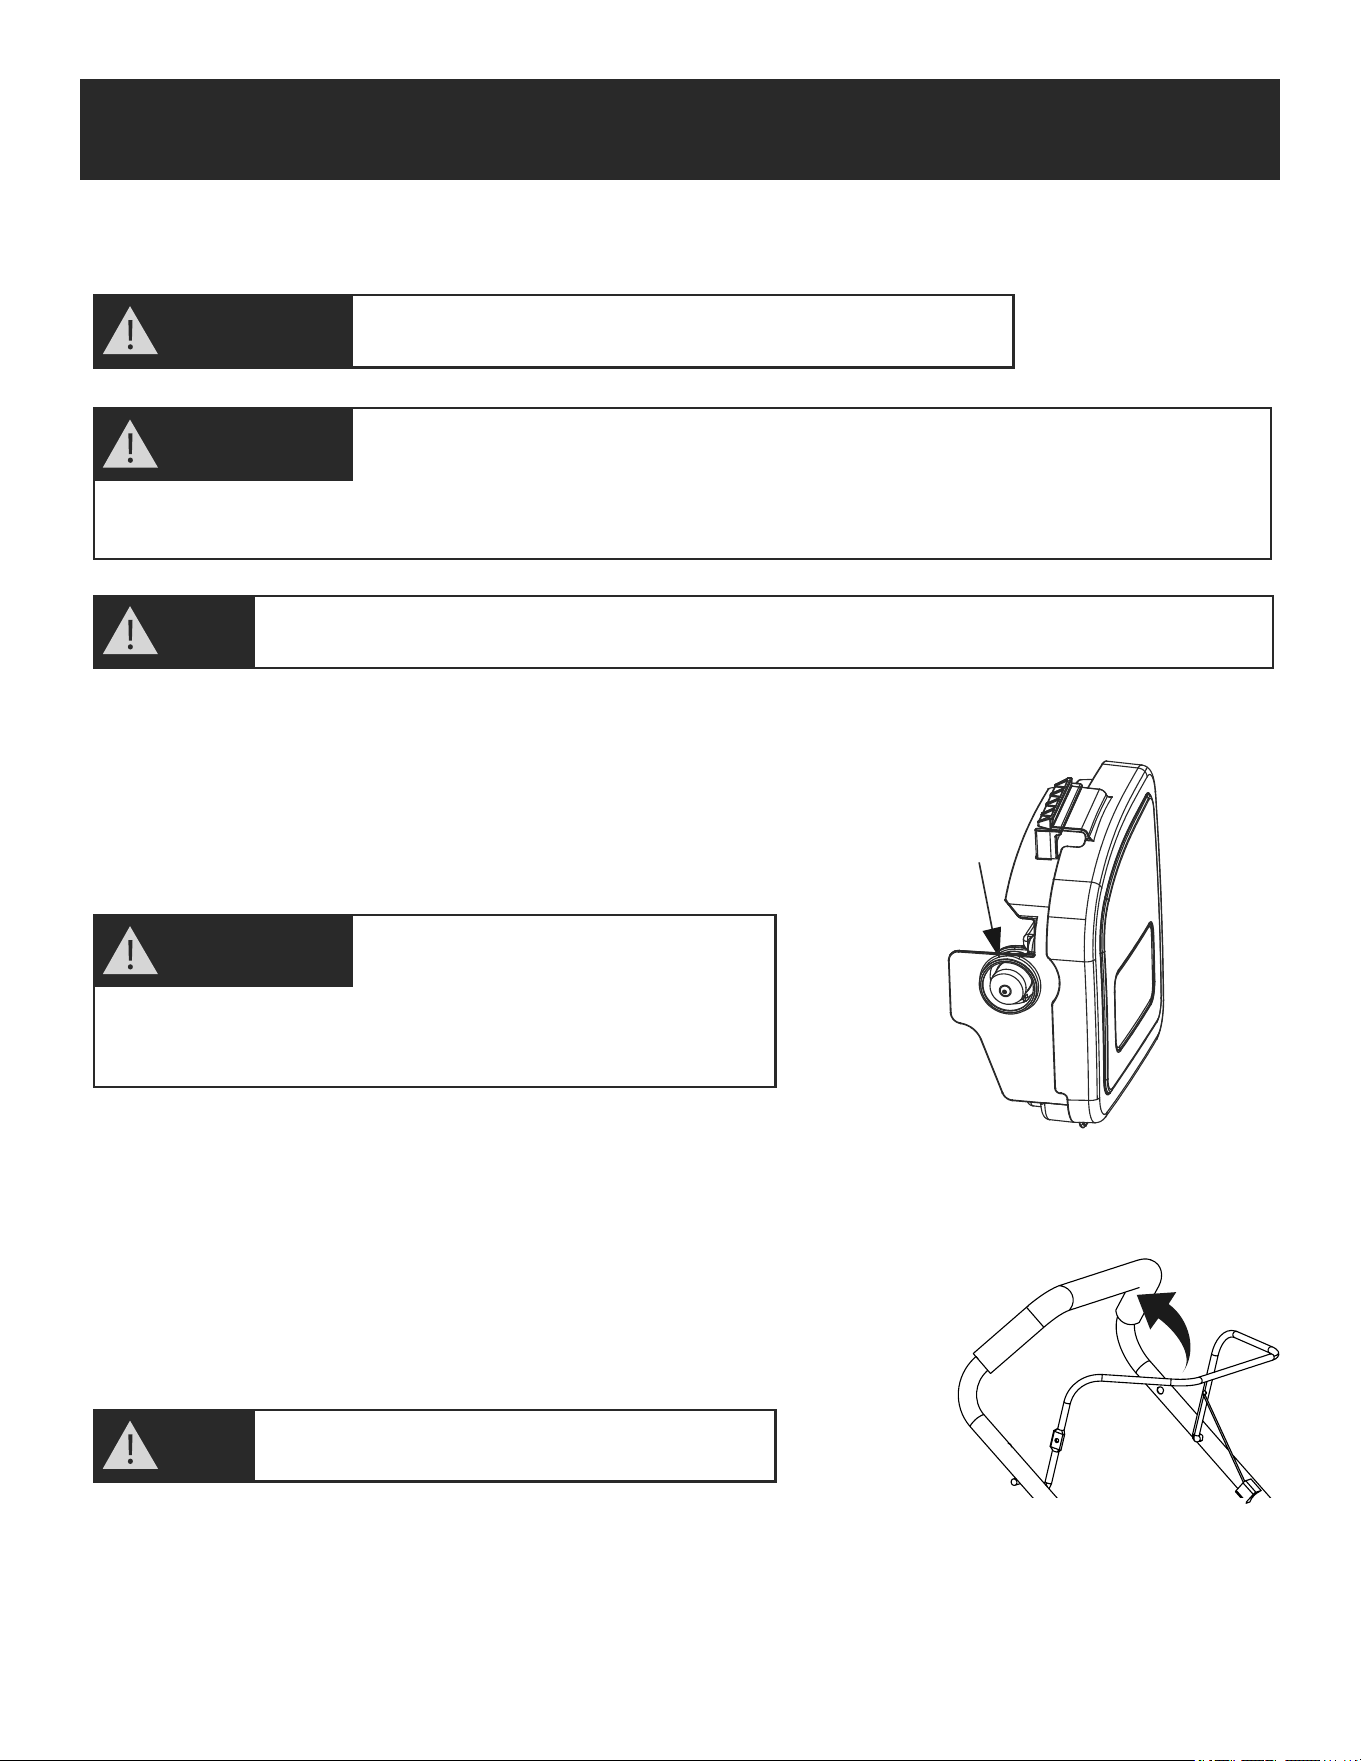
1. When starting a cold engine, press down the primer fully 3-5 times.
2. Stand behind the mower. Pull the engine Start/Stop lever toward upper
handle with one hand and place the other hand on the pull start.
3. Pull the pull start out approx. 4-6 inches until you feel a resistance
and then start the engine with a sharp pull.
The blade begins to rotate as soon as
the engine is started.
WARNING!
WARNING! Pressing the primer bulb too
many times may cause the engine to flood.
WARNING!
To start the engine, make sure that the spark plug boot is located on the plug and the
machine is filled with sufficient oil and fuel.
NOTE!
Do not operate the machine in enclosed or poorly ventilated areas as the exhaust gas
contains toxic substance. Keep hands, feet, and clothing away from all the moving parts
WARNING!
of the machine. The exhaust and other parts of the machine will become hot during use. Make sure that the
blade is securely fastened before starting the engine.
When starting a warm engine, the primer does not need to be
used. If the engine stops due to a lack of fuel, refill and press
down the primer 3 to 5 times.
If the engine fails to start after three pulls,
repeat the process .
NOTE!
Fig
15
Fig
16
Primer

17
OPERATION
4. Once the engine is running, put the starter rope Into
the rope guide. As shown in Fig 17
Stopping The Engine
As shown in Fig
18
Releasing the engine start/stop lever will shut the engine off.
To Clean A Flooded Engine
1. Release the engine start/stop lever to stop engine.
2. Remove the spark plug, dry it, and then reinstall it.
3. Pull the engine start/stop lever toward upper handle.
4. Operate the pull start as described above.
If the engine won’t start after you have
pulled the starter several times, the
NOTE!
Fig
17
Fig
18
engine may be flood with excess fuel. Use following procedure
to clear and start a flooded engine.
Install the spark plug carefully by hand,
to avoid cross-threading. After the plug is
NOTE!
seated tighten 1/8 to 1/4 turn with socket spanner of spark
plug to compress the washer.

18
OPERATION
Mowing
1. Select your required setting.
2. Start the engine and allow it run for a minute or 2.
3. Keep a firm grip on the upper handle with engine stop/start lever and walk along with it to start mowing.
Working Advices
As soon as grass clippings start to trail the lawn mower, it is time to empty the grass bag.
1. To take off the grass bag, use one hand to lift up ejector flap and the other to grab onto the carry handle. The ejector
flap automatically falls down after removing the grass bag and closes off the rear chute opening.
2. Empty the grass debris in the grass bag, and refit grass Bag.
Always observe the strictest safety procedures when using the lawnmower. Carefully
read the safety instructions of this manual before using the lawnmower.
WARNING!
Never open the ejector flap when the grass bag has been detached (to be emptied) and
the engine is still running. The rotating blade can cause serious injuries!
WARNING!
Before taking off the grass bag, switch off the engine and wait until the blade has
come to a stop.
NOTE!
If any grass residue is caught in the discharge chute, clean it using a brush. Do not
remove grass debris in the mower casing or on the blade by hand or with your feet.
NOTE!
Instead use suitable tools such as a brush or broom. To ensure that the cut grass can be collected into
a grass bag, the discharge opening and inside the mower casing must be cleared of any blockage.
High Altitude Operation
If operating lawn mower regularly at altitudes over 5,000 feet, the carburetor’s air-fuel mixture will be too rich and
emmissions may increase. On engines not built for the United States the carburetor can be adjusted to operate under this
condition. The carburetor should be returned to its normal setting if regular operation is less than 5,000 feet.
Contact your service center to modify the carburetor.
19
STORING AND MAINTENANCE
Cleaning
General Cleaning
The lawnmower should be cleaned thoroughly every time after it has been used. Always clean your lawnmower
immediately after use. Do not allow grass cuttings and other debris to become dry and hard on any of the mower surfaces.
Dried grass remnants and dirt may impair the mowing operation.
Check that the grass chute is free of any residual grass. Remove any such residue. Check the underside of the lawn
mower and the blade mount .Tilt the lawn mower onto its left side (opposite the oill filler neck)
Do not tilt the lawnmower by more than 90 degrees.
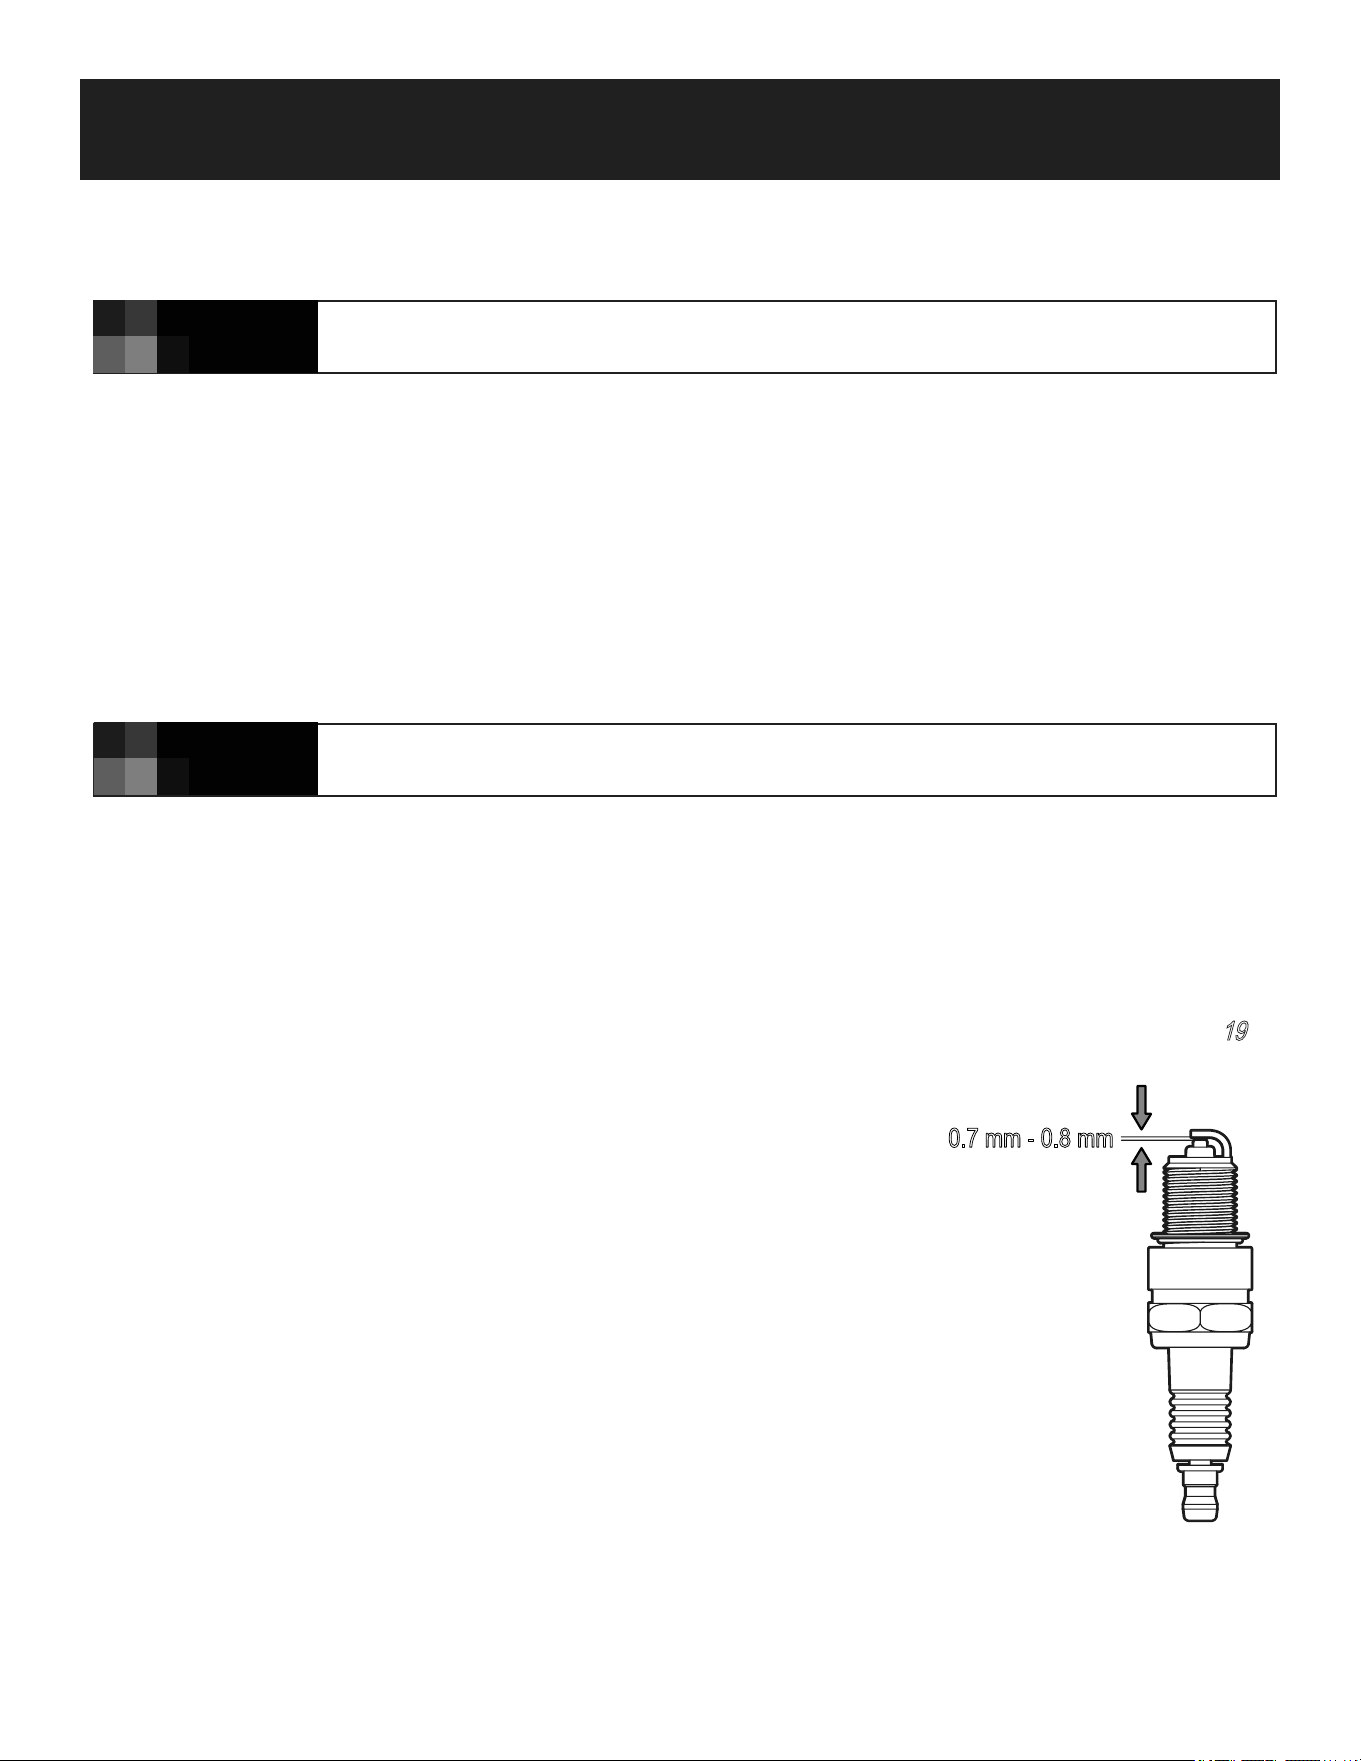
Maintenance Of The Spark Plug
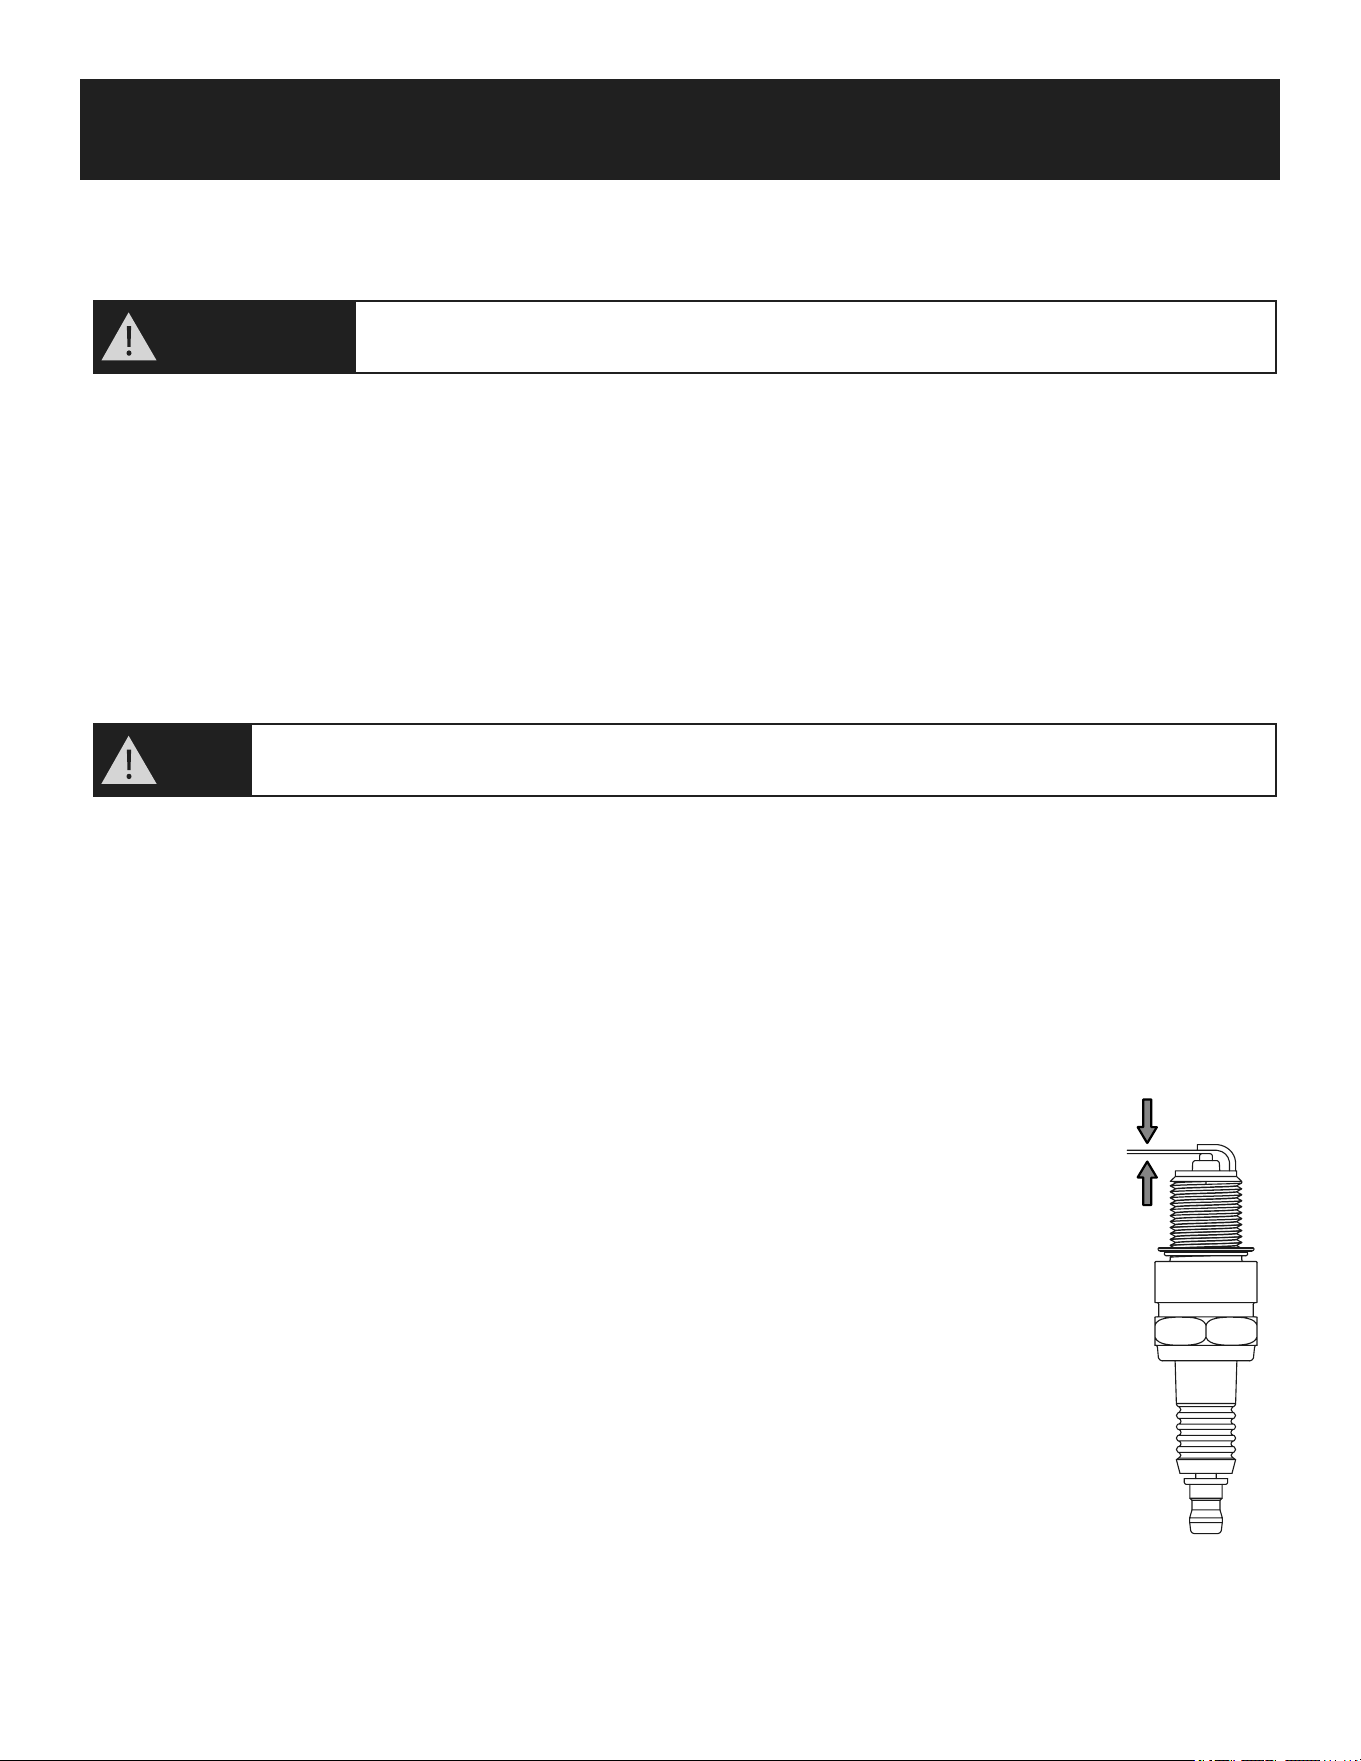
1. Once the engine has cooled, pull off the spark plug with a twist.
2. Remove the spark plug using a spark plug wrench.
3. Clean the spark plug with a wire brush (not supplied).
4. Using a feeler gauge set the gap to 0.75mm.
5. Install the spark plug carefully by hand, to avoid cross-threading.
6. After the spark plug is seated, tighten with the spanner to compress the washer.
Before performing any maintenance or cleaning work, switch Off the engine and wait
until the blade has come to a stop.
WARNING!
Before placing the lawnmower on its side , fully drain the fuel tank using a fuel
extraction pump.
NOTE!
Fig
19
0.7 mm - 0.8 mm
20
STORING AND MAINTENANCE
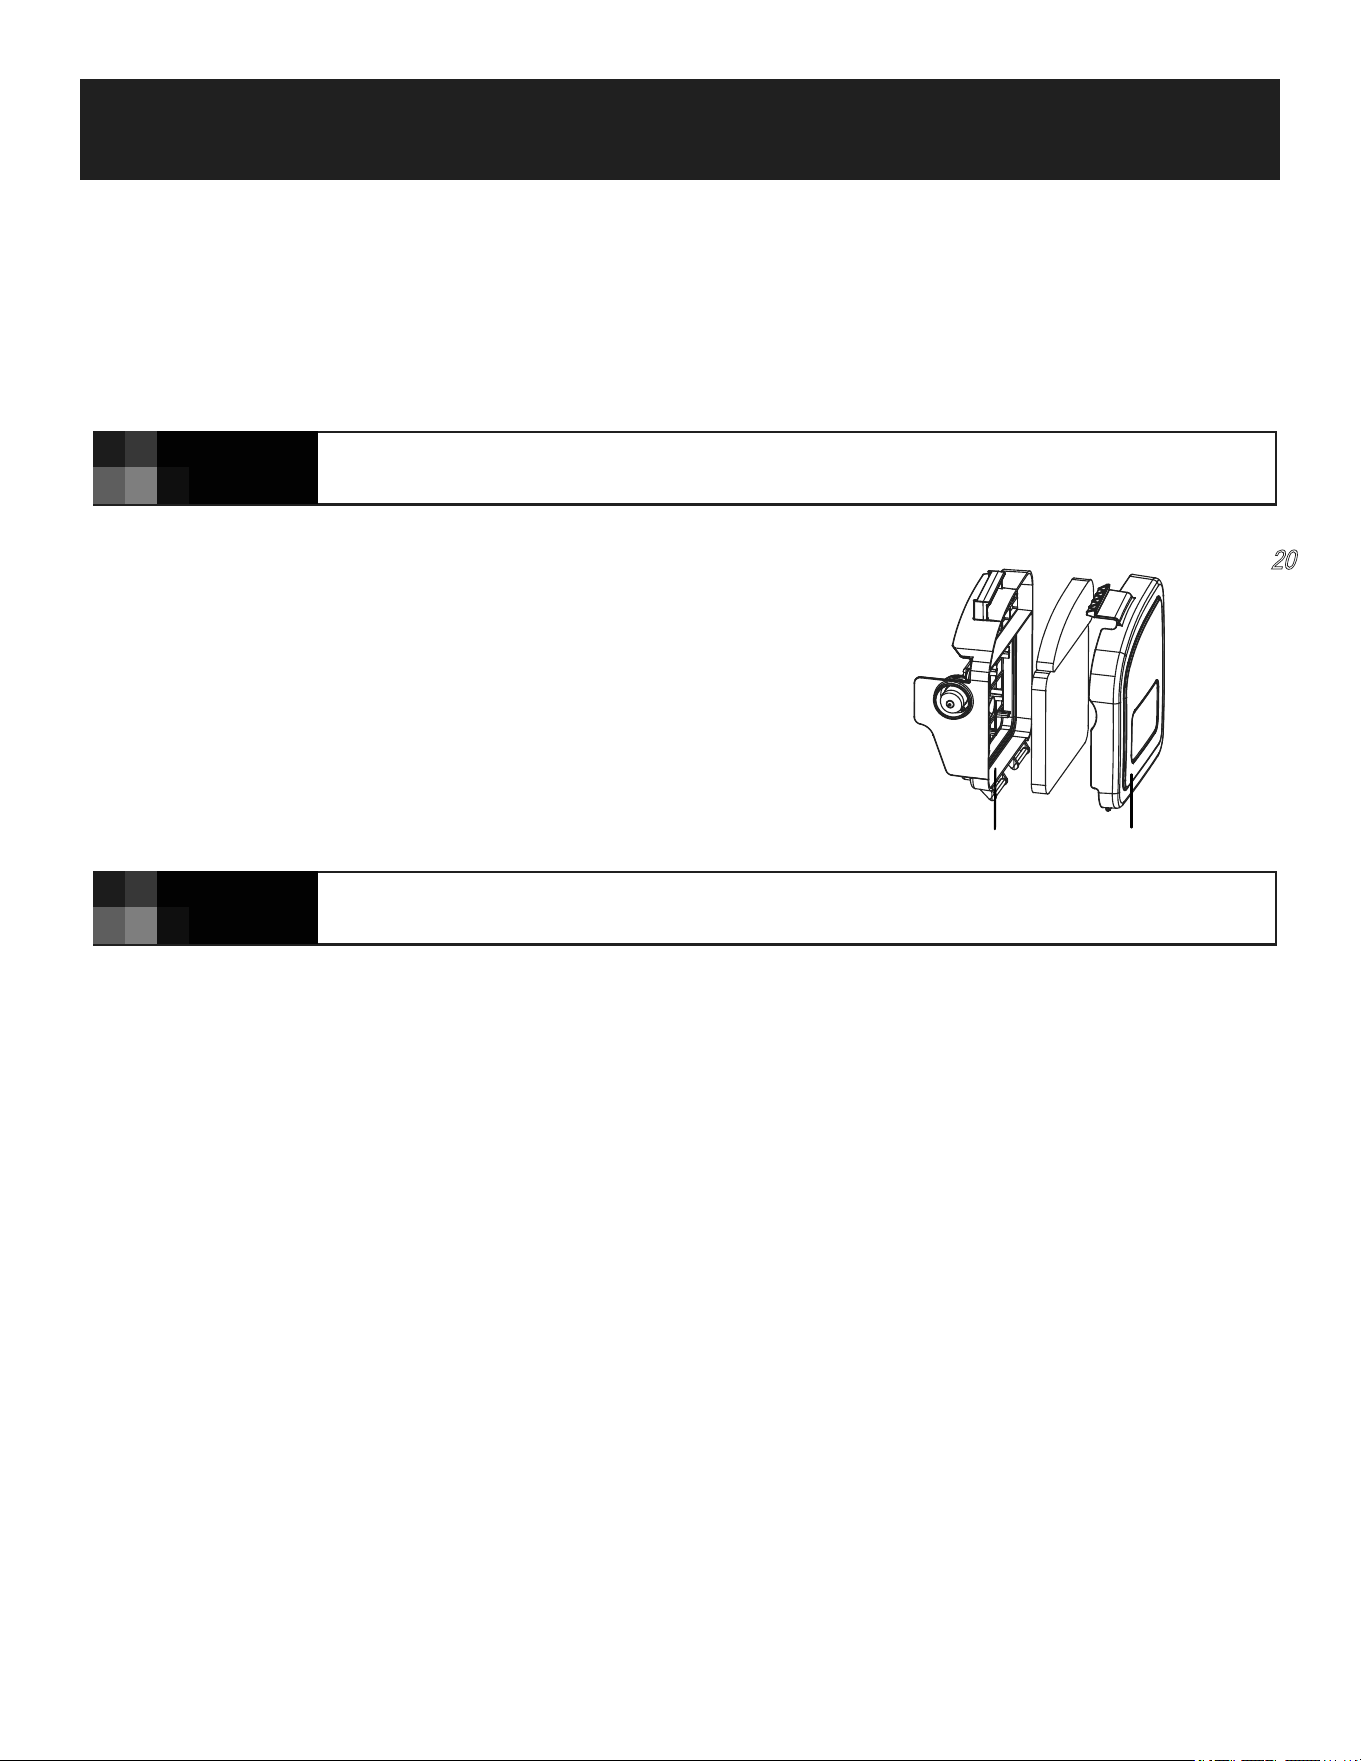
How to Service the Air Filter
As shown in Fig
20
Soiled air filters reduce the engine output by supplying too little air to the carburetor. If the air contains a lot of dust, the
air filter should be checked more frequently .
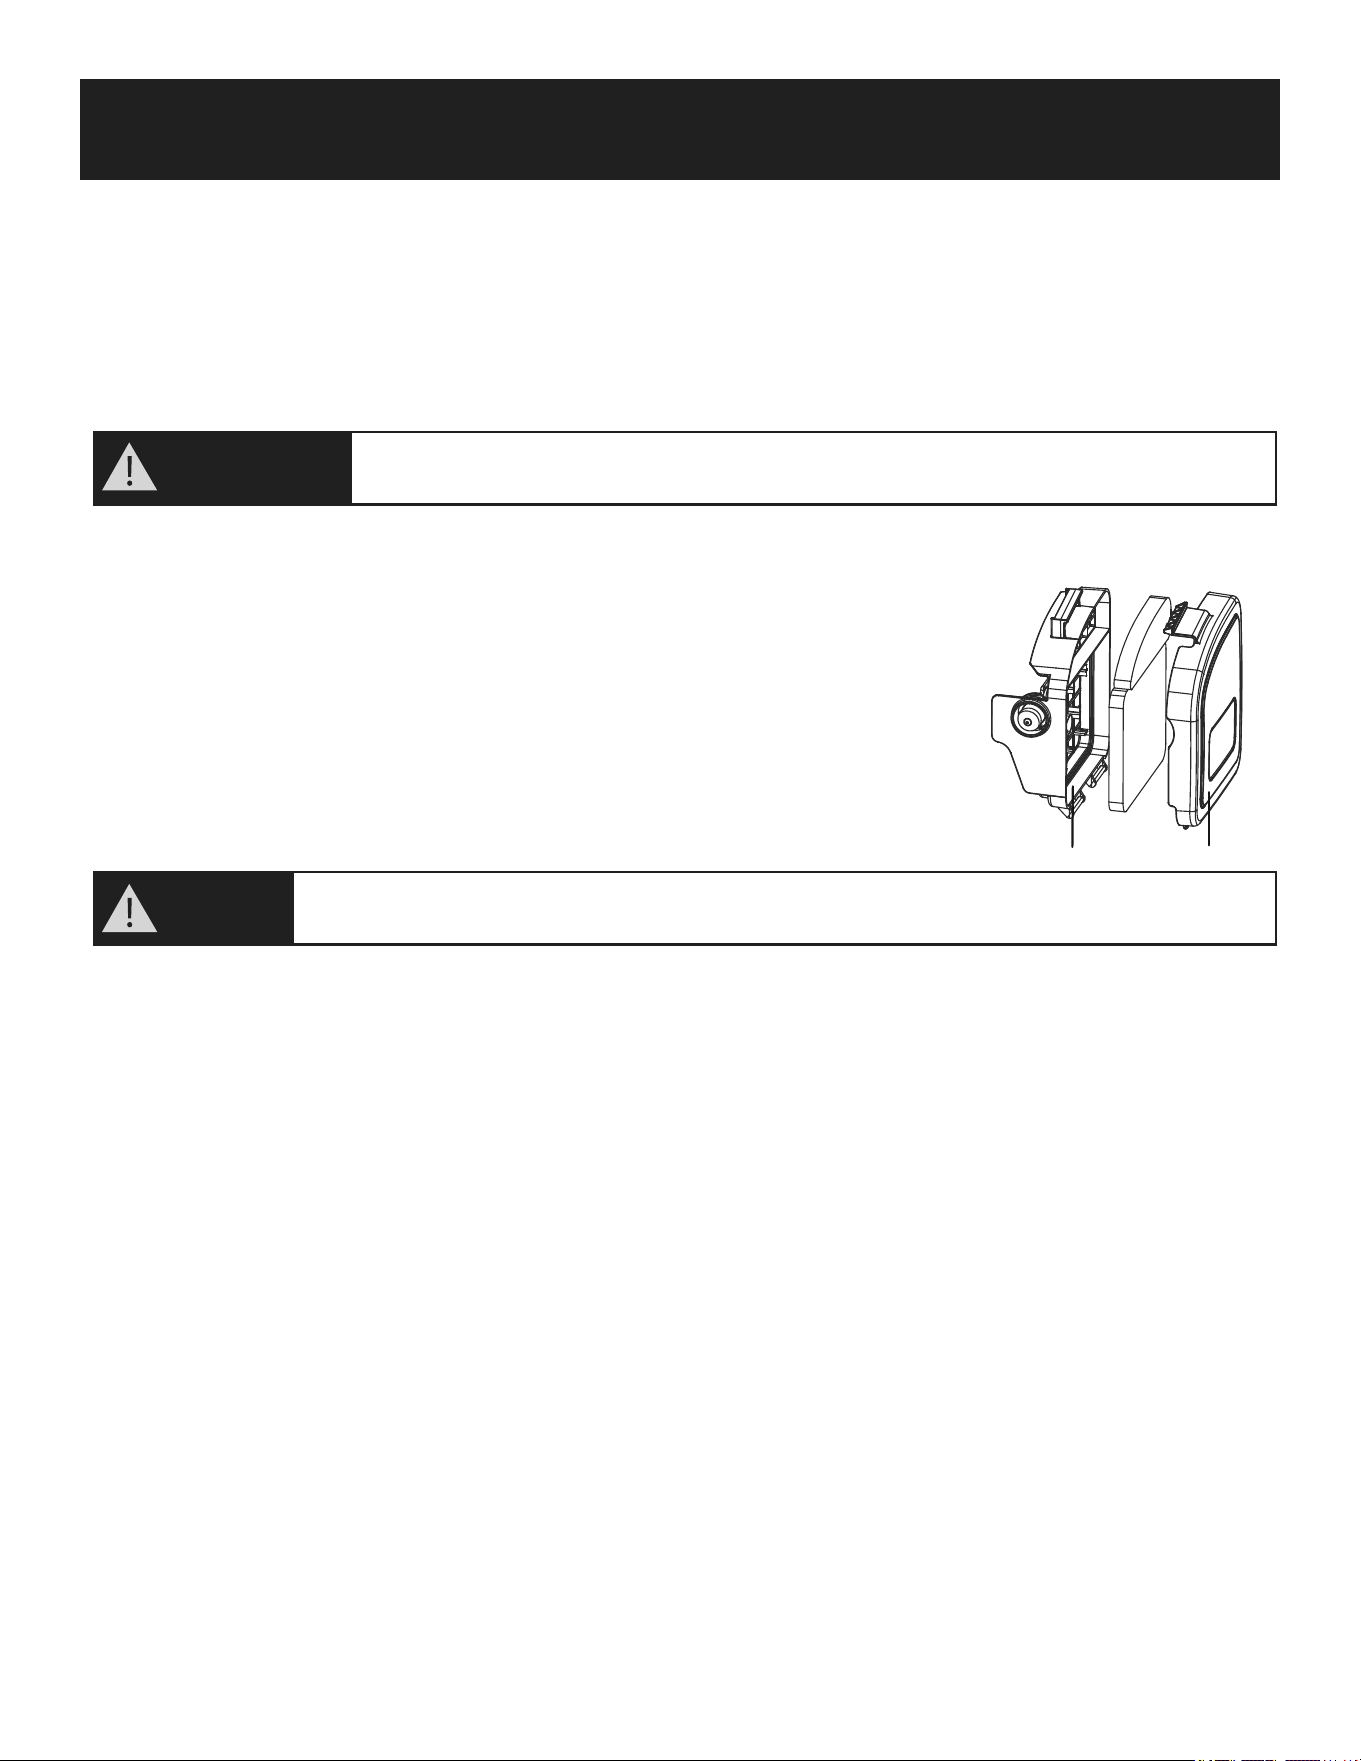
1. Remove the air cleaner outside cover. Becareful to prevent dirt and debris
from falling into the air cleaner assembly.
2. Separate the Air Filter from the Air Filter Housing .
3. Inspect the air filter. Clean dirty air filter with warm water and mild soap. Allow
air filter to dry thoroughly before re-installation
4. Install the air filter assembly onto the carburetor and secure with screw.
Changing The Engine Oil
Tilt the lawn mower towards the oil filler, have a container ready to catch the oil and remove the dipstick. Once the oil has
been emptied, replace the dipstick and wipe clean any spillages.
Refill with 13.5 oz./400ml SAE30 oil or equivalent i. e SAE5W/30, SAE10W/30. When the dipstick is rested on the filler
pipe (i. e . not turn in pace), the oil level must be between the min. and max. marks on the dipstick.
See “Checking the engine oil level and filling with engine oil ”
Start the engine and allow it to run briefly.
Stop the engine, wait one minute and check the oil level. Top up if necessary .
Never run the engine without the air filter element installed.
WARNING!
Fig
20
Do not use pressurized air or solvents to clean the filter. Pressurized air can damage
the filter and solvents will dissolve the filter.
NOTE!
A
B

21
STORING AND MAINTENANCE
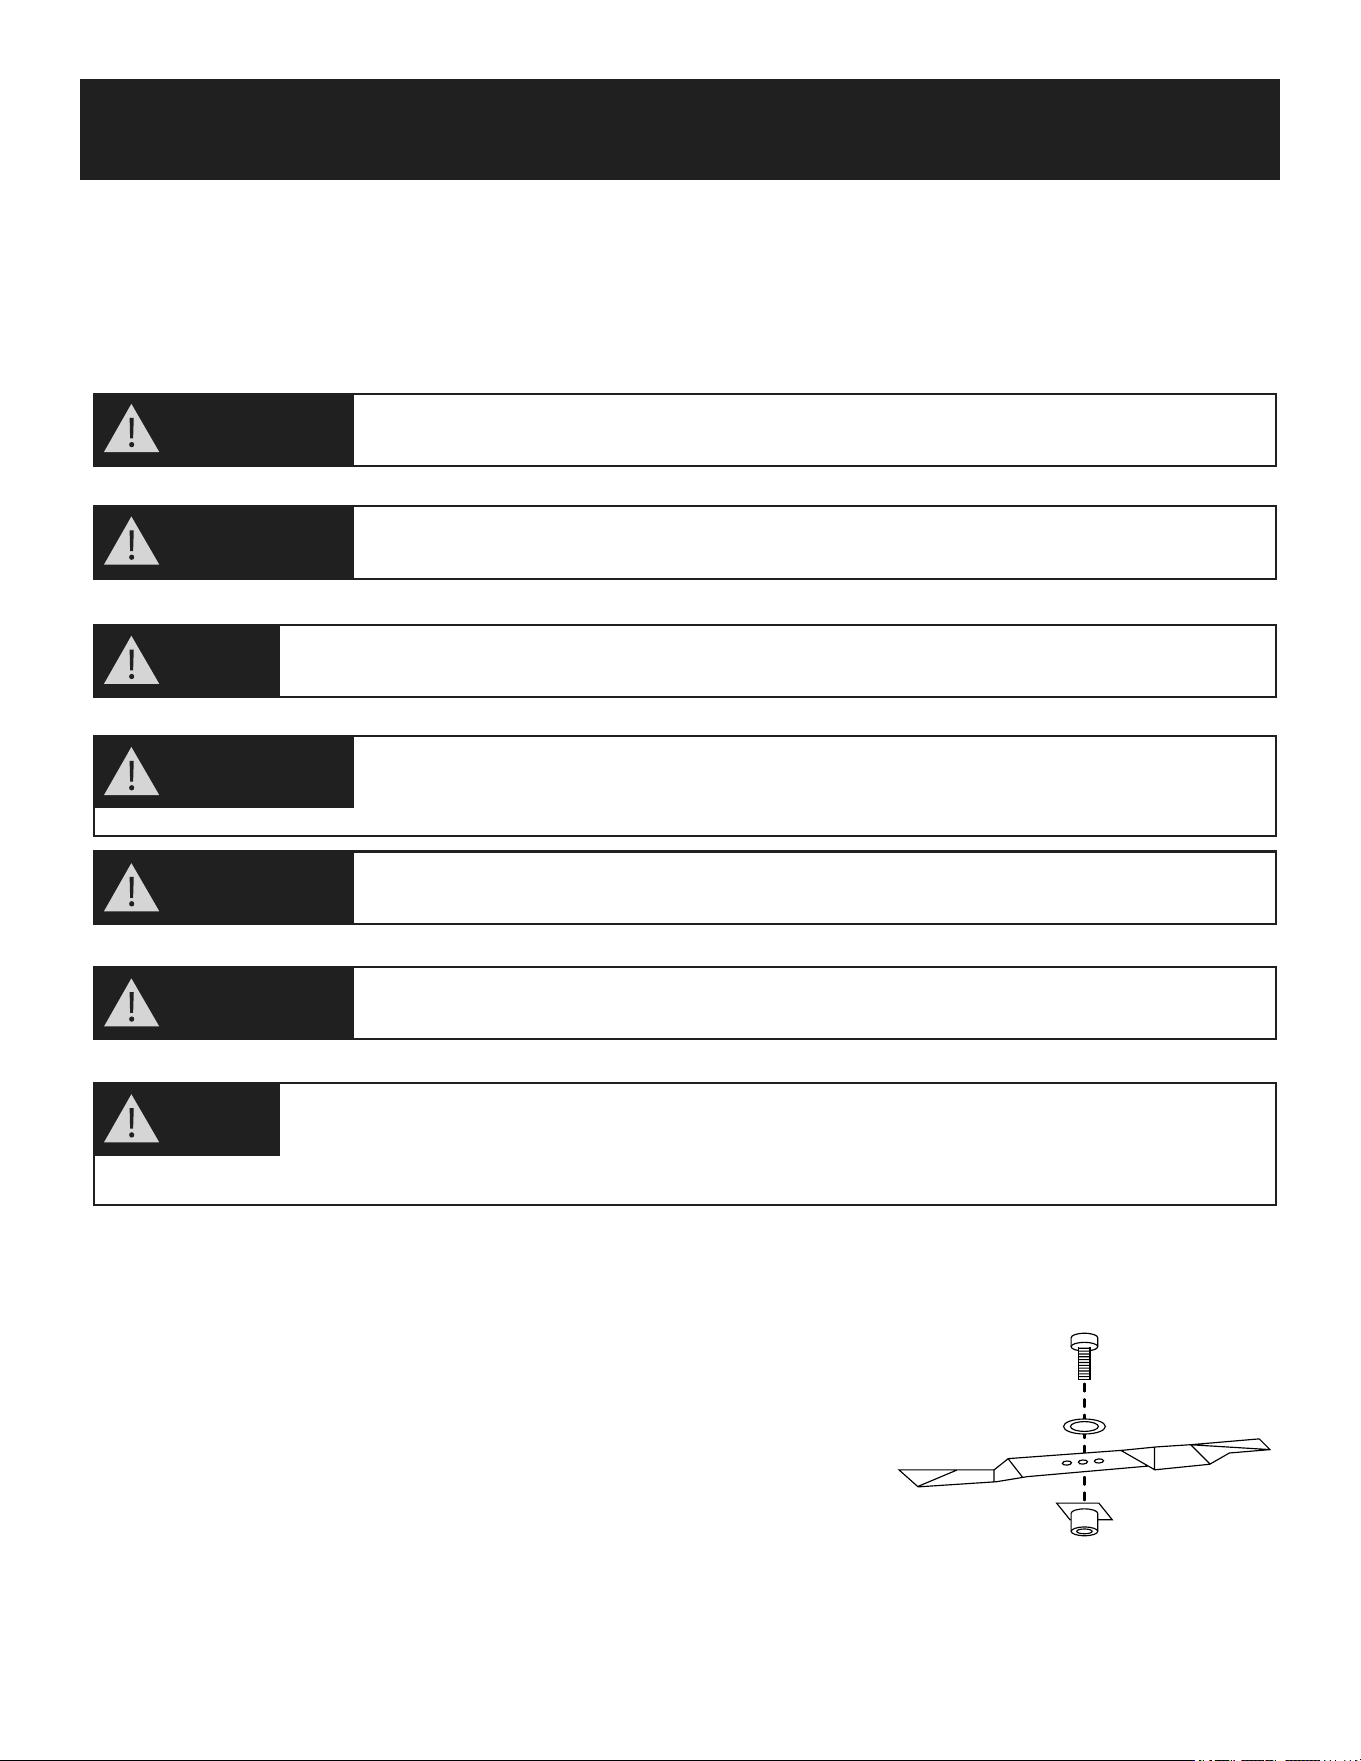
Replacing The Blade
For safety reasons you should only ever have your blade sharpened, balanced and mounted by an authorised service
workshop. For optimum results it is recommended that the blade should be inspected once a year.
For safety reasons we recommend that the blade only be changed by someone
qualified and authorized to do so.
Hold the blade and unscrew the blade bolt counterclockwise using a spanner
wrench. Remove the washer and the blade.
Fit a new blade or re-sharpen the blade, locate the blade on the two studs on
the blade flan and then replace the washer and bolts. Make sure the blade is
correctly located, and then firmly tighten the bolt. Do not over tighten. The up
turn of the blade must project into the motor compartment.
Before you remove the grass collection bag, stop the engine and wait until the blade
stops completely.
WARNING!
You will need garden gloves (not provided) and a spanner wrench(not provided) to
remove the blade.
WARNING!
Don’t invert the mower. Tip it slightly towards the oil filler pipe and reach under the deck.
NOTE!
Always handle the blade with care, sharp edges could cause injury USE GLOVES. Renew
your metal blade after 50Hrs mowing or 2yrs whichever is sooner regardless of condition.
WARNING!
If the blade is cracked or damaged replace it with a new one.
WARNING!
Don’t hold the blade with your bare hand.
WARNING!
Maintain the sharpness of the blade when cutting grass. If the blade is worn, pitted
and blunt, it should be replaced or sharpened. The sharpness of the blade will affect
NOTE!
the performance of the lawnmower.
Fig
21

22
STORING AND MAINTENANCE
Storing the Lawnmower for Short Periods
The lawnmower can be stored for short periods of time (less than 15 days) without performing any storage maintenance.
Before placing the lawnmower into storage always carry out the following:
1. Allow the engine to fully cool.
2. Ensure the grass bag is empty.
3. Clean all debris from under the mower deck.
4. Store the lawnmower on flat and level surface with the mower upright.
5. Store in a safe place which is not accessible by children or people who are not familiar with operation.
Storing the Lawnmower for Extended Periods
If the lawnmower is to be place into storage for more than 15 days, storage maintenance must be performed on the
lawnmower. If the following steps are not carried out, when you next operate the lawnmower it may not start correctly and
may need to be serviced.
1. Empty the gas tank with a gasoline suction pump if available.
2. Start the engine and let it run until any remaining gasoline has been used up.
3. Change the oil at the end of every season. To do so, remove the used engine oil from a warm engine and refill with
fresh oil.
4. Clean the cooling fins of the cylinder and the housing
5. Be sure to clean the entire machine to protect the paint.
6. Store the machine in a well-ventilated place.
For safety reasons we recommend that the blade only be changed by someone
qualified and authorized to do so.
Hold the blade and unscrew the blade bolt counterclockwise using a spanner
wrench. Remove the washer and the blade.
Fit a new blade or re-sharpen the blade, locate the blade on the two studs on
the blade flan and then replace the washer and bolts. Make sure the blade is
correctly located, and then firmly tighten the bolt. Do not over tighten. The up
turn of the blade must project into the motor compartment.
Do not empty the fuel tank in enclosed areas, near fire or when smoking. Gasoline
fumes can cause explosions and fire.
CAUTION!

23
STORING AND MAINTENANCE
Maintenance Schedule
Performing routine maintenance correctly on your lawnmower will ensure you get years of trouble free use.
Please keep this manual safe for future reference.
It is recommended that the following maintenance schedule is adhered to. This will ensure the lawnmower operated
correctly and is safe to use.
The Engine oil should be changed after the fist 8 hours.
Transport
Empty the gas tank.
Always let the engine run until it has used up the remainder of gas in the tank.
Empty the engine oil from the warm engine.
Remove the spark plug boot from the spark plug.
Clean the cooling fins of the cylinder and the housing.
Use the original packaging to ship whenever possible.
12 HOURS OF USE 24 HOURS OF USE 36 HOURS OF USE
Air Filter Clean Clean Replace
Spark Plug Check Clean Replace
Engine Oil Check Replace Check

24
TROUBLESHOOTING
Problems which cannot be fixed with the aid of following table may be fixed by a qualified service center. Please call
1-866-591-8921 for the nearest service center in your area.
Please be aware that any improper repairs will also invalidate the warranty and additional costs may be incurred.
Use only genuine spare parts. Only these spare parts are designed and suitable for the product. The use of other spare
parts not only voids the warranty, you can also endanger yourself and others.
Before performing any maintenance or cleaning work, switch off the engine and wait until
the blade has come to a stop.
WARNING!
Improper repairs can result in the product functioning unsafely. This may endanger
yourself and other.
CAUTION!
FAULT/MALFUNCTION CAUSE SOLUTION
Loud while running,
machine vibrates heavily
Screws are loose
Blade fasteners are loose
Blade is unbalanced
Check screws
Check blade fasteners
Replace blade
Engine does not start
Engine runs unsteadily
Uneven mowing results
Grass bag is not filled
Start/stop lever not pressed
Spark plug is defective
Fuel tank is empty
Engine may be flooded
Air filter is soiled
Spark plug is soiled
Blade is blunt
Cutting height is too low
Blade is worn
Grass bag is clogged
Cutting height is right?
The lawn / grass is wet ?
Does the discharge channel/
housing blocked ?
Does underside
of the mower deck have
been clogged?
Replace spark plug
Call customer service center
Refill with fuel
Remove plug and dry
Clean the air filter
Clean the spark plug
Sharpen the blade
Set correct height
Replace the blade
Empty the grass bag
Correct the cutting height
Allow the lawn to dry
Clean the discharge channel/
housing
Clean the underside of the mower
deck

www.pulsar-products.com
Advertencia: el escape del motor de este producto contiene sustancias químicas conocidas en
el estado de California que pueden causar cáncer, defectos de nacimiento u otros daños reproductivos.
Modelo# PTG1221ARM
Cortacésped
MANUAL DEL USUARIO

INTRODUCCIÓN
Tome nota de la información siguiente al ponerse en contacto con nosotros para recibir
servicio o asistencia bajogarantía.
PULSAR PRODUCTS INC.
8676 Rochester Ave.
Rancho Cucamonga, CA 91730
GUARDE ESTE MANUAL PARA FUTURAS REFERENCIAS
1-866-591-8921
Gracias por comprar este cortacésped de calidad superior de Pulsar Products Inc. Al usar y mantener este producto como
se indica en este manual, el cortacésped le ofrecerá muchos años de servicio confiable.
El sistema de control de emisiones de el cortacésped cumple con todas las normas establecidas por la Agencia de
Protección Ambiental.
Para ponerse en contacto con nosotros:
Puede ponerse en contacto con nosotros por teléfono al 1.866.591.8921 o por correo electrónico en
support@pulsar-products.com.
Fecha de la compra:
Número de modelo:
Número de serie:
Este manual contiene información importante sobre seguridad, operación y mantenimiento.

CONTENIDO
Descripción de las Partes del Producto …………………………………………………………………………………3
Especificaciones Técnicas…………………………………………………………………………………………………5
Uso Previsto ………………………………………..……………………………………………………………………....6
Información de Seguridad…………………………………..……………………………………………………………...7
Ensamblaje……………………………………………..……………………………………………………………………11
Ajuste.…………………………………………..……………………………………………………………………............15
Funcionamiento……………………………………………..……………………………………………………………….16
Almacenamiento y Mantenimiento…………………………..…………………………………………………………….19
Solución de Problemas……………………………………..……………………………………………………………….24
3
DESCRIPTION OF PRODUCT PARTS
Como se Muestra en la figura 1
1. Agarre suave
2. Asa superior
3. Palanca de freno / palanca de parada
4. Botón de bloqueo con perno de cuello cuadrado
5. Asa inferior
6. Bolsa de cesped
7. Tapón del depósito de combustible
8. Cebador
9. Asa de ajuste de altura
10. Rueda trasera
11. Tapa de aceite del motor
12. Tapa de descarga lateral
13. Canal de descarga lateral
14. Cubierta
15. Arranque de bujia
16. Comienzo manual
17. Tapa de descarga trasera
18. Rueda delantera
Fig 1
1
3
2
4
5
6
7
17
16
8
11
15
10
9
13
12
14
18
4
DESCRIPCION DE LAS PARTES DEL PRODUCTO
Como se muestra en la figura 2
Retire con cuidado la máquina de su caja y compruebe que las siguientes piezas estén completas:
Si alguna pieza está dañada o falta, no opere esta herramienta hasta que las partes
faltantes estén reemplazado. Si no se toma en cuenta esta advertencia, se pueden producir
lesiones personales graves.
¡ADVERTENCIA!
Este artículo requiere dos personas para retirar la maquina de la caja. Asegúrate de que
tienes espacio suficiente para bajar el cortacésped. Mantenga sus pies separados para que
tenga un establo colóquese, doble las rodillas y mantenga la espalda recta.
NOTA! Recicle siempre el embalaje de acuerdo con las leyes locales de reciclaje.
NOTA
¡ADVERTENCIA!
A. Cubierta del cortacésped principal (con el mango superior y el mango inferior) 1pc
B. Clip de cable 1pc
C. Montaje de bolsa de cesped
D. Descarga lateral 1pc
E. Manual 1pc
F. Pomo grande con tornillo M6 2 pc
G.Pomo pequeño con perno M6 2 pc
H. Llave para bujías 1pc
I. Enchufe plástico 1pc (dentro del cortacésped)
B
C
I
H
E
F
D
A
G
Fig 2

5
ESPECIFICACIONES TÉCNICAS
Tipo de Motor Cilindro simple de 4 tiempos
Desplazamiento del motor
200 CC
Poder del Motor
3.8KW
La velocidad del motor 2800 RPM
Corte 21 Inches/530mm
Capacidad de la bolsa de hierba 17.2 Galon/65L
Ignición
Depósito de combustible 0.4 Galones/1.5L
Tanque de aceite 0.38 Quarts/0.4L
Peso neto
60lbs/27.2KG
Datos de vibración
Medir el valor de emisión de vibración
6.1m/s²
Incertidumbre
1.5m/s²

6
USO PREVISTO
Esta cortadora de césped a gas ha sido diseñada para cortar áreas de césped en casas privadas y jardines de
pasatiempos.
La máquina debe ser utilizada únicamente para su propósito prescrito. Cualquier otro uso se considera un caso de mal
uso. El usuario / operador y no el fabricante será responsable por cualquier daño o lesión de cualquier tipo causado
como resultado de esto.
Tenga en cuenta que nuestros equipos no han sido diseñados para su uso en aplicaciones comerciales, comerciales o
industriales. Nuestra garantía sera anulada si la máquina se utiliza en negocios comerciales, industriales o para fines
equivalentes.
7
INFORMACIÓN DE SEGURIDAD
IMPORTANTE
Lea estas instrucciones completamente antes de ensamblar y operar.
Descripción de los símbolos
Los símbolos se utilizan en este manual para atraer su atención a posibles riesgos. Los símbolos de seguridad y las
implicaciones que los acompañan hay que entenderlos perfectamente. La advertencia en sí misma no previene los riesgos
y no puede ser una sustituto de los métodos adecuados para evitar accidentes.
Símbolos de advertencia en la máquina
ADVERTENCIA: para reducir el riesgo de lesiones, el usuario debe leer el manual de instrucciones.
Este símbolo, antes de un comentario de seguridad, indica una precaución, una advertencia o un peligro.
Ignorando la advertencia puede provocar un accidente para usted o para otros. Para limitar el riesgo de
lesiones, incendio o electrocución siempre aplique las recomendaciones indicadas.
Mantener alejados
Tenga cuidado con las navajas filosas: retire la bujía antes del mantenimiento
Nunca cargue combustible mientras el motor esté funcionando
Riesgo de lesiones. No abra ni quite los escudos de seguridad mientras el motor está en marcha.

8
INFORMACIÓN DE SEGURIDAD
Símbolos de advertencia en la máquina
Usar protección auditiva, protección ocular durante el funcionamiento.
Las superficies calientes queman los dedos o las palmas.
¡Advertencia! El gas de escape del cortacésped contiene sustancias tóxicas. No haga funcionar el
motor en cerrado o zonas mal ventiladas.

9
INFORMACIÓN DE SEGURIDAD
Entrenamiento
1. Lea las instrucciones cuidadosamente. Familiarícese con los controles y el uso adecuado del equipo.
2. Nunca permita que niños o personas que no estén familiarizadas con estas instrucciones utilicen el cortacésped. Las
regulaciones locales pueden restringir la edad del operador.
3. Nunca corte el césped cuando haya personas cerca, especialmente niños o mascotas.
4. Tenga en cuenta que el operador o usuario es responsable de los accidentes o peligros que ocurran a otras personas o
sus bienes.
Preparación
1. Durante la corte, siempre use zapatos de trabajo y pantalones largos. No opere el equipo descalzo o
llevando sandalias abiertas.
2. Inspeccione el área donde se va a usar el equipo y retire todos los objetos que pueda arrojar el máquina.
3. Advertencia: la gasolina es altamente inflamable.
• Almacene el combustible en recipientes específicamente diseñados para este propósito.
• Reposte combustible solo al aire libre y no fume mientras agregue combustible.
• Añadir combustible antes de arrancar el motor. Nunca quite la tapa del tanque de combustible ni agregue gasolina
mientras el motor está funcionando o cuando el motor está caliente.
• Si se derrama combustible, no intente arrancar el motor, aleje la máquina del área del derrame y evite
creando cualquier fuente de ignición hasta que los vapores de gasolina se hayan disipado.
• Reemplace todas las tapas del tanque de combustible y del contenedor de manera segura.
4. Reemplace los silenciadores defectuosos.
5. Antes de usar, siempre inspeccione visualmente que las cuchillas, los pernos de la cuchilla y el conjunto del cortador no
estén desgastados o dañados. Reemplace las cuchillas y los pernos desgastados o dañados en conjunto para preservar
el equilibrio.
Funcionamiento
1. No haga funcionar el motor en un espacio confinado donde puedan acumularse humos peligrosos de monóxido de carbono.
2. Corte el césped solo a la luz del día o con buena luz artificial.
3. Evite operar el equipo en césped húmedo, cuando sea posible.
4. Siempre asegúrate de estar en las pendientes.
5. Camina, nunca corras.
6. Para máquinas rotativas con ruedas, corte la cara de las pendientes, nunca hacia arriba y hacia abajo.
7. Tenga mucho cuidado al cambiar de dirección en las pendientes.
8. No corte las pendientes excesivamente pronunciadas.
9. Tenga mucho cuidado al invertir o tirar del cortacésped hacia usted.
10. Detenga la (s) cuchilla (s) si tiene que inclinar el cortacésped para transportarlo cuando cruce superficies que no sean
hierba, y al transportar el cortacésped hacia y desde el área a cortar.
¡ADVERTENCIA!
La gasolina es altamente inflamable.

10
INFORMACIÓN DE SEGURIDAD
11. Nunca opere el cortacésped con protecciones defectuosas o sin dispositivos de seguridad, por ejemplo, deflectores
y / o césped receptores, en su lugar.
12. No cambie la configuración del regulador del motor ni acelere demasiado el motor.
13. Desenganche todos los embragues de la cuchilla y la unidad antes de arrancar el motor.
14. Arranque el motor o enciéndalo con cuidado de acuerdo con las instrucciones y con los pies bien alejados de la (s)
cuchilla (s).
15. No incline el cortacésped al arrancar el motor o al encenderlo, excepto si el cortacésped tiene que estar inclinado.
para empezar En este caso, no la incline más de lo absolutamente necesario y levante solo la parte que está lejos de la
operador.
16. No arranque el motor cuando esté parado frente al conducto de descarga.
17. No ponga las manos o los pies cerca o debajo de las piezas giratorias. Manténgase alejado de la abertura de descarga
en todo momento.
18. Nunca levante o lleve un cortacésped mientras el motor esté en marcha.
19. Detenga el motor y desconecte el cable de la bujía, asegúrese de que todas las partes móviles se hayan detenido por
completo y, donde se coloca una llave, retire la llave.
• Antes de eliminar los bloqueos o desatascar el canal.
• Antes de revisar, limpiar o trabajar en el cortacésped.
• Después de golpear un objeto extraño. Inspeccione el cortacésped en busca de daños y haga reparaciones antes
de volver a encenderlo y operando el cortacésped.
• Si el cortacésped comienza a vibrar de manera anormal (apague la maquina verifique de inmediato).
20. Pare el motor y desconecte el cable de la bujía, asegúrese de que todas las partes móviles se hayan detenido por
completo donde se coloca una llave, retire la llave.
• Cada vez que salga del cortacésped.
• Antes de agregar gasolina.
21. Reduzca el ajuste del acelerador durante el apagado del motor y si el motor tiene una válvula de cierre, apague el
combustible al finalizar el corte de sacate.
Mantenimiento y almacenaje
1. Mantenga todas las tuercas, pernos y tornillos apretados para asegurarse de que el equipo se encuentre en buenas
condiciones de funcionamiento.
2. Nunca almacene el equipo con gas en el tanque dentro de un edificio donde los vapores puedan alcanzar una llama
abierta o una chispa.
3. Deje que el motor se enfríe antes de guardarlo.
4. Para reducir el riesgo de incendio, mantenga el césped, el silenciador y el área de almacenamiento de gasolina libres
de hierba, hojas, o exceso de grasa.
5. Revise el recolector de césped con frecuencia para ver si está desgastado o deteriorado.
6. Reemplace las piezas desgastadas o dañadas.
7. Si se debe drenar el tanque de combustible, esto debe hacerse al aire libre.

11
ENSAMBLAJE
Ensamblaje del mango
Como se muestra en Fig 3&4
1. Sujete la manija inferior al dispositivo usando dos
pernos y dos perillas pequeñas en cada lado.
2. Despliegue la manija superior y fíjela a la manija inferior
usando las grandes perillas y las manchas en cada lado.
Poner en orden el cable de conexión
Como se muestra en Fig 5
Fije el cable de conexión al mango.
Con el clip de cable. (Suministrado)
Asegúrese de que la guía de la cuerda esté a la derecha
cuando estés parado detrás del cortacésped.
¡NOTA!
Fig 3
Washer
Bolt
Knobs
Fig 4
Bolt
Knob
Washer
Fig 5
Clip
12
ENSAMBLAJE
Ensamblaje de la bolsa de hierba en el cortacésped
Como se muestra en Fig
7
1. Levante la tapa de descarga trasera con una mano
y enganche en la bolsa de hierba.
2. Suelte la tapa de descarga trasera para asegurar
la bolsa de hierba en posición
Ensamblaje el tapon de mulching
Como se muestra en Fig
8
1. Retire la bolsa de hierba
2. Empuje el tapón de mulching de plástico en el conducto de descarga
hasta que se trabe en su lugar.
3. Luego suelte la tapa, se cerrará hacia atrás para cubrir el tapón
de mulching.
Ensamblaje de descarga
lateral Como se muestra en Fig
9
1. Levante la cubierta de descarga lateral con una mano y enganche en
el lado conducto de descarga con la otra mano.
2. Suelte la cubierta de descarga lateral para asegurar el conducto
en su posición.
Cuando se utiliza la función de descarga
lateral necesitas quitar primero la bolsa de
¡NOTA!
hierba y enchufe el tapón de mulching.
Fig
6
Ensamblaje del gancho de arranque
Como se muestra en Fig
6
1. Estire la cuerda a través del gancho.
2. Inserte el gancho a través del orificio pretaladrado en el marco.
3. Asegure el gancho con la tuerca.
Fig 9
Fig 8
Mulching piug
Side discharge chute
Side discharge cover
Fig 7
Rear discharge cover
Grass bag
13
ENSAMBLAJE
Agruegando aceite de motor
Como se muestra en Fig
10
-
13
1. Retire la varilla medidora de llenado de aceite y limpie el aceite con un paño limpio.
2. Inserte la varilla medidora en el cuello de llenado de aceite, pero no la gire.
3. Luego retire la varilla y compruebe el nivel de aceite. El nivel de aceite debe estar entre las marcas Mín y Máx.
varilla graduada. Si está cerca del nivel inferior, llene la palanca superior con el aceite recomendado (SAE30 o
equivalente). No llene demasiado. Limpie cualquier aceite derramado.
4. Alinee la tapa con la ranura del cuello de llenado, luego gire 1/4 de vuelta para asegurarlo.
Los siguientes procedimientos y los
ajustes deben realizarse antes de arrancar
Fig
10
Fig
11
Fig
12
Para evitar daños en el motor el motor se
envía sin aceite ni combustible. El motor
Para verificar el nivel de aceite del motor,
detenga el motor y coloque el cortacésped
Funcionamiento del motor con bajo nivel
de aceite causará daños en el motor. Se
¡NOTA!
¡NOTA!
Siempre use aceite de alta calidad
clasificado como aceite de SAE30
¡PRECAUCIÓN!
¡PRECAUCIÓN!
¡PRECAUCIÓN!
el motor. No intente hacer ninguno de estos
Ajustes mientras el motor está en marcha.
debe estar lleno con el grado correcto de aceite y
combustible antes de arrancar el motor.
recomienda que el aceite de alta calidad, de 4 tiempos es
utilizado. El uso de aceite menos calidad puede acortar el
la vida del motor y el uso de aceite de 2 tiempos dañará el
motor.
(o equivalente, por ejemplo, SAE 10W / 30, a menudo
denominado aceite de cortacésped de 4 tiempos). Nunca use
aditivos con el aceite recomendado. Para prolongar la vida del
motor es importante que el aceite se cambie después de la
Primeras 5 horas de uso.
en una superficie nivelada.
Engine oil filler neck
14
ENSAMBLAJE
Llenando el combustible del motor
Como se muestra en Fig
13
1. Limpie el área alrededor de la tapa de llenado de gas antes de quitar la tapa. Retire la etiqueta de advertencia,
compruebe el nivel de combustible.
2. Rellene el tanque si el nivel de combustible es bajo.
3. Agregue combustible cuidadosamente para evitar el llenado excesivo o el derrame de combustible. No debe haber
combustible en el cuello del llenado.
4. Limpie cualquier derrame o salpicaduras de gasolina antes de arrancar el motor.
5. Apreite el tapón de llenado después del llenado.
Siempre use combustible limpio, fresco
y sin plomo. Compre combustible en
Fig
13
No rellenar en la base del cuello que puede
permitir la expansión del combustible.
GASOLINA es altamente inflamable y
precaución extrema se debe tomar.
Agregu gasolina en un lugar bien ventilada
con el motor parado. No fume ni permita
Para evitar daños en el motor, el motor no
tiene petróleo ni gas. El motor debe
Mantega fuera del alcance de los niños.
¡PRECAUCIÓN!
¡PRECAUCIÓN!
¡PRECAUCIÓN!
¡ADVERTENCIA!
¡ADVERTENCIA!
cantidades que se pueden usar dentro de 30 días. Nunca
mezcle aceite con gasolina.
No llene en exceso el tanque de combustible.
llenarse con el grado correcto de aceite y gasolina antes de
arrancando el motor.
llamas o chispas en el área donde el motor tiene combustible o
donde se almacena la gasolina. Evite el contacto repetido o
prolongado con su piel o inhalación de vapor.
Fuel filler neck
15
ADJUSTE
Ajuste de la altura de corte
Como se muestra en Fig
14
La altura de corte se ajusta centralmente con un mango de ajuste de
altura de corte. Se pueden seleccionar diferentes alturas de corte.
Tire de la palanca de ajuste y seleccione la altura de corte deseada.
Ponga la manija en la posición deseada.
De la posición 1 a la posición 7.
Configuración de la función requerida
Ajustar solo la altura de corte
cuando se apaga el motor y se tira de la
¡PRECAUCIÓN!
Esta cortadora de césped tiene tres funciones. Estas funciones pueden ser convertidas
cambiando ajuste de accesorios. Por favor, consulte la siguiente tabla para la
Mulching Enchufe Bolsa Descarga Lateral
Para embolsado trasero × √ ×
Para mulching √ × ×
Para descarga lateral √ × √
“√”: instalado “×” :retirar
¡PRECAUCIÓN!
funda de la bujía.
configuración de detalles.
Convertir La
Cortadora De Césped
Fig
14
16
FUNCIONAMIENTO
Arrancando y parando el motor
Para arrancar el motor
Como se muestra en la Fig
15
-
16
1. Al arrancar un motor frío, presione hacia abajo el cebador completamente
de 3 a 5 veces.
2. Párese detrás del cortacésped. Tire de la palanca de arranque del motor
hacia la parte superior con una mano y coloque la otra mano en
el arranque de tracción.
3. Tire de la fuerza de arranque aprox. 4-6 pulgadas hasta que sientas
resistencia y luego arrancar el motor con un fuerte tirón.
La cuchilla comienza a girar tan pronto como
Se arranca el motor.
Demasiadas presiones sobre la
imprimación pueden hacer que el motor
Para arrancar el motor, asegúrese de que la funda de la bujía esté ubicada en la bujía y que la
máquina esté llena de suficiente aceite y combustible.
No opere la máquina en áreas cerradas o con poca ventilación ya que los gases de
escape contienen sustancias tóxicas. Mantenga las manos, los pies y la ropa alejados
Si el motor no arranca después de tres tirones,
repite el proceso.
Fig
15
¡ADVERTENCIA!
¡ADVERTENCIA!
¡ADVERTENCIA!
¡NOTA!
¡NOTA!
se inunde al arrancar un motor caliente. La imprimación no
necesita ser utilizada. Si el motor se para debido a la falta de
combustible, rellene y presione la imprimación 3 ~ 5 veces.
de todas las partes móviles de la máquina. El escape y otras partes de la máquina se calentarán durante el
uso. Asegúrese de que la navaja esté bien sujeta antes de arrancar el motor.
Fig
16
Primer

17
FUNCIONAMIENTO
4. Una vez que el motor esté en marcha, ponga la cuerda de arranque.
En la guía de la cuerda. Como se muestra en Fig 17
Apagando el motor
Como se muestra en Fig
18
Suelte la palanca de arranque / parada del motor, volverá a su
posición inicial, el motor se apagará automáticamente.
Limpiar un motor inundado
1. Suelte la palanca de arranque / parada del motor para detener el motor.
2. Retire la bujía, séquela y luego vuelva a instalarla.
3. Tire de la palanca de arranque / parada del motor hacia la manija superior.
4. Haga funcionar el arranque de tracción como se describe anteriormente.
Si el motor no arranca después de que hayas
jalado el arrancador varias veces, el motor puede
¡NOTA!
¡NOTA!
estar inundado con exceso de combustible. Utilice el siguiente
procedimiento para limpiar y arrancar un motor inundado.
Instale la bujía con cuidado con la mano, para
evitar que se enrosque. Después de que se
asiente el enchufe, apriete 1/8 a 1/4 de vuelta con la llave de
casquillo de la chispa para comprimir la rondana.
Fig
17
Fig
18

18
FUNCIONAMIENTO
Cortando el césped
1. Seleccione su configuración requerida.
2. Arranque el motor y déjelo funcionar, y ajústelo a la velocidad requerida. Ver "para arrancar el motor".
3. Sujete firmemente la manija superior con la palanca de arranque / arranque del motor y camine junto con ella para
comenzar a cortar el césped.
Consejos de trabajo
Tan pronto como los recortes de césped empiecen a rastrear la cortadora de césped, es hora de vaciar la bolsa de césped.
1. Para quitar la bolsa de hierba, use una mano para levantar la tapa del eyector y la otra para agarrar el asa de transporte.
La tapa del eyector se cae automáticamente después de retirar la bolsa de hierba y cierra la abertura del canal trasero.
2. Vacíe los residuos de hierba en la bolsa de hierba y vuelva a colocarla.
Respete siempre los procedimientos de seguridad más estrictos cuando utilice el
cortacésped. Cuidadosamente lea las instrucciones de seguridad de este manual antes
de usar el cortacésped.
Nunca abra la tapa del eyector cuando la bolsa de hierba haya sido desmontada (para
vaciarla) y el motor sigue funcionando ¡La cuchilla giratoria puede causar lesiones
graves!
Antes de quitar la bolsa de hierba, apague el motor y espere hasta que la cuchilla se haya
detenido.
Si queda algún residuo de hierba en el conducto de descarga, límpielo con un cepillo. No
retire los residuos de hierba en la carcasa de la cortadora de césped o en la cuchilla con
¡ADVERTENCIA!
¡ADVERTENCIA!
¡NOTA!
¡NOTA!
la mano o con los pies. En su lugar, utilice herramientas adecuadas, como un cepillo o una escoba para
asegurarse de que la hierba cortada se puede recoger en la bolsa de hierba, la abertura de descarga y el interior
de la carcasa del cortacésped no deben tener obstrucciones.
19
ALMACENAMIENTO Y MANTENIMIENTO
Limpieza
Limpieza general
La cortadora de césped debe limpiarse a fondo cada vez que se haya utilizado. Siempre limpie su cortadora de césped
inmediatamente después de su uso. No permita que los recortes de césped y otros residuos se sequen y endurezcan en
ninguna de las superficies de la cortadora. Los restos de hierba seca y la suciedad pueden perjudicar la operación de corte.
Compruebe que el conducto de hierba esté libre de hierba residual. Eliminar cualquier residuo. Revise la parte inferior de la
cortadora de césped y el soporte de la cuchilla. Incline la cortadora de césped hacia su lado izquierdo (opuesto al cuello
de llenado de aceite)
No incline la cortadora de césped más de 90 grados.
Mantenimiento De La Bujía
1. Cuandoel motor se haya enfriado, retire la bujía con un giro.
2. Retire la bujía con una llave de bujías.
3. Limpie la bujía con un cepillo de alambre (no incluido).
4. Usando un calibre, ajuste el espacio a 0,75 mm.
5. Instale la bujía con cuidado a mano, para evitar que se enrosque.
6. Después de que la bujía esté asentada, apriete con la llave para comprimir la lavadora.
Antes de realizar cualquier trabajo de mantenimiento o limpieza, apague el motor y
espere hasta que la cuchilla se haya detenido.
Antes de colocar el cortacésped de lado, drene completamente el tanque de combustible con
una bomba de extracción de combustible.
Fig
19
¡ADVERTENCIA!
¡NOTA!
0.7 mm - 0.8 mm
20
ALMACENAMIENTO Y MANTENIMIENTO
Cómo reparar el filtro de aire
Como se muestra en Fig
20
Los filtros de aire sucios reducen la salida del motor al suministrar muy poco aire al carburador. Si el aire contiene mucho
polvo el filtro de aire se debe revisar con más frecuencia.
1. Retire la cubierta exterior del filtro de aire . Ten cuidado de evitar la suciedad y los escombros.
de caer en el conjunto del filtro de aire.
2. Separe el filtro de aire del alojamiento del filtro de aire .
3. Inspeccione el filtro de aire. Limpie el filtro de aire sucio con agua tibia y jabón suave.
Deje que el filtro de aire se seque completamente antes de volver a instalarlo.
4. Instale el conjunto del filtro de aire en el carburador y asegúrelo con un tornillo.
Cambiando el aceite del motor
Incline el cortacésped hacia el llenador de aceite, tenga un recipiente listo para recoger el aceite y retire la varilla medidora.
Cuandoel aceite este vacio, vuelva a colocar la varilla y limpie los derrames.
Rellene con 13.5 oz./400ml de aceite SAE30 o equivalente i. e SAE5W / 30, SAE10W / 30. Cuando la varilla se apoya en
el relleno. Eel nivel de aceite debe estar entre las marcas mínimas y máximas en la varilla.
777Consulte “Comprobación del nivel de aceite del motor y llenado con aceite del motor”
Arranque el motor y déjelo funcionar brevemente.
Pare el motor, espere un minuto y compruebe el nivel de aceite. Rellene si es necesario.
Nunca haga funcionar el motor sin el elemento del filtro de aire instalado.
Fig
20
No utilice aire a presión ni disolventes para limpiar el filtro. El aire a presión puede dañar
el filtro y los solventes disolverán el filtro.
NOTA!
¡ADVERTENCIA!
A
B
21
ALMACENAMIENTO Y MANTENIMIENTO
Reemplazo de la navaja
Por razones de seguridad, solo debe afilar, afilar y montar su hoja en un taller de servicio autorizado. Para obtener
resultados óptimos, se recomienda inspeccionar la cuchilla una vez al año.
Por razones de seguridad, recomendamos que la navaja solo sea cambiada
por alguien calificado y autorizado para hacerlo.
Sostenga la navaja y desenrosque el perno de la navaja en sentido contrario
a las agujas del reloj con una llave inglesa. Retire la arandela y la navaja.
Coloque una nueva navaja o afile nuevamente la navaja, ubique la navaja en
los dos espárragos del flanco de la navaja y luego vuelva a colocar la arandela
y los pernos. Asegúrese de que la navaja esté ubicada correctamente y
luego apriete firmemente el perno. No apriete demasiado. El giro hacia arriba
de la navaja debe sobresalir hacia el compartimiento del motor.
Antes de retirar la bolsa de recolección de césped, apague el motor y espere hasta
que la cuchilla se detenga por completo.
Necesitará guantes de jardín (no incluidos) y una llave inglesa (no incluida) para
retirar la navaja.
No invierta el cortacésped. Inclínelo ligeramente hacia el tubo de llenado de aceite y alcance
debajo de la plataforma.
¡NOTA!
¡NOTA!
Maneje siempre la navaja con cuidado, los bordes afilados podrían causar lesiones
UTILICE GUANTES. Renueve su navaja de metal después de 50 horas de corte o 2 años,
lo que ocurra primero, independientemente de la condición.
Si la navaja está rajada o dañada, reemplácela con una nueva.
No sostengas la navaja con tu mano sin guante.
Mantenga el filo de la navaja al cortar la hierba. Si la navaja se ha desgastado
excesivamente y se ha picado y desafilado, debe reemplazarse o afilarse. El filo de la
Fig
21
¡ADVERTENCIA!
¡ADVERTENCIA!
¡ADVERTENCIA!
¡ADVERTENCIA!
¡ADVERTENCIA!
navaja afectará el rendimiento del cortacésped.

22
ALMACENAMIENTO Y MANTENIMIENTO
Almacenando el cortacésped por períodos cortos
El cortacésped se puede almacenar por cortos períodos de tiempo (menos de 15 días) sin realizar ningún mantenimiento
de almacenamiento.
Antes de guardar el cortacésped, realice siempre lo siguiente:
1. Permita que el motor se enfríe completamente.
2. Asegúrese de que la bolsa de hierba esté vacía.
3. Limpie todos los residuos de debajo de la plataforma del cortacésped.
4. Guarde el cortacésped en una superficie plana y nivelada con el cortacésped en posición vertical.
5. Almacene en un lugar seguro que no sea accesible para niños o personas que no estén familiarizadas con la operación.
Almacenando el cortacésped por períodos prolongados
Si el cortacésped debe ser almacenado por más de 15 días, el mantenimiento del almacenamiento se debe realizar en el
cortacésped. Si no se llevan a cabo los siguientes pasos, la próxima vez que opere el cortacésped, es posible que no se
inicie correctamente y que deba ser reparado.
1. Vacíe el tanque de gasolina con una bomba de succión de gasolina si está disponible.
2. Arranque el motor y déjelo funcionar hasta que se haya agotado la gasolina restante.
3. Cambie el aceite al final de cada temporada. Para hacerlo, retire el aceite de motor usado de un motor caliente y vuelva
a llenarlo con aceite nuevo.
4. Limpie las aletas de refrigeración del cilindro y la carcasa.
5. Asegúrese de limpiar toda la máquina para proteger la pintura.
6. Almacene la máquina en un lugar bien ventilado.
For safety reasons we recommend that the blade only be changed by someone
qualified and authorized to do so.
Hold the blade and unscrew the blade bolt counterclockwise using a spanner
wrench. Remove the washer and the blade.
Fit a new blade or re-sharpen the blade, locate the blade on the two studs on
the blade flan and then replace the washer and bolts. Make sure the blade is
correctly located, and then firmly tighten the bolt. Do not over tighten. The up
turn of the blade must project into the motor compartment.
No vacíe el tanque de combustible en áreas cerradas, cerca del fuego o cuando esté
fumando. Los vapores de gasolina pueden causar explosiones y fuego.
¡PRECAUCIÓN!

23
ALMACENAMIENTO Y MANTENIMIENTO
Programa de mantenimiento
Realizar el mantenimiento de rutina correctamente en su cortadora de césped asegurará que obtenga años de uso sin
problemas.
Guarde este manual en un lugar seguro para futuras consultas.
Se recomienda que se cumpla el siguiente programa de mantenimiento. Esto asegurará el funcionamiento del cortacésped.
correctamente y es seguro de usar.
El aceite del motor debe cambiarse después de las primeras 8 horas.
Transporte
Vaciar el depósito de gasolina.
Siempre deje funcionar el motor hasta que haya agotado el resto del combustible en el tanque.
Vaciar el aceite del motor del motor caliente.
Retire la funda de la bujía.
Limpie las aletas de refrigeración del cilindro y la carcasa.
Utilice el embalaje original para enviar siempre que sea posible.
12 HORAS DE USO 24 HORAS DE USO 36 HORAS DE USO
Filtro de Aire Limpiar Limpiar Reemplazar
Bujía Verificar Limpiar Reemplazar
Aceite del motor Verificar Reemplazar Verificar

24
SOLUCIÓN DE PROBLEMAS
Las fallas que no pueden rectificarse con la ayuda de la siguiente tabla pueden ser rectificadas únicamente por una
empresa especializada (centro de servicio al cliente) 1-866-591-8921.
Tenga en cuenta que cualquier reparación inadecuada también invalidará la garantía y podría incurrir en costos adicionales.
Utilice únicamente repuestos originales. Solo estas piezas de repuesto están diseñadas y son adecuadas para el producto.
El uso de otro repuesto las piezas no solo anulan la garantía, sino que también pueden ponerse en peligro a usted y
a su entorno.
Antes de realizar cualquier trabajo de mantenimiento o limpieza, apague el motor y
espere hasta que la navaja se haya detenido.
Las reparaciones incorrectas pueden hacer que el producto funcione de forma
insegura. Esto te pone en peligro a ti y a tu entorno.
FALLA CAUSA SOLUCIÓN
Mientras funciona
la máquina vibra
fuertemente
Los tornillos estan sueltos
Los sujetadores de la navaja están sueltos
La navaja esta desequilibrada
Revise los tornillos
Revise los sujetadores de la navaja
Reemplazar la navaja
El motor no arranca
El motor funciona
inestablemente
Resultados de corte
desigual
Bolsa de hierba no está
llena suficientemente
Palanca de arranque no esta presionada
La bujia esta defectuosa
El tanque de combustible esta vacio
El motor puede estar inundado
El filtro de aire esta sucio
La bujia esta sucia
La navaja no tiene filo
La altura de corte es demasiado baja
La navaja esta desgastada
Bolsa de hierba está obstruida
La altura de corte esta correcto?
El está mojado?
¿El canal de descarga esta
bloqueada?
La parte inferior
de la cubierta del cortacésped
esta obstruido?
Reemplace la bujía
Llame al centro de servicio al cliente
Recarga con combustible
Retire el tapón y seque
Limpiar el filtro de aire
Limpiar la bujia
Afilar la navaja
Establecer la altura correcta
Reemplace la navaja
Vaciar la bolsa de hierba
Corregir la altura de corte
Deja que el césped se seque
Limpiar el canal de descarga /
alojamiento
Limpie la parte inferior del cortacésped.
cubierta
¡PRECAUCIÓN!
¡ADVERTENCIA!