CAUTION: To prevent INJURY from pinching, keep hands and fingers away from the joints while assembling the rail.
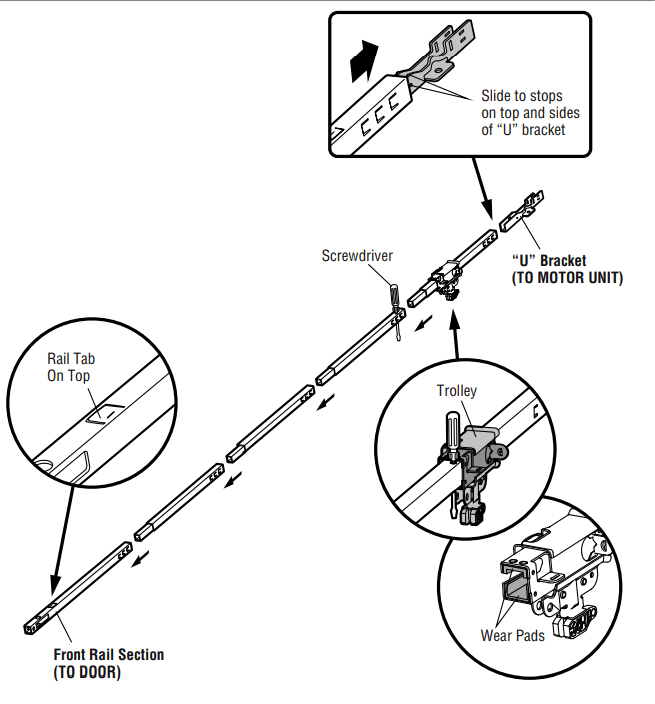
To avoid installation difficulties, do not run the garage door opener until instructed to do so. The front rail has a cut out “window” at the door end. The rail tab MUST be on top of the rail when assembled.
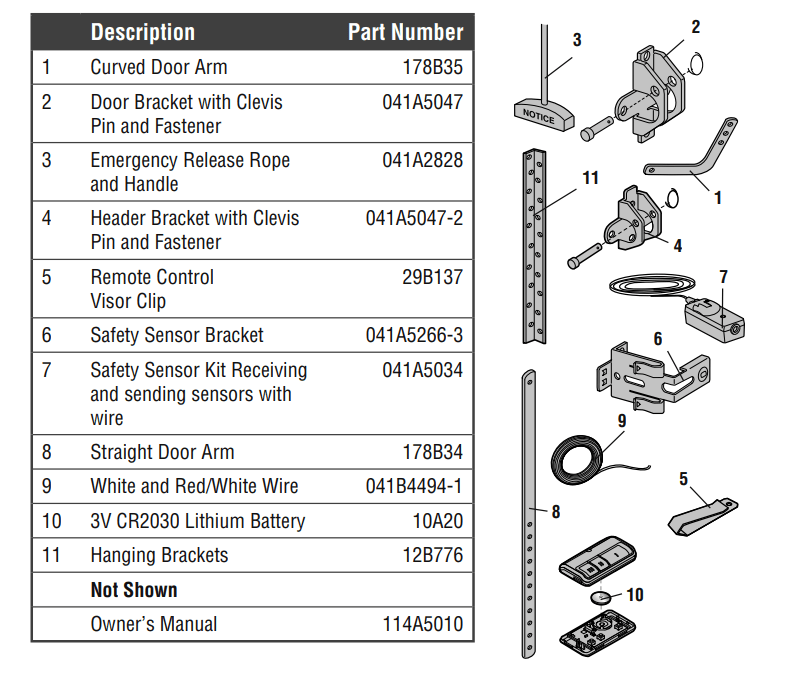
Remove the straight door arm and hanging bracket packaged inside the front rail and set aside for Installation Step 5 and 9. NOTE: To prevent INJURY while unpacking the rail carefully remove the straight door arm stored within the rail section.
Align the rail sections on a flat surface as shown and slide the tapered ends into the larger ones. Tabs along the side will lock into place.
Place the motor unit on packing material to protect the cover, and rest the back end of the rail on top. For convenience, put a support under the front end of the rail.
As a temporary stop, insert a screwdriver into the hole in the second rail section from the motor unit, as shown.
Check to be sure there are 4 plastic wear pads inside the inner trolley. If they became loose during shipping, check all packing material. Snap them back into position as shown.
Slide the trolley assembly toward the screwdriver as shown.
Slide the rail onto the “U” bracket, until it reaches all the stops on the top and sides of the “U” bracket
STEP 2 Fasten the rail to the motor unit
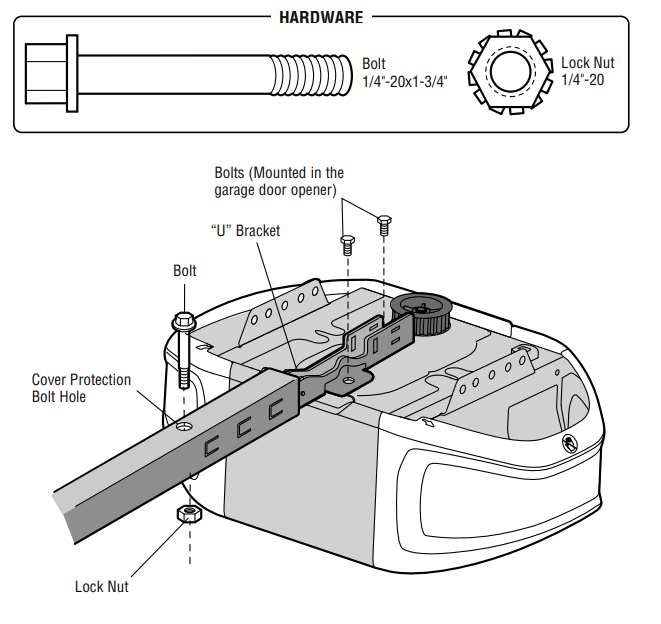
CAUTION: To avoid SERIOUS damage to garage door opener, use ONLY those bolts/fasteners mounted in the top of the opener.
Insert a 1/4"-20 x 1-3/4" bolt into the cover protection bolt hole on the back end of the rail as shown. Tighten securely with a 1/4"-20 lock nut. DO NOT overtighten.
Remove the bolts from the top of the motor unit.
Use the carton to support the front end of the rail.
Place the “U” bracket, flat side down onto the motor unit and align the bracket holes with the bolt holes.
Fasten the “U” bracket with the previously removed bolts; DO NOT use any power tools. The use of power tools may permanently damage the garage door opener.
STEP 3 Install the idler pulley
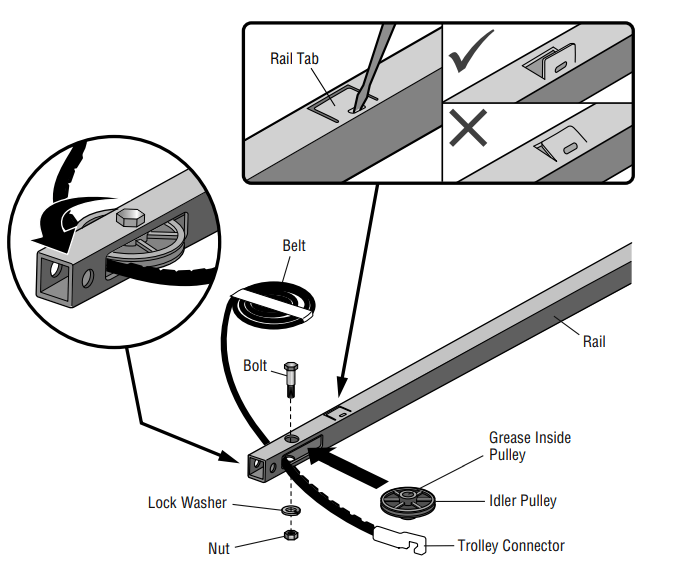
Lay the belt beside the rail, as shown. Grasp the end with the hooked trolley connector and pass approximately 12" (30 cm) of belt through the window. Keep the ribbed side toward the rail, and allow it to hang until Assembly Step 4.
Remove the tape from the idler pulley. The inside center should be pre-greased. If dry, regrease to ensure proper operation.
Place the idler pulley into the window as shown.
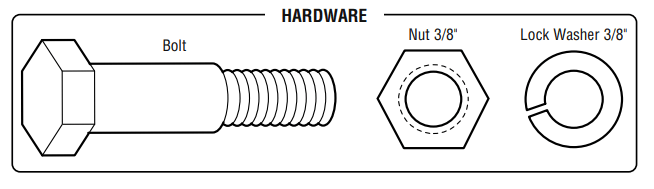
Insert the idler bolt from the top through the rail and pulley. Tighten with a 3/8" lock washer and nut underneath the rail until the lock washer is compressed.
Rotate the pulley to be sure it spins freely.
Locate the rail tab. The rail tab is between the idler bolt and the trolley in the front rail section. Use a flathead screwdriver and lift the rail tab until the tab is vertical (90º).
STEP 4 Install the belt
Pull the belt around the idler pulley and toward the trolley. The ribbed side must contact the pulley.
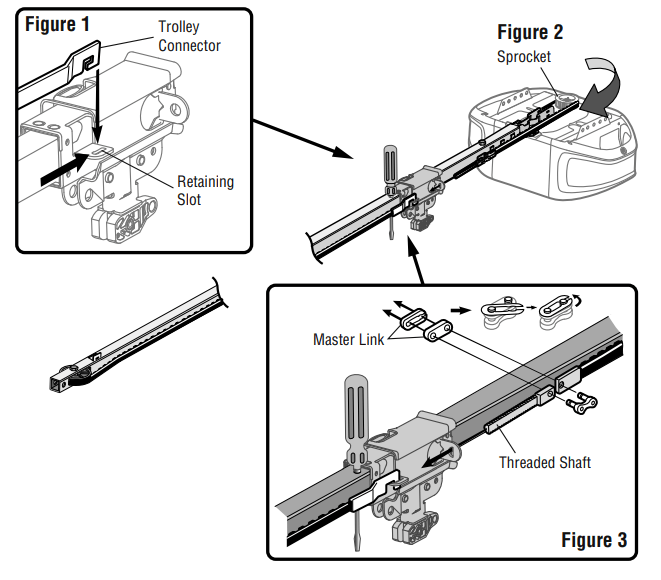
Hook the trolley connector into the retaining slot on the trolley as shown (Figure 1).
With the trolley against the screwdriver, dispense the remainder of the belt along the rail length toward the motor unit and around the sprocket (Figure 2). The sprocket teeth must engage the belt.
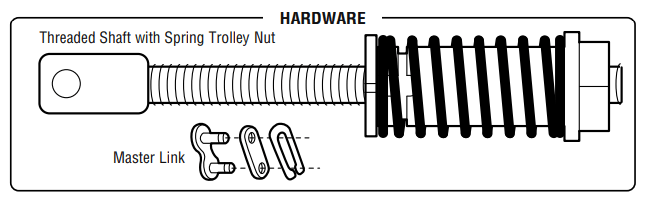
Check to make sure the belt is not twisted. Connect the trolley threaded shaft with the master link (Figure 3).
Push pins of master link bar through holes in end of belt and trolley threaded shaft.
Push master link cap over pins and past pin notches.
Slide the closed end of the clip-on spring over one of the pins. Push the open end of the clip-on spring onto the other pin.
Remove the spring trolley nut from the threaded shaft.
Insert the trolley threaded shaft through the hole in the trolley.
STEP 5 Tighten the belt
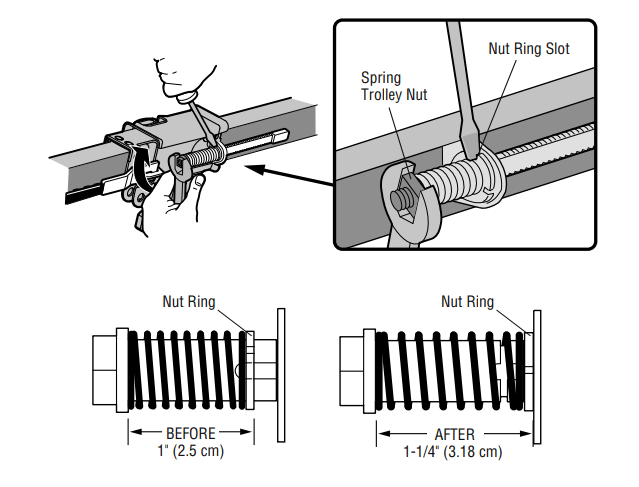
By hand, thread the spring trolley nut on the threaded shaft until it is finger tight against the trolley. Do not use any tools. Remove the screwdriver.
Insert a flathead screwdriver tip into one of the nut ring slots and brace it firmly against the trolley.
Tighten the spring trolley nut with an adjustable wrench or a 7/16" open end wrench about a quarter turn until the spring releases and snaps the nut ring against the trolley. This sets the spring to optimum belt tension.
STEP 6 Install the sprocket cover
WARNING: To avoid possible SERIOUS INJURY to finger from moving garage door opener:
ALWAYS keep hand clear of sprocket while operating opener.
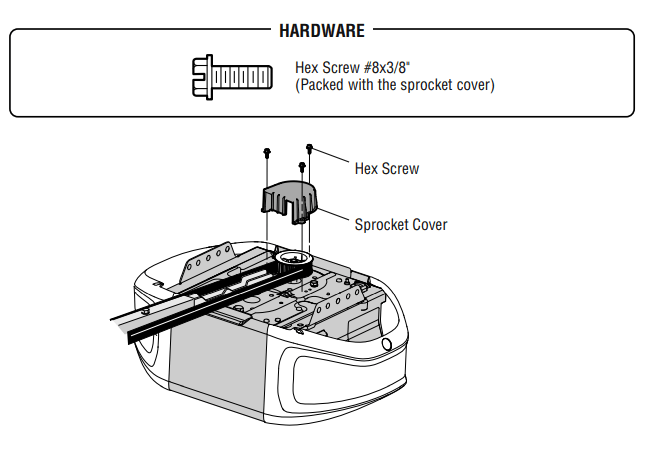
Securely attach sprocket cover BEFORE operating.
1. Position the sprocket cover over the sprocket as shown and fasten to the mounting plate with 8x3/8" hex screws provided.
You have now finished assembling your garage door opener. Please read the following warnings before proceeding to the installation section.
Adjustments
Introduction
WARNING: Without a properly installed safety reversal system, persons (particularly small children) could be SERIOUSLY INJURED or KILLED by a closing garage door.
Incorrect adjustment of garage door travel limits will interfere with proper operation of safety reversal system.
After ANY adjustments are made, the safety reversal system MUST be tested. Door MUST reverse on contact with 1-1/2" (3.8 cm) high object (or 2x4 laid flat) on floor.
CAUTION: To prevent damage to vehicles, be sure fully open door provides adequate clearance.
Your garage door opener is designed with electronic controls to make setup and adjustments easy. The adjustments allow you to program where the door will stop in the open (UP) and close (DOWN) position. The electronic controls sense the amount of force required to open and close the door. The force is adjusted automatically when you program the travel.
NOTE: If anything interferes with the door’s upward travel it will stop. If anything interferes with the door’s downward travel, it will reverse.
One-Piece Doors Only
When setting the UP travel for a one-piece door ensure that the door does not slant backwards when fully open (UP). If the door is slanted backwards this will cause unnecessary bucking and/or jerking when the door is opening or closing
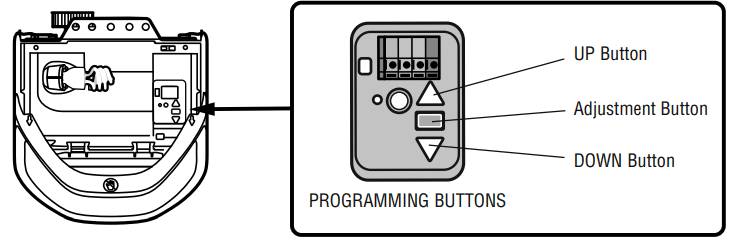
Programming Buttons
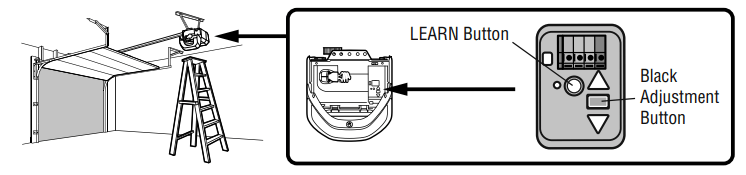
The programming buttons are located on the left side panel of the garage door opener and are used to program the travel. While programming, the UP and DOWN buttons can be used to move the door as needed.
STEP 1 Program the Travel
WARNING: Without a properly installed safety reversal system, persons (particularly small children) could be SERIOUSLY INJURED or KILLED by a closing garage door.
Incorrect adjustment of garage door travel limits will interfere with proper operation of safety reversal system.
After ANY adjustments are made, the safety reversal system MUST be tested. Door MUST reverse on contact with 1-1/2" (3.8 cm) high object (or 2x4 laid flat) on floor.
While programming, the UP and DOWN buttons can be used to move the door as needed.
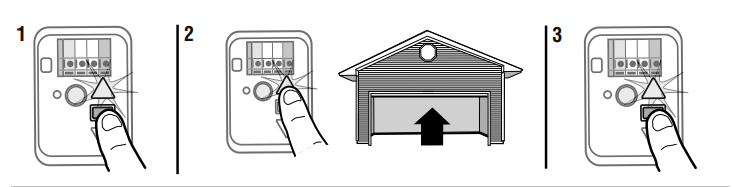
1. Press and hold the Adjustment Button until the UP Button begins to flash and/or a beep is heard.
2. Press and hold the UP Button until the door is in the desired UP position.
3. Once the door is in the desired UP position press and release the Adjustment Button. The garage door opener lights will flash twice and the DOWN Button will begin to flash.
IMPORTANT NOTE: For onepiece door installations refer to page 29.
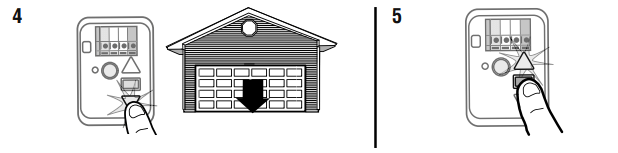
4. Press and hold the DOWN button until the door is in the desired DOWN position.
5. Once the door is in the desired DOWN position press and release the Adjustment Button. The garage door opener lights will flash twice and the UP Button will begin to flash.
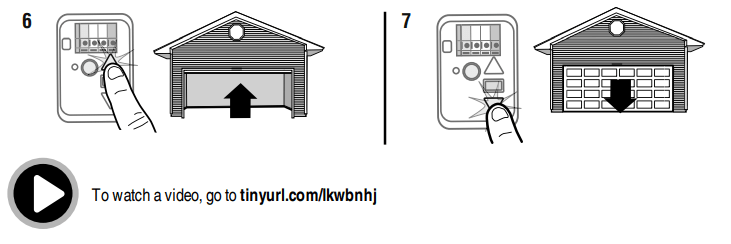
6. Press and release the UP Button. When the door travels to the programmed UP position, the DOWN Button will begin to flash.
7. Press and release the DOWN Button. The door will travel to the programmed DOWN position. Programming is complete.
* If the garage door opener lights are flashing 5 times during the steps for Program the Travel, the programming has timed out. If the garage door opener lights are flashing 10 times during the steps for Program the Travel, the safety reversing sensors are misaligned or obstructed (refer to page 28). When the sensors are aligned and unobstructed, cycle the door through a complete up and down cycle using the remote control or the UP and DOWN buttons. Programming is complete. If you are unable to operate the door up and down, repeat the steps for Programming the Travel.
STEP 2 Test the Safety Reversal System
WARNING: Without a properly installed safety reversal system, persons (particularly small children) could be SERIOUSLY INJURED or KILLED by a closing garage door.
Safety reversal system MUST be tested every month.
After ANY adjustments are made, the safety reversal system MUST be tested. Door MUST reverse on contact with 1-1/2" (3.8 cm) high object (or 2x4 laid flat) on the floor.
With the door fully open, place a 1-1/2 inch (3.8 cm) board (or a 2x4 laid flat) on the floor, centered under the garage door.
Press the remote control push button to close the door. The door MUST reverse when it makes contact with the board.
If the door stops but does not reverse:
Review the installation instructions provided to insure all steps were followed;
Repeat Program the Travel (see Adjustment Step 1);
Repeat the Safety Reversal test. If the test continues to fail, call a trained door systems technician.
If the test continues to fail, call a trained door systems technician.
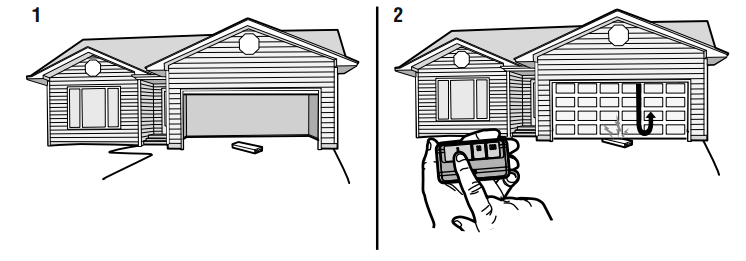
STEP 3 Test the Protector System®
WARNING: Without a properly installed safety reversing sensor, persons (particularly small children) could be SERIOUSLY INJURED or KILLED by a closing garage door.
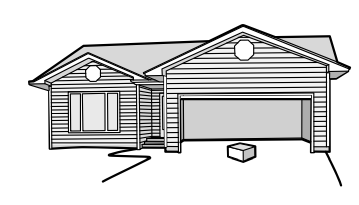
1. Open the door. Place the garage door opener carton in the path of the door.
2. Press the remote control push button to close the door. The door will not move more than an inch (2.5 cm), and the garage door opener lights will flash 10 times.
The garage door opener will not close from a remote control if the LED in either safety reversing sensor is off (alerting you to the fact that the sensor is misaligned or obstructed). If the garage door opener closes the door when the safety reversing sensor is obstructed (and the sensors are no more than 6 inches [15 cm] above the floor), call for a trained door systems technician.
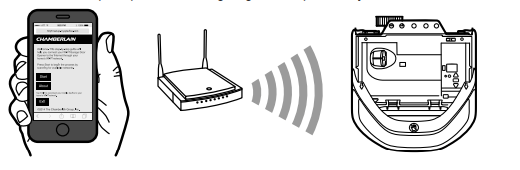
MyQ® Smartphone Control
Get Connected
…and control your garage door opener with the MyQ® App
You will need:
A smartphone or tablet l Broadband Internet connection
A strong Wi-Fi signal (2.4 Ghz, 802.11b/g/n required) in the garage, see page 3
Password for your home network
MyQ® serial number located on the garage door opener
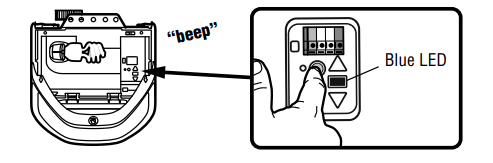
1. ACTIVATE "Wi-Fi LEARN" MODE
Press and release the yellow LEARN button on the garage door opener 3 times. The garage door opener will beep once and a blue light will flash. You have 20 minutes to complete the connection process.
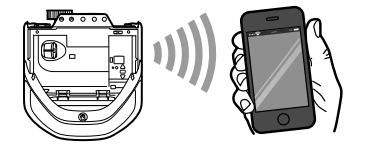
2. CONNECT TO THE MyQ® Wi-Fi NETWORK
On your mobile device, go to Settings → Wi-Fi, and select the network with the "MyQ-" prefix.
3. CONNECT THE GARAGE DOOR OPENER TO YOUR HOME Wi-Fi NETWORK
Launch the web browser (such as Safari or Chrome) on your mobile device and go to "setup.myqdevice.com". Follow the on-screen prompts to add the garage door opener to your home Wi-Fi network.
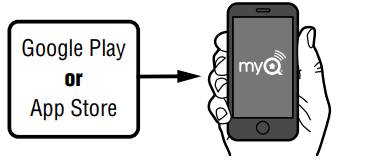
4. SETUP YOUR MyQ® ACCOUNT
Download the MyQ® app from the App StoreSM or Google Play™ store. Sign up for your MyQ® account and add the MyQ® serial number to your account.
Congratulations you've successfully completed the setup. Enjoy MyQ® Smartphone Control!
Operation
Using your Garage Door Opener
The garage door opener can be activated with a wall-mounted door control, remote control, wireless keyless entry, MyQ® Smartphone Control app or MyQ® Garage Door Monitor. When the door is closed and the garage door opener is activated the door will open. If the door senses an obstruction or is interrupted while opening the door will stop. When the door is in any position other than closed and the garage door opener is activated the door will close. If the garage door opener senses an obstruction while closing, the door will reverse. If the obstruction interrupts the sensor beam the garage door opener lights will blink 10 times. If the door is fully open, and the safety reversing sensors are not installed, or are misaligned, the door will not close from a remote control, TTC, or the MyQ® Smartphone Control app. However, you can close the door by holding the button on the door control or the ENTER button on the keyless entry until the door is fully closed.
The garage door opener light bulbs will turn on when the opener is initially plugged in; power is restored after interruption, or when the garage door opener is activated. The lights will turn off automatically after 4- 1/2 minutes. The lights will turn on when someone enters through the open garage door and the safety reversing sensor infrared beam is obstructed, see page 35 (Motion Detecting Control Panel) or see page 37 (Multi-Function Control Panel). Use an incandescent A19 light bulb (100 watt maximum) or for maximum energy efficiency a 26W (100W equivalent) compact fluorescent light (CFL) bulb. NOTE: Do not use halogen, short neck, or specialty light bulbs as these may overheat the end panel or light socket. Do not use LED bulbs as they may reduce the range or performance of your remote controls.
To Open the Door Manually
WARNING: To prevent possible SERIOUS INJURY or DEATH from a falling garage door:
If possible, use emergency release handle to disengage trolley ONLY when garage door is CLOSED. Weak or broken springs or unbalanced door could result in an open door falling rapidly and/or unexpectedly.
NEVER use emergency release handle unless garage doorway is clear of persons and obstructions. l NEVER use handle to pull door open or closed. If rope knot becomes untied, you could fall.
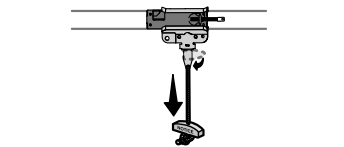
DISCONNECT THE TROLLEY
The door should be fully closed if possible.
Pull down on the emergency release handle so the trolley release arm snaps to the vertical position. The door can now be raised and lowered as often as necessary.
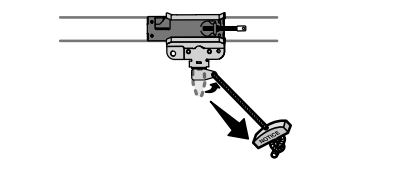
TO RE-CONNECT THE TROLLEY
1. Pull the emergency release handle toward the garage door opener so the trolley release arm snaps to the horizontal position. The trolley will reconnect on the next UP or DOWN operation, either manually or by using the door control or remote control.
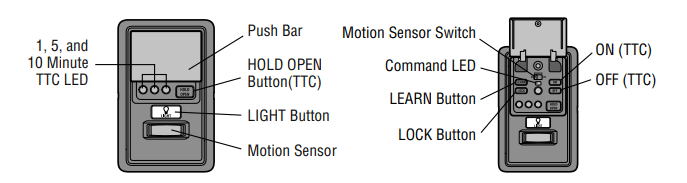
Motion Detecting Control Panel
SYNCHRONIZE THE DOOR CONTROL: To synchronize the door control to the garage door opener, press the push bar until the garage door opener activates (it may take up to 3 presses). Test the door control by pressing the push bar; each press of the push bar will activate the garage door opener
PUSH BAR: Press the push bar to open or close the door.
LIGHT BUTTON: Press the LIGHT button to turn the garage door opener lights on or off. When the lights are turned on they will stay on until the LIGHT button is pressed again, or until the garage door opener is activated. Once the garage door opener is activated the lights will turn off after the specified period of time (the factory default is 4-1/2 minutes). The LIGHT button will not control the lights when the door is in motion. The Light Feature will turn on the light on the garage door opener when someone enters through the open garage door and the safety reversing sensor infrared beam is obstructed.
To change the amount of time the lights stay on:
Press and hold the LOCK button (approximately 10 seconds) until the garage door opener lights flash. The time interval is indicated by the number of times the garage door opener lights flash:
1 flash is 1-1/2 minutes
2 flashes is 2-1/2 minutes
3 flashes is 3-1/2 minutes
4 flashes is 4-1/2 minutes
To cycle through the time intervals repeat the step above. If the push bar LED is continuously blinking, the LOCK feature needs to be turned off.
To turn the Light feature on or off (Factory default is On):
Turn OFF:
Close the garage door.
Start with the garage door opener lights "OFF".
Press and hold the LIGHT button (approximately 10 seconds) until the garage door opener lights turn off, then on again.
Turn ON:
Close the garage door.
Start with the garage door opener lights "ON".
Press and hold the LIGHT button (approximately 10 seconds) until the garage door opener lights turn off, then on again.
LEARN BUTTON: Any compatible remote control, wireless keyless entry, or MyQ® devices can be programmed to the garage door using the LEARN button.
MOTION SENSOR: The motion sensor automatically turns on the garage door opener lights when motion is detected. The lights come on for the set period of time, and then shut off. If using the garage door opener light as a work light disable the motion sensor, otherwise the lights may turn off automatically if you are beyond the range of the motion sensor.
The motion sensor switch turns the motion sensor on or off.
LOCK: Prevents the garage door opener from being activated by remote controls while still allowing activation from the door control and keyless entry.
Turn ON: Press and hold the LOCK button for 2 seconds. The command LED will flash as long as the lock feature is on.
Turn OFF: Press and hold the LOCK button for 2 seconds. The command LED will stop flashing and normal operation will resume.
TIMER-TO-CLOSE (TTC) (Factory default is set to off): The Timer-to-Close feature automatically closes the door after a specified time period and can be adjusted using the door control. DO NOT enable TTC if operating a onepiece door. TTC is to be used ONLY with sectional doors. The garage door opener will beep and the lights will flash before closing the door. The TTC feature will deactivate if the garage door encounters an obstruction twice; or the safety reversing sensors are incorrectly installed. The garage door will reverse open and WILL NOT close until the obstructions are clear or the safety reversing sensors are correctly installed. When the obstruction has been cleared or the safety reversing sensors have been aligned, the door will close when the garage door opener is activated. TTC WILL NOT work if the garage door opener is operating by battery power or if the safety reversing sensors are misaligned. This feature is NOT intended to be the primary method of closing the door. A keyless entry should be installed in the event of an accidental lock out when using this feature.
To turn TTC on or off or to set the TTC time interval:
Turn ON:
Press and hold the ON button until one of the TTC LEDs light up.
Then press the ON button again to cycle through the time interval options. The TTC time interval can be set to 1, 5, and 10 minutes (the corresponding TTC LED will light for each time interval). The garage door opener light bulbs will blink as confirmation. Once the TTC has been set and the door is open, the TTC LED for the selected time interval will blink and begin to count down to close the door.
Turn OFF:
Press and hold the OFF button until all TTC LEDs turn off and a beep is heard from the garage door opener.
Temporarily hold door open (suspend TTC):
Press and release the HOLD OPEN button.
Press the HOLD OPEN button again to resume normal TTC operation.
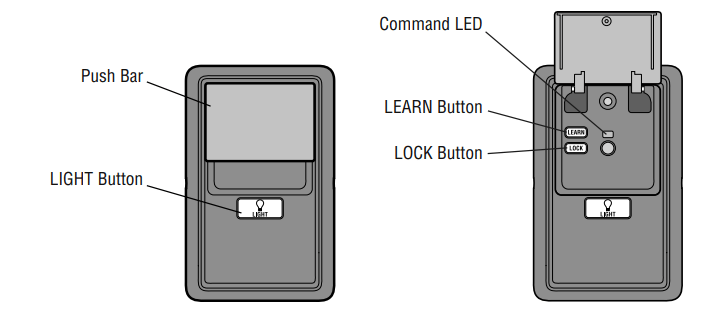
Multi-Function Control Panel
SYNCHRONIZE THE DOOR CONTROL: To synchronize the door control to the garage door opener, press the push bar until the garage door opener activates (it may take up to 3 presses). Test the door control by pressing the push bar; each press of the push bar will activate the garage door opener.
PUSH BAR: Press the push bar to open or close the door.
LIGHT BUTTON: Press the LIGHT button to turn the garage door opener lights on or off. When the lights are turned on they will stay on until the LIGHT button is pressed again, or until the garage door opener is activated. Once the garage door opener is activated the lights will turn off after the specified period of time (the factory default is 4-1/2 minutes). The LIGHT button will not control the lights when the door is in motion. The Light Feature will turn on the light on the garage door opener when someone enters through the open garage door and the safety reversing sensor infrared beam is obstructed.
To change the amount of time the lights stay on:
Press and hold the LOCK button (approximately 10 seconds) until the garage door opener lights flash. The time interval is indicated by the number of times the garage door opener lights flash:
1 flash is 1-1/2 minutes
2 flashes is 2-1/2 minutes
3 flashes is 3-1/2 minutes
4 flashes is 4-1/2 minutes
To cycle through the time intervals repeat the step above. If the push bar LED is continuously blinking, the LOCK feature needs to be turned off.
To turn the Light feature on or off (Factory default is On):
Turn OFF:
Close the garage door.
Start with the garage door opener lights "OFF".
Press and hold the LIGHT button (approximately 10 seconds) until the garage door opener lights turn off, then on again.
Turn ON:
Close the garage door.
Start with the garage door opener lights "ON".
Press and hold the LIGHT button (approximately 10 seconds) until the garage door opener lights turn off, then on again.
LEARN BUTTON: Any compatible remote control, wireless keyless entry, or MyQ® devices can be programmed to the garage door using the LEARN button.
LOCK: Prevents the garage door opener from being activated by remote controls while still allowing activation from the door control and keyless entry.
Turn ON: Press and hold the LOCK button for 2 seconds. The command LED will flash as long as the lock feature is on.
Turn OFF: Press and hold the LOCK button for 2 seconds. The command LED will stop flashing and normal operation will resume.
Remote Control and Keyless Entry
Pre-programmed remote control included, no need to program the remote.
To add or reprogram a remote control, follow the instructions below. Older Chamberlain remote controls are NOT compatible, see page 43 for compatible accessories.
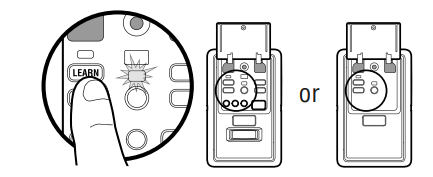
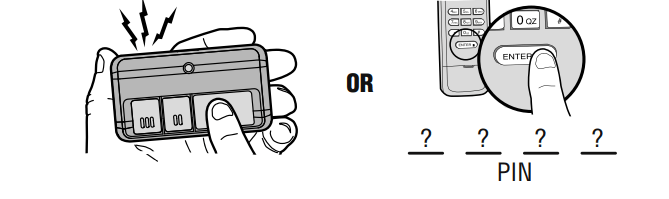
PROGRAM USING THE DOOR CONTROL
Press the LEARN button on the door control to enter Programming Mode.
Press the LEARN button again, the LED will flash once.
Remote Control: Press the button on the remote control that you wish to operate your garage door. Keyless Entry: Enter a 4-digit personal identification number (PIN) of your choice on the keyless entry keypad. Then press the ENTER button.
The garage door opener lights will flash (or two clicks will be heard) when the code has been programmed.
1. The command LED will flash once.
2. The command LED will flash once again.
3.
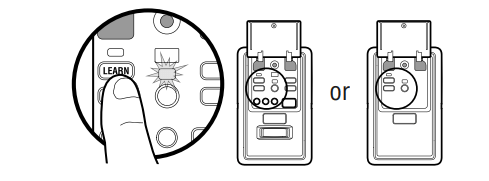
To Erase the Memory
ERASE ALL REMOTE CONTROLS AND KEYLESS ENTRIES
1. Press and hold the LEARN button on garage door opener until the learn LED goes out (approximately 6 seconds). All remote control and keyless entry codes are now erased. Reprogram any accessory you wish to use.
ERASE ALL REMOTE CONTROLS, KEYLESS ENTRIES AND MyQ® DEVICES FROM GARAGE DOOR OPENER
Press and hold the LEARN button on garage door opener until the learn LED goes out (approximately 6 seconds).
Immediately press and hold the LEARN button again until the learn LED goes out. All codes are now erased. Reprogram any accessory you wish to use.
ERASE THE CONNECTION FROM GARAGE DOOR OPENER TO HOME Wi-Fi NETWORK
Press and hold the black adjustment button on the garage door opener until 3 beeps are heard (Approximately 6 seconds).
ERASE A MyQ® ACCOUNT
Go to www.mychamberlain.com to access your MyQ® account.
Go to "Account" section.
Click "Delete Account".
Maintenance
Maintenance Schedule
EVERY MONTH
Manually operate door. If it is unbalanced or binding, call a trained door systems technician.
Check to be sure door opens and closes fully. Adjust if necessary, see page 29.
Test the safety reversal system. Adjust if necessary, see page 31.
EVERY YEAR
Oil door rollers, bearings and hinges. The garage door opener does not require additional lubrication. Do not grease the door tracks.
The Remote Control Battery
WARNING:
To prevent possible SERIOUS INJURY or DEATH:
NEVER allow small children near batteries.
If battery is swallowed, immediately notify doctor.
To reduce risk of fire, explosion or chemical burn:
Replace ONLY with 3V CR2032 coin batteries.
DO NOT recharge, disassemble, heat above 212°F (100°C) or incinerate.
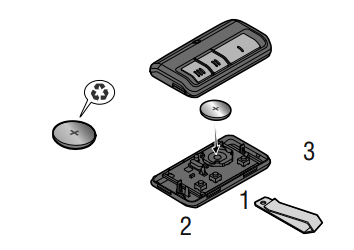
The 3V CR2032 Lithium battery should produce power for up to 3 years. If the battery is low, the remote control’s LED will not flash when the button is pressed. To replace battery, pry open the case first in the middle (1), then at each side (2 and 3) with the visor clip.
Replace the batteries with only 3V CR2032 coin cell batteries. Insert battery positive side up. Dispose of old batteries properly.
NOTICE: This device complies with Part 15 of the FCC rules and Industry Canada’s license-exempt RSSs. Operation is subject to the following two conditions: (1) this device may not cause harmful interference, and (2) this device must accept any interference received, including interference that may cause undesired operation. Any changes or modifications not expressly approved by the party responsible for compliance could void the user’s authority to operate the equipment.
This device must be installed to ensure a minimum 20 cm (8 in.) distance is maintained between users/bystanders and device.
This device has been tested and found to comply with the limits for a Class B digital device, pursuant to part 15 of the FCC rules and Industry Canada ICES standard. These limits are designed to provide reasonable protection against harmful interference in a residential installation.
This equipment generates, uses and can radiate radio frequency energy and, if not installed and used in accordance with the instructions, may cause harmful interference to radio communications. However, there is no guarantee that interference will not occur in a particular installation. If this equipment does cause harmful interference to radio or television reception, which can be determined by turning the equipment off and on, the user is encouraged to try to correct the interference by one or more of the following measures:
Reorient or relocate the receiving antenna.
Increase the separation between the equipment and receiver.
Connect the equipment into an outlet on a circuit different from that to which the receiver is connected.
Consult the dealer or an experienced radio/TV technician for help
Troubleshooting
Diagnostic Chart
Your garage door opener is programmed with self-diagnostic capabilities. The UP and DOWN arrows on the garage door opener flash the diagnostic codes.
DIAGNOSTIC CODE
SYMPTOM
SOLUTION
Up Arrow Flash(es)
Down Arrow Flash(es)
1
1
The garage door opener will not close and the light bulbs flash.
Safety reversing sensors are not installed, connected, or wires may be cut. Inspect sensor wires for a disconnected or cut wire.
1
2
The garage door opener will not close and the light bulbs flash.
There is a short or reversed wire for the safety sensors. Inspect safety sensor wire at all staple and connection points, replace wire or correct as needed.
1
3
The door control will not function.
The wires for the door control are shorted or the door control is faulty. Inspect door control wires at all staple and connection points, replace wire or correct as needed.
1
4
The garage door opener will not close and the light bulbs flash.
Safety reversing sensors are misaligned or were momentarily obstructed. Realign both sensors to ensure both LEDs are steady and not flickering. Make sure nothing is hanging or mounted on the door that would interrupt the sensor’s path while closing
1
5
Door moves 6-8" (15-20 cm) stops or reverses.
No movement, only a single click.
Opener hums for 1-2 seconds no movement.
Manually open and close the door. Check for binding or obstructions, such as a broken spring or door lock, correct as needed. Check wiring connections at travel module and at the logic board. Replace travel module if necessary.
Manually open and close the door. Check for binding or obstructions, such as a broken spring or door lock, correct as needed. Replace logic board if necessary.
Manually open and close the door. Check for binding or obstructions, such as a broken spring or door lock, correct as needed. Replace motor if necessary.
1
6
Door coasts after it has come to a complete stop.
Program travel to coasting position or have door balanced by a trained door systems technician.
2
1-5
No movement, or sound.
Replace logic board.
3
2
Unable to set the travel or retain position.
Check travel module for proper assembly, replace if necessary.
4
1-4
Door is moving stops or reverses
Manually open and close the door. Check for binding or obstructions, such as a broken spring or door lock, correct as needed. If the door is binding or sticking contact a trained door systems technician. If door is not binding or sticking attempt to reprogram travel (refer to page 30).
4
5
Opener runs approximately 6-8" (15-20 cm), stops and reverses.
Communication error to travel module. Check travel module connections, replace travel module if necessary.
4
6
The garage door opener will not close and the light bulbs flash.
Safety reversing sensors are misaligned or were momentarily obstructed. Realign both sensors to ensure both LEDs are steady and not flickering. Make sure nothing is hanging or mounted on the door that would interrupt the sensor’s path while closing.
The garage door opener can beep for several reasons:
Garage door opener has been activated through a device or feature such as Timer-to-Close or garage door monitor, see page 35.
My remote control will not activate the garage door:
Verify the lock feature is not activated on the door control.
Reprogram the remote control.
If the remote control will still not activate the door check the diagnostic codes to ensure the garage door opener is working properly.
My door will not close and the light bulbs blink on my motor unit:
The safety reversing sensor must be connected and aligned correctly before the garage door opener will move in the down direction.
Verify the safety reversing sensors are properly installed, aligned and free of any obstructions.
My garage door opener light(s) will not turn off when the door is open:
The garage door opener is equipped with a feature that turns the light on when the safety reversing sensors have been obstructed or when the motion sensor on the door control detects movement in the garage. These features can be disabled using the door control, see page 35
My neighbor’s remote control opens my garage door:
Erase the memory from your garage door opener and reprogram the remote control(s).
The LEDs on the door control blink:
If you have a Smart Control Panel installed and the TTC is set to a custom time, press the ON button on the Premium Motion-Detecting Control Panel to set the time properly.
My vehicle's Homelink® is not programming to my garage door opener:
Compatibility BridgeTM (not included) may be necessary for certain vehicles. Visit bridge.chamberlain.com to find out if a Bridge is needed.
Wi-Fi troubleshooting
The garage door opener will NOT enter Wi-Fi LEARN mode:
After the initial installation of the garage door opener, the garage door opener must complete a full cycle (open and closed) before the Wi-Fi LEARN mode can be activated.
If there has been a recent power outage, the garage door opener must complete a full cycle before the Wi-Fi LEARN mode can be activated.