User Manual
Operation
Using Your Garage Door Opener
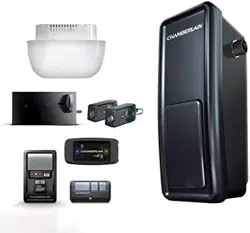
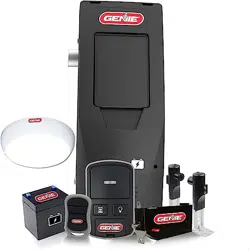
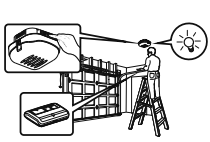
Your garage door opener has already been programmed at the factory to operate with your remote control, which changes with each use, randomly accessing over 100 billion new codes. When programmed to the Chamberlain® Internet Gateway you can monitor and control your garage door from any internet enabled computer or smartphone.
You may program the myQ control panel with up to:
- 12 remote controls
- 2 keypads
- acombination of 16 myQ accessories
The garage door opener can be activated through a wall-mounted door control, remote control, wireless keypad or myQ accessory. When the door is closed and the garage door opener is activated the door will open. lf the door senses an obstruction or is interrupted while opening, the door will stop. When the door is in any position other than closed and the garage door opener is activated, the door will close. If the garage door opener senses an obstruction while closing, the door will reverse. If the obstruction interrupts the sensor beam, the garage door opener lights will blink 10 times. However, you can close the door if you hold the button on the door control or keypad until the door is fully closed. The safety reversing sensors do not affect the opening cycle. The safety reversing sensor must be connected and aligned correctly before the garage door opener will move in the down direction.
The garage door opener lights will turn on when the garage door opener is activated. They will turn off automatically after 4-1/2 minutes or provide constant light when the Light feature on the myQ Control Panel is activated. Bulb size is A19. Bulb power is 100 watts maximum.
Light feature: Lights will also turn on when someone walks through the open garage door. With a myQ Control Panel, this feature may be turned off as follows: With the garage door opener lights off, press and hold the light button for 10 seconds, until the light goes on, then off again. To restore this feature, start with the garage door opener lights on, then press and hold the light button for 10 seconds until the light goes off, then on again.
TIMER-TO-CLOSE (TTC)
The TTC feature automatically closes the door after a specified time period that can be adjusted using a TTC enabled door control. Prior to and during the door closing, the garage door opener lights will flash and the garage door opener will beep.
Using the Door Control (myQ Control Panel)
NOTE: Due to power consumption, this door control (Model 041A7928-3) cannot be used in conjunction with another wired door contro! connected to your garage door opener. If an additional door control is needed, the wireless door contro! mode! 041A7773-1 can be programmed to the door contro! (Model 041A7928-3). To program the 041A7773-1 to the myQ Control Panel, follow the remote control programming steps.
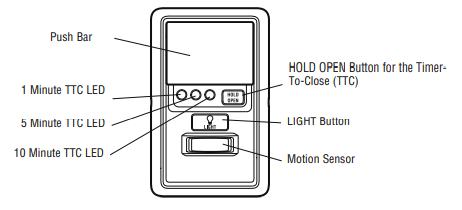
PUSH BAR
- Press the push bar to open/close the door.
LOCK
Designed to prevent operation of the door from hand-held remote controls. However, the door will open and close from the Door Control, keypad, and myQ App.
- Activate: Press and hold the LOCK button for 2 seconds. The command LED will flash as long as the lock feature is activated and your handheld remote control will not operate your door at this time.
- Deactivate: Press and hold the LOCK button again for 2 seconds. The command LED will stop flashing and normal operation will resume.
MOTION SENSOR
This feature will automatically turn on the garage door opener lights when motion is sensed. The lights will come on for 4-1/2 minutes, then shut off.
- Activate/Deactivate:
- Slide the motion sensor switch ON or OFF.
TIMER-TO-CLOSE (TTC)
The TTC feature automatically closes the door after a specified time period (1, 5, or 10 minutes). Once the TTC has been set and the door is open, the LED for the selected close interval will blink and begin to count down to close the door. The control panel will beep and the garage door opener lights will flash before closing the door.
The TTC feature will deactivate if the garage door encounters an obstruction twice; or the safety reversing sensors are incorrectly installed. The garage door will reverse open and WILL NOT close until the obstructions are clear or the safety reversing sensors are correctly installed. When the obstruction has been cleared or the safety reversing sensors have been aligned, the door will close when the garage door opener is activated
- Activate: Press and hold the ON button until one of the TTC LEDs light up. Then press the ON button again to cycle through the time interval options (the corresponding TTC LED will light for each time interval). The garage door opener light bulbs will blink as confirmation.
- Deactivate: Press and hold the OFF button until all TTC LEDs turn off and a beep is heard from the control panel.
- To suspend the TTC: To suspend the TTC and temporarily hold the door open, press and release the HOLD OPEN button (the HOLD OPEN LED will turn solid). The TTC will remain suspended until the HOLD OPEN button is pressed again or the garage door opener is activated from another device (door control, remote control, keypad, etc.).
LIGHTS:
Press the LIGHT button to turn the garage door opener lights on or off. When the lights are turned on they will stay on until the LIGHT button is pressed again, or until the garage door opener is activated. Once the garage . door opener is activated the lights will turn off after the specified period of time (the factory setting is 4-1/2 minutes). The LIGHT button will not control the lights when the door is in motion.
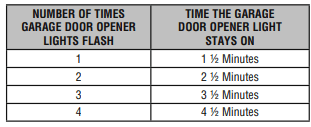
- TO CHANGE THE AMOUNT OF TIME THE REMOTE LIGHTS WILL STAY ON:
- Press and hold the LOCK button until the garage door opener lights flash. The time interval is indicated by the number of flashes
LIGHT ALERT:
The lights will turn on when someone enters through the open garage door and the safety reversing sensor infrared beam is broken.
- ACTIVATE: Start with the garage door opener lights on. Press and hold the LIGHT button until the garage door opener lights turn off, then on again. *
- DEACTIVATE: Press and hold the LIGHT button until the garage door opener lights turn on, then off again.*
*Approximately 10 seconds
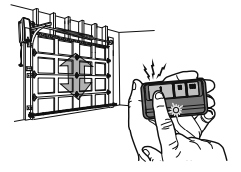
Using the Remote Control
Press and hold the button down until the door or gate starts to move. The remote control will operate from up to 3 car lengths away ’ on typical installations. Installations and conditions vary, contact an : Cd installing dealer for more information.
NOTICE: This device complies with Part 15 of the FCC rules and Industry Canada’s license-exempt RSSs. Operation is subject to the following two conditions: (1) this device may not cause harmful interference, and (2) this device must accept any interference received, including interference that may
cause undesired operation.
Any changes or modifications not expressly approved by the party responsible for compliance could void the user's authority to operate the equipment. This device must be installed to ensure a minimum 20 cm (8 in.) distance is maintained between users/bystanders and device.
This device has been tested and found to comply with the limits for a Class B digital device, pursuant to part 15 of the FCC rules and Industry Canada ICES standard. These limits are designed to provide reasonable protection against harmful interference in a residential installation. This equipment
generates, uses and can radiate radio frequency energy and, if not installed and used in accordance with the instructions, may cause harmful interference to radio communications. However, there is no guarantee that interference will not occur in a particular installation. If this equipment does cause harmful interference to radio or television reception, which can be determined by turning the equipment off and on, the user is encouraged to try to correct the interference by one or more of the following measures:
- Reorient or relocate the receiving antenna.
- Increase the separation between the equipment and receiver.
- Connect the equipment into an outlet ona circuit different trom that to which the receiver is connected.
- Consult the dealer or an experienced radio/TV technician for help.
Programming
Your hand-held remote control (model 953ESTD) has already programmed to the door control (myQ Control Panel) at the factory. Below are instructions for programming additional remote controls, keypads, and myQ enabled accessories to the door control.
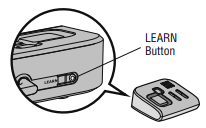
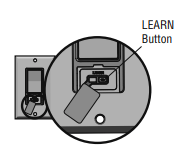
NOTE: Use the learn button on the door control to program all accessories. The yellow learn button on the garage door opener will NOT program accessories.
To Add a Remote Control, Keypad, or myQ Enabled Accessories
REMOTE CONTROL
1. Press the myQ Control Panel LEARN button twice, the red learn LED will turn on.
2. Press the button on the remote control that you wish to operate your garage door.
3. The garage door opener lights will flash (or two clicks will be heard) when the code has been programmed.
KEYPAD
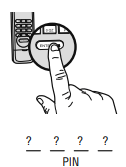
1. Press the myQ Control Panel LEARN button twice, the red learn LED will turn on.
2. Enter a 4-digit personal identification number (PIN) of your choice on the keypad. Then press the ENTER button
3. The garage door opener lights will flash (or two clicks will be heard) when the code has been programmed.
myQ ENABLED ACCESSORIES
1. Press the myQ Control Panel LEARN button twice, the red learn LED will turn on.
2. Press the LEARN button on the myQ device.*

Model PILCEY - Remote Light Control
Light module can be synchronized with the garage door opener light bulbs.
Model AGDMEV - Garage Door and Gate Monitor
Indicates the status of your garage door from inside the home and allows you to close an open garage door from inside the house.
Model WSLCEY - Remote Light Switch
Light module can be synchronized with the garage door opener light bulbs.
Reprogramming Remote Light or Additional Light
Your garage door opener remote light has already been programmed at the factory to operate with your opener. Any additional or replacement remote lights will need to be programmed.
1. Press the LEARN button on the light until the LED comes ON
2. Activate the garage door opener using the hand-held remote, door control, or keypad.
3. The code has been programmed when the remote light comes on.
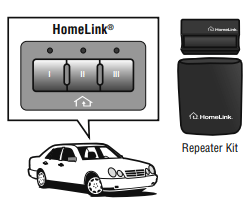
HomeLink®
In the rare case the HomeLink system does not program with the Security+ 2.0 Garage door opener, install a repeater kit. Refer to HomeLink® Home Link instructions below.
HomeLink is the in-vehicle system. The image used is for reference only and your product may look different.
WHEN TO INSTALL A HOMELINK REPEATER KIT
All 2006 and older vehicles — A repeater kit is required and must be purchased by the homeowner.
All 2007 and newer vehicles — Program the HomeLink according to the vehicle instructions. If after ONE attempt to program the HomeLink to the garage door opener and you are unsuccessful, install a repeater.
HOW TO ORDER
Order the HomeLink repeater kit from an installer or call 1-800-355-3515. To program the HomeLink repeater kit, refer to the instructions provided in the kit
INSTALLATION QUICK FACTS
- Only one repeater kit is required per home.
- Use different HomeLink buttons in vehicle if programming multiple cars, button 1 first car, button 2 second car... etc.
- HomeLink remote is NOT a garage door opener.
- Ifyou are using the HomeLink repeater with a garage door opener that has a battery backup system, ensure your original garage door opener remote control is programmed to the garage door opener and place it in your glove box for use in the event of a power outage.
- The remote included in this repeater kit MUST be kept for future programming - new vehicle, new garage door opener, etc.
Getting Connected
Chamberlain Internet Gateway
The Chamberlain Internet Gateway gives you control of your garage door from your internet connected computer or mobile device. You must have your Chamberlain Internet Gateway registered to your customer account at myChamberlain.com in order to use it with the myQ Control Panel. Go to myChamberlain.com and follow the instructions to create an account and register your device if you have not already. Router
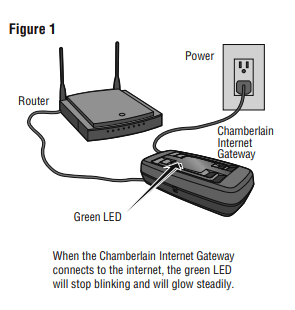
Before starting you MUST have:
- Router
- Broadband Internet Connection
- Chamberlain Internet Gateway Serial Number (located on the bottom of the Chamberlain Internet Gateway)
Connect the Chamberlain Internet Gateway to the router and power. When the Chamberlain Internet Gateway connects to the internet, the green LED will stop blinking and will light solid. (Figure 1)
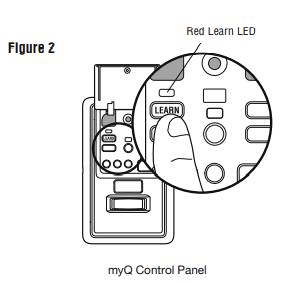
To program your myQ Control Panel to the Chamberlain Internet Gateway:
- Go to myChamberlain.com from a computer or mobile device. will stop blinking and will glow steadily.
- Click Add New Device or
 , then select Add Place, and enter your myQ serial number and name your Place (e.g., My Home).
- Select +Add New Device and choose Garage Door Opener.
- Once you click ADD, you have 3 minutes to press the LEARN button two times on the myQ control panel. The red LEARNLED will turn on. (Figure 2)
- Monitor when the red LEARN LED turns off, which confirms programming is complete. Once the control panel is learned, name your device (e.g., Garage Door Opener). Click Save and an image will appear on your screen.
NOTE: If you have already added a place and select Add New Device, you will see the place you named. Select it and proceed to+Add New Device.
To Erase All Codes From the Door Control(myQ Control Panel) Memory
Erase all remote controls and keyless entries:
- Press and hold the LEARN button on the control panel until the red learn LED goes out (approximately 6 seconds). All remote control and keypad codes are now erased. Reprogram any compatible accessory you wish to use.
Erase all devices (including myQ enabled accessories):
- Press and hold the LEARN button on the control panel until the red Learn LED goes out (approximately 6 seconds).
- Immediately press and hold the LEARN button again until the red Learn LED goes out. All codes are now erased. Reprogram any compatible accessory you wish to use.
Maintenance
Care of Your Garage Door Opener
MAINTENANCE SCHEDULE
Once a Month
- Manually operate door. If it is unbalanced or binding, call a trained door systems technician.
- Check to be sure door opens and closes fully. Adjust limits and/or force if necessary (see Adjustment Steps 1 and 2).
- Repeat the safety reverse test. Make any necessary adjustments (see Adjustment Step 3).
Once a Year
- Oil door rollers, bearings and hinges. The garage door opener does not require additional lubrication. Do not grease the door tracks.
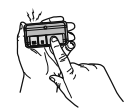
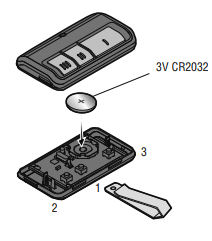
THE REMOTE CONTROL BATTERY
The 3V CR2032 Lithium battery should produce power for up to 3 years. If the battery is low, the remote control's LED will not flash when the button is pressed.
To replace battery, pry open the case first in the middle (1), then at each side (2 and 3) with the visor clip. Replace the batteries with only 3V CR2032 coin cell batteries. Insert battery positive side up. Dispose of old batteries properly.
Troubleshooting
Diagnostic Chart
Your garage door opener is programmed diagnostic capabilities. The diagnostic LED will flash a ee
it has found a number of times, then pause, signifying it potential issue. Consult Diagnostic Chart below.

1 FLASH
Safety reversing sensors wire open (broken or disconnected)
OR
2 FLASHES
Safety reversing sensors wire shorted or black/white wire reversed
- SYMPTOM: One or both of the Indicator lights on the safety sensors do not glow steady.
- Safety reversing sensors are not installed, connected, or wires may be cut. Inspect sensor wires for a disconnected or cut wire.
- There is a short or reversed wire for the safety reversing sensor Inspect safety sensor wire at all staple and connection points, replace wire or correct as needed.
3 FLASHES
Door control or wire shorted
- SYMPTOM: The door doesn't activate from the door control.
- Inspect door control/wires for a short (staple in wire), replace as needed.
- Disconnect wires at door control, touch wires together. If garage door opener activates, replace door control.
- If garage door opener does not activate, disconnect door control wires from garage door opener. Momentarily short across red and white terminals with jumper wire. If garage door opener activates, replace door control wires.
4 FLASHES
Safety reversing sensors slightly misaligned (dim or flashing LED)
- SYMPTOM: Sending indicator light glows steadily, receiving indicator light is dim or flashing.
- Realign receiving sensor, clean lens and secure brackets.
- Verify door track is firmly secured to wall and does not move.
5 FLASHES
Motor RPM is not recognized
- SYMPTOM: Door travels 2-3 inches and stops.
- Reprogram limits and forces. See Adjustment section.
- If the motor unit continues to travel 2-3 inches, check the travel module connection or replace the travel module.
- SYMPTOM: No movement, motor runs 2-3 seconds.
- Reconnect the emergency release.
- Motor may need to be replaced.
9 FLASHES
Cable tension monitor reversal
- SYMPTOM: Door stops and reverses while closing.
- Check for possible door obstructions and remove.
- Check that the cable tension monitor is properly connected to the opener.
- Replace the cable tension monitor.
10 FLASHES
Limits and forces need reprogramming
- SYMPTOM: Door stops while opening.
- Reprogram limits and forces. See Adjustment section.
11 FLASHES
Limits and forces need reprogramming
- SYMPTOM: Door stops and reverses while closing.
- Reprogram limits and forces. See Adjustment section.
12 FLASHES
Attempting ta compensate
- SYMPTOM: Door stops and reverses while closing.
- Garage door opener will try to compensate three times before turning to a 10 Flash.
13 FLASHES
Attempting ta compensates.
- SYMPTOM: Door stops while opening.
- Garage door opener will try to compensate three times before turning to a11 Flash.
The garage door opener doesn't operate from either the Door Control or the remote control:
- Does the garage door opener have electric power? Plug a lamp into the outlet. If it doesn't light, check the fuse box or the circuit breaker. (Some outlets are controlled by a wall switch.)
- Have you disabled all door locks? Review installation instruction warnings
- Is there a build-up of ice or snow under the door? The door may be frozen to the ground. Remove any restriction.
- The garage door spring may be broken. Have it replaced
- If the yellow command LED does not turn on, reverse the wires connected to the RED and WHT terminals of the control panel. Replace wire if necessary.
The yellow and red LEDs on the Door Control are blinking quickly:
- The control panel is charging, and may take up to 5 minutes to become operational.
My remote control will not activate the garage door:
- Verify the lock feature is not activated on the door control.
- Reprogram the remote control. the remote control will still not activate the door check the diagnostic codes to ensure the garage door opener is working properly.
The remote control has short range:
- Change the location of the remote control in your car.
- Some installations may have shorter range due to a metal door, foil backed insulation, or metal garage siding.
The door doesn't open completely:
- Check power door lock.
- Is something obstructing the door? Is it out of balance, or are the springs broken? Remove the obstruction or repair the door.
The door opens but won't close:
- Check cable tension monitor (see Installation Step 6 ).
- If the garage door opener lights blink, check the safety reversing sensor (see Installation Step 9 on). lf the garage door opener lights don’t blink and it is a new installation (see Adjustment Step 2). For an existing installation, see below.
- Repeat the safety reverse test after the adjustment is complete.
The door reverses for no apparent reason and garage door opener lights don’t blink:
- Check cable tension monitor (see Installation Step 6 ).
- Is something obstructing the door? Pull the emergency release handle. Operate the door manually. If it is unbalanced or binding, call a trained door systems technician.
- Clear any ice or snow from the garage floor area where the door closes.
- Review Adjustment Step 2 .
- Repeat safety reverse test after adjustments.
My door will not close and the light bulbs blink:
The safety reversing sensor must be connected and aligned correctly before the garage door opener will move in the down direction.
- Verify the safety sensors are properly installed, aligned and free of any obstructions.
The garage door opener strains to operate door:
- The door may be out of balance or the springs may be broken. Close the door and use the emergency release handle to disconnect the door. Open and close the door manually. A properly balanced door will stay in any point of travel while being supported entirely by its springs. If it does not, disconnect the garage door opener and call a trained door systems technician.
The garage door opener motor hums briefly, then won't work:
- The garage door springs may be broken. See above.
- If the problem occurs on the first operation of the garage door opener, door may be locked. Disable the power door lock.
The garage door opener won't operate due to power failure:
- Manually open the power door lock.
- Use the emergency release handle to disconnect the door. The door can be opened and closed manually. When power is restored, pull manual release a second time.
Door loses limits.
- Collar not tightened securely. Tighten collar (see Assembly Steps 1 and 2 ) and reprogram limits (see Adjustment Step 1).
The garage door opener moves when the door is in operation:
- Some minor movement is normal for this product. If it is excessive the collar will wear prematurely.
- Check to make sure the torsion bar is not moving left/right excessively.
- Check to make sure the torsion bar is not visibly moving up and down as it rotates.
- Check that the opener is mounted at a right angle to the jackshaft. If not, move the position of the mounting bracket.
Power lock makes noise when operating.
- Call Chamberlain® for replacement power lock.
�