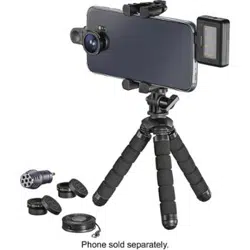
QUICK SETUP GUIDE
Mobile
Photography
Kit
NSMPKIT50
PACKAGE CONTENTS
• LED video light
• USB charging cable
• Directional microphone
• Carrying pouch
• Flexible smartphone tripod
• Bluetooth® shutter remote (CR2032 battery
included)
• 3 lenses (macro, wide-angle, and sheye)
• Lens clip
• 3 lens cap sets
• Soft storage pouch
• Quick Setup Guide
Note: Each product has its own model number. The
model number of this entire kit is NS-MPKIT50.
Before using your new product,
please read these instructions to prevent any damage.
LED VIDEO LIGHT NSM16LED10
Extremely bright and vibrant light for videos and
photos, can be used with both front and rear
camera. Built-in battery won’t drain your phone. 3
brightness settings for maximum versatility. Plugs
into standard headphone jack for convenience. No
app required for use.
CHARGING THE BATTERY
1 Slide the power switch OFF.
2 Connect the USB charging cable from your video
light’s micro USB port to a power source (such as
a computer or USB power adapter (not included)).
The charging LED is red while charging, then
turns o when nished (about 2 hours).
USING YOUR VIDEO LIGHT
1 Connect the 3.5 mm connector to your mobile
device’s audio jack.
Note: The 3.5 mm connector is only used to secure the
light to your phone. It does not interface with your
phone. You may hold the light in your hand if there is
glare or your phone doesn't have a headphone jack.
2 Slide the power switch ON.
3 Direct the video light at your subject and slide the
brightness switch to adjust the brightness, as
needed.
4 Use your mobile device to capture video or
images.
MAINTENANCE
• Do not squeeze or operate the video light with
excessive force.
• Keep the video light in a dry and cool place.
• To maintain battery life, charge the video light at
least once every ve months.
SPECIFICATIONS
SAFETY INFORMATION
• Keep the power switch in the OFF position when the light is not in use.
• Do not store or transport when the LED light is illuminated.
• There are no serviceable parts inside. Do not disassemble.
DIRECTIONAL MICROPHONE
NSMDMIC20
Plug in and point the microphone at the sound you
want to record. Background sound is rejected, and
you hear only what you want in breathtaking clarity.
Works with existing recording apps on your phone,
no separate download needed.
COMPATIBILITY
Designed for mobile phones and tablets.
Compatibility with other devices is not guaranteed.
Note: Before using this microphone, record a short audio
segment to make sure that the microphone is working
correctly.
USING YOUR MICROPHONE
1 Plug the 3.5 mm connector into your recording
device’s audio input jack.
2 Tilt and turn the microphone towards the subject
you want to record.
NOTE: Sound is primarily picked up through the 7 round
holes on the front of the microphone.
3 Turn on your recording device, then record a short
audio segment to make sure that the microphone
is working correctly:
• If sound is too quiet, move the microphone
closer.
• If sound is distorted, the audio is too loud.
Move the microphone farther away.
4 Use your recording device to record the audio you
need.
Low 4 hours Medium 2 hours High 1 hour
Approximate Battery life (for each brightness setting)
2 × 1.9 × 0.5 in.
51 × 46.8 × 12.5 mm
17g (0.6 oz.)
Built-in lithium battery
3.7 V 200 mAh
Low: 4 hours
Medium: 2 hours
High: 1 hour
Approximately 2 hours (from
empty battery)
Dimensions (including
3.5mm plug)
Net weight
Battery
Approximate
battery life (for each
brightness setting)
Charge time
TROUBLESHOOTING
Too much ambient noise is picked up
• Move the microphone closer to the subject. A
certain amount of ambient noise is unavoidable
in loud environments.
• Make sure that the microphone is tilted towards
the subject.
Microphone does not record audio
• Make sure that the 3.5 mm connector is
connected to your recording device’s INPUT jack.
• Make sure that the 3.5 mm connector is fully
inserted into the audio jack. You may need to
remove your device's case.
• Make sure that your device is recording audio.
• Move the microphone closer to the subject.
SPECIFICATIONS
TRIPOD AND REMOTE SHUTTER
NSMTRIBT10
Use by itself or with the included tripod for group
shots or triggering your phone from a distance. No
app needed!
Mount your phone on the tripod for easy group
shots, blur-free night-time shots, or stable video.
Flexible legs allow tripod to be wrapped or hung for
placement anywhere. Works with phones with up to
a 5.5" screen.
USING YOUR TRIPOD
1 Turn the lock screw counter-clockwise to loosen
the clip.
2 Push the folded clip into a horizontal position,
then tighten the lock screw.
3.5 mm connector
Microphone
Polar pattern
Frequency pattern
Signal/Noise
Sensitivity
Connector
Weight
Omni-directional
35-18KHz (±3 dB)
76dB SPL
-30dB (±3dB)
3.5mm TRRS connection
0.6 oz. (18 g)
Tripod
Bluetooth
remote control
LED
Power
switch
Shutter
Clip top
Clip body
Lock screw
Leg
Non-slip foot
Charging LED
3.5 mm connector
LED lights
Front:
Left side: Right side:
Brightness
switch
Power switch
Micro USB port
Flat size (W×H): 18 × 7.5 in. (457.2 x 190.5 mm)
Final folded size: 3 × 7.5 in. (76.2 x 190.5 mm)
NS-MPKIT50_16-0082_QSG_V1_EN.ai 1 4/13/2016 11:06:43 AMNS-MPKIT50_16-0082_QSG_V1_EN.ai 1 4/13/2016 11:06:43 AM
Loading ...
