Loading ...
Loading ...
Loading ...
ENG - 7
02 PRODUCT OVERVIEW
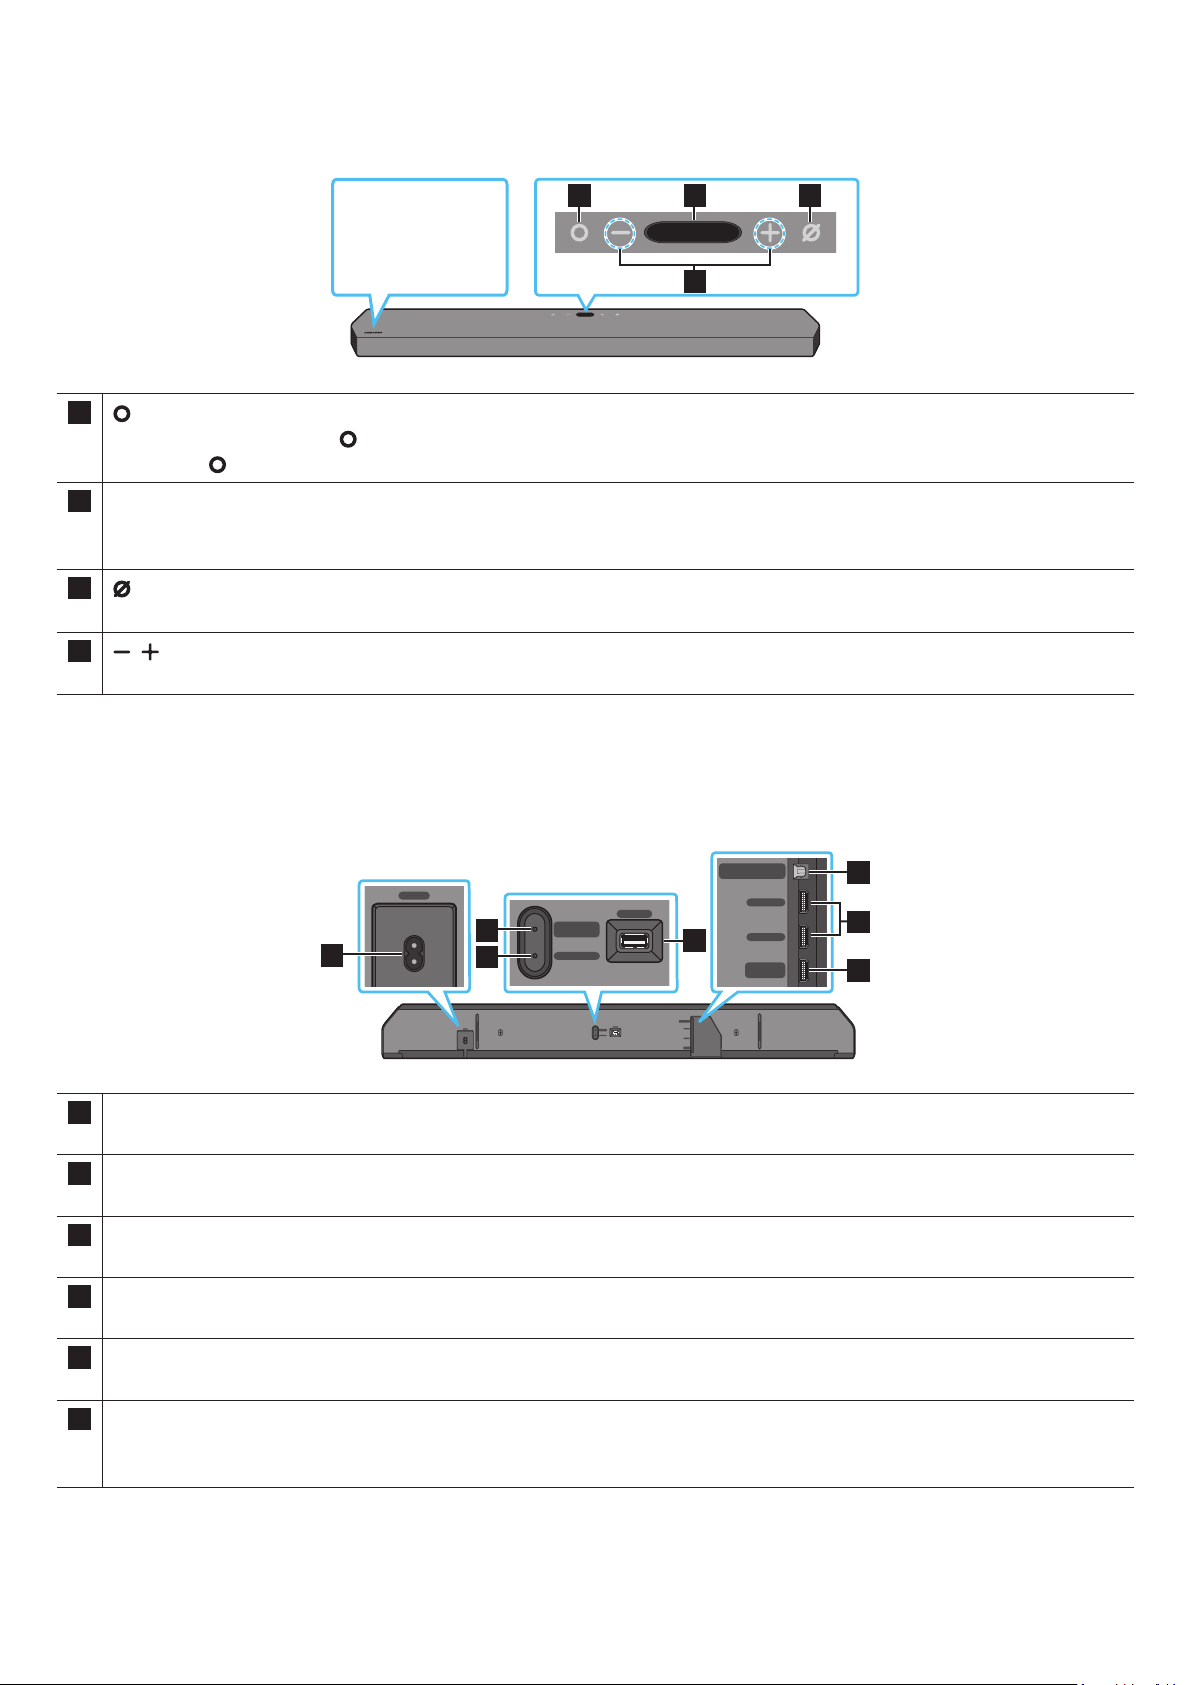
Top Panel of the Soundbar
1 2 3
4
Position the
product so that the
SAMSUNG logo is
located on the top.
1
(Multi Function) Button
• In standby mode, press the (Multi Function) button to turn on the Soundbar.
• Press the (Multi Function) button to change the input source.
2 Display
Displays the product’s status and current mode.
D.IN → HDMI 1 → HDMI 2 → Wi-Fi → BT
3
(Mic On/Off) Button
Press the button to turn the microphone on or off.
4
(Volume) Button
Adjusts the volume.
• When you plug in the AC cord, the power button will begin working in 4 to 6 seconds.
• When you turn on this unit, there will be a 4 to 5 second delay before it produces sound.
• If you hear sounds from both the TV and Soundbar, go to the Settings menu for the TV audio and change the TV speaker to External Speaker.
Bottom Panel of the Soundbar
ID SET
HDMI IN 1
HDMI IN 2
POWER
NETWORK
SERVICE
DIGITAL AUDIO IN
(OPTICAL)
HDMI TO TV
(eARC/ARC)
HDMI 2
HDMI 1
ID SET
(WOOFER/REAR)
POWER
ID SET
NETWORK
SERVICE
ID SET
(WOOFER/REAR)
DIGITAL AUDIO IN
(OPTICAL)
HDMI TO TV
(eARC/ARC)
HDMI 2
HDMI 1
ID SET
HDMI IN 1
HDMI IN 2
POWER
NETWORK
SERVICE
DIGITAL AUDIO IN
(OPTICAL)
HDMI TO TV
(eARC/ARC)
HDMI 2
HDMI 1
ID SET
(WOOFER/REAR)
POWER
ID SET
NETWORK
SERVICE
ID SET
(WOOFER/REAR)
DIGITAL AUDIO IN
(OPTICAL)
HDMI TO TV
(eARC/ARC)
HDMI 2
HDMI 1
ID SET
HDMI IN 1
HDMI IN 2
POWER
NETWORK
SERVICE
DIGITAL AUDIO IN
(OPTICAL)
HDMI TO TV
(eARC/ARC)
HDMI 2
HDMI 1
ID SET
(WOOFER/REAR)
POWER
ID SET
NETWORK
SERVICE
ID SET
(WOOFER/REAR)
DIGITAL AUDIO IN
(OPTICAL)
HDMI TO TV
(eARC/ARC)
HDMI 2
HDMI 1
ID SET
HDMI IN 1
HDMI IN 2
POWER
NETWORK
SERVICE
DIGITAL AUDIO IN
(OPTICAL)
HDMI TO TV
(eARC/ARC)
HDMI 2
HDMI 1
ID SET
(WOOFER/REAR)
POWER
ID SET
NETWORK
SERVICE
ID SET
(WOOFER/REAR)
DIGITAL AUDIO IN
(OPTICAL)
HDMI TO TV
(eARC/ARC)
HDMI 2
HDMI 1
1
2
3
4
5
7
6
1 POWER
Connect the Soundbar’s AC power cable. (See page 13)
2 ID SET (WOOFER/REAR)
Press to connect the Soundbar to surround speakers and a subwoofer wirelessly.
3 NETWORK
Press to connect to a wireless network (Wi-Fi) via the SmartThings app.
4 SERVICE
Connect a USB storage device to upgrade the product’s software.
5 DIGITAL AUDIO IN (OPTICAL)
Connect to the digital (optical) output of an external device. (See page 22)
6 HDMI 1 / HDMI 2
Inputs digital video and audio signals simultaneously using an HDMI cable.
Connect to the HDMI output of an external device. (See page 21)
Loading ...
Loading ...
Loading ...