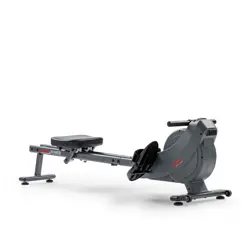
ASUNA 7750
SPACEFLEX MOTORIZED
TREADMILL

INDEX
IMPORTANT SAFETY INFORMATION………………………………………………………
…
EXPLODED DIAGRAM………………………………………………………………………
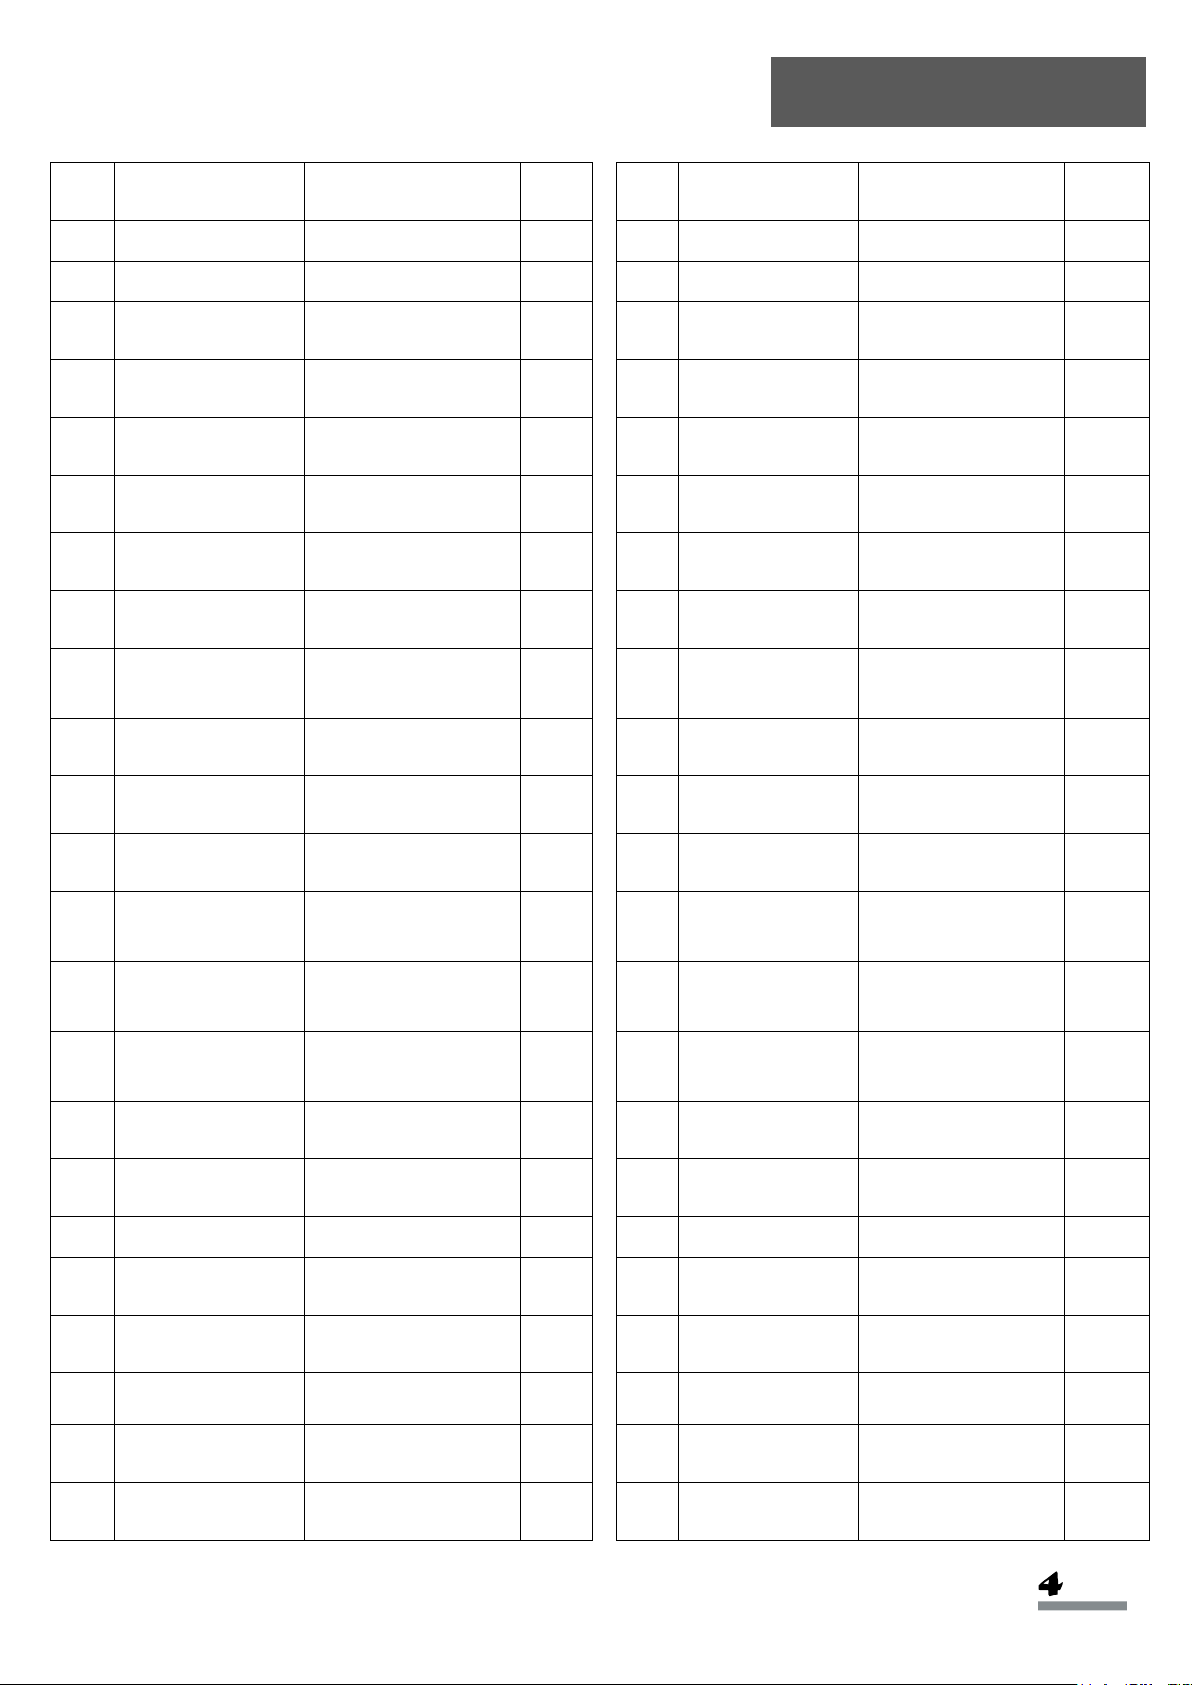
PARTS LIST…………………………………………………………………………………………….
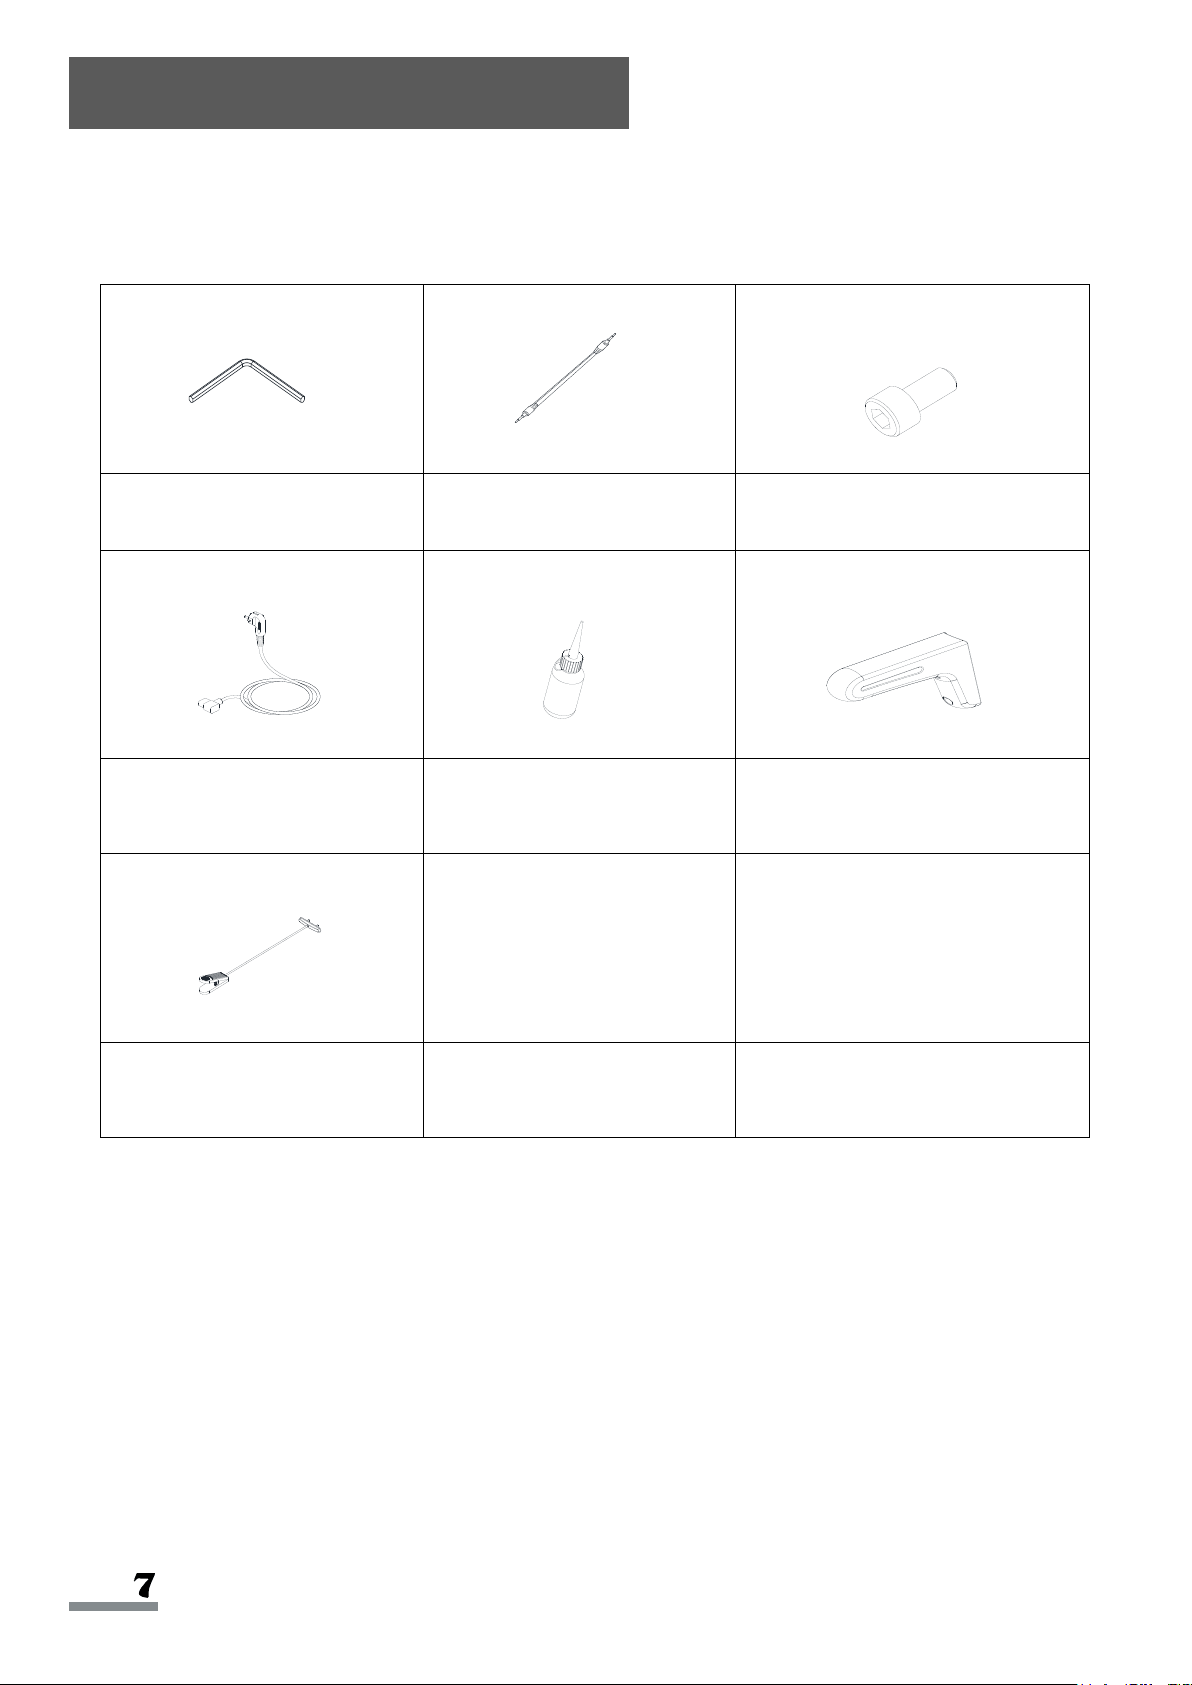
TOOLS & HARDWARE…………………………………………………………………….…
ASSEMBLY INSTRUCTIONS………………………………………………………………........
LUBRICATION……………………………………………………………………………………..…..
FOLDING INSTRUCTIONS……………………………………………………..……………..…
MOVING INSTRUCTIONS……………………………………………………………………..…
SPECIFICATIONS……………………………………………………………………………..….
IMPORTANT ELECTRICAL INFORMATION……………………………………………
...
OPERATING INSTRUCTIONS……………………………………………………………….….
DISPLAY METER……………………………………………………………………………........
MAINTENANCE INSTRUCTIONS………………………………………………………………
MAINTENANCE GUIDELINES………………………………………………………………….
ATTENTION:
Please verify that all parts associated with this product are in good condition
and accounted for.
During the assembly process, please be sure to follow each step accordingly as it has been
explained within this manual.
WARNING: During assembly, it is recommended that all bolts be tightened by hand. Upon
completing assembly, bolts should be secured using the wrench provided. To avoid injury, check
bolts carefully before use.
IMPORTANT:
Read all instructions carefully before using this product. Retain owner's
manual for future reference. For customer service, please contact:
support@sunnyhealthfitness.com
1
2-3
4-6
7
8-9
11
12
13
14
15
16-21
22
23
10

IMPORTANT SAFETY INFORMATION
We thank you for choosing our product. To ensure your safety and health, please use this
equipment correctly. It is important to read this entire manual before assembling and using the
equipment. Safe and effective use can only be achieved if the equipment is assembled, maintained,
and used properly. It is your responsibility to ensure that all users of the equipment are informed of
all warnings and precautions.
1. Before starting any exercise program, you should consult your physician to determine if you
have any medical or physical conditions that could put your health and safety at risk or prevent
you from using the equipment properly. Your physician’s advice is essential if you are taking
medication that affects your heart rate, blood pressure, or cholesterol level.
2. Be aware of your body’s signals. Incorrect or excessive exercise can damage your health. Stop
exercising if you experience any of the following symptoms: pain, tightness in your chest,
irregular heartbeat, shortness of breath, lightheadedness, dizziness, or feelings of nausea. If
you do experience any of these conditions, you should consult your physician before continuing
with your exercise program.
3. Keep children and pets away from the equipment. The equipment is designed for adult use only.
4. Use the equipment on a solid, flat level surface with a protective cover for your floor or carpet.
To ensure safety, the equipment should have at least 8 feet (240CM) of free space behind it and
2 feet (60CM) on each side. Do not place the treadmill on any surface that blocks air openings.
To protect the floor or carpet from damage, place a mat under the treadmill.
5. Ensure that all nuts and bolts are securely tightened before using the equipment. The safety of
the equipment can only be maintained if it is regularly examined for damage and/or wear and
tear.
6. Always use the equipment as indicated. If you find any defective components while assembling
or checking the equipment, or if you hear any unusual noises coming from the equipment during
exercise, discontinue use of the equipment immediately and do not use until the problem has
been rectified.
7. Wear suitable clothing while using the equipment. Avoid wearing loose clothing that may
become entangled in the equipment.
8. Do not place fingers or objects into the moving parts of the equipment.
9. The maximum weight capacity of this unit is 220 pounds (100 KG).
10. The equipment is not suitable for therapeutic use.
11. To avoid bodily injury and/or damage to the product or property, proper lifting and moving are
required.
12. Your product is intended for use in cool and dry conditions. You should avoid storage in extreme
cold, hot or damp areas as this may lead to corrosion and other related problems.
13. This equipment is designed for indoor and home use only; it is not intended for commercial use!
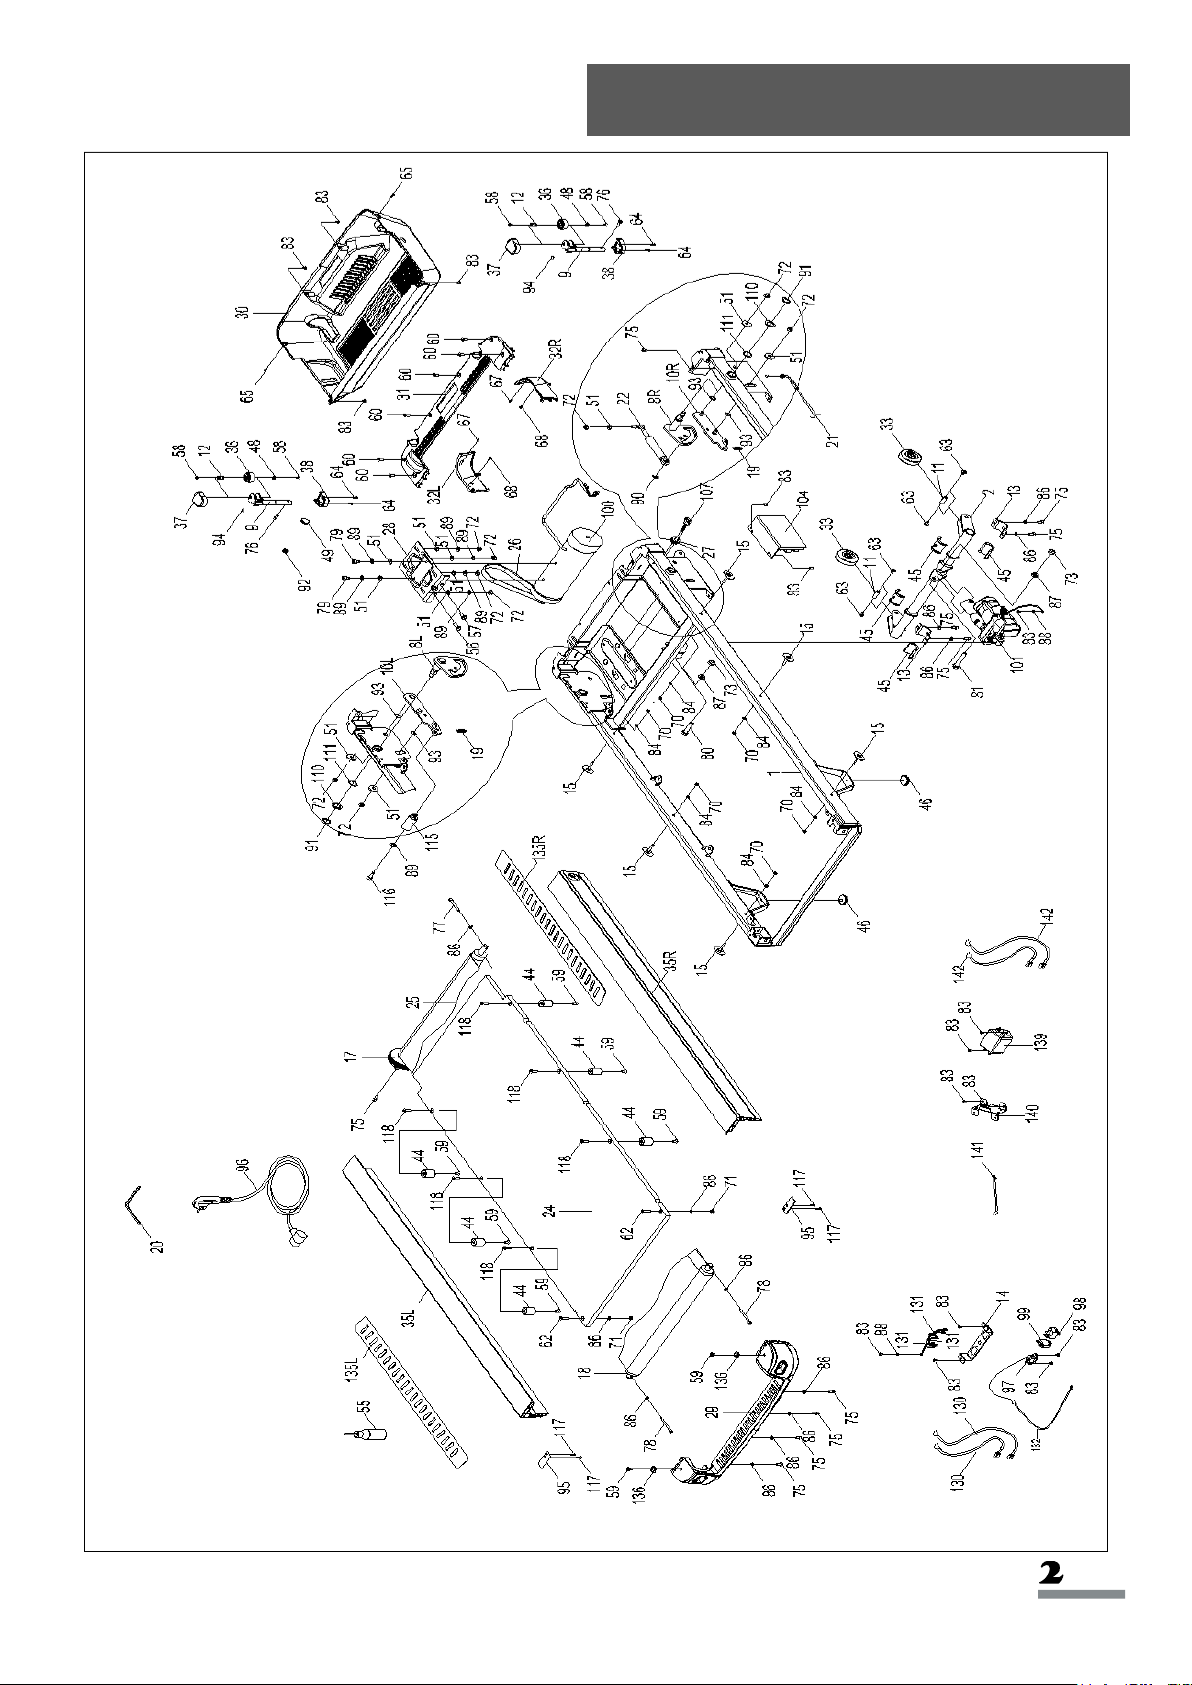
Exploded Diagram 1

Exploded Diagram 2
NO.
DESCRIPTION
SPEC.
QTY
NO.
DESCRIPTION
SPEC.
QTY
1
Main Frame
1
24
Running Board
1
2
Incline Bracket
1
25
Running Belt
1
3
L/R
Handlebar
2
26
Multi-groove Belt
1
4
Tablet Bracket
1
27
Ring Wire Plug
2
5
Meter Bracket
Horizontal Tube
1
28
Motor Seat
1
6
Loudspeaker
Fixed Seat
2
29
Rear Cover
1
7
L/R
Tablet Bracket
Fixed Seat
2
30
Motor Under
Cover
1
8
L/R
Adjusting Sheet
2
31
Motor Upper
Cover
1
9
Supporting Wheel
Fixed Bracket
2
32
L/R
Side Decorative
Cap of Motor
Cover
2
10
L/R
Choice Sheet
2
33
Transportation
Wheel
2
11
Transportation
Wheel Axis
2
34
N/A
-
12
Supporting Wheel
Axis
2
35
L/R
Side Rail
2
13
Incline Bracket U
Shape Fixed Seat
2
36
Supporting
Transportation
Wheel
2
14
Power Fixed
Connector
1
37
Supporting
Wheel Upper
Cover
2
15
Edging Buckle
6
38
Supporting
Wheel Under
Cover
2
16
Handrail Stopper
4
39
Meter Under
Cover
1
17
Front Roller
1
40
Meter Back
Cover
1
18
Rear Roller
1
41
Meter Panel
1
19
Extension Spring
2
42
L/R
Meter Outer Side
Cover
2
20
Allen Wrench
1
43
L/R
Meter Inner Side
Cover
2
21
Cable
1
44
Cushion
6
22
Cylinder
1
45
Incline Axle
Sleeve
4
23
Compression
Spring
1
46
Adjusting Foot
Pad
2
Parts List

NO.
DESCRIPTION
SPEC.
QTY
NO.
DESCRIPTION
SPEC.
QTY
47
Safety Key Seat
1
71
Nut
M6
2
48
C-shape
Snap Ring
Φ10
2
72
Nut
M8
9
49
Upright Stopper
2
73
Nut
M10
2
50
L/R
Loudspeaker Light
Shade
2
74
Screw
M8*15
4
51
Flat Washer
Φ9*Φ23*T1.5
11
75
Screw
M6*12
nickel-chrome
14
52
Light Transmitting
Plate
1
76
Screw
M6*15 half-thread
nickel-chrome
2
53
L/R
Handlebar Stopper
2
77
Screw
M6*50
1
54
Module Fixer
2
78
Screw
M6*60
2
55
Silicone Oil
1
79
Screw
M8*12
2
56
Bolt
M8*20
1
80
Bolt
M10*45 10.9 grade
screw length 15mm
1
57
Bolt
M8*25
1
81
Bolt
M10*60 10.9 grade
screw length 15mm
1
58
Screw
M5*8
4
82
Screw
M2*5
6
59
Screw
M6*12
8
83
Screw
M4*8
20
60
Screw
M6*20
6
84
Washer
Φ5*12*1.2
6
61
Screw
ST3.0*15
2
85
Flat Washer
Φ9*Φ16*T1.6
4
62
Screw
M6*28
2
86
Washer
Φ6.6*Φ11.8*T1.6
nickel-plating
13
63
Screw
M6*12
4
87
Flat Washer
Φ11*Φ20*T2.0
2
64
Screw
ST3.0*20
4
88
Washer
Φ4.1*Φ4.4*T1
nickel-plating
2
65
Screw
ST4.0*15
12
89
Spring Washer
M8
7
66
Screw
BT2.5*8
6
90
E-shape Snap
Ring
Φ8 black
1
67
Screw
ST3.0*10
25
91
C-shape Snap
Ring
match Φ20 black
shaft
2
68
Screw
BT4*8
2
92
Flange Nut
M10*P1.25
2
69
Screw
BT4*15
15
93
Flat Washer
Φ12.2*Φ17*T0.5
4
70
Nut
M5
6
94
O Shaped Ring
inner Φ13
wire Φ1.5
2

NO.
DESCRIPTION
SPEC.
QTY
NO.
DESCRIPTION
SPEC.
QTY
95
Running Board
Baffle
2
119
Screw
BT2.2*5
nickel-plating
4
96
Power Cord
1
120
Speed Shortcut
Key Seat
1
97
End Socket
1
121
Pad Decorating
Light
1
98
Power Switch
1
122
Loudspeaker
Decorating Light
2
99
Overload Protector
1
123
Incline Shortcut
Key PC
1
100
DC Motor
1
124
Speed Shortcut
Key PC
1
101
Incline Motor
1
125
Pulse Outgoing
Line
2
102
Loudspeaker
2
126
Shortcut Key
Outgoing Wire
2
103
MP3 Line
1
127
USB Module
1
104
Controller
1
128
Safety Key
1
105
Upper Wire
1
129
Screw
M3*6
4
106
Screw
M4*12
4
130
Single Wire
950mm
2
107
Lower Wire
1
131
Single Wire
120mm
3
108
Meter
1
132
Grounding Wire
200mm
1
109
Incline Shortcut
Key Seat
1
133
Pole Pressing
Seat
2
110
Washer
Φ20.5*Φ30*T2.0
2
134
Single-sided
Adhesive
2
111
Wave Washer
Φ20.5*Φ27*T0.4
2
135
L/R
Anti-slip Sticker
2
112
Tablet Bracket
Fixing Screw / L
1
136
Screw Cover
2
113
Tablet Bracket
Fixed Screw / R
1
137
Plug
4
114
Handrail
2
138
Safety Key Clip
2
115
Foot Lever
1
139
Filter
1
116
Screw
M8*35
1
140
Filter Bracket
1
117
Screw
M4*12
4
141
Single Grounding
Wire
1100mm
1
118
Screw
M6*25
6
142
Single Wire
400mm
2
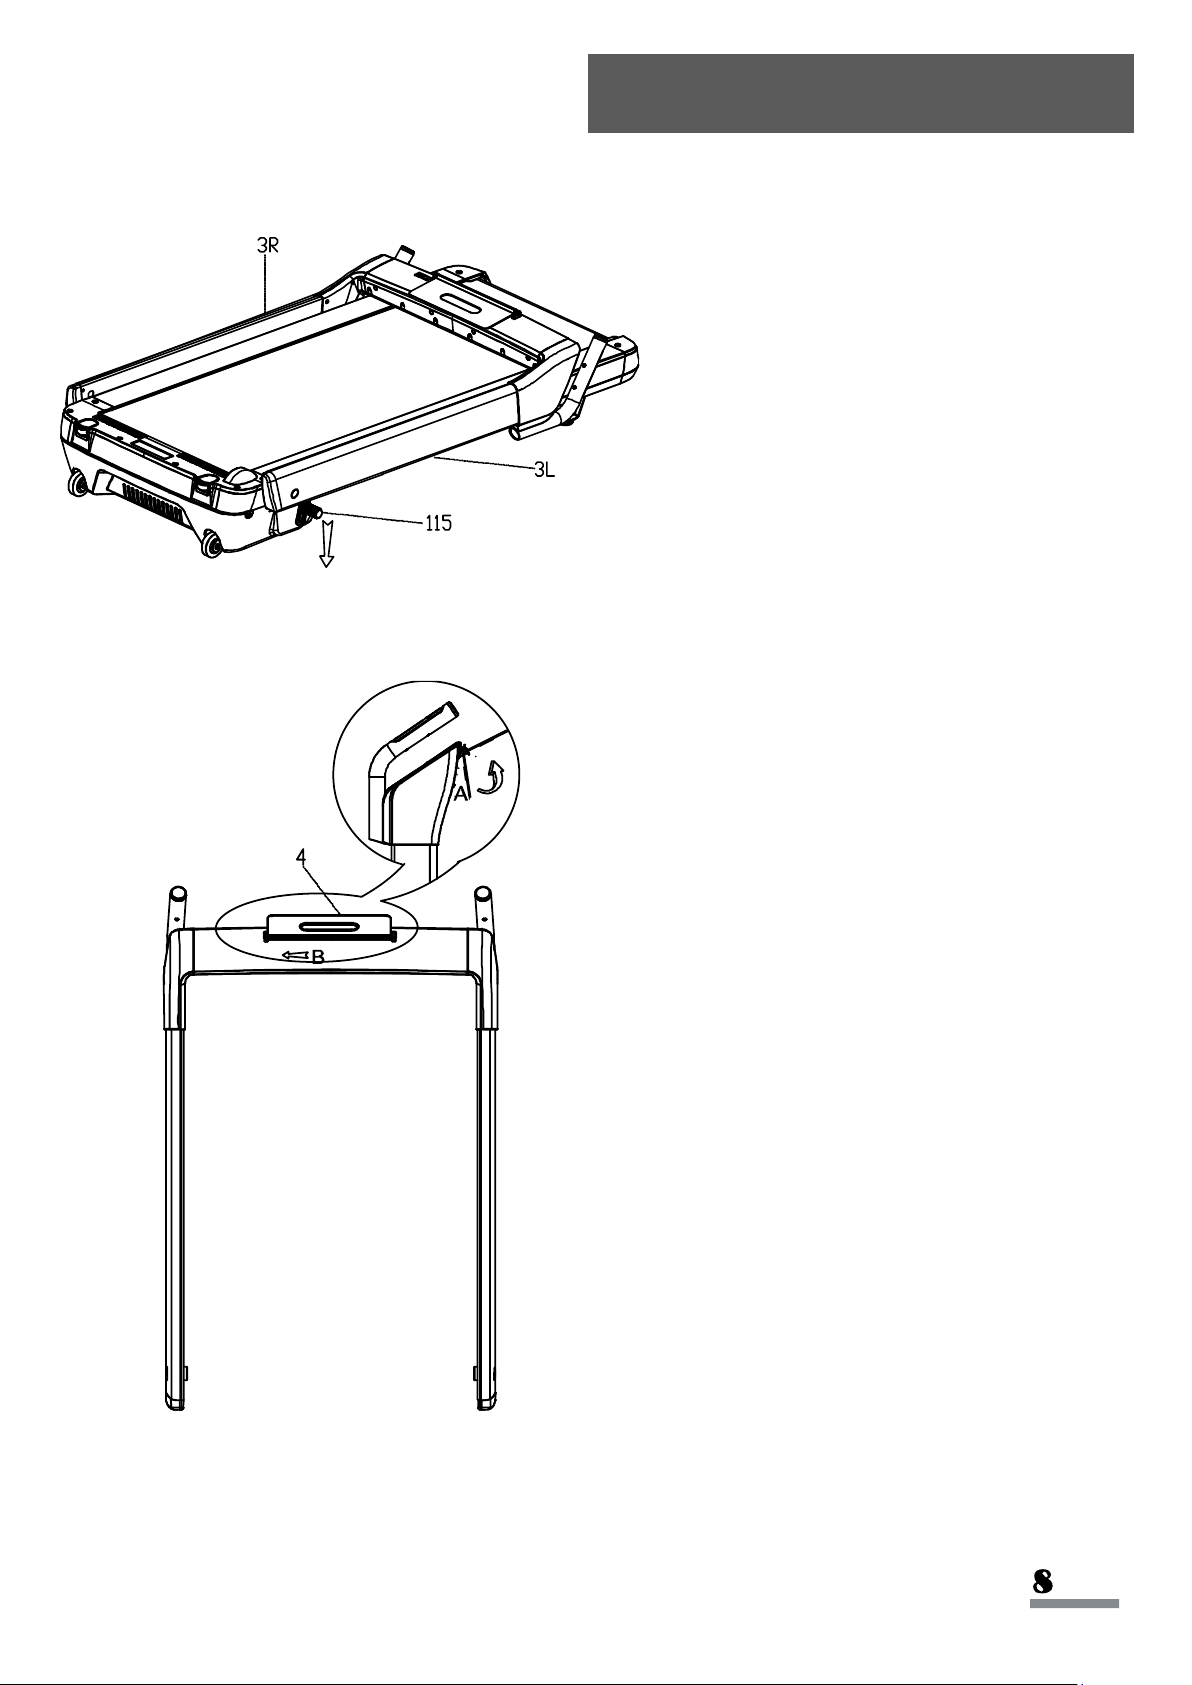
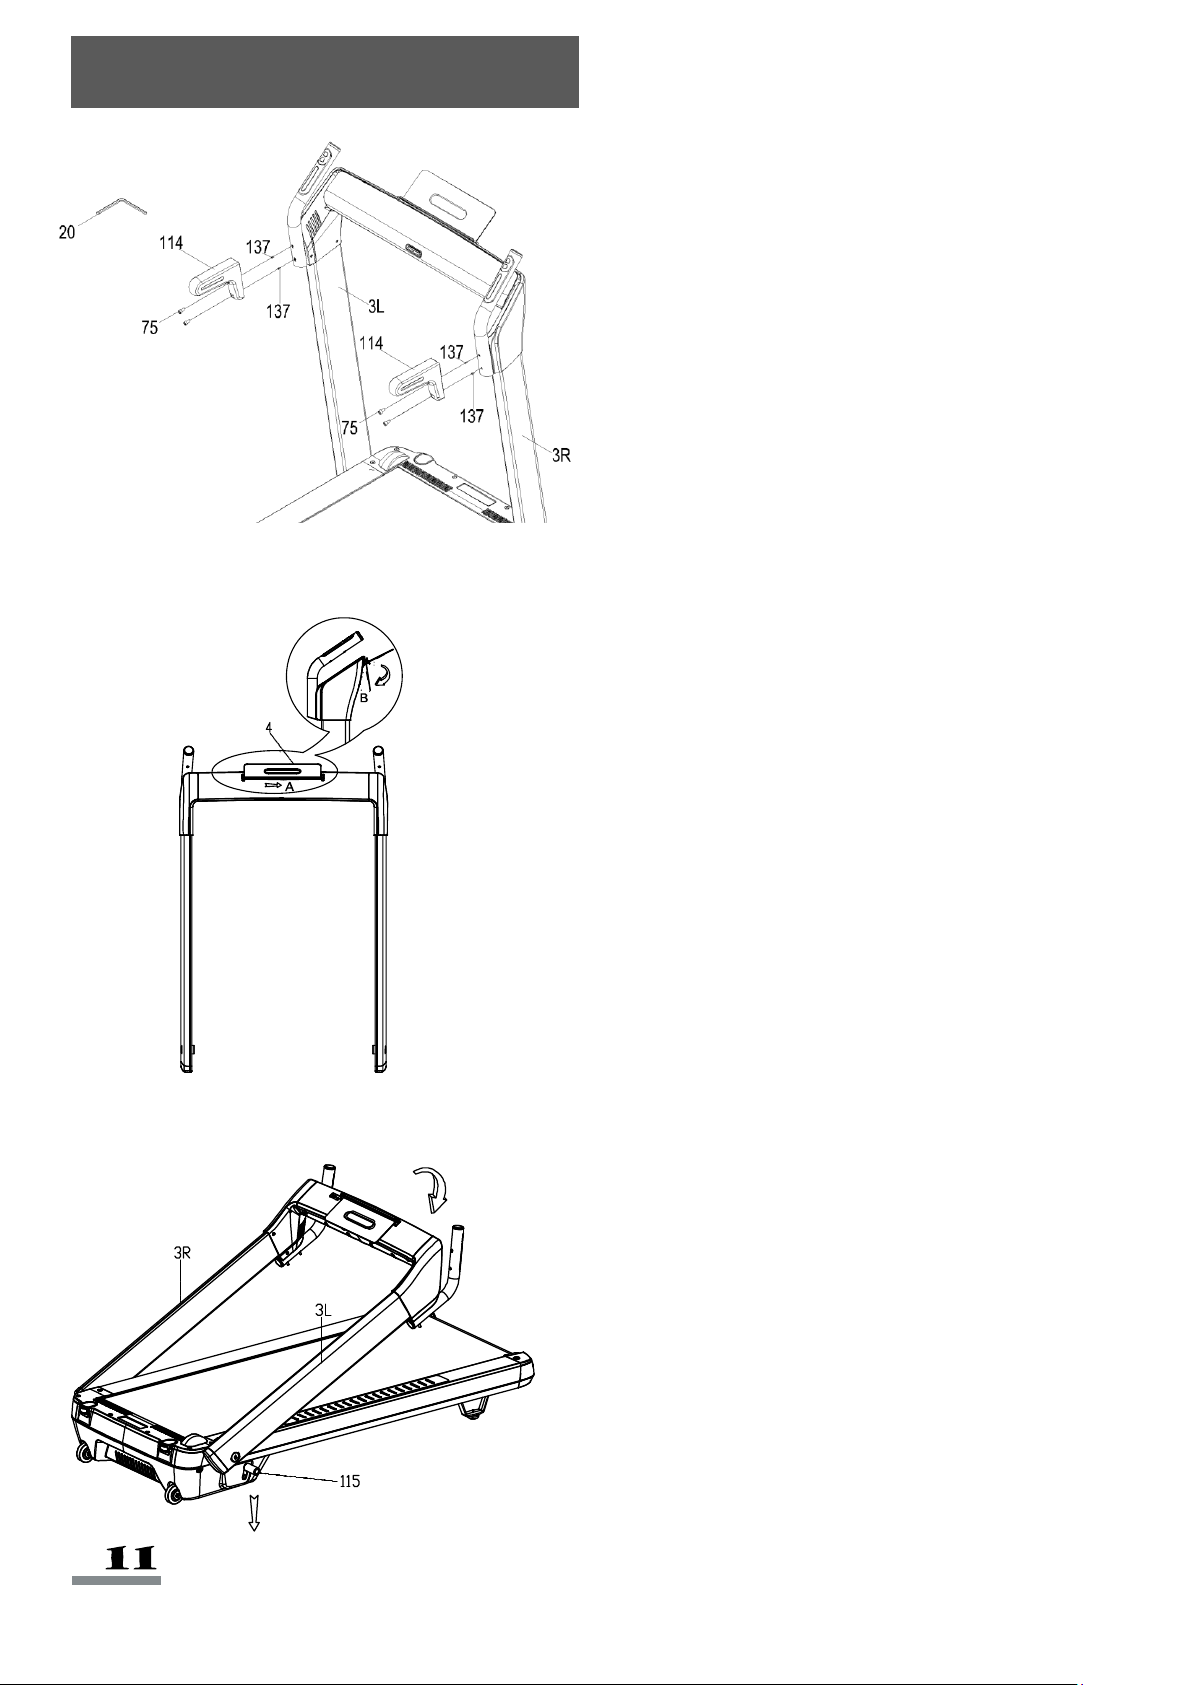
STEP 1:
Hold the Handlebars (No. 3L & No.
3R). Press the Foot Lever (No. 115)
until you hear a click, then raise the
Handlebars (No. 3L & No. 3R) to a
vertical position until you hear a click.
Lightly shake the Handlebars (No. 3L
& No. 3R) to make sure they are
secure.
Assembly Instructions
STEP 2:
Stand in front of the treadmill. Turn the
Tablet Bracket (No. 4) upward as
shown in drawing A, then pull it slightly
to the left as shown in the drawing B to
lock in position.
108
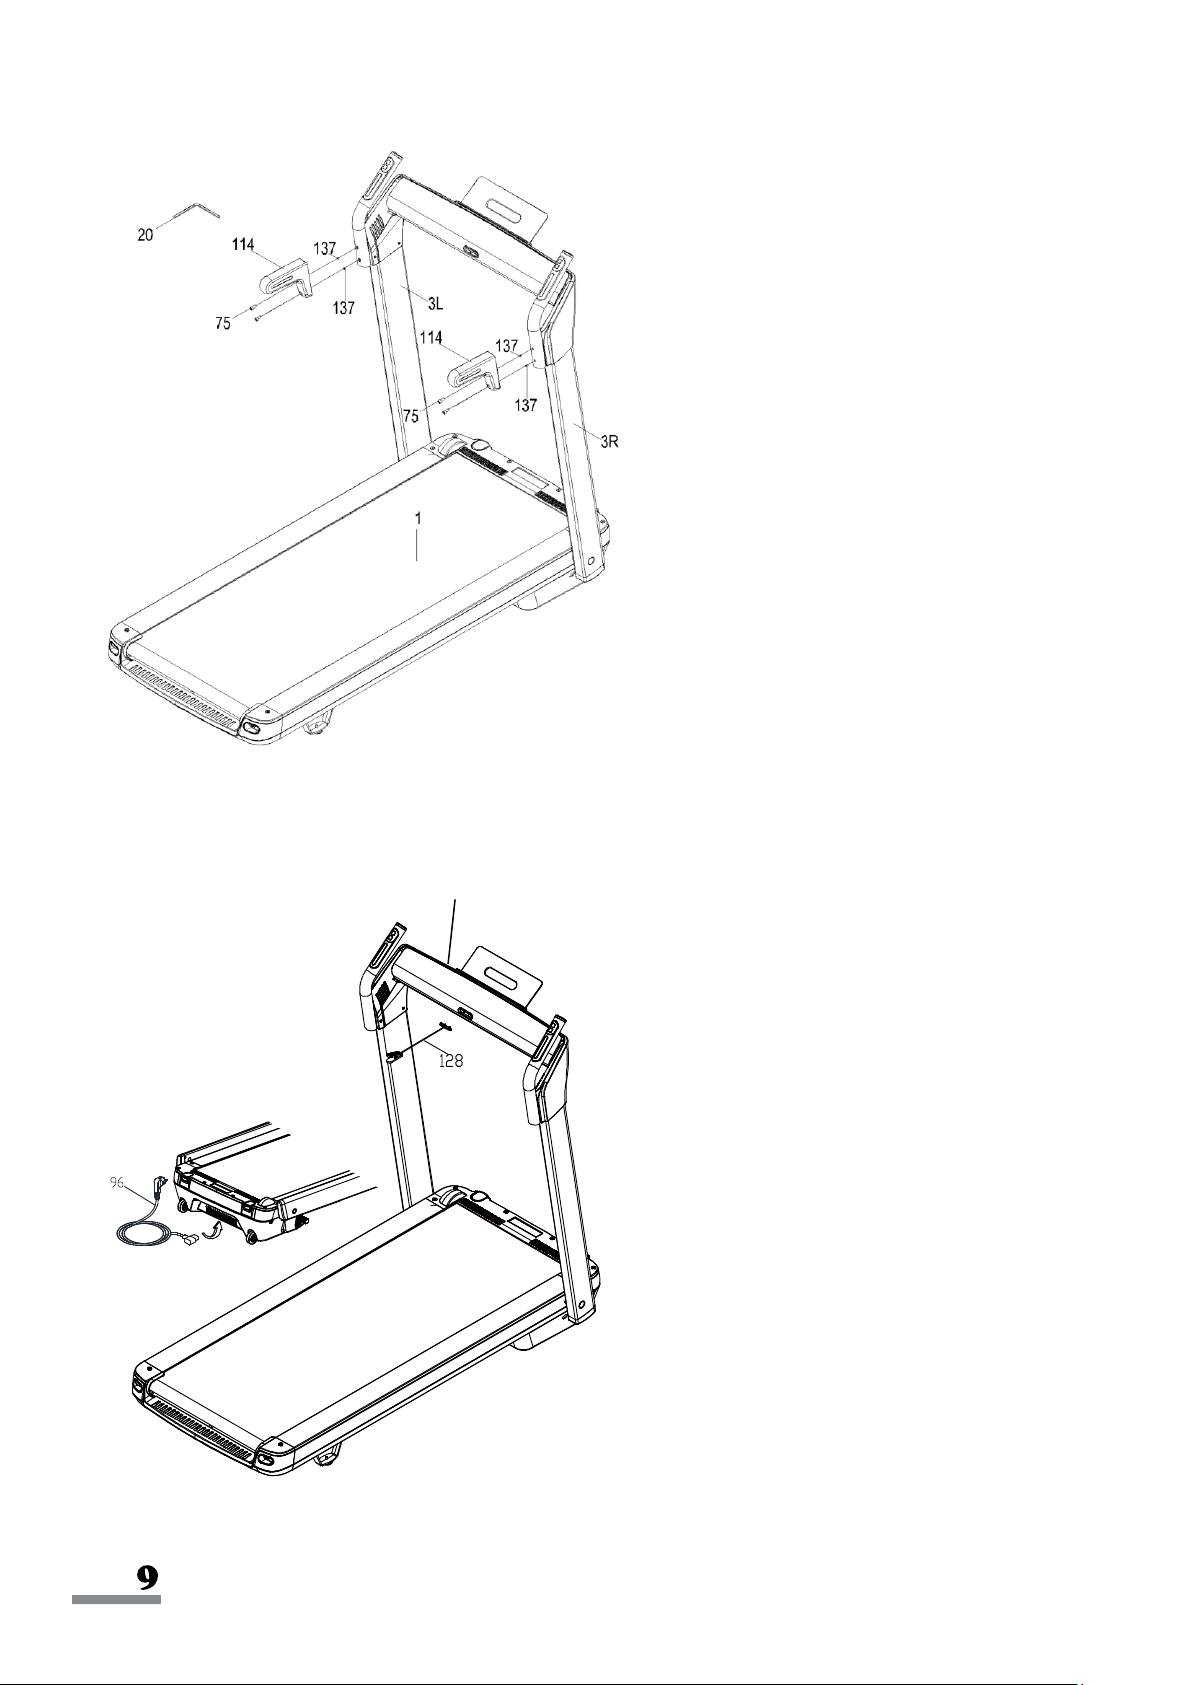
STEP 3:
Remove Plugs (No. 137) from the
Handlebars (No. 3R & No. 3L). Save
the Plugs (No. 137) for later use when
you remove the Handrails (No. 114).
Attach the Handrails (No. 114) to the
treadmill bracket with 4 Screws (No.
75).
Tighten and secure with
Allen
Wrench (No. 20)
.
STEP 4:
Connect the
Power Cord (No. 96) to the
treadmill.
Insert the Safety Key (No. 128) into the
Meter (No. 108).
The assembly is complete!
*IMPORTANT NOTE:
This treadmill does come pre-lubricated, but it is recommended to lubricate your treadmill before
the first use.
RUNNING BELTS & TREADMILL LUBRICANT:
Lubricating the Running Board (No. 24) and Running Belt (No. 25) is essential as the friction
affects the life span and operation of the treadmill. It is suggested that the Running Board (No. 24)
and Running Belt (No. 25) be inspected regularly. If you find any wear on the Running Board (No.
24), please contact us at: [email protected].
WARNING:
Always unplug the treadmill from the electrical outlet before cleaning, lubricating, or repairing the
unit.
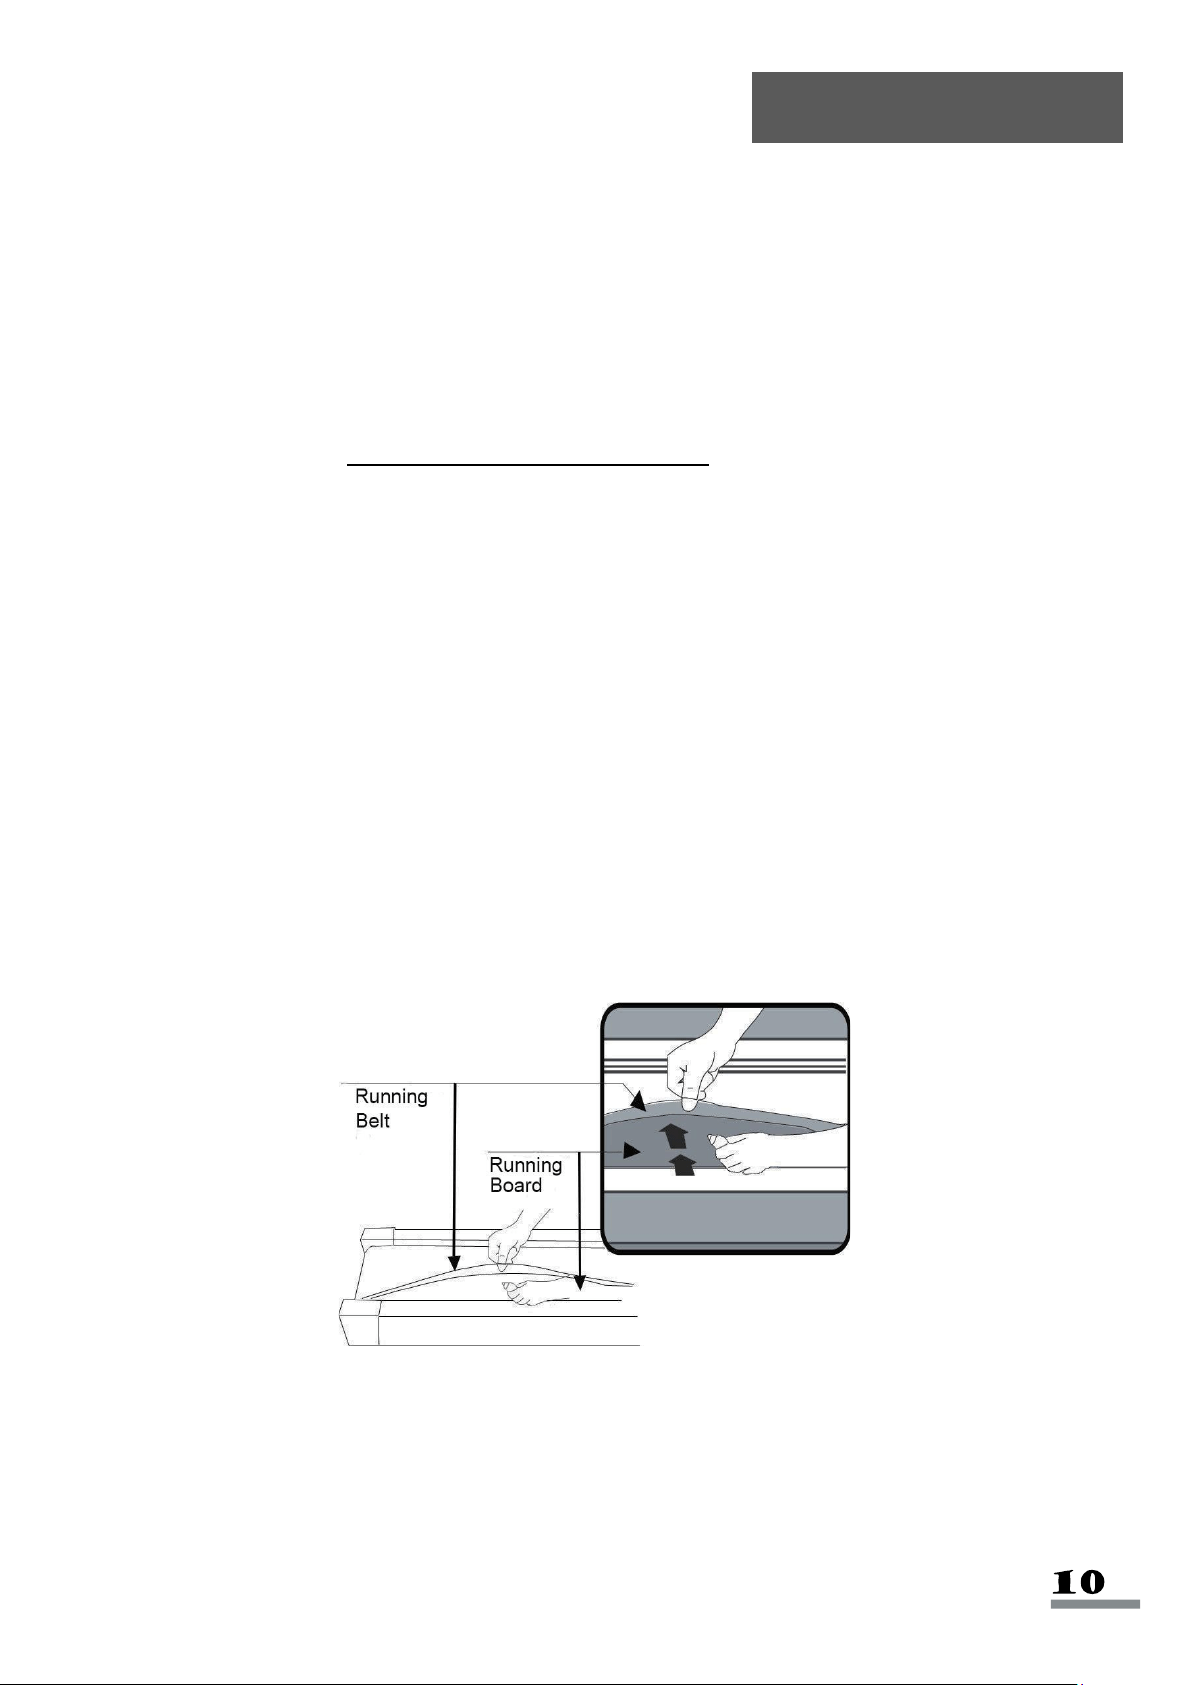
HOW TO LUBRICATE:
Raise the Running Belt (No. 25) up on one side and apply lubricant to the Running Board (No.
24). Use a rag to thoroughly wipe the lubricant over the Running Board (No. 24). Repeat this
process for the other side. The moving parts should turn freely and quietly. Abnormal moving parts
will affect the safety of the equipment. Inspect and tighten bolts regularly.
To better maintain the treadmill and prolong its lifespan, it is suggested that maintenance be done
on a regular basis. DO NOT LOOSEN OR MAKE ANY ADJUSTMENTS TO THE RUNNING BELT
WHILE APPLYING LUBRICANT. A loose Running Belt (No. 25) will result in the runner sliding off
when in use, while too tight of a Running Belt (No. 25) will decrease to the motor's performance
and also create more friction between the roller and Running Belt (No. 25). The most suitable
tightness for the Running Belt (No. 25) is when it is pulled out 50-75mm from the Running Board
(No. 24).
The following time table is recommended:
Light user (less than 3 hours/week)
Medium user (3-5 hours/week)
Heavy user (more than 5 hours/week)
Lubrication
every six months
every three months
every two months
Folding Instructions
Stand in front of the treadmill. Fold the
Tablet Bracket (No. 4) by pulling it to
the right as shown in drawing A. Then,
turn it down as in the drawing B.
Hold the Handlebars (No. 3L & No.
3R). Press the Foot Lever (No. 115)
until you hear a click. Then, lower the
Handlebars (No. 3L & No. 3R).
Before you fold the treadmill, remove
the 4 Screws (No. 75) and the 2
Handrails (No. 114) using the Allen
Wrench (No. 20).
If you saved the Plugs (No. 137), you
can plug in the holes.
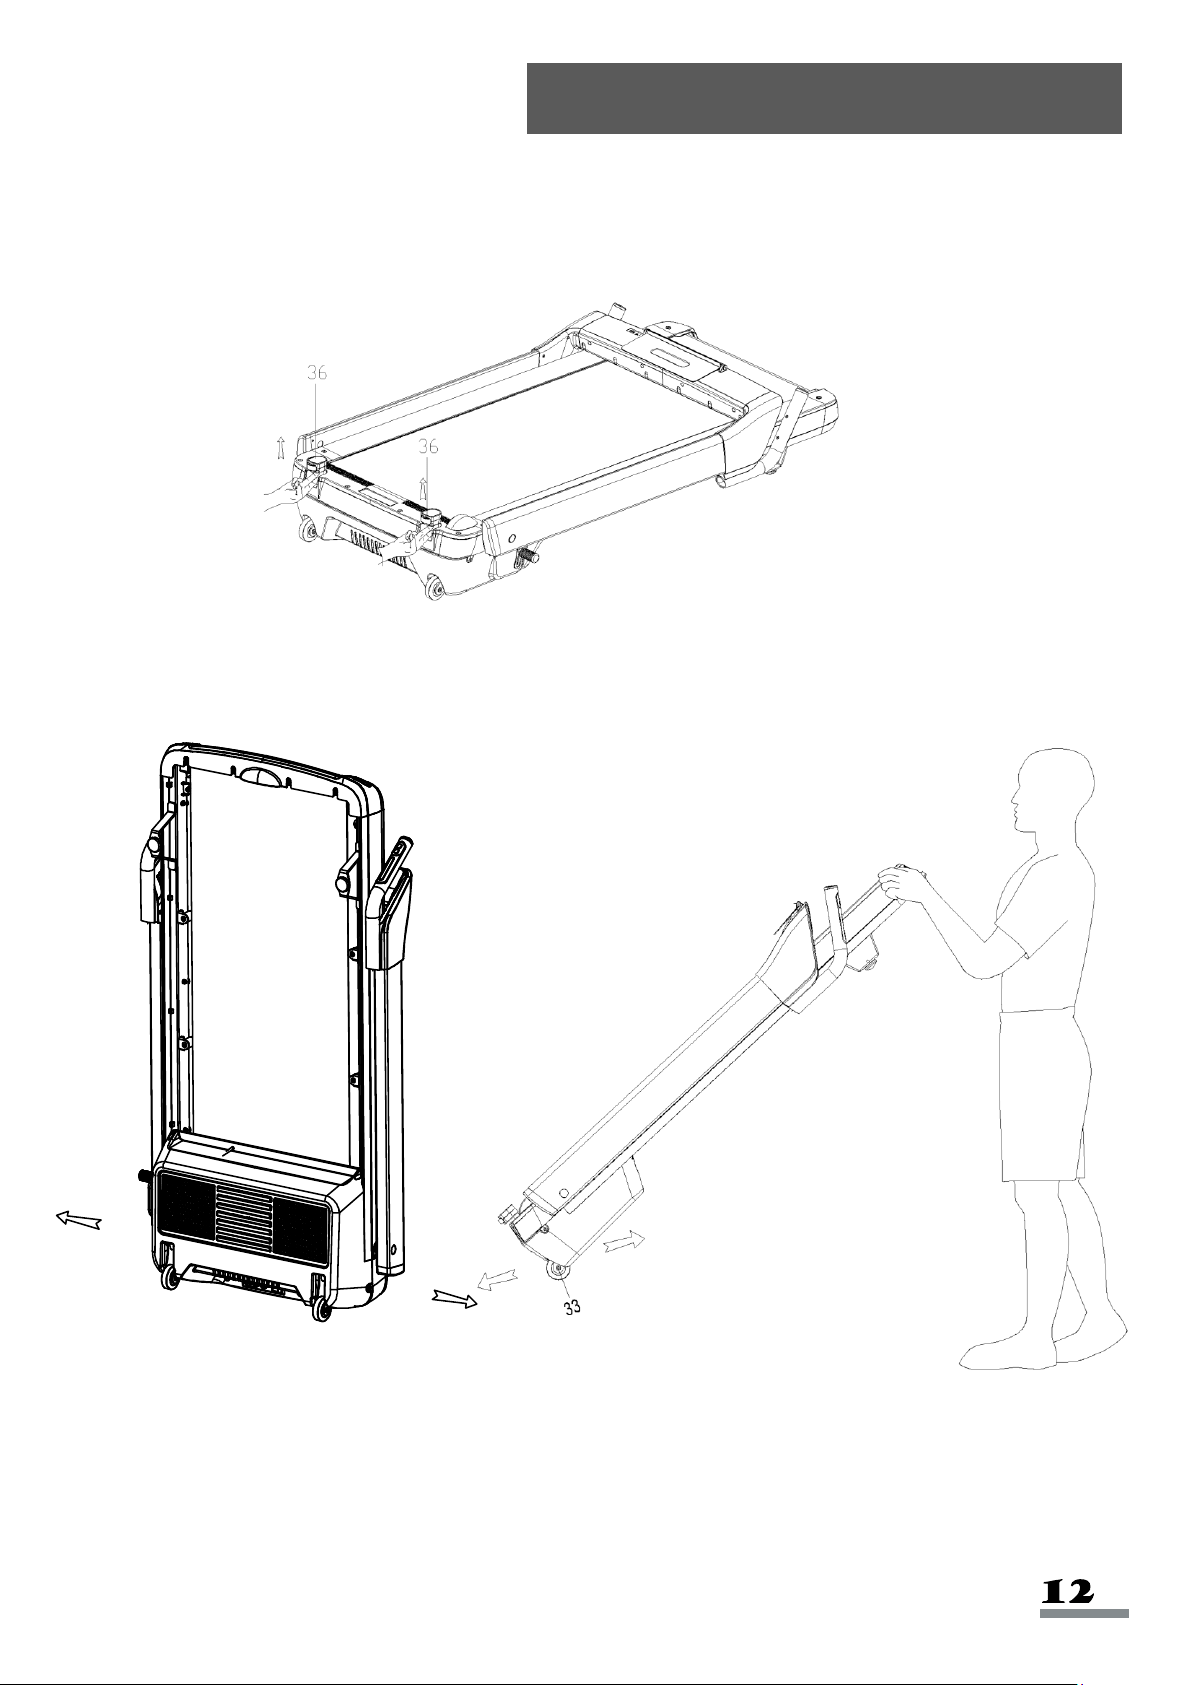
Moving Instructions
Before moving the treadmill, fold the treadmill first. Pull out the Supporting Transportation
Wheels (No. 36) according to the drawing, to ensure the folded treadmill is stable when standing
upright.
To store the treadmill upright, lift the treadmill so it stands vertically. To move the treadmill, tilt the
treadmill towards you until the Transportation Wheels (No. 33) on the front base touch the
ground. Then you can move the treadmill in front and back or left and right directions.

Assembly Size
(INCHES)
57.3(L)*29.3(W)*48(H)
Speed Range
(MI/H)
0.6—8.0
Folded Standing Size
(INCHES)
29.3(L)*10.4(W)*57.3(H)
Rating
930W
Running Size
(INCHES)
51.2(L)*19(W)
Motor Spec
(HP)
2.5HP(PEAK)
N.W. (LBS)
120
Input Volt (V)
110-120V
Max User Weight
(LBS)
220
Operating
Temperature
0-82°F
Incline
0-12%
Blue Single Display
Speed, Time, Distance, Calorie, Pulse, Incline, Step Count
Specifications

WARNING:
This treadmill requires a power source of 10 amps (100-120V) in order to properly operate. For
your safety as well as the safety of others, please verify that the power source is correct before
powering in the equipment. Any power supply source above or below this level could cause
significant damage to the equipment and/or user.
GROUNDING METHODS:
This product must be grounded. Should the treadmill malfunction or breakdown, grounding
provides a path of least resistance for electric current to reduce the risk of electric shock. This
product is equipped with a plug that has an equipment-grounding conductor and a grounding plug.
The plug must be plugged into an appropriate outlet that is properly installed and grounded in
accordance with all local codes and ordinances.
This product is for use on a nominal 100-120V circuit and has a grounding plug that looks like the
plug illustrated in sketch A. Ensure that the product is connected to an outlet with the same
configuration as the plug. Do not use an adaptor for this product.
DANGER:
Improper connection of the equipment can result in risk of electric shock. Check with a qualified
electrician or serviceman if you are unsure whether the product has been properly grounded. Do
not modify the plug provided with the product. If it will not fit the outlet, have a proper outlet installed
by a qualified electrician.
WARNING!
1. NEVER use a ground fault circuit interrupt (GFCI) wall outlet with this treadmill. Route the power
cord away from any moving parts of the treadmill including the elevation mechanism and
transport wheels.
2. NEVER operate the treadmill using a generator or UPS power supply.
3. NEVER remove any cover on this treadmill without first disconnecting the power cord.
4. NEVER expose the treadmill to rain or moisture. This treadmill is not designed for outdoor use or
use in any high humidity environment.
GROUNDING METHOD
Important Electrical Information

1.
Plug the power cord into an outlet with appropriate voltage.
2.
Turn on the power switch.
3.
Insert the
Safety Key (No. 128)
.
4.
Press the
START
button on the meter.
Never start the treadmill while you are standing on the running belt. After connecting the power,
there may be a pause after the running belt begins to move, you should always stand on the
treadmill side plastic non-slip rails until the belt starts moving. Then step on to the running belt.
SAFETY NOTE:
1. We recommend that you maintain a slow speed at the beginning and hold the
handrails until you become familiar with the treadmill.
2. Insert the magnet end of the
Safety Key (No. 128)
into the meter and attach the
opposite end (containing the safety clip on it) to your clothing before starting your
workout. To end your workout, press the
STOP
button or remove the
Safety Key (No.
128)
and the treadmill will stop immediately.
SAFETY KEY FUNCTION:
Removing the
Safety Key (No. 128)
from the meter while the treadmill is running will
cause it to stop immediately.
Operating Instructions
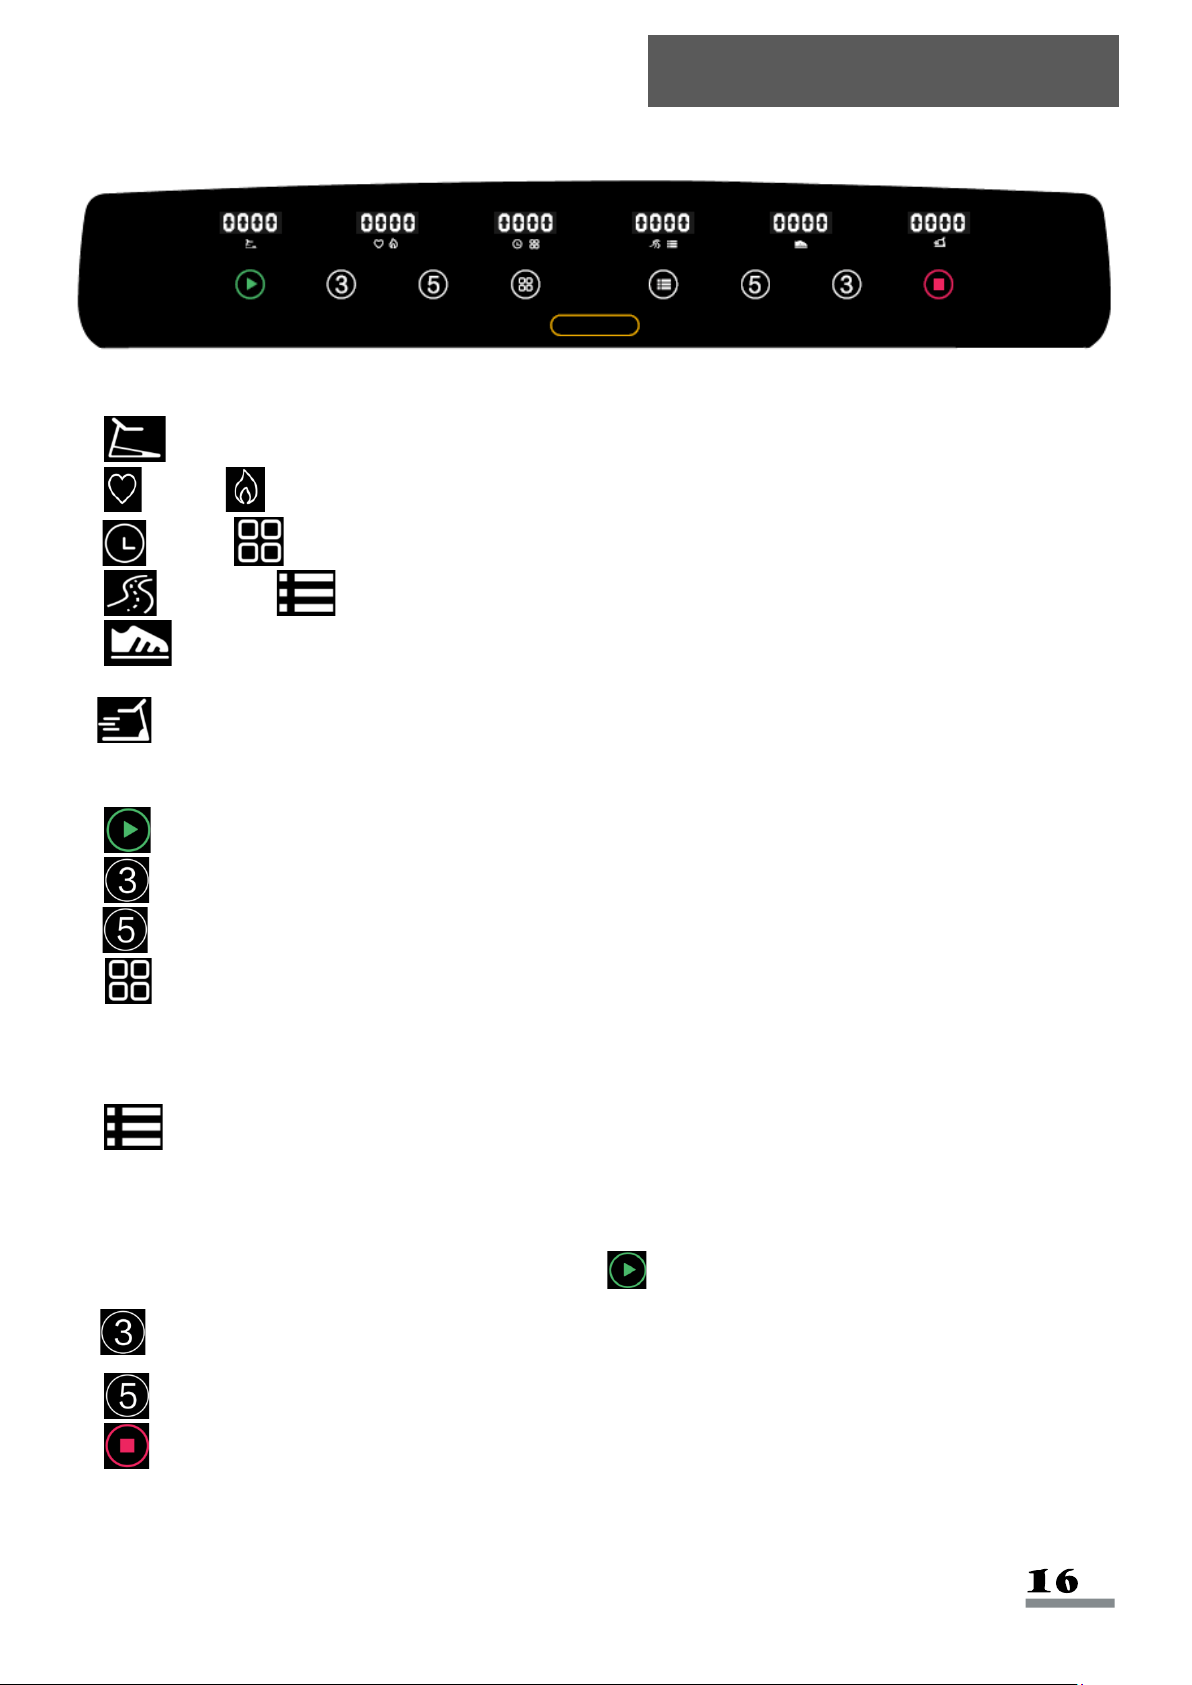
Windows Display:
a. Incline: Displays current incline value.
b. Pulse/ Calorie: Displays current pulse value and the calories burned.
c. Time/ Program: Displays current exercise time and the current program.
d. Distance/ Mode: Displays current exercise distance and current mode.
e. Pedometer: Displays current steps value. Number of steps and number of turns will
display alternately when number of steps is over 10,000; one turn equals to 10,000 steps.
f. Speed: Displays current exercise speed.
Key Functions:
a. Start: When the power is on and safety key is on, press this button to start the treadmill.
b. Incline 3: Set incline at Level 3.
c. Incline 5: Set incline at Level 5.
d. Program: In standby mode, press this button to scroll through programs: 0:00, P1-
P2-...P8, U1-U2-U3. (0:00 is manual mode, P1-P8 is built-in program, U1-U3 is user program.)
Manual mode is the system default operation mode. Manual mode default speed is 0.6 MI/H.
e. Mode: Press to scroll through the functions: 0:00, 30:00, 3.1, 100. (0:00 is manual mode,
30:00 is time countdown mode, 3.1 is distance countdown mode, 100 is calorie countdown
mode.) When choosing different modes, use handrail speed + and - button to set corresponding
countdown value. After setting the value, press Start to start treadmill.
f. Speed 3: To set the speed at 3 MPH.
g. Speed 5: To set the speed at 5 MPH.
h. Stop: To stop the treadmill.
Display Meter
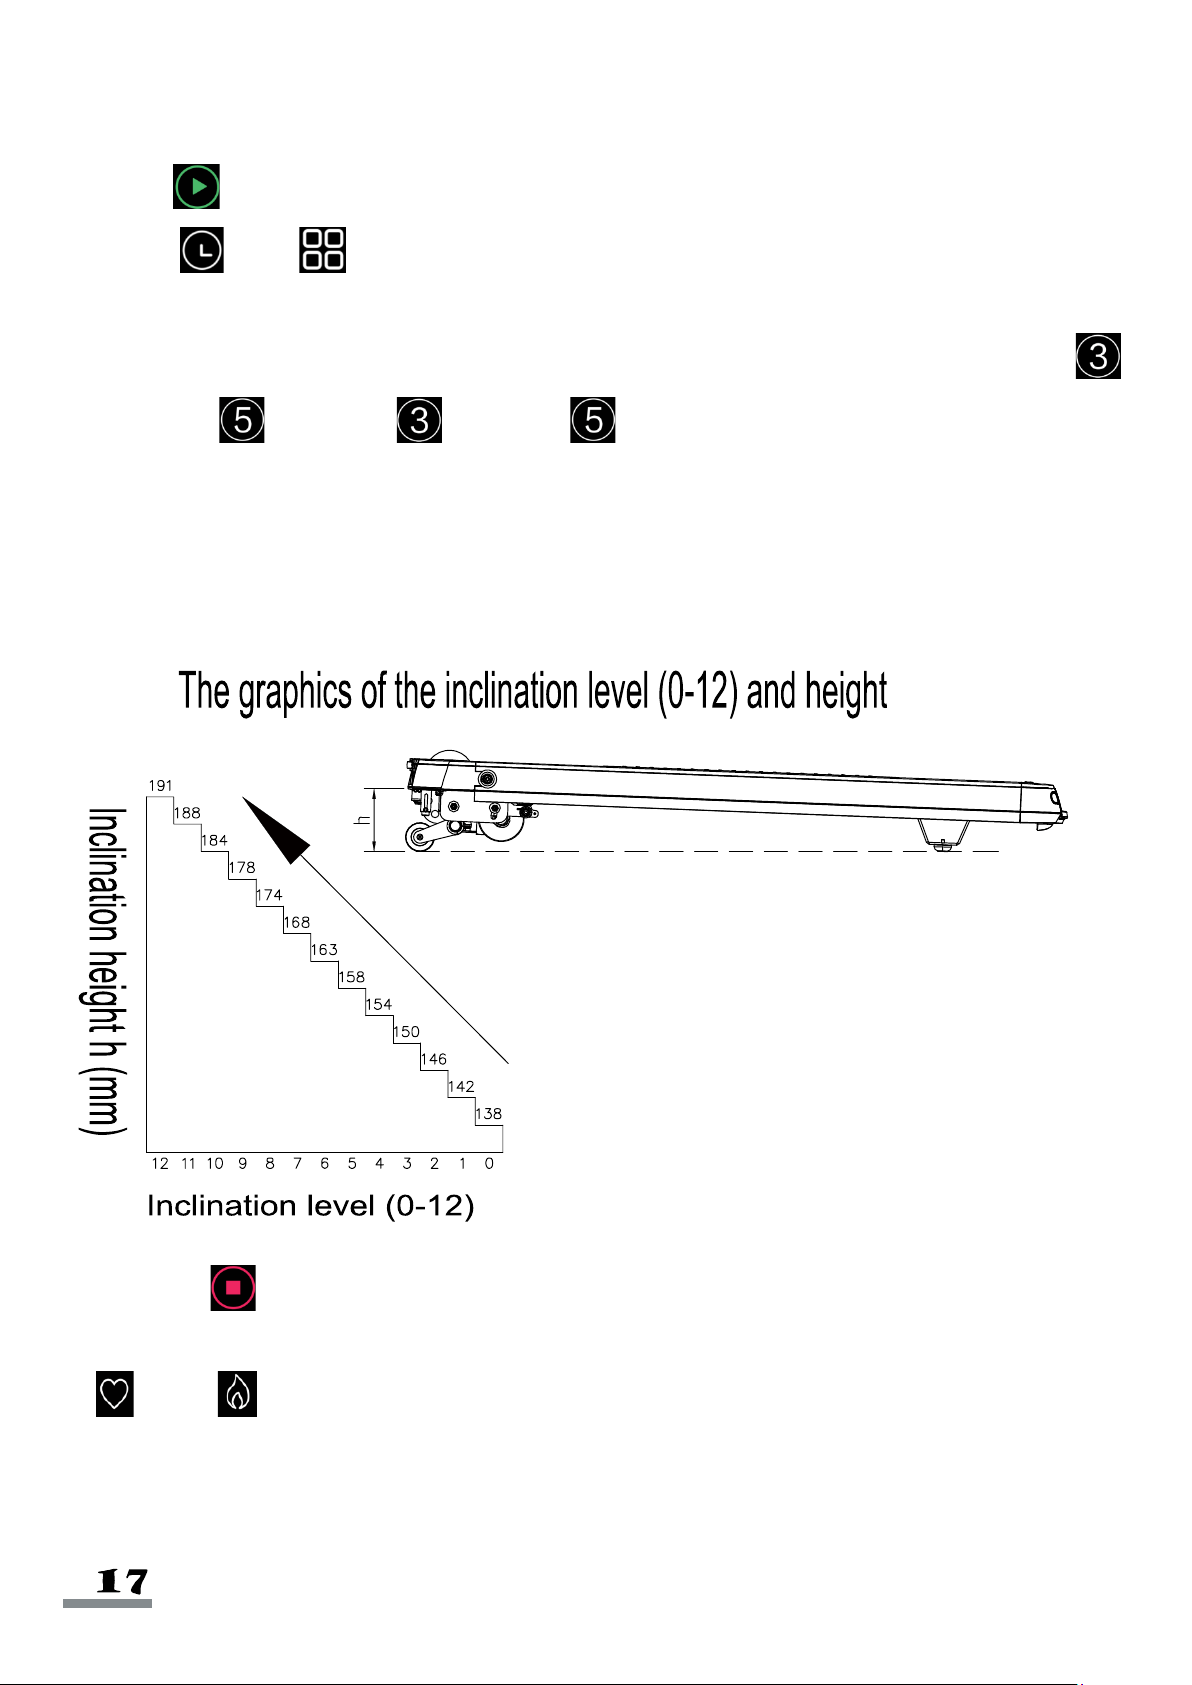
Instant Start:
a. Turn on the power. Insert the safety key in the meter.
b. Press Start, system enters into 3 seconds countdown and the treadmill makes a beeping
sound. Time/ Program window displays the countdown numbers at the same time.
After the 3 seconds countdown, the treadmill starts at 0.6 MI/H speed.
c. After starting, adjust the treadmill speed and incline using handrail buttons. You can use
Incline 3, Incline 5, Speed 3, Speed 5 to adjust the speed and incline to
preset levels.
During the Exercise:
a. Use +/- right handrail buttons to increase/decrease speed. (0.1MI/H increments)
b. Use +/- left handrail buttons to increase/decrease incline.
c. Press the Stop to make the treadmill slow down to a stop.
d. To measure pulse, hold the pulse sensors for 5 seconds, and the pulse icon will light up.
Pulse/ Calorie displays the pulse data.

Manual Mode:
a. In standby mode, press Start, and the treadmill starts at 0.6 MI/H speed and 0% incline.
b. In standby mode, press Mode, to enter time countdown.
Time/ Program window displays “30:00” and flashes and the time icon will light up.
Press the handrail buttons on either side to set exercise time: setting range is: 5:00-99:00.
c. At time countdown mode, pressing Mode enters the distance countdown mode.
Distance/ Mode window displays “3.1” and flashes, then the distance icon will light up.
Press the handrail buttons on either side to set exercise distance: distance setting range is:
0.6-61.9 Miles.
d. At the distance countdown mode, pressing Mode enters into calorie countdown mode,
Pulse/ Calorie window display “100” and flashes, then the calorie light turns on. Press
the handrail buttons on either side to set calorie: calorie setting range is: 20-990 Kcal.
e. After setting one of the modes to countdown, press Start, the treadmill will start to run after
3 seconds. When the countdown is finished, the treadmill will stop. You can also press
Stop to stop directly.
Built-in Automatic Programs:
This system has 8 built-in automatic programs P1 to P8, in the standby mode. Press
Program, Time/ Program window to display “P1” to “P8”, and the program light turns on.
Time/ Program window flashes at the same time. Time light will turn on and display
preset time “30:00”, after pressing both sides of the handrail buttons to set the exercise time, press
Start to start the built-in program. The built-in program is divided into 10 segments: each
program exercise time=set time/10. When you enter into the next segment, if speed or incline is
going to change, the system beeps three times. The system speed and incline will change when the
program segment changes. You can press the handrail buttons to change the speed and incline
during each segment. When the program enters the next segment, it will go to the speed and incline
of this segment. When the segment of the program is finished, the system will beep three times,
and the treadmill slow down steadily to a stop.
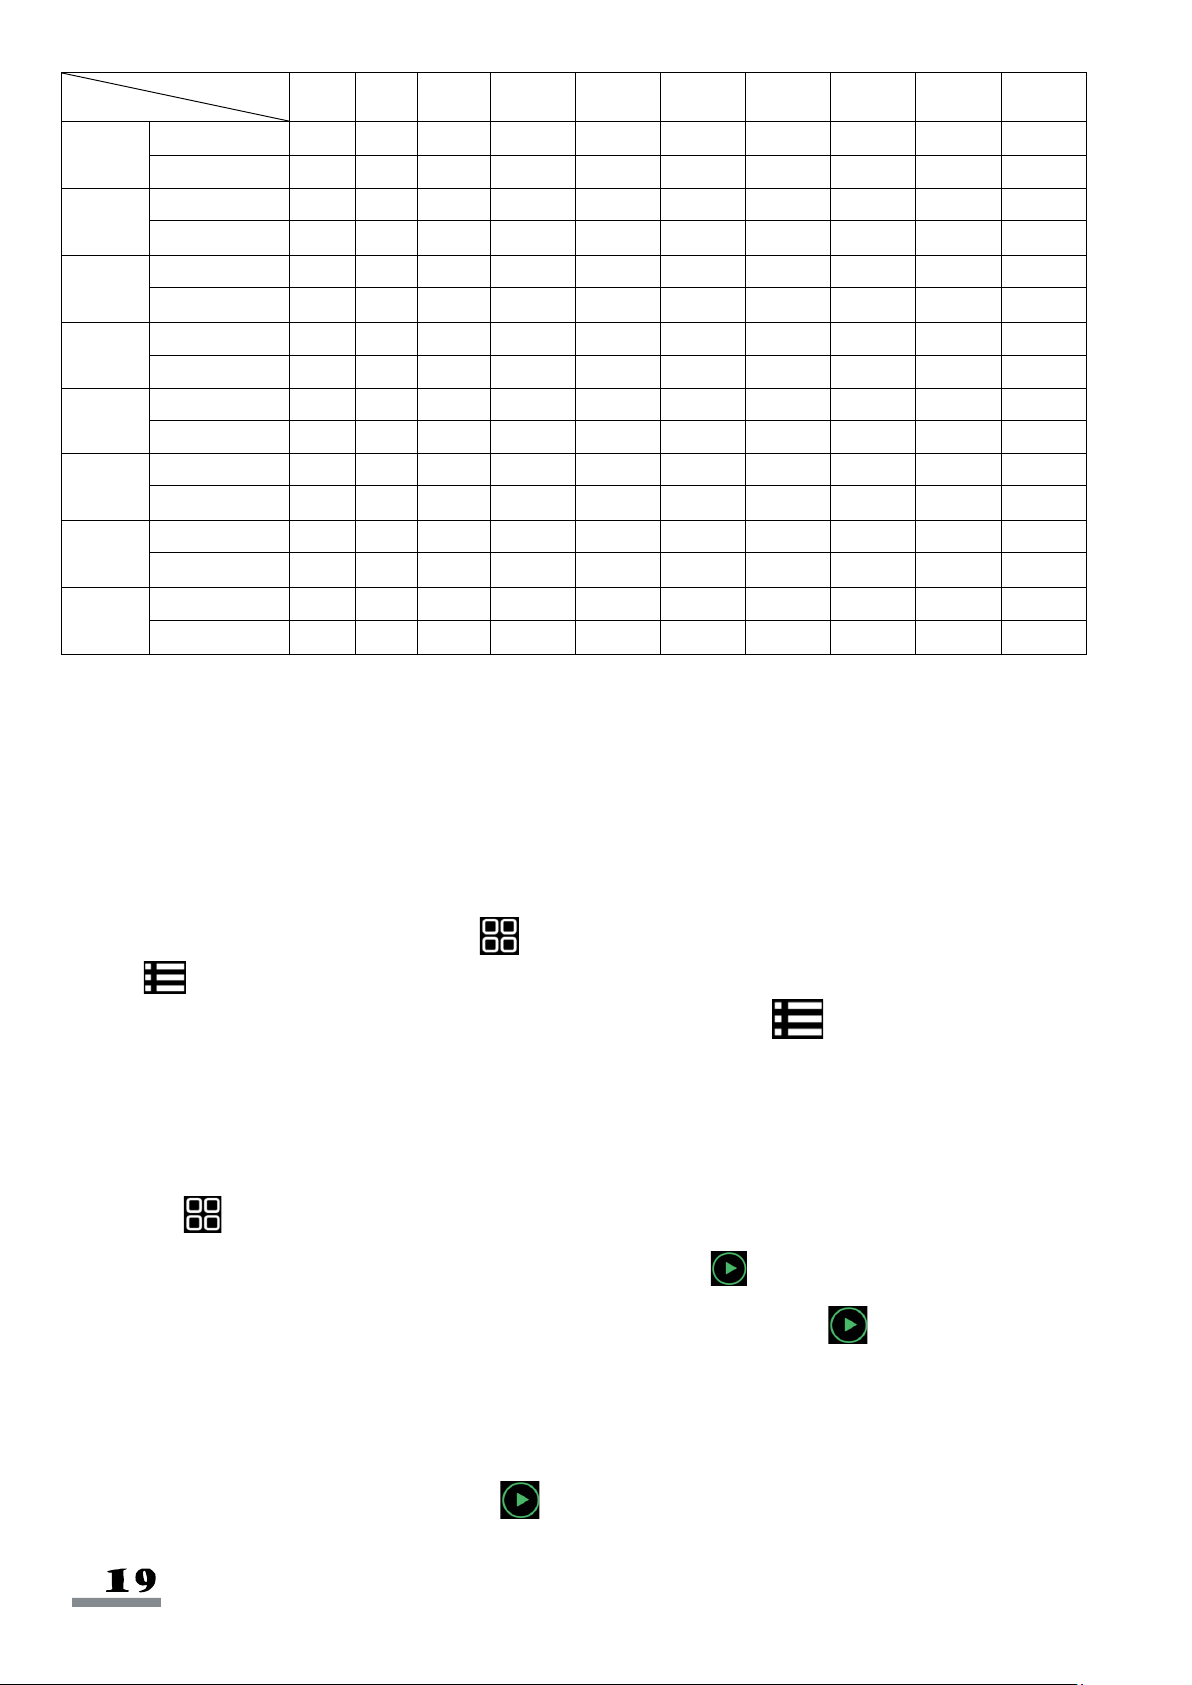
TIME
PROGRAM
1
2
3
4
5
6
7
8
9
10
P1
speed
0.6
2.5
1.9
2.5
1.9
3.1
2.5
1.3
3.1
1.9
incline
1
2
3
3
1
2
2
3
2
2
P2
speed
0.6
3.1
2.5
3.8
2.5
3.8
2.5
1.3
2.5
1.3
incline
1
2
3
3
2
2
3
4
2
2
P3
speed
0.6
3.1
2.5
3.1
2.5
3.1
2.5
1.3
1.9
1.3
incline
1
2
2
3
1
2
2
2
2
1
P4
speed
0.6
3.8
4.4
3.1
5
3.1
5.6
3.8
2.5
1.9
incline
2
2
3
3
2
2
4
6
2
2
P5
speed
0.6
3.8
4.4
3.1
5
3.8
4.4
3.8
2.5
1.9
incline
1
2
4
3
2
2
4
5
2
1
P6
speed
0.6
5
3.8
2.5
3.1
5.6
4.4
3.1
2.5
1.9
incline
2
2
6
2
3
4
2
2
2
1
P7
speed
0.6
3.8
4.4
2.5
2.5
4.4
2.5
1.3
2.5
1.3
incline
4
5
6
6
9
9
10
12
6
3
P8
speed
0.6
2.5
3.8
5
4.4
5
3.8
1.3
1.9
1.3
incline
3
5
4
4
3
4
4
3
3
2
User Customized Program
Beside from 8 built-in programs, there are also 3 user customized programs that allow users to set
according to personal preferences: U1, U2, U3.
a. The setting of user customized program:
At the standby mode, press and hold Program to set the user customized program (U1-U3).
Press Mode to confirm and enter setting, then set the first period. Use handrail speed button to
set speed and use handrail incline button to set incline. Press Mode, finish the first time
setting and enter into the second time setting until finishing all 10 periods’ setting. After finishing the
settings, the data will be saved permanently until the next time. The data will not be lost because of
a power outage.
b. Using user customized program.
(1). Press Program continually at the standby mode until you get to the user customized
program (U1-U3), then set the operation time and press Start to start.
(2). After setting a user customized program and operation time, press Start to start.
c. The user customized program setting instruction.
Every program divides the time into 10 segments. You will need to set the speed, incline, and time
of the 10 segments before pressing the Start to start the treadmill.
Audio:
When the power is on, you can connect the MP3 wire to audio device to play music. When the
treadmill powers down and enters sleep mode, the music will stop. Pressing any key will reactivate
the treadmill.
USB Interface:
USB connection can only charge your device. It cannot be used to play music.
Metric/Imperial Unit Change:
Remove the safety key. Press and hold Start button, then reconnect the safety key. Keep
holding the Start until all the display functions light up then release. Press either side of the
handrail buttons to select Metric or Imperial system ("SI" signifies Metric system and "Eng" signifies
Imperial system). After selecting, press the Start button to confirm and return to standby
mode.
Safety Key Function:
In any mode, pulling off the safety key can stop the treadmill from running immediately. When the
treadmill stops immediately, the treadmill will make a beeping noise and the display panel displays
“SAFE”. At this moment, you cannot operate the treadmill except to turn it off. Insert the safety key
again and the treadmill will be in standby mode.
Incline Self-Adjustment:
At the standby state, press Stop and Speed 5 to do a self-adjustment. After adjusting,
you can return to standby state.
Power Saving Mode:
This system has power saving function in the standby mode. If there is no button command input
within 4 minutes, the system will enter power saving mode and shut off the display automatically.
Press any button to turn on the system.

Treadmill Error Codes:
If the treadmill displays error code, please contact Customer Service at
Er1: Display panel couldn’t receive the signal.
Er3: Over voltage.
Er4: IGBT short circuit (Over current).
Er5: Over load.
Er6: The motor is not connected, (only direct current).
Er7: The controller couldn’t receive the signal.
Er8: Preventing reversing switch action.
Er13: Over current.
Er14: Over-loading; short-circuit.
A. Shutdown:
You can turn off the power to shut down the treadmill in any mode. This will not damage the
treadmill.
B. Attention:
1. Check the power, safety key, and that the treadmill is in a valid mode before starting to exercise.
2. When encountering an emergency, pull off the safety key to stop the treadmill quickly. When you
put the safety key back in, the system goes back to default and you can use the treadmill.

Cleaning
General cleaning will help to prolong the life and improve the performance of your treadmill. Keep
the unit clean and maintained by dusting the components on a regular basis. Cleaning the two
exposed sides of the Running Belt (No. 25) will prevent dust from accumulating underneath.
Keep your running shoes clean so that dirt from the shoes does not wear the Running Board (No.
24) and Running Belt (No. 25). Clean the surface of the Running Belt (No. 25) using a clean
damp cloth. Keep liquids away from electrical parts and Running Belt (No. 25). Be careful and
keep all liquids away from the electrical components and underneath the Running Belt (No. 25).
WARNING
Remember to unplug the treadmill from the electrical outlet before removing the motor
cover. Remove the motor cover and vacuum underneath at least once a year.
Running belt and the lubricant oil of the motorized treadmill:
Running Belt (No.25) and Runing Board (No.24) are already pre-lubricated. Running Belt
(No.25) and Runing Board (No.24) friction may play a major role in the function and life of your
treadmill, thus requiring periodic lubrication. We recommend a periodic inspection of the running
board. If the running board is worn out, please contact: [email protected]
We suggest you buy lubricant from local distributors or contact our company directly.
Maintenance Instructions
To better maintain the treadmill and prolong its life, it is suggested that the treadmill be powered off
for 10 minutes every 2 hours and fully powered off whenever not in use.
Adjusting Belt Centering and Tightness:
a. If the Running Belt (No. 25) doesn’t stop when you press it, the Running Belt (No. 25) and
motor belt is positioned correctly.
b. If the Running Belt (No. 25) stops when you press it, but the motor belt and the front roller don’t
stop, the Running Belt (No. 25) is loose. Adjust the Running Belt (No. 25) for safe use.
c. If the Running Belt (No. 25) and motor belt stop when pressing the Running Belt (No. 25) and
the motor still runs, the motor belt needs to be adjusted for the safe use.
It is necessary to adjust the Running Belt (No. 25) to the best condition for the better use of the
treadmill.
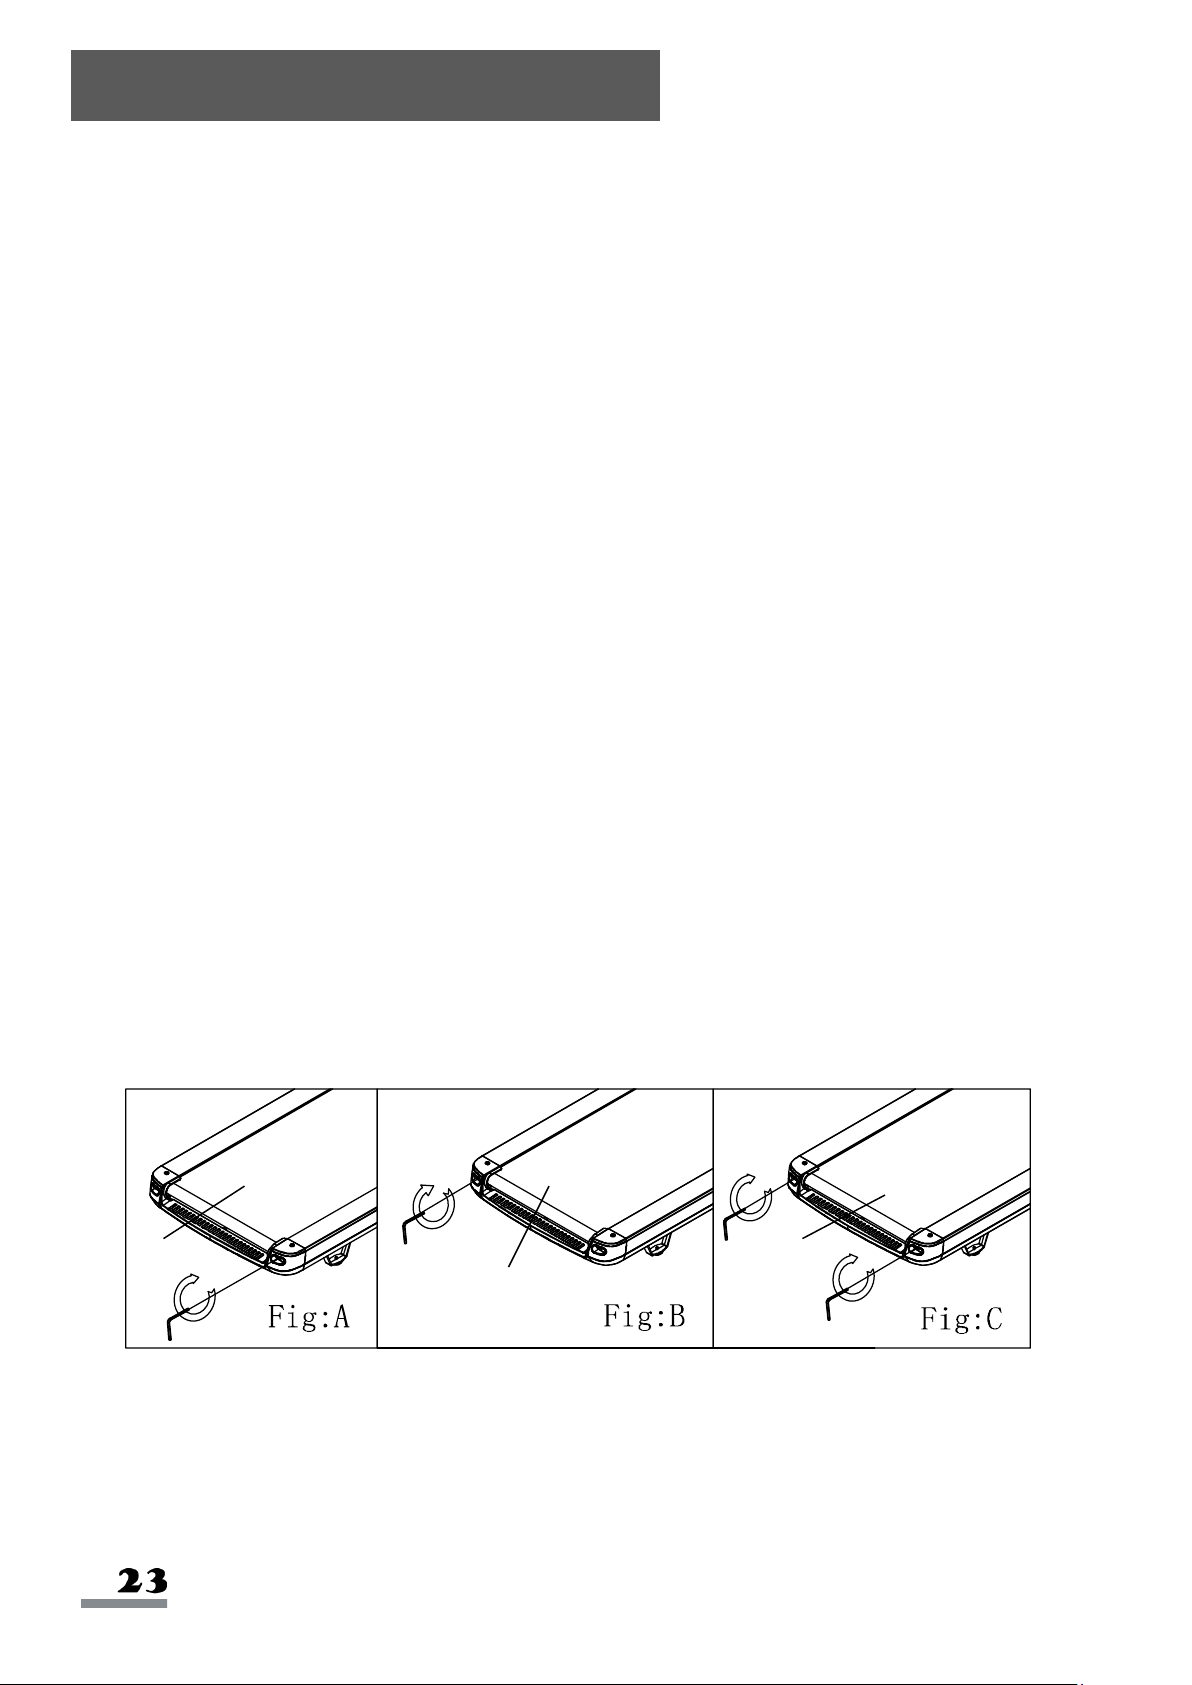
1. Put the motorized treadmill on level ground. Let the treadmill run at the speed of 6-8 MPH,
observe the Running Belt (No. 25) deviating condition.
2. If the Running Belt (No. 25) deviates to the right, pull off the Safety Key (No. 128) and unplug
the power. Turn the right side adjusting bolt clockwise by 1/4 circle. Turn on the treadmill and
watch the Running Belt (No. 25) to see if it is centered. Repeat the above steps, until the
Running Belt (No. 25) is in the middle. Please refer to figure A.
3. If the Running Belt (No. 25) deviates to the left, pull off the Safety Key (No. 128), unplug the
power, turn the left adjusting bolt clockwise by 1/4 circle. Turn on the treadmill and watch the
Running Belt (No. 25) to see if it is centered. Repeat the above steps, until the Running Belt
(No. 25) goes to the middle. Please refer to figure B.
4. After the above adjustment or after multiple uses,
Running Belt (No. 25)
may become loose and
needs adjustments. Pull off the
Safety Key (No. 128)
, turn off the power switch, and turn the left
and right adjusting bolts clockwise by 1/4 circle. Turn on the treadmill, then stand on the treadmill
to confirm the tightness of the
Running Belt (No. 25)
. Repeat above steps, until the
Running
Belt (No. 25)
is moderate in tightness. Please refer to figure C.
Maintenance Guidelines
25
25
25
Version 1.7