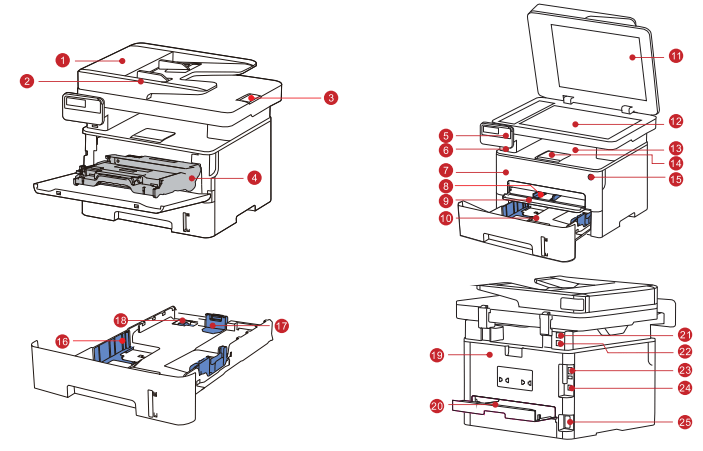
This is used to remove the paper jammed in scanning for the ADF.
2. Document feeder input tray
This is used to place originals scanned from the document feeder.
3. Document feeder output tray stop
To prevent scanned originals from falling.
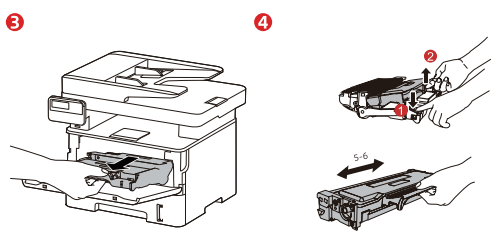
4. Toner cartridge
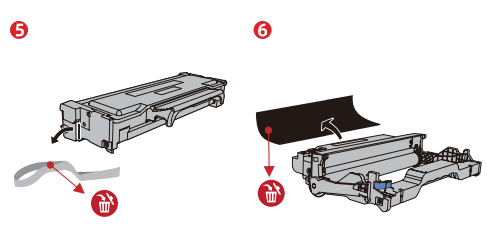
Being need to remove and open the seal when you use it for the first time.
5. Control panel
This is use for setting printer’s copy, scan, view information page and other operation settings.
6. Front USB interface Front USB interface
This is use for saving scanned documents to U disk when inserting U disk.
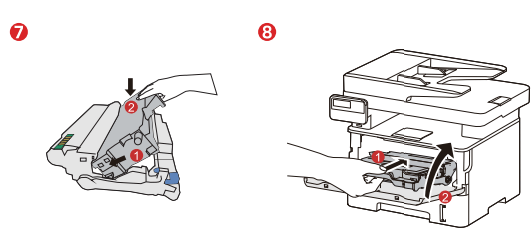
7. Front cover
To open the front cover to take out the laser toner cartridge.
8. Paper deflector of manual feed tray
This is used to adjust width of feeder to compatible with papers.
9. Manual feeder tray
For placing mediums that are printed in manual feed tray.
10. Automatic feeder tray
For placing mediums that are printed in auto feed tray.
11. Cover of scanner
To open the cover of scanner and place scanned original on glass platen.
12. Glass platen
This is used to place scanned original from platen.
13. Output bin
For storing the printed paper.
14. Output bin stop
To prevent printed paper from falling.
15. Power switch
Turn the power on or off and press this button under Ready state to enter energy-saving mode. Press and hold this button for more than 2s to turn the printer power off.
16. Paper width deflector of auto feed tray
This is used to adjust width of feeder to compatible with papers.
17. Paper length deflector of auto feed tray
This is used to adjust length of feeder to compatible with papers.
18. Clip of extended tray of auto feed tray
For adjustment of length extension of the tray .
19. Rear cover
For paper release when it gets jammed.
20. Duplex printing unit
For paper feed at duplex printing and paper release when paper gets jammed at duplex printing.
21. EXT. (interface only for printers with fax function.)
Extension interface, used for connection with external extension telephone.
22. LINE (interface only for machine with the fax feature.)
Telephone line interface, used for connection of this product to the telephone circuit.
23. USB interface
For connecting printer to computer with USB cable.
24. Network interface
For connecting printer to network with network cable.
25. Power interface
For connecting product to power with power cord.
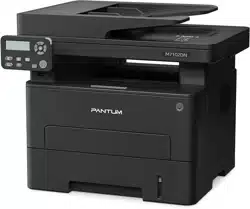
The Quick Installation Manual for Pantum Printer
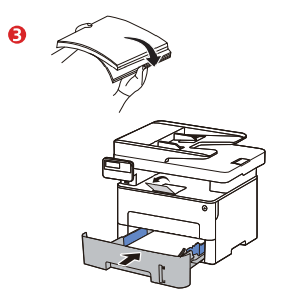
Install the laser toner cartridge
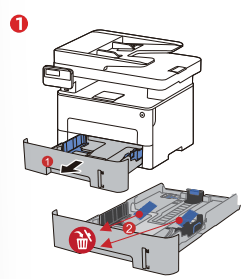
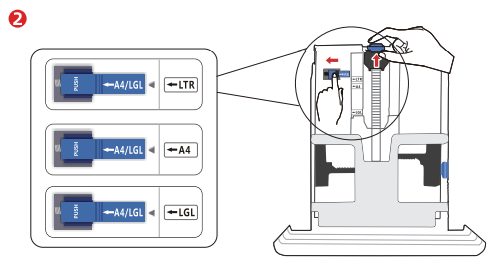
Put papers into the feeder
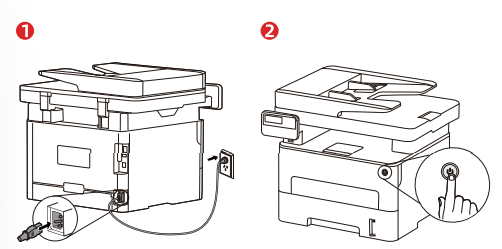
Connect the power supply
Warning: Our printer must use random power code and be placed in somewhere that easily touched. If the printer is not need for a long time, please unplug power plug and cut off power supply.
How to Download and Install Pantum Printer Driver for Windows
How to attain and operate driver software
Choice 1: Download the driver from our official website
Search the website: pantum, find out “Drivers & Downloads” and then select “Drivers”----Input printer’s name---- Select the driver file corresponding to the printer’s name---Select computer system----Download----Save the driver file to the designated location.
Select the driver file you have downloaded and double-click "Autorun.exe”.
Choice2: CD Installation
Insert the attached CD into the CD-ROM drive of your computer and click “My computer” from desktop to find out “DVD RW drive” , next open drive file----click “Autorun.exe” to start driver installation.
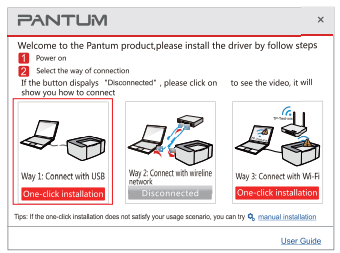
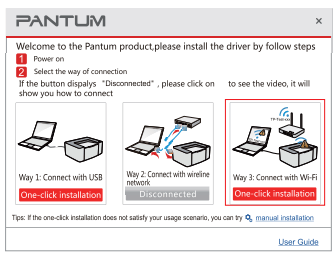
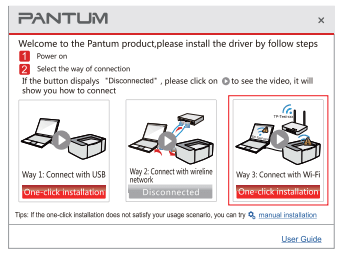
One-click driver installation
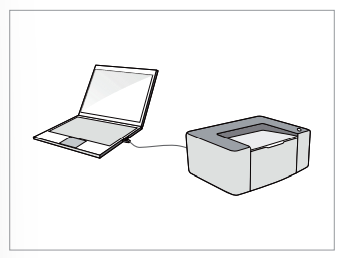
Choice 1: Install the driver by USB cable connection
1. Plug into the USB cable to make a connection between printer and computer.
2. Select way1: Connect with USB and click “One-Click Installation”.
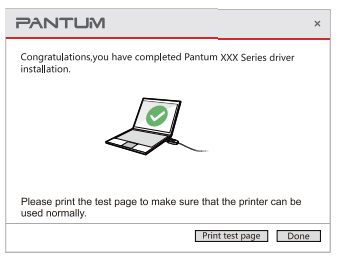
3.The installation is complected.
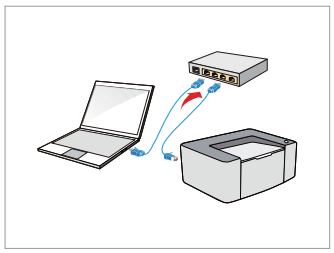
Choice 2: Install the driver by wired connection
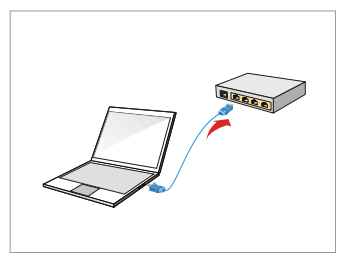
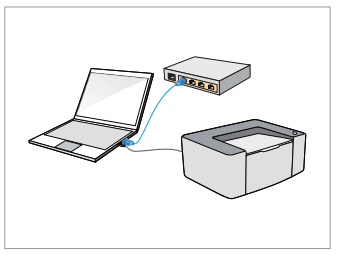
1. Plug in the network cable to make a connection between your printer and computer.
2. Select way2: Connect wireline network and click “One-Click Installation”.
3.The installation is completed
*(The choice only works for the printers which are labeled as “N” “W”, like M7100DN, M7100DW).
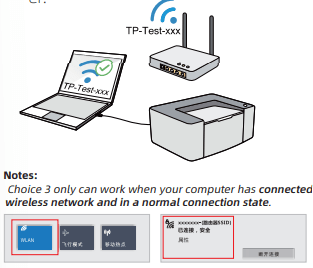
Choice 3(A) : Install the driver by wireless network connection (Only available for computers that have wireless network function.)
1. Plug into the USB cable to make a connection between printer and computer.
2. Select way3: Connect with Wi-Fi and then click “One-Click Installation”.
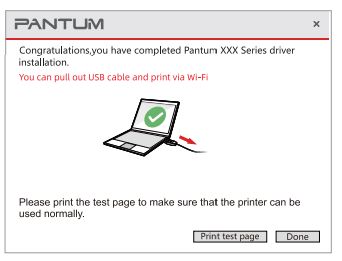
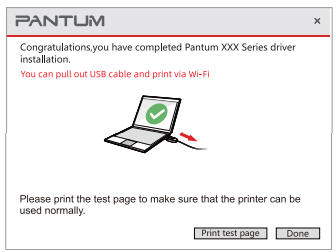
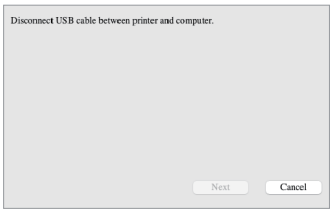
3. When successfully installed, unplug USB cable and then you can achieve wireless printing on PC.
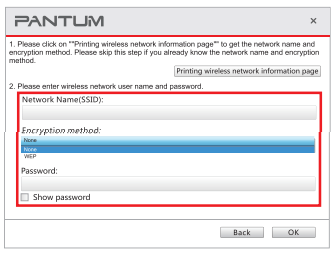
Choice 3(B) : Install the driver by wireless network connection (Only available for computers that have wireless network function.)
1. Plug in the network cable to make a connection between your printer and computer.
2. Plug into the USB cable to make a connection between printer and computer.
3. Select way3: Connect with Wi-Fi and then click “One-Click Installation”.
4. Input wireless network’s name and password.
5. When successfully installed, unplug USB cable and then you can achieve wireless printing on PC.
How to Download and Install Pantum Printer Driver for Mac OS
How to attain and operate driver software ?
Choice 1: Download the driver from our official website
Search the website pantum.com, find out “Drivers & Downloads” and then select “Drivers”----Input printer’s name---- Select the driver file corresponding to the printer’s name---Select computer system----Download----Save the driver file to the designated location.
Select the driver file you have downloaded and double-click it to start the driver installation.
Choice 2: CD Installation
Insert the attached CD into the CD-ROM drive of your computer and double-click “Pantum XXXXXX Mac Driver.pkg” installation package to start driver installation.
How to install the driver ?
Choice 1: Install the driver by USB cable connection
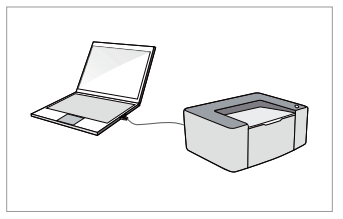
1. Plug into the USB cable to make a connec- tion between printer and computer.
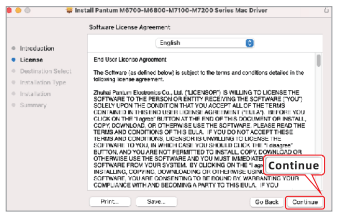
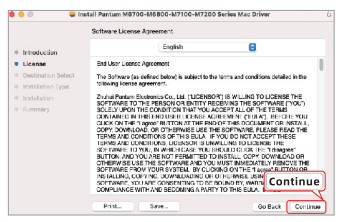
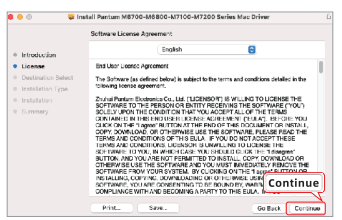
2. Read the installation agreement and click “Continue”.
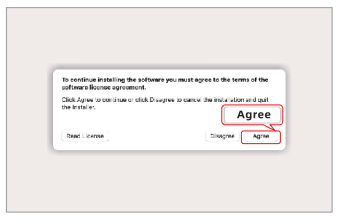
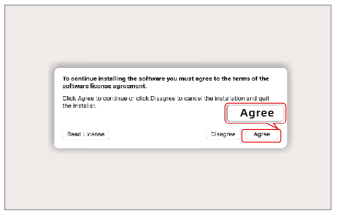
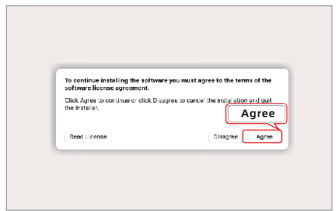
3. Enter installation interface and click “Agree”.
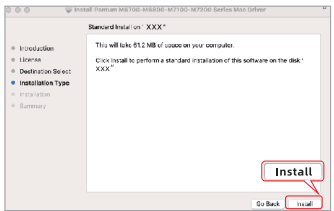
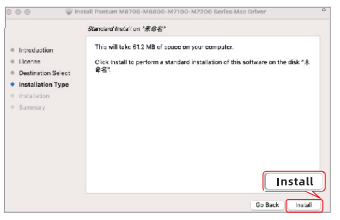
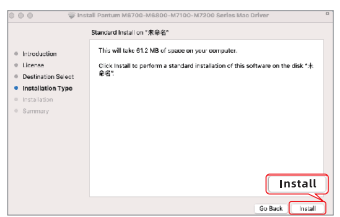
4. Read the installation instruction and click “Install”.
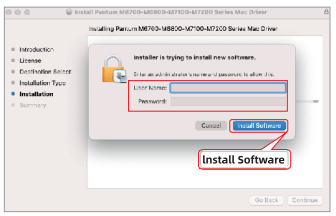
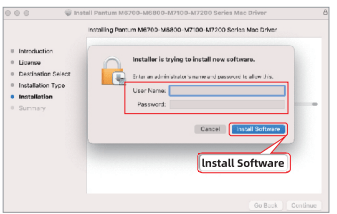
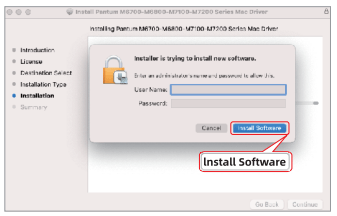
5. Input your computer username and password, click “Install Software”.
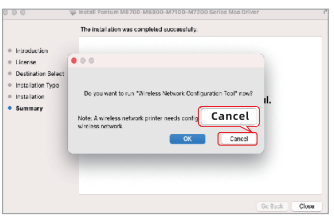
6. Click “Cancel” when it asks you if you want to run “Wireless network configura- tion tool”.
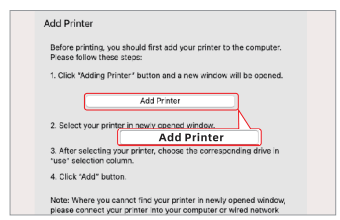
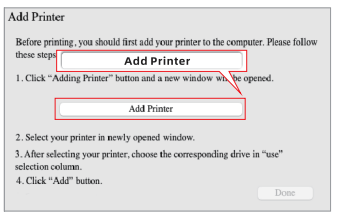
7. Click “Add Printer”.
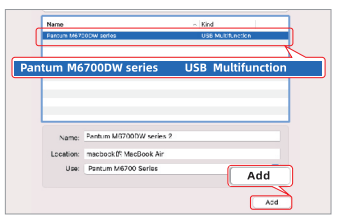
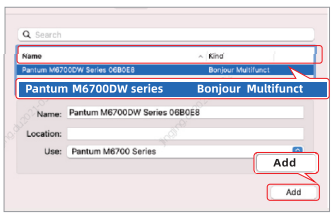
8. Select the connection type called “USB Multifunction” and click “Add”.
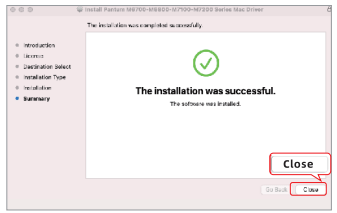
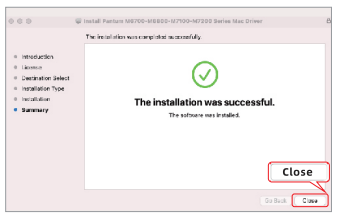
9. When successfully connected, click “Close” to complete driver installation.
Choice 2 : Install the driver by wired network connection.
1. Plug in the network cable, then make your printer and computer connected to the same router.
2. After reading installation agreement, then click “Continue”.
3. Enter installation interface and click “Agree”.
4. Read the installation instruction and click “Install”.
5. Input your computer username and password, then click “Install Software”.
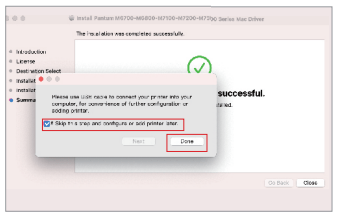
6. Select “Skip this step and configure or add printer laser” and click “Done”.
7. The driver installation has complected and click “Close”.
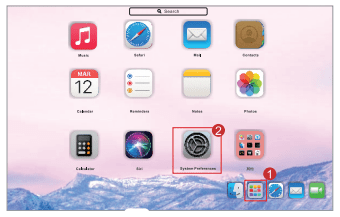
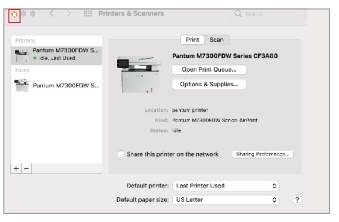
8. Open your “System Preferences”.
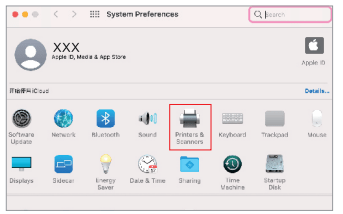
9. Click “Printers&Scanners” in your System Preferences.
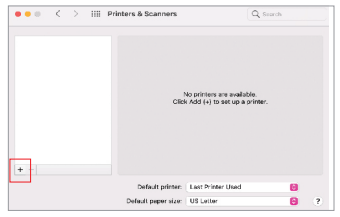
10. Click “+”(see bottom left) and add printer in “printers&scanners”.
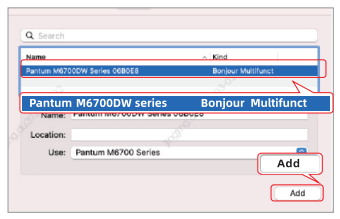
11. Select the connection type called “ Pantum (Product name) series Bonjour Multifunct” and click “Add”.
12. The connection is complected and close it.
Choice 3: Install the driver by wireless network connection
Notes: Choice 3 only can work when your computer has connected wireless network and in a normal connection state.
1. Plug into the USB cable to make a connection between printer and computer.
2. Read the installation agreement and click “continue”.
3. Enter the installation interface and click “Agree”
4. Read the installation instruction and click “Install”.
5. Input your computer username and password and then click “Install Software”
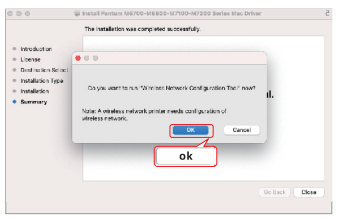
6. Click “OK” when it turns out pop-ups like “Do you want to run ”Wireless Network Configuration Tool now?"
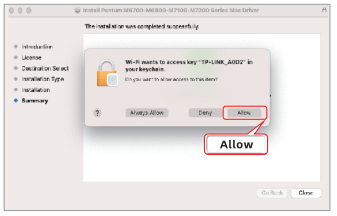
7. Click “Allow” when it ask you if you want the program to access the current network.
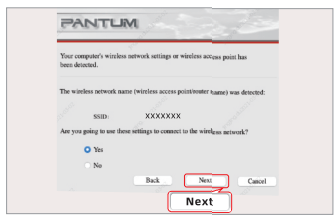
8. Ensure the wireless network’s name that has been detected and click “Next”.
9. Ensure the wireless network’s name that has been detected and click “Next”.
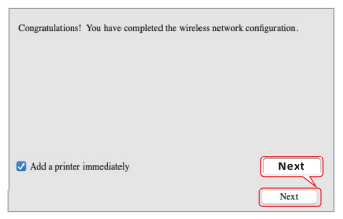
10. Follow the tips and unplug USB cable.
11. Click “Add Printer"
12. Select the connection type called “ Pantum (Product name) series Bonjour Multifunct” and click “Add”.
13. When it connects successfully, click “close”, then the wireless network connection and driver installation is complected
How to Download and Install Pantum Printer App for Android ?
How to download and setup “Pantum” App ?
Choice 1 : Download “Pantum Print” App from Google play
Search “Pantum” in Google play and download it.
Choice 2 : Download “Pantum” App from our official website
Scan the QR code by your phone and enter our official website, then download it.
How to connect and use “Pantum” App ?
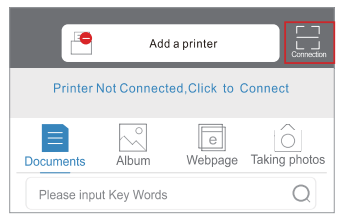
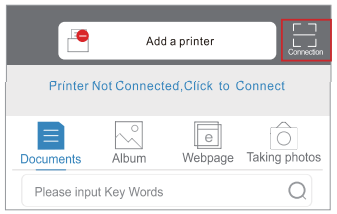
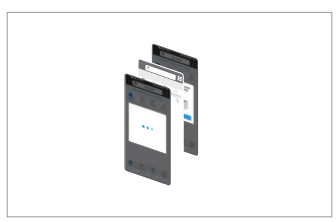
1. Open the app and click “connection” on home page.
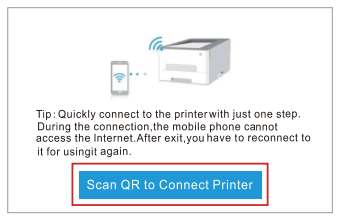
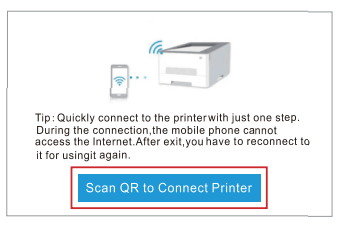
2. "Click “ Scan QR to Connect Printer”.
3. Scan the QR code.
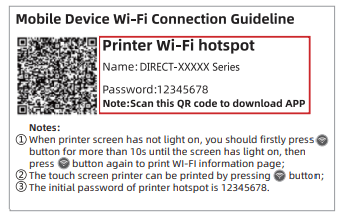
Question: How to get the printer’s hotspot password and QR?
Key: Press the button from printer, then print WIFI information page out.(as the picture shows).
4. Follow the App’s cue to connect your printer.
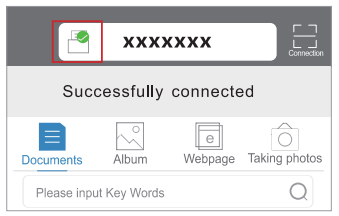
5. Then successfully connected.
Notes:
Your cellphone would be out of internet when it connects to the WI-FI of printer.
When you close the app, you’d better connect printer again, if you want to use app.
The above connection method is only for printer hotspot, if you want to keep the internet on during printing, you can go to Pantum/global/video/ to see video guidance.
How to Download and Install Pantum Printer ?
How to download and install “Pantum”
Search ‘Pantum print’ in Apple app store and download it.
How to connect and use “Pantum” App ?
1. Open the app and click “connection” on home page.
2. Click “ Scan QR to Connect Printer”.
3. Scan the QR code.
Question: How to get the printer’s hotspot password and QR?
Key: Press the button from printer, then print WIFI information page out.(as the picture shows).
4. Follow the App’s cue to connect your printer.
5. Then successfully connected.
Notes:
Your cellphone would be out of internet when it connects to the WI-FI of printer.
When you close the app, you’d better connect printer again, if you want to use app.
The above connection method is only for printer hotspot, if you want to keep the internet on during printing, you can go to https://global . Pantum/global/video/ to see video guidance.
How to Connect to AirPrint and Print for iOS ?
How to download and install “Pantum”
1. Press button from printer, then print WI-FI information page out to get the password and name of printer’s hotspot (as picture shows).
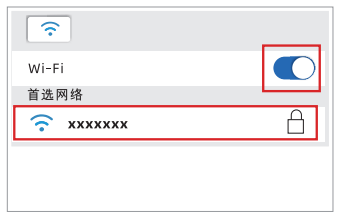
2. Open the SETTINGS on your iphone and select WI-FI.
3. Next you will see a list of available Wi-Fi connections in your vicinity, SELECT the printer’s hotspot and click ENTER.
4. Input the password and make it connect to the printer. (The initial password is 12345678)
Notes: Your cellphone would be out of internet when it connects to the WI-FI of printer and if you close the app, you should connect again when you want to print by app.
How to download and install “Pantum”
1. Open the picture/file that has been down- loaded and select it “”


 button from printer, then print WIFI information page out.(as the picture shows).
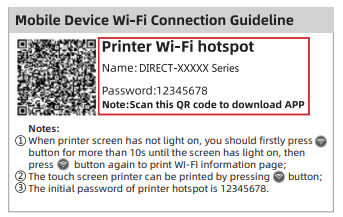


 button from printer, then print WI-FI information page out to get the password and name of printer’s hotspot (as picture shows).


 ”
”