The MetalliScanner
®
m40 electronic metal detector locates metal through concrete and most nonmetallic materials.
The wide and pinpoint scanning positions allow you to quickly and easily find plumbing, ductwork, rebar, nails, and
screws in your walls, floors, and ceilings. Find studs in lath and plaster walls by locating the row of nails attaching the
wood lath to the studs. MetalliScanner
®
m40 is also great for scanning reclaimed or recycled lumber to find hidden
metal before sawing and planing.
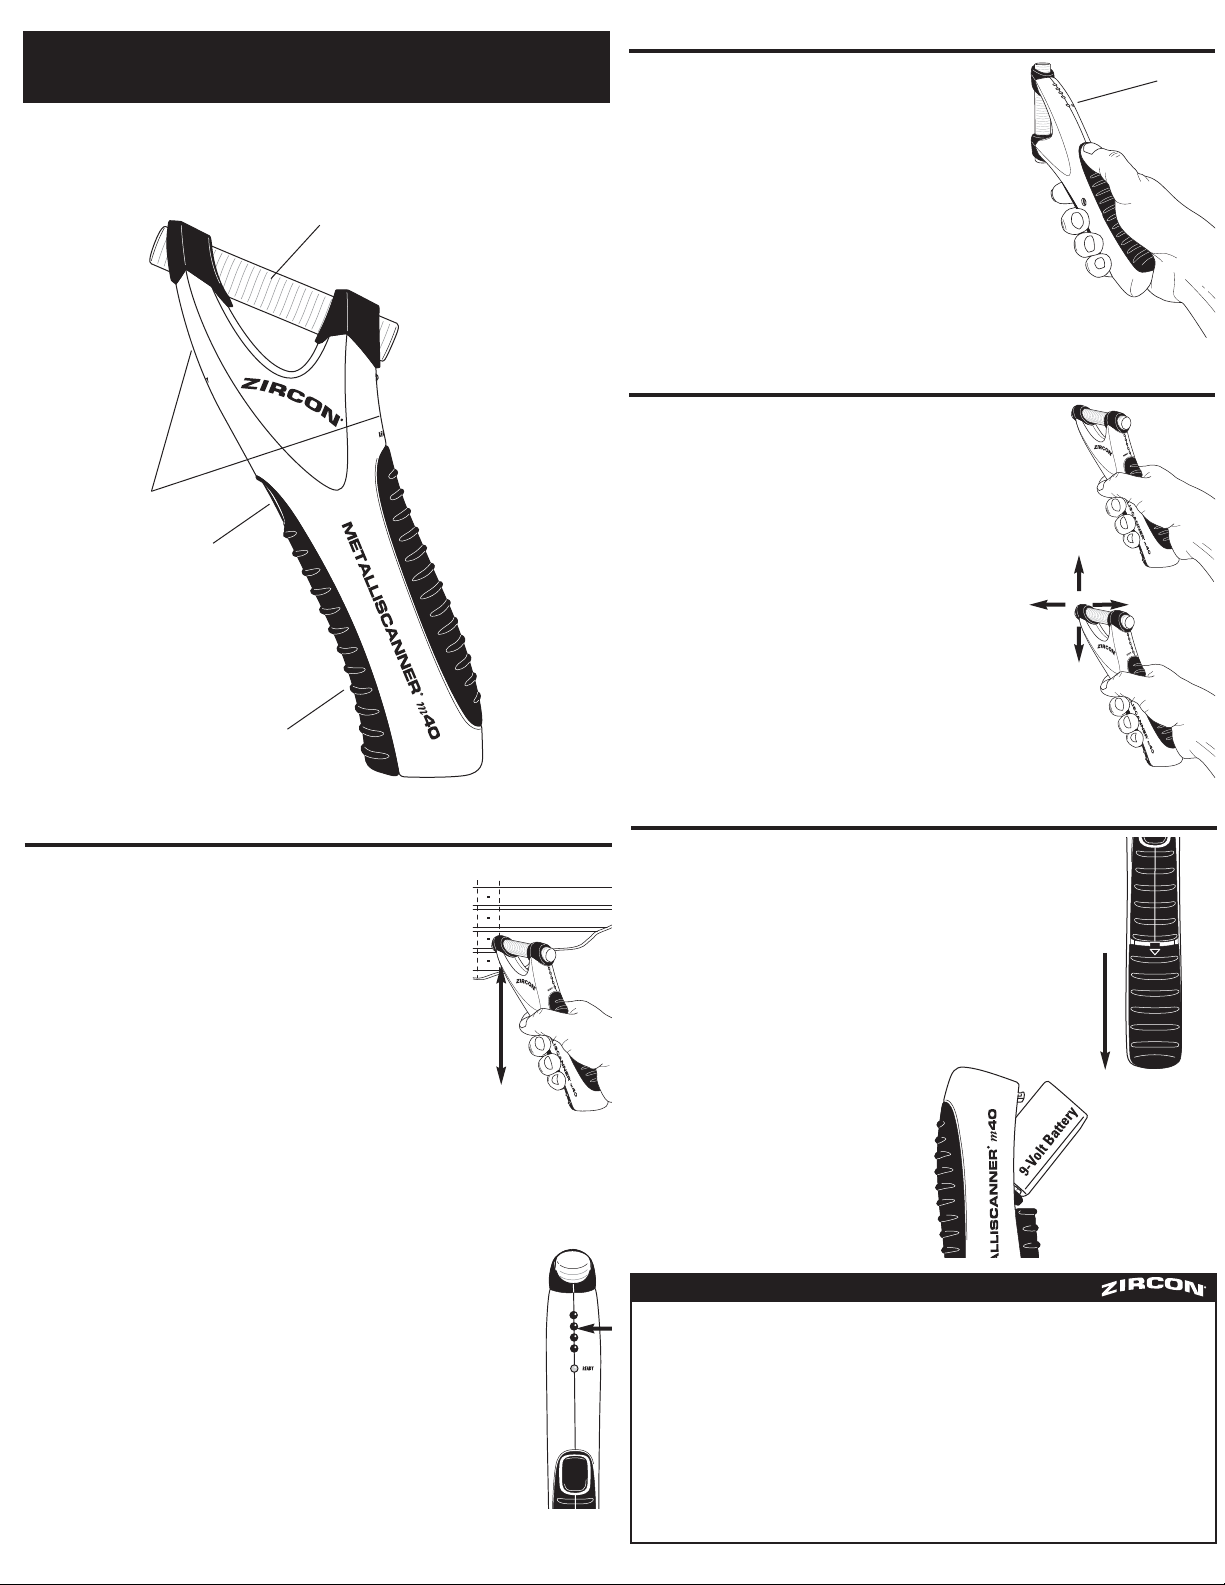
1. Grasp the tool with your thumb over the power button.
2. Hold the tool in the air with the blue sensor parallel
to the scanning surface away from any known metal.
3. Press and hold power button. The READY light
indicates that calibration is complete and you are
ready to search for metal.
4. Move the unit near the surface and scan while
continuing to hold the power button. Do not rotate
the tool, see Tip #3.
5. As you approach a metal object the red LEDs will light progressively
from the bottom up. The closer the illuminated lights get to the top,
the closer you are to a metal object. The illuminated blue sensor and
audio tone indicate a strong target. Small targets or targets deep within
the surface may only illuminate some of the red LEDs and not the blue
sensor or audio tone. In this case, use the highest LED indication to
determine the metal position.
6. Mark the point where you get the highest LED indication, continue scanning,
and mark the point where the LED indication decreases. Halfway between
these points is the logical center of the metal field. To further refine this
position, see Tip #1.
1. Grasp the tool with your index finger over power button.
2. Hold the tool in the air with the blue sensor perpendicular
to the scanning surface away from any known metal.
3. Press and hold power button. The READY light indicates
that calibration is complete and you are ready to search
for metal.
4. Move the unit near the surface and scan while
continuing to hold the power button. Do not rotate
the tool, see Tip #3.
5. As you approach a metal object the red LEDs will
light progressively from the bottom up. The closer the
illuminated lights get to the top, the closer you are to
a metal object. The illuminated blue sensor and audio
tone indicate a strong target. Small targets or targets
deep within the surface may only illuminate some of
the red LEDs and not the blue sensor or audio tone.
In this case, use the highest LED indication to determine
the metal position.
6. Mark the point where you get the highest LED indication;
continue scanning and mark the point where the LED
indication decreases. Halfway between these points is
the logical center of the metal field. To further refine this
position, see Tip #1.
7. Scan the surface both vertically and horizontally to
pinpoint the metal target location.
1. Scan across the wall using the Wide Area Scanning procedure outlined
previously to locate the nails that attach the wood lath to the studs.
2. To help confirm you have found a stud and not a pipe or other metal
object, scan the target area located in Step #1 again, this time using
Pinpoint Scanning, and scan the area vertically. The LEDs may move up
and down on the display, indicating the nail pattern of the small nails
attaching the wood lath to the stud. (In contrast, a pipe or other solid
metal will typically be indicated by a consistent signal.)
3. To help verify your findings, scan your work area thoroughly and mark
the location of every object indicated by the tool. Do not assume
everything is a stud.
•Studs are normally spaced 16 in.(40 cm) or 24 in.(60 cm) apart,
not odd intervals.
•Studs normally run from floor to ceiling,except above and below
windows, and above doors.
•Pipes and other large metal objects will give a consistent,strong
signal in either scanning mode. The nails in a stud will likely show
some variance in the strength of the signal.
•Be aware of walls that are likely to contain plumbing.For example,
a living room wall may be common to a bathroom and contain
plumbing for the sink, shower, or toilet.
Tips:
1. If the unit indicates metal over a large area, you can refine the scanning area to
more accurately locate the metal target. After scanning the area as indicated
above, mark the edges of the area where you get the strongest metal signal.
Starting over one of the marks, press and hold the power button; this will
recalibrate the tool and decrease the sensitivity. While holding the power button,
scan the area again. The area indicated should become smaller so you can more
precisely identify the metal location. This procedure can be repeated to narrow
the field even further.
2. Because the unit uses signal strength to determine position, large, deep objects,
and small, shallow objects will give similar indications.
3. The unit should be turned on in the same orientation that will be used when
scanning. If the tool is twisted or rotated during use, you may get a temporary
indication of metal where none is present. Wait until ONLY the READY light is on
before scanning.
4. MetalliScanner
®
m40 finds ferrous (magnetic) metal such as
1
⁄2 in. (12 mm)
rebar to 4 in. (102 mm) deep and non-ferrous (non-magnetic) metal such as
1
⁄2 in. (12 mm) copper pipe up to 2 in. (51 mm) deep. Targets found at the
maximum depth may only be indicated by the first red LED on the display.
5. When scanning concrete, the tool will indicate the presence of the metal mesh
that is usually found in driveways and slab foundations, but due to the size
variety of metal mesh, the tool may not indicate the exact location of the wires.
6. Magnetized materials may cause false, unstable indications.
1. Remove the battery cover located below the power button by pressing in on the arrow
and sliding the cover towards the bottom of the tool.
2. Holding the tool upside down, tilt the battery out of the cavity.
MetalliScanner
®
m40
Electronic Metal Detector
WIDE AREA SCANNING
PINPOINT SCANNING
LOCATING STUDS IN LATH & PLASTER CHANGING THE BATTERY
Battery Cover
Power Button
LED Display (both sides)
Blue Sensor
LIMITED 1 YEAR WARRANTY
Zircon Corporation, (“Zircon”) warrants this product to be free from defects
in materials and workmanship for one year from the date of purchase.
Any in-warranty defective product returned to Zircon*, freight prepaid with proof
of purchase date and $5.00 to cover postage and handling, will be repaired or
replaced at Zircon’s option. This warranty is limited to the electronic circuitry and
original case of the product and specifically excludes damage caused by abuse,
unreasonable use or neglect. This warranty is in lieu of all other warranties,
express or implied, and no other representations or claims of any nature shall
bind or obligate Zircon. Any implied warranties applicable to this product are
limited to the one year period following its purchase. IN NO EVENT WILL ZIRCON
BE LIABLE FOR ANY SPECIAL, INCIDENTAL OR CONSEQUENTIAL DAMAGES
RESULTING FROM POSSESSION, USE OR MALFUNCTION OF THIS PRODUCT.
In accordance with government regulations, you are advised that: (i) some
states do not allow limitations on how long an implied warranty lasts and/or
the exclusion or limitation of incidental or consequential damages, so the above
limitations and/or exclusions may not apply to you, and further (ii) this warranty
gives you specific legal rights and you may also have other rights which vary
from state to state.
Return product freight prepaid with proof of purchase date (dated sales receipt)
and $5.00 to cover postage and handling, to:
Zircon Corporation
*Attn: Returns Department
1580 Dell Avenue
Campbell, CA 95008-6992 USA
Be sure to include your name and return address. Out of warranty service and
repair, where proof of purchase is not provided, shall be returned with repairs
charged C.O.D. Allow 4 to 6 weeks for delivery.
E-mail: [email protected]
Patent Pending
©
2007 Zircon Corporation • P/N 62515 Rev A 08/07
Visit www.zircon.com/support for the most current instructions.
MetalliScanner and Zircon are registered trademarks or trademarks of Zircon Corporation.
Tip #4
READY Light
El detector electrónico de metales MetalliScanner
®
m40 localiza metales a través del concreto y la mayoría de los materiales
no metálicos. Las posiciones de escaneo amplias o de precisión le permiten encontrar rápida y fácilmente la plomería,
conductos, barras de refuerzo, clavos, y tornillos en paredes, pisos, y techos. Encuentra vigas metálicas en tiras de yeso y
paredes emplastadas ubicando la hilera de clavos que fija la tira de madera a las vigas. MetalliScanner
®
m40 es también
ideal para escanear madera recuperada o reciclada en busca de metales ocultos antes de proceder a aserrarla y cepillarla.
1. Agarre la herramienta con el pulgar sobre el botón de encendido.
2. Sostenga la herramienta en el aire, con el sensor azul paralelo a la
superficie a escanear, alejado de cualquier metal conocido.
3. Presione y sostenga el botón de encendido. La luz
READY
(Listo) indica
que la calibración se ha terminado y que está listo para buscar el metal.
4. Mueva la unidad cerca de la superficie y escanee mientras continúa
sosteniendo el botón de activación. No rote la herramienta, vea el
Consejo #3.
5. A medida que se acerca a un objeto de metal los LED rojos se encenderán
progresivamente desde la parte inferior hacia arriba. Mientras más cerca de la
parte superior estén las luces, más cerca se encontrará de un objeto metálico.
El sensor azul iluminado y el tono de audio indican un objetivo sólido. Los objetivos
pequeños o profundos dentro de la superficie puede que iluminen algunos de los LED
rojos y no el sensor azul o el tono de audio. En este caso utilice la indicación del LED más
para determinar la posición del metal.
6. Marque el punto donde obtenga la indicación del LED más, continúe escaneando, y marque
el punto donde la indicación del LED disminuye. A mitad de recorrido entre estos puntos está el
centro lógico del campo metálico. Para refinar esta posición aún más, refiérase al Consejo #1.
1. Agarre la herramienta con el índice sobre el botón de encendido.
2. Sostenga la herramienta en el aire con el sensor azul perpendicular a la
superficie a escanear alejado de cualquier metal conocido.
3. Presione y sostenga el botón de encendido. La luz de Ready (Listo) indica
que la calibración se ha terminado y que está listo para buscar el metal.
4. Mueva la unidad cerca de la superficie y escanee mientras continúa sosteniendo
el botón de activación. No rote la herramienta, vea el Consejo #3.
5. A medida que se acerca a un objeto de metal los LED rojos se encenderán
progresivamente desde la parte inferior hacia arriba. Mientras más cerca de
la parte superior estén las luces, más cerca se encontrará de un objeto
metálico. El sensor azul iluminado y el tono de audio indican un objetivo sólido.
Los objetivos pequeños o profundos dentro de la superficie puede que iluminen
algunas de los LED rojos y no el sensor azul o el tono de audio. En este caso
utilice la indicación LED más alta para determinar la posición del metal.
6. Marque el punto donde obtenga la indicación del LED más; continúe escaneando
y marque el punto donde la indicación del LED disminuye. A mitad del recorrido
entre estos puntos está el centro lógico del campo metálico. Para refinar esta
posición aún más, refiérase al Consejo #1.
7. Escanee la superficie tanto vertical como horizontalmente para encontrar de forma
precisa la ubicación del objetivo metálico.
1. Escanee de un lado a otro de la pared utilizando el procedimiento de escaneo de área ancha descrito anteriormente
para ubicar los clavos que fijan la tira de madera a las vigas.
2. Para ayudar a confirmar que ha encontrado una viga y no un tubo u otro objeto
metálico, escanee el área del objetivo localizada en el Paso #1 nuevamente, esta vez
utilizando el Escaneo de Precisión y escanee el área verticalmente. Los LED pueden
moverse hacia arriba y hacia abajo en el display, indicando el patrón de colocación
de los clavos pequeños que fijan la tira de madera a la viga. (En cambio, un tubo u
otro metal sólido se indicará generalmente con una señal uniforme).
3. Para ayudar a verificar los resultados, escanee a fondo su área de trabajo y marque
la ubicación de cada objeto indicado por la herramienta. No asuma que todo lo que
encuentra sea una viga.
•Las vigas normalmente están espaciados a 16 ó 25 pulgadas (40 ó 60 cm) uno
de otro, no a intervalos irregulares.
•Las vigas normalmente van de piso a techo,excepto por encima y por debajo de
las ventanas y sobre las puertas.
•Los tubos y otros objetos grandes de metal proporcionarán una señal fuerte y uniforme
en cualquier modalidad de escaneo. Los clavos en una viga probablemente mostrarán
alguna variante en la potencia de la señal.
•Esté pendiente de las paredes que probablemente contengan plomería.Por ejemplo,una
pared de sala puede ser pared común de un baño y contener instalaciones de plomería
para el lavamanos, la ducha, o el inodoro.
Consejos:
1. Si la unidad indica la existencia de metal en un área extensa, puede refinar el área de escaneo para ubicar el
objetivo de metal de manera más precisa. Después de escanear el área como se indicó anteriormente, marque
los bordes del área donde obtenga la señal indicadora de metal con mayor potencia. Comience por una
de las marcas, presione y sostenga el botón de encendido; esto recalibrará la herramienta y disminuirá
la sensibilidad. Mientras sostiene el botón de encendido, escanee el área nuevamente. El área indicada
deberá reducirse de modo que pueda identificar de forma más precisa la ubicación del metal. Este
procedimiento puede repetirse para estrechar aún más el campo.
2. Debido a que la unidad utiliza la potencia de la señal para determinar la posición, tanto los objetos
grandes y profundos como los pequeños y superficiales le proporcionarán indicaciones similares.
3. La unidad deberá activarse en la misma orientación que se utilizará cuando escanee. Si gira o rota la
herramienta durante el uso, puede obtener una indicación temporal de la existencia de metal donde no
exista ninguno. Espere hasta que ÚNICAMENTE la luz de
READY
(Listo) se encienda antes de escanear.
4. MetalliScanner
®
m40 encuentra metales ferrosos (magnéticos) tales como barras de refuerzo de
1
⁄2 pulg.
(
12 mm) hasta a 4 pulg. (102 mm) de profundidad y metales no ferrosos (no magnéticos) tales como
tubos de cobre de
1
⁄2 pulg. (
12 mm) y hasta a 2 pulg. (51 mm) de profundidad. Los objetivos encontrados
a la máxima profundidad pueden indicarse únicamente por el primer LED rojo del display.
5. Cuando escanee concreto, la herramienta indicará la presencia de la malla de metal que
generalmente se encuentra en las entradas de estacionamiento y la losa de cimiento, pero
debido a la variedad de tamaños de las mallas metálicas, la herramienta puede que no
indique la ubicación exacta de los alambres.
6. Los materiales magnetizados pueden originar indicaciones falsas.
1. Retire la cubierta de la batería ubicada debajo del botón de encendido presionando sobre la
flecha y deslizando la cubierta hacia la parte inferior de la herramienta.
2. Sosteniendo la herramienta en posición invertida,
incline la batería hacia afuera de la cavidad.
MetalliScanner
™
m40
Detector Electrónico de Metales
ESCANEO PARA ÁREA AMPLIA
ESCANEO DE PRECISIÓN
LOCALIZACIÓN DE VIGAS METALICAS
EN TIRAS DE YESO Y EMPLASTES
CAMBIO DE LA BATERÍA
Cubierta de la batería
Botón de encendido
Display LED (en ambos lados)
Sensor azul
GARANTÍA LIMITADA DE 1 AÑO
La Empresa Zircon, (“Zircon”) garantiza que este producto se encuentra libre
de defectos en sus materiales y mano de obra por un período de un año a
partir de la fecha de su compra. Cualquier producto defectuoso en garantía
devuelto a Zircon*, con flete prepago con comprobante de la fecha de compra
y $5.00 para cubrir el envío, será reparado y reemplazado a discreción de Zircon.
Esta garantía está limitada al circuito electrónico y a la caja original del
producto y excluye específicamente daños causados por abuso, uso indebido o
negligencia. Esta garantía reemplaza cualquier otra garantía, expresa o implícita
y Zircon no será responsable por ninguna otra afirmación o reclamo de cualquier
naturaleza. Toda garantía implícita que se aplique a este producto está limitada
a un período de un año a partir de la fecha de su compra. EN NINGÚN CASO
ZIRCON SERÁ RESPONSABLE POR CUALQUIER DAÑO ESPECIAL, SECUNDARIO O
COMO CONSECUENCIA DE LA TENENCIA, EL USO O EL MAL FUNCIONAMIENTO
DE ESTE PRODUCTO.
De acuerdo con las reglamentaciones gubernamentales, se le notifica que: (i)
algunos estados no permiten limitaciones en cuanto al período de duración de
una garantía implícita y/o a la exclusión o a la limitación de daños secundarios
o consecuentes, de modo que las limitaciones y/o exclusiones mencionadas
anteriormente pueden no ser aplicables en su caso y además (ii) esta garantía le
otorga derechos legales específicos, y usted también podría tener otros derechos
que pueden variar de estado en estado.
Envíe el producto con flete prepago con el comprobante con la fecha de compra
(recibo de ventas con fecha) y $5.00 para gastos de envío a:
Zircon Corporation
*Attn: Returns Department
1580 Dell Avenue
Campbell, CA 95008-6992 USA
Asegúrese de incluir su nombre y dirección para la devolución. El servicio y
la reparación fuera de la garantía, cuando no se provea el comprobante de
compra, se devolverá reparado y el pago será contra entrega. Deje transcurrir de
4 a 6 semanas para el envío.
Correo electrónico: [email protected]
Patente Pendiente
©2007 Zircon Corporation • P/N 62515 Rev A 08/07
Visite www.zircon.com/support para actualización de las instrucciones.
MetalliScanner y Zircon son marcas registradas o marcas de fábrica de Zircon Corporation.
Paso #4
La Luz
READY