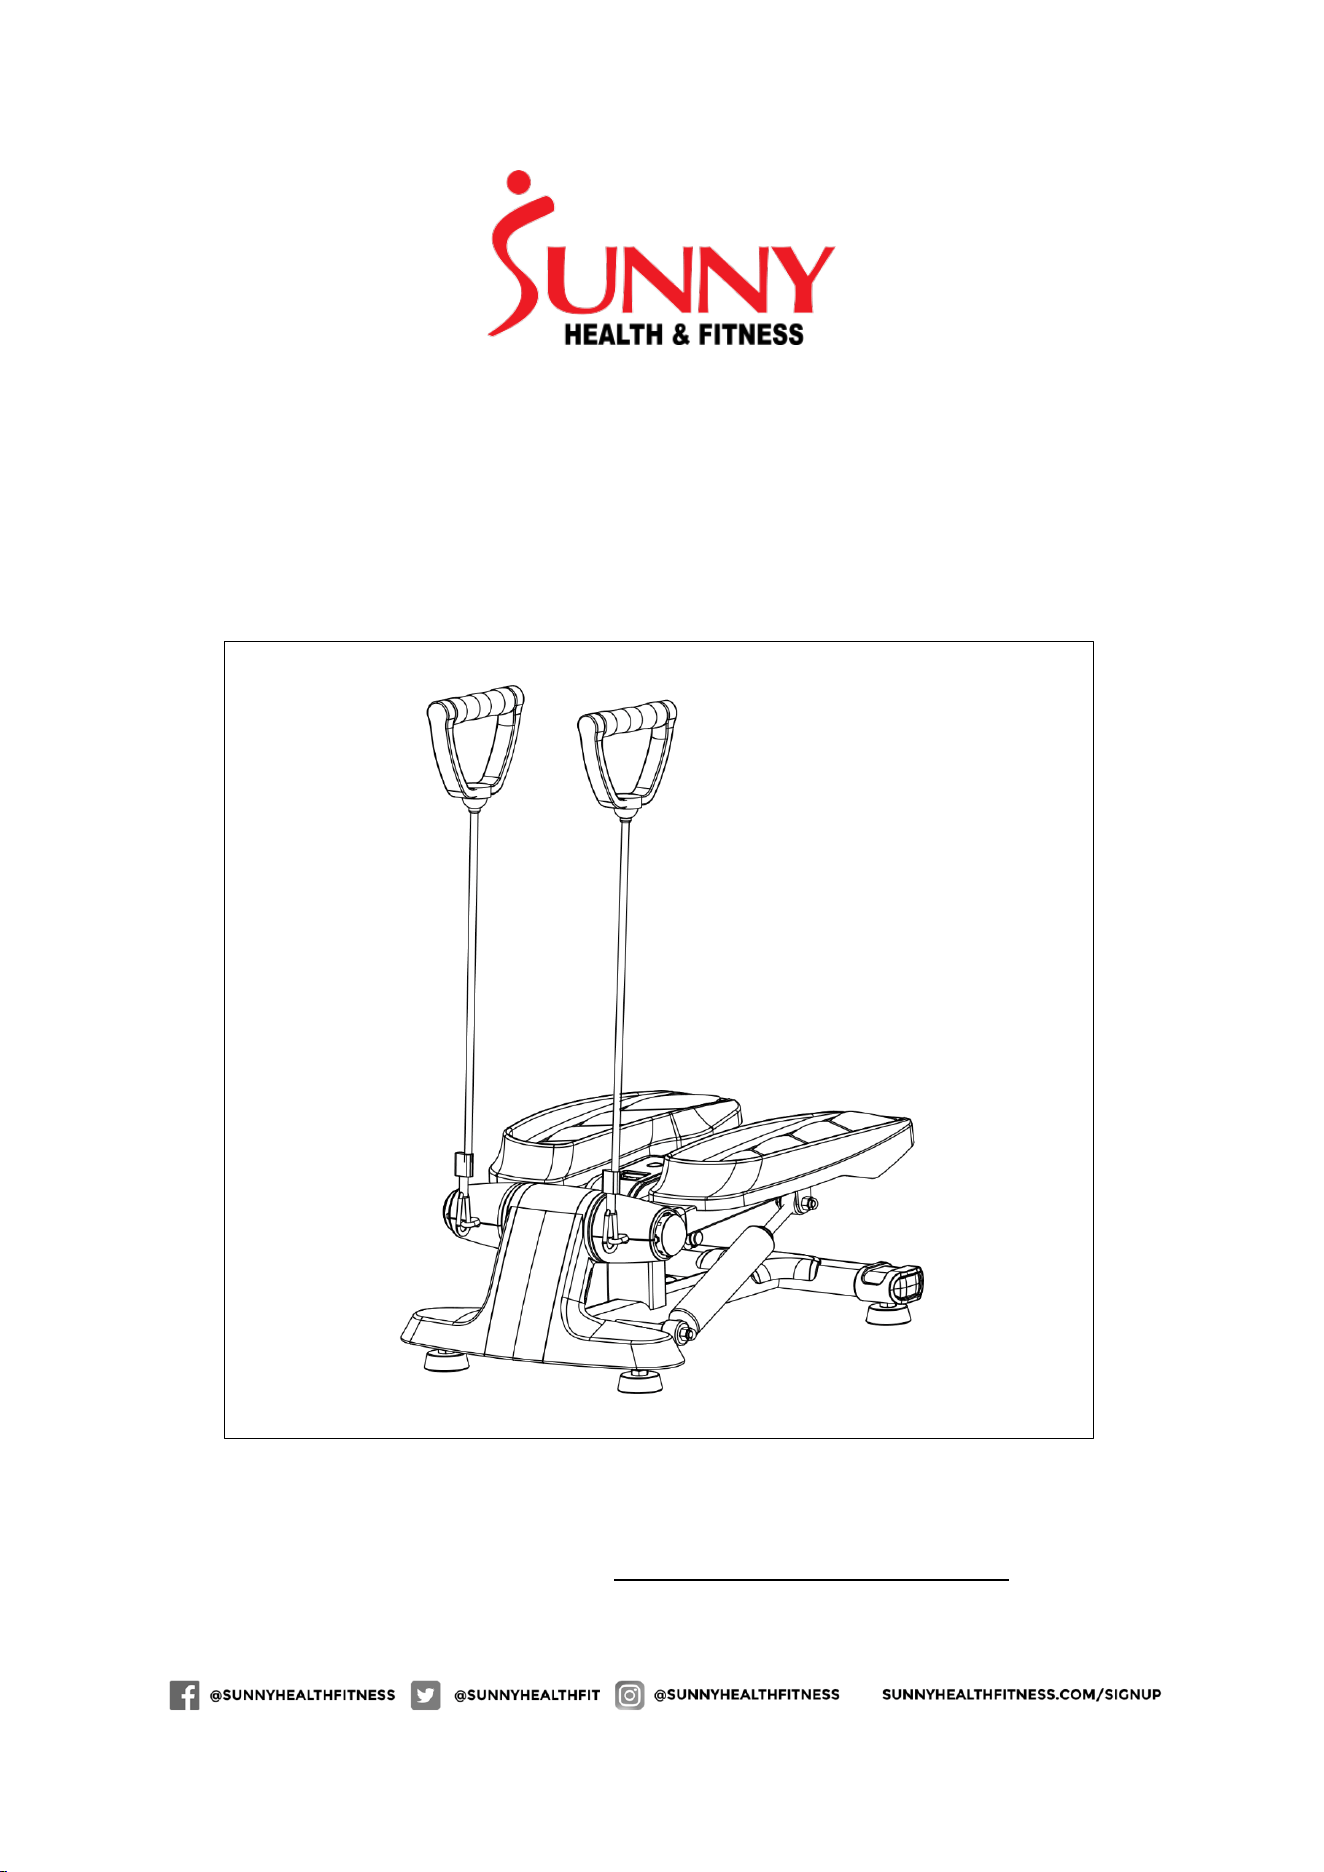
VERSA STEPPER
SF-S0870
USER MANUAL
IMPORTANT! Please retain owner’s manual for maintenance and adjustment
instructions. Your satisfaction is very important to us, PLEASE DO NOT RETURN
UNTIL YOU HAVE CONTACTED US: support@sunnyhealthfitness.com or 1- 877 -
90SUNNY (877-907-8669).

1
IMPORTANT SAFETY INFORMATION
We thank you for choosing our product. To ensure your safety and health, please use
this equipment correctly. It is important to read this entire manual before assembling
and using the equipment. Safe and effective use can only be achieved if the equipment
is assembled, maintained and used properly. It is your responsibility to ensure that all
users of the equipment are informed of all warnings and precautions.
1. Before starting any exercise program, you should consult your physician to
determine if you have any medical or physical conditions that could put your health
and safety at risk or prevent you from using the equipment properly. Your
physician’s advice is essential if you are taking medication that affects your heart
rate, blood pressure or cholesterol level.
2. Be aware of your body’s signals. Incorrect or excessive exercise can damage your
health. Stop exercising if you experience any of the following symptoms: pain,
tightness in your chest, irregular heartbeat, shortness of breath, lightheadedness,
dizziness, or feelings of nausea. If you do experience any of these conditions, you
should consult your physician before continuing with your exercise program.
3. Keep children and pets away from the equipment. The equipment is designed for
adult use only.
4. Use the equipment on a solid, flat level surface with a protective cover for your floor
or carpet. To ensure safety, the equipment should have at least 2 feet (60 CM) of
free space all around it.
5. Ensure that all nuts and bolts are securely tightened before using the equipment.
The safety of the equipment can only be maintained if it is regularly examined for
damage and/or wear and tear.
6. Always use the equipment as indicated. If you find any defective components while
assembling or checking the equipment, or if you hear any unusual noises coming
from the equipment during exercise, discontinue use of the equipment immediately
and do not use until the problem has been rectified.
7. Wear suitable clothing while using the equipment. Avoid wearing loose clothing that
may become entangled in the equipment.
8. Do not place fingers or objects into the moving parts of the equipment.
9. The maximum weight capacity of this unit is 245 pounds (111 KG).
10. The equipment is not suitable for therapeutic use.
11. To avoid bodily injury and/or damage to the product or property, proper lifting and
moving are required.
12. Your product is intended for use in cool, dry conditions. You should avoid storage
in extreme cold, hot or damp areas as this may lead to corrosion and other related
problems.
13. This equipment is designed for indoor and home use only! It is not intended for
commercial use!
2
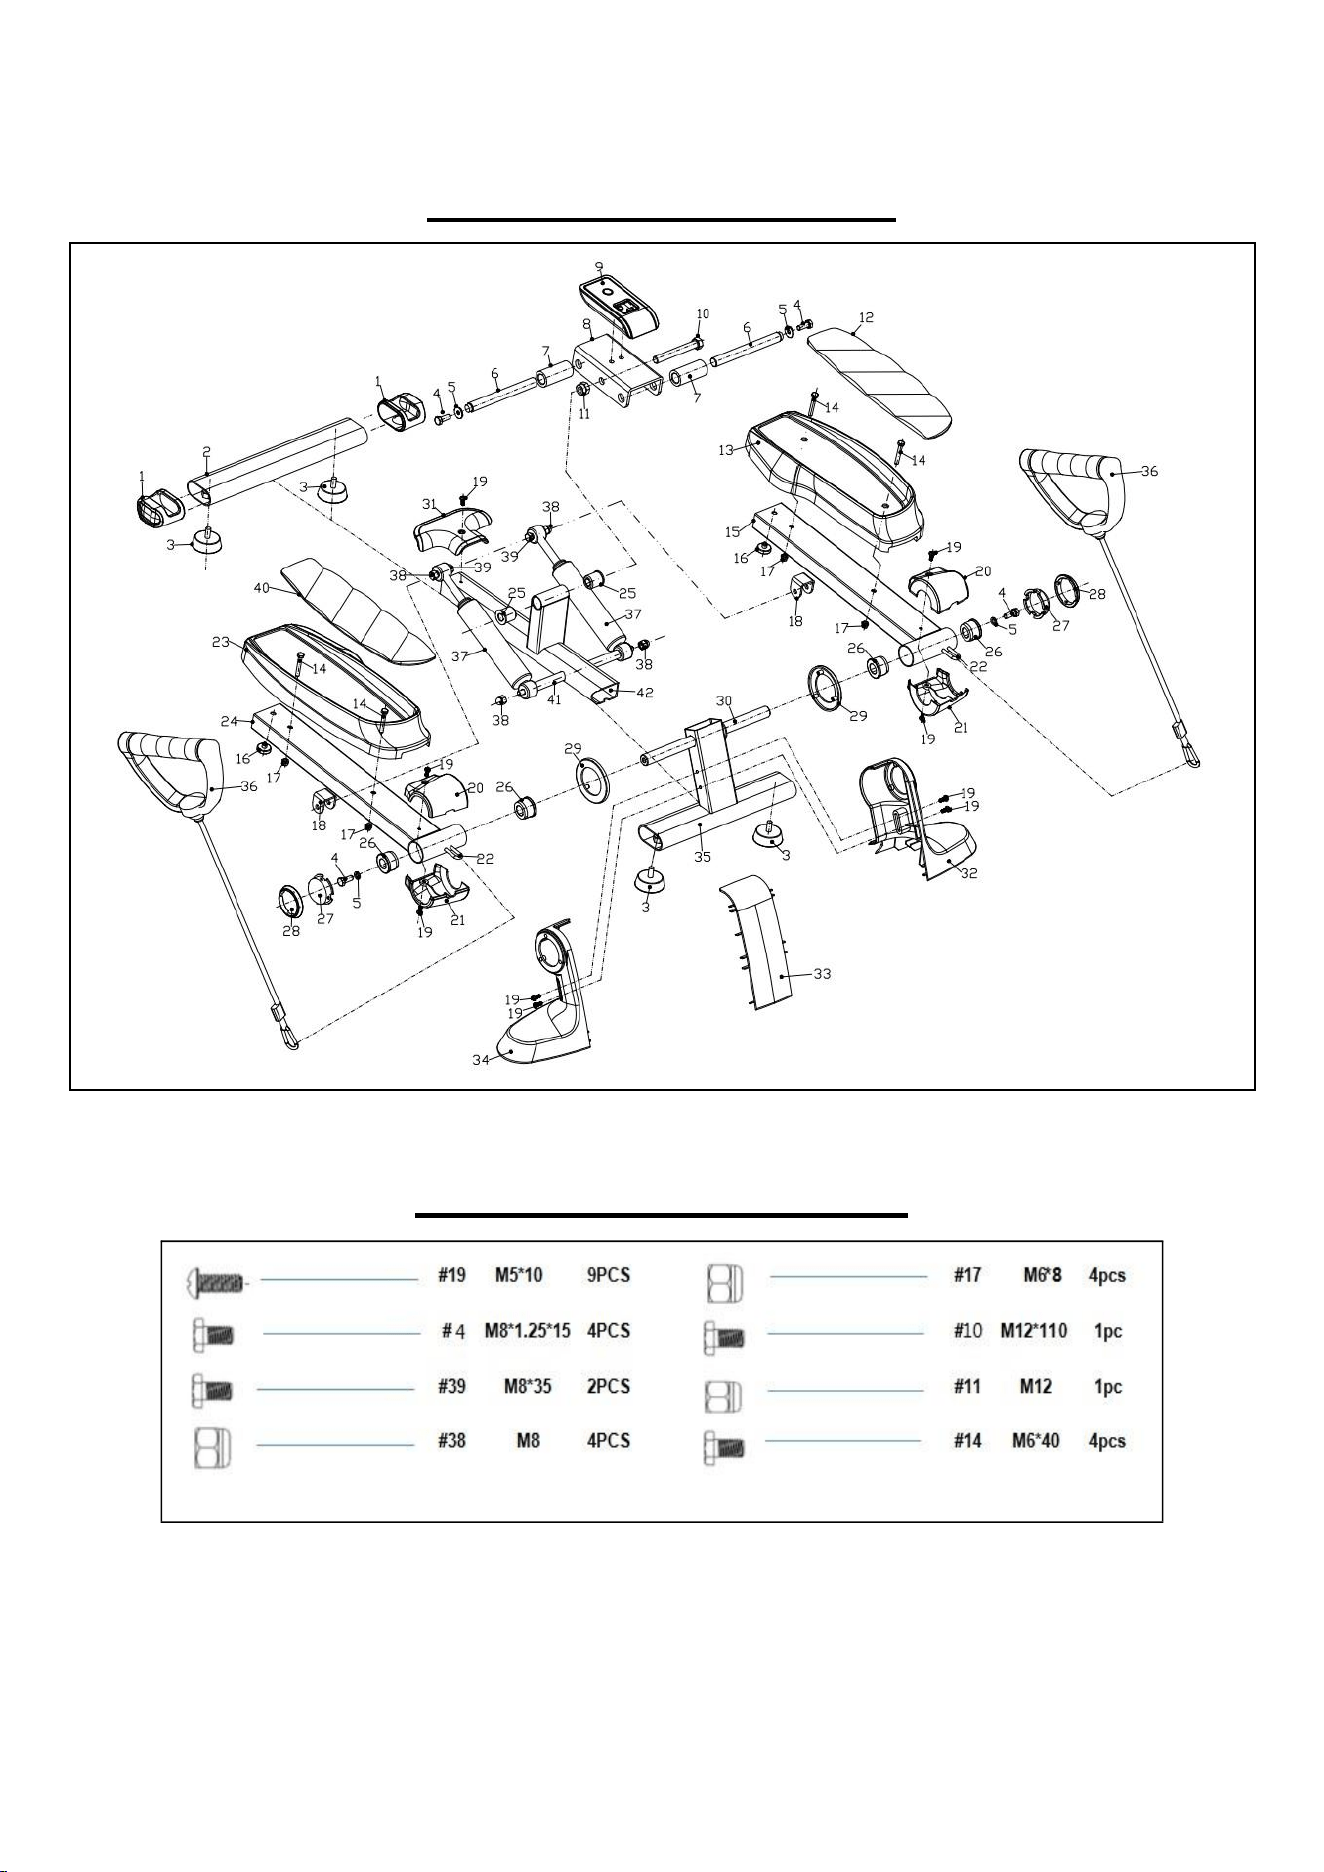
EXPLODED DIAGRAM
Note: When the hydraulic cylinder is used for 20 minutes, let the hydraulic
cylinder cool down. Please do not touch the oil cylinder after use.
HARDWARE PACKAGE

3
PARTS LIST
No.
Description
Spec.
Qty.
No.
Description
Spec.
Qty.
1
Rear End Cap
38X57.5X68
V=25.6
2
22
Hook
Ø 5x75
2
2
Rear Stabilizer
60x30x2x350
1
23
Step Right
1
3
Adjust Knob
Ø 49.5*17 V63.7
4
24
Step Support Assembly
Right
30x60x1.5x420
1
4
Screw
M8*1.25*15
4
25
Axle Sleeve For
Computer Frame
2
5
Washer
Ø8
4
26
Step Tube Axle Sleeve
4
6
Pedal Slide Shaft
Ø 15x245
2
27
Side Cover
Ø 51.2x24.3 V=10
2
7
Sleeve for Shaft
Ø 28x56
2
28
Side Decorative Circle
Ø 56.7x8.8 V=4.9
2
8
Holder of Computer
76x42x5x140
1
29
Intermediate Decorative
Circle
Ø 78.5x11.5 V=9.7
2
9
Computer
1
30
Shaft
Ø 16x150
1
10
Outer Hexagon Bolt
M12*110
1
31
Cover For Rear
Stabilizer
160.5x92.6x19
V=31.4
1
11
Outer Hexagon Nut
M12
1
32
Front Decorative Cover
(Left)
187.7X179X147.3
V=120
1
12
Step Mat Left
98x27.6x323.4
V=178
1
33
Front Decorative Cover
(Middle)
211X45X95 V=61.1
1
13
Step Left
171.7x62.9x377.2
V=348
1
34
Front Decorative Cover
(Right)
187.7X179X147.3
V=120
1
14
Step Bolt
M6*40
4
35
Front Stabilizer
60x30x2x300
1
15
Step Support Assembly
Left
30x60x1.5x420
1
36
Resistance Band
2
16
Crash Pad
Ø 30X9.8
2
37
Hydraulic Cylinder
2
17
Step Fixed Nut
M6*8
4
38
Hexagon Cap Head
M8
4
18
Hydraulic Cylinder
Support
25x3x65
2
39
Nut
M8*35
2
19
Screw
M5*10
9
40
Step Mat Right
1
20
Front Decorative Cover
(Upper)
76x40.3x83.3
V=25.23
2
41
Hydraulic Cylinder Fixed
Shaft
1Ø 5x253.5
1
21
Front Decorative Cover
(Lower)
76x44.6x84 V=26
2
42
Middle Frame
1
Replacement Parts (U.S. and Canadian Customers only)
Please provide the following information in order for us to accurately identify the part(s) needed:
✓ The model number (found on cover of manual)
✓ The product name (found on cover of manual)
✓ The part number found on the Parts List and Exploded Diagram (found near the front of the
manual)
Please contact us at support@sunnyhealthfitness.com or 1- 877 - 90SUNNY (877-907-8669).
4
ASSEMBLY INSTRUCTIONS
We value your experience using Sunny Health and Fitness products. For assistance
with parts or troubleshooting, please contact us at [email protected]
or 1-877-90SUNNY (877-907-8669).
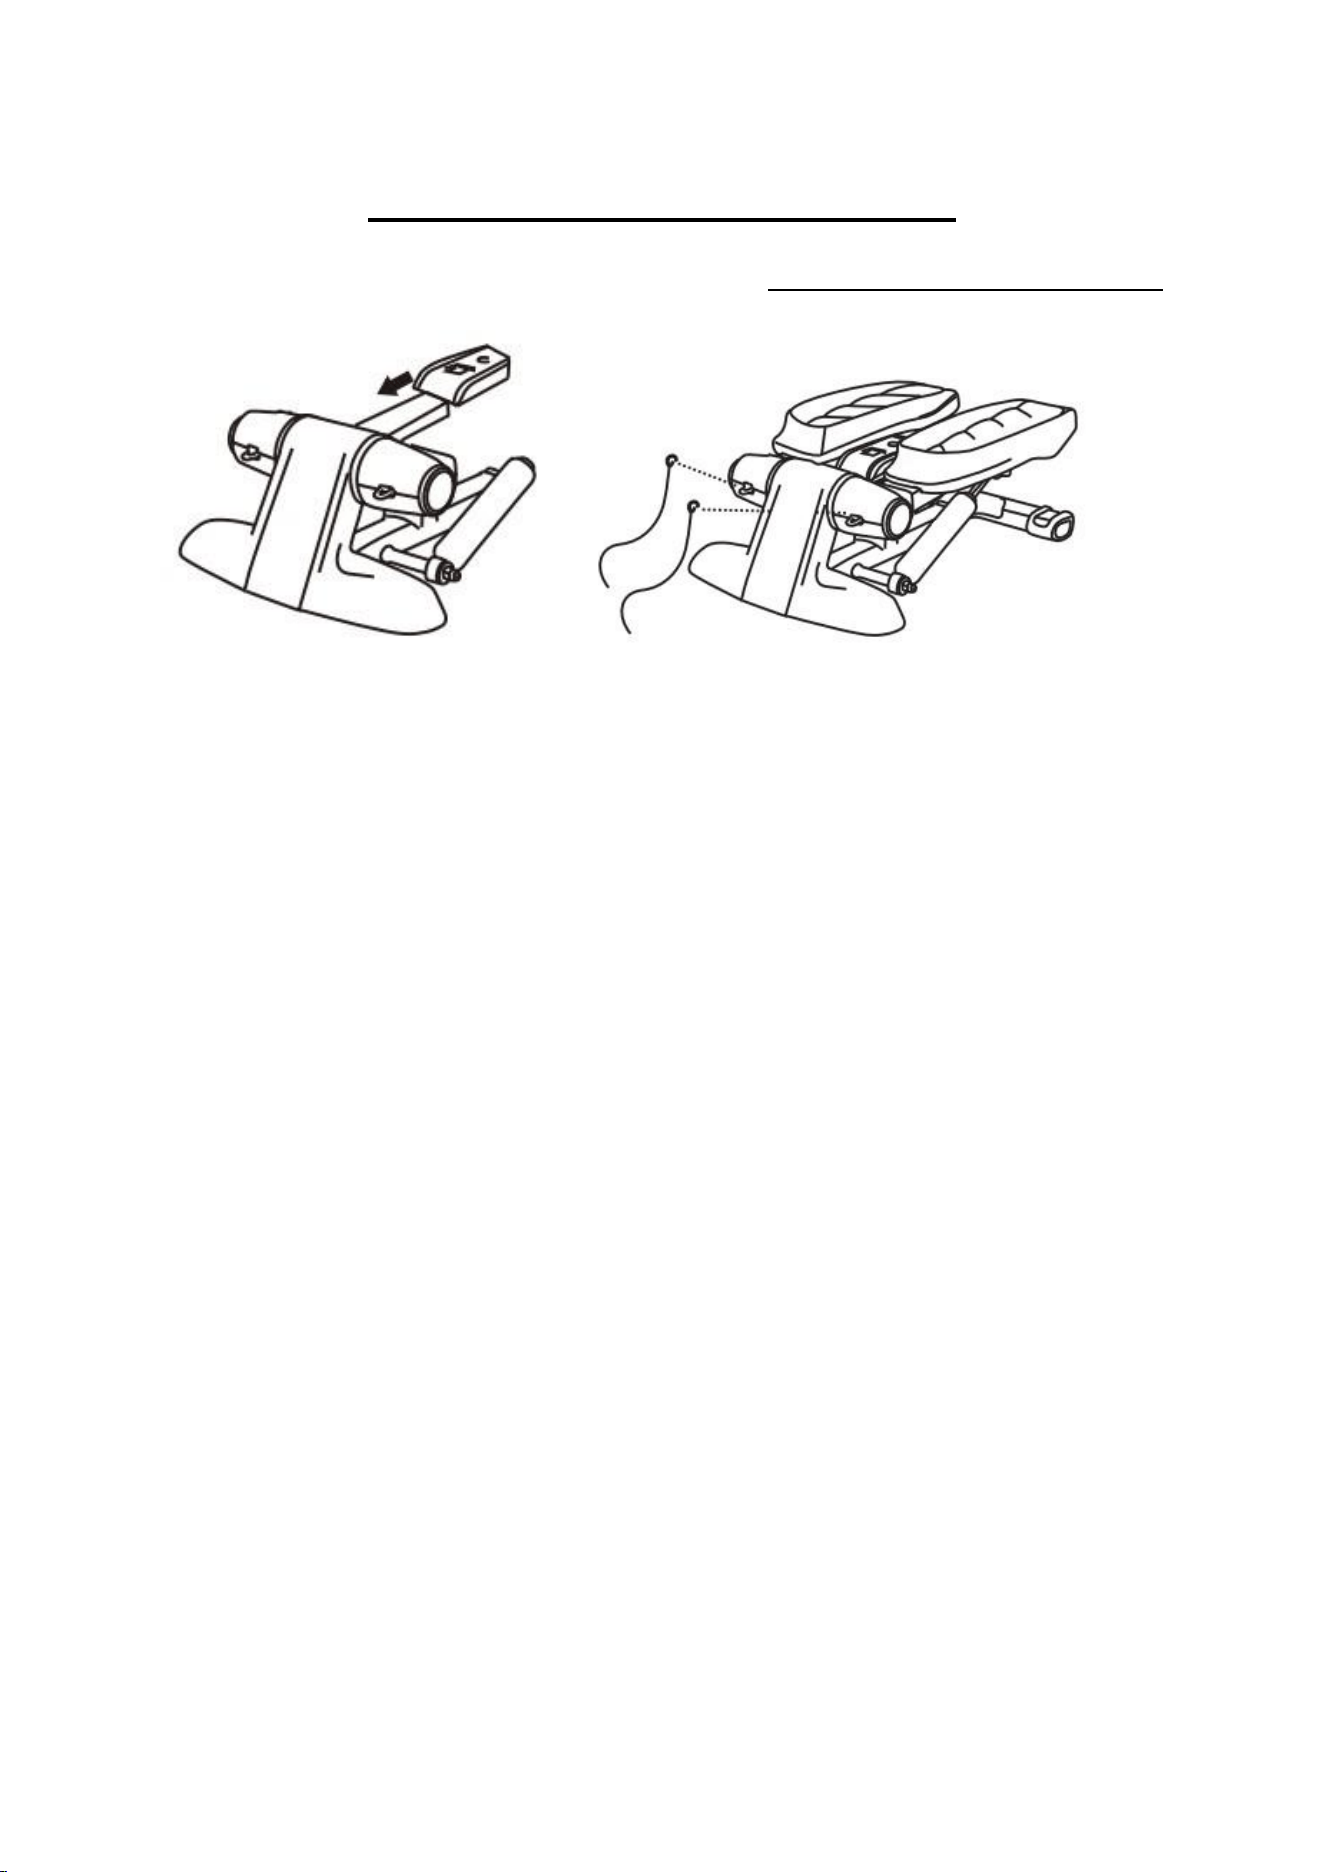
① ②
Figure 1: Take out the Computer (No. 9) and insert it according to the picture.
Figure 2: Attach 2 Resistance Bands (No. 36) to the hooks as shown in the picture.
Using the Stepper
Important tips: Please put the stepper on flat, solid ground. It is recommended to
place a carpet pad underneath the stepper to prevent damage to the ground after
long-term use.
- First, place the stepper in front of you. Put one foot on the pedal completely and
keep your legs vertical. Move slowly until your leg touches the end.
- Secondly, maintain the balance and make the other foot follow the previous
action on the opposite pedal.
Start practicing with a slow pace and gradually familiarize yourself with the exercise.
Speed up the pace and add upper body actions to incorporate exercising other parts
of your body. It is recommended to use this stepper at least once every other day. At
the beginning, exercise for 5 minutes, then gradually increase to 15 minutes, and then
30 minutes. You can also exercise every day, but remember, do what you can!
Recovery after exercise: To reduce muscle pain in the days to follow, movement
after exercise is very important. Make sure to drink water, take a deep breath, and
relax the body. This will help make you physically and mentally comfortable and
provide you with a sense of accomplishment.
5
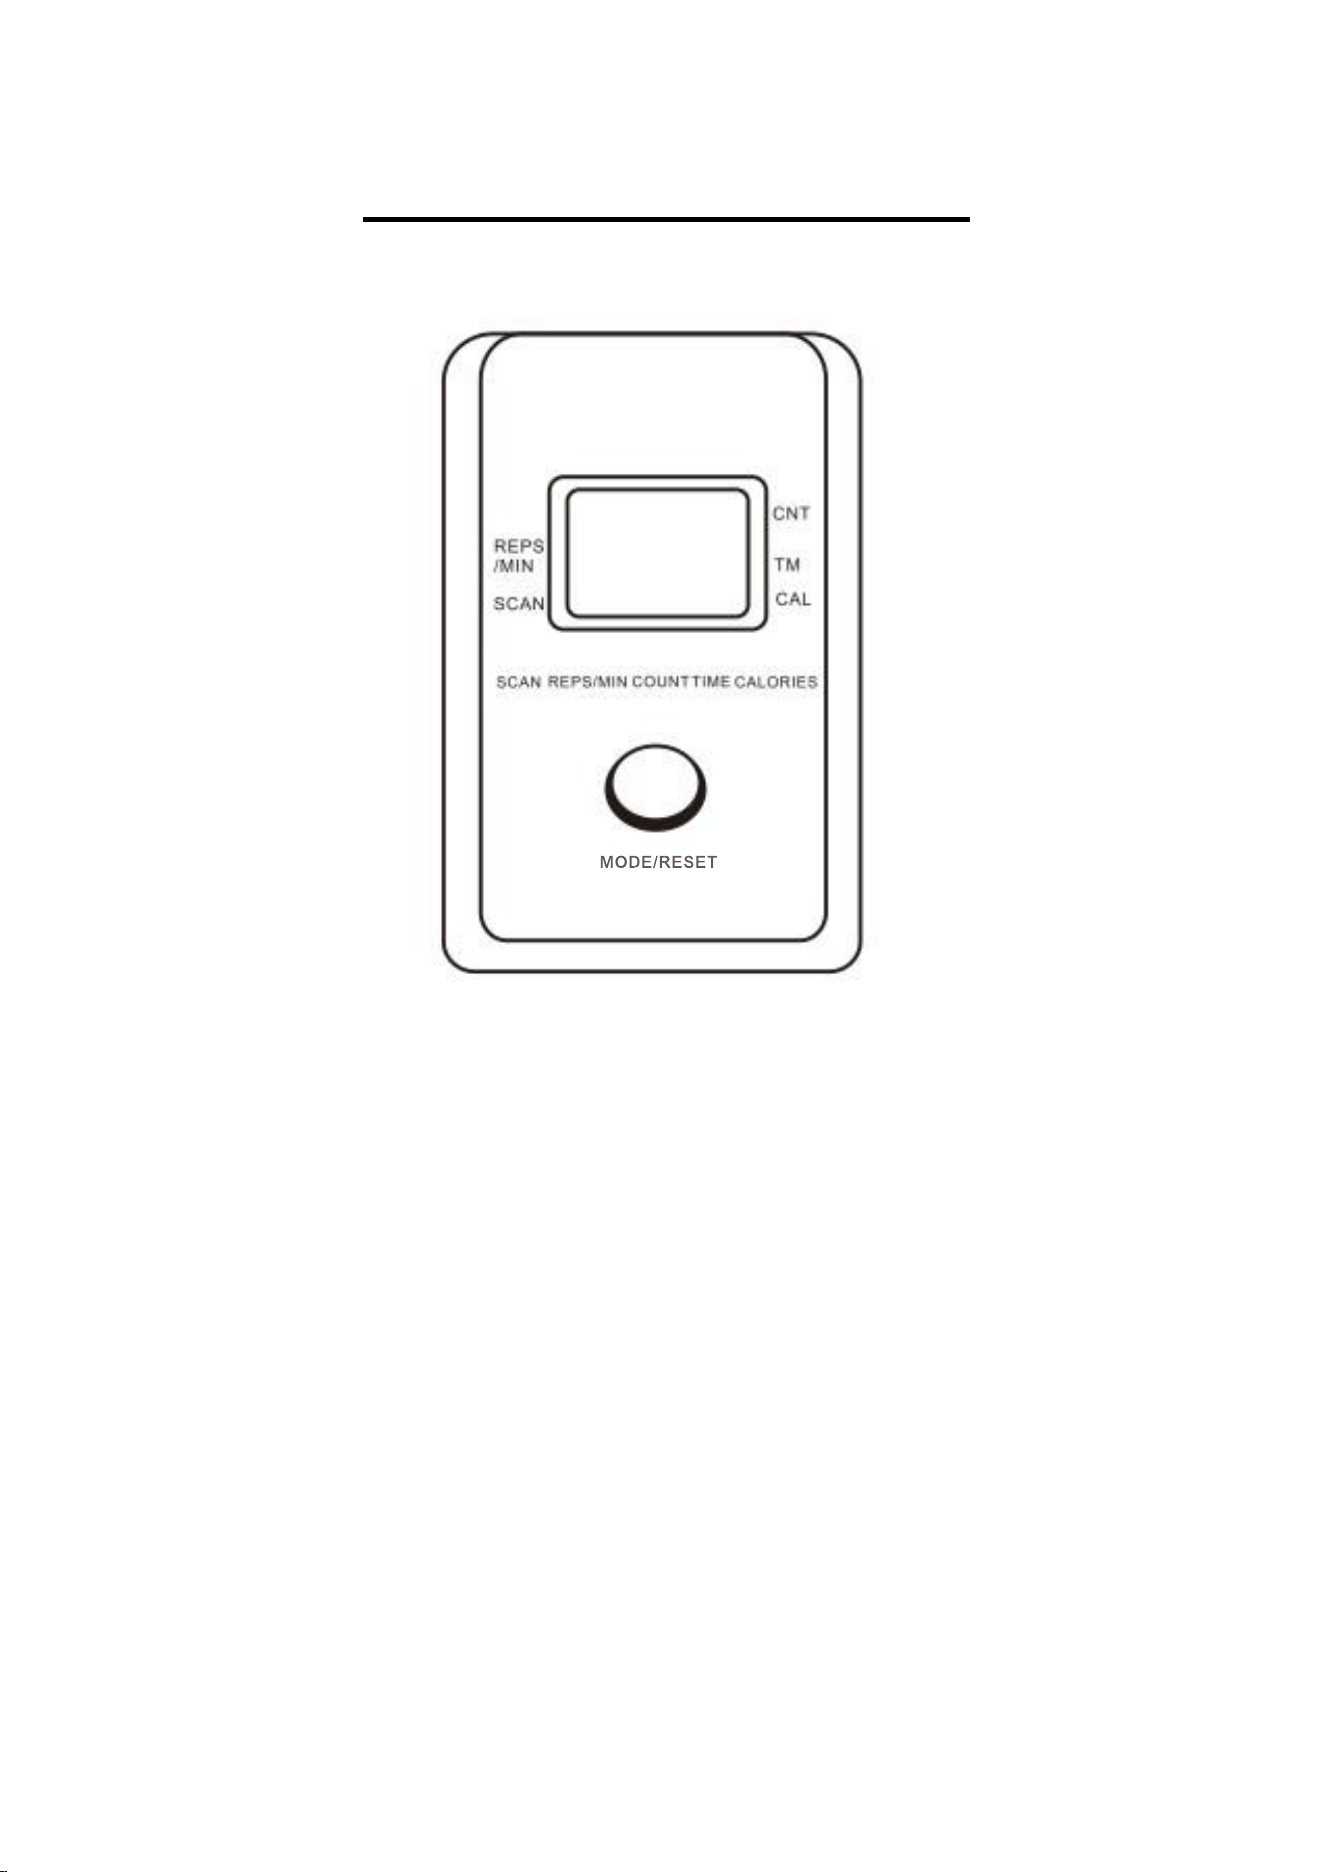
OPERATING INSTRUCTIONS
COMPUTER DISPLAY:
FUNCTIONS:
SCAN:
Automatically displays each function value in a sequence.
TIME:
from 0-99:59.
CALORIES:
Accumulated calories burned during exercise. This is only a reference
value, not for medical reference.
COUNT:
The number of times accumulated.
REPS/MIN: The rate of steps per minute.
AUTO SCAN: In this mode the display will automatically show REPS/MIN, TIME,
CALORIES, SCAN for 4 seconds.
AUTO ON/OFF: If there is no movement for 4 minutes, the display will turn off
automatically. You can restart the display by touching the mode button
when stepping.
IMPORTANT: Any movement will start the display. Pressing the mode button will allow
you to select from the following four items (REPS/MIN, TIME, CALORIES, SCAN).

6
TROUBLESHOOTING
PROBLEM
POSSIBLE SOLUTION
Pedal rotation is not smooth
or stops running
1. Interlocking is usually caused by movement over
time. In this case, the heat produced by the step
resistance causes inner dish rotational delay. If you
want the pedal to be flexible to rotate, please wait
for the cylinder to cool down before use.
2. If the hydraulic cylinder is damaged, please replace
it.
Harsh noise when rotating
1. First, make sure that all bolts have been tighten.
Then, add a small amount of lubricant to reduce
friction and noise.
No displays on the meter
1. If there is no battery installed, please open the
display table’s back cover and install the battery.
2. Electronic meter is damaged, please replace it.
3. The cable is not plugged in, please inspect it.
4. The step angle is too low, please re-adjust the
stepper angle.
Version 1.1

7