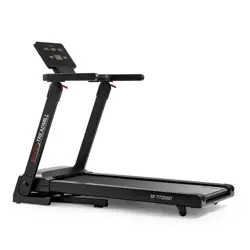
SPACE SAVING FOLDING TREADMILL
SF-T7632
USER MANUAL
English, Page 8 ~ 24
Español, Page 25 ~ 41
IMPORTANT! Please retain owner’s manual for maintenance and adjustment instructions. Your satisfaction
is very important to us, PLEASE DO NOT RETURN UNTIL YOU HAVE CONTACTED US:
support@sunnyhealthfitness.com or 1- 877 - 90SUNNY (877-907-8669).
IMPORTANTE! Conserve el manual del usuario para las instrucciones de mantenimiento y ajuste. Su
satisfacción es muy importante para nosotros, POR FAVOR NO REGRESE HASTA TENER CONTACTO
CON: support@sunnyhealthfitness.com o 1- 877 - 90SUNNY (877-907-8669).

1
IMPORTANT SAFETY INSTRUCTION
When using an electrical appliance, basic precautions should always be followed, including the following:
Read all instructions before using this treadmill.
DANGER– To reduce the risk of electrical shock:
1. Always unplug this appliance from the electrical outlet immediately after using and before cleaning.
WARNING – To reduce the risk of burns, fire, electric shock, or injury to persons:
1. The treadmill should never be left unattended when plugged in. Unplug from outlet when not in use and before putting on or taking off
parts.
2. Use this treadmill only for its intended use as described in this manual. Do not use attachments not recommended by the manufacturer.
3. Never operate this treadmill if it has a damaged cord or plug, if it is not working properly, if it has been dropped or damaged, or dropped
into water. Return this treadmill to a service center for examination and repair.
4. Keep the cord away from heated surfaces.
5. Never operate the treadmill with the air openings blocked. Keep the air openings free of lint, hair, and alike items.
6. Never drop or insert any object into any opening.
7. Do not use outdoors.
8. Do not operate where aerosol (spray) products are being used or where oxygen is being administered.
9. To disconnect, turn the treadmill off, then remove plug from outlet.
10. Connect this treadmill to a properly grounded outlet only. See grounding instructions.
CAUTION:
To avoid injury, use extreme caution when stepping onto or off of a moving belt. Read instruction manual before using.
SAVE THESE INSTRUCTIONS
INFORMACIÓN IMPORTANTE DE SEGURIDAD
Al usar un aparato eléctrico, siempre se deben seguir las precauciones básicas, incluidas las siguientes:
Lea todas las instrucciones antes de usar esta caminadora.
PELIGRO: Para reducir el riesgo de descarga eléctrica:
1. Desenchufe siempre este aparato de la toma de corriente inmediatamente después de usarlo y antes de limpiarlo.
ADVERTENCIA: para reducir el riesgo de quemaduras, incendios, descargas eléctricas o lesiones a personas:
1. La caminadora nunca debe dejarse desatendida cuando está enchufada. Desenchúfela del tomacorriente cuando no esté en uso y
antes de poner o quitar partes.
2. Use esta caminadora solo para el uso previsto como se describe en este manual. No utilice accesorios no recomendados por el
fabricante.
3. Nunca opere esta caminadora si tiene un cable o enchufe dañado, si no está funcionando correctamente, si se ha caído o dañado, o
si se ha caído al agua. Devuelva esta caminadora a un servicio para su revisión y reparación.
4. Mantenga el cable alejado de las superficies calientes.
5. Nunca opere la caminadora con las aberturas de aire bloqueadas. Mantenga las aberturas de aire libres de pelusas, pelos y artículos
similares.
6. Nunca deje caer ni inserte ningún objeto en ninguna abertura.
7. No usar al aire libre.
8. No opere donde se estén utilizando productos en aerosol (aerosol) o donde se esté administrando oxígeno.
9. Para desconectar, apague la caminadora, luego retire el enchufe del tomacorriente.
10. Conecte esta caminadora solo a un tomacorriente debidamente conectado a tierra. Vea las instrucciones de puesta a tierra.
PRECAUCIÓN:
Para evitar lesiones, tenga mucho cuidado al subirse o bajarse de una banda en movimiento. Lea el manual de instrucciones antes de
usar.
GUARDA ESTAS INSTRUCCIONES

2
IMPORTANT SAFETY INFORMATION
We thank you for choosing our product. To ensure your safety and health, please use this equipment correctly. It is important to read this
entire manual before assembling and using the equipment. Safe and effective use can only be achieved if the equipment is assembled,
maintained, and used properly. It is your responsibility to ensure that all users of the equipment are informed of all warnings and
precautions.
1. Before starting any exercise program, you should consult your physician to determine if you have any medical or physical conditions
that could put your health and safety at risk or prevent you from using the equipment properly. Your physician’s advice is essential if
you are taking medication that affects your heart rate, blood pressure or cholesterol level.
2. Be aware of your body’s signals. Incorrect or excessive exercise can damage your health. Stop exercising if you experience any of
the following symptoms: pain, tightness in your chest, irregular heartbeat, shortness of breath, lightheadedness, dizziness, or feelings
of nausea. If you do experience any of these conditions, you should consult your physician before continuing with your exercise
program.
3. Keep children and pets away from the equipment. The equipment is designed for adult use only.
4. Use the equipment on a solid, flat level surface with a protective cover for your floor or carpet. To ensure safety, the equipment should
have at least 8 feet (240 CM) of free space behind it and 2 feet (60CM) on each side. Do not place the treadmill on any surface that
blocks air openings. To protect the floor or carpet from damage, place a mat under the treadmill.
5. Ensure that all nuts and bolts are securely tightened before using the equipment. The safety of the equipment can only be maintained
if it is regularly examined for damage and/or wear and tear.
6. Always use the equipment as indicated. If you find any defective components while assembling or checking the equipment, or if you
hear any unusual noises coming from the equipment during exercise, discontinue use of the equipment immediately and do not use
until the problem has been rectified.
7. Wear suitable clothing while using the equipment. Avoid wearing loose clothing that may become entangled in the equipment.
8. Do not place fingers or objects into the moving parts of the equipment.
9. The maximum weight capacity of this unit is 220 pounds (100 KG).
10. The equipment is not suitable for therapeutic use.
11. To avoid bodily injury and/or damage to the product or property, proper lifting and moving is required.
12. Your product is intended for use in cool, dry conditions. You should avoid storage in extreme cold, hot or damp areas as this may lead
to corrosion and other related problems.
13. This equipment is designed for indoor and home use only, it is not intended for commercial use!
INFORMACIÓN IMPORTANTE DE SEGURIDAD
Gracias por haber elegido nuestro producto. Para garantizar su seguridad y salud, utilice este equipo correctamente. Es importante que
lea todo el manual antes de instalar y usar el equipo. Solo se puede archivar un uso seguro y eficaz del equipo si se instala, mantiene y
utiliza correctamente. Es su responsabilidad asegurarse de que todos los usuarios de los equipos conozcan todas las advertencias y
precauciones.
1. Antes de comenzar algún programa de ejercicios, deberá consultar con su médico para determinar si tiene alguna condición médica
o física que pudiera poner en riesgo su salud y seguridad o que pudiera impedir que utilice correctamente el equipo. Es importante
que reciba las recomendaciones de su médico en caso de que esté tomando un medicamento que afecte su ritmo cardíaco, presión
arterial o nivel de colesterol.
2. Esté atento a las señales que le envía su cuerpo. Ejercitarse incorrecta o excesivamente puede dañar su salud. Deje de hacer
ejercicio si experimenta alguno de los siguientes síntomas: dolor, opresión en el pecho, latidos cardíacos irregulares, extrema falta
de aire, sensación de desmayo, mareos o sensación de náuseas. Si presenta alguna de esas condiciones, deberá consultar con su
médico antes de continuar con su programa de ejercicios.
3. Mantenga el equipo lejos del alcance de niños y mascotas. El equipo está diseñado para el uso exclusivo de adultos.
4. Utilice el equipo sobre una superficie plana y sólida con una cubierta protectora para su piso o alfombra. Para garantizar la seguridad,
el equipo debe tener al menos 8 pies (240 CM) de espacio libre detrás de la máquina y 2 pies (60 CM) en cada lado. No coloque la
caminadora en ninguna superficie que bloquee las aberturas de aire. Para proteger el piso o la alfombra de daños, coloque un tapete
debajo de la caminadora.
5. Asegúrese de que todas las tuercas y pernos estén bien ajustados antes de usar el equipo. Solo puede conservarse la seguridad del
equipo si se inspecciona regularmente para detectar daños o desgaste.
6. Siempre utilice el equipo como se indica. Si encuentra algún componente defectuoso mientras instala o revisa el equipo, o si escucha
ruidos extraños que provienen de este mientras se ejercita, deje de utilizarlo inmediatamente y no lo utilice hasta que el problema se
haya corregido.
7. Use ropa adecuada cuando utilice el equipo. Evite usar ropa suelta que pueda enredarse en el equipo.
8. No coloque los dedos u objetos en las partes móviles del equipo.
9. La capacidad de peso máximo de esta unidad es de 220 libras (100KG).
10. El equipo no es adecuado para uso terapéutico.
11. Debe cuidarse al levantar y mover el equipo a fin de que no se dañe la espalda. Siempre utilice la técnica de levantamiento adecuada
y pida ayuda en caso de que sea necesario.
12. Su producto está diseñado para su uso en condiciones frescas y secas. Usted debe evitar el almacenamiento en zonas
extremadamente frías, calientes o húmedas, ya que pueden provocar corrosión y otros problemas relacionados.
13. ¡Este equipo está diseñado para el uso exclusivo en la casa y en interiores! ¡No es para uso comercial!
3
IMPORTANT OPERATING INSTRUCTIONS
1. Insert the power plug directly into the socket.
2. Read the manual before operating the treadmill.
3. Changes in speed do not occur immediately. Set your desired speed using the adjustment keys on the main console. The speed will
increase gradually.
4. While on the treadmill, move with caution as distractions may cause you to lose balance and stray from walking in the center of the
running belt. This may result in serious injury.
5. This unit starts at a very low speed. To begin use, hold onto the handrails and stand on the side rails while it starts up, then step onto
the running belt once it’s in motion.
6. Always hold the handrails when making changes in the settings.
7. A safety key is provided for emergency use. The treadmill will function only if the safety key is inserted into the computer console. In
case of emergency, remove the safety key to immediately stop the running belt and shut off the treadmill. The display screen will reset
once the safety key is reinserted.
8. The console control keys are precisely set and require very little finger pressure to use. To avoid damaging these keys, do not use
excessive pressure when operating these controls.
9. This treadmill is designed for adult use only! Children should not be allowed to use or play near this treadmill. When present, children
should always be supervised by an adult.
10. Women who are pregnant or nursing should consult a physician before attempting to begin any exercise program.
11. Always stay hydrated during and after exercise.
IMPORTANT NOTE:
The running belt must be lubricated before the first use! Please see Page 13 for instructions on how to properly apply
lubricant.
INSTRUCCIONES DE OPERACIÓN IMPORTANTES
1. Inserte el enchufe de alimentación directamente en la toma de corriente.
2. Lea el manual antes de operar el equipo.
3. Los cambios en la velocidad no ocurren inmediatamente. Establezca la velocidad deseada con las teclas de ajuste de la consola
principal. La velocidad aumentará gradualmente.
4. Mientras se encuentre en la caminadora, muévase con precaución ya que las distracciones pueden hacer que pierda el equilibrio y
se aleje de caminar en el centro del cinturón. Esto puede resultar en lesiones graves.
5. Esta unidad comienza a una velocidad muy baja. Para comenzar el uso, sostenga los pasamanos y párese en los rieles laterales
mientras se inicia, luego pise la correa una vez que esté en movimiento.
6. Mantenga siempre el pasamanos cuando realice cambios en la configuración.
7. Se proporciona una llave de seguridad para uso de emergencia. La máquina funcionará solo si la llave de seguridad está insertada
en la consola de la computadora. En caso de emergencia, retire la llave de seguridad para detener inmediatamente el cinturón y
apagar la caminadora. La pantalla de visualización se reiniciará una vez que se reinserte la llave de seguridad.
8. Las teclas de control de la consola están ajustadas con precisión y requieren muy poca presión con los dedos para usarlas. Para
evitar dañar estas teclas, no ejerza una presión excesiva al operar estos controles.
9. ¡Este equipo está diseñado para uso exclusivo de adultos! No se debe permitir que los niños usen o jueguen cerca de este equipo.
Cuando están presentes, los niños siempre deben ser supervisados por un adulto.
10. Las mujeres embarazadas o en período de lactancia deben consultar a un médico antes de intentar comenzar cualquier programa
de ejercicios.
11. Mantente siempre hidratado durante y después del ejercicio.
NOTA IMPORTANTE:
¡La banda para caminadora debe lubricarse antes del primer uso! Consulte la página 30 para obtener instrucciones sobre cómo
aplicar correctamente el lubricante.
4
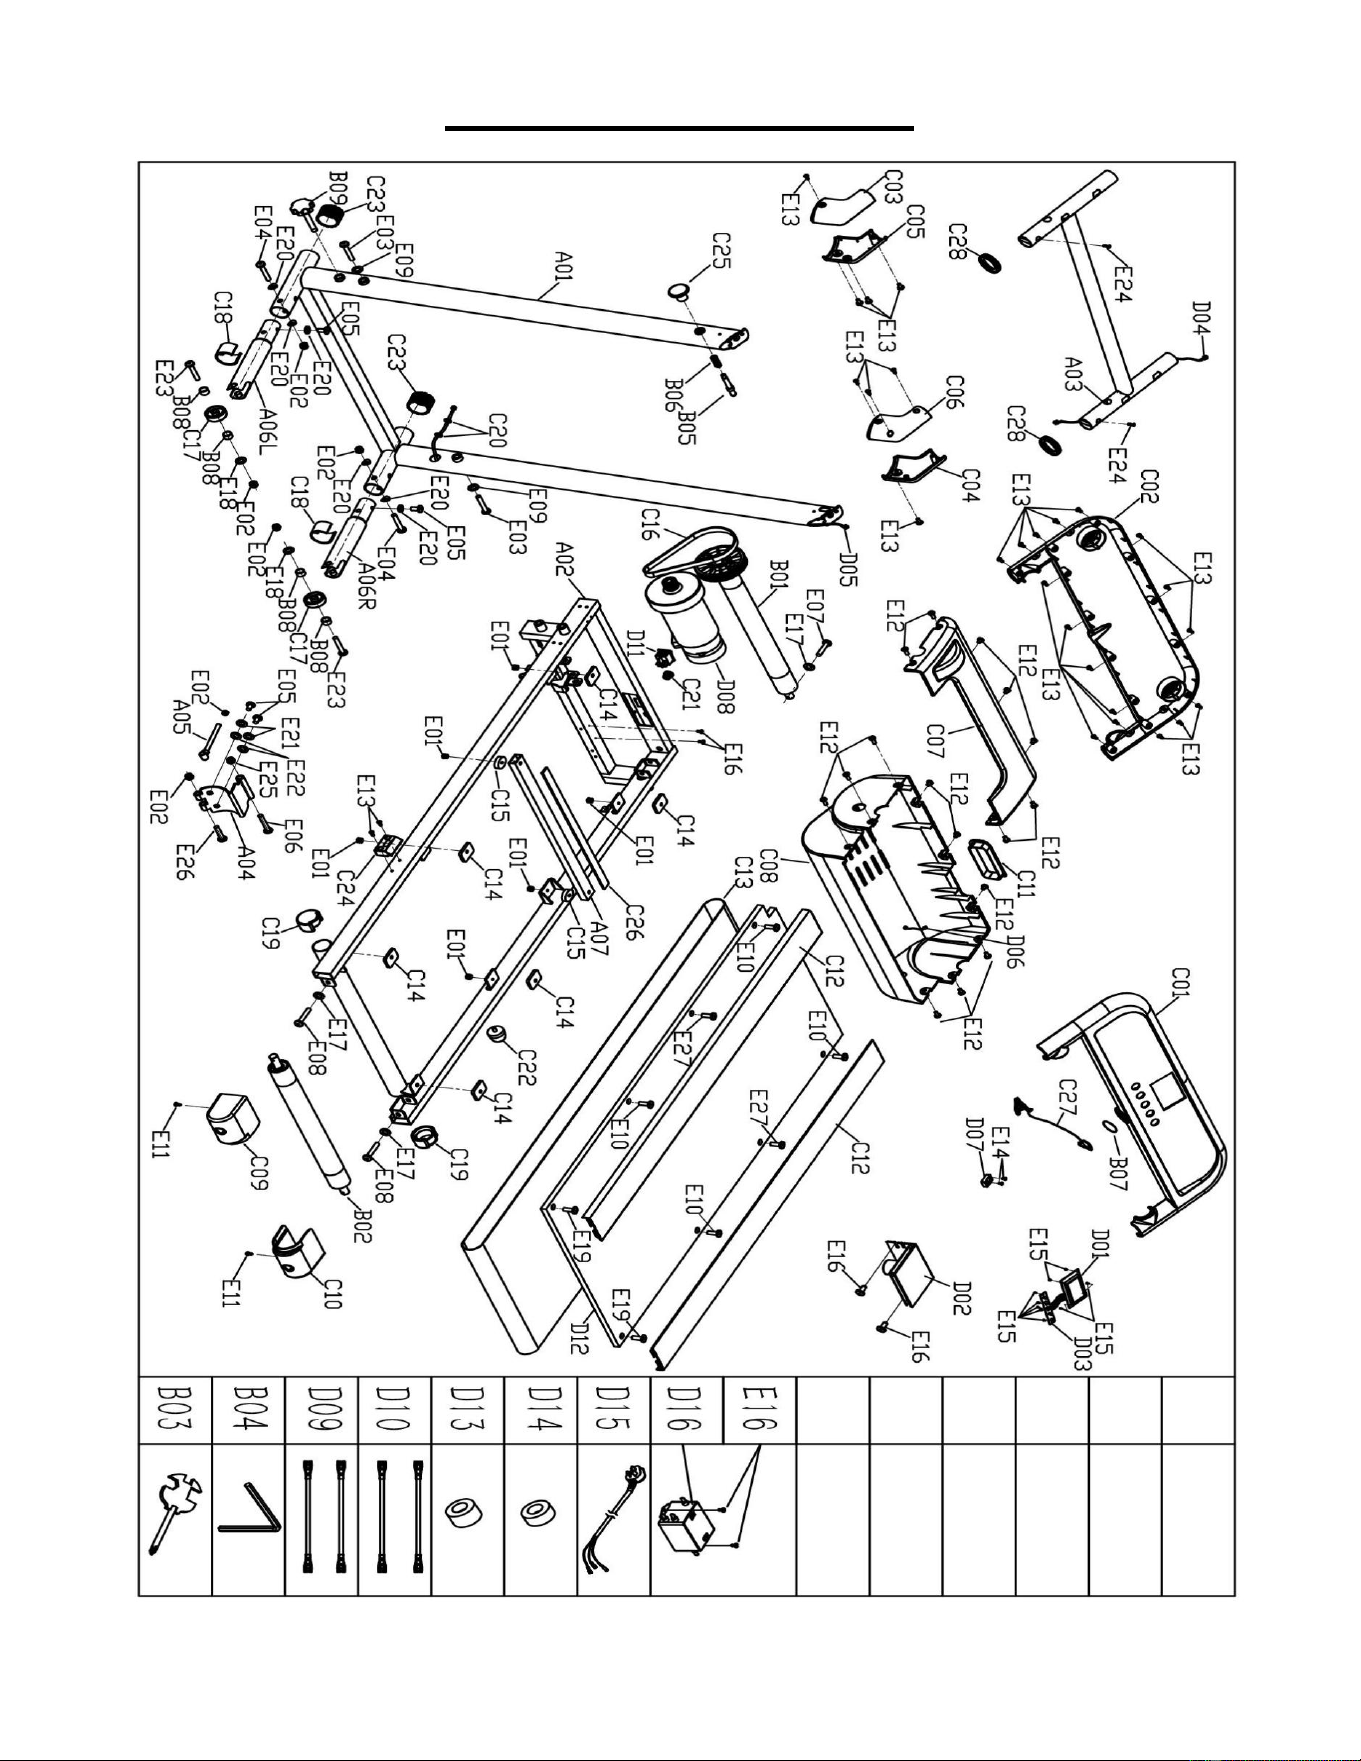
EXPLODED DIAGRAM
5
PARTS LIST
No. Description Spec. Qty.
No. Description Spec. Qty.
A01 Base Frame 1 D02 Control Board 1
A02 Main Frame 1 D03 Keyboard 1
A03 Console Bracket 1 D04 Top Signal Wire 1
A04 Motor Frame 1 D05 Middle Signal Wire 1150mm 1
A05 Adjustable Frame 1 D06 Lower Signal Wire 1600mm 1
A06L/
R
Base Support Tube L/R 2 D07 Speed Sensor 200mm 1
A07 Running Board Strengthen Tube 1 D08 DC Motor 1
B01 Front Roller 1 D09 AC Single Line Blue 350mm 2
B02 Rear Roller 1 D10 AC Single Line Brown 350mm 2
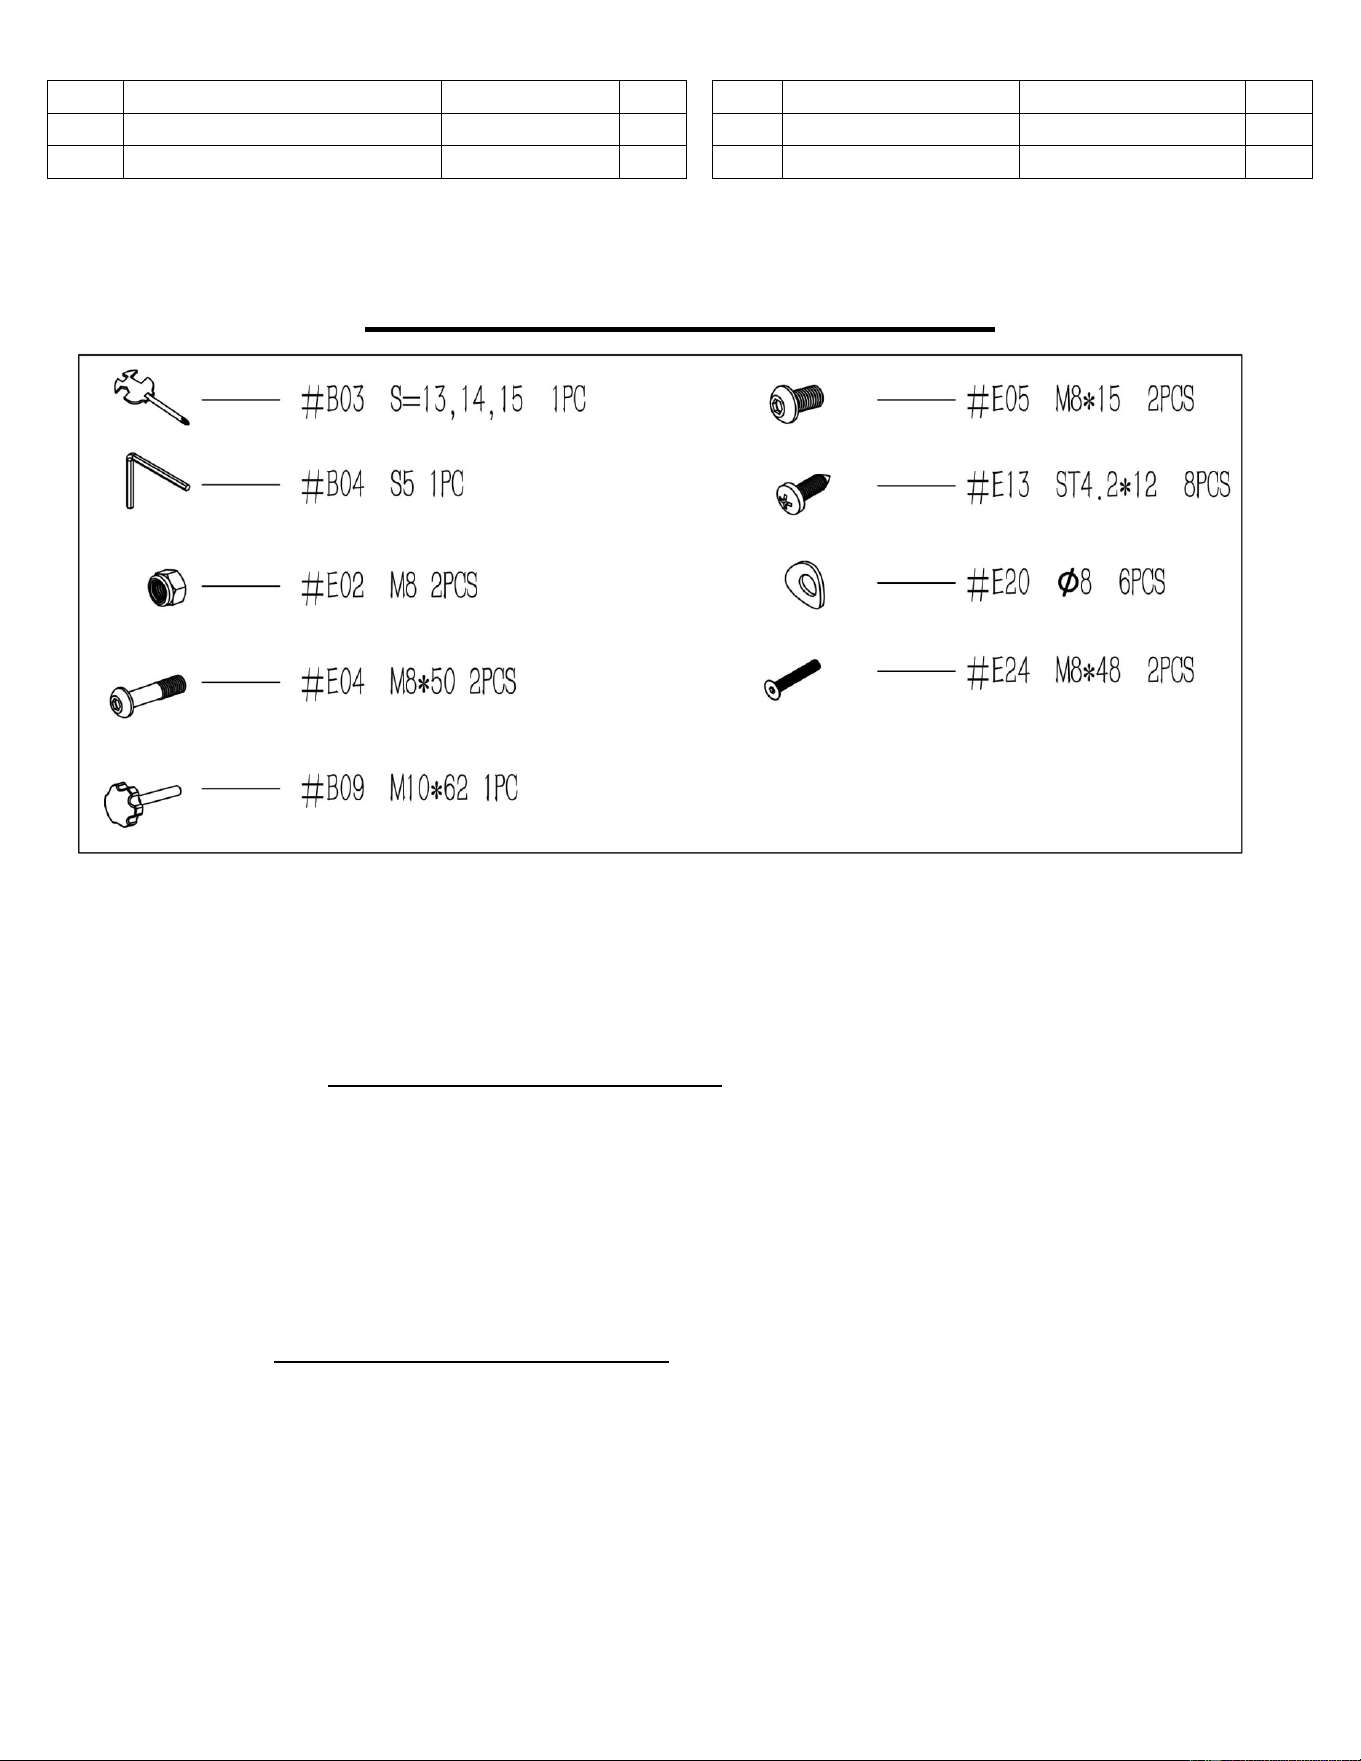
B03 Spanner with Screw Driver S=13,14,15 1 D11 Power Switch 1
B04 Allen Wrench S5 1 D12 Running Board 1
B05 Locking Pin Iron 1 D13 Magnetic Ring 1
B06 Pressure Spring 1 D14 Magnetic Core 1
B07 Safety Key Plate 1 D15 Power Wire 2150mm 1
B08 Transportation Wheel Bushing 4 D16 Filter 1
B09
Lock Knob
M10*62
1
E01
Nut
M6
6
C01 Console Top Cover 1 E02 Nut M8 6
C02 Console Bottom Cover 1 E03 Bolt M10*60 2
C05 Left Upright Tube Inner Cover 1 E04 Bolt M8*50 2
C06 Right Upright Tube Inner Cover 1 E05 Bolt M8*15 4
C07
Motor Top Cover
1
E06
Bolt
M10*90
1
C08 Motor Bottom Cover 1 E07 Bolt M6*45 1
C09 Left Rear Cover 1 E08 Bolt M6*55 2
C10
Right Rear Cover
1
E09
Flat Washer C
Φ10
2
C11 Motor Cover Buckle 1 E10 Bolt M6*28 4
C12 Side Rail 2 E11 Bolt
M5*12
(including washer)
2
C13 Running Belt 1 E12 Bolt
M5*8
(including washer)
16
C14 Rubber Cushion 6 E13 Screw ST4.2*12 27
C15 Blue Cushion 2 E14 Screw ST2.9*8 2
C16
Motor Belt
1
E15
Screw
ST2.9*6
9
C17 Transportation Wheel 2 E16 Screw ST4.2*12 6
C18 C Shape Foot Pad 1 2 E17 Washer Φ6 3
C19 C Shape Foot Pad 2 2 E18 Washer Φ8 2
C20 Ring Protecting Wire Plug 2 E19 Bolt M6*25 2
C21 Power Wire Buckle 1 E20 Arc Washer Φ8 6
C22 Cushion 1 E21
Spring Washer
Φ8
2
C23 Inner Cap 2 E22 Flat Washer C Φ8 2
C24 Fixed Block 1 E23 Bolt M8*48 L20 2
C25
Locking Pin
1
E24 Bolt M8*48 2
C26 Rubber Cushion
1
E25 Nut M10 1
C27 Safety Key 1
E26 Bolt M8*60 1
C28 Handlebar Decoration Ring 2 E27 Bolt M6*46 2
D01 Console 1

6
LISTA DE PIEZAS
n.°
Descripción
Especificación
Ctd.
n.°
Descripción
Especificación
Ctd.
A01 Estructura Inferior 1 C27 Llave de Seguridad 1
A02 Estructura Principal 1 C28
Aro Decorativo del
Pasamanos
2
A03 Soporte de la Consola 1 D01 Pantalla de Consola 1
A04 Soporte del Motor 1 D02 Tablero de Control 1
A05 Soporte Ajustable 1 D03 Teclado 1
A06L
/R
Tubo de Soporte de la Base
Izq/Der
2 D04
Cable de Señal
Superior
1
A07
Tubo de Refuerzo para Tablero
de Carrera
1 D05 Cable de Señal Central 1150mm 1
B01 Rodillo Delantero 1 D06 Cable de Señal Inferior 1600mm 1
B02 Rodillo Trasero 1 D07 Sensor de Velocidad 200mm 1
B03 Llave Inglesa con Destornillador S=13,14,15 1 D08 Motor CC 1
B04 Llave Allen S5 1 D09 Cable Singular CA Blue 350mm 2
B05 Clavija de Bloqueo 1 D10 Cable Singular CA Brown 350mm 2
B06 Resorte de Presión 1 D11
Interruptor de
Alimentación
1
B07 Placa para Llave de Seguridad 1 D12 Tabla para Caminadora 1
B08 Buje de Rueda de Transporte 4 D13 Aro Magnético 1
B09 Perilla de Bloqueo M10*62 1 D14 Núcleo Magnético 1
C01 Cubierta Superior de la Consola 1 D15 Cable de Enchufe 2150mm 1
C02 Cubierta Inferior de la Consola 1 D16 Filtro 1
C03
Cubierta de Tubo Vertical
Izquierda
1 E01 Tuerca M6 6
C04
Cubierta de Tubo Vertical
Derecha
1 E02 Tuerca M8 6
C05
Cubierta Interior de Tubo Vertical
Izquierda
1 E03 Perno M10*60 2
C06
Cubierta Interior de Tubo Vertical
Derecha
1 E04 Perno M8*50 2
C07 Cubierta Superior de Motor 1 E05 Perno M8*15 4
C08 Cubierta Inferior de Motor 1 E06 Perno M10*90 1
C09 Cubierta Trasera Izquierda 1 E07 Perno M6*45 1
C10 Cubierta Trasera Derecha 1 E08 Perno M6*55 2
C11 Hebilla de Cubierta de Motor 1 E09 Arandela Plana C Φ10 2
C12 Riel Lateral 2 E10 Perno M6*28 4
C13 Banda para Caminadora 1 E11 Perno M5*12 (con Arandela) 2
C14 Almohadilla de Goma 6 E12 Perno M5*8 (con Arandela) 16
C15 Almohadilla Azul 2 E13 Tornillo ST4.2*12 27
C16 Correa de Motor 1 E14 Tornillo ST2.9*8 2
C17 Rueda de Transportación 2 E15 Tornillo ST2.9*6 9
C18 Almodilla de Pie Forma C 1 2 E16 Tornillo ST4.2*12 6
C19 Almodilla de Pie Forma C 2 2
E17 Arandela Φ6 3
C20
Aro Protectora de Cable del
Enchufe
2 E18 Arandela Φ8 2
C21 Hebilla de Alimentación Eléctrica 1 E19 Perno M6*25 2
C22 Almohadilla 1 E20 Arandela Φ8 6
C23 Tapa Interior 2 E21 Arandela de Presión Φ8 2
C24 Bloque de Fijación 1 E22 Arandela Plana C Φ8 2
C25 Clavija de Bloqueo 1 E23 Perno M8*48 L20 2
C26 Almohadilla de Goma 1 E24 Perno M8*48 2
7
n.° Descripción Especificación Ctd. n.° Descripción Especificación Ctd.
E25 Tuerca M10 1 E27 Perno M6*46 2
E26 Perno M8*60 1
PAQUETE DE HERRAMIENTA
Replacement Parts (U.S. and Canadian Customers only)
Please provide the following information in order for us to accurately identify the part(s) needed:
The model number (found on cover of manual)
The product name (found on cover of manual)
The part number found on the Parts List and Exploded Diagram (found near the front of the
manual)
Please contact us at support@sunnyhealthfitness.com or 1- 877 - 90SUNNY (877-907-8669).
Pedido de piezas de repuesto (solo para clientes de EE. UU. y Canadá)
Por favor indique la siguiente información para que podamos identificar con precisión las piezas
necesarias:
El número de modelo (se encuentra en la portada del manual).
El nombre del producto (se encuentra en la portada del manual).
El número de pieza que se encuentra en el “ESQUEMA DE LAS PIEZAS” y en la “LISTA DE
PIEZAS” (se encuentra al principio del manual).
Contáctenos en support@sunnyhealthfitness.com o 1-877-90SUNNY (877-907-8669).
8
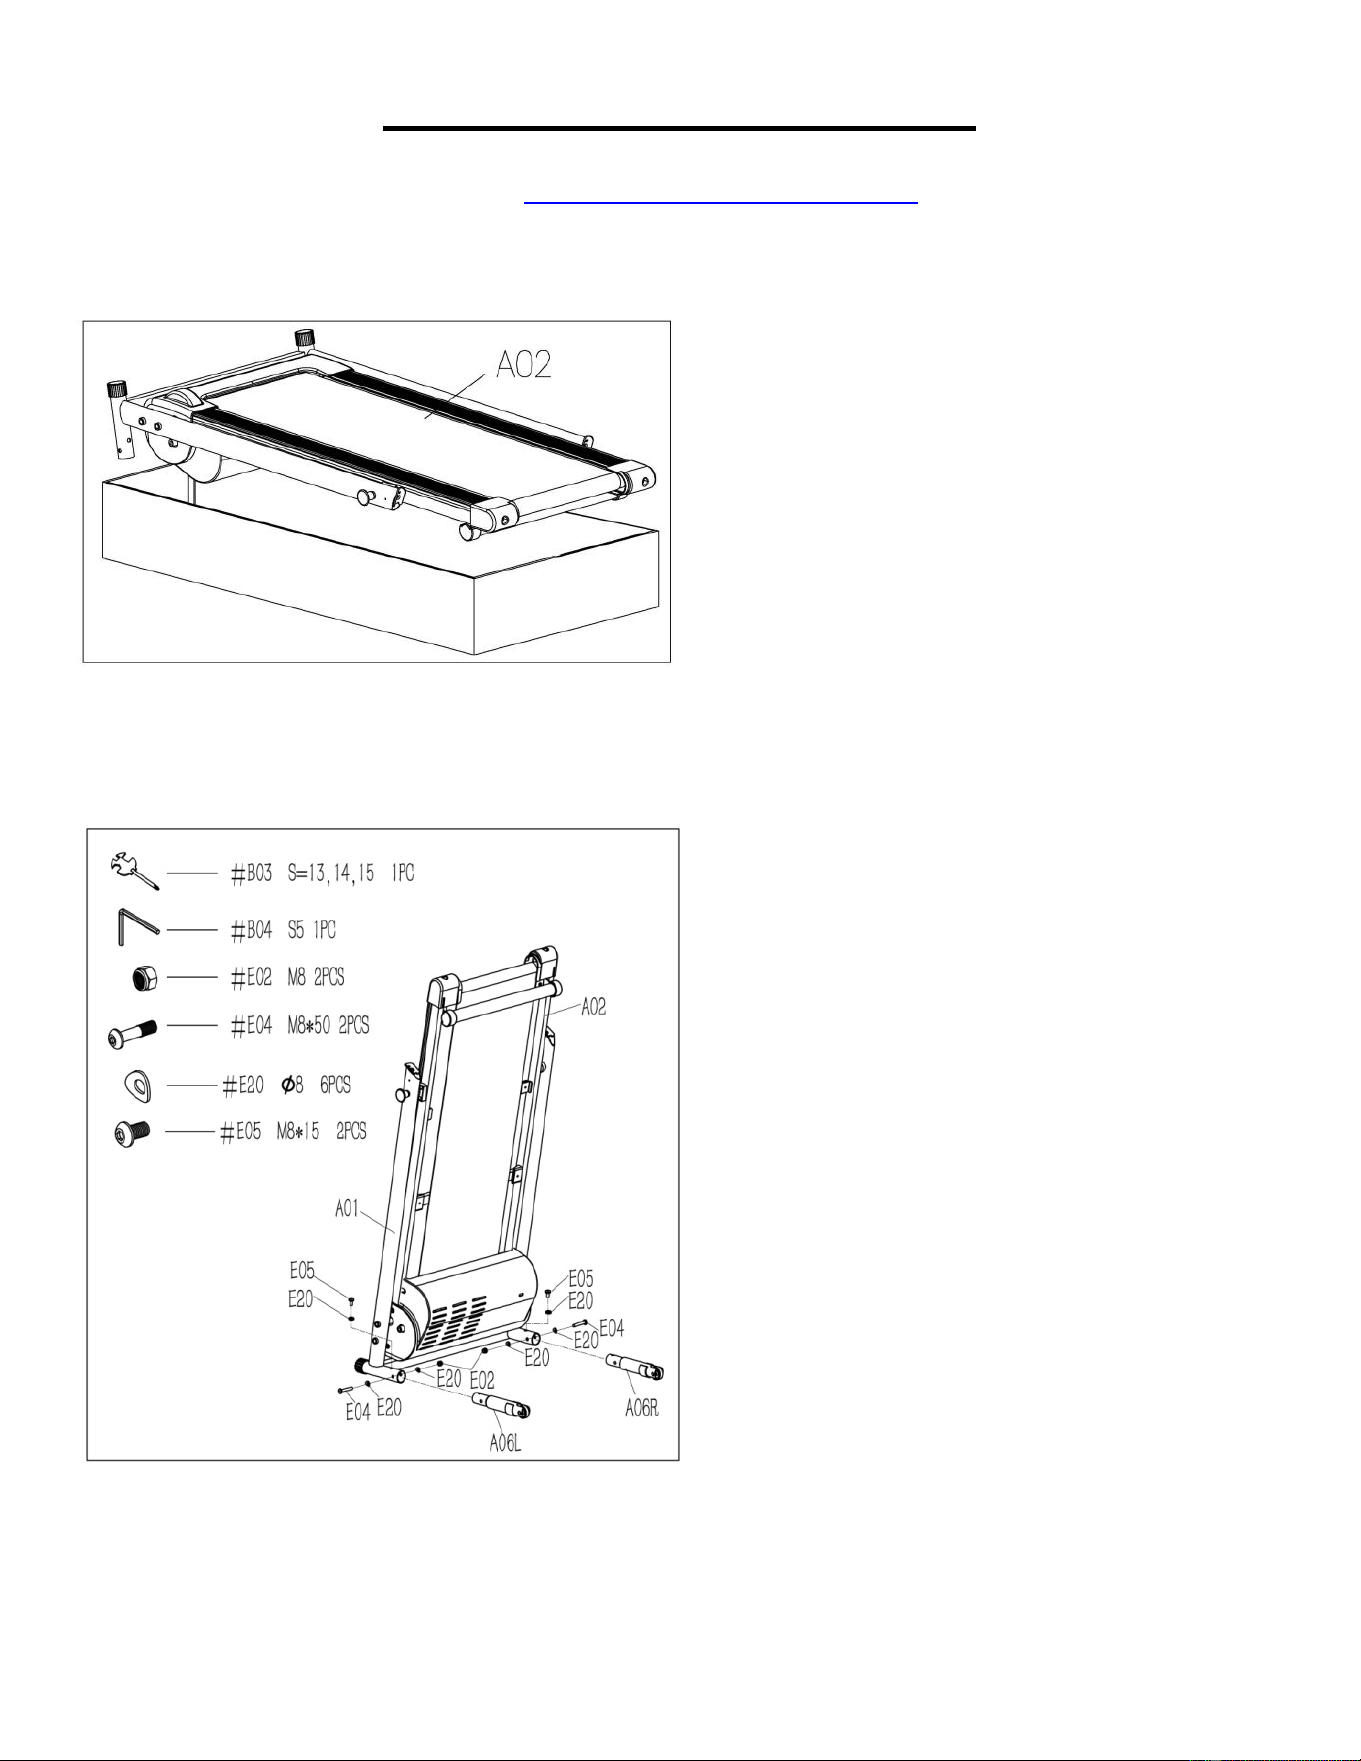
ASSEMBLY INSTRUCTIONS
We value your experience using Sunny Health and Fitness products. For assistance with parts or
troubleshooting, please contact us at support@sunnyhealthfitness.com or 1-877-90SUNNY (877-907-
8669).
STEP 1:
NOTE: We recommend having two people
do the assembly.
Open the carton box and remove contents.
Place the Main Frame (No. A02) on level
ground. Ensure that you have a work area
that is clean and has adequate space.
STEP 2:
NOTE: Support Main Frame (No. A02) at
position “F”
with one hand to prevent it
from falling down during assembly.
Attach the Left Base Support Tube (No.
A06L) to Base Frame (No. A01). Use
Allen Wrench (No. B04) and Spanner
with Screw Driver (No. B03) to screw 1
Bolt (No. E04), 2 Arc Washers (No. E20),
and 1 Nut (No. E02) into the Base Frame
(No. A01).
Then, screw the 1 Bolt (No. E05) and 1
Arc Washer (No. E20) into the Base
Frame (No. A01).
Repeat the step above to assemble the
Right Base Support Tube (No. A06R) to
the Base Frame (No. A01).

9
We value your experience using Sunny Health and Fitness products. For assistance with parts or
troubleshooting, please contact us at support@sunnyhealthfitness.com or 1-877-90SUNNY (877-907-
8669).
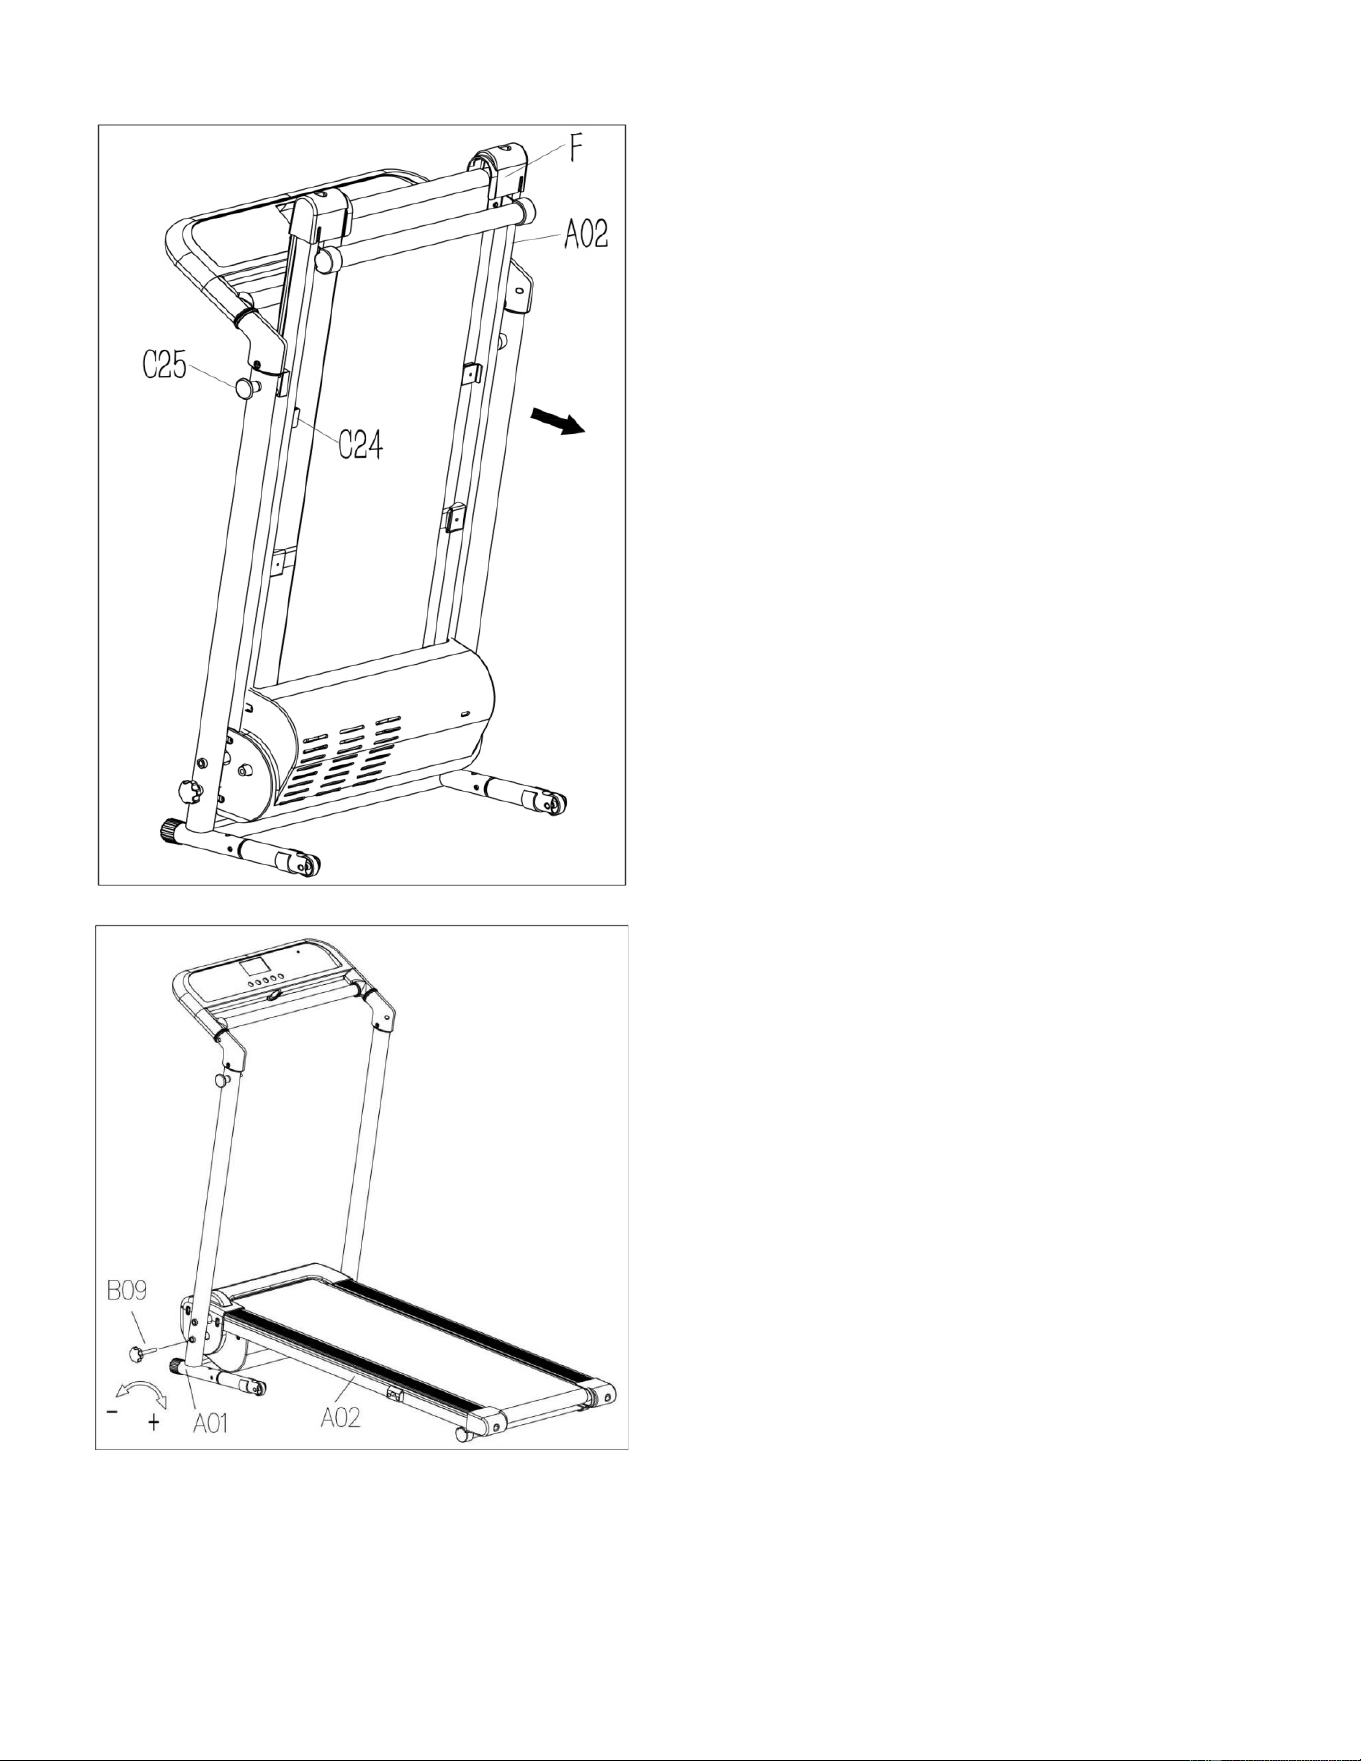
STEP 3:
NOTE:
To avoid any possible injury, please
hold on the Main Frame (No. A02) at
position “F” before you pull the Locking Pin
(No. C25) and ensure that the space directly
underneath it is clear of any objects. Once
the Main Frame (No. A02)
is released,
please continue to hold on until it reaches
the floor.
Pull the Locking Pin (No. C25) and lower
the Main Frame (No. A02) to the floor.
NOTE: The Locking Pin (No. C25) will snap
back into the treadmill. It does not detach
from the treadmill.
STEP 4:
Connect the Top Signal Wire (No. D04)
to
the Middle Signal Wire (No. D05).

10
We value your experience using Sunny Health and Fitness products. For assistance with parts or
troubleshooting, please contact us at support@sunnyhealthfitness.com or 1-877-90SUNNY (877-907-
8669).
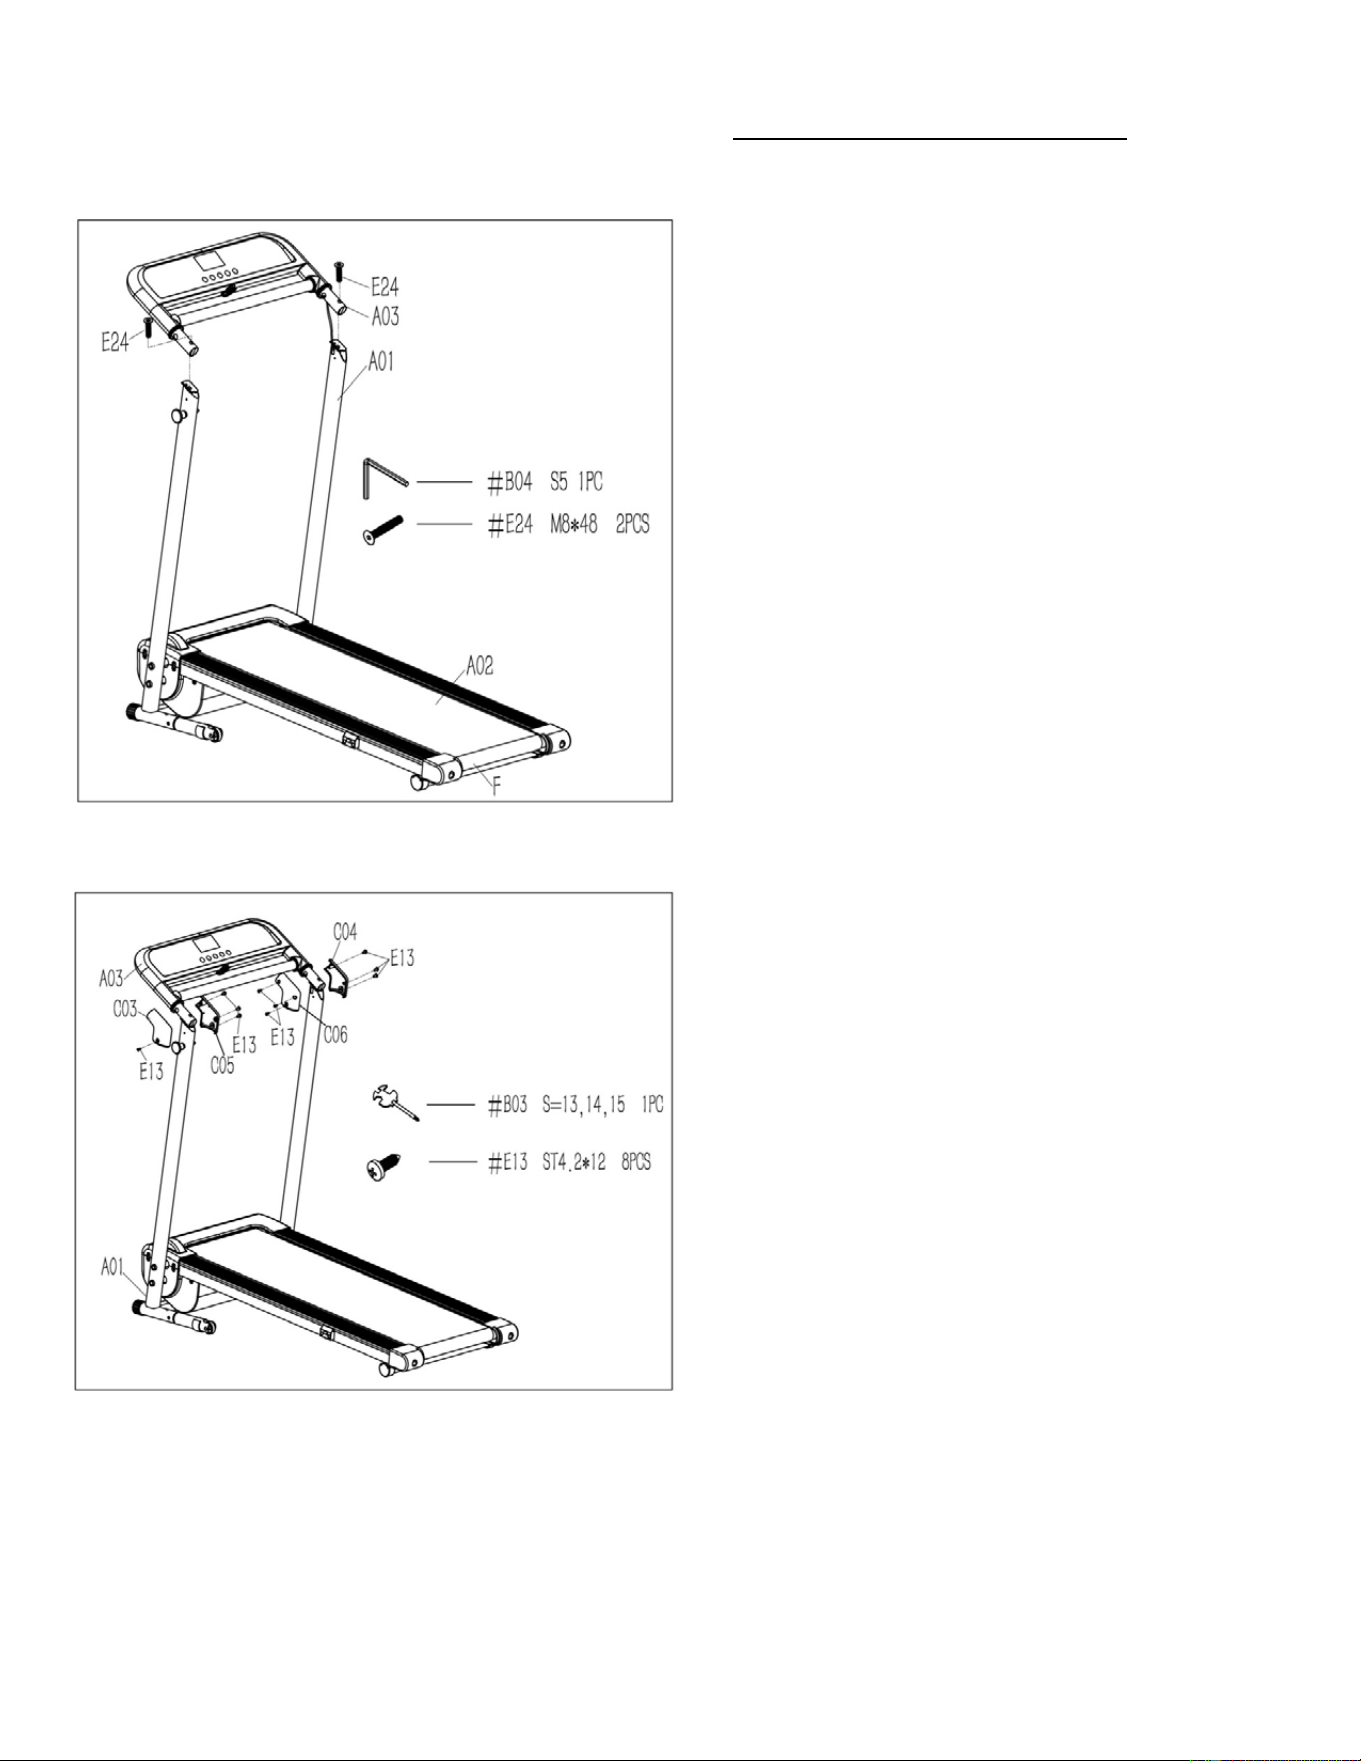
STEP 5:
Attach the Console Bracket (No. A03) to the
Base Frame (No. A01) with 2 Bolts (No.
E24). Tighten using Allen Wrench (No. B04).
STEP 6:
Attach the Left & Right Upright Tube Covers
(No. C03 & No. C04) and Left & Right
Upright Tube Inner Covers (No. C05 & No.
C06) to the Base Frame (No. A01) and
Console Bracket (No. A03) with 8 Screws
(No. E13). Tighten using Spanner with
Screw Driver (No. B03).
11
We value your experience using Sunny Health and Fitness products. For assistance with parts or
troubleshooting, please contact us at support@sunnyhealthfitness.com or 1-877-90SUNNY (877-907-
8669).
IMPORTANT NOTE!
You will need to lubricate
your treadmill before the first
use. See Page 13.
STEP 7:
Insert Lock Knob (No. B09)
. Secure the
Base Frame (No. A01) to Main Frame (No.
A02) by turning
Lock Knob (No. B09)
clockwise until tight.
The assembly is complete!
12
MAINTENANCE & CARE
General cleaning will help to prolong the life and improve the performance of your treadmill. Keep the
unit clean and maintained by dusting the components on a regular basis. Cleaning two exposed sides
of the Running Belt (No. C13) will prevent dust from accumulating underneath. Keep your running
shoes clean so that dirt from your shoes does not wear out the Running Board (No. D12) and Running
Belt (No. C13). Clean the surface of the Running Belt (No. C13) with a clean damp cloth.
To better maintain the treadmill and prolong its life it is recommended that the treadmill be powered
off for 10 minutes after 2 hours of continue use and fully powered off whenever not in use.
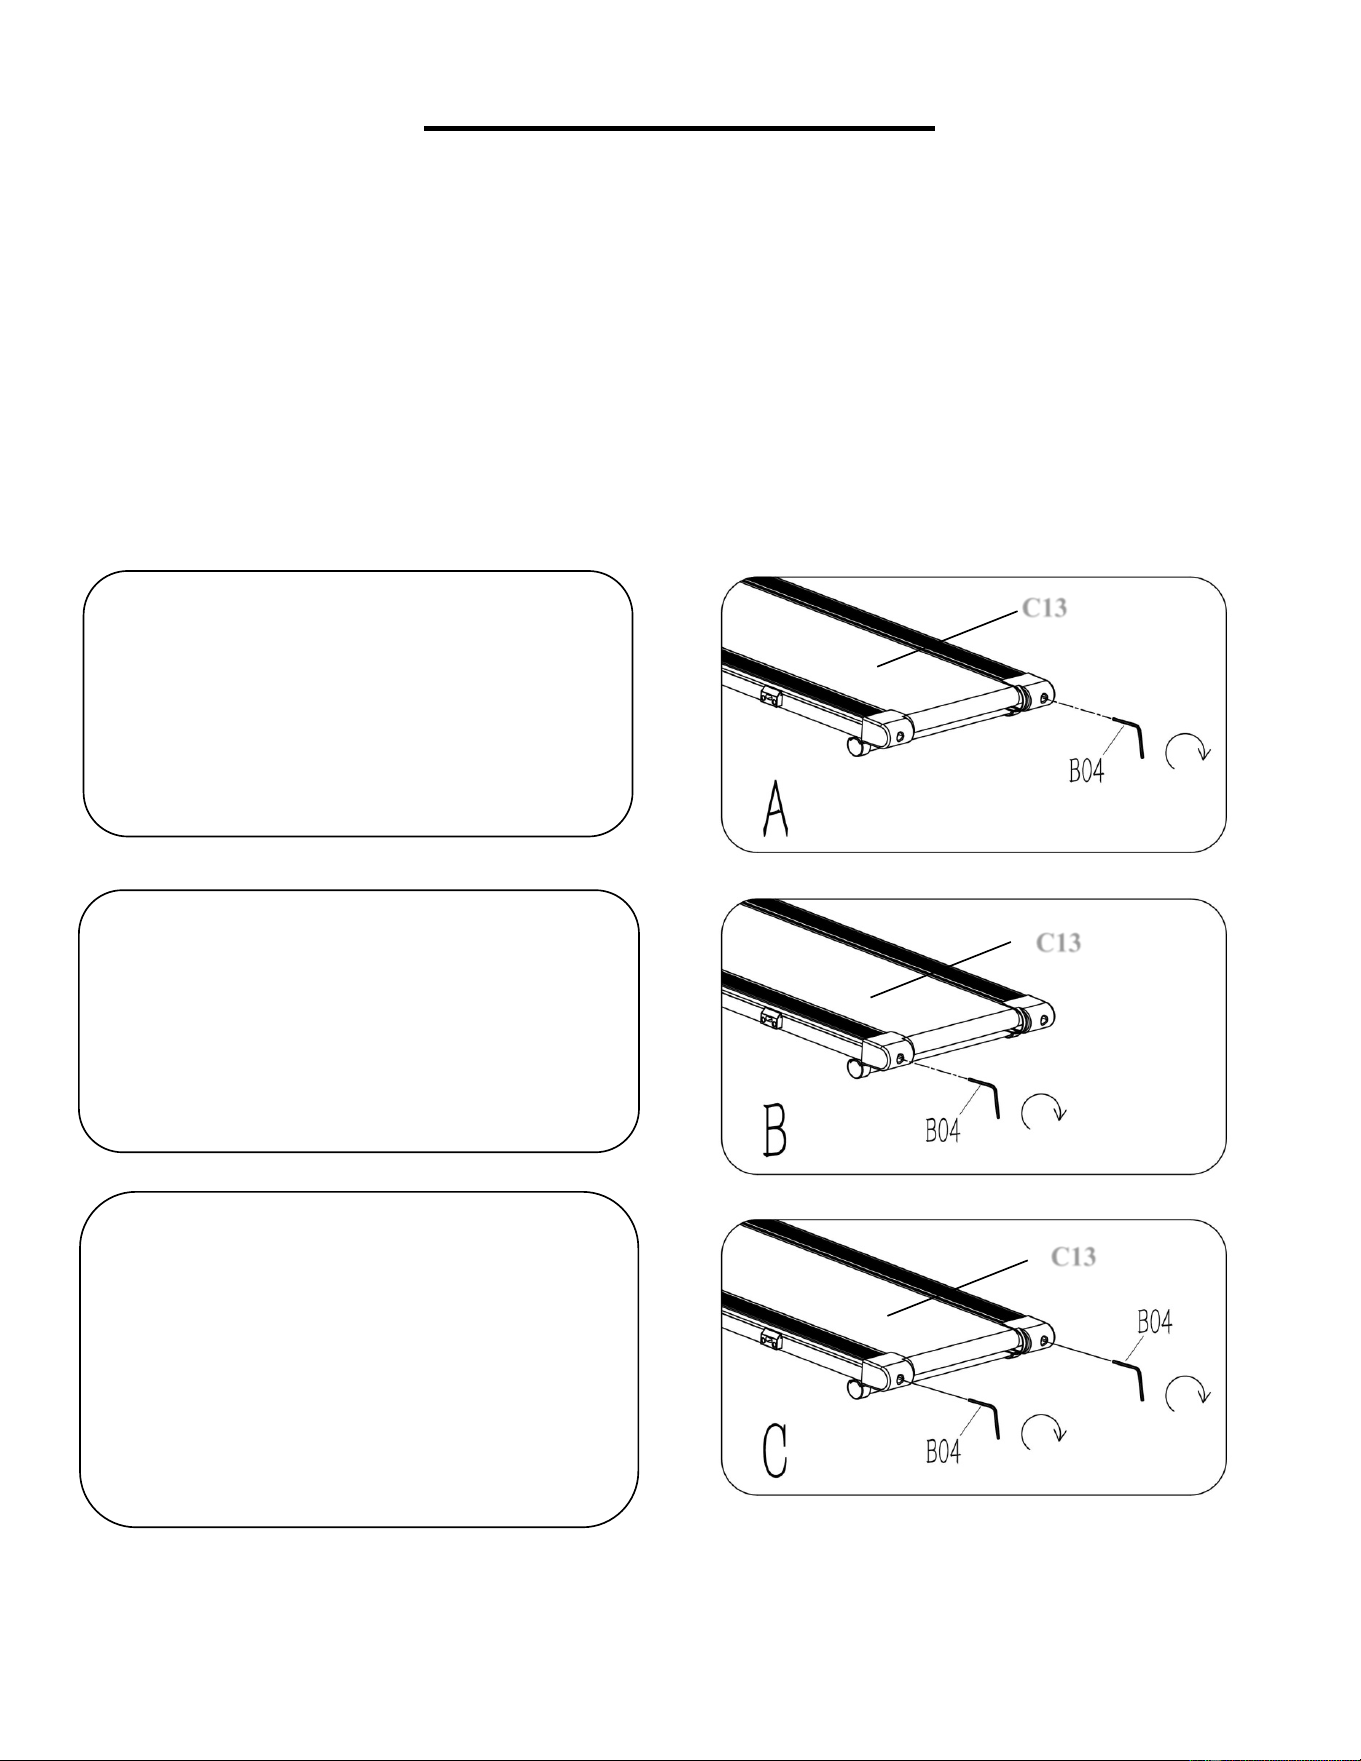
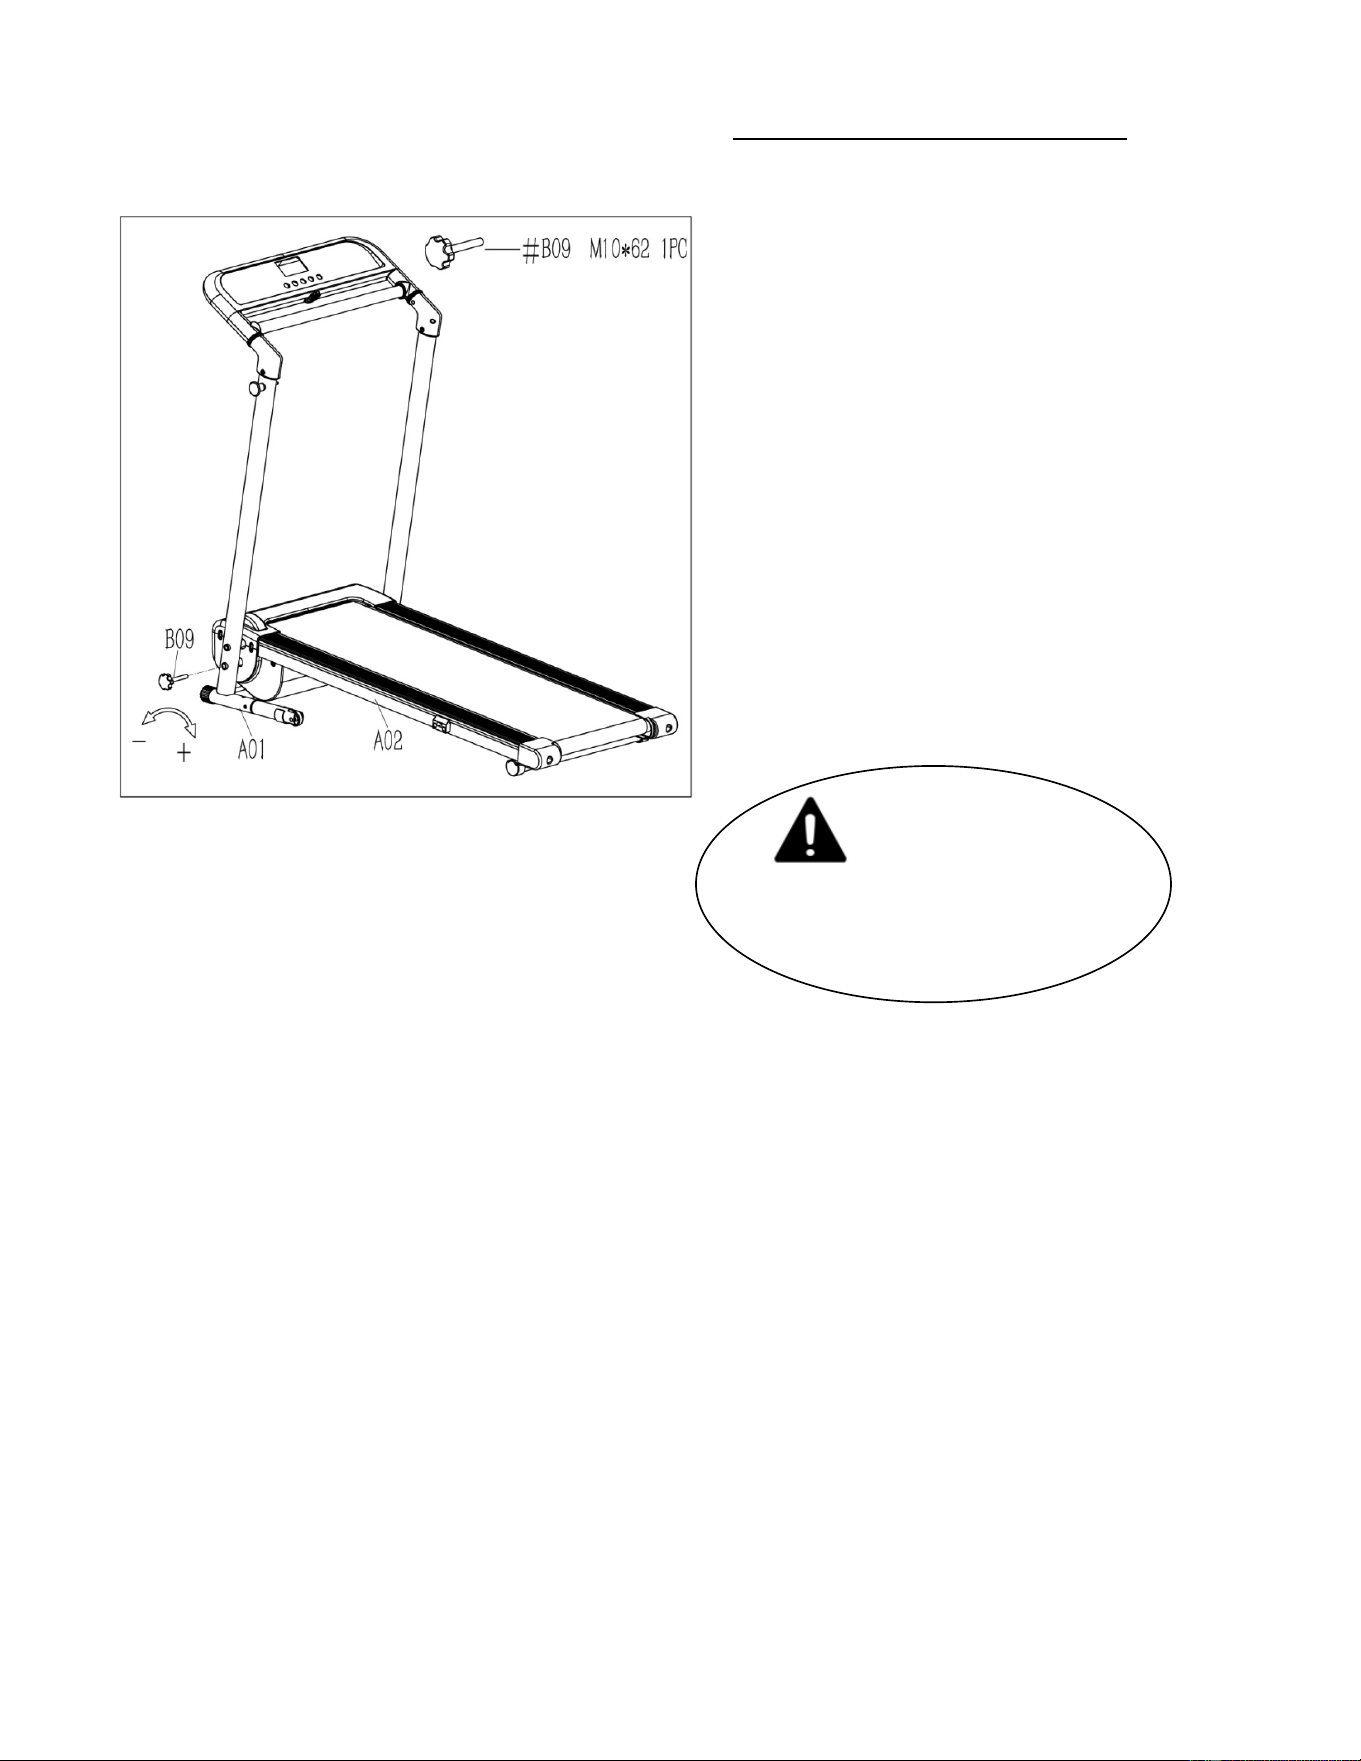
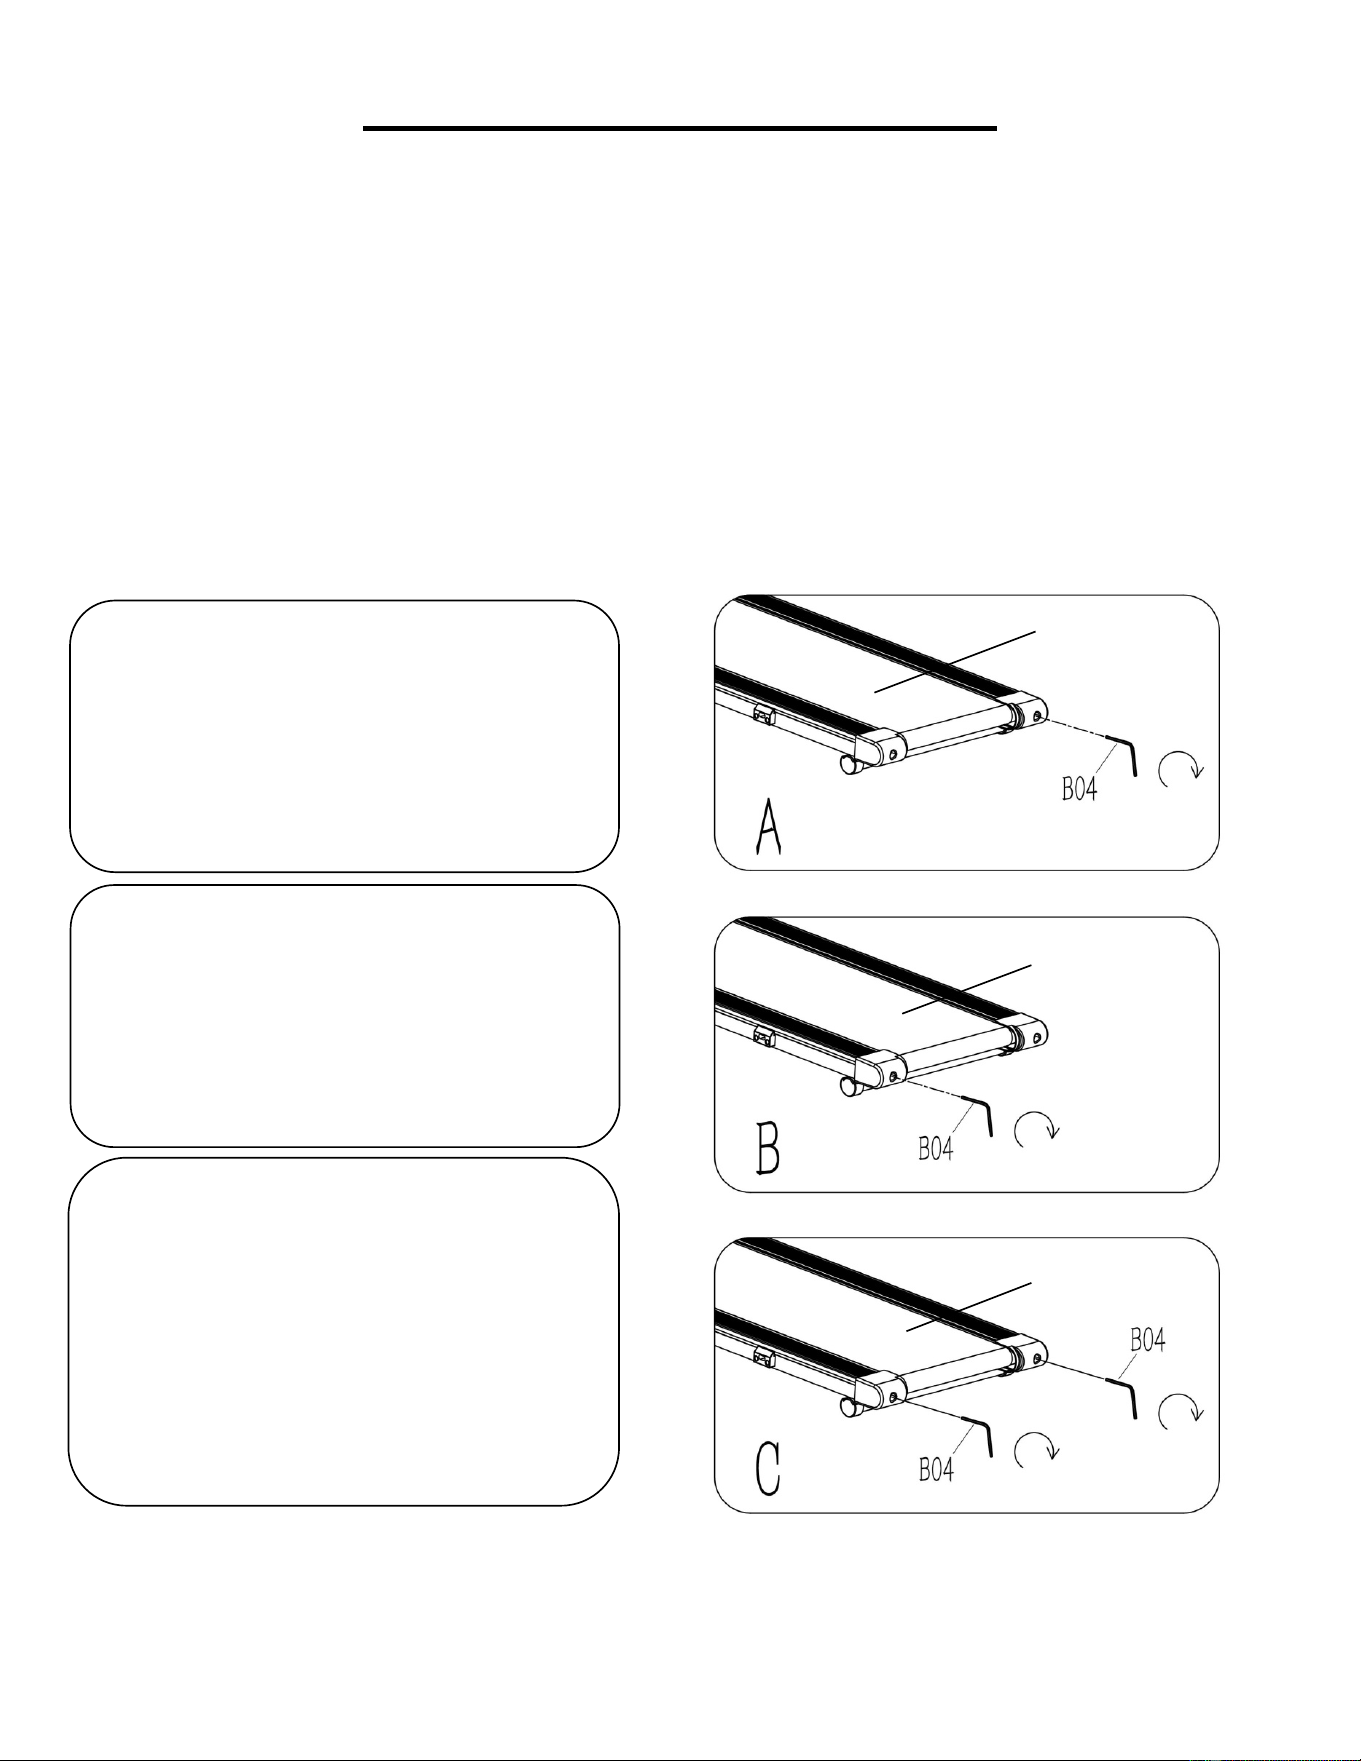
CENTERING THE RUNNING BELT:
Place the treadmill on level ground and set it at 3-5 MPH to check if the Running Belt (No. C13) drifts
from the center.
1. If the Running Belt (No. C13) drifts to
the right, turn the right adjusting bolt ¼
turn clockwise, then turn the left adjusting
bolt ¼ turn counter-clockwise
. If the
Running Belt (No. C13) does not move,
repeat this step until it centers. Refer to
Figure A.
2. If the Running Belt (No. C13) drifts to
the left, turn the left adjusting bolt ¼ turn
clockwise, then turn the right adjusting bolt
¼ turn counter-clockwise. If the Running
Belt (No. C13) does not move, repeat this
step until it centers. Refer to Figure B.
3. Over time, the Running Belt (No. C13)
will loosen. To tighten the Running Belt
(No. C13)
turn the left & right adjusting
bolts one full turn clockwise, check the
tension of the Running Belt (No. C13).
Continue this process until Running Belt
(No. C13) is at the correct tension. Make
sure to adjust both sides equally to ensure
correct belt alignment. Refer to Figure C.
C13
C13
C13
C13
13
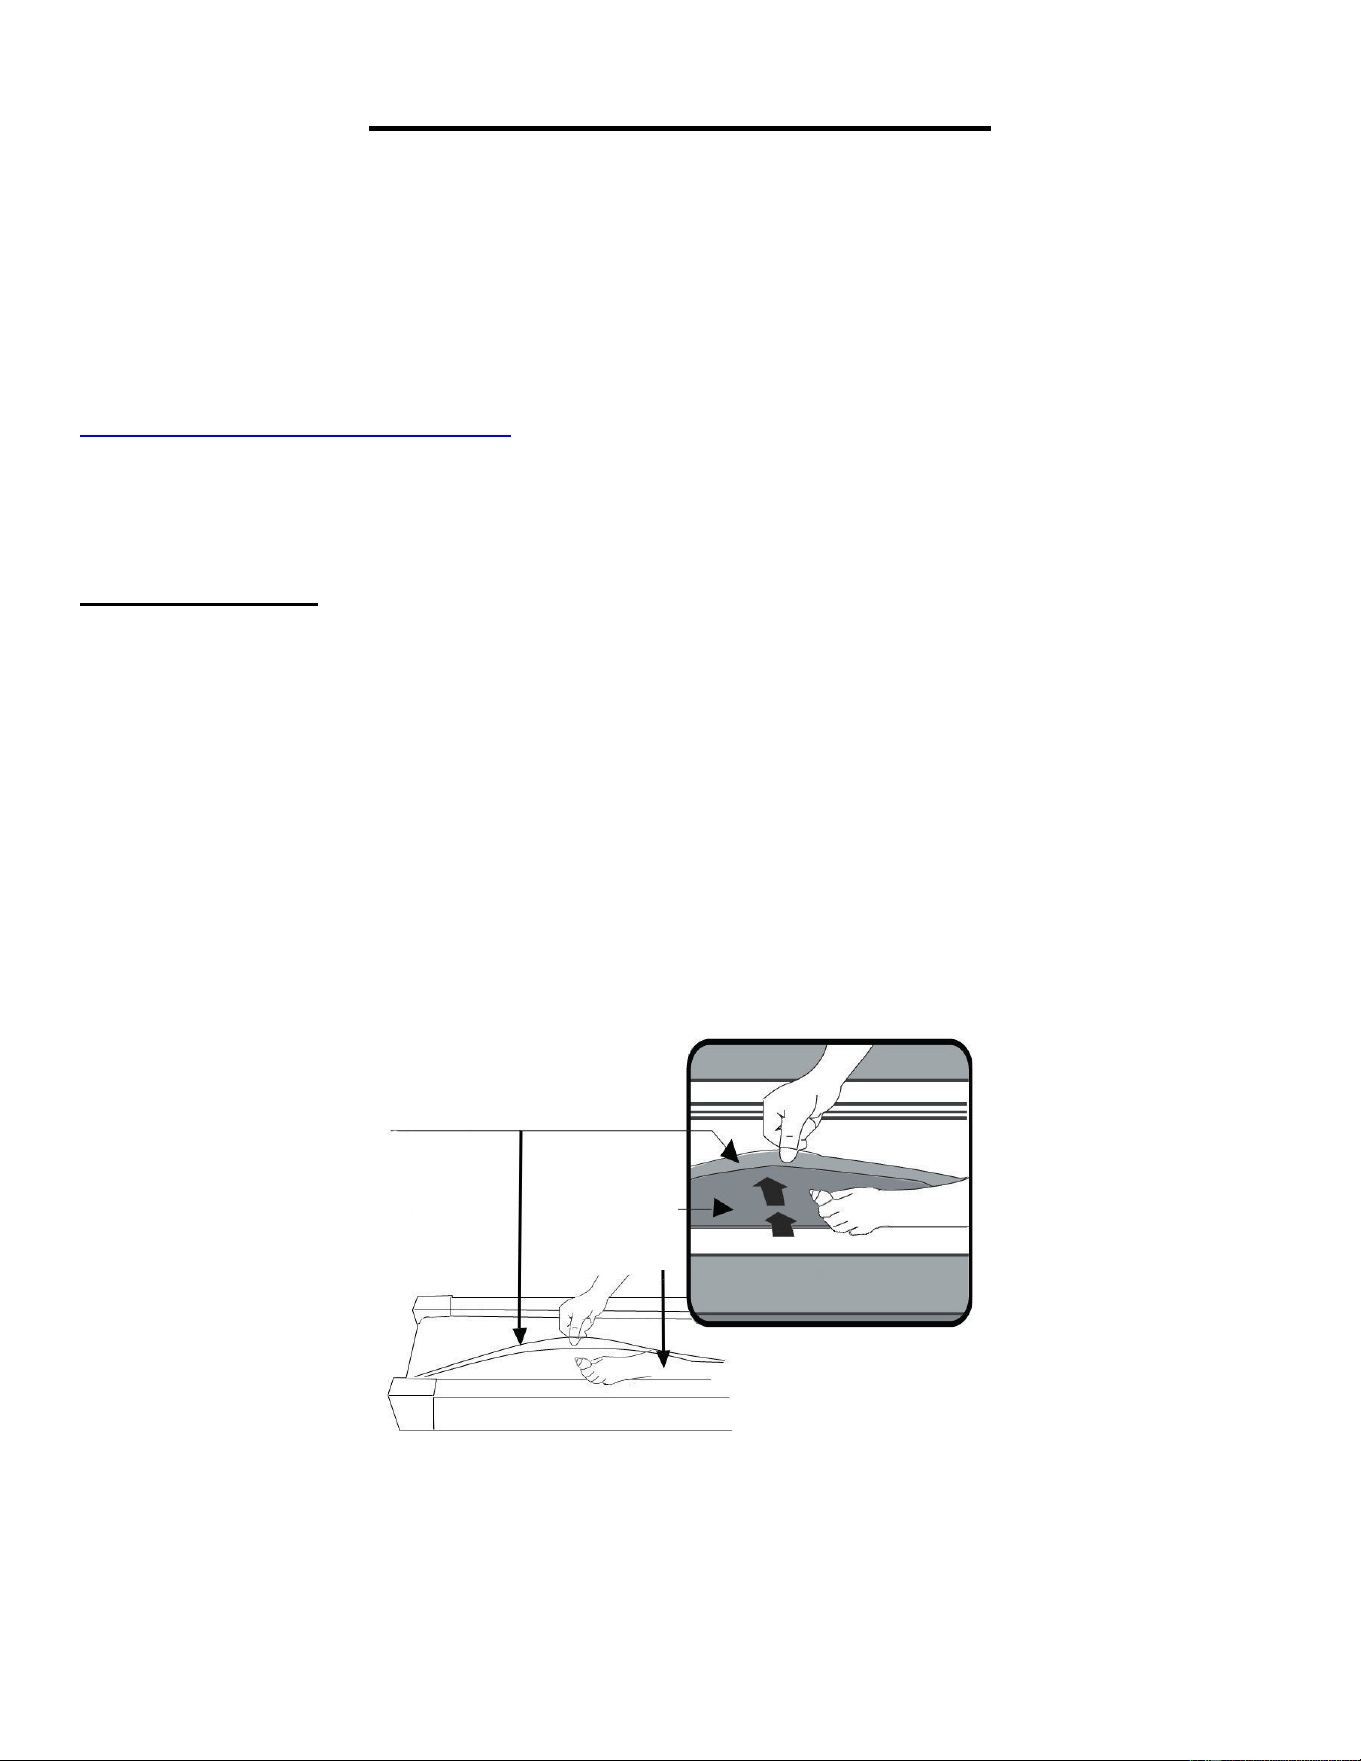
LUBRICATING THE TREADMILL
*IMPORTANT NOTE:
You will need to lubricate your treadmill before the first use.
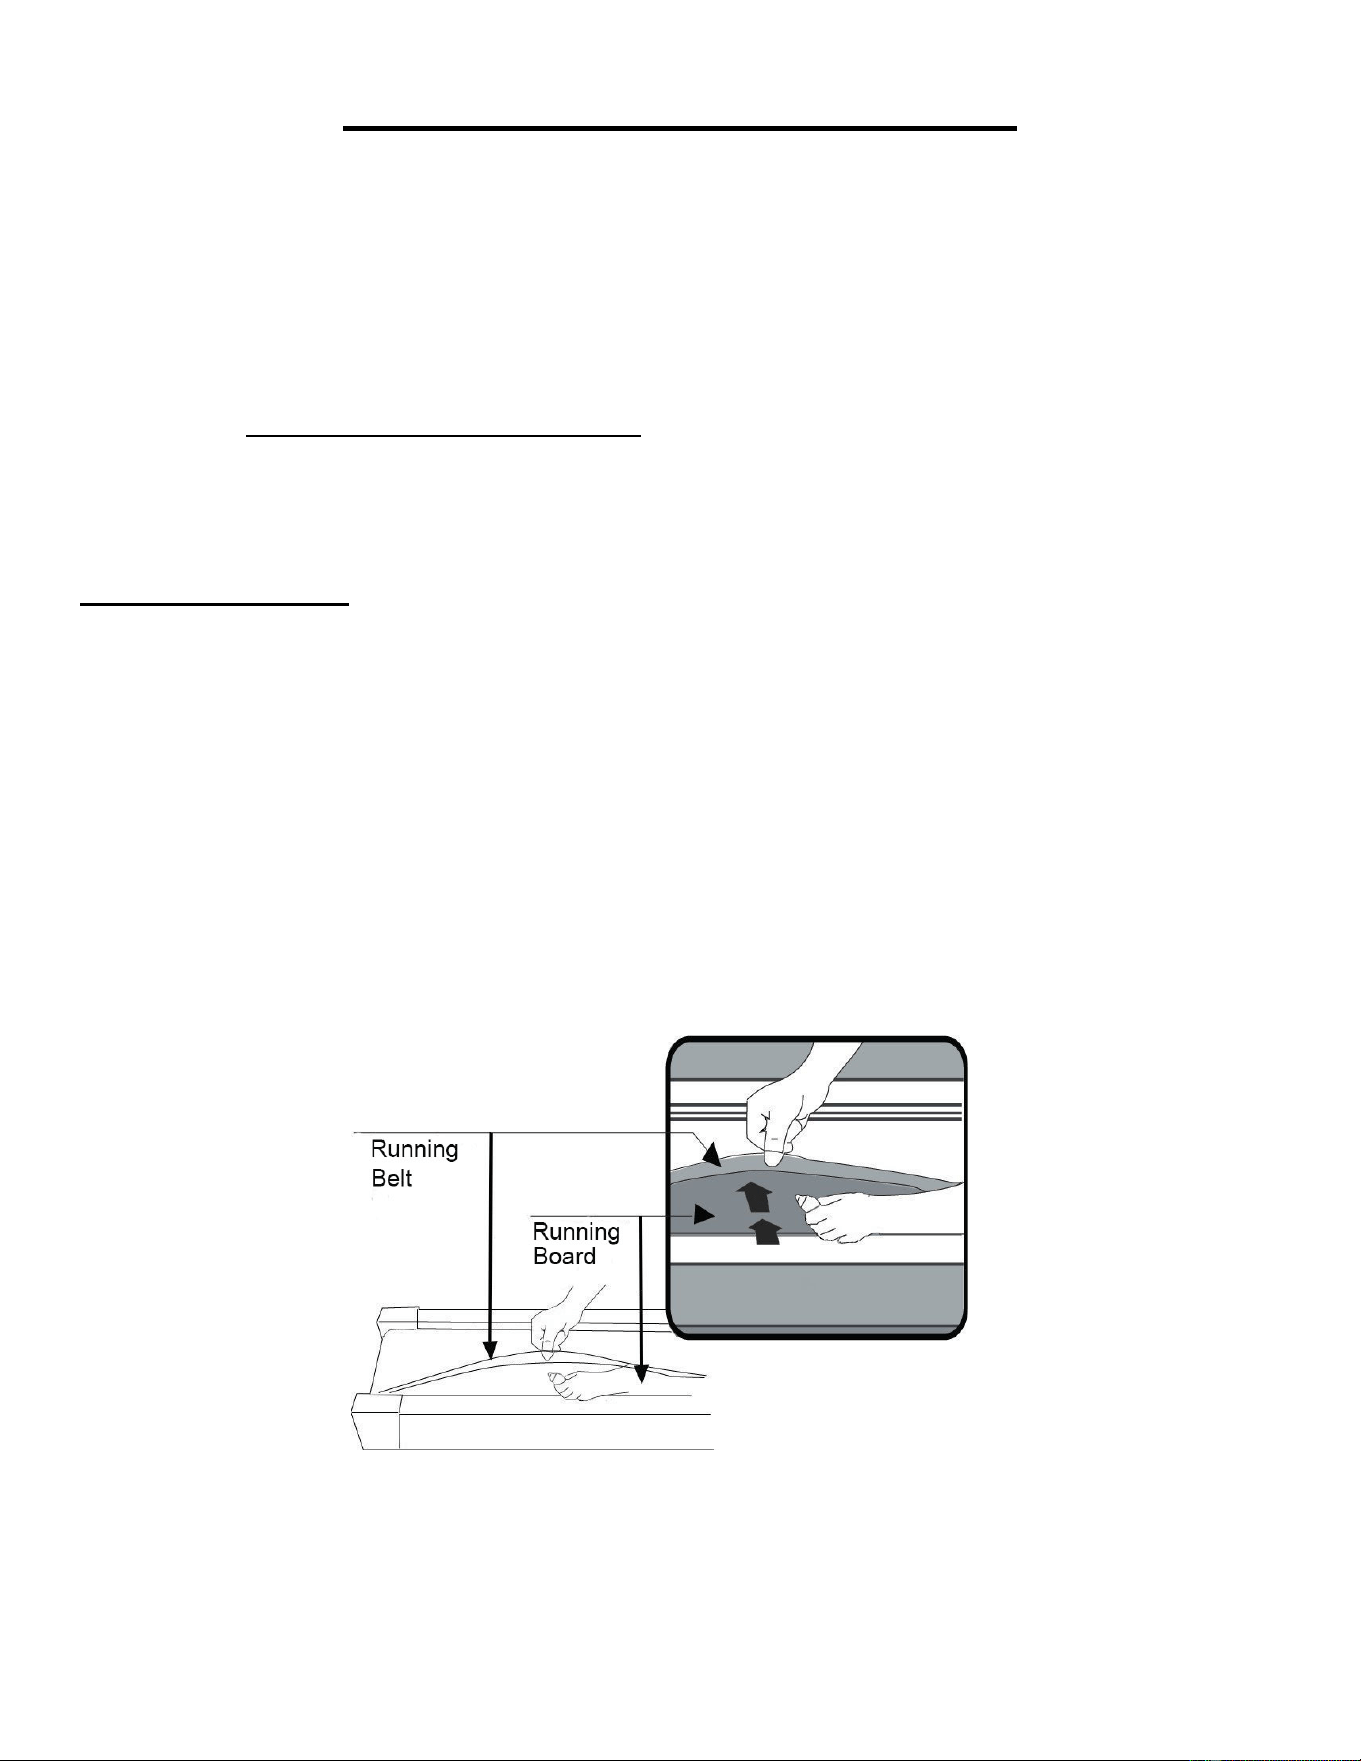
RUNNING BELT & TREADMILL LUBRICANT:
Lubricating the Running Board (No. D12) and Running Belt (No. C13) is essential as the friction
affects the life span and operations of the treadmill. Inspect the Running Board (No. D12) and
Running Belt (No. C13) regularly. If you find any wear on the Running Board (No. D12), please
contact us at: support@sunnyhealthfitness.com.
WARNING: Always unplug the treadmill from the electrical outlet before cleaning, lubricating or
repairing the unit.
HOW TO LUBRICATE:
1. Raise the Running Belt (No. C13) up on one side and apply lubricant to the Running Board (No.
D12). Use a rag to thoroughly wipe the lubricant over the Running Board (No. D12). Repeat this
process for the other side.
2. The moving parts should turn freely and quietly. Abnormal moving parts will affect the safety of the
treadmill. Inspect and tighten bolts regularly.
3. To better maintain the treadmill and prolong its lifespan, it is suggested that maintenance be done
on a regular basis.
4. DO NOT LOOSEN OR MAKE ANY ADJUSTMENTS TO THE RUNNING BELT WHILE APPLYING
LUBRICANT. A loose Running Belt (No. C13) will result in the runner sliding off during use, while too
tight of a Running Belt (No. C13) will negatively affect the motor’s performance and create more friction
between the roller and Running Belt (No. C13). The most suitable tightness for the Running Belt (No.
C13) is when it is pulled out 50-75mm from the Running Board (No. D12).
Recommended Time Table:
Light user (less than 3 hours/ week) every six months
Medium user (3-5 hours/ week) every three months
Heavy user (more than 5 hours/ week) every two months
14
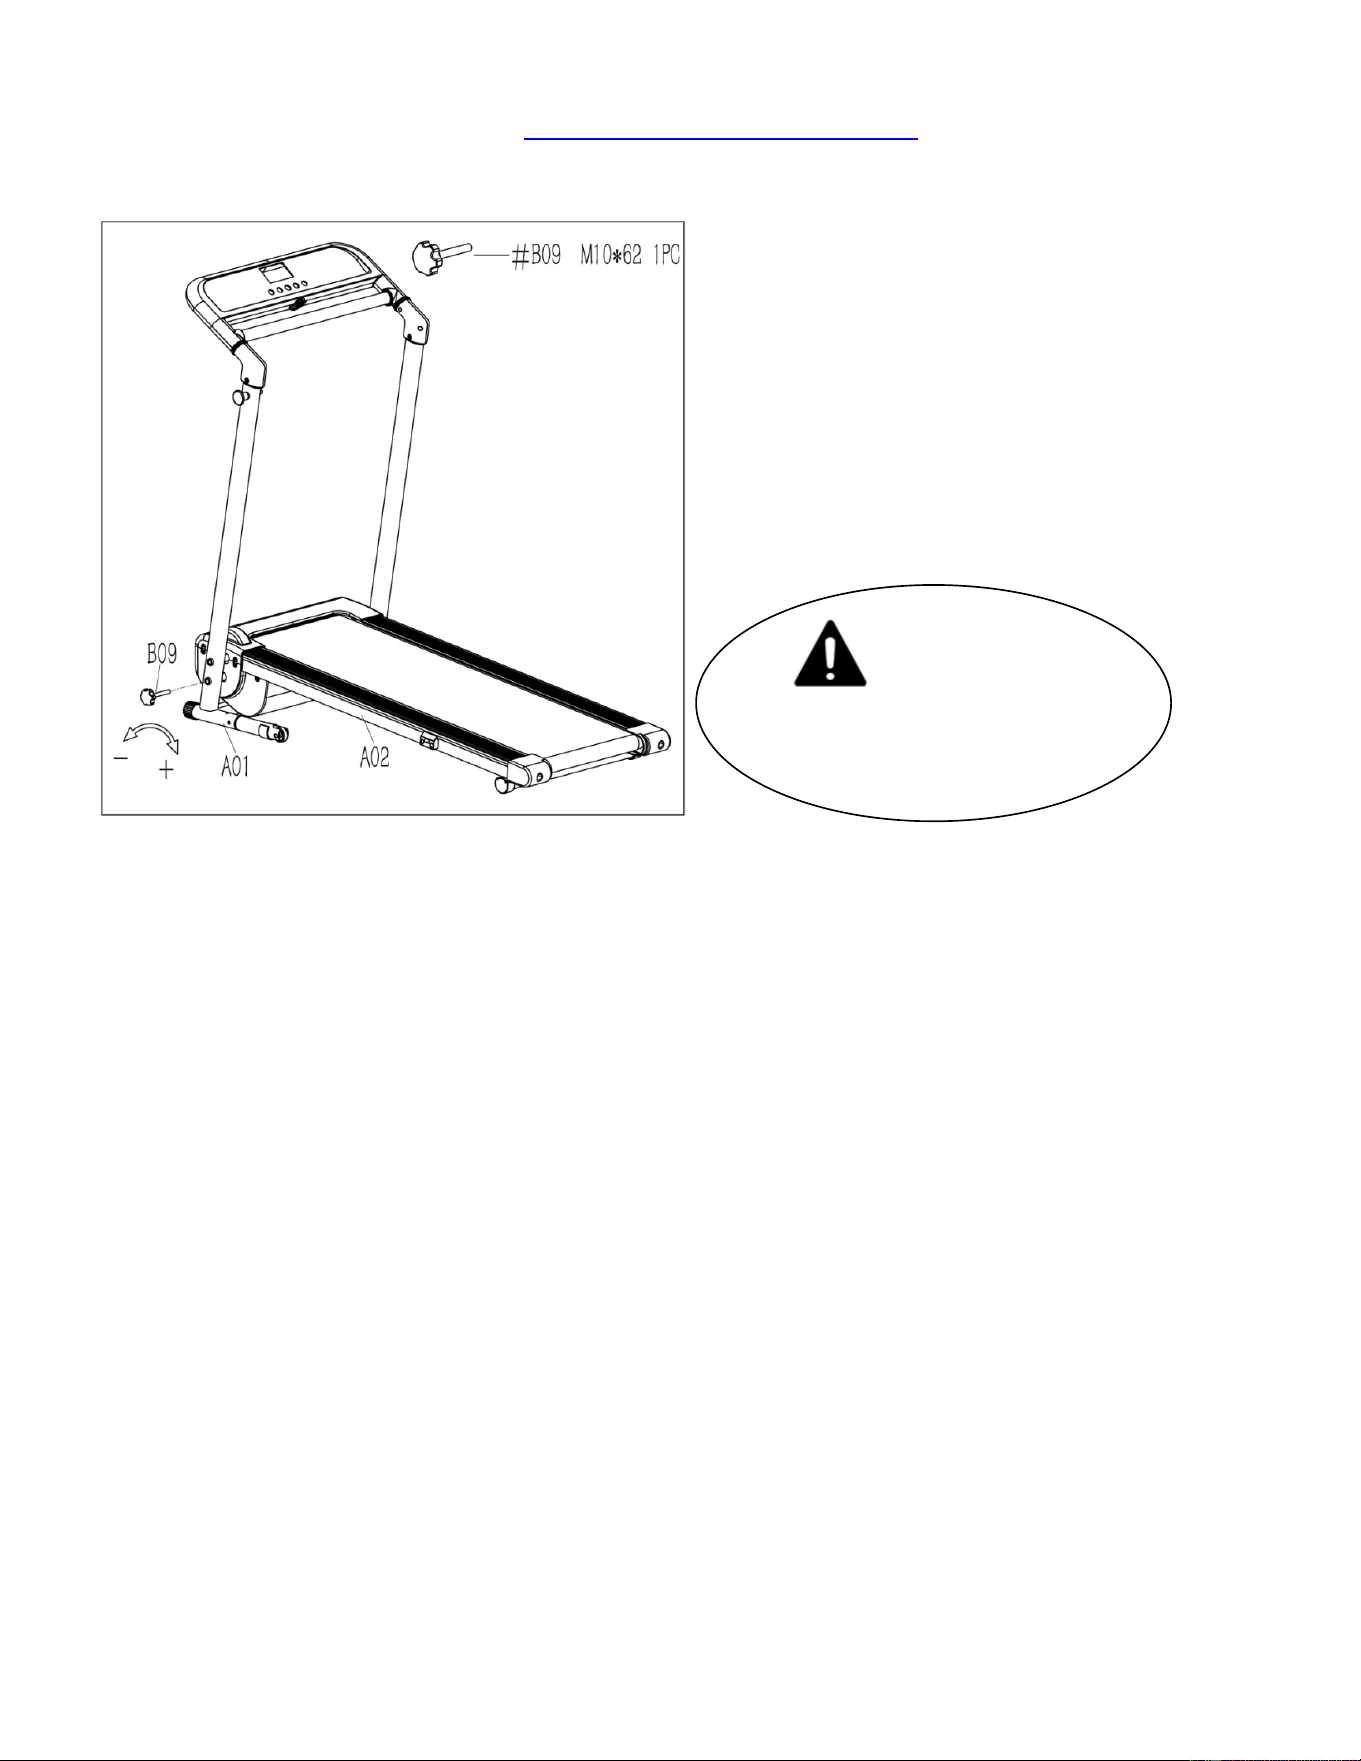
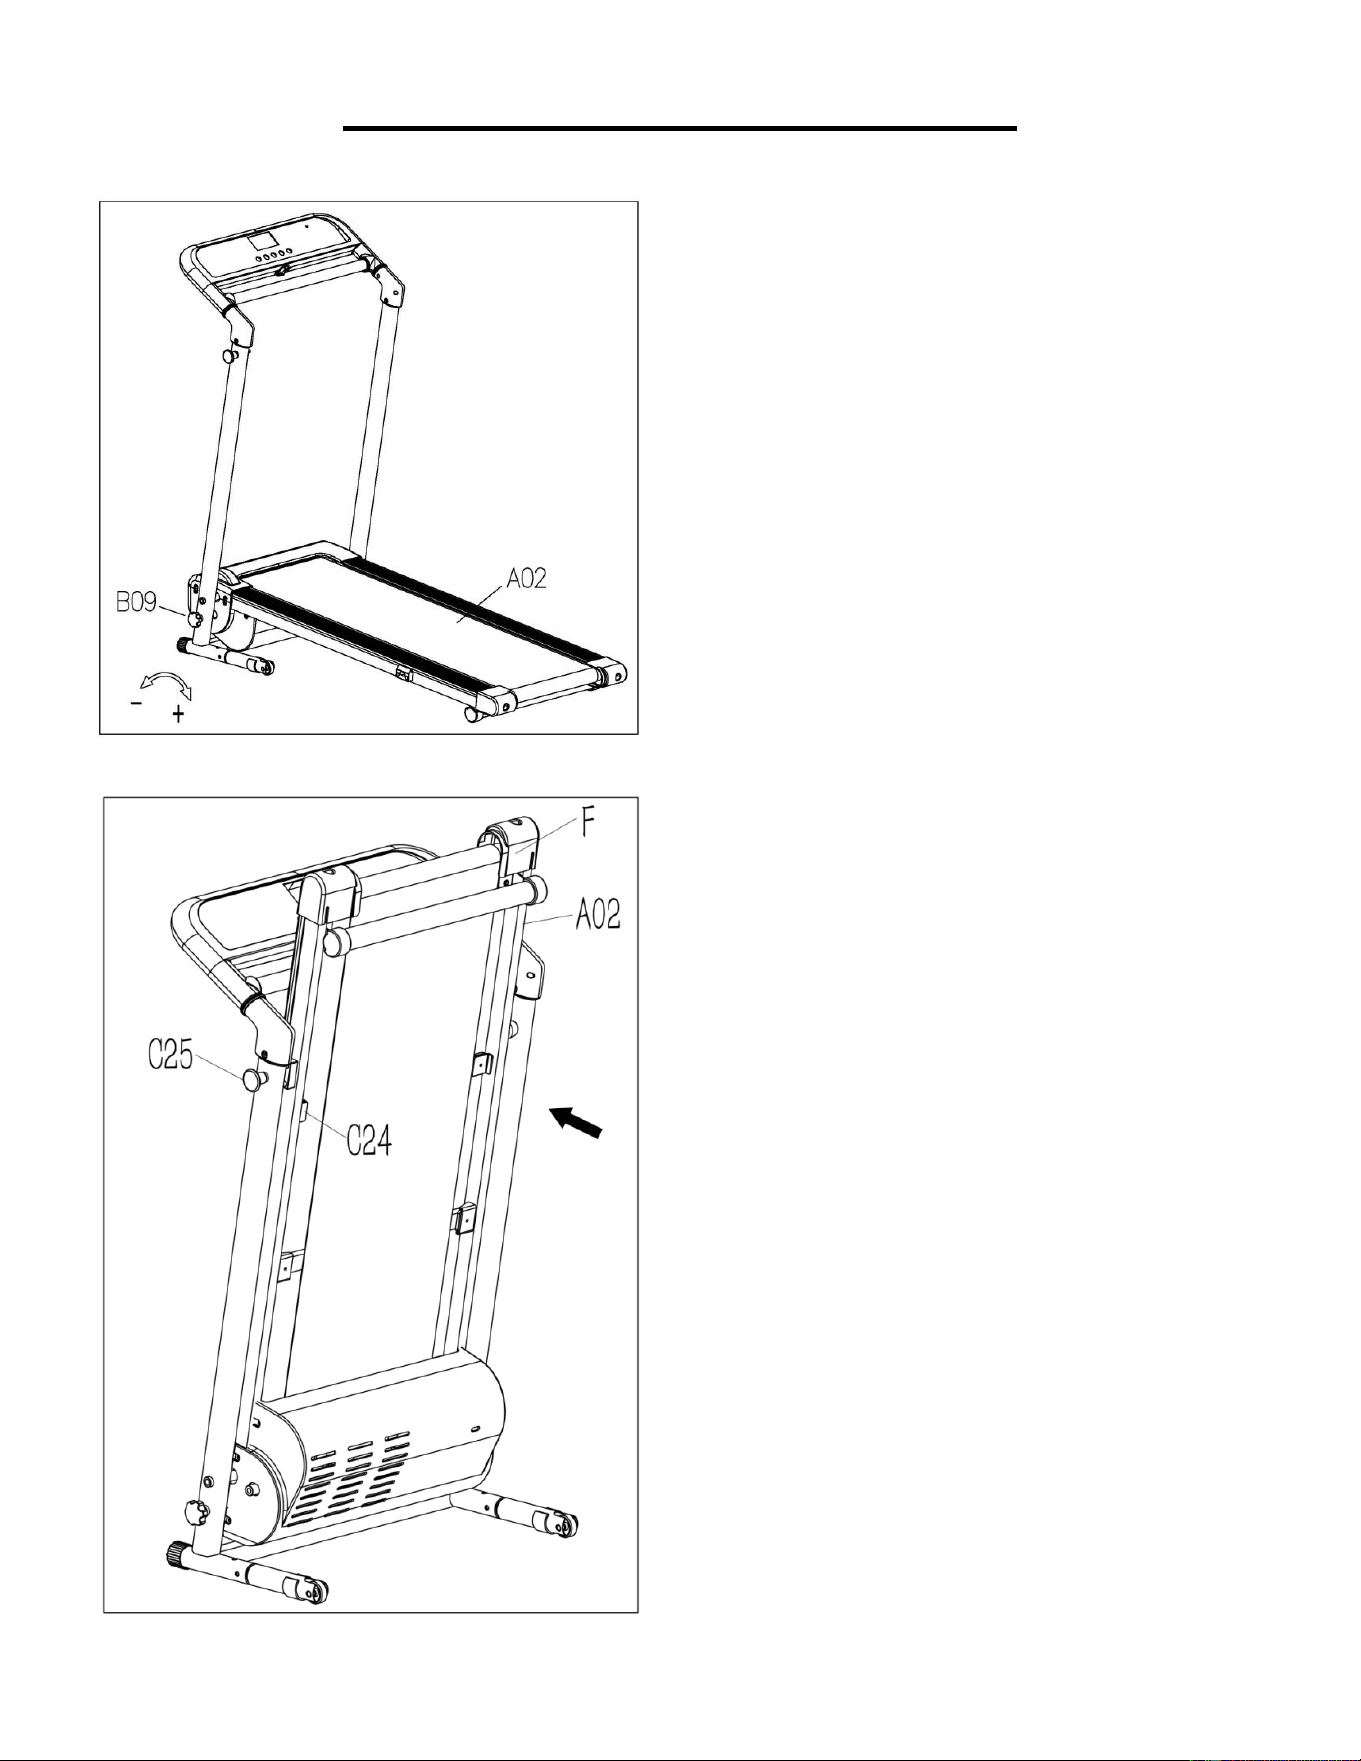
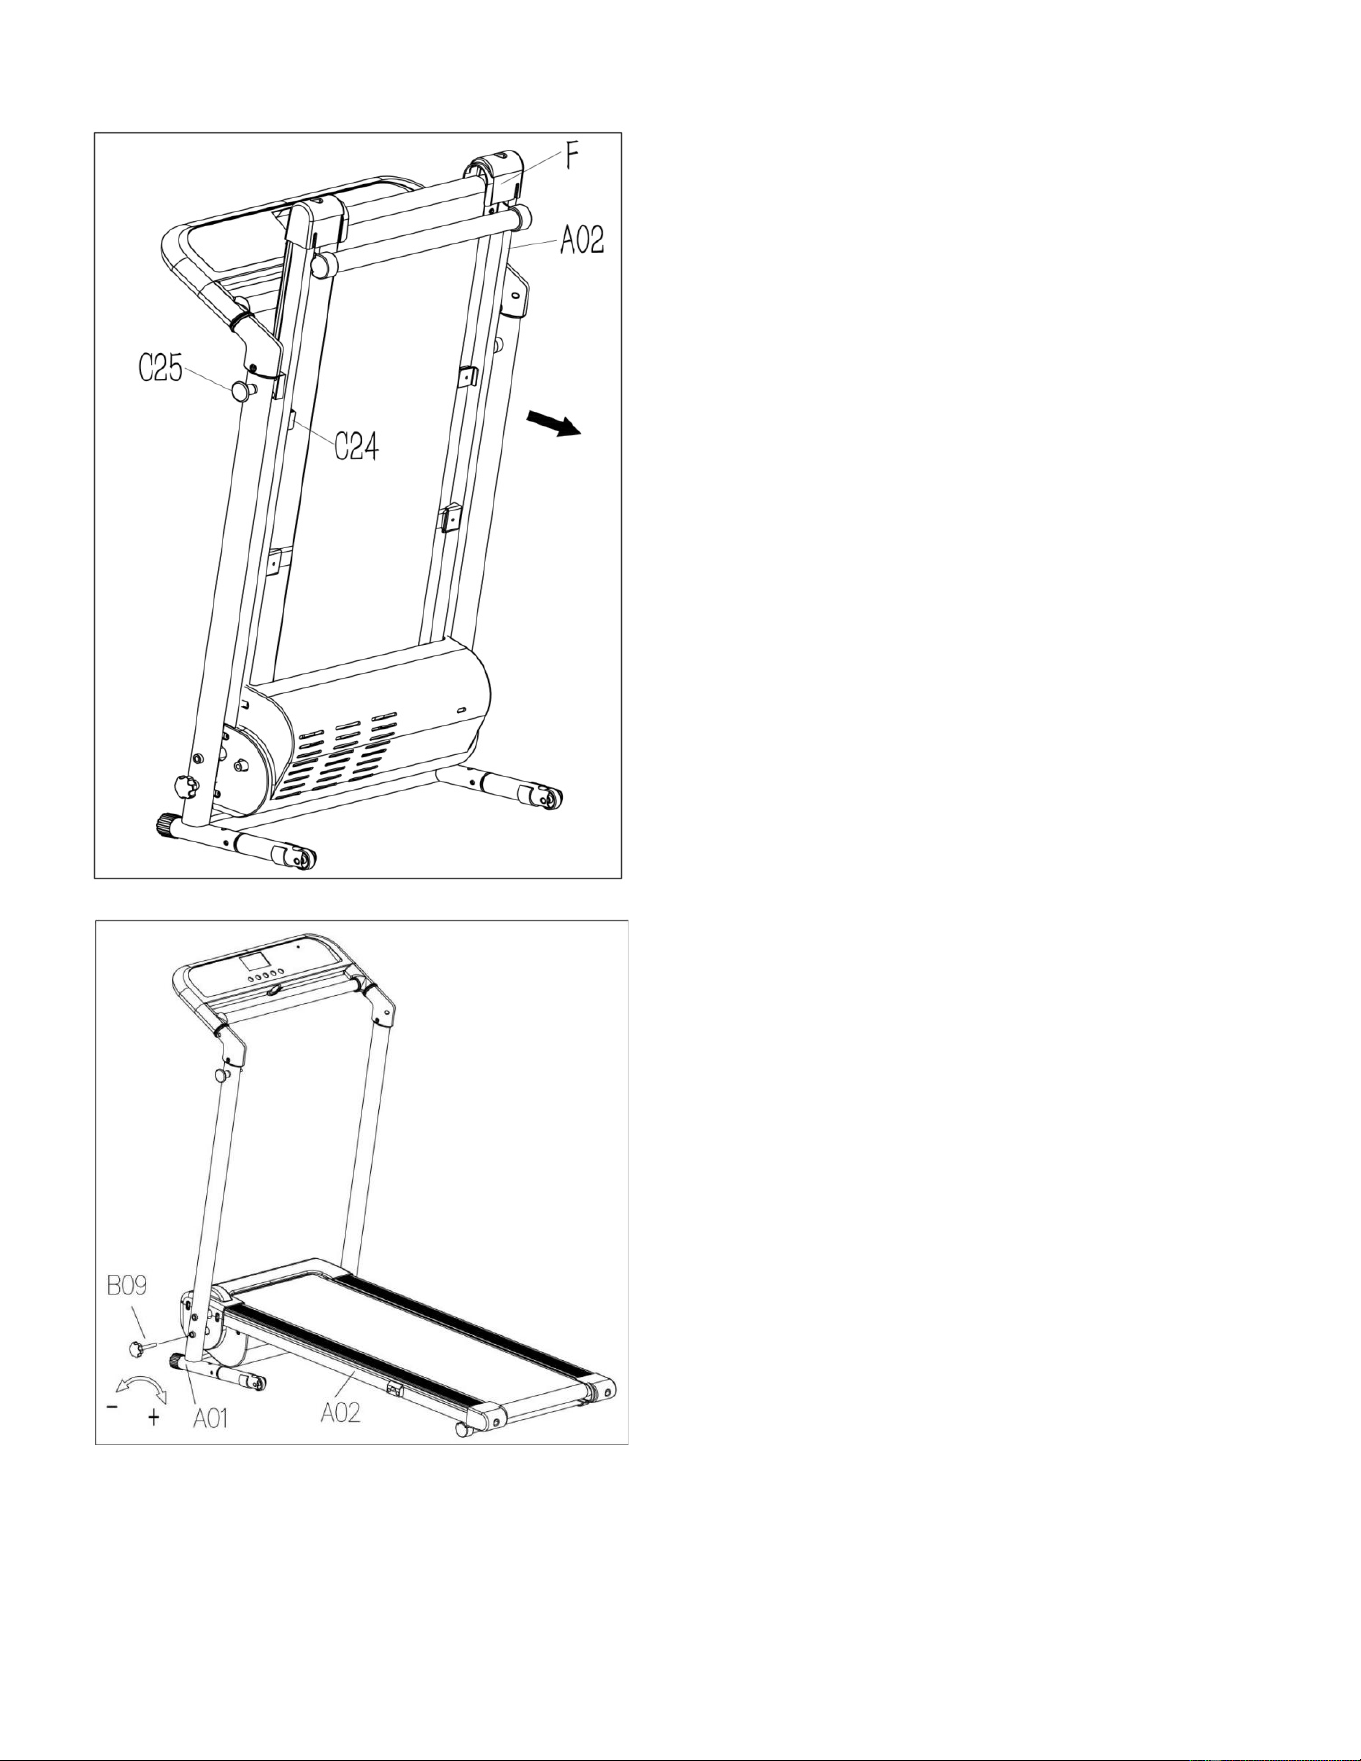
FOLDING INSTRUCTIONS
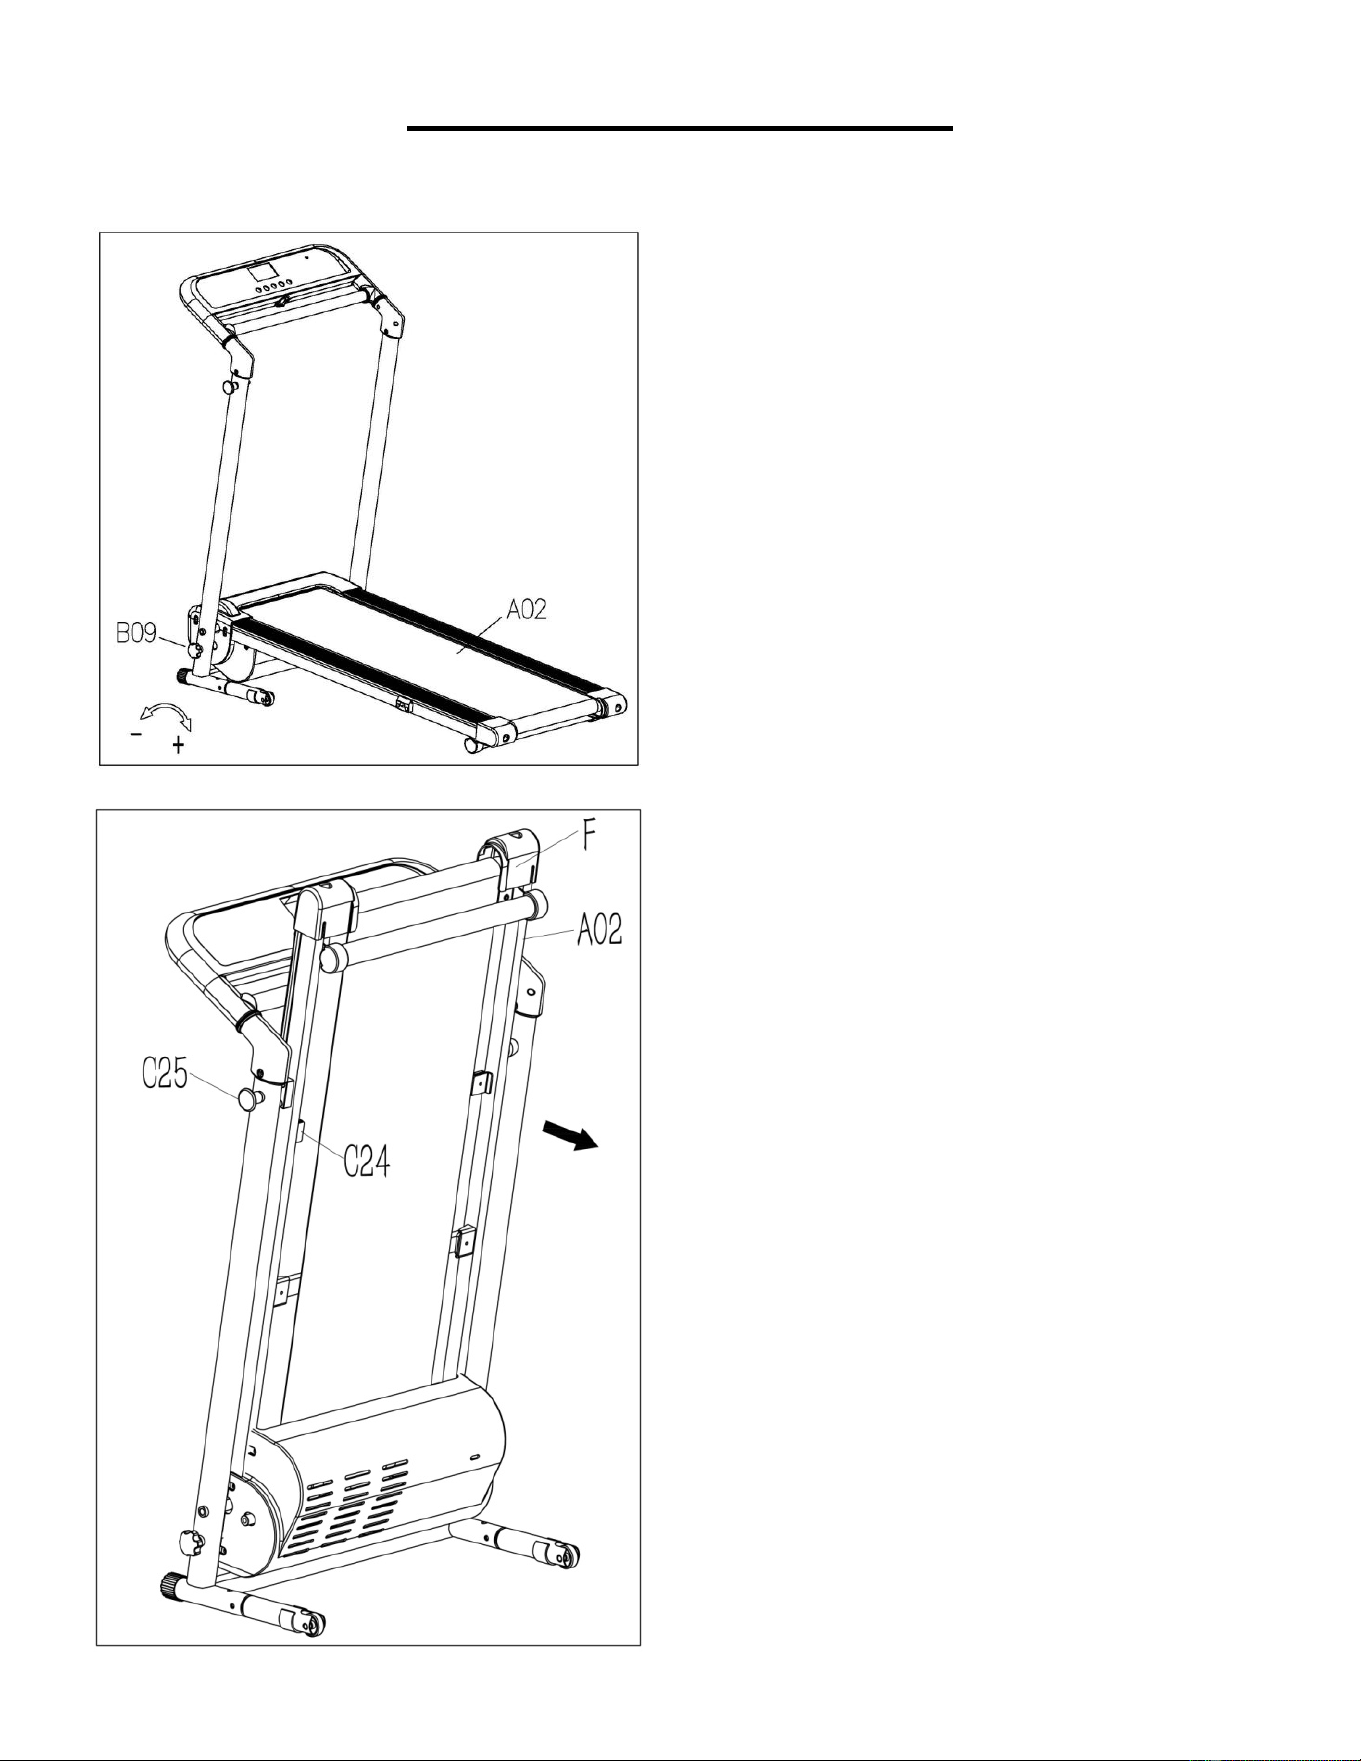
FOLDING:
Loosen the Lock Knob (No.
B09) counter-clockwise and pull
it out. Fold up the Main Frame
(No. A02).
NOTE:
Remember where you
keep the Lock Knob (No. B09)
after you pull it out. You will need
it when you unfold the treadmill.
Pull out the Locking Pin (No.
C25) with one hand, then lift up
the Main Frame (No. A02) at
position “F” with the other hand
until the Locking Pin (No. C25)
snaps into the hole of Fixed
Block (No. C24).
15
UNFOLDING:
NOTE: Before lowering the Main
Frame (No. A02), ensure that the
space directly underneath is clear
of any objects.
To avoid any possible injury,
please hold on the Main Frame
(No. A02) at position “F” before
you pull the
Locking Pin (No.
C25). Once the Main Frame (No.
A02) is released, continue to hold
on at position “F” until it reaches
the floor.
Secure Base Frame (No. A01)
into Main Frame (No. A02) by
inserting Lock Knob (No. B09)
and turning clockwise until tight.

16
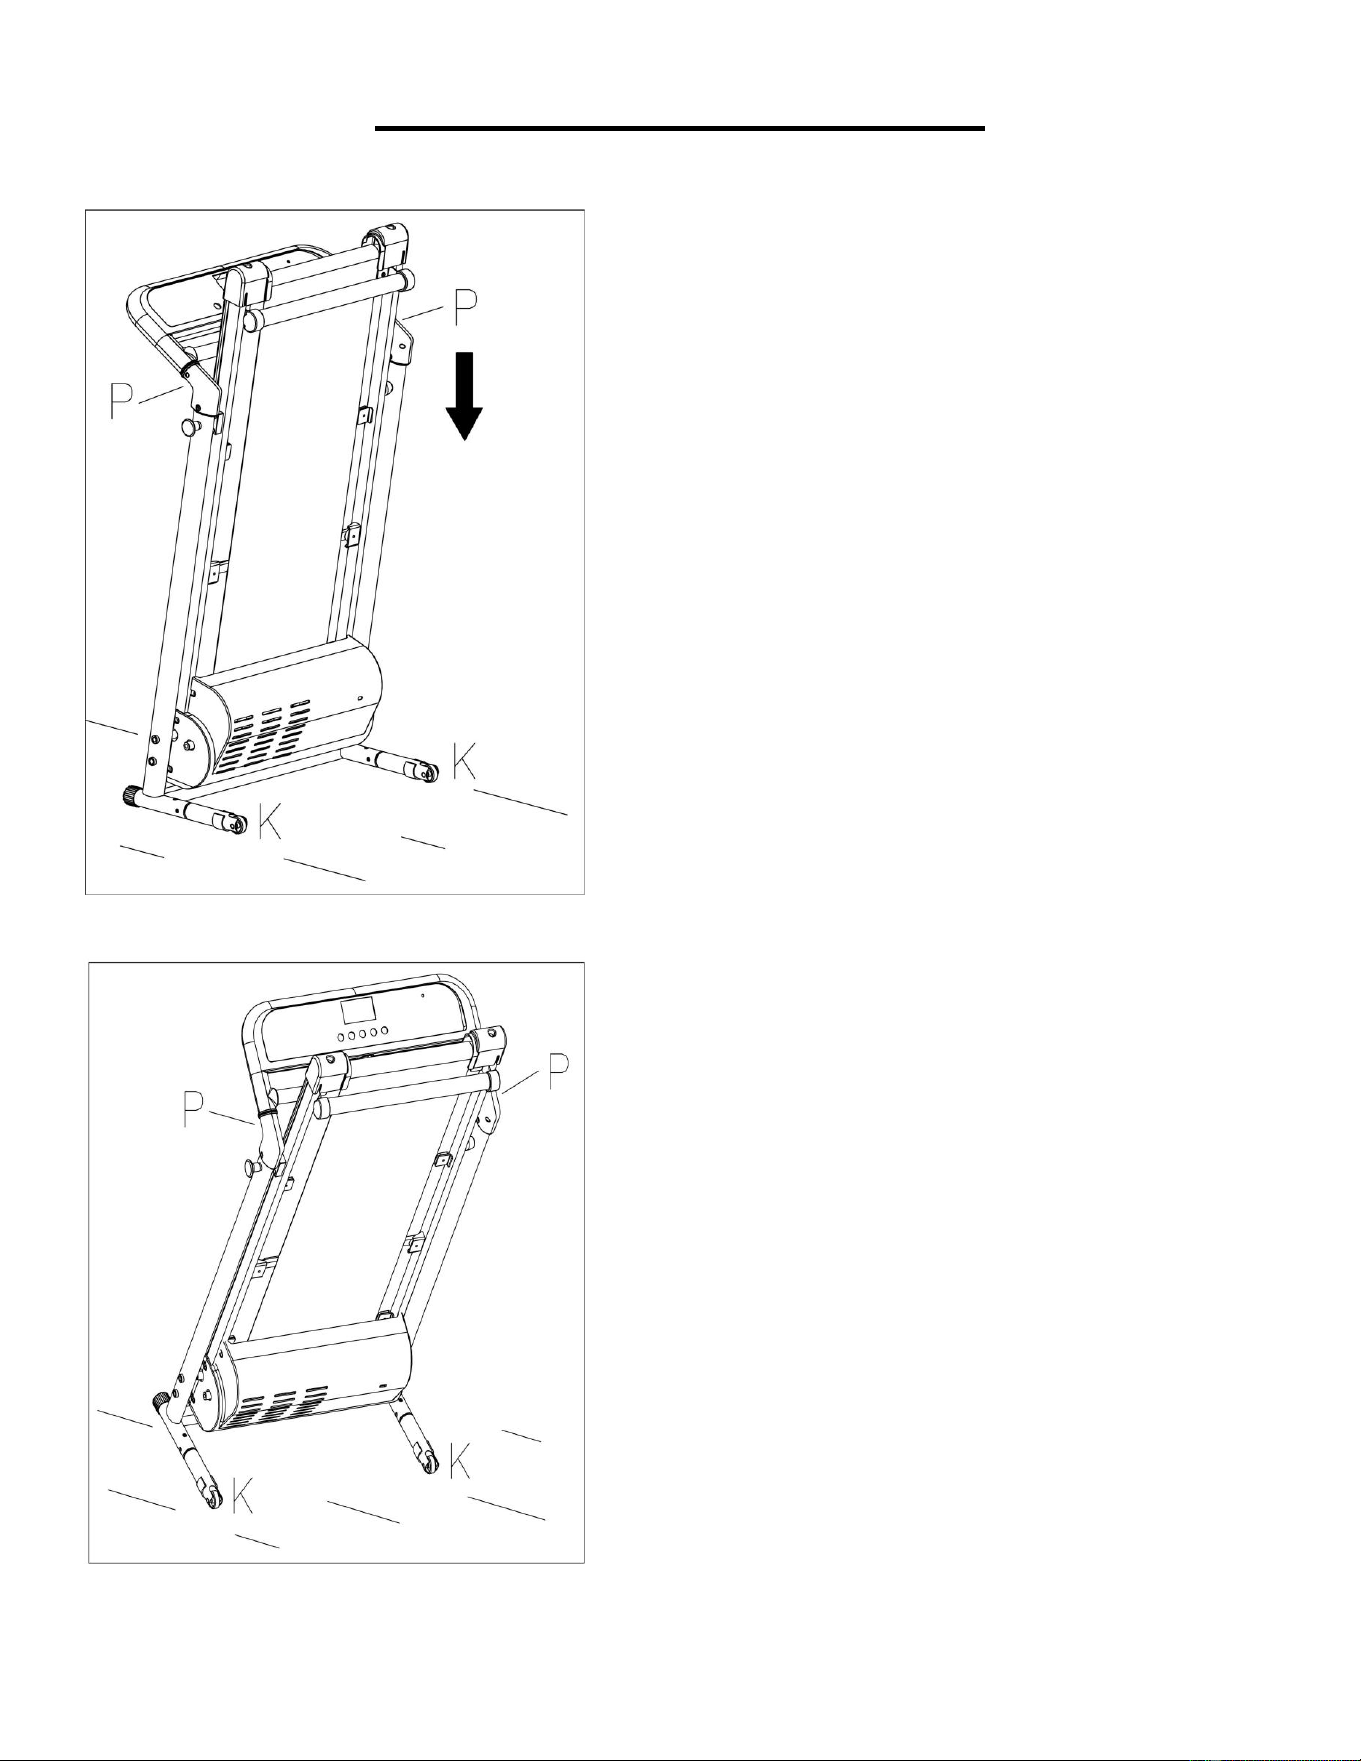
HOW TO MOVE THE TREADMILL
To transport, hold the treadmill
from position “P” and tilt until the
transportation wheels “K” are
able to move on the ground.
Before attempting to move the
treadmill, please make sure that
it has been properly folded.
Unplug the power wire.
To tilt, start by placing one hand
at position “P”
to support the
top end of the treadmill. Next,
place one foot at position “K” to
hold the bottom end of the
treadmill steady. With your foot
at “K”, slowly tilt the top of the
treadmill downward towards the
ground. Once the main frame
“P”
reaches a low enough
point, the transportation wheels
of the treadmill touch the
ground.

17
HOW TO USE SAFETY KEY
Secure Base Frame (No. A01) into Main Frame (No. A02) by inserting Lock Knob (No.
B09) and turning clockwise until tight.
Insert the Safety Key (No. C27) into the magnetic area of the Console (No. D01) and
clip to your clothes.
Note: In an emergency, pull out the Safety Key (No. C27), and the treadmill will stop.
18
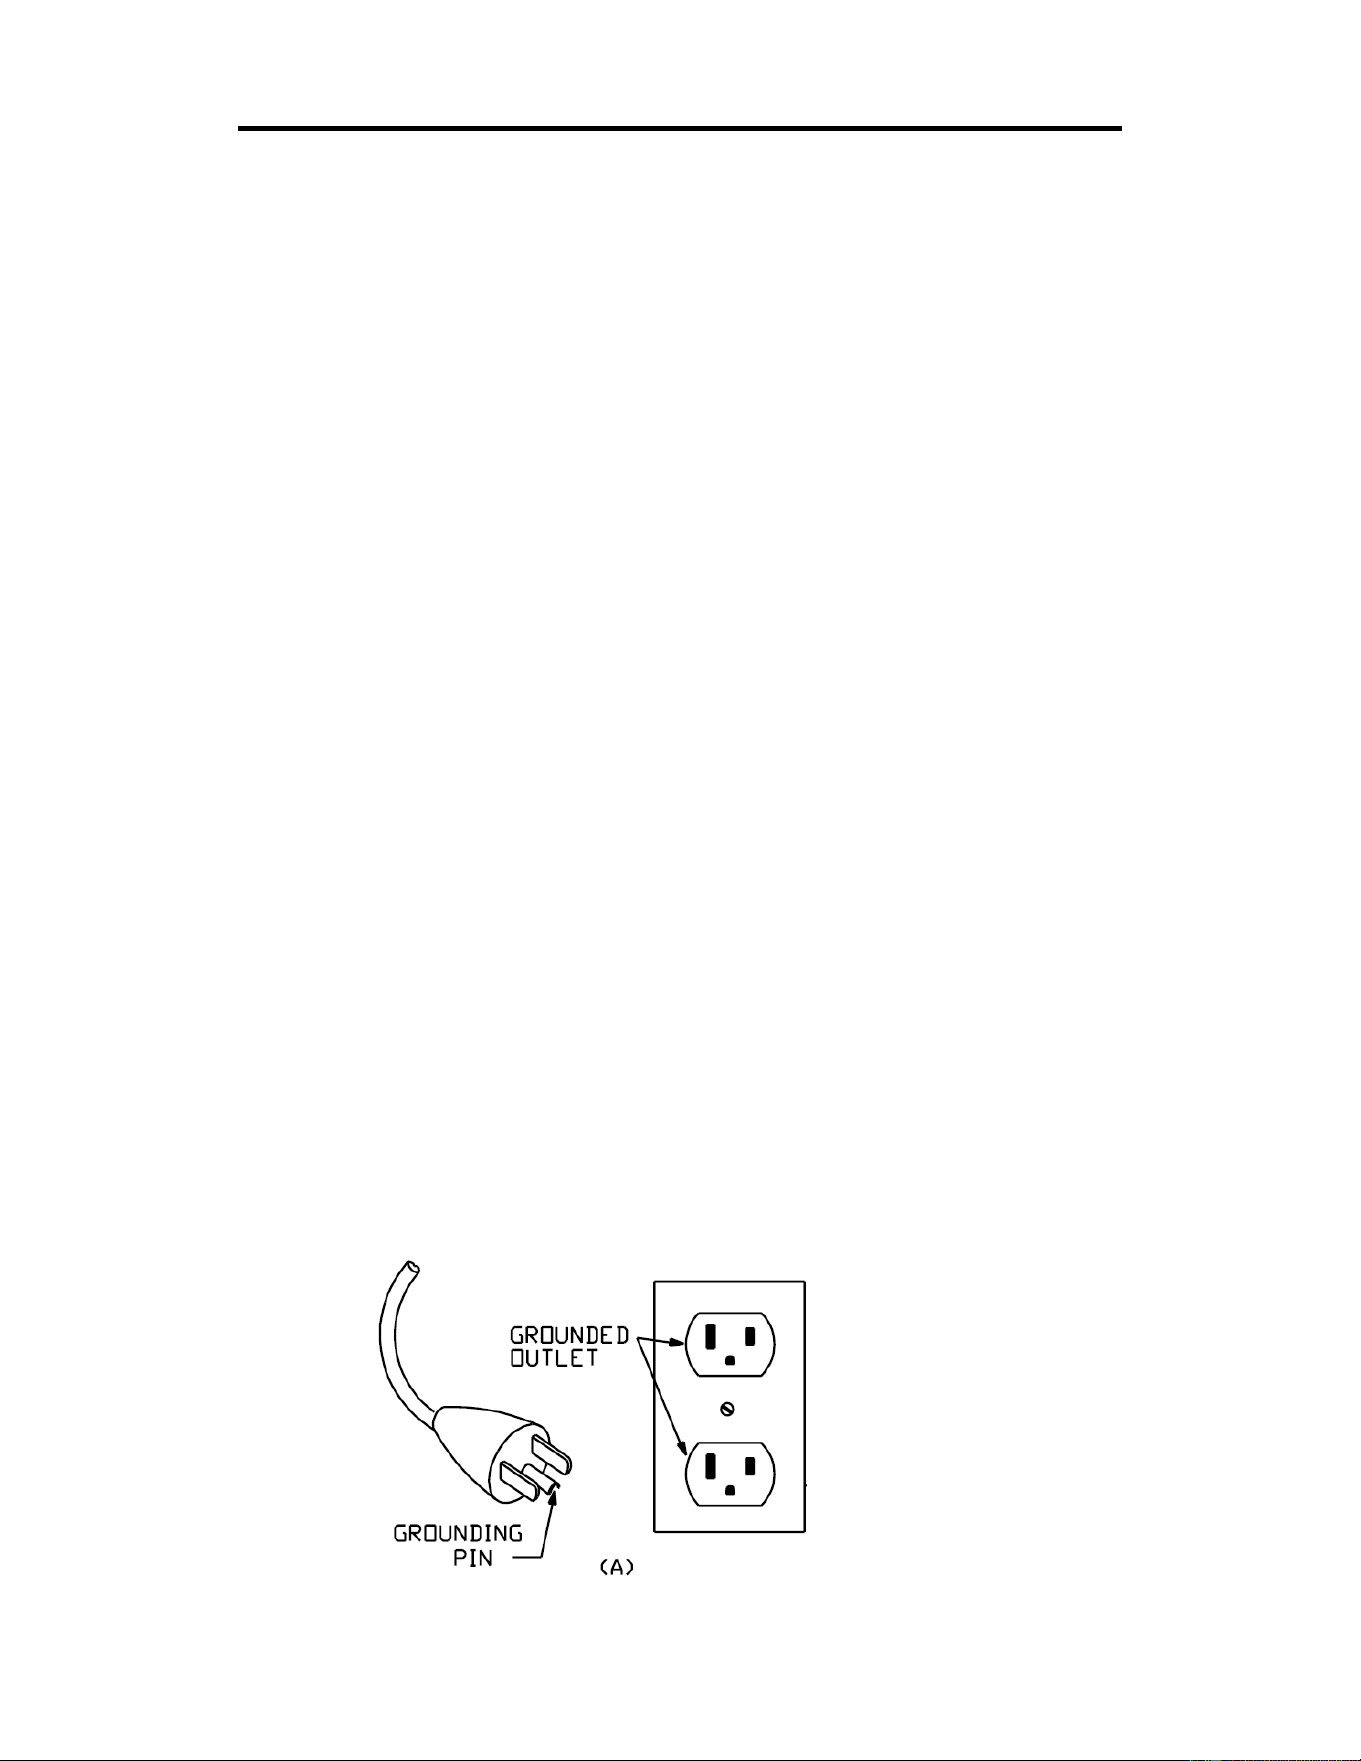
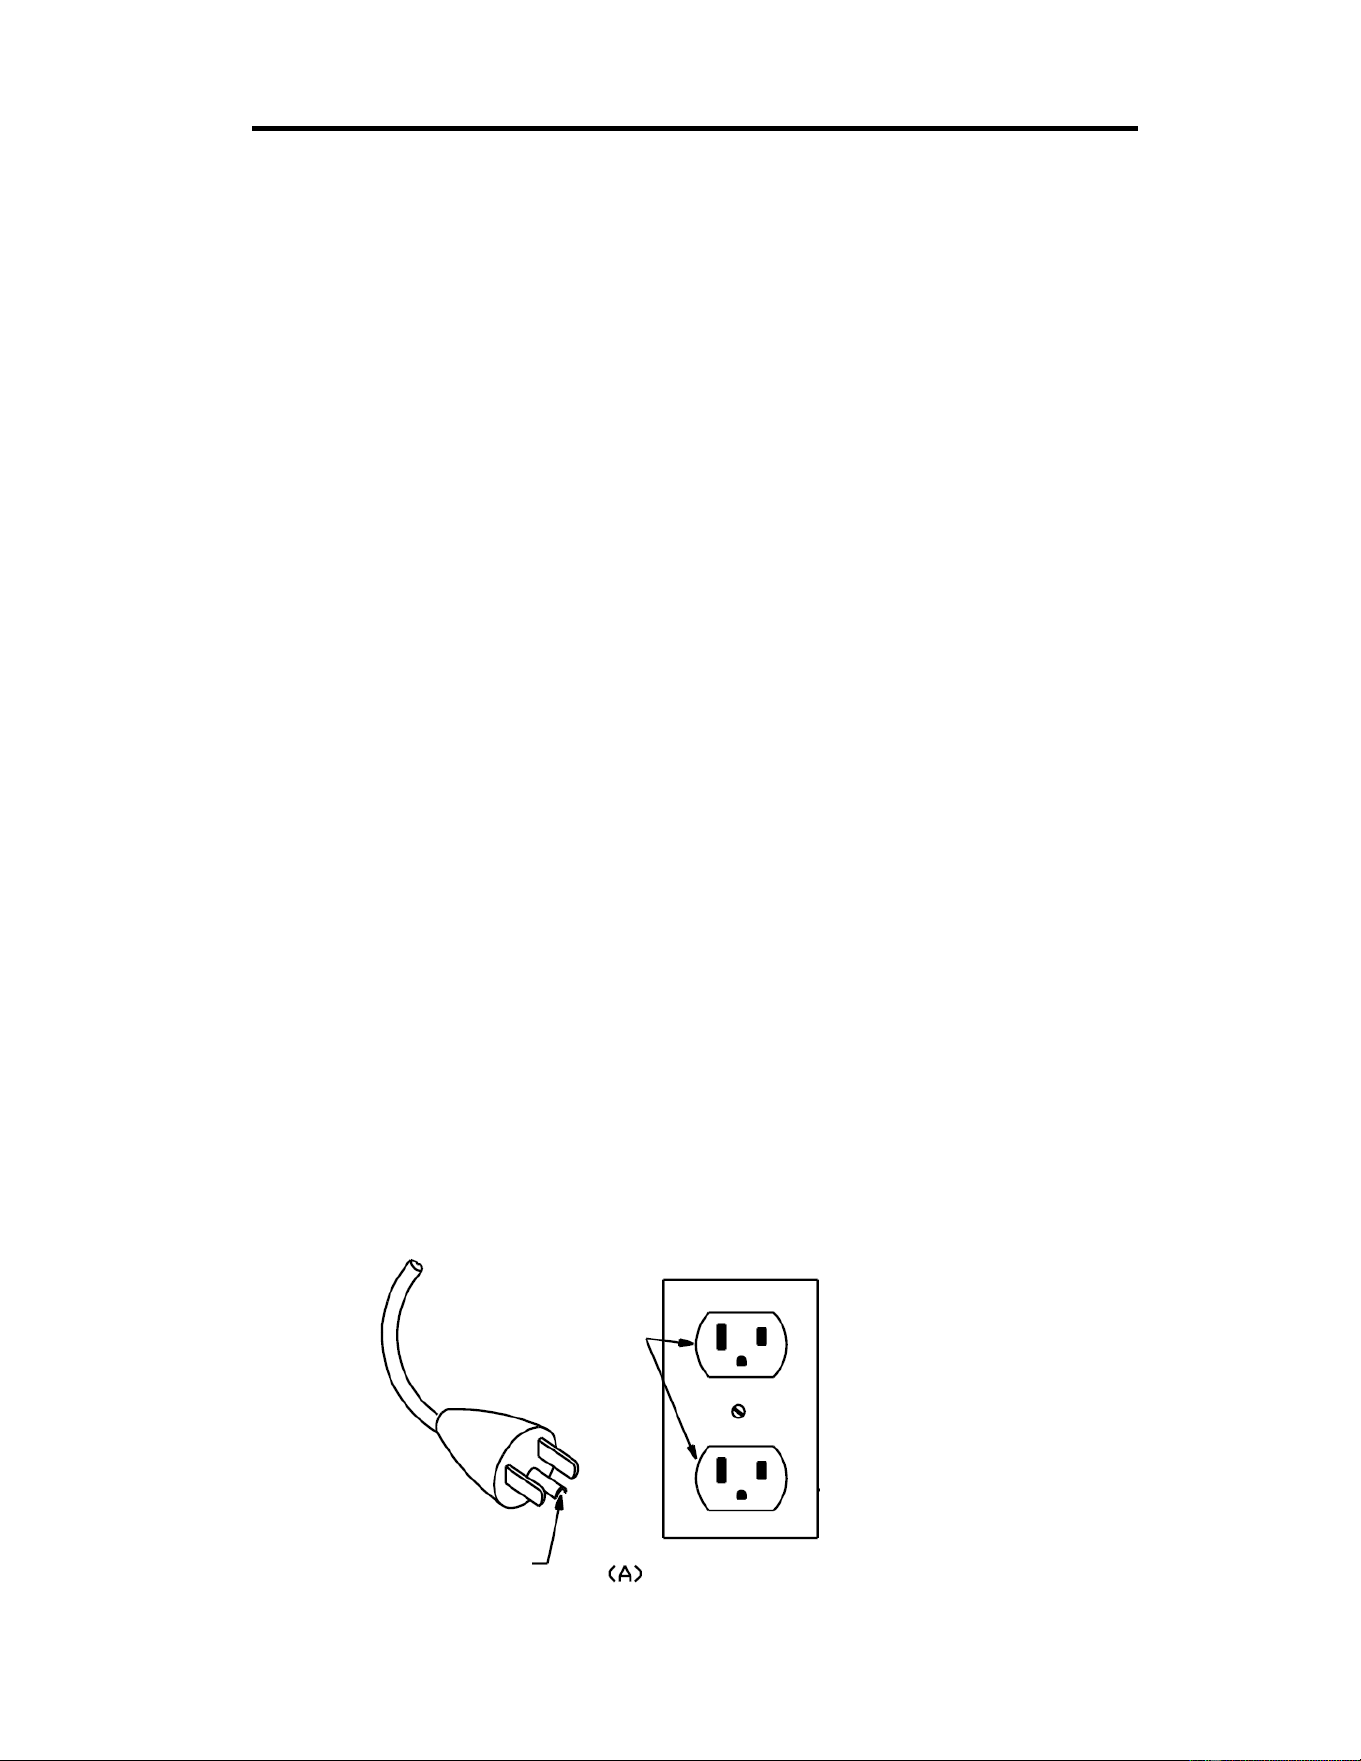
IMPORTANT ELECTRICAL INFORMATION
WARNING: This treadmill requires a power source of 8 amps (100-120 V) in order to properly
operate. For your safety, as well as the safety of others, verify that the power source is correct before
powering the equipment. Any power source above or below this level could cause significant damage
to the equipment and/or user.
GROUNDING METHODS:
This product must be grounded. Should the treadmill malfunction or breakdown, grounding provides a
path of least resistance for electric current to reduce the risk of electric shock. This product is equipped
with a plug that has an equipment-grounding conductor and a grounding plug. The plug must be
plugged into an appropriate outlet that is properly installed and grounded in accordance with all local
codes and ordinances. Ensure that the product is connected to an outlet with the same configuration
as the plug. Do not use an adaptor for this product.
This product is for use on a nominal 100-120V circuit and has a grounding plug that looks like the plug
illustrated in sketch A.
DANGER:
Improper connection of the equipment-grounding conductor can result in risk of electric shock. Check
with a qualified electrician or serviceman if you are unsure whether the product has been properly
grounded. Do not modify the plug provided with the product. If it will not fit the outlet, have a proper
outlet installed by a qualified electrician.
WARNING!
1. NEVER use a ground fault circuit interrupt (GFCI) wall outlet with this treadmill. Route the power
cord away from all moving parts of the treadmill including the elevation mechanism and
transportation wheels.
2. NEVER operate the treadmill using a generator or UPS power supply.
3. NEVER remove any cover on this treadmill without first disconnecting power cord.
4. NEVER expose the treadmill to rain or moisture. This treadmill is not designed for outdoor use or
use in any other high humidity environment.
GROUNDING METHOD

19
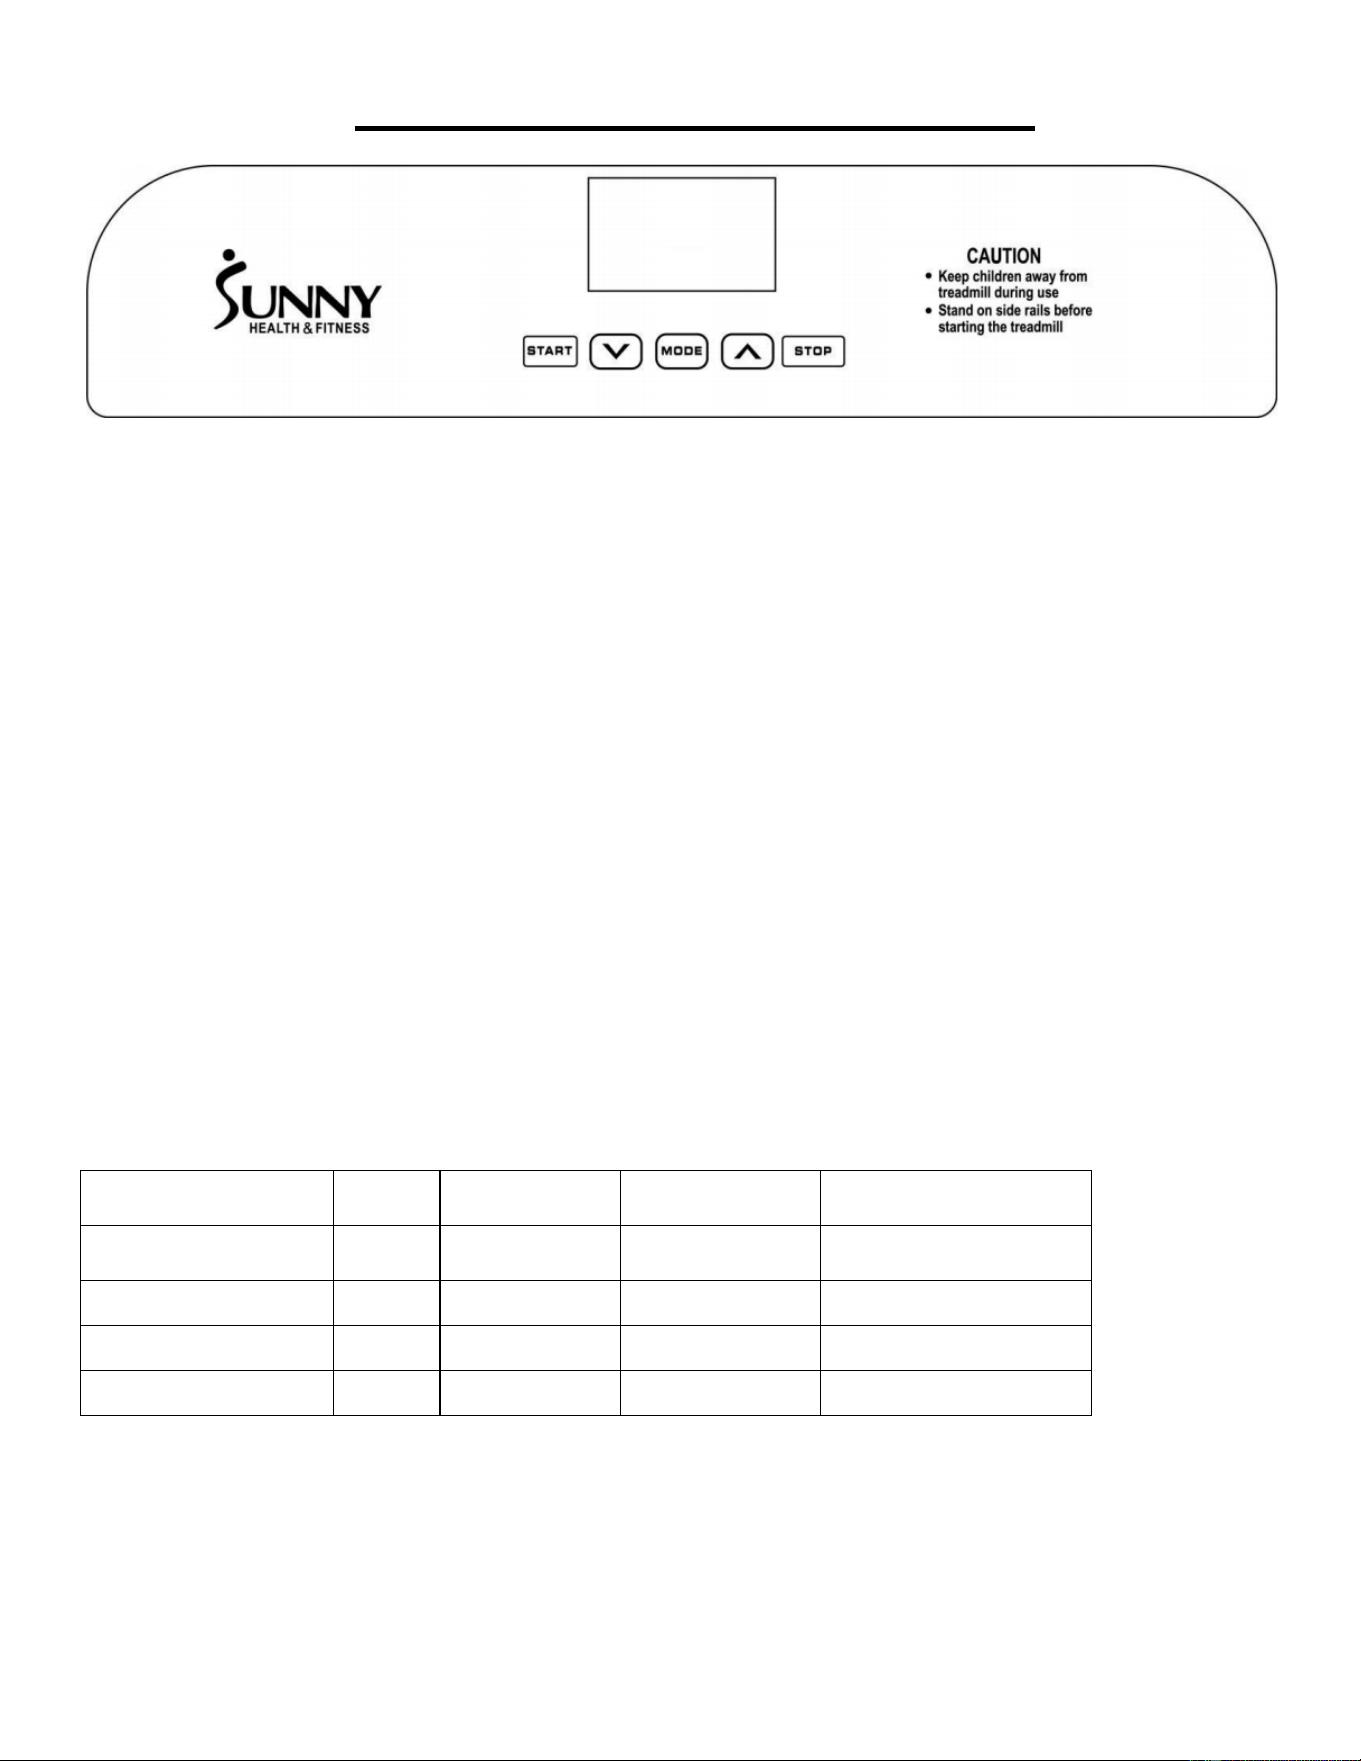
THE DISPLAY CONSOLE
DISPLAY
SPEED: Displays current speed (range 0.5-7.0 MPH). When in setting mode, the window displays H-
1, H-2, H-3.
TIME: Displays the running time. Displays the exercise time from 0:00-99:59 MINS. If the time reaches
99:59, the treadmill will stop smoothly and display “End” and will enter standby mode after 5 seconds.
When in countdown mode, it will count from the setting time to 0:00. When the countdown reaches to
0:00, the treadmill will stop smoothly and show “End” and will enter into standby mode after 5 seconds.
DISTANCE: Displays the distance traveled (range 0.0-99.9 MILES). When the distance reaches 99.9
MILES, it will reset to 0.00 and begin counting again from 0.0. When in countdown mode, it will count
down from the distance you set to 0.00. When it reaches 0.00, the treadmill will stop smoothly and
display “End”, then enter standby mode after 5 seconds.
CALORIES: Displays the user’s calories burned (range 0-999 KCAL). When it reaches 999 KCAL, it
will start again from 0. In countdown mode, it will count from the number of calories you set to 0. When
it reaches 0, the treadmill will stop smoothly and show “End”, and then enter standby mode after 5
seconds.
PROGRAMS
Initial Default Value Set Range Display Range
TIME (MIN:SECOND)
0:00 15:00 5:00 - 99:00 0:00 - 99:59
SPEED (MPH)
0.5 0.5 0.5-7.0 0.5-7.0
DISTANCES (MILES)
0 1.0 0.5-99.9
0.0-99.9
CALORIES (KCAL)
0 50 10-999 0-999

20
FUNCTION KEYS
START: To start the treadmill, insert the magnetic end of the Safety Key (No. C27) into the console
then press the START button. This treadmill requires the Safety Key (No. C27) in order to start at
default setting speed 0.5 MPH.
STOP: This button can PAUSE and STOP the treadmill. When in use, press this button once to PAUSE:
your workout and the current workout data will still be shown. Press STOP again to end your workout
session and all data from this session will be deleted.
MODE: Press this button to select a MODE. Pressing once will enter H1, the TIME countdown mode
starting from 15:00 MINS. H2 is the DISTANCE countdown mode starting from 1.0 MILE and H3 is the
CALORIES countdown mode which starts from 50 KCAL. When setting each mode, you can press the
SPEED +/- buttons to increase or decrease the preset H1, H2, H3 settings then press START to start
the treadmill.
SPEED +/ SPEED –: Press the SPEED +/- buttons to increase or decrease the speed in increments of
0.1 MPH. Pressing and holding either of these buttons for a duration of over 0.5 second will increase
or decrease the speed continually.
LUBRICATION REMINDER
Your treadmill needs lubrication maintenance every 188 miles. When it is time for maintenance, the
treadmill beeps every 10 seconds and displays an “OIL” icon on your LCD display. Please read the
LUBRICATING THE TREADMILL on Page 13 to learn the proper steps to lubricate your treadmill.
Apply the lubricating oil to the middle of the running board on both sides. After application, press and
hold the STOP button for 3 seconds to clear the “OIL” reminder.

21
TREADMILL FUNCTIONS
SAFETY LOCK FUNCTION:
Removing the Safety Key (No. C27) from the Console (No. D01) while the treadmill is running, and
the treadmill will stop immediately. Once the treadmill reaches a full stop, the window display of the
Console (No. D01) will show “- - -“ and the buzzer will beep 3 times. To start the treadmill again, insert
the magnetic end of the Safety Key (No. C27) into the Console (No. D01) and press the START button.
POWER SAVE FUNCTION:
When the treadmill has been inactive for 10 minutes, it will enter Power Saving Mode. While the
treadmill is in this mode, the window display of the Console (No. D01) will be turned off. To turn it back
on, press any button.
POWER ON:
Flick the power switch to this symbol to turn on the treadmill.
POWER OFF:
Flick the power switch to this symbol to turn the treadmill off at any time, including while the treadmill is
in use.
SAFETY NOTE:
1. We recommend that you maintain a slow speed at the beginning of a session and hold the handrails
until you become familiar with the treadmill.
2. Insert the magnetic end of the Safety Key (No. C27) into the Console (No. D01) and attach the
safety clip to your clothing before starting your workout. To end your workout, press the STOP button
or remove the Safety Key (No. C27) and the treadmill will stop immediately.

22
EXERCISE INSTRUCTIONS
GETTING STARTED:
Before starting any exercise program, you should consult your physician to determine if you have any
medical or physical conditions that could put your health and safety at risk or prevent you from using
the treadmill properly.
Be aware of your body’s signals. Incorrect or excessive exercise can damage your health. Stop
exercising immediately if you experience any of the following symptoms: pain, tightness in your chest,
irregular heartbeat, shortness of breath, lightheadedness, dizziness, or feelings of nausea.
Get to know your treadmill. Before attempting to use the treadmill, take some time to familiarize yourself
with the controls.
1. Once you get on, stand with your feet on the side rails and stabilize yourself by holding onto the
handrails.
2. Next, attach the clip end of the Safety Key (No. C27) to your clothes and insert the magnetic end of
the Safety Key (No. C27) into the Console (No. D01).
3. Press the START button to start the treadmill.
4. The treadmill will start at the system default setting speed of 0.5 MPH. When you feel comfortable,
slowly increase this speed.
5. When you are finished with your workout, press the STOP button to stop the treadmill or you can
remove the magnetic end of the Safety Key (No. C27) to stop the treadmill.

23
TROUBLESHOOTING
PROBLEM POSSIBLE CAUSE SUGGESTED ACTION
Treadmill will not start.
Not plugged in. Plug power cord into outlet.
Safety Key (No. C27) is
not inserted.
Insert Safety Key (No. C27).
Running belt is not
centered.
Running belt tension is not
correct on the left or right
sides of the running board.
Tighten the left and right
adjusting bolts of the rear
roller.
Console is not working.
Wires from the console and
bottom control board are
not properly connected.
Check wire connections from
the console to the bottom
control board.
Transformer is damaged.
If the transformer is
damaged, contact customer
service.
E01 or E13
: Message
failure.
Wires from the console and
bottom control board are
not properly connected.
Check wire connections from
the console to the bottom
control board. If the wire has
been punctured or damaged,
you will need to replace it. If
the problem is not rectified,
you may need to replace the
bottom control board.
E02: Burst clash
protection.
Incoming voltage is lower
than 50% of the required
voltage.
Check that the incoming
power supply is the correct
voltage.
E03: No speed sensor
signal.
Speed sensor signal
cannot be received by the
control board.
Check that the sensor wire is
properly connected. If
damaged, replace wire.
Check to see if the magnetic
sensor is damaged, replace
if necessary.
E05: Current overload
protection (Self Protecting
System).
The incoming voltage is too
low or too high. The control
board is damaged.
Restart the treadmill. Check
the incoming voltage to
ensure it is correct. Check
the control board, replace if
damaged.
A moving part of the
treadmill is stuck and
therefore the motor is
unable to rotate properly.
Inspect moving parts of the
treadmill to ensure that they
are operating correctly.
Check the motor, listen for
strange noise, and check for
a burning smell. Replace the
motor if necessary.

24
NOTE: If you are unable to resolve an issue using the troubleshooting guide above, please
contact Customer Service at [email protected]
.
E06: Motor Abnormality.
The motor wire
is not
connected, or the motor is
damaged.
Check motor
wires to see if
the motor is connected. If the
wire has been punctured or
damaged, you will need to
replace it. If the problem is
not rectified, you may need to
replace the motor.
E08: Control Board
Abnormality.
The control
board is not
connected.
Check the upper and middle
wires to see if the control
board is connected. If the
wire has been punctured or
damaged, you will need to
replace it. If the problem is
not rectified, you may need to
replace the control board.
E10: Motor Abnormality.
Motor is short-circuited. Replace with a new motor.
A moving part of the
treadmill is stuck and
therefore the motor is
unable to rotate properly.
Inspect moving parts of the
treadmill to ensure that they
are operating correctly and
lubricate treadmill
. Replace
the motor if necessary.
Version 2.8

25
INSTRUCCIONES DE ARMADO
Valoramos su experiencia con los productos de Sunny Health and Fitness. Para obtener ayuda con
las piezas o la solución de problemas, contáctenos en support@sunnyhealthfitness.com o al 1-877-
90SUNNY (877-907-8669).
PASO 1:
NOTA: Recomendamos tener dos personas
para hacer el armado.
Abra la caja de cartón, saque el contenido y
coloque el Estructura Principal (n.° A02)
en un suelo nivelado. Asegúrese de tener un
área de trabajo limpia y con espacio
adecuado.
PASO 2:
NOTA: Sostenga el Estructura Principal
(n.° A02) en la posición "F" con una mano
para evitar que se caiga durante el
montaje.
Conecte el Tubo de Soporte de la Base
Izquierda (n.° A06L) al Estructura
Inferior (n.° A01). Use una Llave Allen
(n.° B04) y una
Llave Inglesa con
Destornillador (n.° B03) para atornillar el
1 Perno (n.° E04), 2 Arandelas (n.° E20)
y la 1 Tuerca (n.° E02) en el Estructura
Inferior (n.° A01).
Luego, atornille el 1 Perno (n.° E05) y la 1
Arandela (n.° E20) en el Estructura
Inferior (n.° A01).
Repita el paso anterior para ensamblar el
Tubo de Soporte de la Base Derecha
(n.° A06R) al Estructura Inferior (n.°
A01).
26
Valoramos su experiencia con los productos de Sunny Health and Fitness. Para obtener ayuda con
las piezas o la solución de problemas, contáctenos en support@sunnyhealthfitness.com o al 1-877-
90SUNNY (877-907-8669).
PASO 3:
NOTA:
Para evitar posibles lesiones,
sostenga la Estructura Principal (n.° A02)
en la posición “F” antes de tirar del Clavija
de Bloqueo (n.° C25) y asegúrese de que el
espacio directamente debajo de él no tenga
ningún objeto. Una vez que se suelta la
Estructura Principal (n.° A02)
, continúe
presionando hasta que llegue al piso.
Tire del Clavija de Bloqueo (n.° C25) y baje
la Estructura Principal (n.° A02) al piso.
NOTA: El Clavija de Bloqueo (n.° C25)
volverá a encajar en la caminadora. No se
desprende de la caminadora.
PASO 4:
Conecte el Cable de Señal Superior (n.° D04)
al Cable de Señal Central (n.° D05).
27
Valoramos su experiencia con los productos de Sunny Health and Fitness. Para obtener ayuda con las
piezas o la solución de problemas, contáctenos en support@sunnyhealthfitness.com o al 1-877-
90SUNNY (877-907-8669).
PASO 5:
Conecte el Soporte de la Consola (n.° A03)
al Estructura Inferior (n.° A01)
con 2
Pernos (n.° E24). Apriete con una Llave
Allen (n.° B04).
PASO 6:
Instale las
Cubiertas del Tubo Vertical
Izquierda y Derecha (n.° C03 y n.° C04) y
las Cubiertas Interiores del Tubo Vertical
Izquierda y Derecha (n.° C05 y n.° C06) al
Estructura Inferior (n.° A01) y el Soporte
de la Consola (n.° A03) con 8 Tornillos (n.°
E13). Apriete utilizando la
Llave Inglesa
con Destornillador (n.° B03).
28
Valoramos su experiencia con los productos de Sunny Health and Fitness. Para obtener ayuda con las
piezas o la solución de problemas, contáctenos en support@sunnyhealthfitness.com o al 1-877-
90SUNNY (877-907-8669).
¡NOTA IMPORTANTE!
Deberá lubricar su caminadora
antes del primer uso. Vea la
página 30.
PASO 7:
Inserte la Perilla de Bloqueo (n.° B09).
Asegure el Estructura Inferior (n.° A01)
al Estructura Principal (n.° A02) girando
la Perilla de Bloqueo (n.° B09) hacia la
derecha hasta que quede apretado.
¡El armado está completo!
29
MANTENIMIENTO Y CUIDADO
La limpieza general ayudará a prolongar la vida útil y el rendimiento de su caminadora. Mantenga la
unidad limpia y mantenida desempolvando los componentes regularmente. Limpie ambos lados de la
Banda para Caminadora (n.° C13) para evitar que se acumule polvo debajo. Mantenga sus zapatos
para correr limpios para que la suciedad de sus zapatos no desgaste la Tabla para Caminadora (n.°
D12) y la Banda para Caminadora (n.° C13). Limpie la superficie de la Banda para Caminadora (n.°
C13) con un paño limpio y húmedo.
Para mantener mejor la caminadora y prolongar su vida útil, se sugiere apagarla durante 10 minutos
cada 2 horas y apagarla completamente cuando no esté en uso.
CENTRANDO LA BANDA PARA CAMINADORA:
Coloque la caminadora en una superficie nivelada y ajústela a 3-5 mph para verificar si la Banda para
Caminadora (n.° C13) se desplaza.
Si la Banda para Caminadora (n.° C13) se
mueve hacia la derecha, gire el perno de
ajuste en el lado derecho ¼ de vuelta a la
derecha
, luego gire el Tornillo de Ajuste
Izquierdo ¼ de vuelta hacia la izquierda. Si la
Banda para Caminadora (
n.° C13) no se
mueve, repita este paso hasta que quede
centrado. Consulte la Figura A.
Si la Banda para Caminadora (n.° C13) se
mueve hacia la derecha, gire los pernos de
ajuste en el lado izquierdo ¼ de vuelta a la
derecha, luego gire el Tornillo de Ajuste
Derecho ¼ de vuelta hacia la izquierda. Si la
Banda para Caminadora (
n.° C13) no se
mueve, repita este paso hasta que quede
centrado. Consulte la Figura B.
Con el tiempo, la Banda para Caminadora
(n.° C13) se aflojará. Para apretar la Banda
para Caminadora (
n.° C13), gire los pernos
de ajuste del lado izquierdo y derecho una
vuelta completa hacia la derecha, verifique la
tensión de la Banda para Caminadora (
n.°
C13). Continúe este proceso hasta que la
Banda para Caminadora (n.° C13) esté en
la tensión correcta. Asegúrese de ajustar
ambos lados por igual para asegurar la
alineación correcta de la correa. Consulte la
Figura C.
C13
C13
C13
30
LUBRICAR LA CAMINADORA
NOTA IMPORTANTE:
Deberá lubricar su caminadora antes del primer uso.
CORREAS DE CORREA Y LUBRICANTE DE CAMINADORA:
Lubricando la Tabla para Caminadora (n.° D12) y la Banda para Caminadora (n.° C13) es esencial
ya que la fricción entre las dos afectas la vida útil y la función de la Caminadora. Se sugiere que el
Tabla para Caminadora (n.° D12) y la Banda para Caminadora (n.° C13) sean inspeccionados
regularmente. Si encuentra algún desgaste en la Tabla para Caminadora (n.° D12), contáctenos en:
support@sunnyhealthfitness.com.
ADVERTENCIA: Siempre desenchufe la caminadora de la toma de corriente eléctrica antes
de limpiar, lubricar o reparar la unidad.
CÓMO LUBRICAR:
1. Levante la Banda para Caminadora (n.° C13) en un lado y aplique lubricante a la Tabla para
Caminadora (n.° D12). Use un trapo para limpiar completamente el lubricante sobre la Tabla para
Caminadora (n.° D12). Repita este proceso para el otro lado.
2. Las partes móviles deben girar libremente y en silencio. Una anomalía en las piezas móviles afectará
la seguridad del equipo. Inspeccione y apriete los pernos regularmente.
3. Para mantener mejor la caminadora y prolongar su vida útil, se sugiere que el mantenimiento se
realice de manera regular.
4. NO AFLOJE NI HAGA AJUSTES A LA BANDA DE CAMINADORA CUANDO SE APLICA LA
LUBRICACIÓN. Si la Banda para Caminadora (n.° C13) transportadora está floja, el usuario podría
resbalarse al correr; y si está demasiado apretada, afectará negativamente el desempeño del motor
y también creará mayor fricción entre el rodillo y las Banda para Caminadora (n.° C13). La tensión
más adecuada para la Banda para Caminadora (n.° C13) se obtiene al jalar 50-75 mm desde el
Tabla para Caminadora (n.° D12).
Se recomienda la siguiente tabla de tiempo:
Uso ligero (menos de 3 horas / semana) cada 6 meses
Uso medio (3-5 horas / semana) cada 3 meses
Uso pesado (más de 5 horas / semana) cada 2 meses
Tabla para
Caminadora
Banda para
Caminadora
31
INSTRUCCIONES DE PLEGADO
PLEGANDO:
Afloje la Perilla de Bloqueo (n.° B09)
girando hacia la izquierda
y sáquela.
Pliegue la Estructura Principal (n.°
A02).
Nota: Recuerde dónde guarda la Perilla
de Bloqueo (n.° B09)
después de
retirarlo. Lo necesitará cuando
despliegue la caminadora.
Saque el Clavija de Bloqueo (n.° C25)
con una mano, luego levante el
Estructura Principal (n.° A02)
en la
posición "F" con la otra mano hasta que
el Clavija de Bloqueo (n.° C25) encaje
en el orificio del Bloque de Fijación (n.°
C24).
32
DESPLIEGUE:
Nota: Antes de bajar la Estructura
Principal (n.° A02), asegúrese de que el
espacio directamente debajo no tenga
ningún objeto.
Para evitar posibles lesiones, sostenga el
Estructura Principal (n.° A02)
en la
posición "F" antes de tirar del Clavija de
Bloqueo (n.° C25)
. Una vez que se
suelta el Estructura Principal (n.° A02),
continúe presionando en la posición "F"
hasta que llegue al piso.
Asegure la Estructura Inferior (n.° A01)
en la Estructura Principal (n.° A02)
insertando la Perilla de Bloqueo (n.° B09)
y girándola hacia la derecha hasta que
esté apretada.
33
COMO MOVER LA MAQUINA
Para transportar, sostenga la caminadora desde la
posición "P" e inclínela hasta que la rueda "K"
pueda moverse en el suelo.
Antes de intentar mover la caminadora,
asegúrese de que haya sido doblada
correctamente. Desenchufe el cable de
alimentación.
Para inclinar, comience colocando una mano en
la posición "P" para sostener el extremo superior
de la caminadora. Luego, coloque un pie en la
posición "K" para sostener el extremo inferior de
la caminadora de manera estable. Con el pie en
"K"
, incline lentamente la parte superior de la
caminadora hacia abajo, hacia el suelo. Una vez
que la Estructura Principal "P" alcanza un punto
suficientemente bajo, las ruedas de la
caminadora tocan el suelo.

34
CÓMO USAR LA LLAVE DE SEGURIDAD
Asegure el Estructura Inferior (n.° A01) en el Estructura Principal (n.° A02)
insertando la Perilla de Bloqueo (n.° B09) y girándola hacia la derecha hasta que esté
apretada.
Inserte la Llave de Seguridad (n.° C27) en el área magnética de la Pantalla de
Consola (n.° D01) y fíjela a su ropa.
Nota: En una emergencia, saque la Llave de Seguridad (n.° C27) y la caminadora se
detendrá.
35
INFORMACIÓN ELÉCTRICA IMPORTANTE
ADVERTENCIA: Esta caminadora requiere una fuente de alimentación de 8 amperios (100-
120 V) para funcionar correctamente. Para su seguridad, así como la seguridad de los demás, verifique
que la fuente de alimentación sea correcta antes de enchufar el equipo. Cualquier fuente de
alimentación por encima o por debajo de este nivel podría causar un daño significativo al equipo o al
usuario.
MÉTODOS CONEXIÓN A TIERRA:
Este producto debe estar conectado a tierra. La conexión a tierra proporciona la menor resistencia
para la corriente eléctrica y reducirá el riesgo de descarga eléctrica. El enchufe debe enchufarse en
un tomacorriente adecuado que esté correctamente instalado y conectado a tierra de acuerdo con
todos los códigos y ordenanzas locales. Asegúrese de que el producto esté conectado a un
tomacorriente que contenga la misma configuración que el enchufe. No utilice un adaptador para este
producto.
Este producto es para uso en un circuito nominal de 100-120 V y tiene un enchufe de conexión a tierra
que se parece al enchufe ilustrado en el esquema A.
PELIGRO:
La conexión incorrecta del conductor de conexión a tierra del equipo puede provocar un riesgo de
descarga eléctrica. Consulte con un electricista certificado si tiene dudas sobre si el producto está
correctamente conectado a tierra. No modifique el enchufe provisto con el producto. Si no encaja en
el tomacorriente, haga que un electricista instale un tomacorriente adecuado.
¡ADVERTENCIA!
1. NUNCA use un tomacorriente de pared con interrupción diferencial por falla a tierra o GFCI por sus
siglas inglés con esta caminadora. Encamina la fuente de alimentación alejado de cualquier parte
móvil de la caminadora, incluido el mecanismo de elevación y el transporte ruedas
2. NUNCA opere la caminadora usando un generador o una fuente de alimentación de UPS.
3. NUNCA retire ninguna cubierta sin desconectar primero la alimentación de CA.
4. NUNCA exponga la caminadora a la lluvia o humedad. Esta caminadora no está diseñada para uso
al aire libre, cerca de piscinas, o en cualquier otro entorno de alta humedad.
Toma de
Tierra
Clavija de
Puesta a Tierra
MÉTODOS CONEXIÓN A TIERRA
36
LA PANTALLA DE LA CONSOLA
PANTALLA
VELOCIDAD (SPEED): Muestra la velocidad actual (rango 0.5-6.5MPH). En el modo de configuración,
la ventana muestra H-1, H-2, H-3.
TIEMPO (TIME): Muestra el tiempo de ejecución. Si el tiempo llega a 99:59, la caminadora se detendrá
suavemente y mostrará FIN (END) e ingresará en el modo de espera después de 5 segundos. Cuando
esté en el modo de cuenta atrás, contará desde el tiempo de configuración hasta 0:00. Cuando baja a
0:00, la caminadora se detendrá suavemente y mostrará FIN (END), y entrará en el modo de espera
después de 5 segundos.
DISTANCIA (DIST): Muestra la distancia recorrida (rango 0.0-99.9 MILLAS). Cuando el reloj llegue a
99.9, se restablecerá a 0.00 y comenzará a contar nuevamente desde 0.0. Cuando se encuentre en el
modo de cuenta atrás, la cuenta regresiva se establecerá en forma descendente a 0.00. Cuando
alcance 0.00, la caminadora se detendrá suavemente y mostrará FIN (END), luego entrará en el modo
de espera después de 5 segundos.
CALORÍAS (CAL): Muestra las calorías quemadas por el usuario (rango 0-999 calorías). Cuando
llegue a 999, comenzará nuevamente desde 0. En el modo de cuenta regresiva, contará desde la
cantidad de calorías que configuró a 0. Cuando llegue a 0, la caminadora se detendrá suavemente y
mostrará FIN (END), y luego ingresará al modo de espera después de 5 segundos.
PROGRAMAS Inicio
Valor
Predeterminada
Rango de
Configuración
Rango de Pantalla
TIEMPO
(MIN:SEGUNDO)
0:00 15:00 5:00 – 99:00 0:00 – 99:59
VELOCIDAD (MPH)
0.5 0.5 0.5 – 7.0 0.5 – 7.0
DISTANCIA (MILLA)
0 1.0 0.5 – 99.9 0.0 – 99.9
CALORÍAS (KCAL)
0 50 10 - 999 0 - 999

37
TECLAS DE FUNCIÓN
INICIO (START): Para iniciar la caminadora, inserte el extremo del imán de la Llave de Seguridad (n.°
C27) en la consola de la computadora y luego presione el botón de INICIO (START). Esta cinta de
correr requiere la Llave de Seguridad (n.° C27) para comenzar. 0.5 MPH es la velocidad de inicio
predeterminada.
PAUSA/DETENER (STOP): Este botón puede PAUSAR y DETENER. Cuando esté en uso, presione
este botón una vez para PAUSAR su entrenamiento y aún se mostrarán los datos del entrenamiento
actual. Presione DETENER (STOP) nuevamente para finalizar su sesión de entrenamiento y todos los
datos de esta sesión serán eliminados.
MODO (MODE): Cuando la caminadora está detenida, presione este botón para seleccionar un MODO
(MODE). Presionando una vez ingresará H1, el modo de cuenta regresiva de TIEMPO empezando
desde las 15:00 MINS. H2 es el modo de cuenta atrás de DISTANCIA a partir de 1.00 MILLAS y H3 es
el modo de cuenta atrás de CALORÍAS que comienza desde 50 KCAL. Al configurar cada modo, puede
presionar +/- para aumentar o disminuir los ajustes preestablecidos de H1, H2, H3 y luego presionar
INICIO (START) para iniciar la cinta de correr. No puede establecer el modo cuando la caminadora se
está moviendo o cuando está en pausa.
BOTONES DE VELOCIDAD +/–: Presione los botones VELOCIDAD +/- para aumentar o disminuir la
velocidad en incrementos de 0.1 MPH. Si presiona y mantiene presionado cualquiera de estos botones
durante más de 0,5 segundos, la velocidad aumentará o disminuirá continuamente.
NOTIFICACIÓN DE LUBRICACION
Su caminadora necesita lubricación cada 300 km (188 millas). La caminadora emite un pitido cada 10
segundos y muestra un icono de ACEITE (OIL) en la pantalla LCD para recordarle cuándo es la hora.
Lea la sección LUBRICAR LA CAMINADORA en la página 30 para conocer los pasos adecuados para
lubricar su caminadora. Aplique el aceite lubricante en el centro de la tabla para caminadora en ambos
lados. Después de la aplicación, presione y mantenga presionado el botón PAUSA/DETENER (STOP)
durante 3 segundos para borrar el recordatorio.

38
FUNCIONES DE LA CAMINADORA
FUNCIÓN DE PARO DE SEGURIDAD:
Quitando la Llave de Seguridad (n.° C27) de la consola de la computadora mientras la caminadora
está funcionando hará que se detenga de inmediato. Una vez que la caminadora se detenga por
completo, la pantalla de la computadora mostrará "- - -" y la máquina para correr emitirá un pitido 3
veces. Para volver a encender la caminadora, inserte el extremo del imán de la Llave de Seguridad
(n.° C27) en la consola de la computadora y presione el botón de INICIO (START).
FUNCIÓN DE AHORRO DE ENERGÍA:
Cuando la caminadora haya estado inactiva durante 10 minutos, entrará en el modo de ahorro de
energía. Mientras la máquina para correr está en este modo, la visualización de la pantalla de la
computadora se apagará. Para volver a encenderlo, pulse cualquier botón.
ENCENDIDO:
Presione el interruptor de encendido hacia este símbolo para encender la caminadora.
APAGADO:
Deslice el interruptor de encendido hacia este símbolo para apagar la caminadora en cualquier
momento. Esto incluye durante el ejercicio.
NOTA DE SEGURIDAD:
Le recomendamos que mantenga una velocidad lenta al comienzo de una sesión y que sostenga los
pasamanos hasta que se haya familiarizado con la caminadora.
Inserte el extremo del imán de la Llave de Seguridad (n.° C27) en la consola de la computadora y fije
el extremo opuesto (que contiene el sujetador de seguridad) a su ropa antes de comenzar su
entrenamiento. Para finalizar su entrenamiento, presione el botón PAUSA/DETENER (STOP) o retire la
Llave de Seguridad (n.° C27) y la caminadora se detendrá de inmediato.

39
INSTRUCCIONES DE EJERCICIO
EMPEZANDO:
Antes de comenzar cualquier programa de ejercicios, debe consultar a su médico para determinar si
tiene alguna condición médica o física que pueda poner en riesgo su salud y seguridad o evitar que
use el equipo adecuadamente. Sé consciente de las señales de tu cuerpo. El ejercicio incorrecto o
excesivo puede dañar su salud. Deje de hacer ejercicio inmediatamente si experimenta alguno de los
siguientes síntomas: dolor, opresión en el pecho, arritmia cardíaca, falta de aliento, mareos o sensación
de náusea.
Conozca su caminadora. Antes de intentar usar la caminadora, tómese un tiempo para pararse al lado
y familiarizarse con los controles.
1. Una vez que te subes, puedes pararte con los pies en los rieles laterales y estabilizarte sujetándote
de los pasamanos.
2. A continuación, coloque el extremo con sujetador de la Llave de Seguridad (n.° C27) en su ropa
e inserte el extremo magnético de la llave en la consola del equipo.
3. Presione el botón INICIO (START) para iniciar la caminadora.
4. La caminadora comenzará a la velocidad de configuración predeterminada del sistema de 0.5 MPH.
Cuando te sientas cómodo, puedes aumentar esta velocidad lentamente.
5. Cuando haya terminado con su ejercicio, presione el botón PAUSA/DETENER (STOP) para detener
la caminadora o puede quitar el extremo magnético de Llave de Seguridad (n.° C27) para detener
la caminadora.

40
SOLUCIÓN DE PROBLEMAS
PROBLEMA POSIBLE CAUSA ACCIÓN SUGERIDO
La caminadora no
comienza.
No enchufado. Enchufe el cable en el tomacorriente.
Llave de Seguridad ( n.° C27) no
insertada.
Inserte la Llave de Seguridad ( n.° C27) .
Banda para
Caminadora no está
centrada.
La tensión de la Banda para
Caminadora no está ajustado en
los lados izquierdo o derecho de
la Tabla para Caminadora.
Apriete los pernos de ajuste en el lado
izquierdo y derecho del rodillo trasero
(consulte la página 29).
Computadora no
funciona.
Cables de la computadoray la
placa
de control inferior no está
correctamente conectada.
Revisar conexiones de cables de la
computadora al tablero de control.
El transformador está dañado.
Si el transformador está dañado,
póngase en contacto con el servicio
técnico al cliente
E01 o E13:
Error de
mensaje.
Cables de la computadora y la
placa de control inferior no está
correctamente conectada.
Revise que el cable del sensor esté
conectado correctamente. Si está
dañado, reemplace el cable. Verifique si
el placa de control está dañado,
reemplácelo si es necesario.
E02: Protección
contra choques de
electricidad.
El voltaje de entrada es inferior al
50% del voltaje requerida.
Revise que la fuente de alimentación
eléctrica sea el voltaje correcto.
E03: No hay señal del
sensor de velocidad.
La
señal del sensor de velocidad
no puede ser recibida por el panel
de control.
Revise que el cable del sensor esté
conectado correctamente. Si está
dañado, reemplace el cable. Verifique si
el sensor magnético está dañado,
reemplácelo si es necesario.
E05: P
rotección de
sobrecarga de
corriente (sistema de
autoprotección).
El voltaje de entrada es
demasiado bajo o demasiado
alto. El tablero de control está
dañado.
Reinicie la caminadora. Compruebe la
tensión de entrada para asegurarse de
que es correcta. Revis
e el tablero de
control, reemplácela si está dañada.
Una parte móvil de la máquina
para correr está atascada y, por lo
tanto, el motor no puede girar
correctamente.
Inspeccione las partes móviles de la
caminadora para asegurarse de que
estén funcionando correctamente.
Revise el motor, escuche el ruido extraño
y compruebe si hay un olor a quemado.
Reemplace el motor si es necesario.

41
NOTA: Si no puede resolver la problema utilizando la guía de solución de problemas anterior,
comuníquese con el Servicio al cliente a support@sunnyhealthfitness.com
.
E06: Anormalidad del
motor.
El
cable del motor no está
conectado o el motor está
dañado.
Revise los cables del motor para ver si el
motor está conectado. Si el cable ha sido
perforado o dañado, deberá
reemplazarlo. Si el problema no se
soluciona, es posible que deba
reemplazar el motor.
E08: Anormalidad del
tablero de control.
El tablero de control no está
conectada.
Verifique los cables superior y medio para
ver si el tablero de control está
conectado. Si el cable ha sido perforado
o dañado, deberá reemplazarlo. Si el
problema no se soluciona, es posible que
deba reemplazar la placa de control.
E10: Anormalidad del
motor.
El motor está en cortocircuito. Reemplazar con un motor nuevo.
Una parte móvil de la caminadora
está atascada y, por lo tanto, el
motor no puede girar
correctamente.
Inspeccione las partes móviles de la
caminadora para asegurarse de que
estén funcionando correctamente y
lubrique la caminadora. Reemplace el
motor si es necesario.
Versión 2.8