DANGER! Risk of suffocation! Keep any packaging materials away from children -these materials are a potential source of danger, e.g. suffocation.
Inserting batteries (remote control)
Open the battery compartment.
Insert two 1.5 V AAA batteries in accordance with the polarity markings inside the battery compartment.
Close the battery compartment.
Assembly
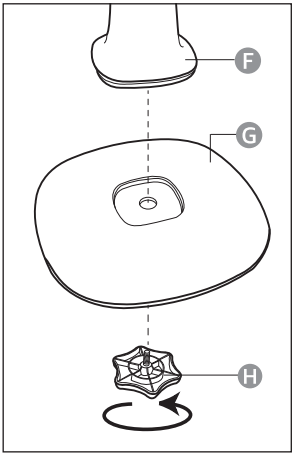
Step 1:
NOTICE: Remove the protection bracket from the rear guard (B), and the protection sleeve from the main body's (E) pin.
Connect the leg (F) with the base (G).
Secure the connection with the knob screw (H).
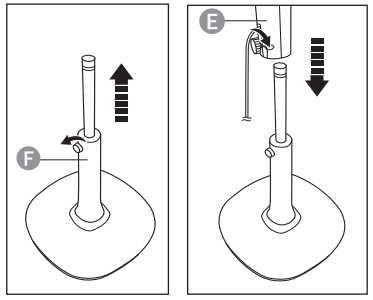
Step 2:
Loosen the knurled screw on the leg (F) by turning it counter-clockwise.
Extend the inner rod to its maximum length, then secure it with the knurled screw.
Connect the main unit (E) with the rod. Fasten both parts with the knurled screw on the main unit.
Step 3:
Unscrew the fixing ring in the counterclockwise direction.
Step 4:
NOTICE: The product features a timer, which lets the user to set an automatic switch off time. You can choose from 0.5 to 7.5 hours.
Connect the rear guard (B) with the main unit (E). Align the rear guard's small round holes with the 3 pins on the main unit's front.
Secure the rear guard (B) with the fixing ring.
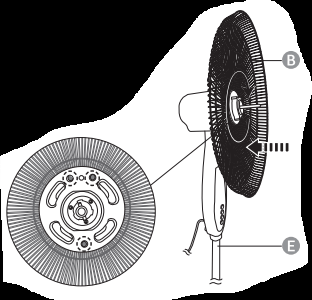
Step 5:
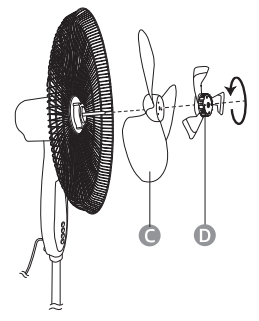
Place the large blade (C) on the shaft. Align the cross pin on the shaft with the groove on the rear side of the large blade (C).
Place the small blade (D) on the shaft. Align the pin on the rear side of the small blade with one of the three holes on the large blade (C).
Hold the large blade (C) with one hand and screw on the small blade (D) in the counter-clockwise direction to secure the blades.
Step 6:
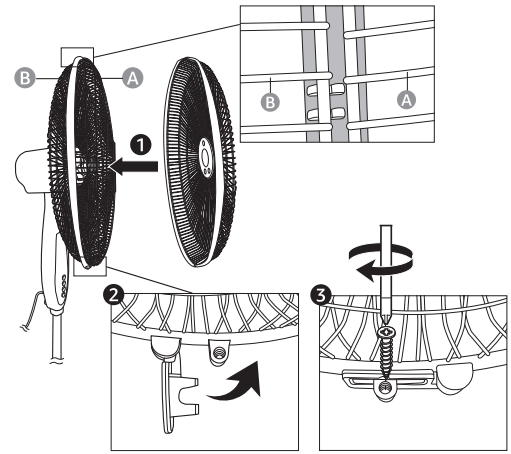
NOTICE: Loosen the screw of the locking ring and open the locking bracket before connecting the front guard (A) with the rear guard (B).
Clip the rear guard (B) into the front indent of the locking ring on the front guard (A).
Close the locking bracket.
Secure the guards with the locking screw.
Operation
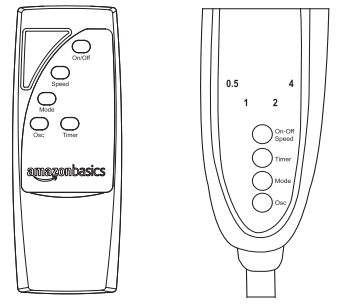
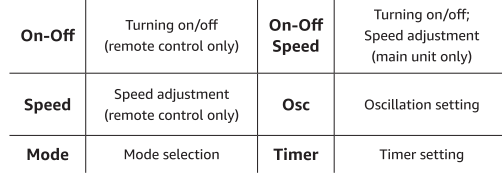
Control Panel/Remote Control
Turning on/off
To turn on the product, press On-Off Speed button on the main unit (E), or press On/Off on the remote control (I). The product starts operation at speed set to 1.
To turn off the product, press On/Off on the remote control again, or press On-Off Speed button repeatedly on the main unit (the product toggles between the 3 speed modes and then turns off).
Timer
NOTICE: The product features a timer, which lets the user to set an automatic switch off time. You can choose from 0.5 to 7.5 hours.
To turn on the timer, press the Timer button. An indicator next to the number 0.5 lights up on the main unit (E).
To set a Longer time, press the Timer button repeatedly. The timer toggles between 0.5 and 7.5 hours (e.g. if the timer is set for 2.5 hours, indicators next to the number 2 and 0.5 light up).
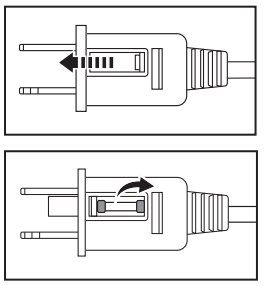
Airflow modes
NOTICE: The product features 3 airflow modes: normal, nature and sleep.
Press Mode button to toggle between the airflow modes. You can choose from following modes:
Speed
NOTICE: The product features 3 speed settings.
NOTICE: When using On-Off Speed button on the main unit (E), the product toggles between 3 speed settings and then turns off (1-2-3-OFF).
To toggle between the speed modes, press On-Off Speed button on the main unit (E), or press the Speed button on the remote control (I).
Oscillation
To turn on the automatic oscillation, press Osc button.
To turn the oscillation off, press Osc button again.
Height/ angle adjustment
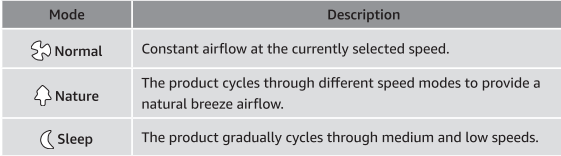
Height adjustment
Turn the knurled screw on the leg counter-clockwise.
Move the main unit (E) up or down.
Secure the main unit by turning the knurled screw clockwise.
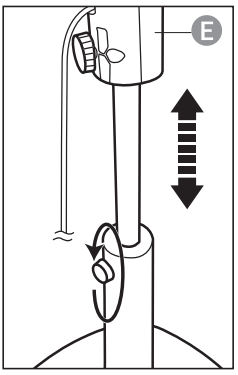
Angle adjustment
The angle of the fan can be adjusted manually. Simply tilt the guard up or down.
Fuse replacement
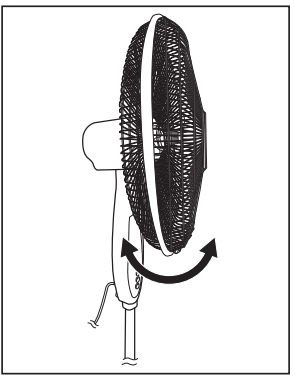
NOTICE: The product requires a 5 A 125 V fuse.
If the product loses power and you suspect that the fuse has blown, unplug the power plug.
Slide the cover towards the prongs of the plug.
Remove the blown fuse and replace it with an identical fuse.
Slide the cover back to close the fuse compartment.
Cleaning and Maintenance
WARNING Risk of electric shock! To prevent electric shock, unplug before cleaning.
WARNING Risk of electric shock! During cleaning do not immerse the electrical parts of the product in water or other liquids. Never hold the product under running water.
Cleaning
To clean, wipe with a soft, slightly moist cloth.
Regularly remove dust and dirt from the guards using a vacuum cleaner.
Dry the product after cleaning.
Never use corrosive detergents, wire brushes, abrasive scourers, metal or sharp utensils to clean the product.
Maintenance
Store in a cool and dry place away from children and pets, ideally in original packaging.
Avoid any vibrations and shocks.
Troubleshooting
Problem
Solution
The product cannot be switched on.
Check if the power plug is connected to the proper power outlet.