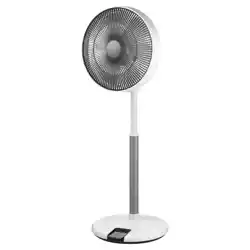

16” Oscillating Pedestal Fan,
Rotary Knob, with 3 Speed
Settings and Adjustable Tilt
OWNER’S MANUAL
FAO1605
Visit our website at www.emersonradio.com
To obtain a manual in Spanish, please download it on our website.
H�ps://www.emersonradio.com/documents/

TO PREVENT FIRE OR SHOCK HAZARD, DO NOT USE THIS PLUG WITH AN EXTENSION CORD,
RECEPTACLE OR OTHER OUTLET UNLESS THE BLADES CAN BE FULLY INSERTED TO PREVENT
BLADE EXPOSURE. TO PREVENT FIRE OR SHOCK HAZARD, DO NOT EXPOSE THIS APPLIANCE
TO RAIN OR MOISTURE.
IMPORTANT SAFETY INSTRUCTIONS
1. Read these instructions.
2. Keep these instructions.
3. Heed all warnings, and read all cautionary marking on the appliance and safety instructions
4. Do not block any ventilation openings, do not cover the air inlet and outlet while in operation. Install in
accordance with the manufacturer's instructions.
5. Do not use the fan near flammables and combustible.
6. Follow all instructions.
7. This product is intended for household use ONLY and not for commercial, indust
rial or outdoor use.
8. Always unplug before cleaning or leaving the appliance unused for a long period of time. Keep your
hands dry when plugging/unplugging.
9. Do not operate any fan with a damaged cord or plug. Discard fan or return to an authorized service
facility for examination and/or repair.
10. Do not defeat the safety purpose of the polarized or grounding-type plug. A polarized plug has two
blades with one wider than the other. A grounding type plug has two blades and a
third grounding
prong. The wide blade or the third prong is provided for your safety. If the provided plug does not fit into
your outlet, consult an electrician for replacement of the obsolete outlet.
11. Only use attachments / accessories specified by the manufacturer.
12. Do not run cord under carpeting. Do not cover cord with throw rugs, runners, or similar coverings. Do
not route cord under furniture or appliances. Arrange cord away from traffic area and where it will not
be tripped over.
13. Do not leave the appliance running unattended.
14. Keep electrical appliances out of reach from children or infirm persons. Do not allow them use the
appliances without supervision.
15. This appliance is not intended for use by persons (including children) with reduced physical, sensory or
mental capabilities, or lack of experience and knowledge, unless they have been given supervision or
instruction concerning use of the appliance by a person responsi
ble that they do not play with the
appliance.
WARNING: To reduce the risk of fire or electric shock do not use this tower fan with any solid-state
speed control device.
16. This appliance employs overload protection (fuse). A blown fuse indicates an overload or short-circuit
situation. If the fuse blows, unplug the product from the outlet. Replace the fuse as per the user
service instructions and check the appliance. If the replacement fuse blows, a short-circuit may be
pres
ent and the appliance should be discarded or returned to an authorized service facility for
examination and/or repair.
17. Check the appliance regularly and refer to TROUBLESHOOTING or contact our customer support if it
shows any of the following signs :
- Power Cord or plug is damaged
- Loud noise, unusual smell or excessive heat.
18.
19.
R
To mitigate the risks of fire, electric shock, or personal injury, it is crucial to avoid using replacement parts
that are not authorized by the manufacturer, including components produced at home via a 3D printing.
efer all servicing to qualified service personnel. Servicing is required when the appliance has been
damaged in any way, such as power
-supply cord or plug is damaged, liquid has been spilled or objects
have fallen into the appliance, the appliance has been exposed to rain or moisture, does not operate
normally, or has been dropped.
1 WARNING
EN
1
FOR HOUSEHOLD USE ONLY
READ AND SAVE THESE INSTRUCTIONS
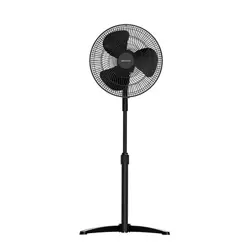
When using the appliance for the first time, remove the wraps and attach the parts by following the steps
below.
1. Insert the Pole Assembly: Position the pole assembly into the cross base connector from the top,
make sure it is securely seated. Use the observation hole to confirm that the pole assembly is fully
engaged within the cross base connectors (refer to Figure 1).
3 ASSEMBLY INSTRUCTIONS
No.
Description
1 Front Guard
2
Fan Blade
3 Rear Guard Nut
4
Rear Guard
5 Motor Shaft
6
Motor Housing
7
Blade Nut
8 Internal Pole
9
Extension Pole
10
Height Adjustment Collar
11
Stand
12 Cross Base Connector
1 2 3
Tighten
Loosen
47
Fasten
5
6
8
9
10
12
11
EN
Crossbase
connector
Stand
Pa!
Height
adjustment
ring
Pole assembly
Crossbase connector
Observation hole
Fig.1 Fig.2 Fig.3
Thumb screw
Fig.6
Screw installation hole
Fig.4 Fig.5
2
2 COMPONENTS DIAGRAM
Specifica�ons
32-Wa�
120V, 60 Hz
300mA
Power
Voltage
Current
Unit Weight
Unit Dimensions
27.56"W x 27.56"D x 48.82"H
(700mm x 700mm x 1240mm)
6.0lbs (2.72kg)
2. Install the Stands: Insert four stands into the cross base connector, to make sure that each stand is
firmly secured and properly aligned within the connector (see Figures 2 and 3).
3. Adjust the Height: Loosen the height adjustment ring on the extension pole to modify the internal
pole to your desired height. Note: If the internal pole is not readily visible, it is stored within the
extension pole and can be extracted by pulling it outward. Once the desired height is achieve
d,
retighten the height adjustment ring to secure it in place (refer to Figures 4 and 5)
4. Attach the Head Unit: To affix the head unit to the internal pole, loosen the thumb screw located on
the underside of the head unit (a separate screwdriver may be required for this step). Position the
head unit onto the internal pole, make sure proper alignment with the groove and mounting hole, and
then tighten the thumb screw to secure it firmly (see Figure 6).
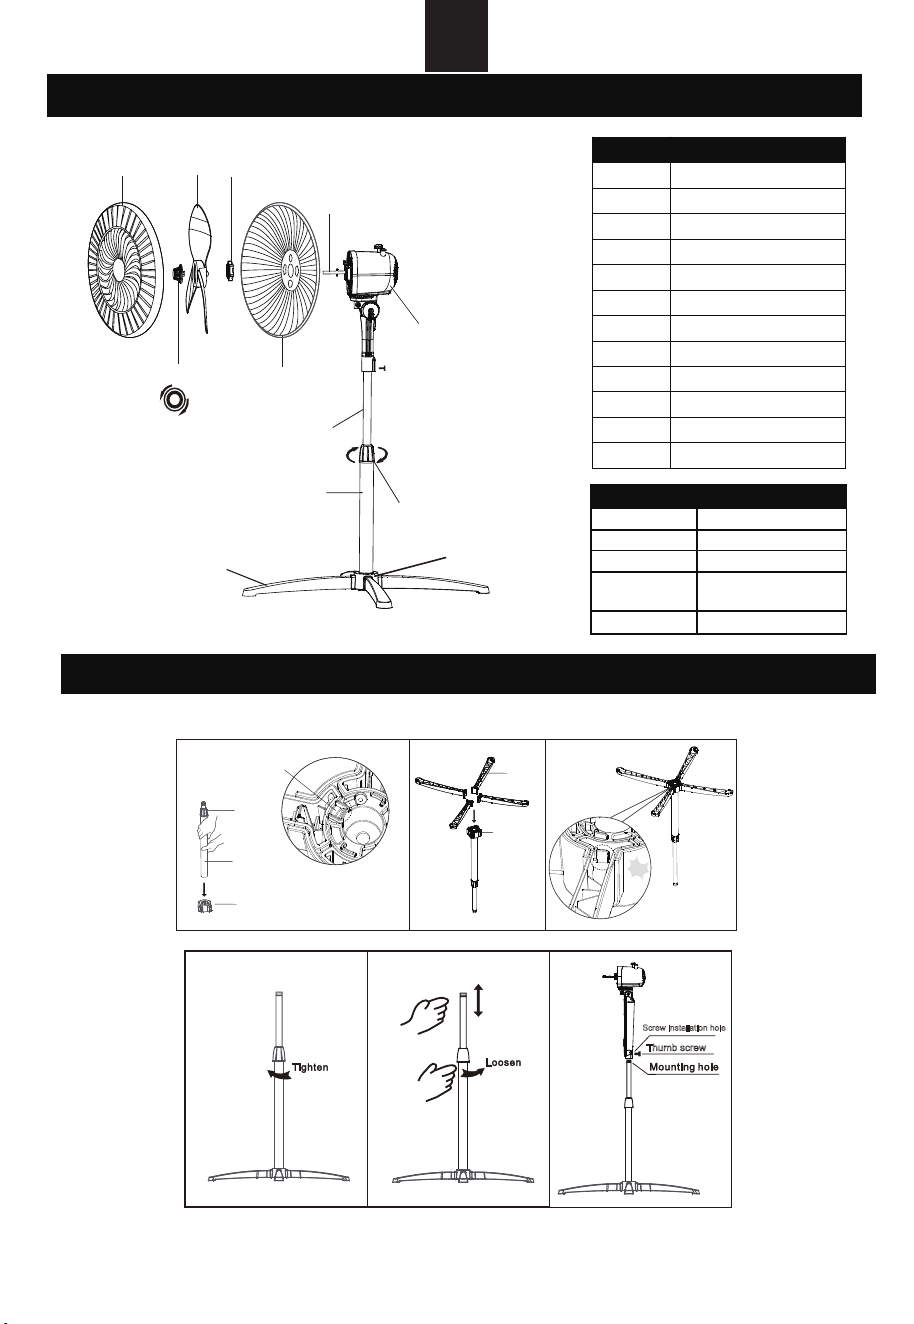
1. Align the Guards: Position
the front guard buckle in alignment with the upper edge of the rear guard,
make sure that the alignment follows the corresponding schematic (see Figure 7).
2. Engage the Guards: Firmly press the guards together using both hands in a sequential manner.
As the guards interconnect, you will hear a series of audible clicks, indicating proper engagement
(refer to Figure 8).
3. Secure the Installation: For a self-locking installation, use a separate screwdriver to tighten the
s
crew located on the lower grille buckle of the front guard (see Figure 9).
A. Control Parts Description
B. Instructions:
1. Speed Control: Adjust the fan speed using the rotary knob located on the top of the motor
5 OPERATING INSTRUCTIONS
4 INSTALLATION OF FRONT AND REAR GUARDS
Grill line
Buckle
Grill line
Buckle
Fig.7
1 1
2 2
3 3
Pa!
Fig.8
Grill buckle
Fig.9
EN
3
housing. The knob offers four settings:
0 – Off; 1 – Low; 2 – Medium; 3 – High
Low speed of air flow
Middle speed of air flow
Head Oscillating Knob
High speed of air flow
Off
Rotary Knob
2. Oscillation Control: To initiate or halt the oscillation of the fan head, engage the clutch knob
located atop the motor housing by pushing down to start or pulling up to stop.
3. Airflow Direction Adjustment: To modify the airflow direction, gently push the guards in the
desired upward or downward direction.
4. Height Adjustment: To adjust the fan height, loosen the height adjustment ring. Carefully
raise or lower the fan to the desired height, then securely re-tighten t
he height adjustment ring
to ensure stability.
To maintain optimal air circulation to the motor, it is essential to keep the vents at the rear of the motor
housing free for dust and debris. Note: A vacuum cleaner should not be used to clean these vents prior
to disconnecting the power. Do not disassemble the fan to remove any accumulated fluff.
Notice:
1. When you replace the fuse, please do not operate suddenly or exceed, or else the product will be
damage or cause accident
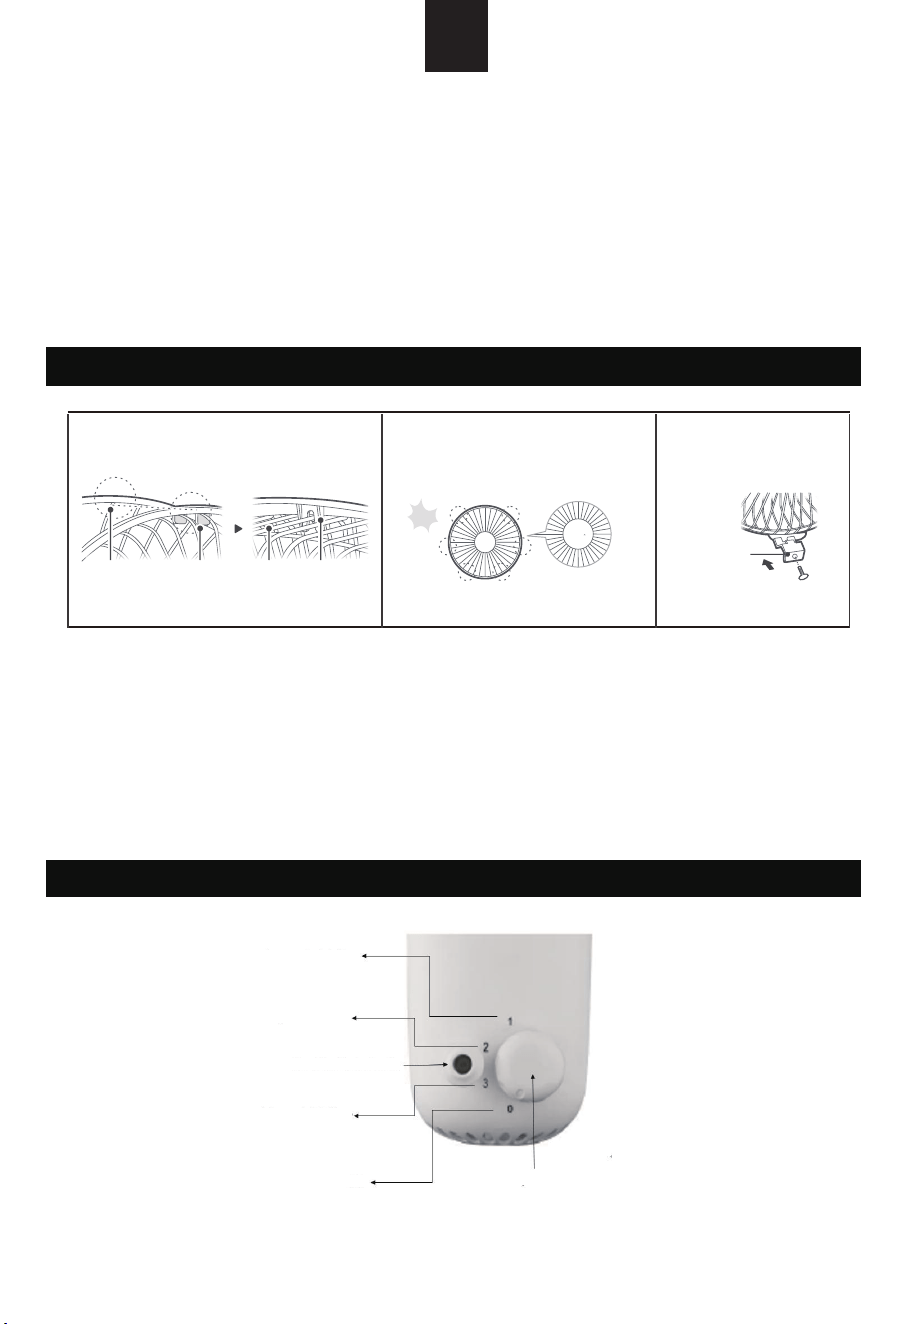
6 CLEANING AND MAINTENANCE INSTRUCTIONS
Guards and Blades
Gently clean the plastic components using a mild soap solution
and a damp cloth or sponge. Make sure that any soap residue
is thoroughly removed by rinsing with clean water on a separate
cloth or sponge
.
CAUTION
1.
Always unplug the fan before any cleaning or maintenance to
avoid the risk of fire, electric shock, or injury to persons.
2.
Do not immerse in water or get liquid inside the motor
housing or interior parts.
3.
Do not use any chemical agents
,
abrasive cl
eaners or
cleaning pads as these will damage the finish of fan
4.
Store in a cool
,
dry place and cover it to protect from dust
.
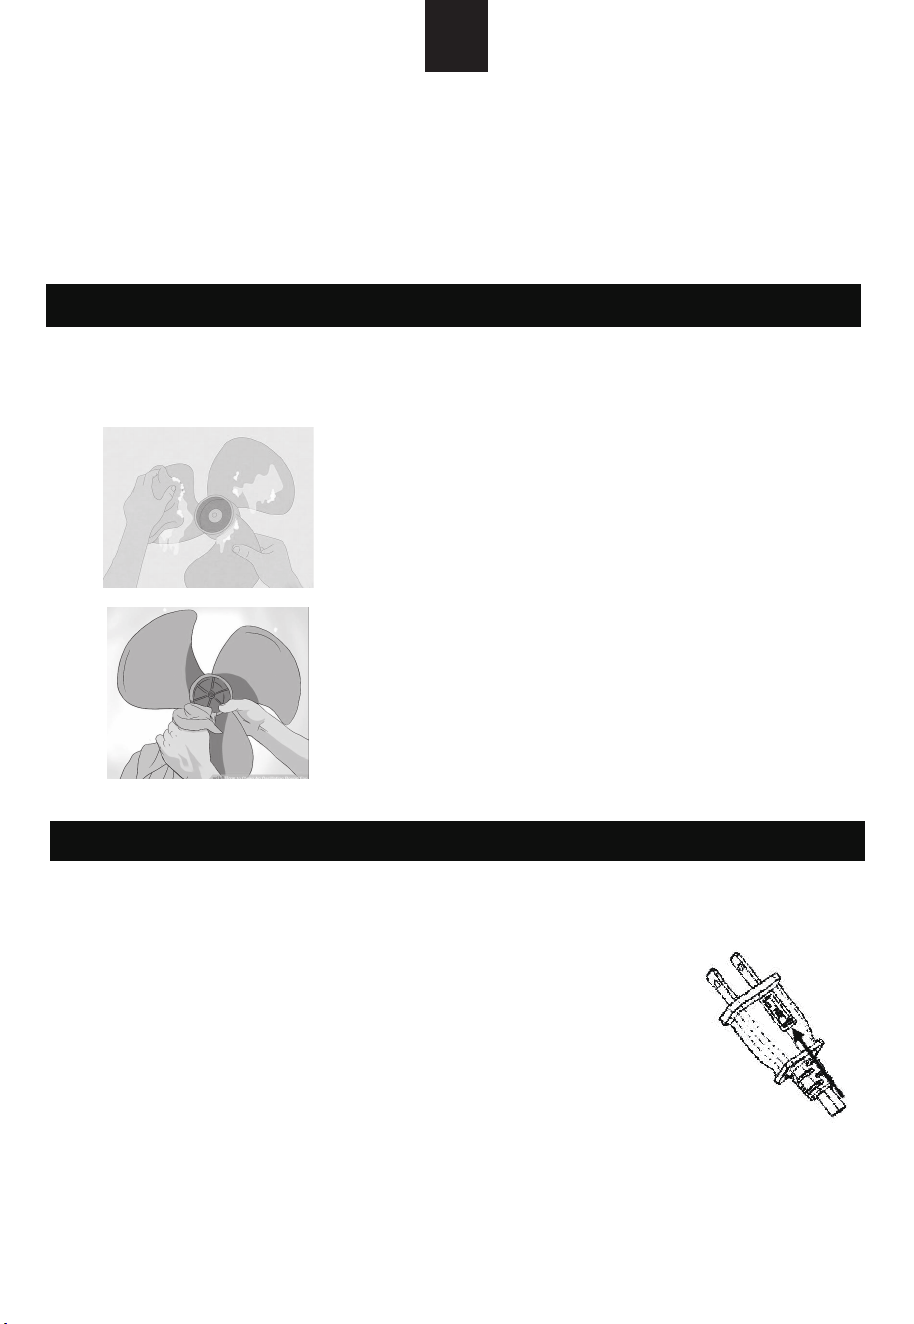
7 USER SERVICING INSTRUCTIONS
- Firmly grip the plug and remove from the receptacle or other outlet device. Do
not unplug by pulling on cord.
- If your fan loses power and you suspect that the fuse on your fan has blown,
you should first remove the spare fuse holder attached to the cord plug.
Remove the spare fuse from the plastic spare house holder, and set the spare
fuse aside.
- You can gain access to the blown fuse by sliding open the lid found on the side
of the plug. Slide the lid outward on the fuse compartment un
til the blown
fuse is fully visible.
- Carefully remove the blown fuse and insert the replacement fuse into place.
- Risk of fire. Replace fuse only with 2.5Amp, 125 volt fuse (provided with
product). Fully close the fuse lid by sliding back into place. Discard the
blown fuse. The plug should now be ready for normal use.
- Risk of fire. Do not replace attached plug. Contains a safety device (fuse)
that should be removed. Discard product if the attached plug is damaged.
EN
4
2. If you encounter any operational challenges, please make sure that you are observing the correct
procedures.

EN
5
1. My fan won’t turn on
a. Make sure that the cord is connected to a powered outlet and the mains voltage corresponds
with the voltage indicated on the fan.
2. My fan is shaky and wobbling
a. Place the fan on a flat, level surface.
b. Incorrect installation might also cause shakiness. Please refer to the assembly instruction in
page 3.
3. My fan is making vibration and noise
a. Place the fan on a flat, level surface.
b. Be sure not to insert anything into the air inlet and outlet.
If y
our problem is not listed or still persists, please contact our Customer Support (see page 6)
-Consult the dealer or an experienced radio / TV technician for help.
Emerson Radio Corp, warrants this product to be free from manufacturing defects i original material,
including original parts, and workmanship under normal home use and conditions (“manufacturing defect”)
for a period of one (1) year from date of original purchase in, and if used in the United States. Should
ser
vice be necessary under this warranty, Emerson will provide the following at our Return Repair Facility
provided the manufacturing defect is verified along with the date of purchase:
* Repair service for one (1) year from date of original purchase at no charge for labor and parts.
To Receive Authorization to Return a Defective Item, please contact Emerson Customer Service at
1-800-898-9020 . Have your Model number,
Serial Number and dated Proof of Purchase
available
when you call.
9 FCC CAUTION
8 TROUBLESHOOTING
10 LIMITED WARRANTY
This device complies with part 15 of the FCC Rules. Operation is subject to the following two
conditions: (1) This device may not cause harmful interference, and (2) this device must accept any
interference received, including interference that may cause undesired operation.
NOTE 1: This equipment has been tested and found to comply with the limits for a Class B digital
device, pursuant to part 15 of the FCC Rules. These limits are designed to provide reasonable
protection against harmful interference in a residential installation. This equipment generates, uses
and can radiate radio frequency energy and, if not installed and used in accordance with the
instructions, may cause harmful interference to radio communications. However, there is no
guarantee that interference will not occur in a particular installation. If this equipment does cause
harmful interference to radio or television reception, which can be determined by turning the
equipment off and on, the user is encouraged to try to correct the interference by one or more of the
following measures:
- Reorient or relocate the receiving antenna.
- Increase the separation between the equipment and receiver.
- Connect the equipment into an outlet on a circuit different from that to which the receiver is
connected.
- Consult the dealer or an experienced radio/TV technician for help.
NOTE 2: Any changes or modifications to this unit not expressly approved by the party responsible
for compliance could void the user's authority to operate the equipment.

15-01-2410
The Serial Number can be found on the bottom cabinet. We suggest that you record the Serial Number of
your unit in the space below for future reference.
Model Number: FAO1605
Serial Number:
To register your product online please visit
http://www.emersonradio.com/service/product-registration/
* Pack the unit in a well-padded heavy corrugated box. Please insure the item is well padded to avoid
damage while in transit back to our facility. If the item incurs da
mage, it will NOT be replaced and the
consumer will be responsible for return freight costs to receive their same unit back.
* Enclose your check or money order payable to Emerson Radio in the amount of $15 to cover return
shipping and handling costs.
* Enclose a note with your name, address, phone number, Return Authorization number and brief reason
for returning the unit.
* Enclose a copy of your proof of purchase (warranty service will not be provided without dated proof of
purchase).
* Ship the unit prepaid via UPS or parcel post (SHIP INSURED and obtain a tracking number).
returned to Emerson:
In the event the product must be
NOTE: This warranty does not cover:
(a) Damage to equipment not properly connected to the product.
(b) Cost incurred in the shipping of the product to and from Emerson’s Return Facility.
(c) Damage or improper operation of unit caused by customer abuse, misuse, negligence or failure to follow
operating instructions (including cl
eaning instructions) provided with the product.
(d) Ordinary adjustments to the product which can be performed by customer as outlined in the owner’s
manual.
(e) Products not purchased in the United States.
S E R V I C E
FOR ADDITIONAL SET-UP OR OPERATING ASSISTANCE
PLEASE CALL
1-800-898-9020
FOR CUSTOMER SERVICE,PLEASE E-MAIL TO:
OR WRITE TO:
Emerson Radio Corp.
Consumer Affairs Dept.
959 Route 46 East
Suite 210,2nd Floor
Parsippany, NJ 07054
6
EN
CALIFORNIA RESIDENTS ONLY-
WARNING: Cancer and Reproductive Harm - www.p65warnings.ca.gov
(f) Damage to product if used outside the United States.
THIS WARRANTY IS NON-TRANSFERABLE AND APPLIES ONLY TO THE ORIGINAL PURCHASER AND
DOES NOT EXTEND TO SUBSEQUENT OWNERS OF THE PRODUCT. ANY APPLICABLE IMPLIED
WARRANTIES, INCLUDING THE WARRANTY OF MERCHANTABILITY, ARE LIMITED IN DURATION TO
A PERIOD OF THE EXPRESSED WARRANTY AS PROVIDED HEREIN BEGINNING WITH THE DATE OF
ORIGINAL PURCHASE AT RET
AIL AND NO WARRANTIES, WHETHER EXPRESSED OR IMPLIED,
SHALL APPLY TO THE PRODUCT THEREAFTER. EMERSON MAKES NO WARRANTY AS TO THE
FITNESS OF THE PRODUCT FOR ANY PARTICULAR PURPOSE OR USE. THE EXTENT OF EMERSON
RADIO CORP’S LIABILITY UNDER THIS LIMITED WARRANTY IS THE REPAIR OR REPLACEMENT
PROVIDED ABOVE AND, IN NO EVENT, SHALL EMERSON RADIO CORP’S LIABILITY EXCEED THE
PURCHASE PRICE PAID BY THE PURCHASER OF THE PRODUCT. UNDER NO CIRCUMSTANCES
SHALL EMERSON RADIO CORP. BE LIA
BLE FOR ANY LOSS, DIRECT, INDIRECT, INCIDENTAL,
SPECIAL, OR CONSEQUENTIAL DAMAGE ARISING OUT OF OR IN CONNECTION WITH THE USE OF
THIS PRODUCT. THIS WARRANTY IS VALID ONLY IN THE UNITED STATES OF AMERICA. THIS
WARRANTY GIVES YOU SPECIFIC LEGAL RIGHTS. HOWEVER, YOU MAY HAVE OTHER RIGHTS
WHICH MAY VARY FROM STATE TO STATE. SOME STATES DO NOT ALLOW LIMITATIONS ON
IMPLIED WARRANTIES OR EXCLUSION OF CONSEQUENTIAL DAMAGE, THEREFORE THESE
RESTRICTIONS MAY NOT APPLY TO YOU.
Printed in China
EN
Emerson Part No. FAO1605-20241002-01