User Manual Sony STR-ZA3100ES Receiver
Precautions
On safety
Should any solid object or liquid fall into the cabinet, unplug the receiver and have it checked by qualified personnel before operating it any further.
On power sources
- Before operating the receiver, check that the operating voltage is identical with your local power supply. The operating voltage is indicated on the nameplate on the back of the receiver.
- If you are not going to use the receiver for a long time, be sure to disconnect the receiver from the wall outlet. To disconnect the AC power cord (mains lead), grasp the plug itself; never pull the cord.
- One blade of the plug is wider than the other for the purpose of safety and will fit into the wall outlet only one way. If you are unable to insert the plug fully into the outlet, contact your dealer.
- AC power cord (mains lead) must be changed only at a qualified service shop.
On heat buildup
Although the receiver heats up during operation, this is not a malfunction. If you continuously use this receiver at a large volume, the cabinet temperature of the top, side and bottom rises considerably*. To avoid burning yourself, do not touch the cabinet.
- The top of the cabinet may become too hot to touch.
On placement
- Do not install the appliance in a confined space, such as a bookcase.
- Sufficient space around the receiver is needed to release heat. When placing the receiver in a rack, leave more than 44.45 mm (1.75 in) space above the receiver, and more than 44.45 mm (1.75 in) space along the sides of the receiver. The rack behind the receiver should be open. If you place the receiver with its back against the wall, leave more than mm (3.5 in) space between the receiver and the wall.
- Make sure to use a “WS-RE1” dedicated rack mount kit for this receiver when mounting the receiver on a rack mount.
- Place the receiver in a location with adequate ventilation to prevent heat buildup and prolong the life of the receiver.
- Do not place the receiver near heat sources, or in a place subject to direct sunlight, excessive dust, or mechanical shock.
- Do not place anything on top of the cabinet that might block the ventilation holes and cause malfunctions.
- Magnets are attached to both the front panel and front cover. Do not place cards with magnetic stripes, such as bank cards or ID passes, near the receiver. These cards may become unusable due to the effects of the magnets on the receiver.
On cleaning
Clean the cabinet, panel, and controls with soft dry cloth. Do not use any type of abrasive pad, scouring powder, or solvent, such as alcohol or benzine.
If you have any questions or problems concerning your receiver, please consult your nearest Sony dealer.
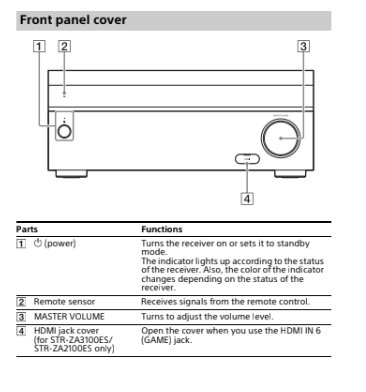
Main parts and controls
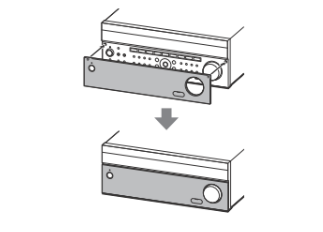
Attaching the front cover
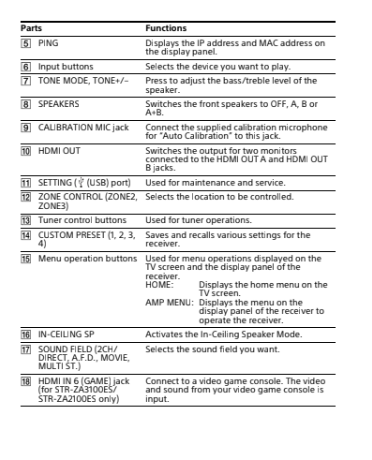
Front panel

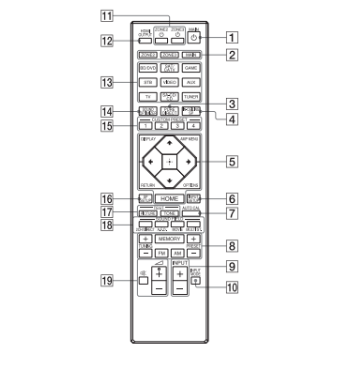
Remote Control

Preparation 1: Preparing the receiver and the remote control
Before starting the following steps, connect speakers and AV devices to the receiver referring to the supplied Startup Guide.
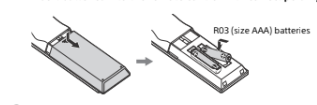
1. Insert batteries into the remote control with correct polarity.
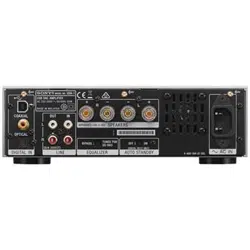
2. Connect the supplied AC power cord (mains lead) to the AC IN terminal on the receiver firmly, then connect the AC power cord (mains lead) to a wall outlet.
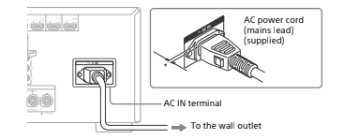
- Space remains between the plug and the rear panel even when the power cord (mains lead) is inserted firmly. The cord is supposed be connected this way. This is not malfunction.
3. Press to turn the AV receiver on.

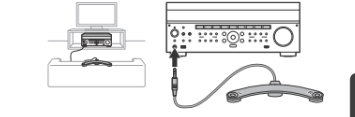
4. Place the calibration microphone at your listening position and set it at the same height as your ears.
The calibration microphone is used for setting the speakers Auto Calibration) in Preparation 2 (Easy Setup).
Perform this step after removing the front cover.
5. Turn the TV on, and then switch the input of the TV to which the receiver is connected.
The Easy Setup screen appears on the TV screen when you turn on the receiver for the first time or after the receiver is initialized.
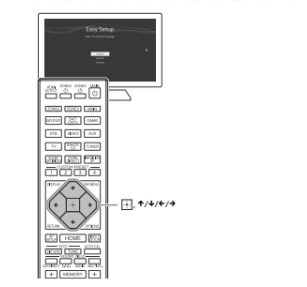
- Press to select the language for the messages on the screen, and then press .
- Set up the receiver in accordance with the instructions on the Easy Setup screen.
Note:
- If the Easy Setup screen does not appear or you want to display the Easy Setup screen manually, you can display it by selecting [Setup] - [Easy Setup] from the home menu.
- The speakers emit very loud sound during the calibration and the volume cannot be adjusted. Be considerate of your neighbors and any children who are present.
Troubleshooting
The following troubleshooting page covers frequently asked questions.
You can search by a keyword using the online troubleshooting guide.
If you still cannot find a solution, consult your nearest Sony dealer.
General
The top of the receiver is hot.
→ Phenomenon is specific to this amplifier. This is not a malfunction.
If “Control for HDMI” or “Network Standby” is set to “On,” or Standby Through” is set to “On” or “Auto,” the power for zone 2 is turned on, the top of the receiver may become hot even while the receiver is in standby mode. This condition occurs because current is flowing in the internal circuits of the receiver, and this is normal.
Video
There is no picture or an unclear picture appears on the TV screen or monitor, regardless of type of picture.
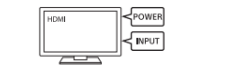
→ Select the appropriate input on the receiver (pages 10, 11).
→ Set your TV to the appropriate input mode.
→ Make sure that cables are correctly and securely connected to equipment.
→ Depending on the playback equipment, equipment may need to be set up. Refer to the operating → instructions supplied with the equipment.
→ Set “HDMI Signal Format” of the selected HDMI IN jack except HDMI IN 6 (GAME) jack (for STR ZA3100ES/STR-ZA2100ES only) to Standard format” in the “HDMI Setup” menu.
Specific type of image is not output or corrupted.
HDMI output
→ The output of the HDMI video signals of the receiver may be set to “OFF.” In this case, select “HDMI OUT A” or “HDMI OUT B” using the HDMI OUT button on the receiver (page 10) or HDMI OUTPUT button on the remote control (page 11).
→ Sony recommends that you use an HDMI authorized cable or HDMI cable made by Sony. Be sure to use High Speed HDMITM cables with Ethernet. Premium High Speed HDMITM cable with Ethernet is required for 4K/60p 4:4:4 8 bit and 4K/60p 4:2:0 10 bit, etc.
4K image
→ Depending on the TV or video equipment, 4K images may not be displayed. Check the video capability and setting of your TV or video device. Also, make sure to connect to the receiver to an HDMI input jack of a TV or video equipment supporting 4K. You have to connect an HDMI cable to an HDMI jack that supports HDCP 2.2 when you use a playback device for 4K resolution video content, etc.
Audio
There is no sound, no matter which equipment is selected, or only a very low-level sound is heard.
→ Check that the speakers and equipment are connected correctly.
→ Check that both the receiver and all equipment are turned on.
→ Check that MASTER VOLUME control is not set at –∞ dB. Try to set it at about –40 dB.
→ Check that SPEAKERS is not set to “OFF” (page 10).
→ Try pressing the input button on the remote control to select the equipment of your choice.
HDMI input
→ Depending on the playback equipment, equipment may need to be set up. Refer to the operating instructions supplied with the equipment.
Error messages
You can check the status of the receiver by the message. See the following to solve the problem. If any problem persists, consult your nearest Sony dealer.
PROTECTOR
→ The receiver is covered and ventilation holes are blocked. The receiver will automatically turn off after a few seconds. Remove the object covering the upper panel of the receiver and turn on the power again.
→ Irregular current is output to the speakers due to a short circuit on the speaker terminals. The receiver will automatically turn off after a few seconds. If the protective device on the receiver is activated due to a short-circuit problem, turn off the receiver. Check the connection of the speakers and turn on the power again.
UPDATE FAILED
→ Insert a USB flash drive on which the package file for updating the receiver is saved, and then turn the receiver off and turn it on again.