1
Questions or Concerns? (855) 686-3835 • support@etekcity.com
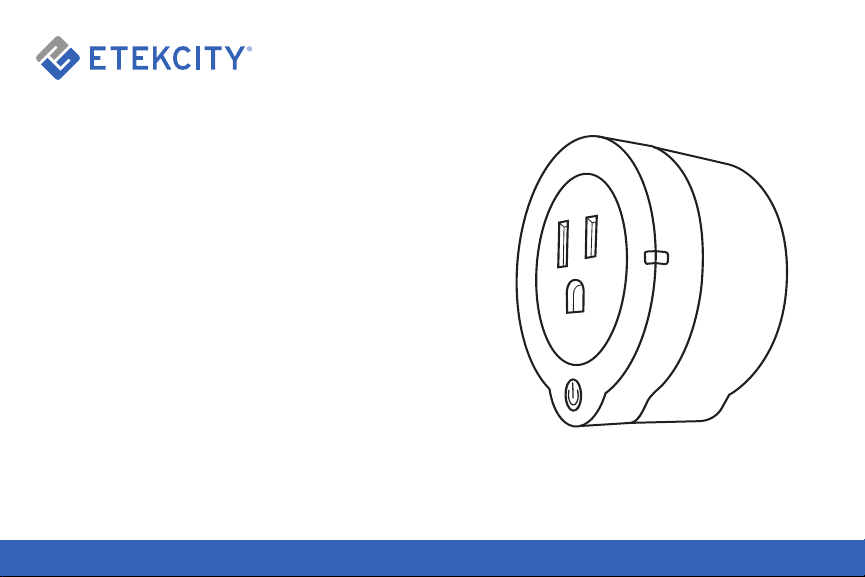
Voltson Smart Wi-Fi Outlet
Model No.: ESW01-USA

2
Thank You.
Thank you for purchasing the Voltson Smart Wi-Fi
Outlet by Etekcity. We are dedicated to providing our
customers with quality products for building a better
living. Should you have any questions or concerns
about using your new product, feel free to reach out
to our helpful customer support team at
(855) 686-3835 or by email at
support@etekcity.com. We hope you enjoy your new
product!

Table of Contents
Safety Information 4
Fuction Diagram 5
Setup 6
Configuration 7
APN Mode 11
Operation
Turning Devices On/Off 15
Data 17
Creating Schedules 19
Using Sunrise & Sunset Scheduling 21
Set Timer 26
Away Mode 28
Device Setting 30
Share Device 31
Energy Saving Mode 33
Power Protection 34
Reconfiguring a Device 35
Connect with Alexa 39
Connect with Google Home 43
Delete a Device 47
Log Out 48
Specifications 50
Troubleshooting 51
Warranty 52
Customer Support 53

4
Safety Information
IMPORTANT: Please read, understand, and comply
with all of the instructions provided in this manual
before using the device. Failure to comply with the
instructions given in this manual and/or using the
device in ways other than the ones mentioned in this
manual may result in serious injury and/or damage
to the product.
• DO NOT exceed the maximum load current of
8A (approximately 1000W). Always check the
electrical power before use to avoid potential
damage to the device.
• DO NOT use for or near space heaters or air
conditioning units.
• Keep out of reach of children.
• The outlet is for indoor use only. Avoid exposure
to high-temperature sources, direct sunlight and
moisture. The outlet is best used in areas with
good air circulation.
• To avoid short circuiting, keep the outlet out of
direct/indirect contact with water and liquids.
• DO NOT install the outlet in washrooms,
restrooms, and any other damp environments.
• When cleaning, use a dry cloth to wipe the
outlet’s surface.
• The VeSync home automation app is only
compatible with Android 4.0 / iOS 7.0 operating
systems and above.
• The app does not support every phone/tablet.
Only use Android 4.0 / iOS 7.0 or above.
• The outlet does not support 2G/3G/4G networks
for configuration.
• Before configuration, make sure the wireless
network is operating normally in order to avoid
adverse effects on the product operation.
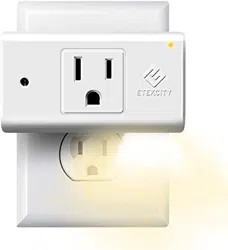
5
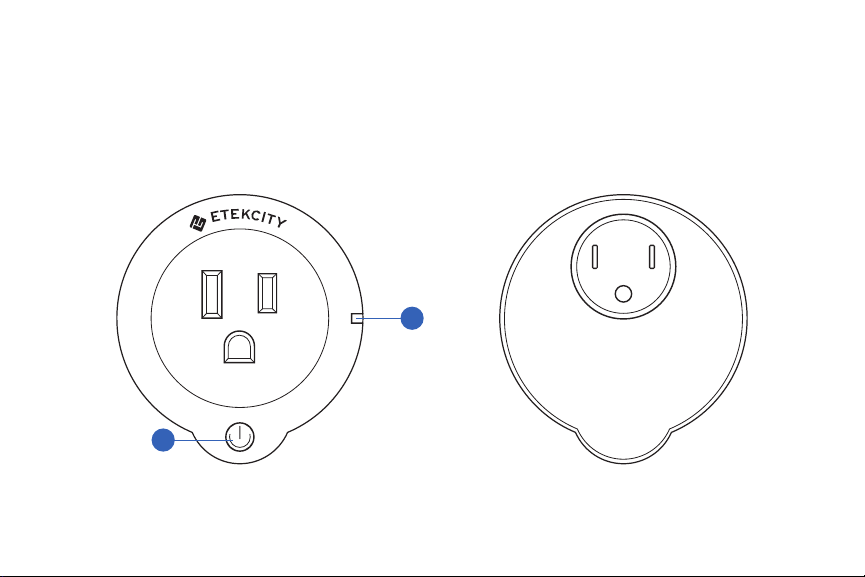
Function Diagram
1. Power button
2. LED indicator
1
2
Front View Back View
6
Setup
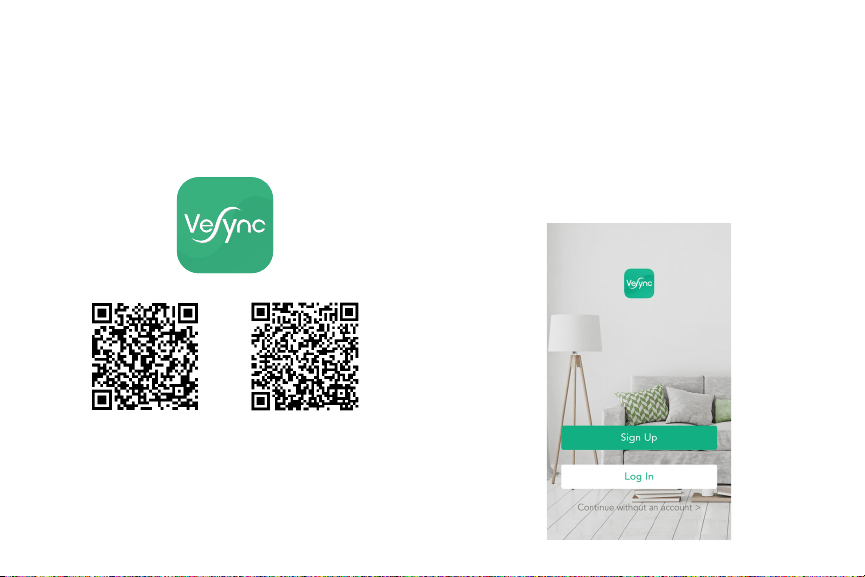
1. Scan the QR code or download the VeSync App
from the App Store or Google Play Store.
iOS Android
2. Open the VeSync App and tap “Sign Up” to
create a new account. Enter a new email &
password, then tap “Sign In.”
Note: It is recommended create an account so that
you can connect to Amazon Echo for voice control.
You can also share the outlet with your friends and
family to control.
NOTE: For Android users, you must select
“Allow” to use VeSync.
7
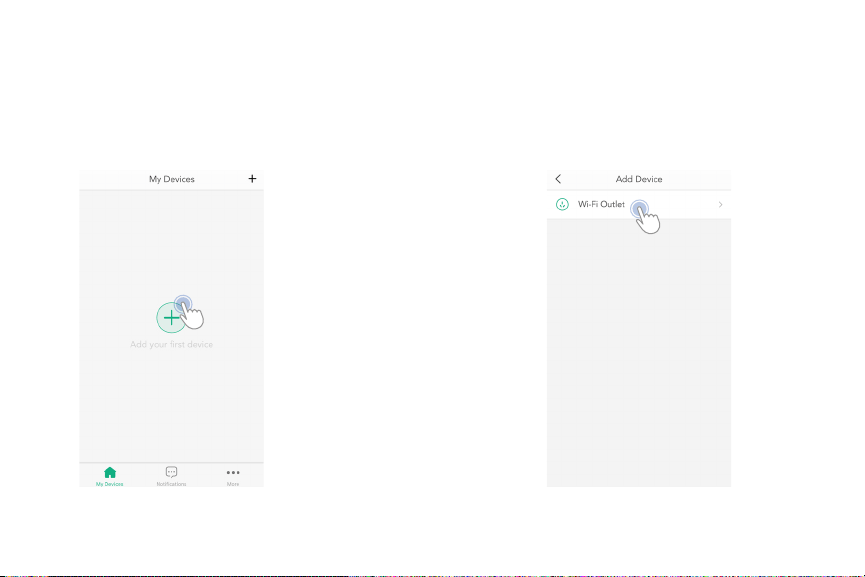
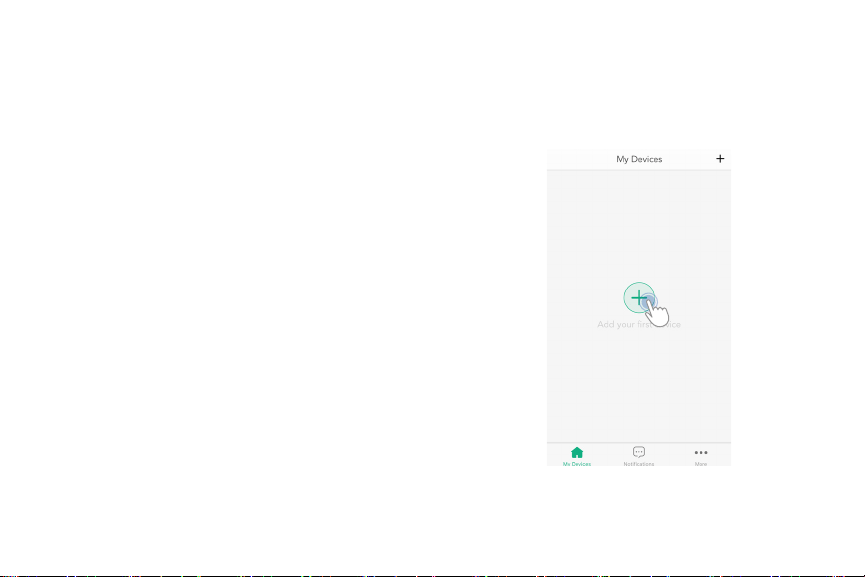
Configuration
1. Tap the “+” button on the screen
to add your device.
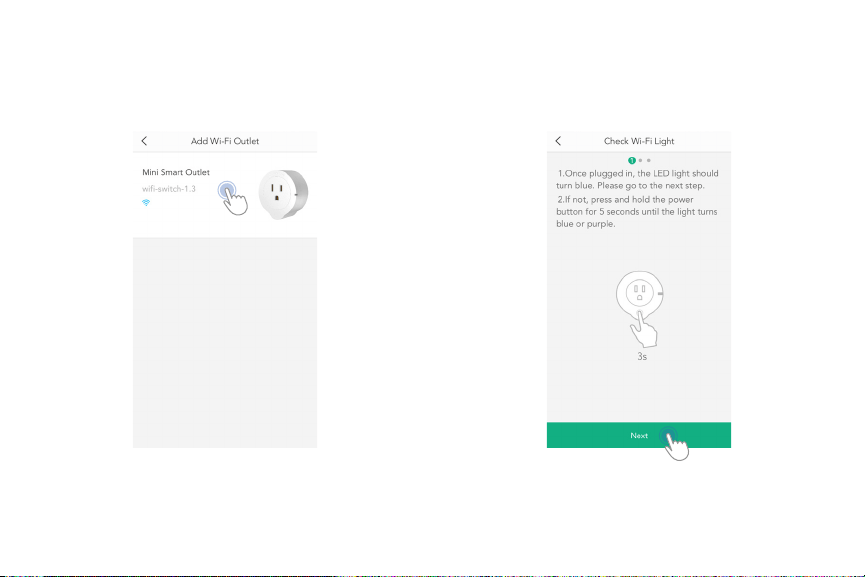
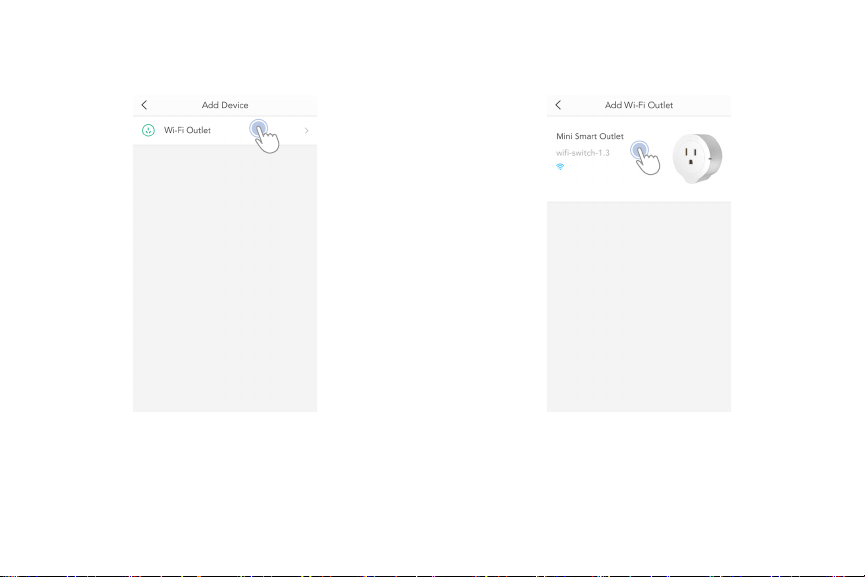
2. Select “Wi-Fi outlet.”
8
Note: A purple LED light means the yellow and blue
lights are on at the same time. If your LED light is
yellow or off, please refer to the Reconfiguration
section on page 31.
3. Select this model. 4. Plug your smart outlet into a powered electrical
outlet or power strip. The LED indicator should light
up blue.
9
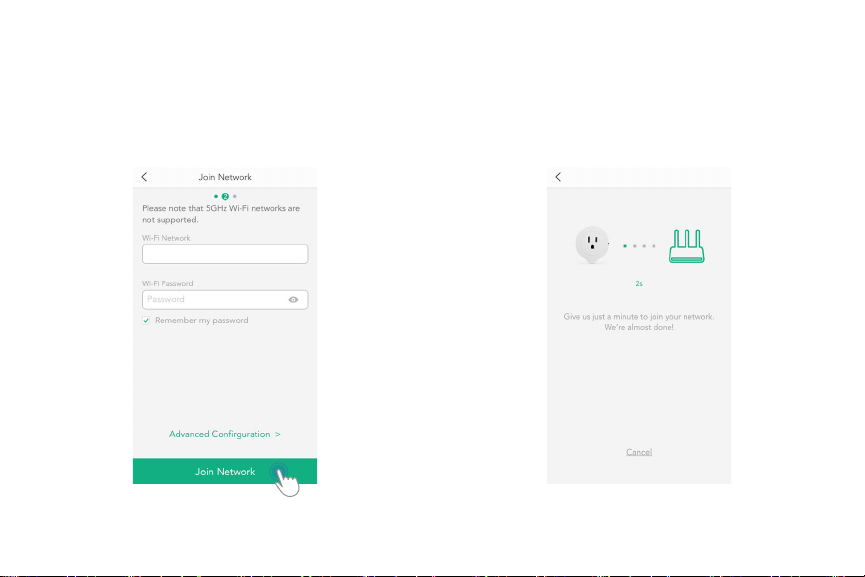
5. Type in the name of your home Wi-Fi network and
password, then tap “Join Network.”
Note: This Wi-Fi outlet configuration only supports a
2.4GHz Wi-Fi network.
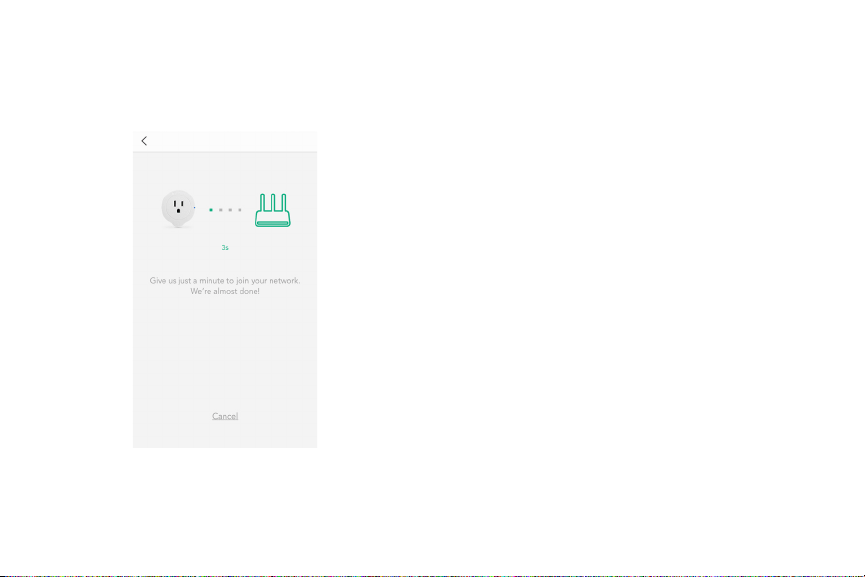
6. The system will take a moment to connect. If you
tap “Cancel” you will be taken back to the setup
screen.
WiFi123
10
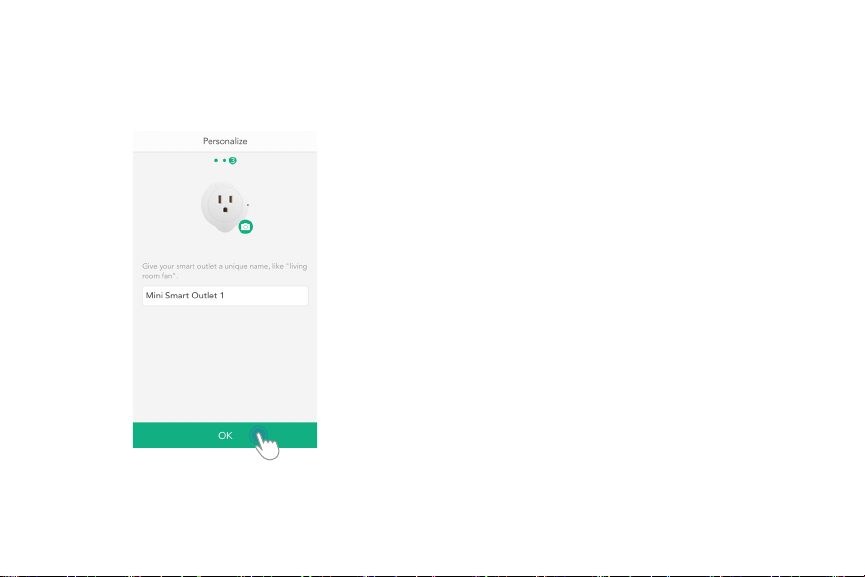
7. Congratulations! You have completed setup. Give
your outlet a unique name, or simply tap “OK” to
use the default name.
Note: You can change the device name and picture
at any time in Device Setting.
11
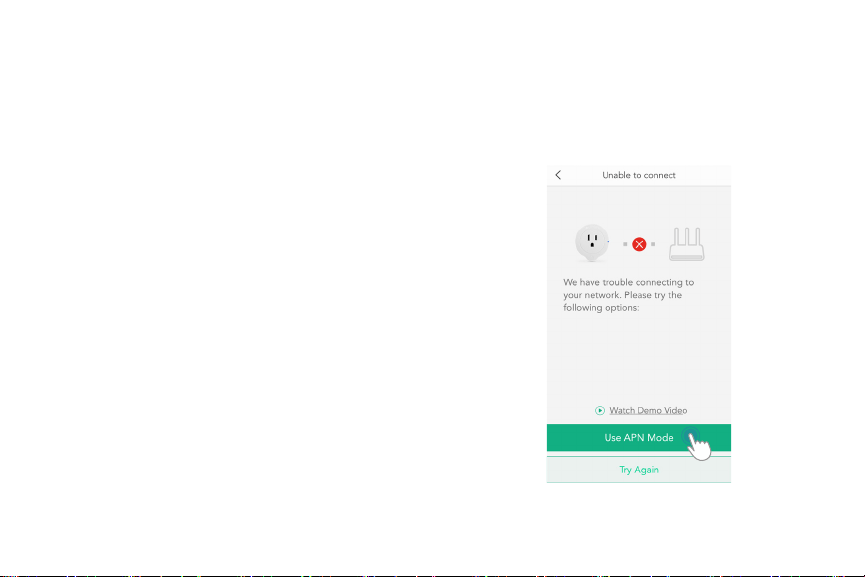
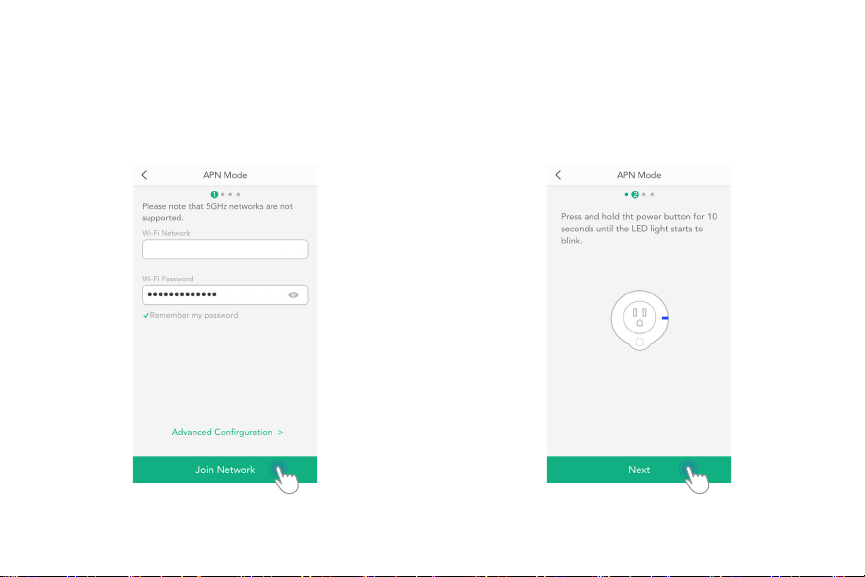
APN Mode
If setup fails, you can use APN mode to configure
your Wi-Fi outlet.
1. While on the configuration page,
tap “Use APN Mode.”
12
3. Press and hold the power button for 10 seconds
until the LED light blinks blue or purple.
Note: If necessary, unplug the outlet, then plug it
back in.
2. Enter your home Wi-Fi network name and
password to start setup.
WiFi123
13
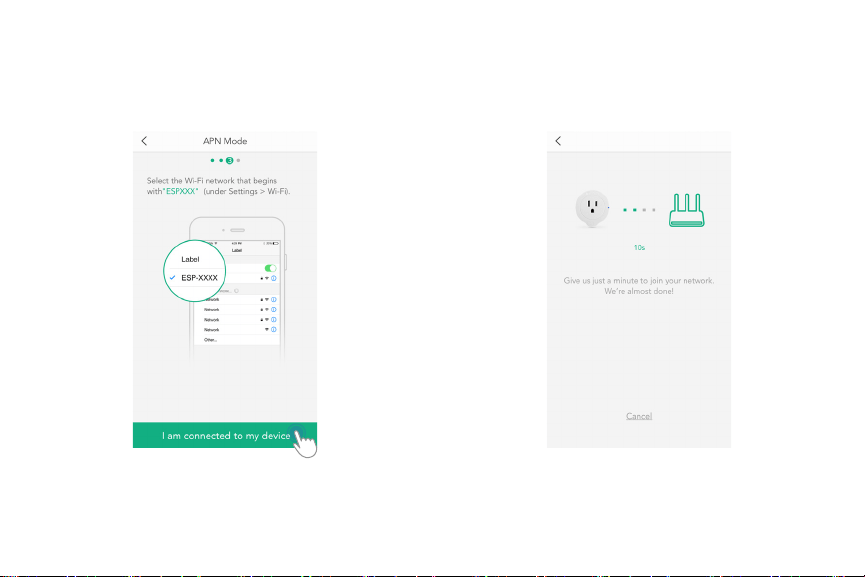
4. Go to the Settings on your mobile device, and
select the Wi-Fi network that reads “ESP-XXXX”
(Settings -> Wi-Fi)
5. The system will take a moment to connect. If you
tap “Cancel” you will be taken back to the setup
screen.
14
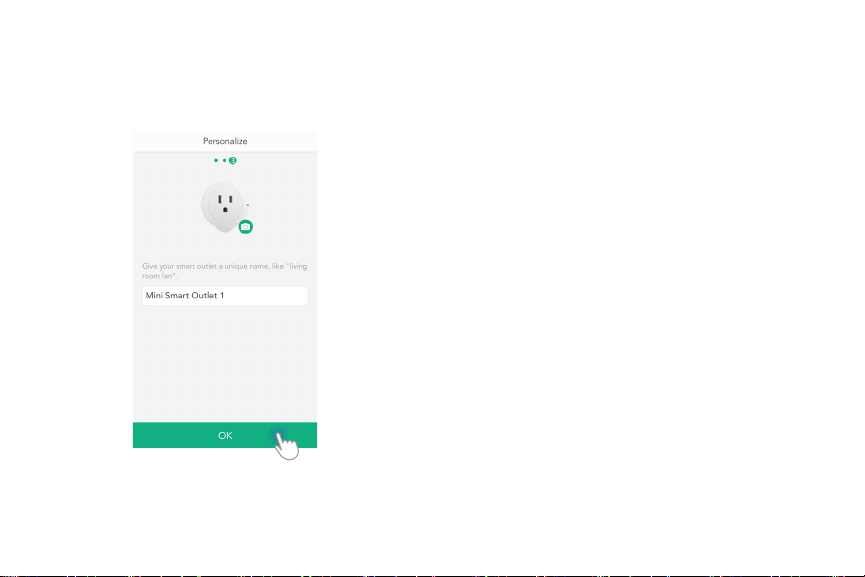
6. Congratulations! You have completed setup. Give
your outlet a unique name, or simply tap “OK” to
use the default name.
15
Operation
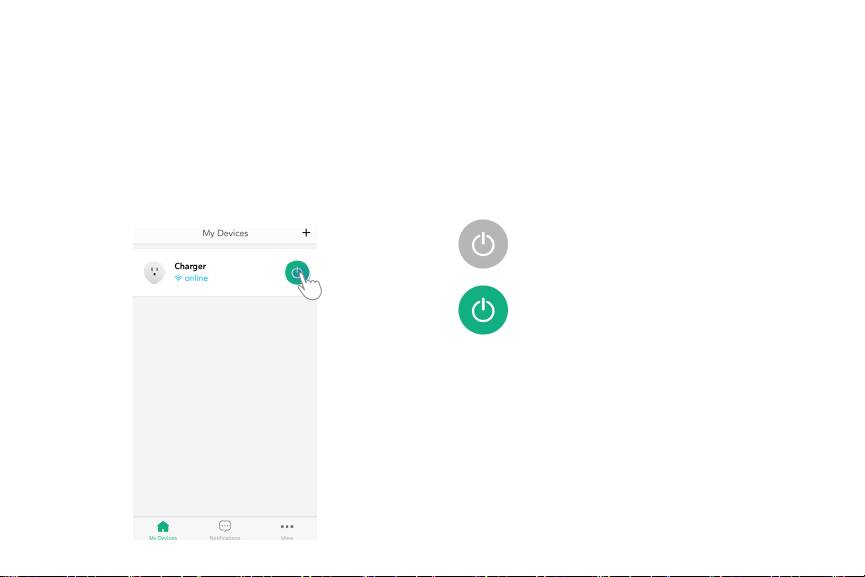
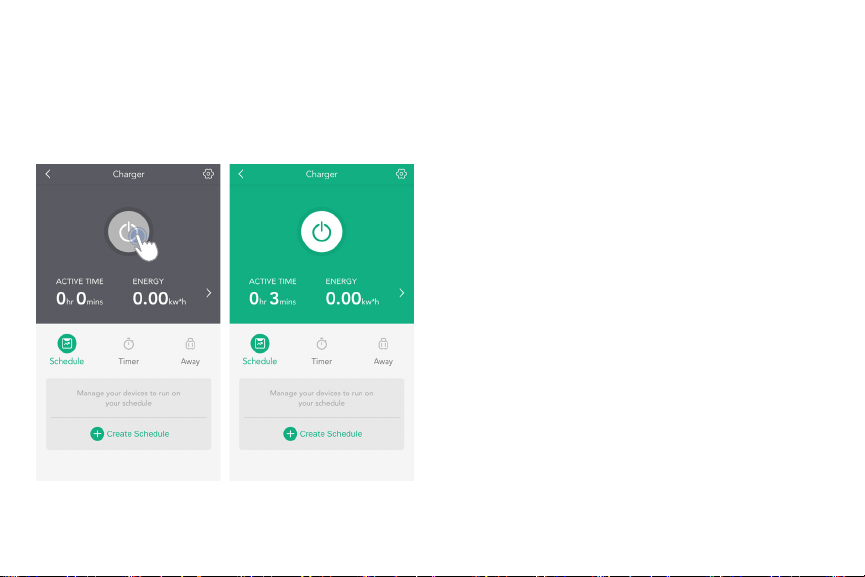
Turning Devices On/Off
Method 1
On the “My Devices” screen, you can tap the power
button to turn the device on/off.
Note: This on/off power button controls the power
flow of the smart outlet. The outlet itself will remain
connected to the internet.
Device is Off
Device is On
16
Method 2
Tap on the device on the “My Devices” screen for a
detailed view of the device. Tap the power button on
the detailed view to turn the device on.
Off On
17
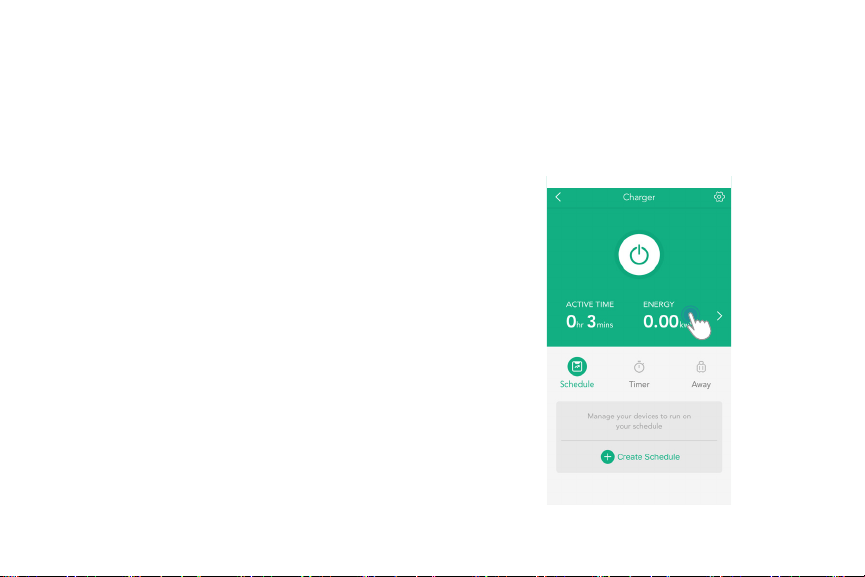
Data
The VeSync app gathers information from the outlet
and will automatically calculate your energy usage.
Follow the steps below to view energy consumption
reports on the app.
1. On the detailed device page, tap the area near
“Energy.” You can also tap the arrow to the right of
“Energy.”
18
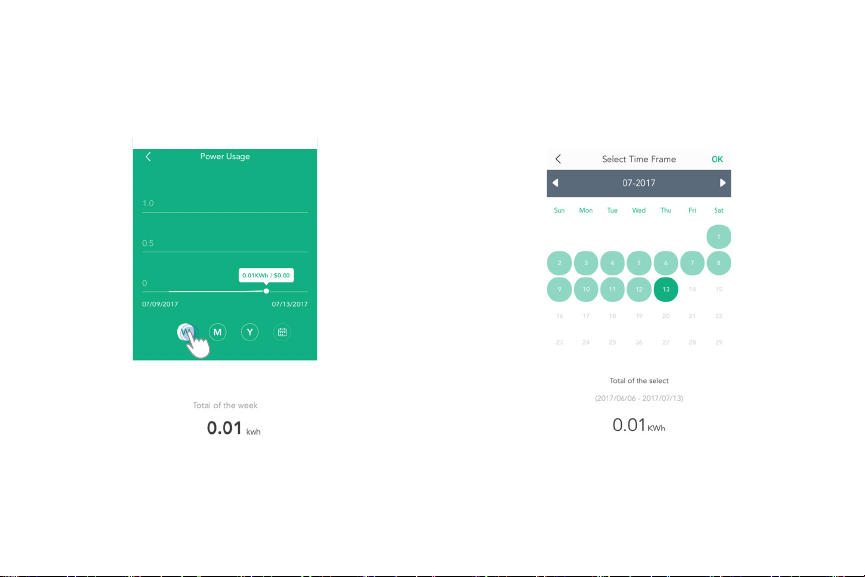
2. Tap “W”, “M”, “Y”, respectively, to see weekly,
monthly, and yearly energy consumption. Tapping
the 4th button allows you to view the energy
consumption over a custom time period.
3. To select a customized time period, tap the
desired dates to define a start and end time. The app
will display the corresponding data.
19
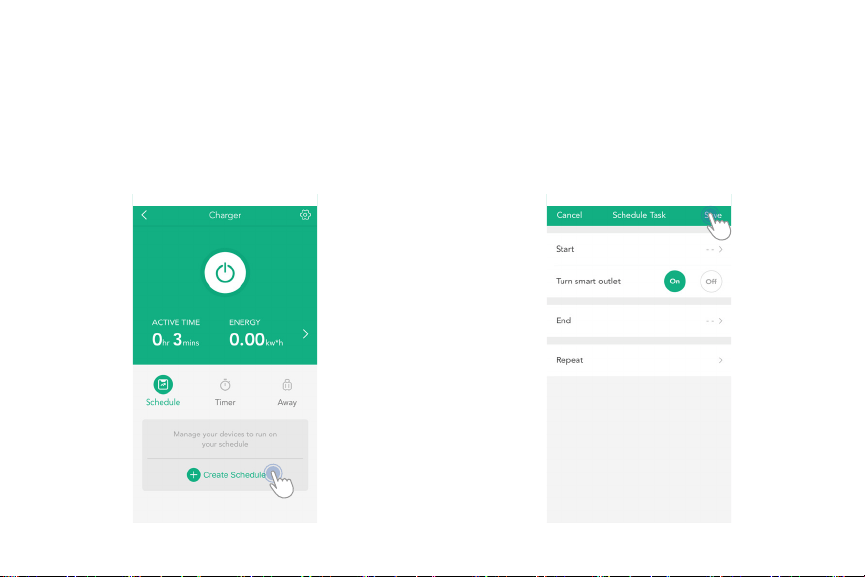
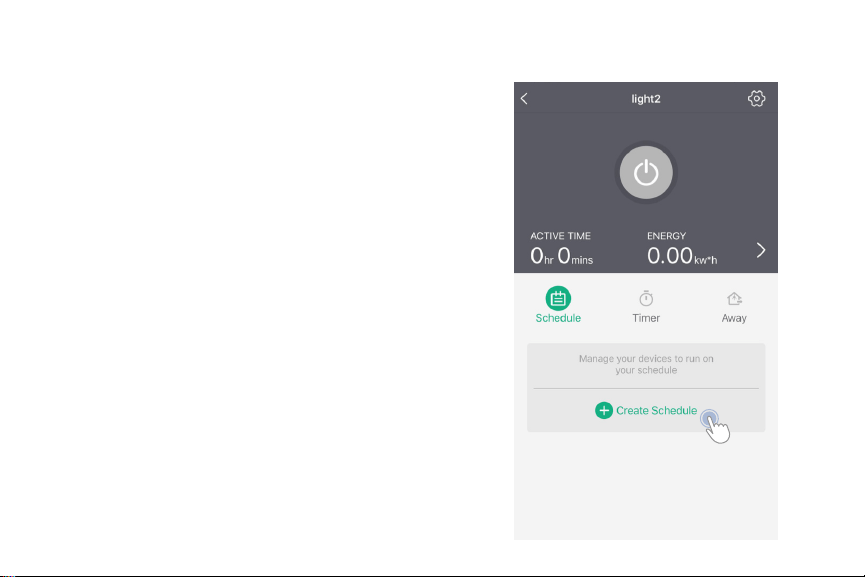
Creating Schedules
1. Tap “+ Create Schedule” to create a scheduled
time for the device.
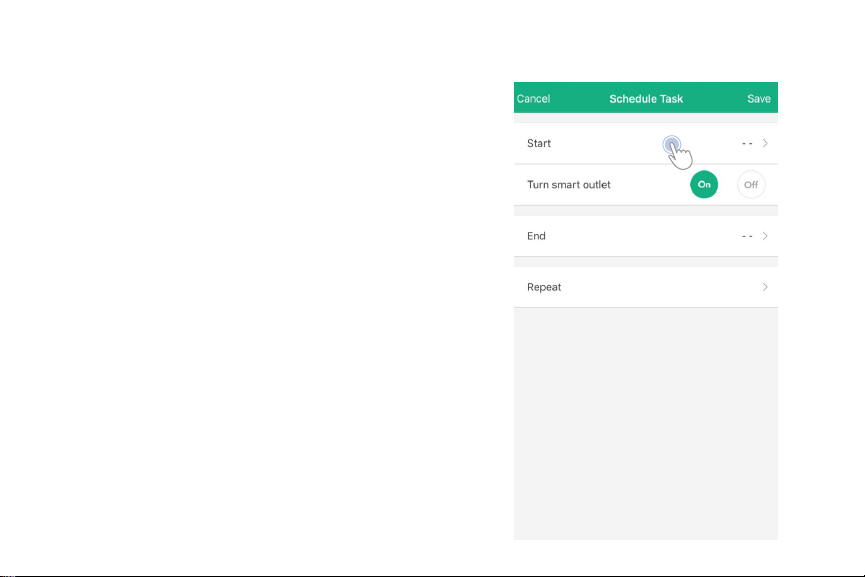
2. Set your scheduled time for your device and
a command to turn the outlet on or off at the
scheduled time. You can also set an end time or
leave it blank. Tap “Save” when you are done.
20
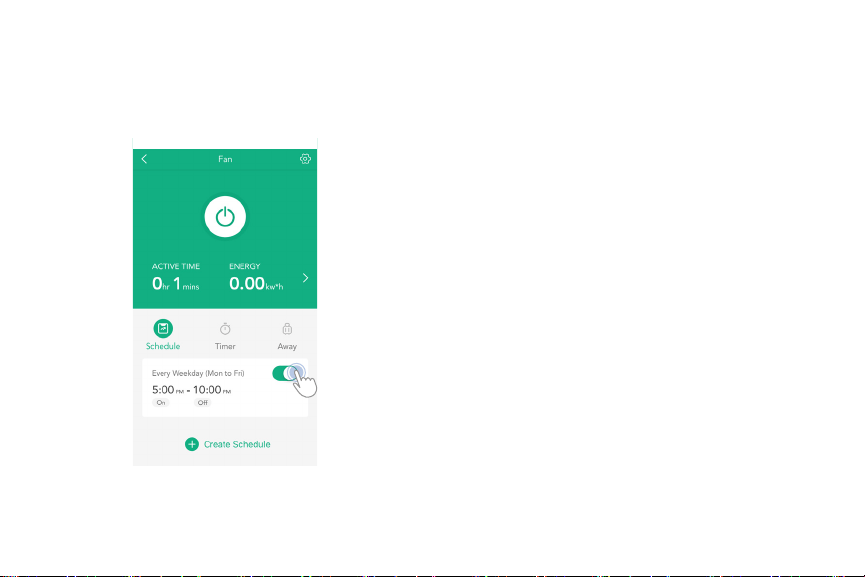
3. You can turn on or off any schedule at anytime for
your outlet.
Note: This smart outlet supports up to 32 groups of
schedules, timers, and away modes.
21
Using Sunrise & Sunset Scheduling
You can schedule the outlet to turn on or off at
sunrise or sunset based on your location.
1. Make sure Location Services has been turned on
for VeSync.
2. Tap “+ Create Schedule” to create a scheduled
time for device.
22
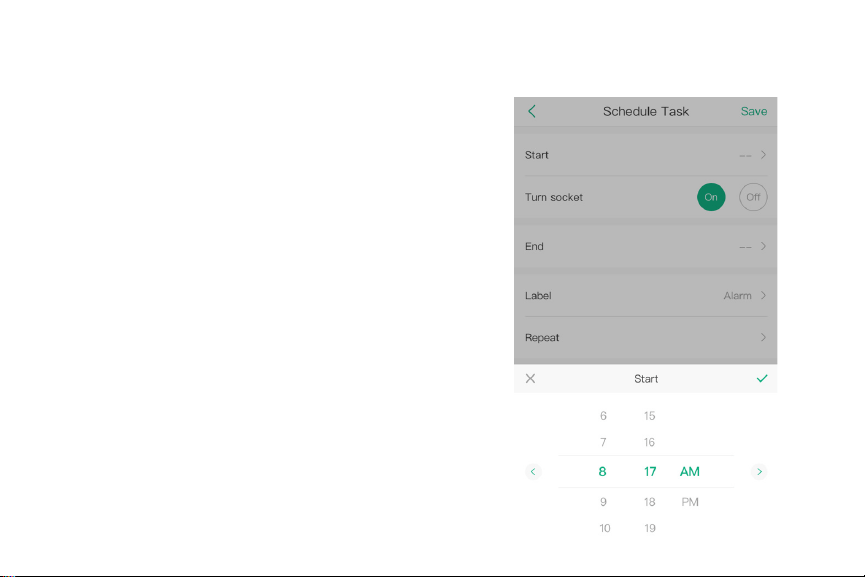
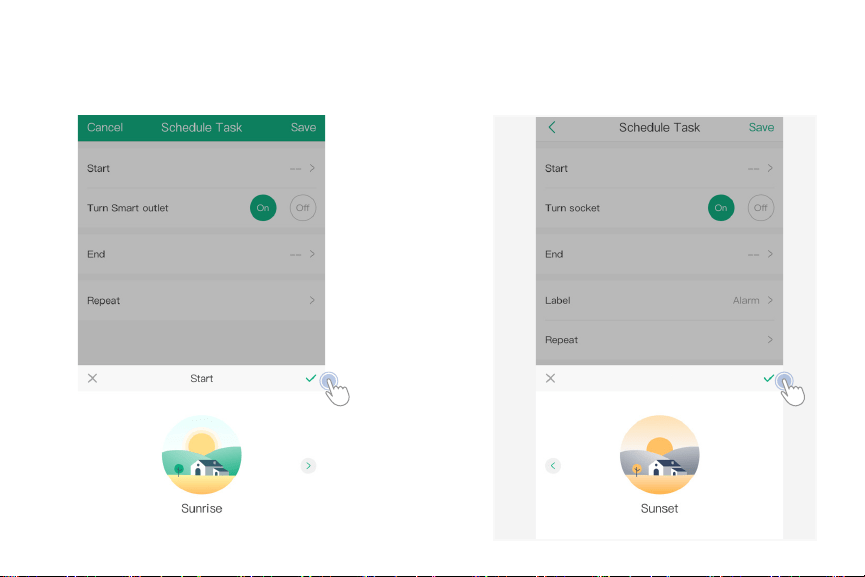
3. Select the “Start” or “End” time to set the time
for sunrise or sunset.
Note: You can not select sunrise or sunset for the same
time. If you select “Sunrise” for your start time, you must
select “Sunset” for the end time.
23
4. When the time selection comes onto the
screen, tap on the left or right arrows to select
“Sunrise” or “Sunset.”
24
5. To confirm “Sunrise” or “Sunset,” tap the
checkmark to program the time.
6. You can also select “Sunrise” or
“Sunset” for your end time.
End
25
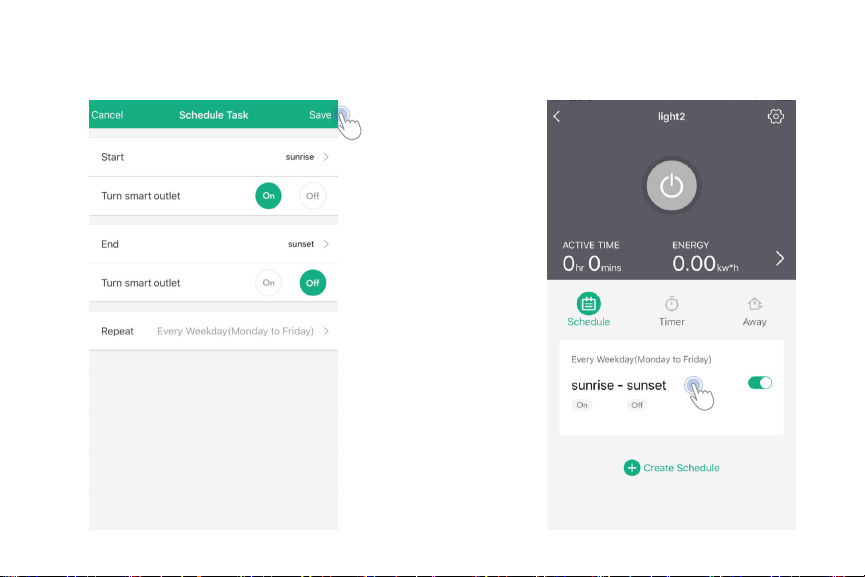
7. Tap “Save” at the top of the screen when you
have set your start and end times.
8. You can turn on or off any schedule at
anytime for your outlet.
26
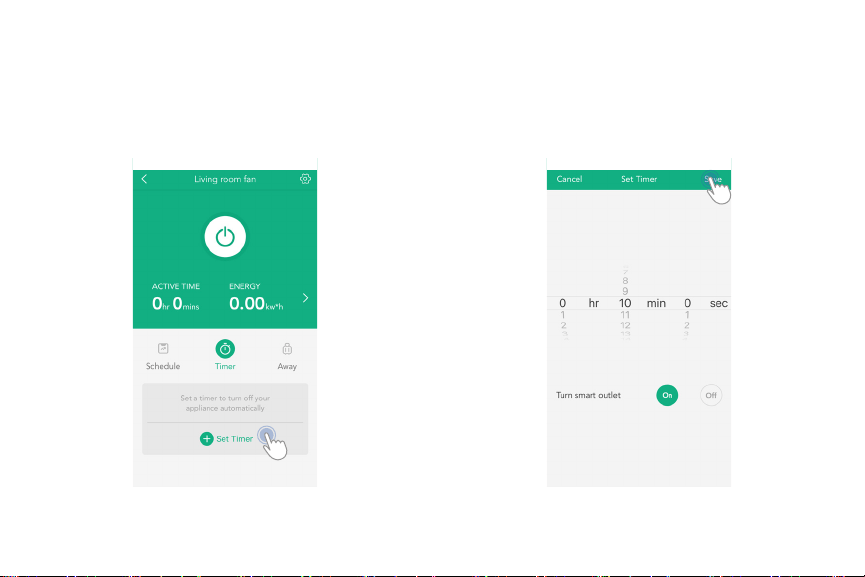
Set Timer
1. On the detailed device view, tap “Timer” then tap
“+ Set Timer” to set a timer.
2. Set your timer and command to turn the outlet on
or off. Tap “Save” when you are done.
27
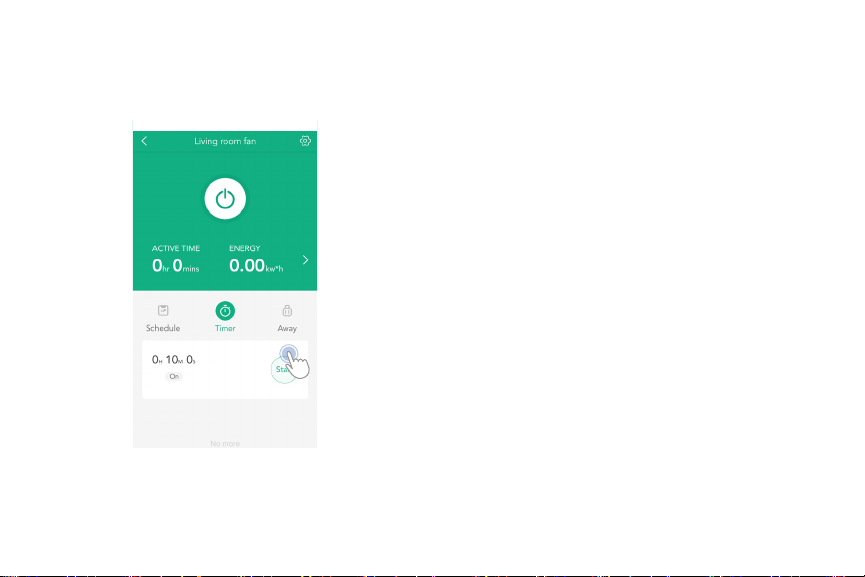
3. Tap “Start” to start timer. When the timer ends,
it will execute the command you have set for the
outlet.
Note: For your safety, you cannot turn the device off
once the timer has started.
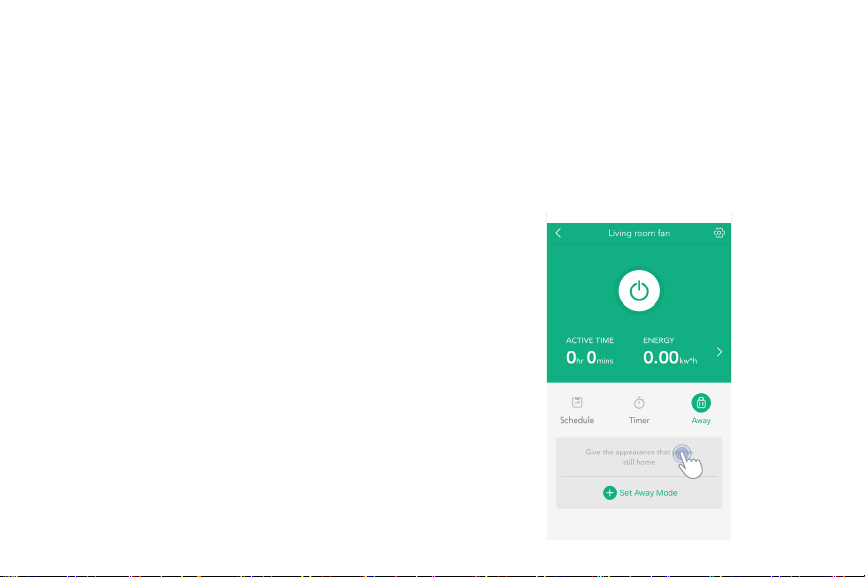
28
The away mode turns on the outlet at random for
half-hour intervals during the programmed time. For
example, if your programmed away timer is at 11:30
pm, the away timer will turn the outlet on at anytime
between 11:00 pm to 12:00 am for half an hour.
Away Mode
1. On the detailed device view tap “Away ” , then tap
“+ Set Away” to set an away timer.
29
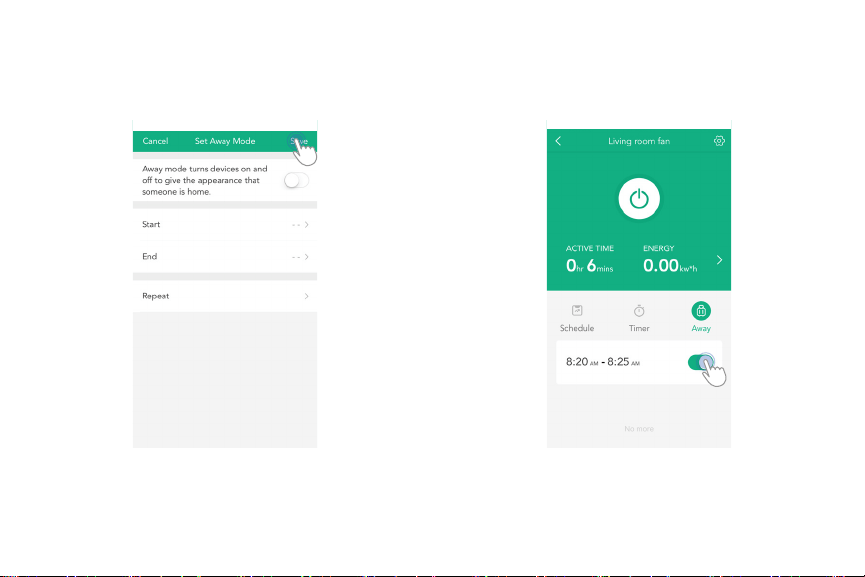
3. Swipe to turn your away timer on or off.2. Set a start and end time, and select the desired
days for the away timer. Tap “Save” when you are
done.
30
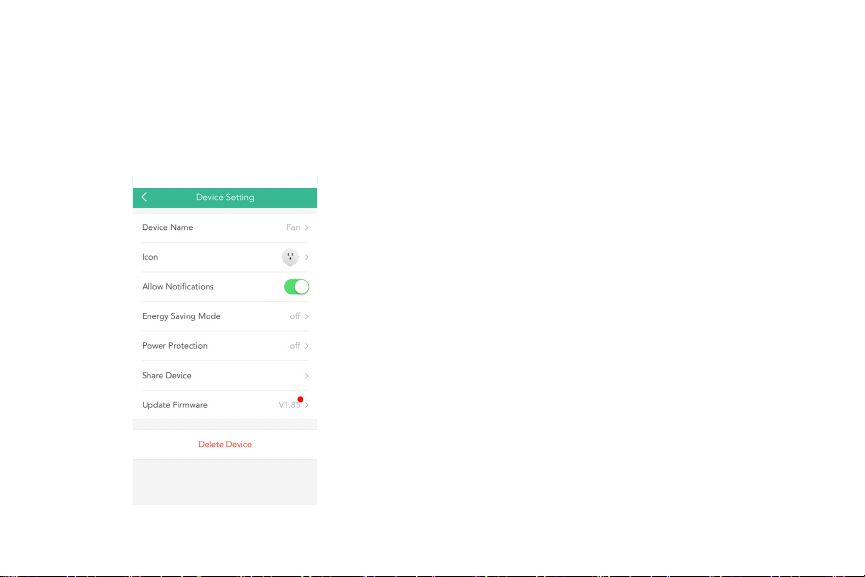
Device Setting
This menu allows you to edit your device name and
picture, as well as turn on/off notifications.
This menu also provides options for the Energy
Saving Mode, Power Protection, device sharing, and
firmware updates.
31
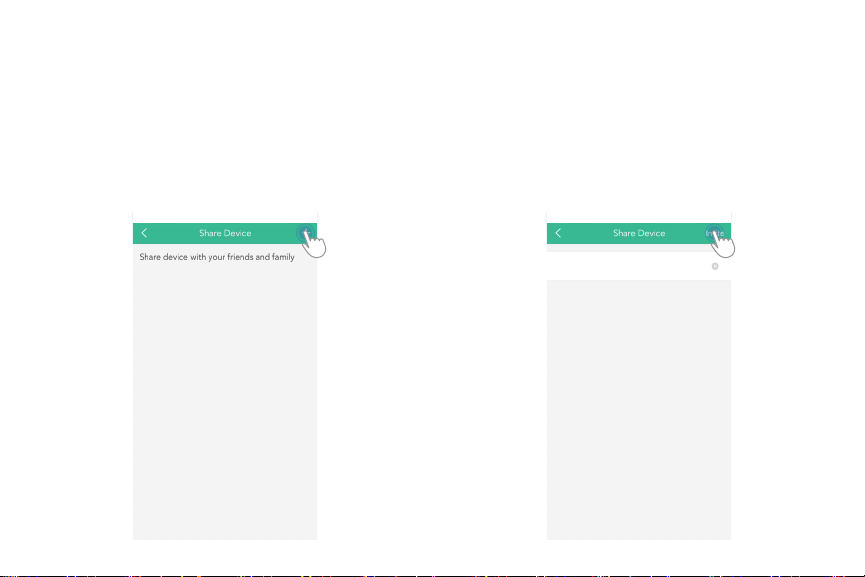
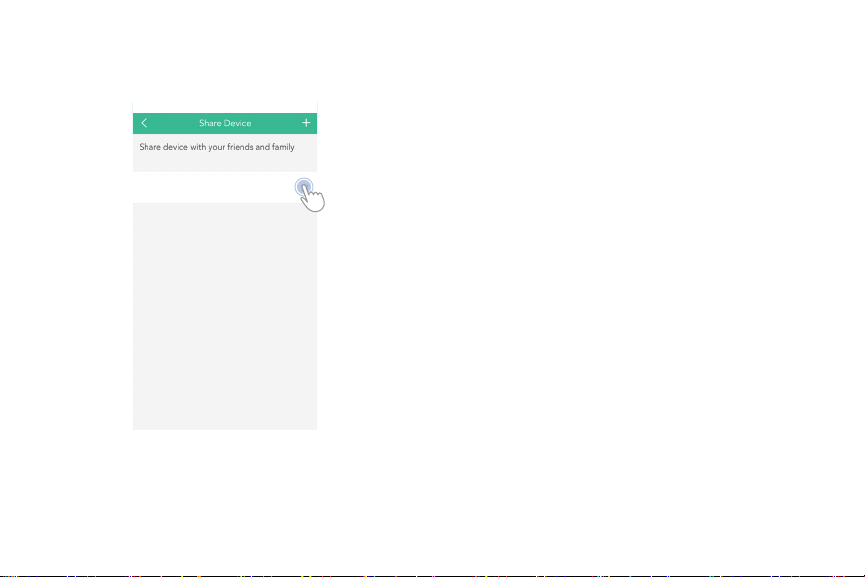
Share Device
Note: You cannot share your device if you have not
created a VeSync account.
1. To allow your friends and family to control your
outlet, tap “+” on the upper right-hand corner to
share.
2. Enter the person’s email and tap “Share.”
32
3. Tap the trash can icon to delete people who you
have shared your device with.
Note: The persons you share your device with
cannot edit or delete your device settings.
User

33
Energy Saving Mode
The VeSync App allows you to program the smart
Wi-Fi outlet to save energy based on the cost per
kilowatt hours (kWh).
1. On the Device Setting menu, tap “Energy Saving
Mode” to access the Energy Saving Mode settings.
2. Turn on the Energy Saving Mode. Enter your Cost
per KWh and Max cost. Tap to “Save” when you
are done. Your device will now turn off once it has
reached your max cost setting.
34
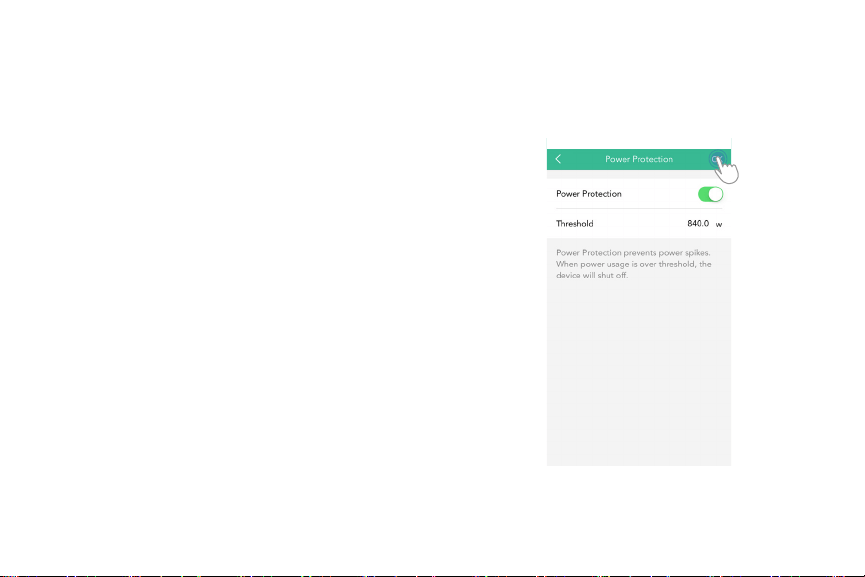
Power Protection
The Power Protection mode enables you to program
the outlet to prevent power spikes from damaging
your connected devices.
1. On the Device Setting menu, tap “Power
Protection” to access the Power Protection
settings.
2. Activate the Power Protection mode, enter a
threshold, and tap ”OK” to save. The device will turn
off when power usage has exceeded the threshold.
Note: This Wi-Fi outlet is not a professional energy
calculating device. The outlet only provides rough
estimates and should not be relied on as a primary
source for power protection.
35
Reconfiguring a Device
1. Unplug your connected device from the Wi-Fi
Outlet. Press and hold the power button on the
outlet for about 5 seconds until the LED indicator
shines solid blue.
2. Tap the “+” button on the screen to add your
device.
36
3. Select “Wi-Fi outlet.” 4. Select this model.

37
Note: A purple LED light means yellow and blue light
are on at the same time. If your LED light is yellow
or off, please reconfigure the outlet.
Note: This Wi-Fi outlet configuration only supports a
2.4GHz Wi-Fi network.
5. Plug your smart outlet into a powered electrical
outlet or power strip, then check the LED indicator.
If the indicator light is solid blue, then you can tap to
continue setup.
6. Type in the name of your home Wi-Fi network and
password, then tap “Join Network.”
WiFi123
38
7. The system will take a moment to connect. If you
tap “Cancel” you will be taken back to the setup
screen.
39
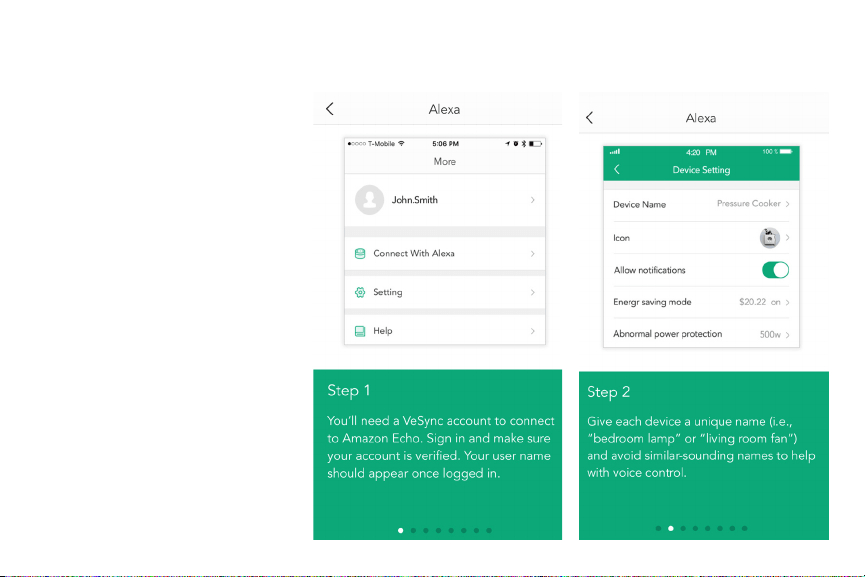
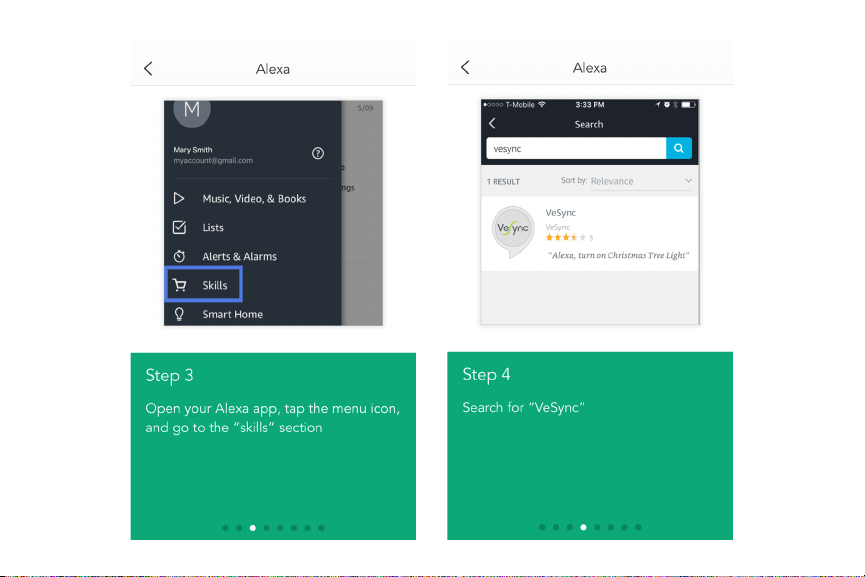
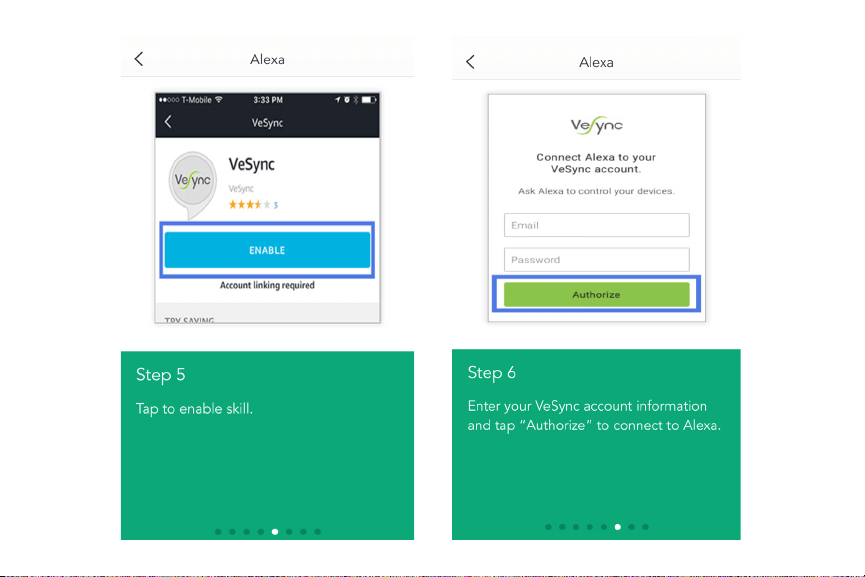
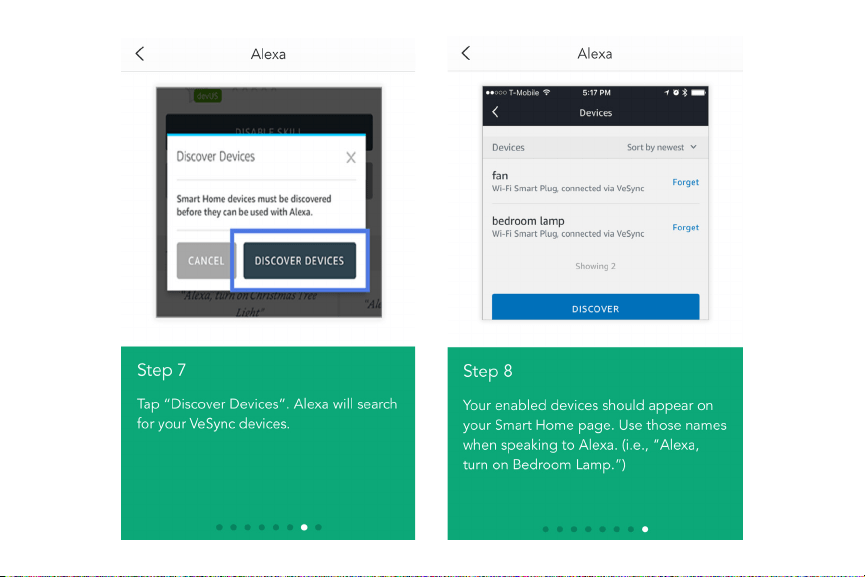
Connect with Alexa
Note: You must create a VeSync
account to connect with Alexa.
To view these instructions on the
VeSync app, tap “More” on the My
Devices page, then tap “Connect
with Alexa.”
40
41
42
43
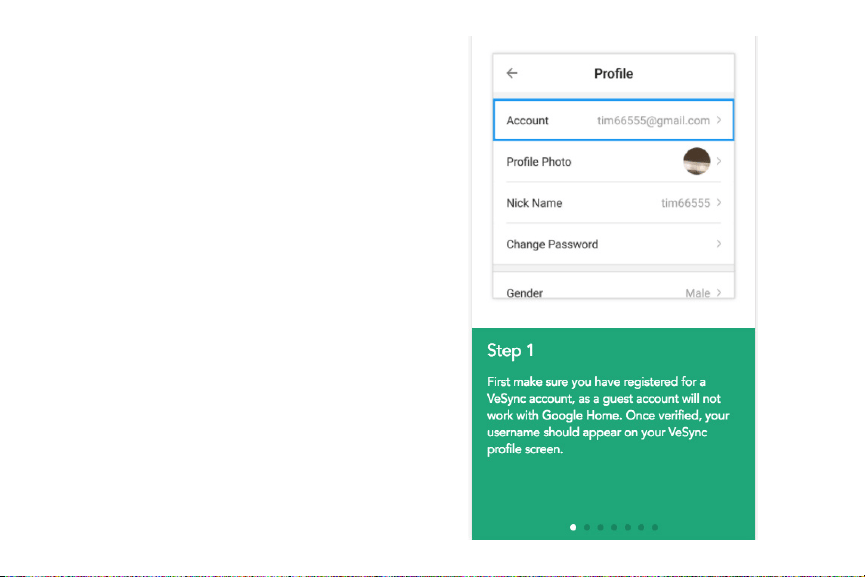
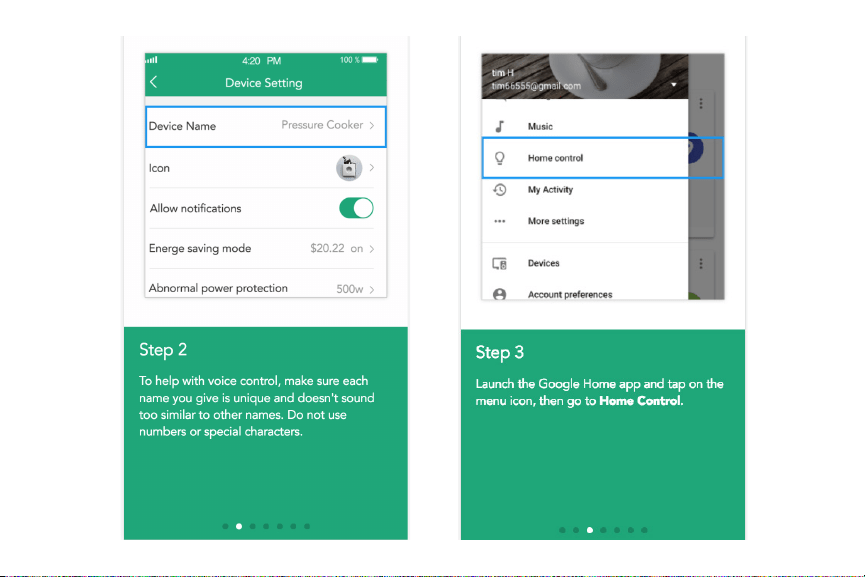
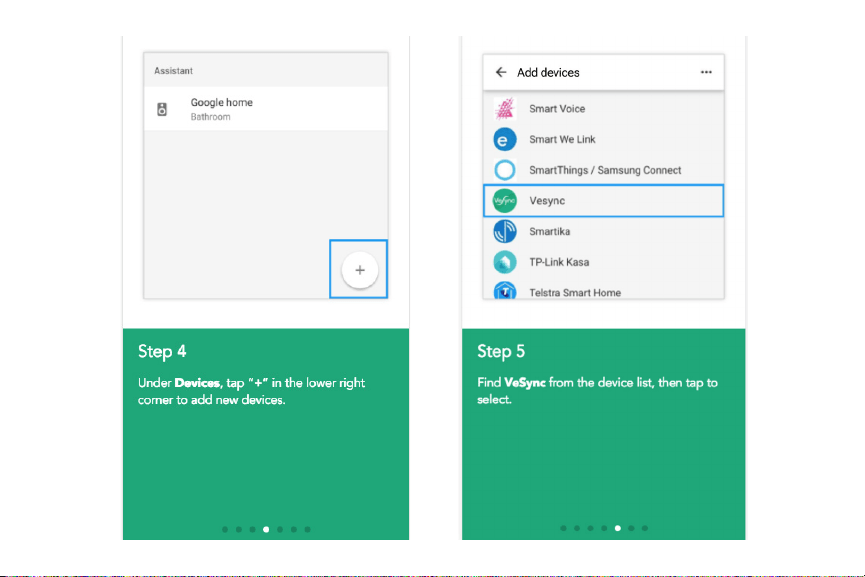
Connect with Google Home
Note: You must create a VeSync
account to connect with Google Home.
To view these instructions on the
VeSync app, tap “More” on the My Devices page,
then tap “Connect with Google Home.”
44
45

46
47
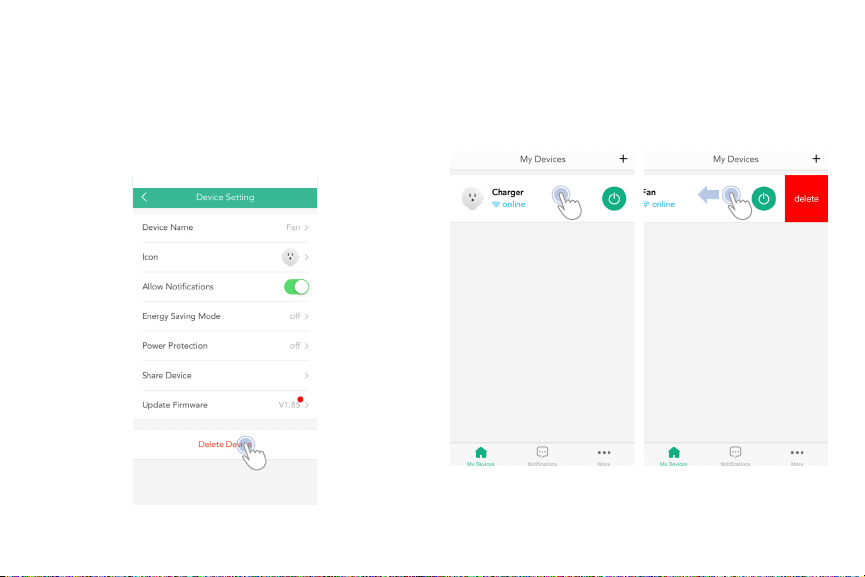
Delete a Device
1. You can delete your device on the Device Setting
menu. This option is located at the bottom of the
screen.
Android devices: On the
“My Devices” screen,
press and hold for 2
seconds to delete.
iOS devices: On the “My
Devices” screen, swipe
left to delete.
HOLD 2
SECONDS
Note: People whom you have shared the device with
cannot delete it.
48
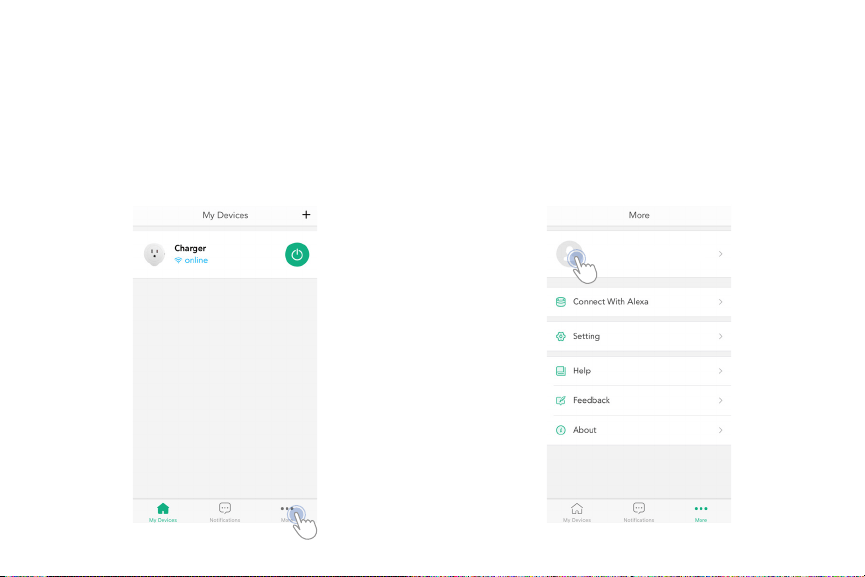
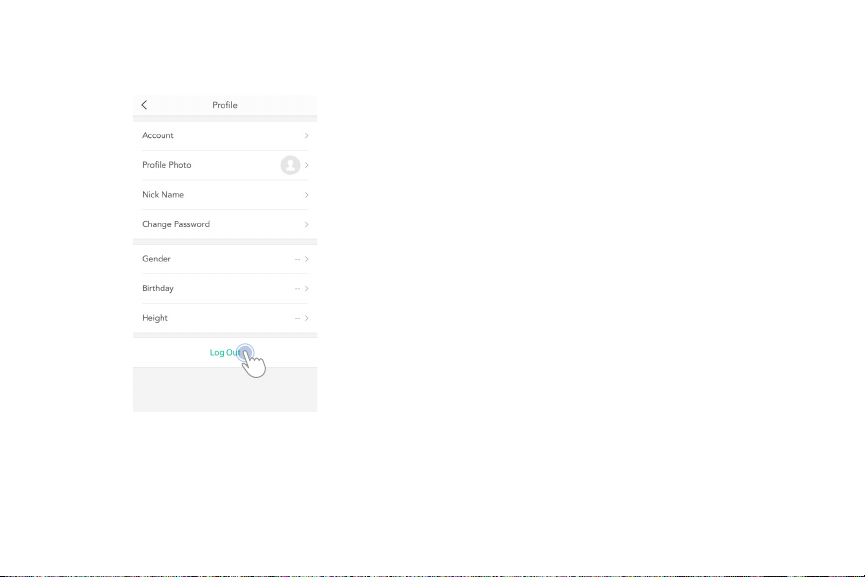
Log Out
Note: You do not need to log out if you have not
created a VeSync account.
1. Tap on “More”.
1. Tap your profile picture.
User

50
Specifications
Communication Mode IEEE802.11b/g/n (Wi-Fi)
Communication Frequency 2400 - 2483.5 MHz
Wireless Distance (Outlet to Router) 98 - 164 feet | 30 - 50 meters
(max visible range)
Maximum Switch Current 8A
AC Power Supply Range & Supply Frequency 120V, 60Hz
Rf PA Power 25 dBm
Power Consumption 0.7 - 1.2 W
Operating Environment 14°F ~ 104°F | -10°C ~ 40C°
Storage & Transportation Environment -4°F ~ 104°F | -20°C ~ 60C°
Size 102mm x 62mm x 30mm
Compatible Systems Android 4.0 or higher | iOS 7.0 or higher
NOTE: Your outlet Wi-Fi signal range may be shortened or adversely affected by one or more of the following: your Wi-Fi
network operation power rate, the Wi-Fi sensitivity of the receiving device, thick building walls and surrounding electrical
devices.

51
Troubleshooting
Q: Why won’t my device respond to my app
remote commands?
• Ensure that your Wi-Fi network is working
properly and that the Wi-Fi outlet is properly
plugged in and connected to a device.
• Check to make sure the Wi-Fi outlet isn’t placed
too far from the wireless network router. It must
be within a 164 ft (50m) visible range from the
router.
Q: Why won’t the power usage data update in the
app even when my outlet is in use?
• Sometimes it takes some time for the power
usage data to update. If you’re using a low power
consumption appliance, data may take longer to
transfer.
Q: Why won’t the VeSync app allow me to add a
device?
• The outlet has been reconfigured.
• If the device network was set up by another user,
have the primary user share the device with you
so that you can set up the outlet on your mobile
device.
• Make sure your Wi-Fi outlet’s firmware is up to
date.
• Make sure the Wi-Fi password you’re inputting is
correct.
• Try configuration using APN mode.
• Remove the Wi-Fi outlet from its power supply;
wait a few seconds and plug the outlet back in
and re-attempt configuration.
Q: After adding a device, why won’t the device
icon appear on the main screen of the VeSync
app?
• Refresh the main menu screen and the device
should then normally appear on the screen.
Q: After moving a Wi-Fi outlet to another socket,
the outlet is appearing as offline or the light is
slowly blinking blue. Why is this happening?
• Check to make sure the Wi-Fi outlet isn’t placed
too far from the wireless network router. It must
be within a 164 ft (50m) visible range from the
router.
• Check to make sure the wireless network has not
changed and is functioning normally.
• Reset the outlet by pressing and holding
the outlet power button for 20 seconds and
releasing when the indicator light begins to flash
quickly. Then, re-configure the outlet with the
network.
52
Warranty
Terms & Policy
Etekcity warrants all products to be of the highest quality in material, craftsmanship and service for a
minimum of 1 year effective from the date of purchase. Warranty lengths may vary between product
categories.
Should you encounter any issues or have any questions regarding your new product, feel free to contact our
helpful Customer Support Team. Your satisfaction is ours!
Please scan here for the full warranty.

53
Customer Support
Should you encounter any issues or have any questions regarding your new product, feel free to contact our
helpful Customer Support Team. Your satisfaction is ours!
Customer Support
Etekcity Corporation
1202 N Miller St. Suite A
Anaheim, CA 92806
Toll-Free: (855) 686-3835
Fax: (657) 202-1693
Local: (657) 500-1872
Email: support@etekcity.com
Support Hours
Monday - Friday:
9:00 am - 5:00 pm PST
*Please have your order number ready before
contacting customer support.

54
Connect with us @Etekcity.

Scan here to join the community!
Visit us at www.etekcity.com
Building on better living.