Documents: Go to download!
User Manual
- User Manual - (English)
- Quick start guide - (English)
- Leaflet - (English)
- Quick Install Guide - (English)

- Connections and setup
- AC power
- Roku TV Remote
- The Home screen
- Using your TV
- Adjusting TV settings
- Customizing your TV
Table of contents
HD LED SMART TV USER MANUAL
Connections and setup
Connecting an antenna, cable, or satellite box
If you are using an antenna, CATV cable without a set-top box, or a cable or satellite box that has only an antenna output, connect a 75-ohm coaxial cable (not provided) from the device to the ANT/CABLE input on the TV.
Tip: If you are using an antenna with a 300-ohm twin-lead cable, you need to use a to-75-ohm adapter (not provided) to adapt the twin-lead cable to a connection that is compatible with the TV’s antenna input.
Tip: If you receive your TV stations through a set top box from a cable or satellite TV provider, connect it to the TV using the best connection method available. From most to least desirable:
- HDMI® input – Digital HD and SD video
- AV input – analog SD video
- Antenna input – analog SD video using NTSC
Connecting external equipment with a composite AV video cable
If the best connection available on your device is AV or composite video output, connect it to the TV using a composite AV cable (not provided). Composite AV cables typically have three RCA-type plugs on each end, color coded as follows:
- Yellow – Video
- Red – Audio, right channel
- White or black – Audio, left channel
Connect each plug to the corresponding connector on the device and on the TV.
Note: Select models have an AV Input that looks like a headphone jack. Use the breakout cable (included) to adapt this input to the three RCA-type plugs on your composite cable.
Connecting external equipment with an HDMI® cable
If possible, connect your devices using HDMI® cables (not provided). They help to provide the best video quality and also carry audio signals, so that only one cable is needed. For better picture quality, we recommend that you use cables designated as High Speed HDMI® Cables.
Tip: You might need to configure the device to send its signal through its HDMI® connector.
The connector labeled HDMI (ARC) has the additional ability to use the audio return channel to send digital audio to a receiver or soundbar, as explained in Connecting an AV receiver or digital soundbar. Only on select models: The connector labeled HDMI (eARC) provides the same functionality as the HDMI ARC connector, plus the ability to pass through full-resolution sound formats such as Dolby Atmos and DTS:X from and to devices that support these formats, without additional processing by the TV. Additional details are provided in Choosing an audio format.
Connecting headphones or analog sound bar
You can connect headphones or an analog sound bar (not provided) to the TV’s headphone jack.
Tip: Inserting a plug in the headphone jack disables the sound from the TV’s built-in speakers.
Warning: Loud noise can damage your hearing. When using headphones, use the lowest volume setting on your headphones that still lets you hear the sound.
Select models also have an audio line out connection that is not affected by TV volume or mute settings and does not disable the TV speakers. Use this connection when you want to use your amplifier or sound bar to control the TV volume. To turn off the TV’s built-in speakers, in the Home screen menu, navigate to Settings > Audio TV speakers and change the setting.
Connecting headphones to the Roku Voice Remote Pro
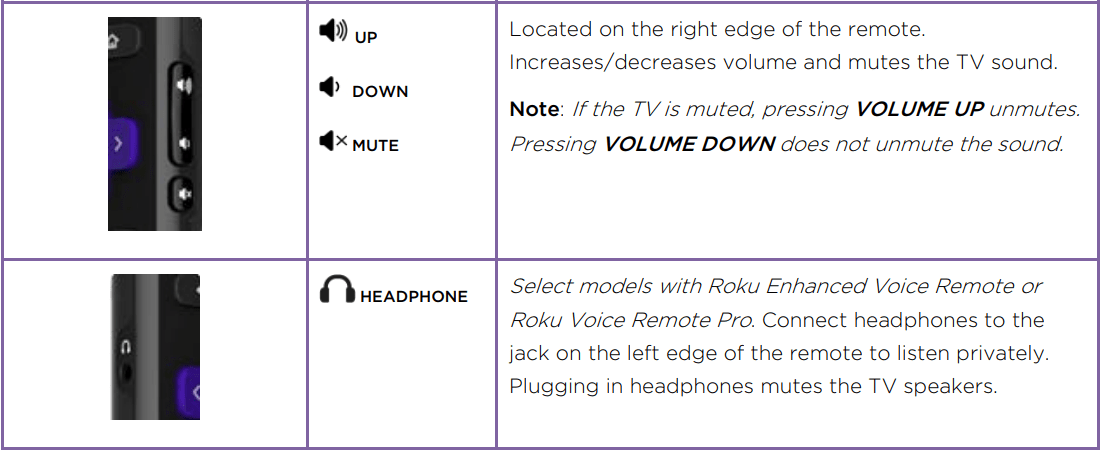
Select Roku TVs come with the Roku Enhanced Voice Remote or Roku Voice Remote Pro. On these models, you can connect headphones to the jack on the left side of the remote.
Tip: Inserting a plug in the remote’s headphone jack disables the sound from the TV’s built-in speakers or attached receiver or soundbar. The volume and mute controls on the right side of the remote adjust the volume level of the connected headphones.
Warning: Loud noise can damage your hearing. When using headphones, use the lowest volume setting on your headphones that still lets you hear the sound. You might notice that connecting headphones to your remote shortens the remote’s battery life somewhat
Connecting an AV receiver or digital sound bar
You can enjoy Dolby Audio™ multichannel sound from your TV if you connect a digital amplifier or soundbar (not provided) in any of the following ways:
Digital optical audio out (S/PDIF) – Connect a TOSLINK optical cable (not provided) from the TV to the Optical input on your receiver or soundbar.
HDMI® ARC – Connect an HDMI® cable (not provided) from the HDMI (ARC) connector to the HDMI® input on your receiver or soundbar. This connection uses the Audio Return Channel (ARC) feature of HDMI® to output sound from the TV to a compatible device. To use this feature, you must configure the TV to enable HDMI® ARC, as explained in Setting up a digital audio connection.
HDMI® eARC – Select models only: Connect an HDMI® cable (not provided) from the HDMI (eARC) connector to the HDMI (ARC) or HDMI (eARC) input on your receiver or soundbar. If your receiver or soundbar supports HDMI enhanced ARC (eARC), the TV can pass through full-resolution sound from programs containing enhanced audio. If your receiver or soundbar does not support eARC, use the TV’s eARC port to make the connection to the device’s ARC port. The eARC port is backward compatible with the ARC standard.
Preparing for Internet connectivity
If you want to watch streaming content and take advantage of most of the cool features of your Roku TV, connect it to the Internet through a wireless modem/router or a wireless access point (not provided). The TV has a built-in wireless LAN adapter.
Note: The TV supports only its internal wireless network adapter—it does not support the use of a USB network adapter.
Select models have both wired and wireless network connectivity. To use the wired network connection, connect an RJ-45 Ethernet cable (not provided) from the jack on the back of your TV to your network router or switch. The wired connection automatically supports both 10 Base-T and 100 Base-T Ethernet.
AC power
Plug your TV into a power outlet. You can tell that the TV has power because the status indicator lights up when the TV is off.
The topic Status indicator explains how the status indicator shows what is happening with the TV.
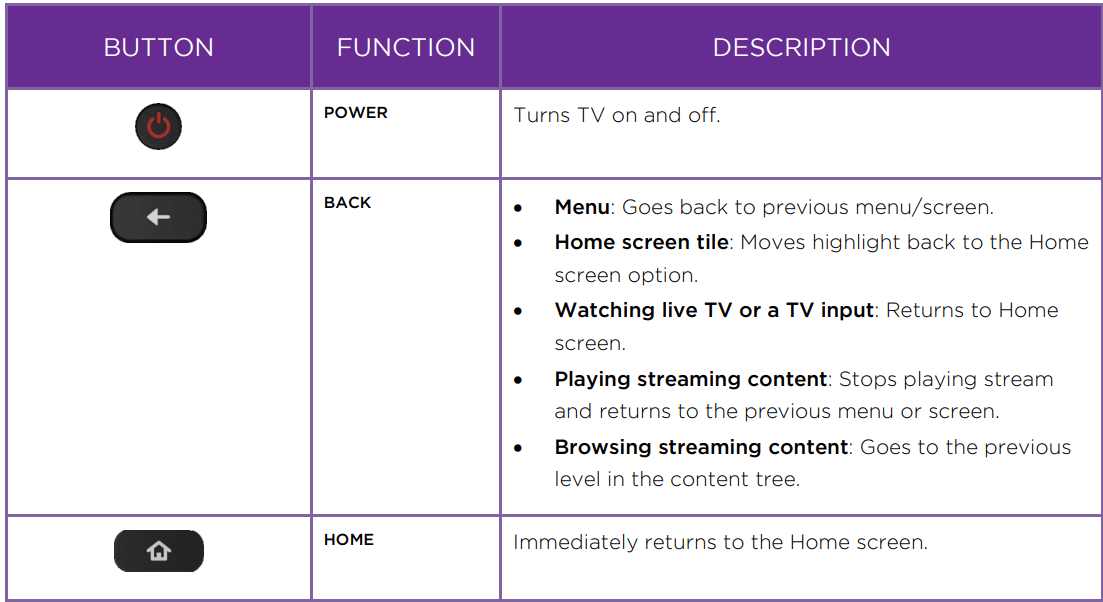
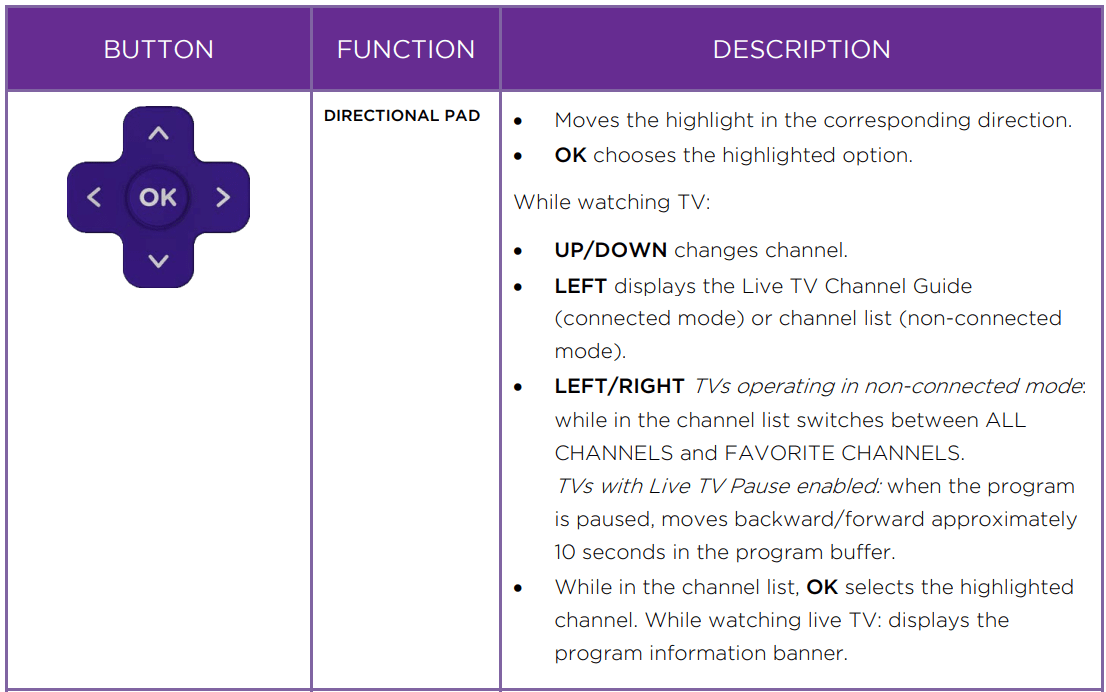
Roku TV Remote
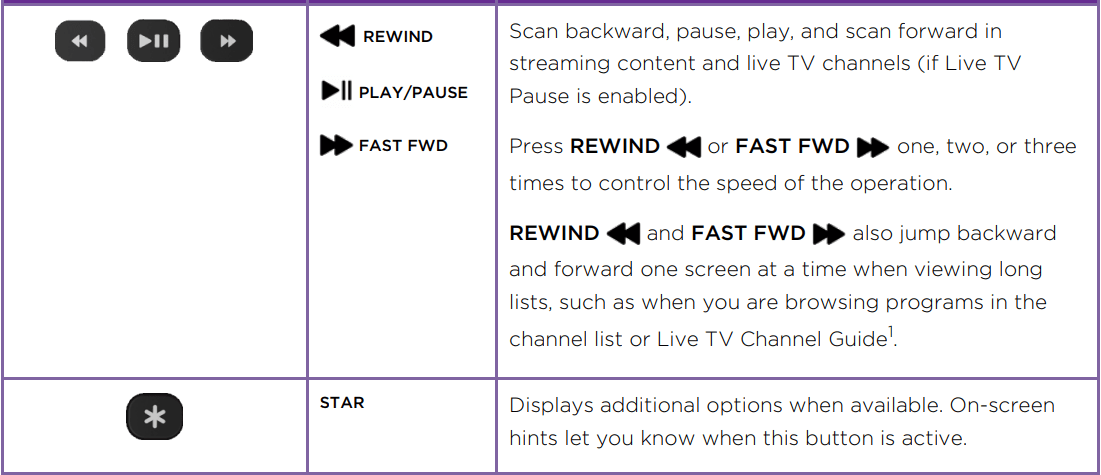
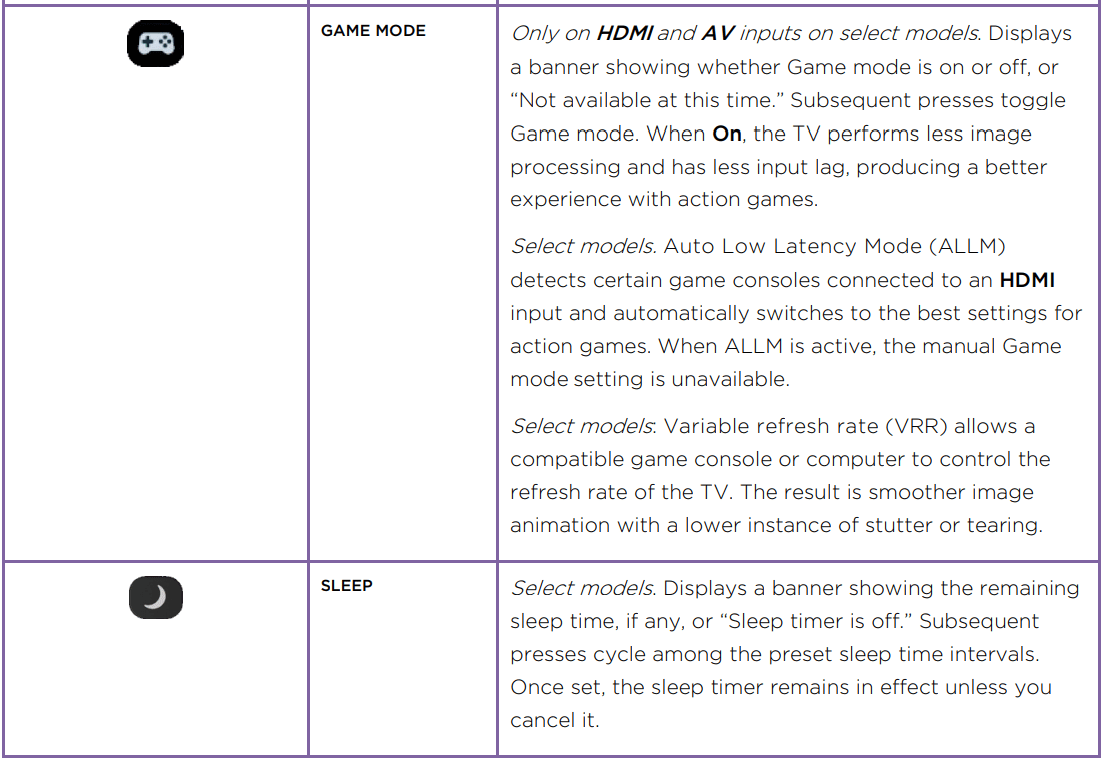
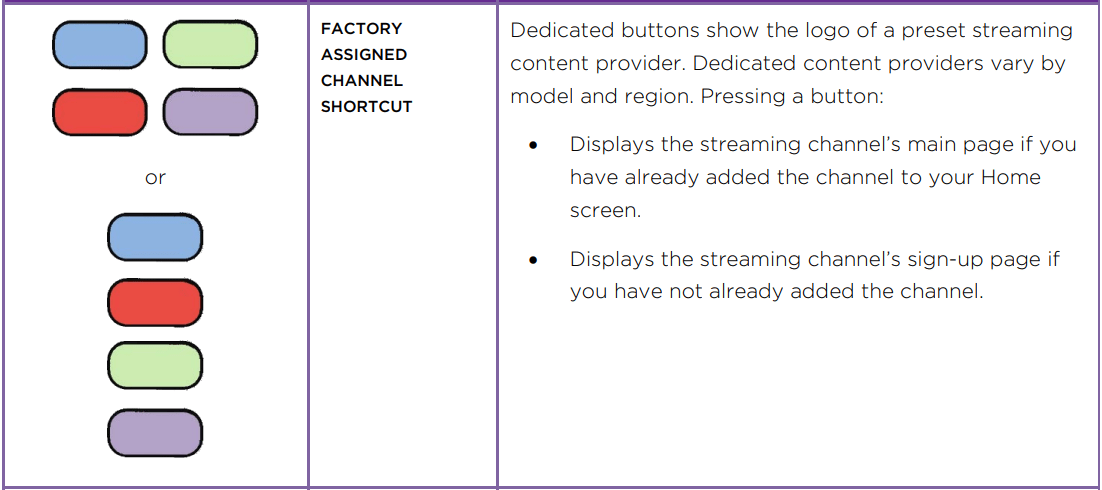
Use the following information to identify the buttons on your Roku remote.
Note: Remote buttons and features vary somewhat by model. Your remote might not have all buttons or features listed.
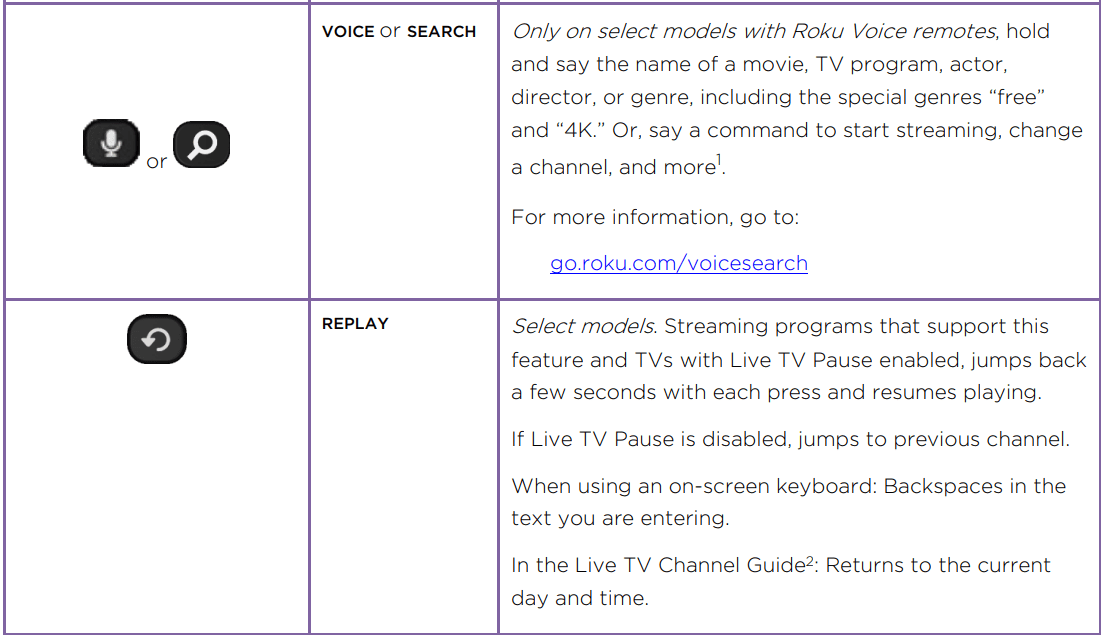
- If your remote has a VOICE
 just below the purple pad, you have a Roku Voice Remote.
 - If your remote has a headphone jack on its left edge, you have a Roku Enhanced Voice Remote or Roku Voice Remote Pro.
Roku Voice remotes have additional capabilities as noted in the following table.
Panel buttons
Your TV has buttons on its side, bottom, or back panel that perform simple control functions. The TV panel buttons are not a substitute for the remote, as they do not give you access to all TV functions.
Depending on model, your TV model has one of several different panel button designs. Choose the one that applies to your TV from the following list:
- Single button
- Three buttons
- Game-pad style joystick
- Four buttons
- Five buttons (with mute)
- Five buttons (without mute)
- Seven buttons
Single button
If your TV has this style of panel button, you can perform the following functions:
- Turn TV on: short press.
- Display the Input List: short press when TV is on.
- Select the next input in the Input List: short press while the TV is showing the Input List.
- Dismiss the Input List without changing inputs: no press.
- Turn TV off: long press.
Short press = less than two seconds
Long press = more than two seconds
No press: = no press within two seconds.
Three buttons
If your TV has this style of panel buttons, you can perform the following functions:
- Turn TV on: middle button, short or long press.
- Volume up: right button when Input List is not active.
- Volume down: left button when Input List is not active.
- Display Input List: middle button, short press when TV is on.
- Highlight next input in the Input List: right button when Input List is active.
- Highlight previous input in the Input List: left button when Input List is active.
- Select highlighted item in the Input List: middle button, short press, or no press.
- Turn TV off: middle button, long press.
Short press = less than two seconds
Long press = more than two seconds
No press: = no press within four seconds
Game-pad style joystick
If your TV has this style of panel button, you can perform the following functions:
|  |
Four buttons
If your TV has this style of panel buttons, you can perform the following functions:
- Power: Turns the power on and off.
- Input: Selects among TV inputs. Each press moves down one item. Pausing for a few moments selects the highlighted item.
- Volume +: Increases the volume.
- Volume –: Decreases the volume.
Five buttons (with mute)
If your TV has this style of panel buttons, you can perform the following functions. Note that the order of the buttons might vary from model to model. Examine the panel button labels to determine your TV model’s layout.
- Power: Turns the power on and off.
- Input: Selects among TV inputs. Each press moves down one item. Pausing for a few moments selects the highlighted item.
- Volume +: Increases the volume.
- Volume –: Decreases the volume.
- Mute: Mutes and unmutes the sound.
Five buttons (without mute)
If your TV has this style of panel buttons, you can perform the following functions. Note that the order of the buttons might vary from model to model. Examine the panel button labels to determine your TV model’s layout.
- Power: Turns the power on and off.
- Input +: Selects the next TV input. Each press moves down one item. Pausing for a few moments selects the highlighted item.
- Input -: Selects the previous TV input. Each press moves up one item. Pausing for a few moments selects the highlighted item.
- Volume +: Increases the volume.
- Volume –: Decreases the volume..
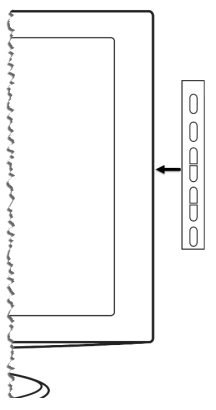
Seven buttons
If your TV has this style of panel buttons, you can perform the following functions. Note that the order of the buttons might vary from model to model. Examine the panel button labels to determine your TV model’s layout.
|  |
The Home screen
Note: A paid subscription or other payments may be required for some channel content. Channel availability is subject to change and varies by country. Not all content is available in countries or regions where Roku® products are sold.
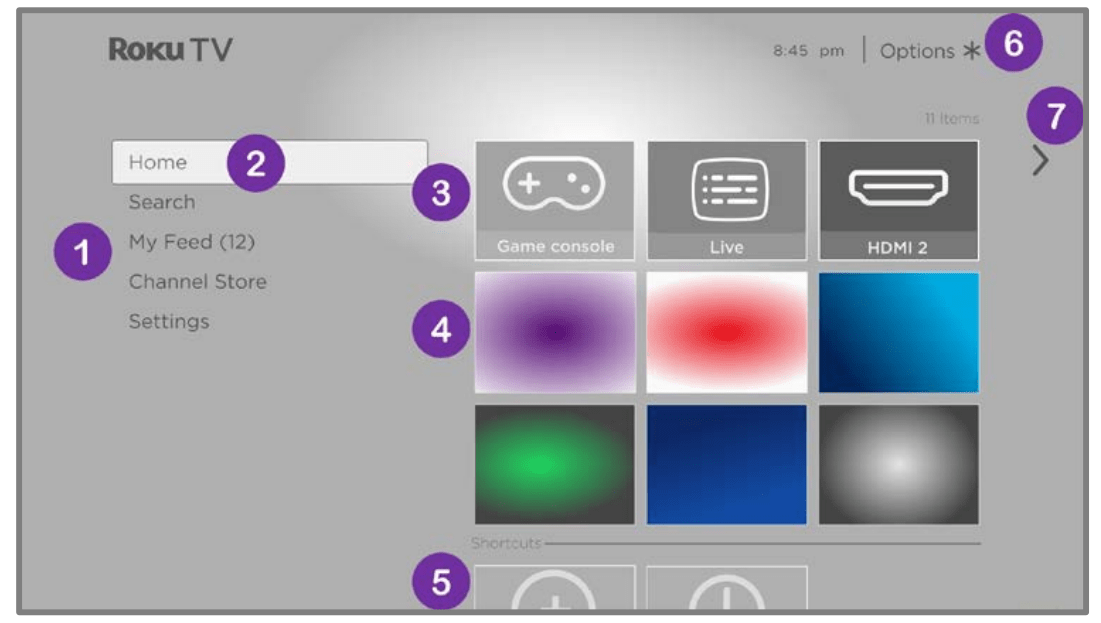
Typical connected Home screen
Note: The options appearing in the left navigation area vary by geographic location and might change from time to time.
- Home screen menu—shows options available to you when you are on the Home screen.
- Highlighted option—press OK to select.
- TV input tiles—select an input to watch the connected device.
- Streaming channel and app tiles—select a tile and press OK to go to the indicated streaming channel or application. You can add any number of channels from the Roku Channel Store.
- Direct access tiles – shortcuts to often used features.
- Options hint—press STAR
 to see options when this symbol is present.
 - Next screen hint—press RIGHT to see the next screen.
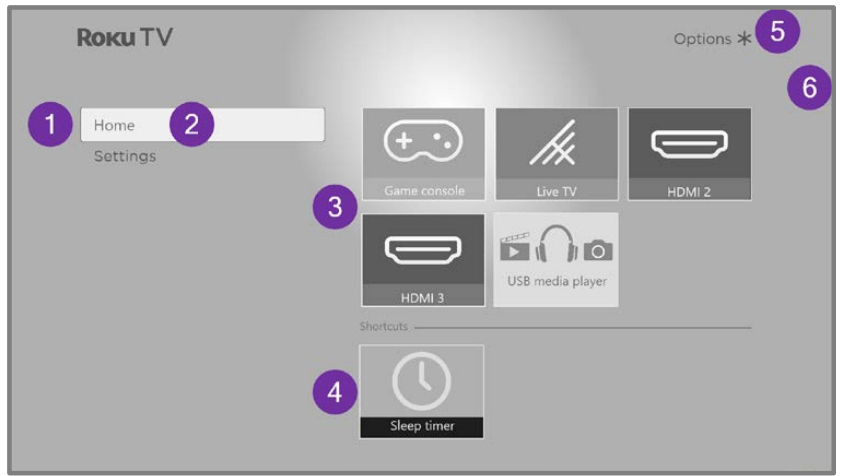
Typical non-connected Home screen
- Home screen menu—shows options available to you when you are on the Home screen.
- Highlighted option—press OK to select.
- TV input tiles—select an input and press OK to watch the connected device.
- Direct access tiles – shortcuts to often used features.
- Options hint—press STAR
 for options when this symbol is present.
 - Next screen hint—press RIGHT to see the next screen.
Personalize your Home screen
There are many things you can do to personalize your Home screen and make it just right for you and your family:
- Only in connected mode: Add streaming channels by using the Streaming Channels menu option or the Add Channels shortcut to browse the Roku Channel Store.
- Only in connected mode: Change the screen theme by going to Settings > Themes to find and pick one to suit your mood.
- Customize the Home screen. Hide or show the shortcut tiles that appear at the bottom of your Home screen grid. Only in connected mode in the United States, hide Featured Free or hide Movie Store and TV Store.
- Remove a tile by highlighting it and pressing STAR
 . Then highlight Remove input or Remove channel and press OK.
 - Move a tile by highlighting it and pressing STAR
 . Then highlight Move input or Move channel and press OK. Use the purple directional pad to move the tile, and then press OK to lock it in its new location. Move the shortcut tiles within the shortcut area only.
Shortcuts are designed to always appear at the very bottom of the grid, so you can access them quickly by pressing UP once when you’re at the top of the grid
- Only on channels that you have subscribed through your linked Roku account, manage your subscriptions by highlighting a streaming channel tile and pressing STAR
 . Then highlight Manage subscription and press OK. Select Cancel subscription and then follow the instructions to confirm your cancellation.
 - Rename a TV input tile by highlighting it and pressing STAR
 . Then highlight Rename input and press OK. Highlight a new name in the list, and then press OK to assign that name to the tile.
 - Rename a TV input tile by highlighting it and pressing STAR . Then highlight Rename input and press OK. Highlight a new name in the list, and then press OK to assign that name to the tile.
Rather than using the predefined names and icons, you can set a custom name and icon. To do so, scroll up or down to highlight Set custom name & icon, and then press OK. Follow the instructions on the screen to enter a name and select an icon for the input.
Note: If you specify a custom name for an input, voice commands will not reliably switch to that input. Voice commands typically can only switch among inputs that use built-in names, such as “AV,” and “Cable Box,” and “DVR.”
Using your TV
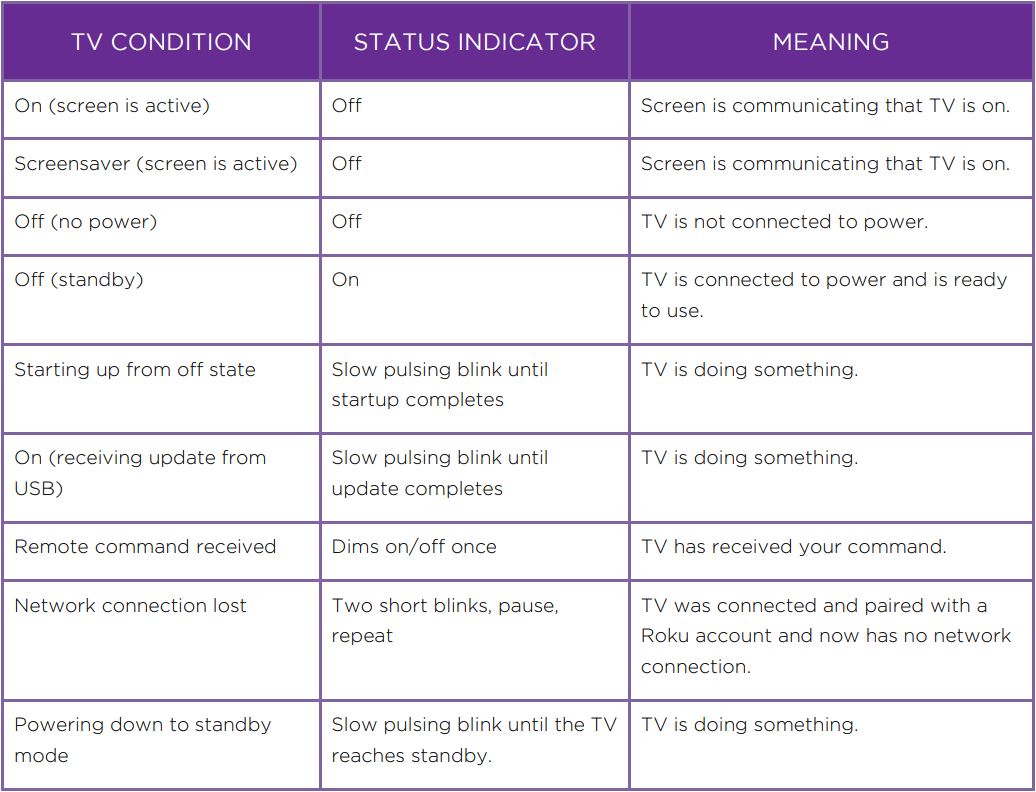
Status indicator
Your TV has a single status indicator. It goes on and off and blinks in different ways depending on the status of the TV, as shown in the following table:
Standby mode energy savings
When you turn off your TV, it remains in a higher power mode for a few minutes, after which it goes into a very low power standby mode. If you turn on the TV again before it has entered the very low power mode, it turns on immediately. After the TV goes into the lower power standby mode, it takes a few seconds longer to start up.
Only in connected mode, you can optionally enable Fast TV start. When this option is enabled, your TV starts up almost immediately regardless of how long it has been turned off, but uses somewhat more power in standby mode. Fast TV start also gives you access to some additional features, such as turning on the TV with voice commands and turning off the screen when listening to music. For more information, see Fast TV start.
Getting help
Only in connected mode, you can get two different types of help:
- Tips and tricks videos: Only in the United States, from the Home screen menu, navigate to Settings > Help and select Roku Tips & Tricks.
- Help with Roku voice: Navigate from the Home screen menu to Settings > Help and select Voice help. Or from your Roku voice remote or the Roku mobile app, press VOICE
 and say “Help.”
Opting in to Smart TV experience (U.S. only)
Only in connected mode in the United States, the first time you select live TV, an HDMI input, or AV input, your TV offers to enable the Smart TV experience. If you decide to enable it at this time, you’re all set to enjoy its recommendations and features.
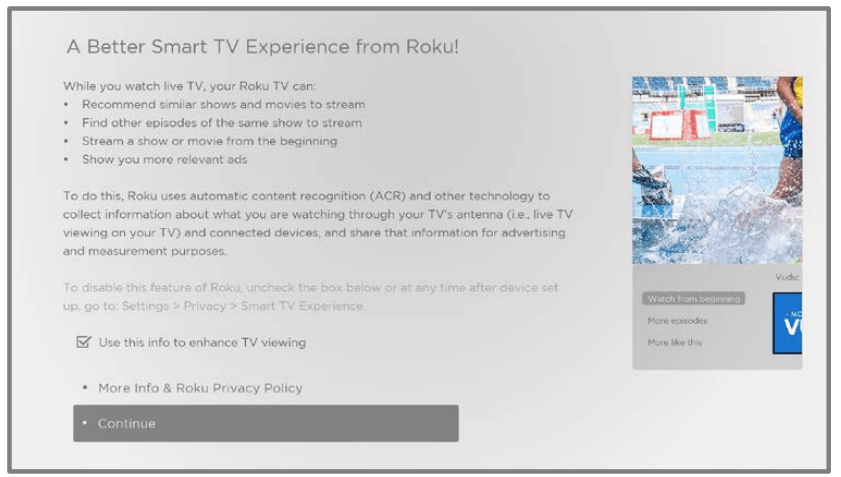
The Smart TV experience uses automatic content recognition (ACR) and other technology to collect information about what you watch on live TV, and on devices like media players and cable boxes connected to the HDMI or AV inputs. Opting in means that you give permission to analyze the programs you watch for the purpose of making recommendations, as well as showing ads that are more relevant to you.
If you decide not to enable the Smart TV experience at this first opportunity, you can enable it later. Or, if you decide you’d rather not use the feature, you can disable it, but be aware that previously collected information is retained and not deleted.
Disable Smart TV experience
If you decide you want to disable Smart TV experience, follow these steps:
- From the Home screen menu, go to Settings > Privacy > Smart TV experience.
- Navigate to the right to highlight Use info from TV inputs.
- Press OK on the remote to clear the check box.
Disable Auto Notifications
If you want to keep the Smart TV experience enabled, but you do not want to see notifications while you are watching programs, you can disable notifications. To do so, follow these steps:
- From the Home screen menu, go to Settings > Privacy > Smart TV experience.
- Navigate to the right to highlight Use info from TV inputs.
- Press DOWN to highlight Enable auto notifications.
- Press OK to clear the check box.
Note: These settings do not affect recommendations for More Ways to Watch that you see in the Live TV Channel Guide when watching live TV channels. Those recommendations show up only in the Live TV Channel Guide and do not rely on ACR technology
Watching live TV channels
Select the Live TV tile in the Home screen. Your TV remembers the last channel you watched and starts with that channel playing.
Changing channels
To change channels, you can do any of the following:
- Press UP to change to the next higher channel.
- Press DOWN to change to the next lower channel.
- Press LEFT to display the channel list or Live TV Channel Guide1 , and then press the arrow keys to select the channel or program you want to watch. Press REWIND
 or FAST FWD
  to move through the list one page at a time. When you’ve highlighted the channel or program you want to watch, press OK. (If you decide you don’t want to change channels, press BACK
 )
) - Only if Live TV Pause is not enabled, press REPLAY
 to jump to the previous channel. Press again to return to the channel you were watching before you pressed REPLAY
  .
.
Note: If the REPLAY  is not available on your remote, you can use this feature in the Roku mobile app
Using the Live TV Channel Guide (U.S. only)
Only in connected mode in the United States, use the Live TV Channel Guide to find both over-the-air and live streaming TV programs. The Live TV Channel Guide lets you scroll through all the TV channels you receive (except those you have hidden, if any), plus a large number of live streaming programs. You can see what’s on right now and the upcoming 14 days.
For live, over-the-air TV programs, you can use More Ways to Watch to find the program you’re watching and start watching it from the beginning from one of your streaming channels. Your clue that there are More Ways to Watch a program is a purple star ( ) next to the program name in the guide.
For example, you might turn on your TV at 10 minutes past the hour and discover you are missing the current episode of Empire. But there is a purple star next to the program title, so you can press STAR  and find that there are several streaming channels where you can watch the current episode from the beginning. You also can find more episodes of Empire, and other programs that have a similar theme.
Note: A paid subscription or other payments may be required for some streaming channels.
To open the Live TV Channel Guide, press LEFT while watching live TV. It opens with the name of the current program highlighted, and a lot more information.
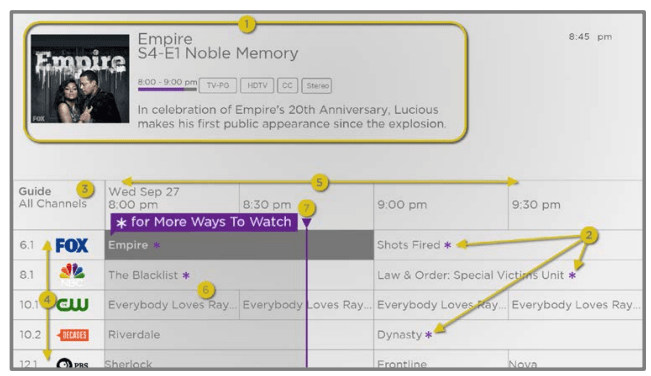
- Program information for the highlighted program. See Viewing program information for details.
- More Ways to Watch indicator. See More Ways to Watch for more information.
- Channel filter. Currently set to All Channels.
- Channel list. Navigate UP or DOWN.
- Time slots. Navigate LEFT or RIGHT. Press FAST FWD
 or REWIND
  to skip ahead or back a screen at a time.
 - Program list. Shaded area is prior to the current time.
- Progress bar. Shows the current time within the listed programs.
When you are viewing the current time slot, notice that the Live TV Channel Guide shows a light gray background for portions of programs before the current time, and a dark background for programs and portions of programs that have not yet aired.
The line dividing these two zones is the progress bar.
Navigating the Live TV Channel Guide in connected mode (U.S. only)
Only in connected mode in the United States:
- Use the purple directional pad to move up, down, left, and right.
- To switch to a program that is currently in progress, highlight it, and then press OK. (Note that pressing OK on a past or future program does nothing.)
- To return to the current time after navigating to a different time slot, press REPLAY
 .
. - To return to the currently airing program without causing a channel change, press BACK
 .
. - To see More Ways to Watch, highlight any program that has a purple asterisk and then press STAR
 .While using the Live TV Channel Guide, navigate all the way to the left so that a channel number is highlighted, and then press STAR
  to open the Channel options dialog.
Changing channel options in connected mode (U.S. only)
Only in connected mode in the United States, while using the Live TV Channel Guide, navigate all the way to the left to the channel number column, and then press STAR  to open Channel options.
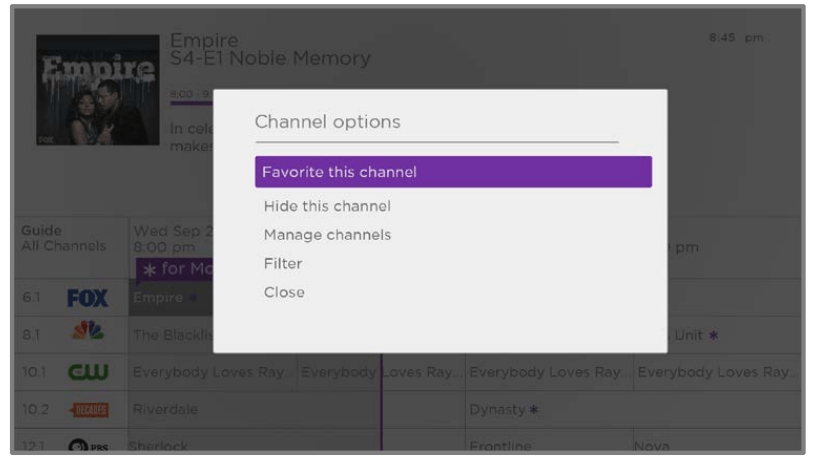
Favorite/Unfavorite this channel – Select this option to make the selected channel a favorite. Select again to remove the channel from your favorites. Use the Filter option to show only favorite channels.
Hide/Unhide this channel – Select this option to hide the current channel. Select again before moving on to unhide the channel if you hid it by mistake. But note that once you close the dialog, you cannot access the channel to unhide it. Instead, use the Manage channels option to unhide hidden channels.
Manage channels – Opens the Manage Channels menu where you can edit the channel lineup and mark certain channels as favorites. See Manage channels.
Filter – Opens the Filter dialog where you can choose to see:
- All Channels – Show all channels that you can receive.
- Recents – Show only recently tuned channels in the order in which you watched them.
- Favorites – Show only channels you have marked as favorites.
Viewing program information
You can view program information in different ways:
- When you are viewing a program and no other guides or menus are open, press OK to view program information in a banner at the bottom of the screen. This program information appears both in connected and non-connected modes. The following illustration shows the information that is available.
Program information banner
Program information might include any or all of the following, depending on availability within the broadcast information:
- Channel number
- Channel call sign
- Signal strength
- Program title and episode name/number
- Start time, end time, and graph of program length showing current position
- Content rating
- Video resolution (480i, 480p, 720p, 1080i, 1080p, 4K)
- Frame rate (24Hz, 30Hz, 60Hz for television sources, 60Hz, 70Hz, 72Hz, 75Hz for computer sources)
- Audio format (Mono, Stereo, Dolby Audio™ logo)
- Audio features (SAP/MTS)
- Only on select 4K models: HDR or Dolby Vision™ 1 logo (HDMI® and streaming sources)
- Closed captioning (CC)
- Current time
- Program description.
Tip: If you’ve set up Live TV Pause and you’re watching live TV, you’ll also see a progress bar showing the current playback position within the rolling 90-minute pause time
- Only in connected mode in the United States, view program information for any program listed in the Live TV Channel Guide. Press LEFT while watching live TV to see the Live TV Channel Guide. For more information, see Using the Live TV Channel Guide.
Adjusting settings while watching a program
Press STAR  to display the Options menu. Press UP or DOWN to highlight an option, and then press LEFT or RIGHT to change the setting. The topic Adjusting TV settings explains each of the settings in detail.
Pausing Live TV
Live TV Pause gives your Roku TV the ability to pause, play, fast forward, and rewind live TV received on the ANT input. You can pause live TV for up to 90 minutes.
Requirements
- Connect your TV to the Internet.
- Provide your own dedicated USB flash drive (thumb drive} with the following minimum specifications.
- 16 GB
- 15 Mbps read/write speed
- USB 2.0 compliant
- A USB flash drive (thumb drive) meeting the minimum requirements is highly recommended over an externally-powered hard disk drive. Note that you can use any larger size drive—there is no limit to the maximum size—but using a larger drive does not extend the 90-minute pause time.
- Important: After warning you and giving you a chance to cancel Live TV Pause setup, all existing content on your USB drive is erased when you enable this feature.
- Connect your USB drive to the TV’s USB port.
- Important: Some TV models have more than one USB port. You can connect your Live TV Pause USB drive to any port, but make sure that nothing is connected to other USB ports while enabling Live TV Pause. Reconnect other USB devices after you have finished enabling Live TV Pause.
- Enable Live TV Pause, as explained in the following topic.
Enabling Live TV Pause
You can start setting up Live TV Pause in any of the following ways:
- After completing a channel scan, select Set up Live TV Pause from the available options
- Press Play/Pause
 on the Roku remote while watching a digital Antenna TV channel.
 - Highlight the Live TV tile on the Home screen, press STAR
 on the remote, and then select Enable Live TV Pause.
After starting setup of Live TV Pause in any of these ways, the TV prompts you through the steps needed to enable this feature. Setup takes only a few moments.
Note: Use of a USB hub is not supported
Using Live TV Pause
If you have used the Roku remote to watch streaming channels, using Live TV Pause should be very familiar to you.
- While watching a digital live TV channel, press PLAY/PAUSE
 to pause or play the content. After the TV program has been paused for 90 minutes, the TV resumes playing from the point in the program where you paused it.
 - After watching a channel for a while, press REWIND
 to jump back up to the point where you first started watching the channel, up to 90 minutes.
 - After pausing or rewinding, press FAST FWD
 to jump ahead up to the point where you are once again watching the live TV program.
 - Press REWIND
 or FAST FWD
  repeatedly to cycle through 1x, 2x, and 3x skip speeds. Press REPLAY
  to play back the last several seconds of the program.
 - When the program is paused, press LEFT and RIGHT to move backward or forward through the program approximately 10 seconds per press. Small frames appear across the screen to identify your location in the program.
Note: If REPLAY  is not available on your remote, you can use the Roku mobile app.
Whenever you use any of the Live TV Pause features, the TV momentarily displays a progress bar:
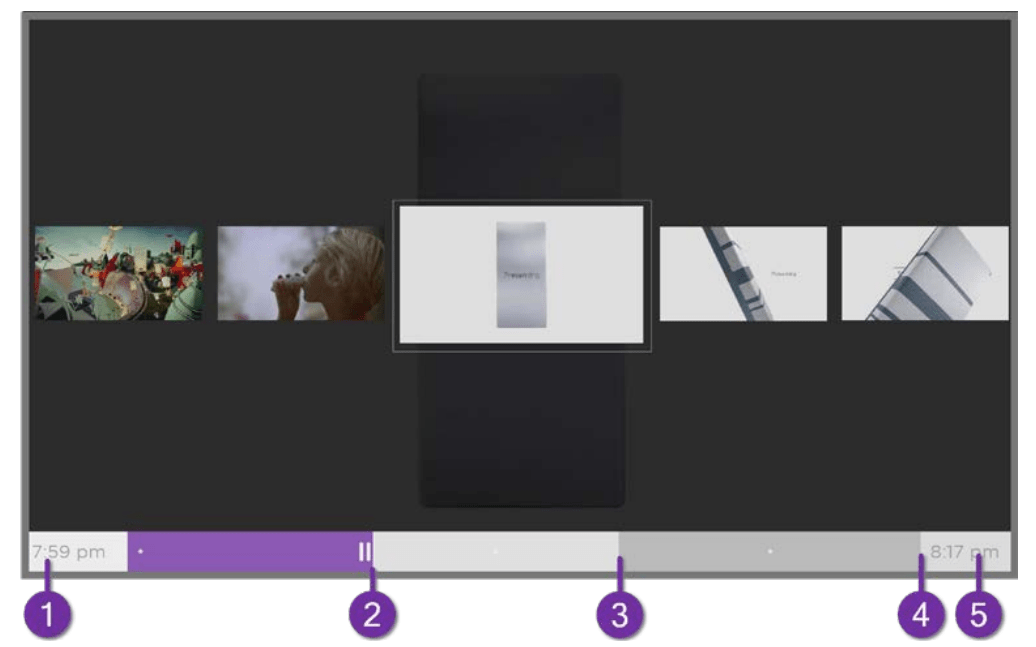
- Time at current playback position.
- Current playback position
- Extent of pause time, representing the amount of time this channel has been buffered, up to 90 minutes.
- 90 minute mark, representing the maximum extent of pause time.
- Current time.
The progress bar also shows tick marks at each half hour point, to help you locate the boundaries where one program ends and a new one begins.
Notes about Live TV Pause
- You can use Live TV Pause only with digital broadcast and cable channels received through the TV’s ANT input (ATSC and Clear QAM channels).
- Changing channels erases and restarts the Live TV Pause buffer.
- Returning to the Home screen, selecting another input, or turning off the TV erases and resets the Live TV Pause buffer.
- Disconnecting the USB drive erases the Live TV Pause buffer.
Adjusting TV settings
You can adjust most picture and sound settings while you are watching a program by pressing STAR  to open the TV settings menu. There are some additional picture and sound settings in the main Settings menu.
In most cases, the changes you make apply only to the input you are using. Live TV, each HDMI® input, and the AV input have their own settings that the TV remembers when you return to that input. The TV also separately remembers the settings you specify while viewing streaming content.
Main Settings menu
Use the Settings menu to adjust overall TV settings. Press  to go to the Home screen, and then navigate to Settings > TV picture settings.
You can adjust the following overall TV picture settings from the Settings screen:
- TV brightness – Provide a better viewing experience in darker or brighter rooms. Increases or decreases the TV’s general brightness across all TV inputs.
Note: This setting is identical to the TV brightness setting you can access in the TV settings menu while watching a program
- HDR notification – Only on select models: Controls whether the TV displays a notification in the upper right corner of the screen for a few seconds when HDR or Dolby Vision™ content begins to play.
- On – The TV displays a notification when HDR or Dolby Vision™ content begins to play.
- Off – The TV does not display a notification when HDR or Dolby Vision™ content begins to play.
Note: This setting does not affect the HDR or Dolby Vision™ notification that always appears in the program information banner. Press OK while watching a program to open the program information banner.
- Settings per input – Lists each TV input. Select an input, and then press STAR
 to display the TV settings menu where you can adjust the input’s settings while watching the video and listening to the sound from that input.
Tip: You don’t have to go to the main Settings menu first—you can display an input’s TV settings menu and adjust its settings whenever you are watching the input by pressing STAR  .
.
TV settings menu
TV settings menu
Tip: Some streaming channels assign STAR  to a different function (or no function at all), meaning this button will not open the TV settings menu. In these cases, use a different channel, such as The Roku Channel, to configure options. The selected settings remain active for all streaming channels.
Press UP or DOWN to highlight a setting, and then press OK or RIGHT to see the options for the setting. You’ll see the changes you make right away in picture appearance or audio quality.
- Sleep timer
- Picture settings
- Sound settings
- Manage channels (U.S., connected mode)
- Manage channels (Canada/non-connected mode)
- Accessibility & captions
- Picture off
Tip: To dismiss the TV settings menu, just wait a few seconds without pressing any buttons. Or press STAR  again to dismiss the menu immediately.
Sleep timer
Opens the Sleep timer menu where you can set a timer that turns off the TV after the specific amount of time. This setting remains in effect even if you stop watching the current input
Picture settings
The Picture settings menu adjusts the appearance of the picture for the active input.
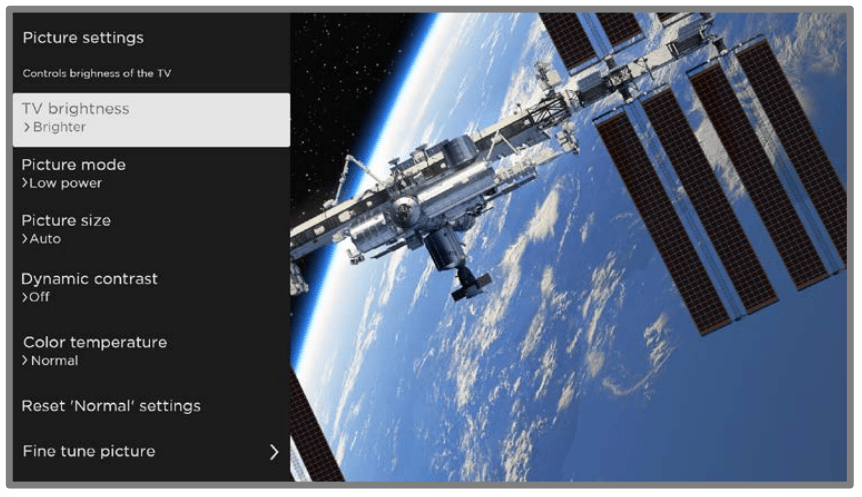
Typical Picture settings menu
- TV brightness – Overall brightness of the picture. This setting applies to all TV inputs and is identical to the TV brightness setting under Settings > TV picture settings.
- Picture mode – Picture presets for various viewing preferences. For example, selecting Vivid sets Brightness, Contrast, Sharpness, and other values to produce a very vibrant picture. Selecting Movie changes the settings to produce a picture suitable for enjoying movies in a darkened room.
Tip: If you make changes to individual picture settings, these settings are saved for the current input and the current Picture mode. In this way, you can individually set the HDMI 1 input’s Movie picture mode to use different settings than the HDMI 2 input’s Movie picture mode, and different settings than the Live TV input’s Movie picture mode.
Note: If you change the settings of a Picture mode, a small purple dot appears to the right of the Picture mode name.
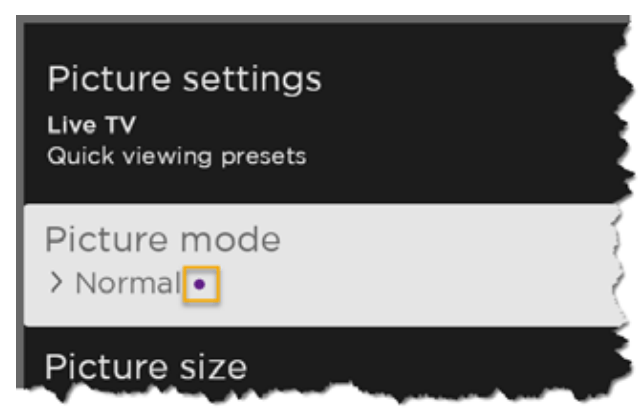
Use Reset picture settings, described below, to return the input’s selected picture mode to its default settings.
- Picture size – Aspect ratio of the picture, enabling you to view a picture in its original format, or zoom or stretch it to fill the screen. The Auto setting has been found to produce the best picture in most cases.
Note: Certain picture settings vary by brand and model. Not all settings are available on all TVs. Names of certain settings also vary by brand and might differ from the names listed here.
- Local dimming – Only on select models: Sets the amount of dimming applied to multiple areas of the screen’s backlight intensity. This setting can make dark areas darker without affecting the brightness of light areas.
- Dynamic contrast – Only on select models: Automatically adjusts the backlight level to achieve the optimum contrast and prevent excessive differences between light and dark areas of the screen.
- Micro contrast – Only on select models: Improves image contrast.
- Action Smoothing – Only on select models. Each TV brand uses a different name for this option. Adjusts the amount of motion processing applied to the video signal. A higher setting results in more smoothing, but can cause undesirable picture artifacts in certain types of content. Each Picture mode has a different default setting.
- Natural Cinema – Only on select models. Each TV brand uses a different name for this option. When enabled, this feature reduces “judder” that is often present when 24 frame-per-second movies are upscaled to 60Hz TV standards.
Natural Cinema mode is On by default in Movie and HDR Dark picture modes, and Off by default in other picture modes.
- Action Clarity – Only on select 120Hz models. Each TV brand uses a different name for this option. Reduces blur, especially for fast-moving images such as sports.
- LED Motion Clarity – Only on select models that also have the local dimming feature. Each TV brand uses a different name for this option. Reduces motion blur caused by the refresh rate of the screen. Enabling this feature inserts black frames between picture frames in a way that improves the clarity of fast moving objects. It provides an improved viewing experience for video games and sporting events, but reduces the brightness of the picture. You can select settings of Low, Medium, High, or Off to achieve the desired picture quality.
- Game mode – Only on HDMI® and AV inputs: Controls whether Game mode is enabled. When On, the TV performs less image processing and has less input lag. When Off, the TV performs more image processing and has more input lag, which is less desirable for action games.
- Auto Low Latency Mode (ALLM) – Only on select models: Auto Low Latency Mode (ALLM) detects when certain game consoles are connected to an HDMI input, and then automatically configures the best settings for action games when that input is selected. When ALLM is active, the manual Game mode setting is not available. The TV does not display an ALLM menu option.
- Color temperature – Adjusts the overall color tones in the picture from Normal to slightly more bluish (Cool) to slightly more reddish (Warm).
- Reset picture settings – Returns all picture settings for the input’s currentlyselected Picture mode to their original values.
- Apply settings to all inputs – Applies the settings of the current Picture mode to all TV inputs.
- Fine tune picture – Displays the Fine tune picture menu.

Fine tune picture menu options
- Backlight - Adjusts the overall light intensity of the screen.
- Brightness – Adjusts the dark level of the picture.
- Contrast – Adjusts the white level of the picture.
- Sharpness – Adjusts the sharpness of edges in the picture.
- Color – Adjusts the saturation of colors in the picture. A setting of 0 removes all color and displays a black and white picture.
- Tint – Adjusts the color balance from green to red to obtain accurate colors in the picture.
Variable refresh rate (VRR)
Only on select models: Variable refresh rate (VRR) allows a compatible game console or computer connected via HDMI to control the refresh rate of the TV. This feature helps to ensure that the TV does not begin to display a video frame until the video source has completely rendered it. The result is smoother image animation with a lower instance of stutter or tearing. This feature requires the following conditions:
- Variable refresh rate is turned On in the HDMI settings for the input. This setting is Off by default.
- The HDMI mode is set to Auto or HDMI 2.0 in the HDMI settings for the input.
- Game mode is enabled.
- The connected device supports VRR.
Expert Picture Settings (4K models only)
4K (UHD) TV models have additional picture settings for demanding home theater enthusiasts. Expert Picture Settings include gamma, noise reduction, 11-point white balance adjustment, and extended color space management.
You can access Expert Picture Settings only by using the Roku mobile app on an iOS® or Android™ mobile device. For more information, go to the following link on the Roku web site:
Sound settings
Roku premium audio devices
You can purchase and connect a Roku premium audio device, such as a Roku Streambar™, to the HDMI ARC or HDMI eARC port on any model of Roku TV. When you do, you can put away the remote control for that device, because the Sound settings menu on the TV provides direct access to the sound settings of the connected Roku device. These settings replace the sound settings that might be available when the Roku premium audio device is not connected.
To access Roku premium audio settings, first press STAR 
to display the TV settings menu, then select Sound settings.
Sound settings menu for Roku premium audio devices
- Sound mode – Select from among various preset sound modes to make shows and music sound their best. This setting applies across the entire TV; that is, to all TV inputs.
- Volume mode – Select from among modes for normal listening, volume leveling, and night listening.
- Speech clarity – Select Off, Low, or High to make voices easier to hear above the rest of the program.
- Expanded stereo – Select one of the available settings to simulate surround sound or, only with Roku wireless speakers in a 3.x or 5.x surround configuration, to play stereo sound from all speakers.
- Surround level – Only if you have Roku wireless speakers in a 3.x or 5.x surround configuration, this option lets you select the surround volume level to your liking.
- Virtual surround – When you do not have Roku wireless speakers in a surround configuration, this option enhances the stereo sound from the soundbar to simulate surround sound.
- Dolby AC-4 Dialog Enhancement – Only on select models: Select On for AC-4 to enhance the dialog in content that supports the AC-4 audio format.
- Reset sound settings – Returns all sound settings to their defaults.
Volume mode (select models only)
To access Volume mode, first press STAR  to display the TV settings menu, then select Sound settings.

Sound settings menu for models with Volume mode
Tip: Some streaming channels assign STAR  to a different function, meaning it will not open the TV settings menu. In these cases, use a different channel, such as The Roku Channel, to set the Volume mode. The selected mode remains active for all streaming channels.
Sound settings menu - Volume mode
- Volume mode
- Off – Volume mode is inactive and content volume is unmodified.
- Leveling – Provides a consistent volume level across different types of content, so that you need not change the volume every time you switch channels or when a commercial comes on.
- Night – Soft sounds, such as whispers, are increased while loud sounds, such as explosions, are decreased, making it easier to hear your TV at night without disturbing others
- Dolby AC-4 Dialog Enhancement – Only on select models: Select On for AC-4 to enhance the dialog in content that supports the AC-4 audio format.
Sound settings – Dolby® Audio Processing (select models only)
Each TV input has separate settings for fine tuning sound quality. All of the settings in this menu apply only to the currently-selected input. To access the DAP settings, first press STAR  to display the Options menu, then select Sound settings.

Tip: Some streaming channels assign STAR  to a different function, meaning it will not open the TV settings menu. In these cases, use a different channel, such as The Roku Channel, to configure Dolby® Audio Processing. The selected settings remain active for all streaming channels.
Sound settings menu– Dolby® Audio Processing
- Sound mode – Select from among various preset sound modes to improve speech, make music sound its best, boost bass or treble, or simulate a theater. Use Reset sound settings, described below, to return the input’s current settings to their original values. This setting applies across the entire TV; that is, to all TV inputs. It does not affect the sound quality for headphones, HDMI (ARC) HDMI (eARC), or S/PDIF (TOSLINK) connectors.
- Virtual surround – (Only on select models) – Options vary by TV model. Simulates surround sound that otherwise would require installation of a surround sound audio system. Sometimes, the effect interferes with dialog clarity. Use the Dialog enhancer option to compensate.
- Dialog enhancer – Improves the clarity of speech when on.
- Volume leveling - Smooths out the high and low sounds.
- Dolby AC-4 Dialog Enhancement – Only on select models: Select On for AC-4 to enhance the dialog in content that supports the AC-4 audio format.
- Reset audio settings – Returns Virtual surround, Dialog enhancer, and Volume leveling settings to their default settings for the selected Sound mode.
Sound settings – DTS® TruSurround / DTS® Studio Sound (select models only)
Each TV input has separate settings for fine tuning sound quality. All of the settings in this menu apply only to the currently-selected input. To access the DTS® settings, first press STAR to display the TV settings menu, then select Sound settings.

Sound settings menu for models with DTS® TruSurround/Studio Sound
Tip: Some streaming channels assign STAR  to a different function, meaning it will not open the TV settings menu. In these cases, use a different channel, such as The Roku Channel, to configure DTS® Studio Sound. The selected settings remain active for all streaming channels.
Sound settings menu– DTS® TruSurround / DTS® Studio Sound
- Sound mode – Select from among various preset sound modes to improve speech, make music sound its best, boost bass or treble, or simulate a theater. Use Reset audio settings, described below, to return the input’s current settings to their original values. This setting applies across the entire TV; that is, to all TV inputs. It does not affect the sound quality for headphones, HDMI (ARC) HDMI (eARC), or S/PDIF (TOSLINK) connectors.
- DTS TruSurround – Simulates surround sound that otherwise would require installation of a surround sound audio system. Sometimes, the effect interferes with dialog clarity. Use the Dialog clarity option to compensate.
- Dialog Clarity – Available only when DTS TruSurround is On. Choose among Low, Medium, and High settings to improve the clarity of dialog when you are using the TruSurround feature
- TruVolume – Minimizes annoying volume fluctuations in programs
- Dolby AC-4 Dialog Enhancement - Only on select models: Select On for AC-4 to enhance the dialog in content that supports the AC-4 audio format
- Reset audio settings – Returns DTS TruSurround, Dialog Clarity, and TruVolume settings, to their default settings for the selected Sound mode.
Sound settings – Sonic Emotion™ Premium (select models only)
Sonic Emotion™ Premium is an audio technology that enables your TV to produce a more immersive sound experience. Each TV input has separate settings for fine tuning sound quality. All of the settings in this menu apply only to the currently-selected input. To access the Sonic Emotion™ settings, first press STAR  to display the TV settings menu, then select Sound settings.

Sound settings menu for models with Sonic Emotion™ Premium
Tip: Some streaming channels assign STAR  to a different function, meaning it will not open the TV settings menu. In these cases, use a different channel, such as The Roku Channel, to configure Sonic Emotion™. The selected settings remain active for all streaming channels.
Sound settings menu– Sonic Emotion™ Premium
- Sound mode –Select from among various preset sound modes to improve speech, make music sound its best, boost bass or treble, or simulate a theater. Use Reset audio settings, described below, to return the input’s current settings to their original values. This setting applies across the entire TV; that is, to all TV inputs. It does not affect the sound quality for headphones, HDMI (ARC) HDMI (eARC), or S/PDIF (TOSLINK) connectors
- Sonic Emotion Premium – Displays a menu with individual Sonic Emotion™ audio settings,
- Dolby AC-4 Dialog Enhancement – Only on select models: Select On for AC-4 to enhance the dialog in content that supports the AC-4 audio format.
- Reset audio settings – Returns Sonic emotion settings to their default settings for the selected Sound mode.
Sonic Emotion™ settings
When you select Sonic Emotion Premium from the Sound settings menu, these additional settings become available:

Sonic Emotion settings menu for models with Sonic Emotion™ Premium
- Dialog Enhancement – Enhances your ability to hear and understand dialog in the program.
- Bass Enhancement – Enhances the low frequency sound component in the program.
- Absolute 3D Sound – Simulates sound from multiple speakers that would otherwise require installation of a surround sound audio system.
Customizing your TV
Add TV inputs
As you use your TV, you might find that you need to add a TV input tile that you did not add during Guided Setup. To add a TV input:
- From the Home screen menu, navigate to Settings > TV inputs. Notice that the list of inputs is divided into two sections: Inputs being used and Inputs not used.
- Press UP or DOWN to highlight an input in the Inputs not used section of the list.
- Press RIGHT to move the highlight to Set up input.
- Press OK to add the input.
- Press HOME
 to return to the Home screen. Notice that the input has been added to the top of the Home screen. If you want to move the input tile to a different position in the grid, see Rearrange tiles.
Tip: If you purchase and connect a Roku premium audio product, such as a Roku Streambar™, your TV automatically controls all required sound settings, power, volume, and mute through your TV’s remote control
Add streaming channels
You can add streaming channels by searching in the Roku Channel Store from any of the following locations:
- Channel Store option
- Search (including Roku Voice Search)
- Add Channels shortcut
New streaming channels are added to the bottom of the Home screen. If you want to move the channel tile to a different position in the grid, see Rearrange tiles.
Hint: If you have multiple Roku devices, they all show the same set of streaming channels after their next daily update, unless the channel is not compatible with the device. So don’t be surprised when you add a channel to your Roku TV and then see it the next day on your Roku Streaming Stick or Roku Streambar™.
Rename inputs
Rather than trying to remember that your Blu-ray™ player is connected to HDMI 1 and your game console is connected to HDMI 3, you can rename the TV inputs to match the connected device.
Note: Renaming an input also changes the icon associated with it.
To rename an input, you can either:
- Highlight the input tile in the Home screen, and then press STAR
 to display a list of options. From the list of options, select Rename input. Then select a new name and icon.
OR
- From the Home screen menu, navigate to Settings > TV inputs. On the TV inputs screen, select the input you want to rename, select Rename, and then select a new name and icon from the provided list.
Rather than using the predefined names and icons, you can set a custom name and icon. To do so, scroll up or down to highlight Set custom name & icon, and then press OK. Follow the instructions on the screen to enter a name and select an icon for the input.
Press  to return to the Home screen. The new name and icon are now in effect
Remove unwanted tiles
It’s easy to remove unused TV inputs and unwanted channel or app tiles. For example, if you never use the HDMI 3 input, or if you don’t like the weather app you added from the Roku Channel Store, you can remove them from your Home screen.
Note: You also can remove the Live TV tile if you never use the TV tuner. But be aware that removing the Live TV tile also deletes the channel list. You’ll have to set up the TV tuner again next time you want to view live TV. Instructions for setting up the TV tuner can be found in Setting up live TV
- TTo remove any tile, highlight the tile in the Home screen, and then press STAR
 to display a list of options. From the list of options, select Remove input. In the screen that follows, confirm you want to remove the input.
 - Alternatively, to remove a TV input tile, navigate to Settings > TV inputs. On the TV inputs screen, select the input you want to remove, and then select Remove > Confirm. Then press HOME
 to return to the Home screen.
Rearrange tiles
When you add a TV input tile, it’s added at the top of your Home screen. When you add a new streaming channel, it’s added at the bottom of your Home screen.
You can easily rearrange the order of the tiles on the Home screen to suit your viewing preferences. For example, you might want Live TV to be the first tile in your Home screen. But if you mostly watch one streaming channel, you might want its tile to be the first one on your Home screen.
- On the Home screen, highlight one of the tiles you want to move
- Press STAR
 to display a list of options for the type of tile you selected.
 - Select Move input or Move channel. The list of options disappears and the highlighted tile shows arrows indicating how it can be moved.
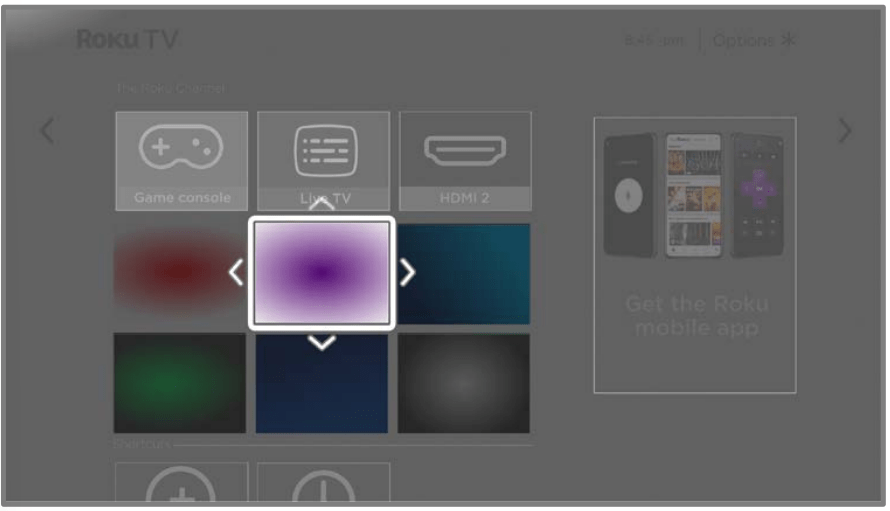
Note: A paid subscription or other payments may be required for some channels. Channel availability is subject to change and varies by country. Not all content is available in countries or regions where Roku® products are sold.
4. Use the purple directional pad to move the highlighted tile to its new position. As you move the tile, it pushes other tiles out of its way.
5. Press OK to lock the tile into its new position.
6. Repeat these steps to move other tiles until you have arranged your Home screen to your liking.
Change the look and feel with themes
Only in connected mode, another way to customize your TV is to change its theme. The theme establishes the look and feel of the TV through colors, designs, fonts, wallpaper (background), screensaver and, only in the United States, menu navigation sounds.
To change the theme, from the Home screen menu navigate to Settings > Theme. In the Themes screen, choose from the following options:
- Theme packs – Only in the United States, choose from a selection of packages that include coordinated wallpapers, screensavers, and sounds.
- Wallpapers – Select a wallpaper of your choice.
- Screensavers – Select a screensaver of your choice.
- Sounds – Only in the United States, select a sound set of your choice.
- Wallpaper updates – When this feature is on, Roku overrides your selected theme with a theme of their own choosing for various holidays and significant events. After the holiday or event passes, the TV reverts to your selected theme.
- Screensaver wait time – Select the idle time after which you want your selected screensaver to appear.
- Restore default theme – Every Roku TV has a theme based on the TV brand and model. Use this option to restore that default theme.
Configure power settings
Power settings configure features related to how your TV’s power settings work.
Power on settings
Power on settings tell the TV what to do when you turn on the power. To configure the power on settings, from the Home screen, navigate to Settings > System > Power > Power on. Highlight the preferred power on location in the list, and then press OK.
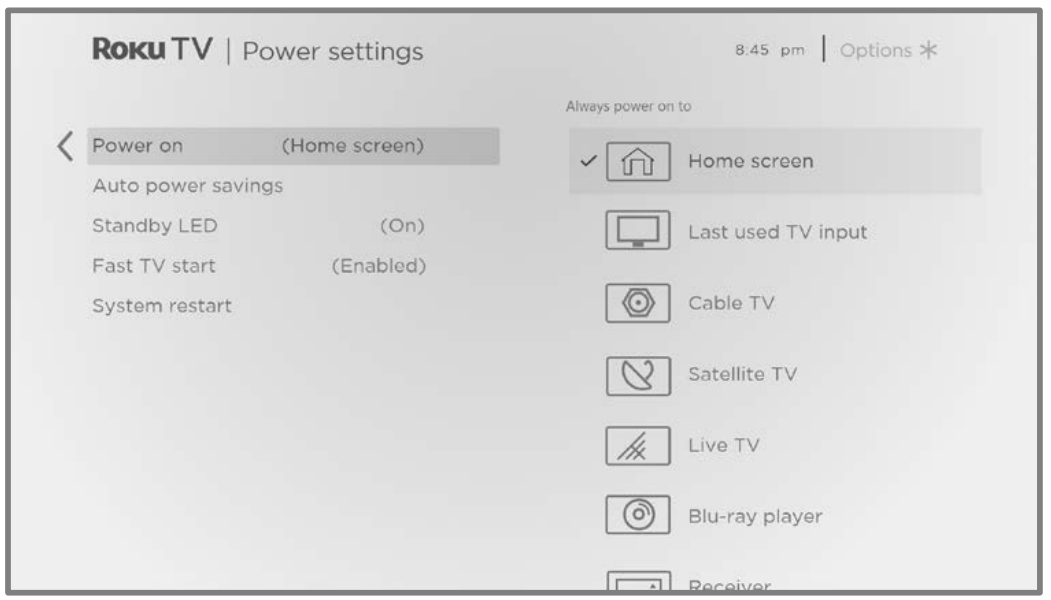
Auto power savings
To help you save energy, your TV can automatically turn itself off after a period of inactivity or a period during which no signal has been detected. It is factory-configured to do both of these things, but you can change these settings if needed.
To configure automatic power off, from the Home screen menu navigate to Settings > System > Power > Auto power savings. In the Power settings screen, highlight the following options and press OK to turn them on or off:
- Reduce power after 15 minutes – If no video or audio activity and no user interaction occur for 15 minutes, the TV automatically turns off the screen and sound.
- Turn off after 4 hours – If no video or audio activity and no user interaction occur for 4 hours, the TV goes into standby mode.
Standby LED On/Off
Normally, the status indicator is lit whenever the TV is in standby mode. If you prefer the status indicator to not be lit in standby mode, you can turn it off. To do so, from the Home screen menu, navigate to Settings > System > Power > Standby LED, and then select Off.
After making this change, the status indicator still performs all other indication functions.
Fast TV start
Only in connected mode, you can enable Fast TV start. As you might expect, Fast TV start lets you start watching your TV almost instantly after turning it on. But it also enables other convenient features, such as the ability to listen to certain music channels with the TV screen off and the convenience of being able to turn on and control your TV using voice commands.
Be aware that enabling Fast TV start makes your TV use somewhat more power when it is powered off to standby mode.
Configure accessibility
Captions mode
The Captions mode settings specify when closed captions appear. Change caption settings from the Home screen menu by selecting Settings > Accessibility > Captions mode. At this point, you can choose among the following options:
- Off – No captions appear.
- On always– Captions appear whenever they are available from the program source.
- On replay– Captions appear only when you use the replay feature, and only when you are watching a streaming program that supports instant replay, watching a video through the Roku or USB media player, or watching a TV channel after enabling Live TV Pause.
- On mute – Captions appear only when the TV is muted.
Tips: You can change the captions mode while watching a program. Press STAR  to display the TV settings menu, and then select Closed captioning. However, note that some streaming channels require you to enable captions through a setting within their channel even though you have turned on captions elsewhere.
Note: Once enabled, the captions mode applies to all inputs that support captions and remains enabled until you turn it off
Captions preferred language
Use the Captions preferred language setting to select the language in which you want closed captioning to appear when that language is available. If your preferred language is not available, then captioning reverts to the default language for the program, which usually is English.
Highlight the language you prefer, and then press OK to select it.
Captions style
Use these settings to control how closed captions look when displayed on your TV. At this point, you can choose among the following options:
- Text style – Choose from a list of fonts. As you move the highlight to each font, you can see a sample of the result in an adjacent panel.
- Text edge effect – Choose from a list of edge effect styles, such as raised, depressed, and various shadows. As you move the highlight to each effect, you can see a sample of the result in an adjacent panel.
- Text size – Choose from a list of sizes. As you move the highlight to each size, you can see a sample of the result in an adjacent panel.
- Text color - Choose from a list of colors for the text. As you move the highlight to each color, you can see a sample of the result in an adjacent panel.
- Text opacity - Choose from a list of opacity settings for the text. This setting determines how much the area behind the text shows through the text. A value of 100% blocks all of the content behind the text. As you move the highlight to each setting, you can see a sample of the result in an adjacent panel.
- Background color - Choose from a list of colors for the background area behind the text. As you move the highlight to each color, you can see a sample of the result in an adjacent panel. Note that you won’t see any change unless you set the Background opacity to a value other than Off.
- Background opacity - Choose from a list of opacity settings for the background of the caption. This setting determines how much the area behind the caption background shows through the background. A value of 100% blocks all of the content behind the background. As you move the highlight to each setting, you can see a sample of the result in an adjacent panel.
- Window color - Choose from a list of colors for the window rectangle surrounding the entire caption. As you move the highlight to each color, you can see a sample of the result in an adjacent panel. Note that you won’t see any change unless you set the Window opacity to a value other than Default or Off.
- Window opacity - Choose from a list of opacity settings for the window rectangle surrounding the entire caption. This setting determines how much the area behind the caption window shows through the window. A value of blocks all of the content behind the window. As you move the highlight to each setting, you can see a sample of the result in an adjacent panel.
Parental controls
Parental controls enable you to control whether the members of your household can view certain kinds of broadcast TV programs. When a program or feature is blocked, you can unblock it by entering a parental control PIN that only you know
Note: Parental controls block content from the TV tuner and from streaming options, if any, on the Home screen menu. Parental controls do not block content on other TV inputs or content from streaming channels you add to your TV
Creating a parental control PIN
The first time you access the Parental controls screen, you must create a new parental control PIN. Thereafter, whenever you want to change parental control settings, unblock programming that has been blocked, change the PIN, or disable parental controls, you must enter your parental control PIN.
Tip: Your parental control PIN has no connection to your Roku account PIN. You can make them the same if you want—this is entirely your choice.
To create a new parental control PIN, from the Home screen menu navigate to Settings > Parental controls. The screen displays a numeric keypad. Use the purple directional pad to enter a four-digit code, and then press OK. Then repeat the process to enter the same PIN again, just to make sure you correctly entered the PIN you want to use.
Important: If you forget your parental control PIN, the only way to recover is to perform a factory reset operation
Blocking Broadcast TV shows
For broadcast TV, parental controls use information embedded in the broadcast signal to determine whether to allow a program to be displayed. Parents can configure parental controls to block broadcast TV programs that meet or exceed a specific rating, so they cannot be viewed or heard unless the correct parental control PIN is entered.
Note: Rating standards differ by country.
Enabling parental control of TV programs
The first step in blocking TV programs is to enable parental control of TV programs.
This setting is provided separately to make it easier for you to turn parental control of TV programs on and off without disturbing their settings. For example, your kids are going to summer camp for two weeks, and while they are gone, you don’t want to have to deal with unblocking programs that you want to watch by entering your parental control PIN. All you need to do is clear Enable parental controls, and all TV programs are unblocked. When the kids return, select Enable parental controls again, and all of your parental control settings are restored in a single operation.
To enable parental control of TV shows:
- n the Home screen menu, navigate to Settings > Parental controls, and then enter your parental control PIN.
- In the Parental controls screen, navigate to TV tuner > Parental control of TV shows.
- Make sure the check box next to Enable parental controls is checked. If not, highlight it and press OK.
Blocking based on US TV ratings
Most broadcast US TV shows—other than movies—contain rating data that enables parental controls to block shows that parents don’t want others to view. The ratings are divided into two groups that function independently:
- Youth group – TV-Y, TV-Y7
- Main group – TV-G, TV-PG, TV-14, TV-MA
Within each of these groups, the ratings interact such that if you block a particular level of content, the TV also blocks all content with a higher rating. Conversely, if you unblock a particular level of content, the TV also unblocks all content with a lower rating. For example, if you block TV-PG programs, the TV also blocks TV-14 and TV-MA programs. If you subsequently unblock TV-14 programs, TV-PG programs are also unblocked, but TV-MA programs remain blocked.
Similarly, within the main group, content types can be individually blocked. For example, you can block just coarse language in programs with a TV-PG rating. If you do, then the TV also blocks programs with coarse language in the higher ratings (TV-14 and TV-MA). Subsequently unblocking coarse language in TV-14 ratings does not unblock coarse language in TV-MA programs, but it does unblock coarse language in TV-PG programs.
To block TV shows based on US television ratings:
- From the Home screen menu, navigate to Settings > Parental controls, and then enter your parental control PIN.
- In the Parental controls screen, navigate to TV tuner > TV ratings. Choose among the following settings:
- Entire ratings – Highlight the rating you want to block, and then navigate to the right and select the first option that blocks the entire rating level (and all higher rating levels).
- Individual content types – Highlight the rating that contains the content type you want to block, and then select the content types you want to block from among those listed. Remember that blocking a content type in one rating blocks the equivalent content type in all higher rating levels.
Blocking based on US movie ratings
Most movies in the US are rated by the Motion Picture Association of America, or MPAA, so the ratings are known as MPAA ratings. TV broadcast signals carry movie rating data that enables parental controls to block shows that parents don’t want others to see. The ratings are:
- G – General audiences
- PG – Parental guidance suggested
- PG-13 – Parents strongly cautioned for children age 13 or younger
- R – Restricted
- NC-17 – Not for age 17 or younger
Unlike US TV ratings, there are no individual content types within the ratings. But like TV ratings, blocking movies with a particular rating also blocks movies with a higher rating, and unblocking movies with a particular rating also unblocks movies with a lower rating.
Tip: Blocking movies with an NC-17 rating also blocks programs with the now-obsolete X rating, which can still occur in the program data of older movies.
To block movies based on MPAA ratings:
- From the Home screen menu, navigate to Settings > Parental controls, and then enter your parental control PIN.
- In the Parental controls screen, navigate to TV Tuner > Movie ratings.
- Select the rating level you want to block. You need only select one rating level, and all higher levels are automatically blocked.
Blocking based on Other ratings
Your TV can block programs having ratings that had not been defined when the TV was manufactured. It does this by detecting a new Rating Region Table in a program and then downloading the new table and displaying its rating in the Parental controls.
When the TV downloads a new Rating Region Table, it adds a new option to the list of rating types: Other ratings. If you see this option in the Parental controls screen, you have tuned to a station that has implemented a new rating table. Once the new rating table has been downloaded to the TV, it remains in the TV until it is factory reset, and you can configure blocking based on the new ratings.
New Region Rating Tables can have independent rating levels, or rating levels that interact in the same ways as the built-in US TV and MPAA Movie ratings.
Tip: If your TV downloads a new Region Rating Table, you’ll have to experiment with its settings to understand how to use it
Blocking based on Canadian English ratings
Canadian-English language and third-language programs that are broadcast in Canada are rated by the Action Group on Violence on Television, or AGVOT. TV broadcast signals carry rating data that enables parental controls to block programs that parents don’t want others to view based on content containing violence, language, sex, or nudity. The ratings are:
- C – Children under 8 years
- C8 – Children 8 years and older
- G – Generally suitable for all age groups
- PG – Parental guidance suggested for viewers under 14 years
- 14+ Generally not suitable for viewers under 14 years
- 18+ Generally not suitable for viewers under 18 years
Blocking content with a particular rating also blocks content with a higher rating, and unblocking content with a particular rating also unblocks movies with a lower rating.
To block programs based on AGVOT ratings:
- From the Home screen menu, navigate to Settings > Parental controls, and then enter your parental control PIN.
- In the Parental controls screen, navigate to TV tuner > Canadian English ratings.
- Select the rating level you want to block. You need only select one rating level, and all higher levels are automatically blocked.
Blocking based on Canadian French ratings
Canadian-French language programs that are broadcast in Canada are rated by Québec’s Ministry of Culture and Communications. TV broadcast signals carry rating data that enables parental controls to block programs that parents don’t want others to view based on content containing violence, language, sex, or nudity. The ratings are:
- G – Generally suitable for all age groups
- 8+ Viewers 8 years and older
- 13+ Viewers 13 years and older
- 16+ Viewers 16 years and older
- 18+ Adults only
Blocking content with a particular rating also blocks content with a higher rating, and unblocking content with a particular rating also unblocks movies with a lower rating.
To block programs based on Canadian-French ratings:
- From the Home screen menu, navigate to Settings > Parental controls, and then enter your parental control PIN.
- In the Parental controls screen, navigate to TV tuner > Canadian French ratings.
- Select the rating level you want to block. You need only select one rating level, and all higher levels are automatically blocked.
Blocking unrated programs
Some broadcast TV programs and movies do not have an assigned rating, and are considered to be “Unrated”. Whether or not such programs contain content that is objectionable to you cannot be determined. However, you can choose to block such programs.
To block all unrated broadcasts:
- From the Home screen menu, navigate to Settings > Parental controls, and then enter your parental control PIN.
- In the Parental controls screen, navigate to TV tuner > Block all unrated programs.
- Highlight Unrated programs and press OK. When blocking is enabled, the adjacent padlock icon changes from unlocked to locked.
Tip: Blocking programs that have not been assigned a rating does not block programs that specifically have been assigned a US TV rating of “None” (for example a broadcast of a local town council meeting). Programs that do not have an assigned rating display Rating NA (for “not applicable,” meaning a rating is not needed).
In the absence of other ratings for a program, the parental controls do not consider the MPAA US movie rating N/A (MPAA rating not applicable to this content) and NR (applicable content not rated by the MPAA) to be ratings. In these cases, the TV handles the program as though it is unrated, blocking the program if Unrated programs blocking is enabled.
What happens when a TV program is blocked?
After you’ve set up parental controls, TV programs and movies are blocked:
- When you change channels and the new channel is playing a program whose rating exceeds your settings.
- When a new program comes on the channel you are watching and its rating exceeds your settings.
When a program is blocked by parental control settings, the TV displays a blocked message:
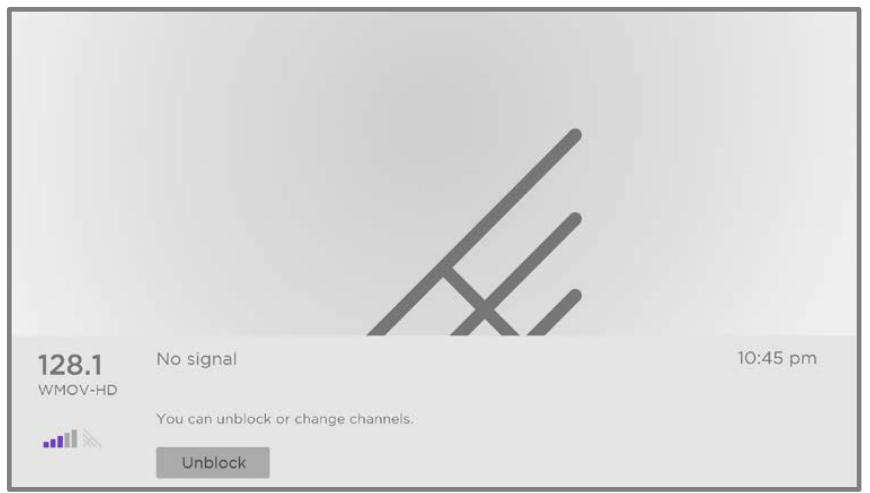
Whenever this blocked message appears, both the video and audio of the program are blocked, as well as program data that would normally appear in the area at the bottom of the screen. Only in connected mode: program title and information show as “Blocked” as well.
To watch the blocked program, you need to know the PIN code defined when you enabled parental controls
1. Press OK to select Unblock. The Parental Control PIN pad appears
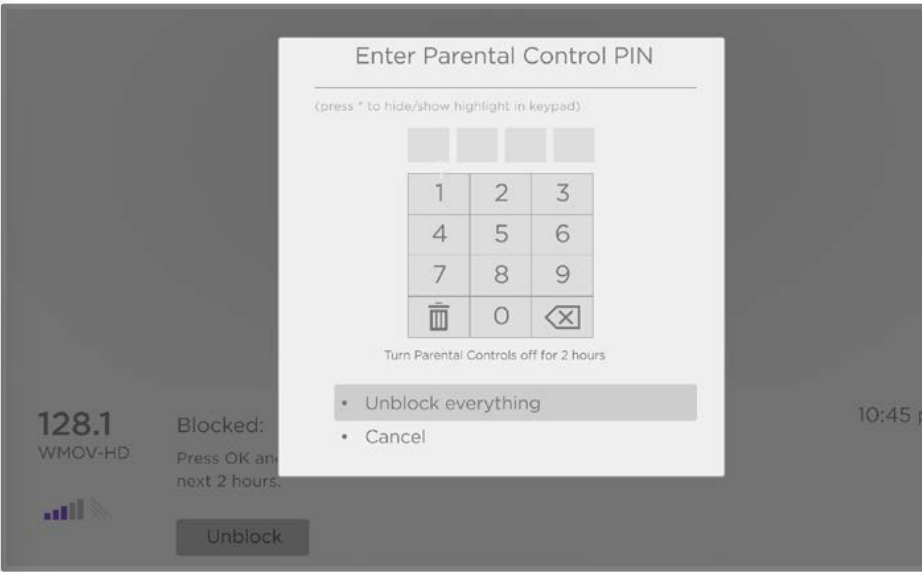
2. Use the purple directional pad to enter your parental control PIN code, and then press OK to select Unblock everything.
TIP: To shield your parental control PIN from others in the room, press STAR  to hide the highlighted number. When you hide the highlight, you will have to count key presses to keep track of which number is selected.
After unblocking programs that have been blocked, all blocking is disabled for two hours or until you turn off the TV.
Changing the parental control PIN
- From the Home screen menu, navigate to Settings > Parental controls, and then enter your parental control PIN.
- In the Parental controls screen, highlight Change PIN.
- Move the highlight into the adjacent keypad, and then use the purple directional pad to enter a four-digit code, and then press OK. Then repeat the process to enter the same PIN again, just to make sure you correctly entered the PIN you want to use.
Resetting parental controls
So now your kids have grown up and gone away to college, and you no longer want to deal with blocked programs.
To erase all parental control settings:
- From the Home screen menu, navigate to Settings > Parental controls, and then enter your parental control PIN.
- In the Parental controls screen, highlight Reset parental controls.
- Follow the instructions on the screen to confirm that you want to erase all parental control settings.
Tip: Resetting parental controls also erases your parental control PIN
See other models: X2HR XC8349/01 FC8451/61 FC8454/61 GC2048/30
