Owner's Guide Television
Getting started
Features
- Google Assistant on Android TV
Android TV brings a world of content to your biggest screen. With the Google Assistant built in, you can quickly access entertainment, get answers, and control devices around your home. Find the latest blockbuster, check the score of the big game, or dim the lights. Just say “Hey Google,” or press the mic button on your remote to get started.
Android TV offers thousands of movies, shows, and games from Google Play, YouTube, and your favorite apps. Discover your favorite content, apps, and games on Google Play.
You can use your remote control to select channels which are broadcast in digital format and conventional analog format. Also, cable and satellite subscribers can access their TV channels.
You can display on the TV screen the title, contents (DTV only) and other information on the current program.
This unit automatically scans and memorizes channels available in your area, eliminating difficult setup procedures.
This feature allows you to block children’s access to inappropriate programs.
- Internet Browsing
- Closed caption decoder
Built-in closed caption decoder displays text for closed caption supported programs.
Audio can be selected from the remote control.
If there is no input signal and no operation for 15 minutes, the unit will go into standby mode automatically.
You can set the unit to go into standby mode after a specific amount of time.
- Choices for on-screen language
Select your on-screen language: English, Spanish or French.
- Stereo sound function
- PLL frequency synthesized tuning
Provides free and easy channel selection and lets you tune directly to any channel using the number and decimal point “•” keys on the remote control.
- Various adjustments for picture and sound
Customizes picture quality suitable for your room and sets your sound preference.
HDMI control allows your other HDMI link devices to be controlled by the HDMI cable connected to your TV.
- HDMI input
- HDMI-DVI input
If your video device has a DVI output jack, use an HDMI-DVI conversion cable to connect the unit.
Audio and video input from an external device.
- Digital audio output
- Headphone audio output
Headphone 3.5mm stereo jack for personal listening.
Remote control
 (POWER)
Turns the TV on and off of standby.
VUDU
Access directly to VUDU.
 (INFO)
Displays input, resolution, and HDR information.
 (Google Assistant)
Activates your personal Google Assistant.
 (OPTIONS)
Displays a list of menu options applicable to the active screen.
OK
Press to decide the command of setting when the Home menu is displayed.
 (NAVIGATION buttons)
Moves the cursor, selects the on-screen menu items.
 (HOME)
Access to your apps, Live TV, input devices, settings, and the Google Play Store.
TV
Direct access to your installed TV channels. (This feature is only available for OTA and select cable channels.)
COLOR buttons*
Use these keys according to the directions on-screen with HDMICEC function.
 (INPUTS)
Change input source.
Select and change access to the attached devices such as Blu-ray player, gaming consoles, or cable box.
CH + / –*
Selects a channel.
0 - 9 (NUMBER buttons)*
Used to enter a channel / program number.
- (DOT) : Use with 0-9 to select digital channels. For example, to enter 2.1, press
* Depending on the type of remote control, these buttons may not be present.
HDMI-CEC keys
 : Starts, pauses or resumes playback.
 : Stops the disc playback.
 /
/  : Searches backward or forward through the disc.
 /
/  : Skips backward or forward chapters, titles or tracks on a disc.
Note(s): Pause may not work properly on some devices even if they are HDMI control (HDMI CEC) compliant.
CC
Displays the audio portion of programming as text superimposed over the video.
 (MUTE)
Turns the sound on and off.
VOL + / –
Adjusts the volume.
 (BACK)
Returns to the previous menu screen.
 (TV GUIDE)
Access to the Electronic Program Guide (EPG).
It allows you to find channels and content easily.
 (FORMAT)*
Adjusts the picture size on the TV screen.
SAP
Selects audio mode (MONO / STEREO / SAP) / audio language.
NETFLIX
Access directly to Netflix.
Control panel
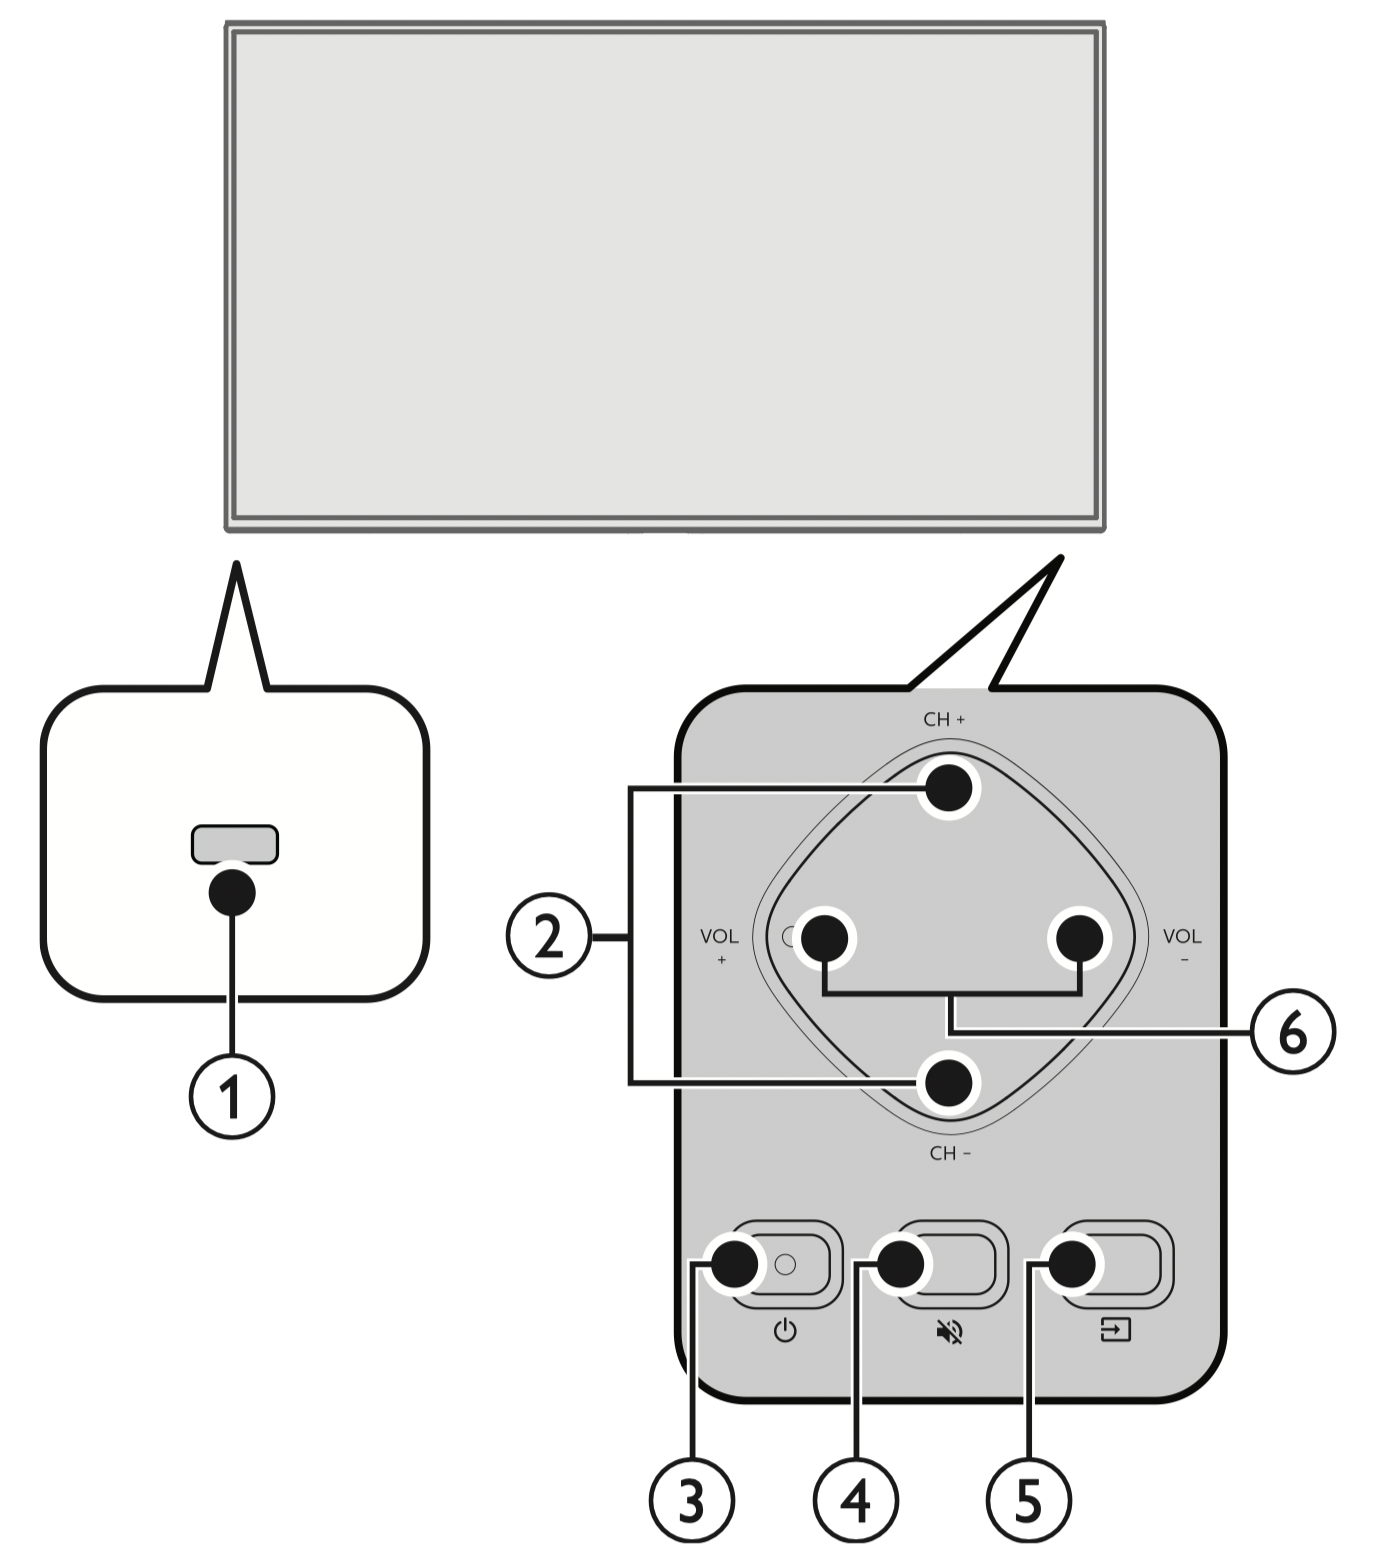
1. Remote control sensor
Receives IR signal from remote control.
2. CH + / –
Selects a channel.
3. (POWER)
Turns the TV on or switches the TV into standby mode.
4. (MUTE)
Turns the sound on and off.
5. (INPUTS)
Selects connected devices.
6. VOL + / –
Adjusts the volume.
VOL + : Volume up
VOL – : Volume down
Terminals
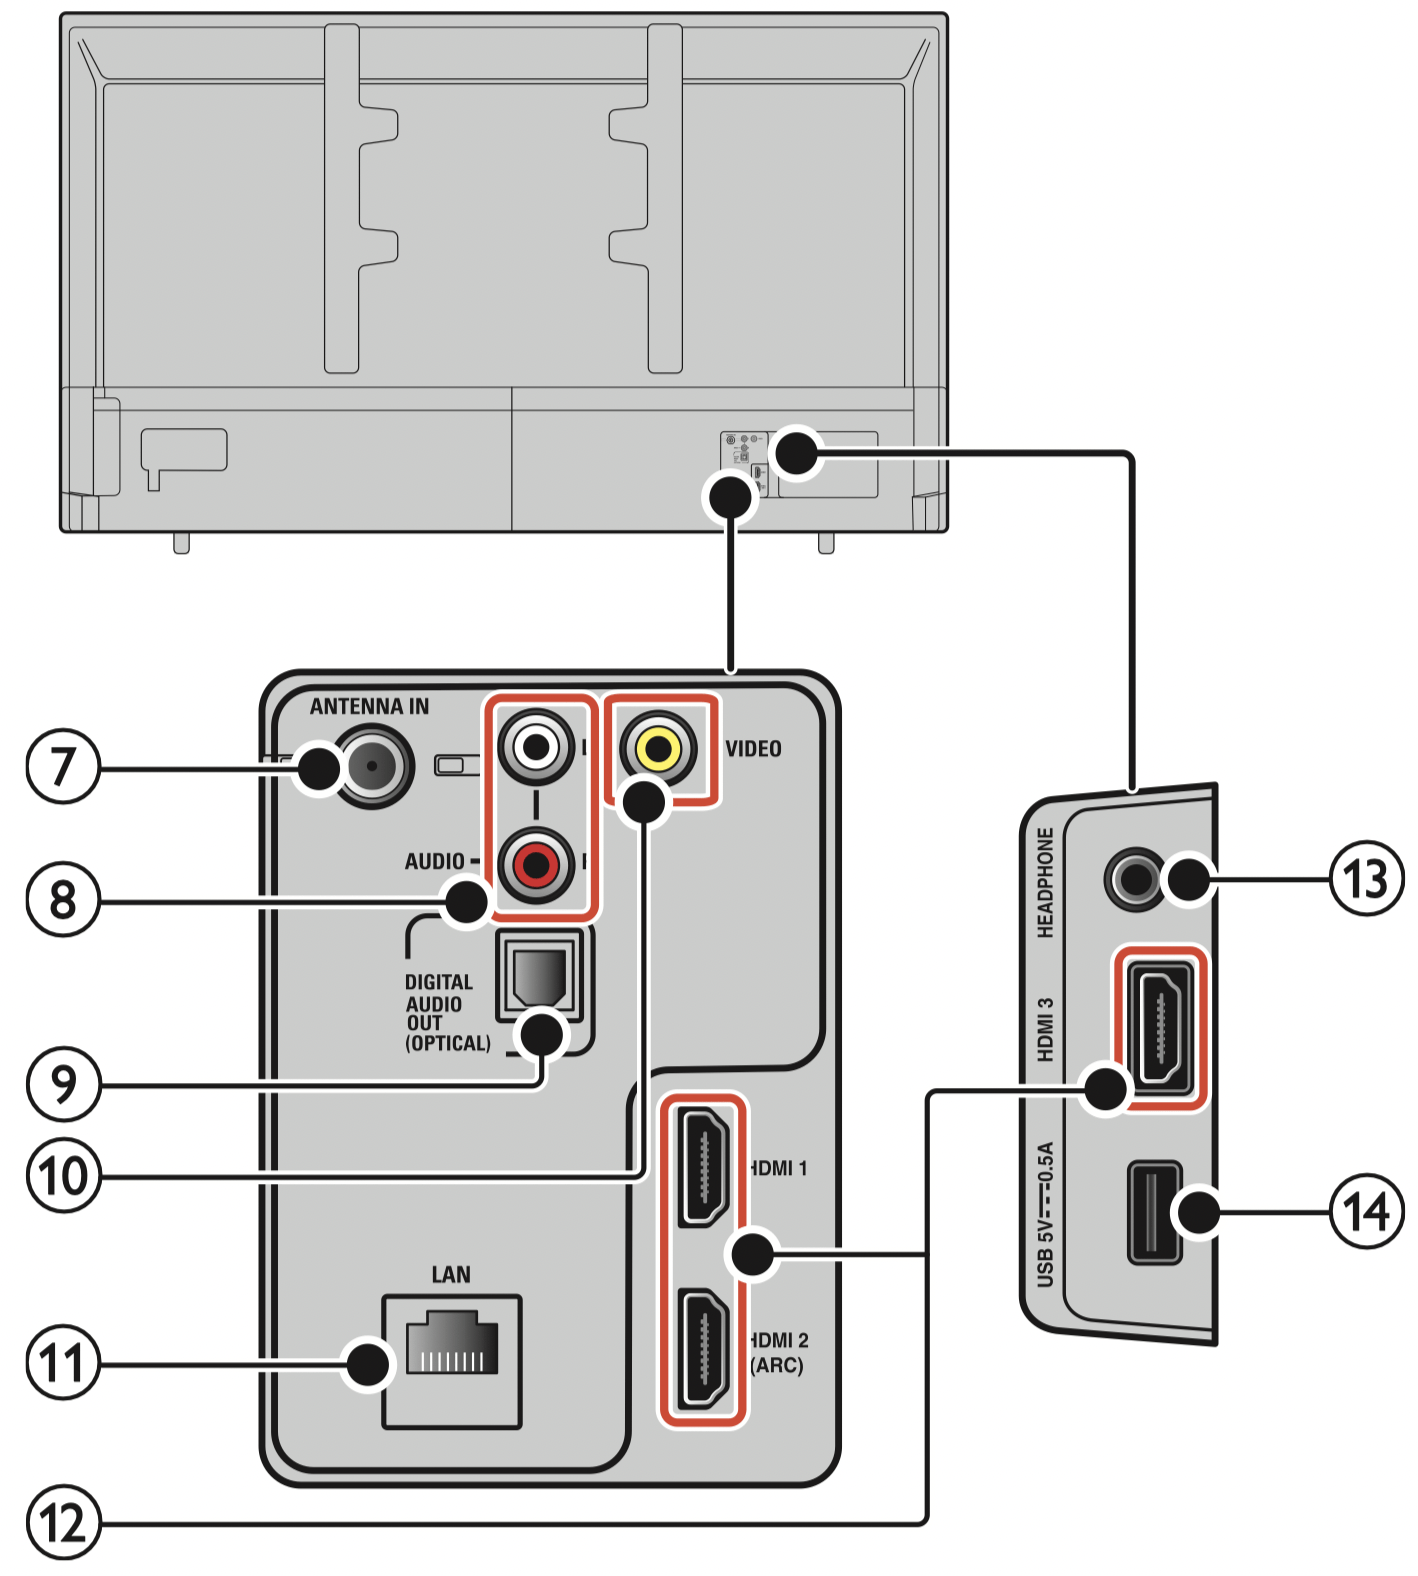
7. 75 ohm Cable / Antenna connection
Signal input from an antenna or Cable / Satellite set-top boxes.
8. Analog audio (L/R) input jacks
Connect analog audio signals from;
- HDMI-DVI / Analog audio (L/R) jacks signal
- Composite video / Analog audio (L/R) jacks signal
- PC connection / Analog audio (L/R) jacks signal with stereo mini 3.5mm plug audio cable on PC
9. Digital audio output (Optical) jack
Digital audio (S/PDIF) output to home theaters and other digital audio systems.
10. Composite video (VIDEO) input jack
Connect composite analog video signal.
11. Ethernet port
For internet connection using an Ethernet cable with an RJ-45 connector.
12. HDMI input jack(s)
Digital audio and video input from high definition digital devices such as DVD / Blu-ray Disc™ players, cable / satellite set-top boxes, PC’s, etc.
* For HDMI 2 only In addition to normal HDMI and HDMI-DVI functionality, it outputs TV audio to an HDMI-ARC-compliant device, such as a home theater system.
13. Headphone audio output jack
Headphone 3.5mm stereo jack for personal listening.
14. USB terminal
Data input from USB memory stick only.
Note(s): This TV has a USB port which is designed for USB media playback or to connect peripheral devices, such as a keyboard or mouse. While you may find that a particular keyboard or mouse works to some extent, we cannot guarantee full functionality. You will not damage the TV in any way by trying various keyboards or mice, but the performance of that device may be limited.
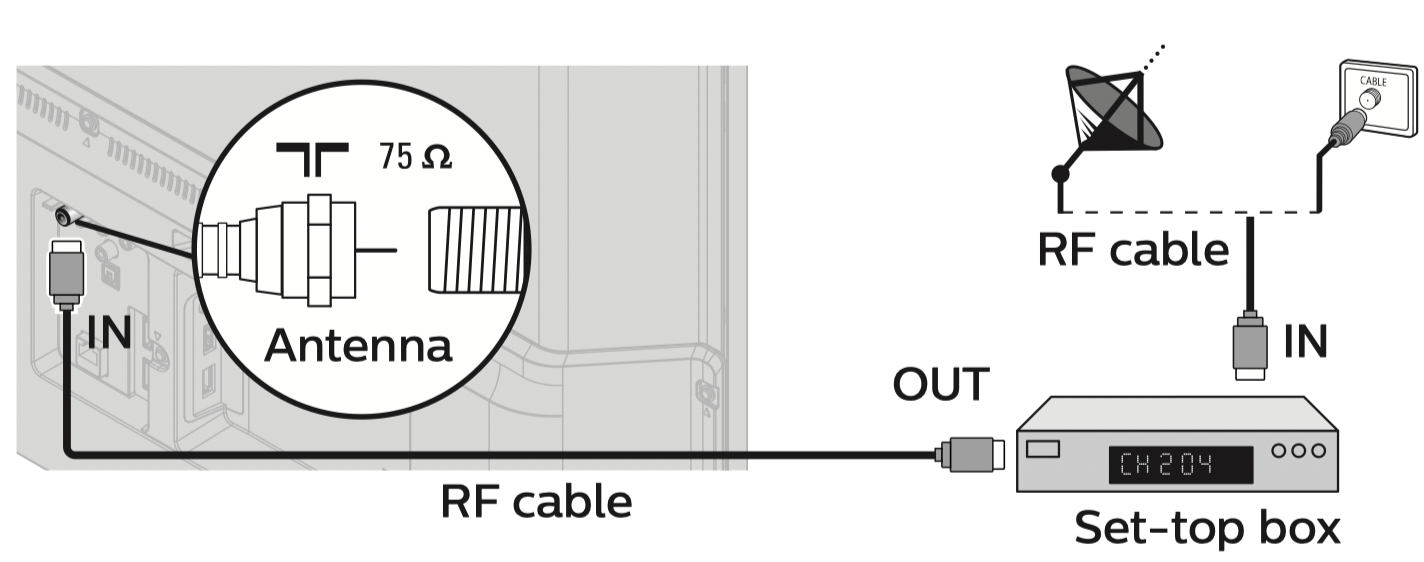
Connecting antenna or cable / satellite / IPTV set-top box
Be sure your antenna or another device is connected properly before plugging in the AC power cord.
If connecting to an antenna through an RF cable
Any DTV programs that are broadcast in your area can be received for free through an antenna connection.
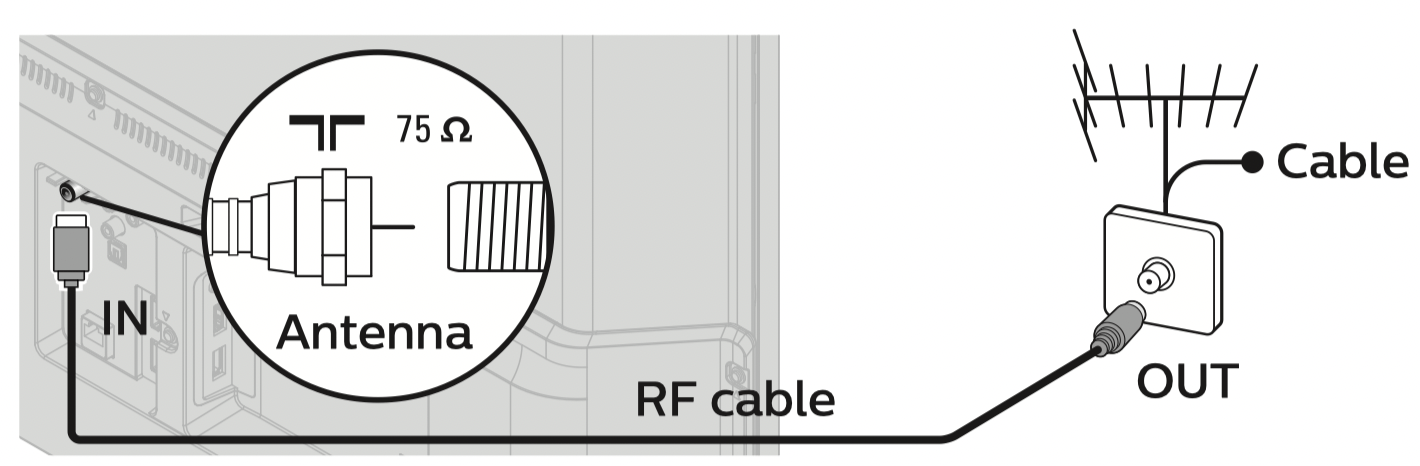
If connecting cable / satellite / IPTV set-top box using an RF cable
If the TV is connected to a cable / satellite set-top box via a coaxial connection, set the TV to channel 3/4 or the channel specified by the service provider.
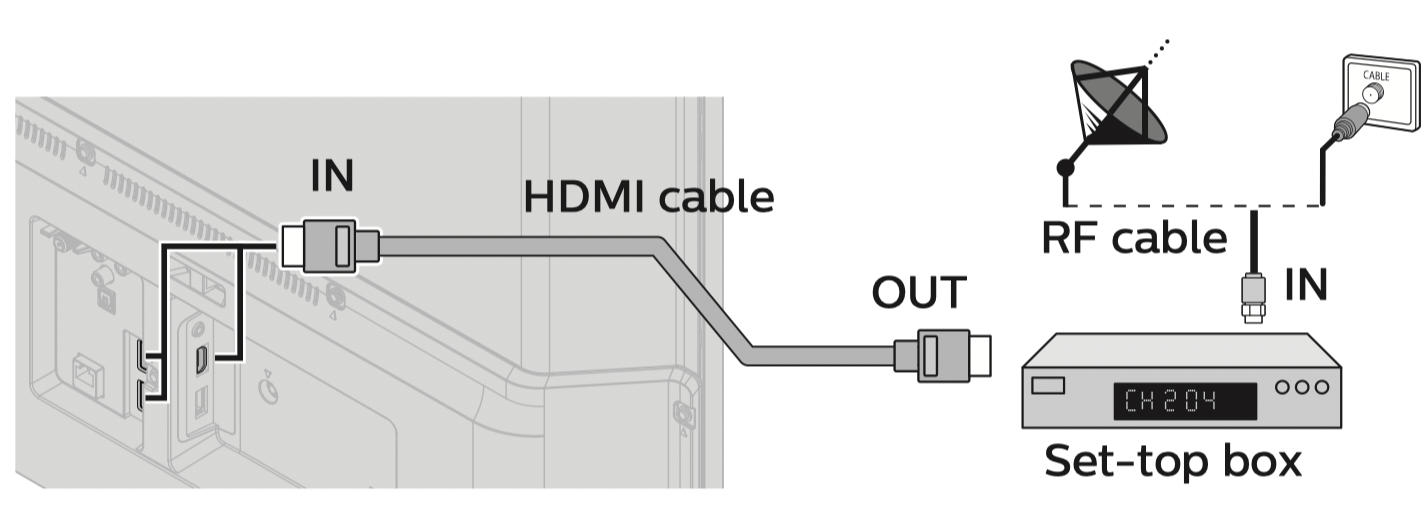
If connecting cable / satellite / IPTV set-top box using an HDMI cable
If the TV is connected to a cable / satellite set-top box via an HDMI cable, make sure you select the correct source by using (INPUTS).
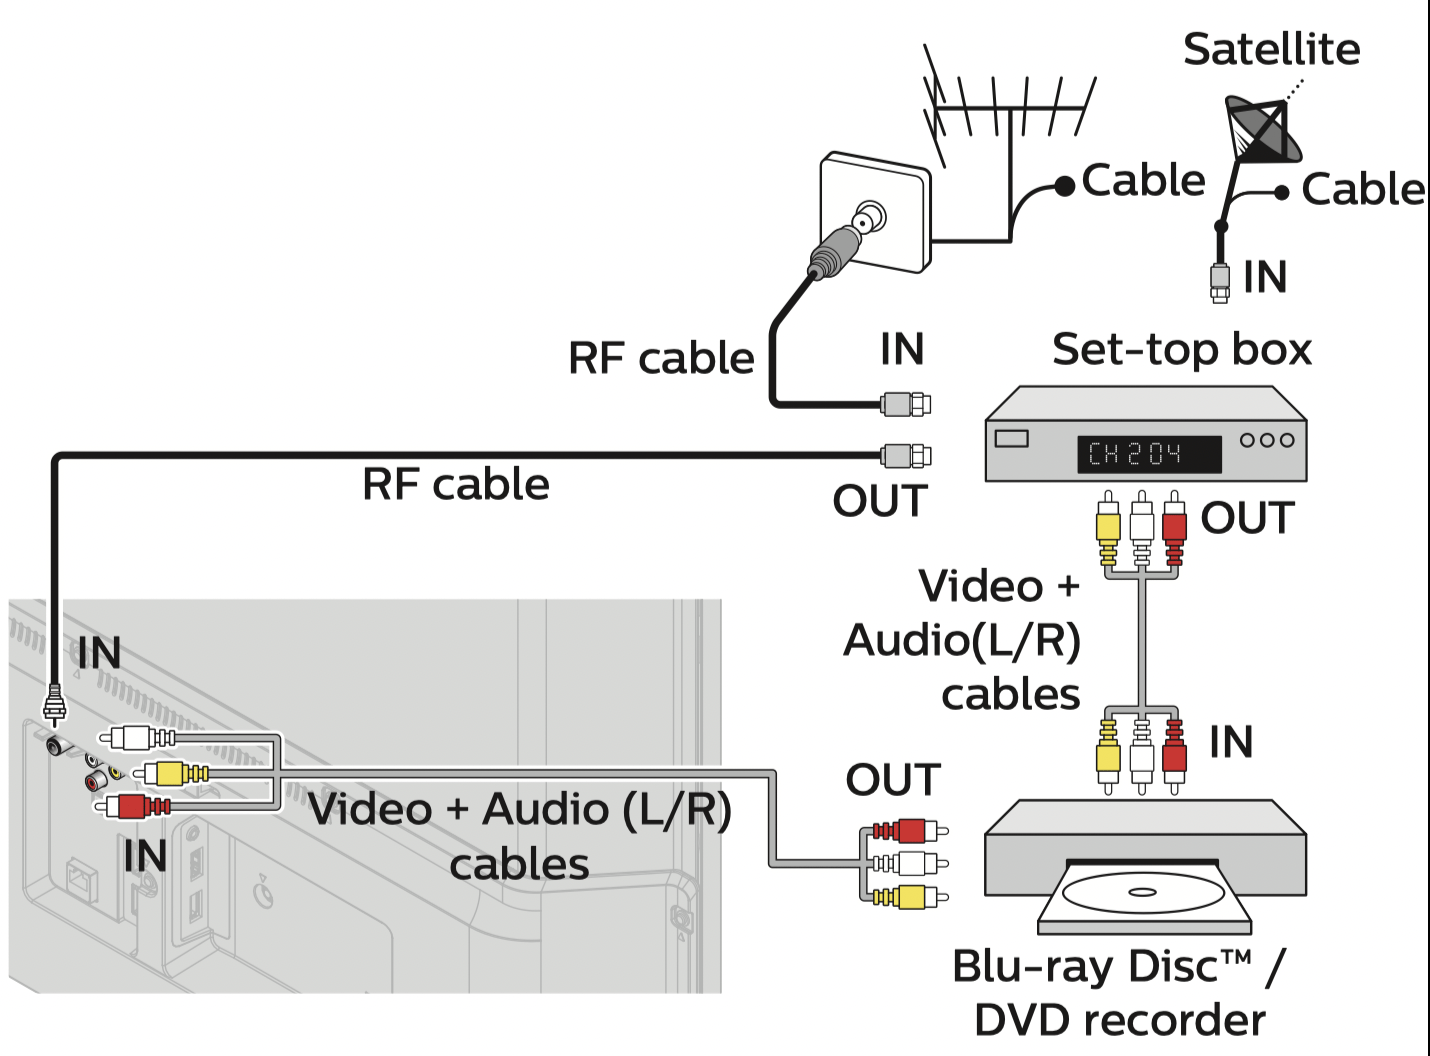
Connecting a cable / satellite / IPTV set-top box, Bluray Disc™ / DVD recorder via composite connectors and analog audio
Do not place your recorder too close to the screen because some recorders can be susceptible to harmful interference from the TV.
Note(s)
- Depending on your antenna system, you may need different types of combiners (mixers) or separators (splitters) for HDTV signal. The minimum RF bandpass on these devices is 2,000MHz or 2GHz.
- For your safety and to avoid damage to this unit, please unplug the RF coaxial cable from the antenna input jack before moving the unit.
- If you did use an antenna to receive analog TV, it should also work for DTV reception. Outdoor or attic antennas will be more effective than a set-top box or inside antenna.
- To turn on your reception source easily between antenna and cable, install an antenna selector.
- If you are not receiving a signal from your cable service, contact the cable provider.
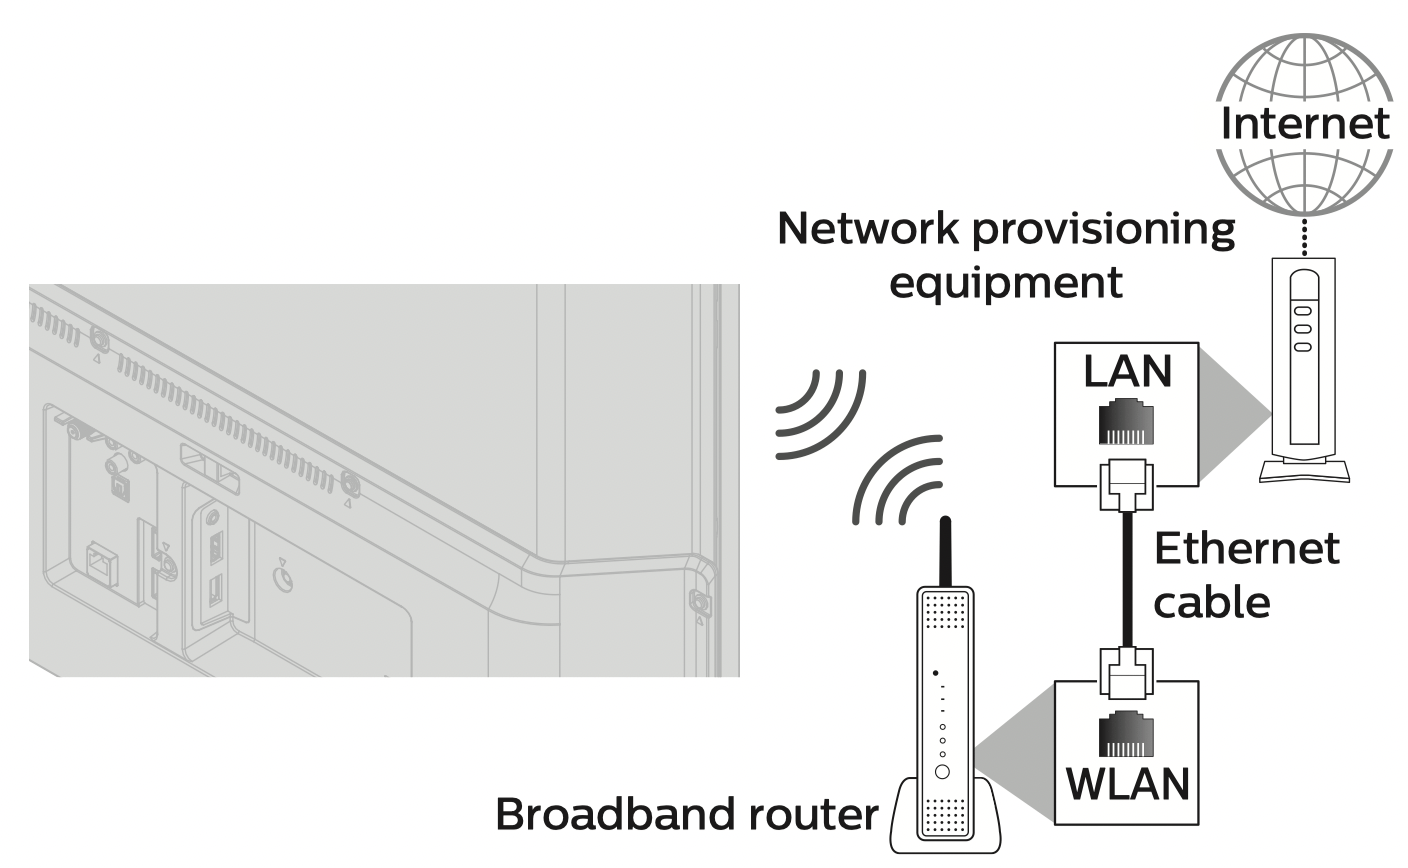
Connecting the TV to the internet using a wireless LAN
Note(s)
- After you make the wireless connection, set up the necessary network settings.
- Use a wireless LAN Access Point (AP) (e.g. broadband wireless router) which supports IEEE 802.1 1 a/b/g/n/ac. (n is recommended for stable operation of the wireless network.)
- This unit does not support Ad-hoc mode.
- Other radio devices or obstacles may cause interference to the wireless network connection.
Use your TV
Switching on your TV and putting it in standby mode
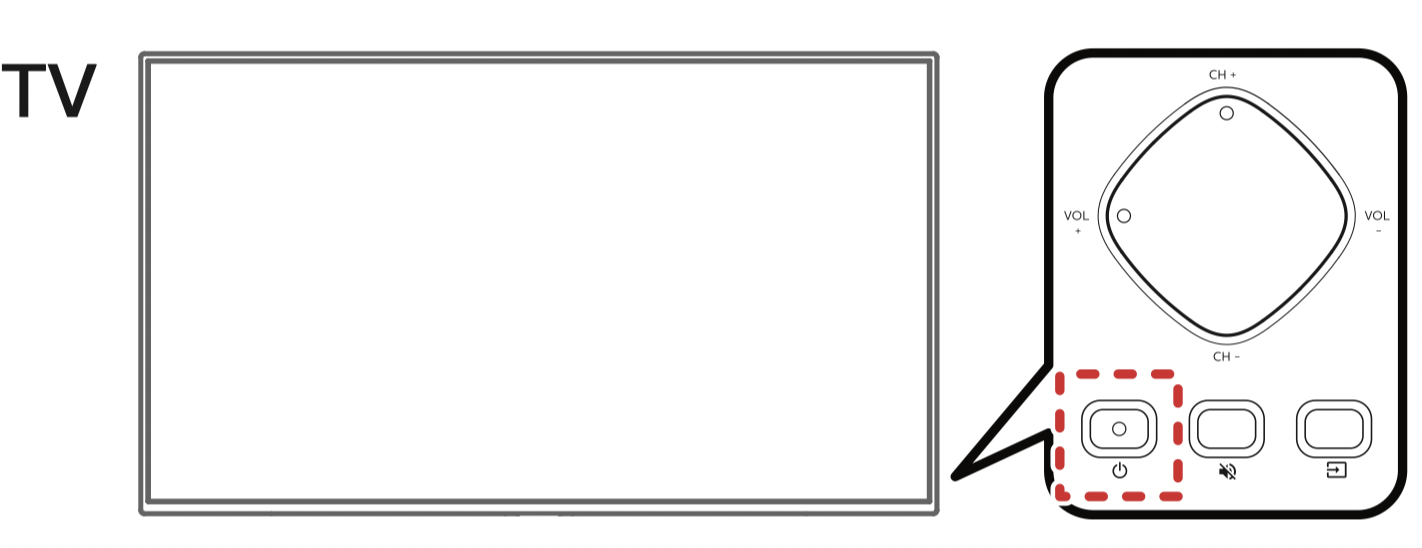
Turns the TV on and off of standby.
- Press (POWER) on the TV or the remote control.
Note(s): Energy consumption contributes to air and water pollution. When the AC power cord is plugged in, your TV consumes energy with a very low standby power consumption.
Adjusting volume
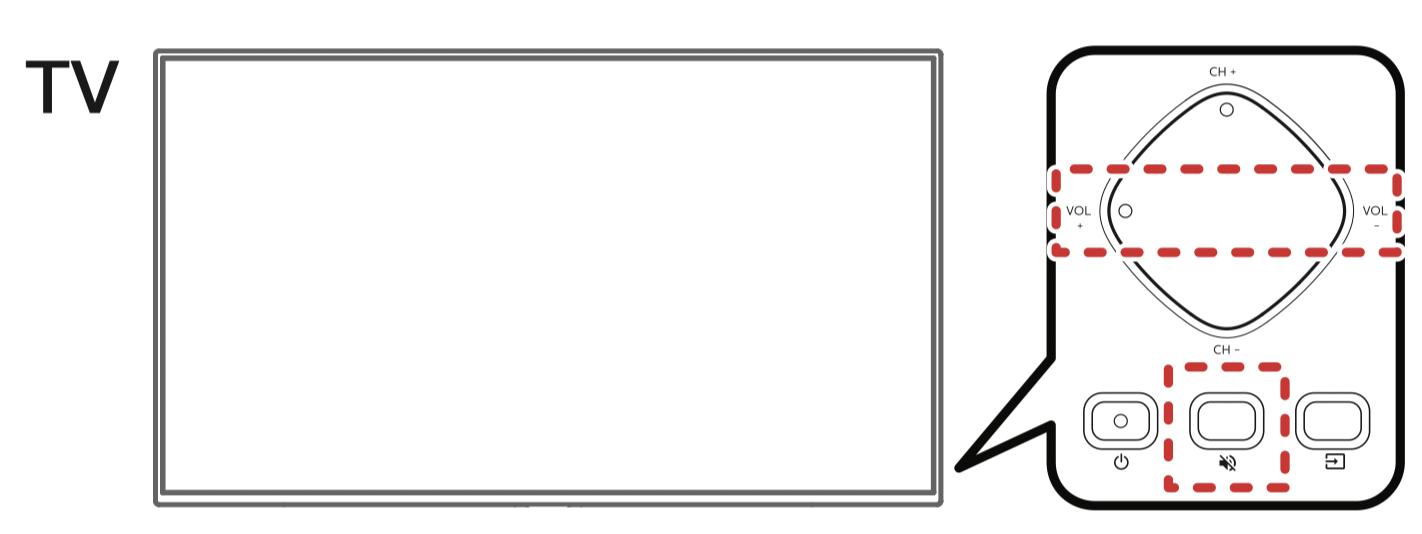
To decrease or increase volume
- Press VOL + / – on the TV or the remote control.
- VOL + : Volume up
- VOL – : Volume down
To mute or unmute sound
- Press (MUTE) on the TV or the remote control to mute the sound.
- Press (MUTE) again or VOL + / – to recover the original sound.
Switching channels
To change channels, you can do any of the following:
- Press CH + / – on the TV.
- Press CH + / –* on the remote control.
- Use the NUMBER buttons* on the remote control.
- Press
 on the remote control for digital channels only.
* Depending on the type of remote control, these buttons may not be present.
Watching channels from an external device
Switching each input mode can easily switch with the remote control between TV and external devices when they are connected to the unit.
1. Turn on the set-top box or the connected device.
① Press (INPUTS) and use to select the set-top box or the connected device and wait a few seconds till the picture appears.
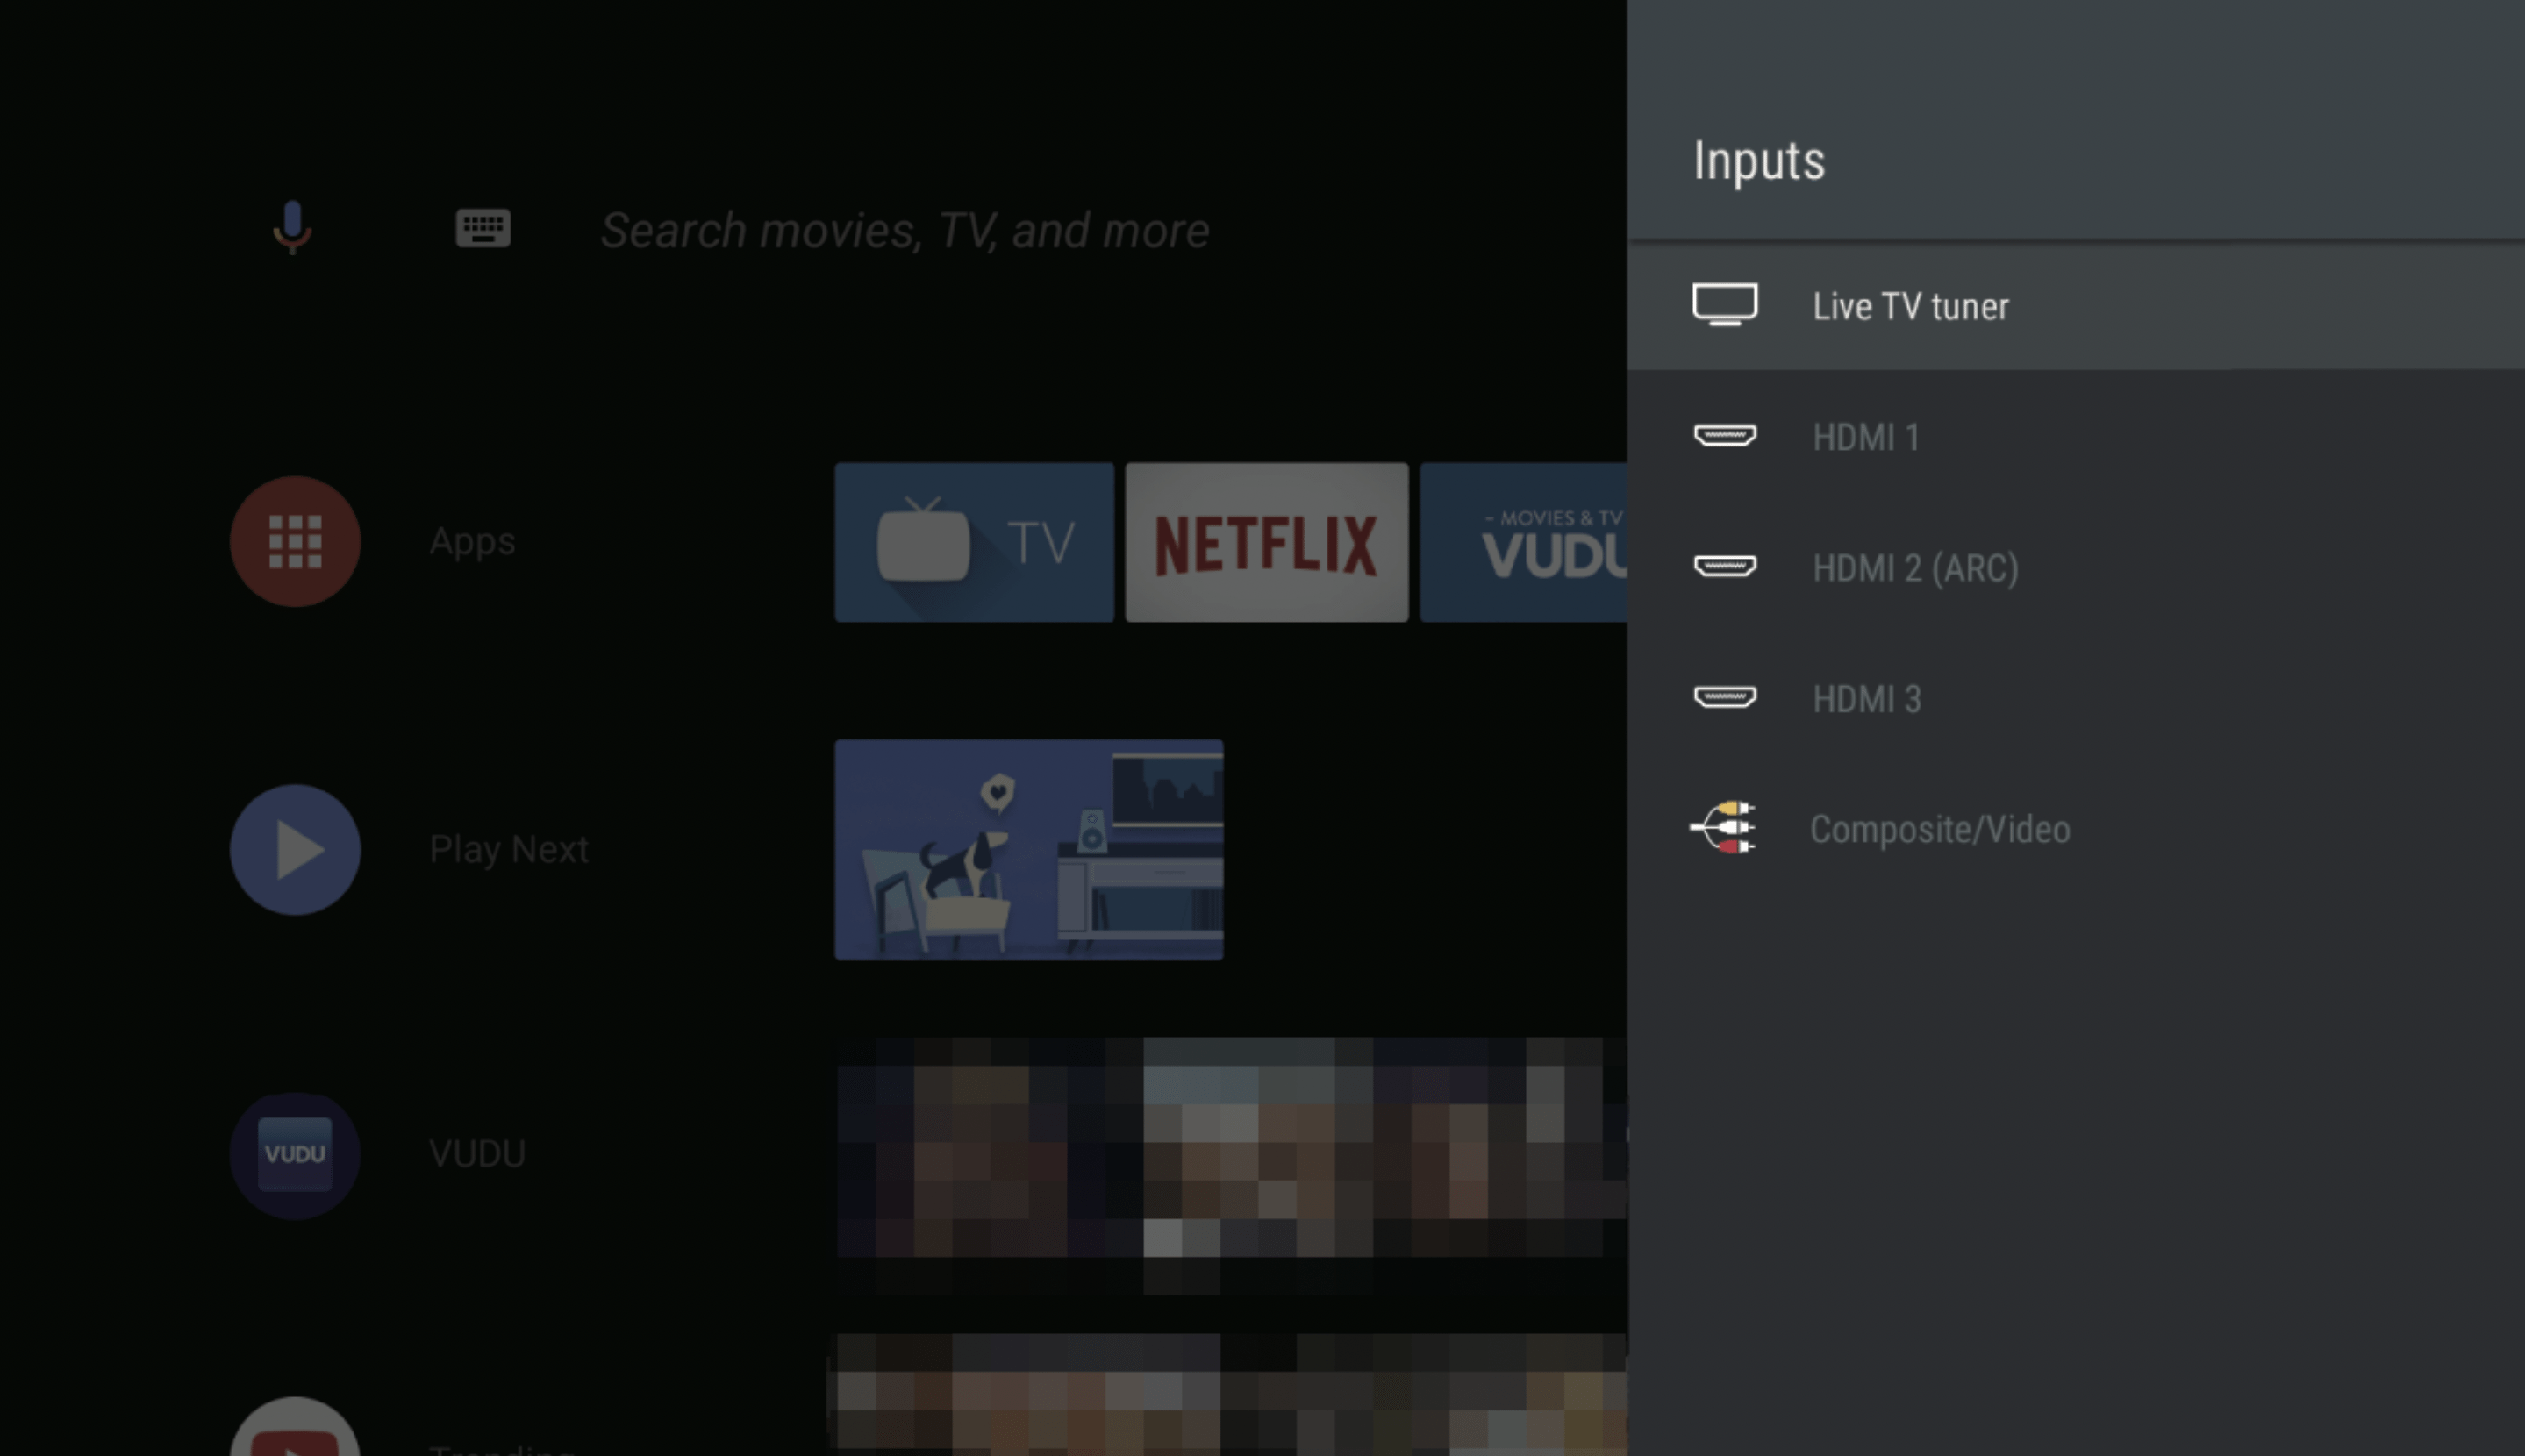
② Use the remote control of the set-top box or the connected device to select channels.
Access the Home menu
1. Press (HOME).
Guide to Home menu
From the Android TV home screen, you can easily access movies, TV shows, music, apps, input devices, settings, and more.
To go back to the home screen at any time, press (HOME) on your remote control.
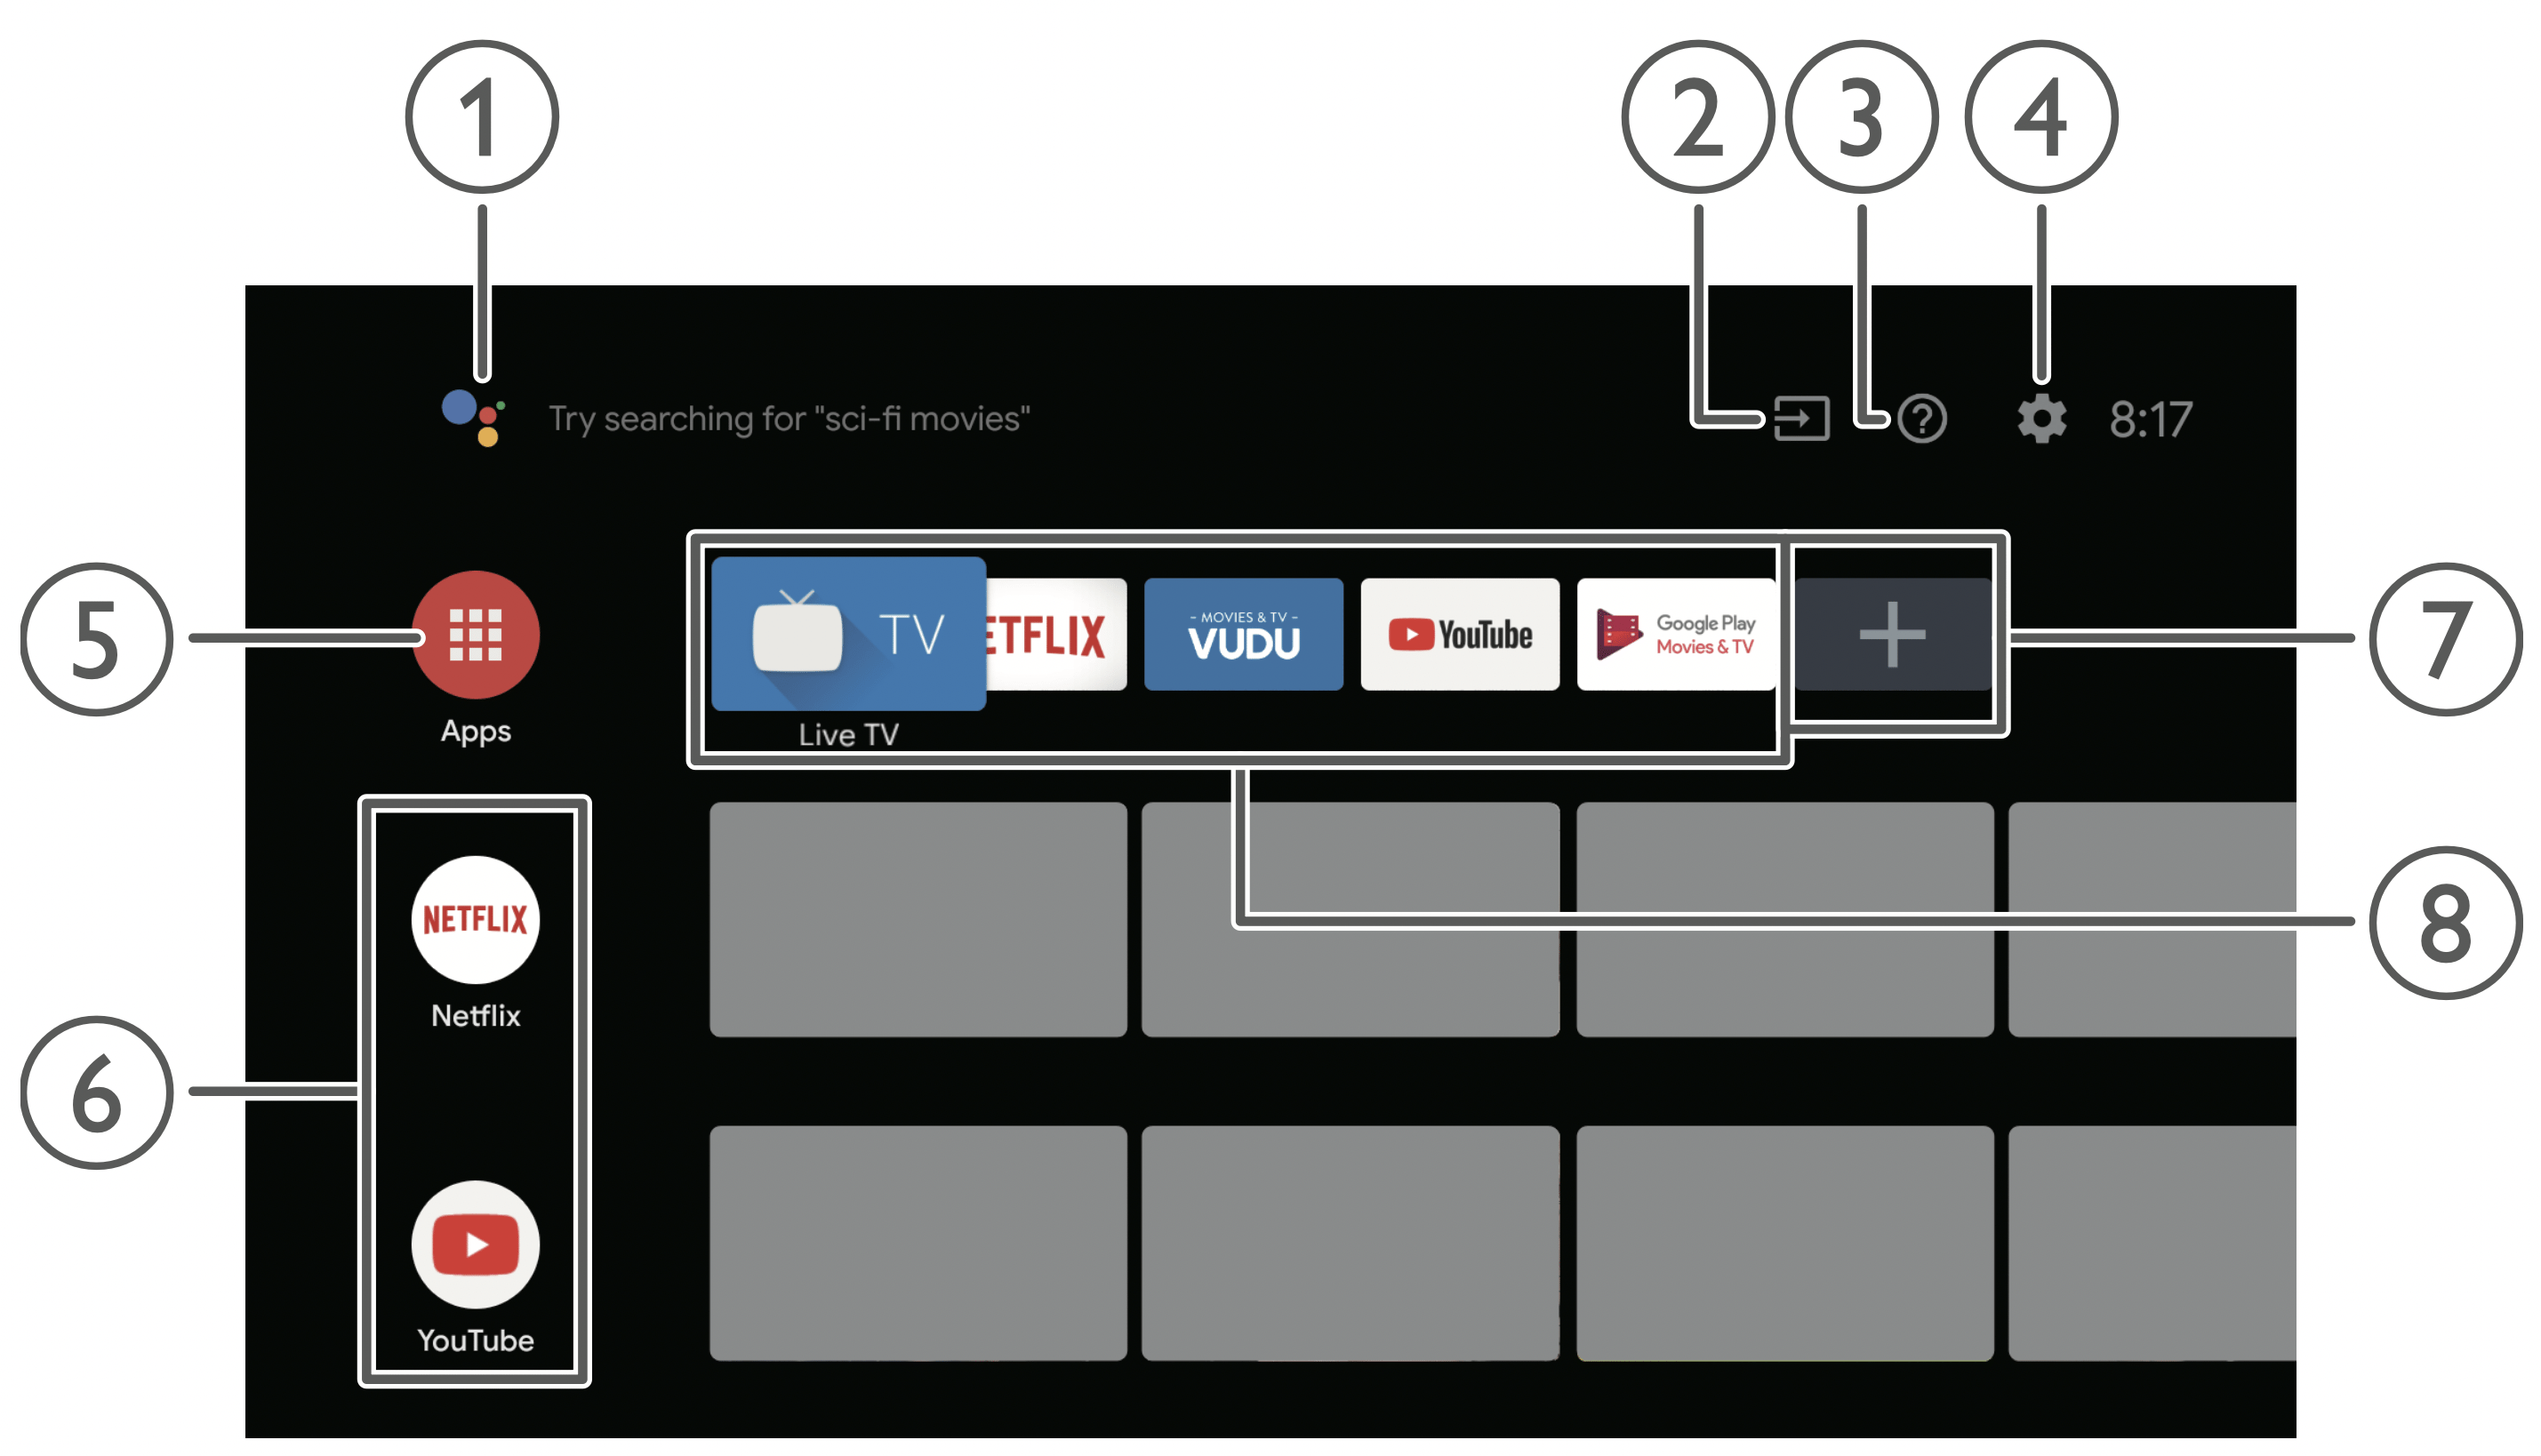
1. Google Assistant : Activates your personal Google Assistant. Type or speak to search for content, control your TV, manage your smart home devices, and more.
2. Source : Toggle inputs between your favorite source devices.
3. e-Help : Online help videos and tutorials
4. Settings: Configure your television settings and connect to wireless devices.
5. Apps : Apps gallery
You must sign in with a Google account to visit and download apps from the Google Play store.
6. How to rearrange channels : Within the row, you want to rearrange, press  on your remote control. To rearrange channels, Select arrow () icon, and press OK. Use to move up or down. Press OK.
7. Install additional apps : Select the “+” and click on the Google Play Store to expand your entertainment library.
8. How to move or delete applications : Select the application and long press OK on your remote control.
To move, Select Move in the list, and press OK. Use  to move left or right.
Press OK.
To delete, Select Remove from favorites in the list, and press OK.
Using options menu
You can access to some TV settings directly by using (OPTIONS).
1. Press (OPTIONS) to display options menu, then press OK.
2. Use to select a desired setting, then press OK.
Picture style
Following settings can be configured.
- Standard
- Natural
- Vivid
- Sports
- Movie
- Game
- Energy saving
- Picture
Picture format
The items displayed depending on the input terminal and the reception resolution are different.
- 4:3
- Wide screen
- Full
- Unscaled Picture
Closed captions
This item displays only when captions are on the streaming.
Multi audio
This item is displayed when DTV broadcasting is received.
This item is displayed when ATV broadcasting is received.
Speakers
- TV speakers
- Digital audio output
Power
Sleep time
- Off
- 10 minutes
- 20 minutes
- 30 minutes
- 60 minutes
- 90 minutes
- 120 minutes
- 180 minutes
- 240 minutes
Picture off
Select Picture off, the TV screen is switched off, to switch the TV screen back on, press any key on the remote control.
Settings
See Getting more from your TV
Maintenance
Cleaning
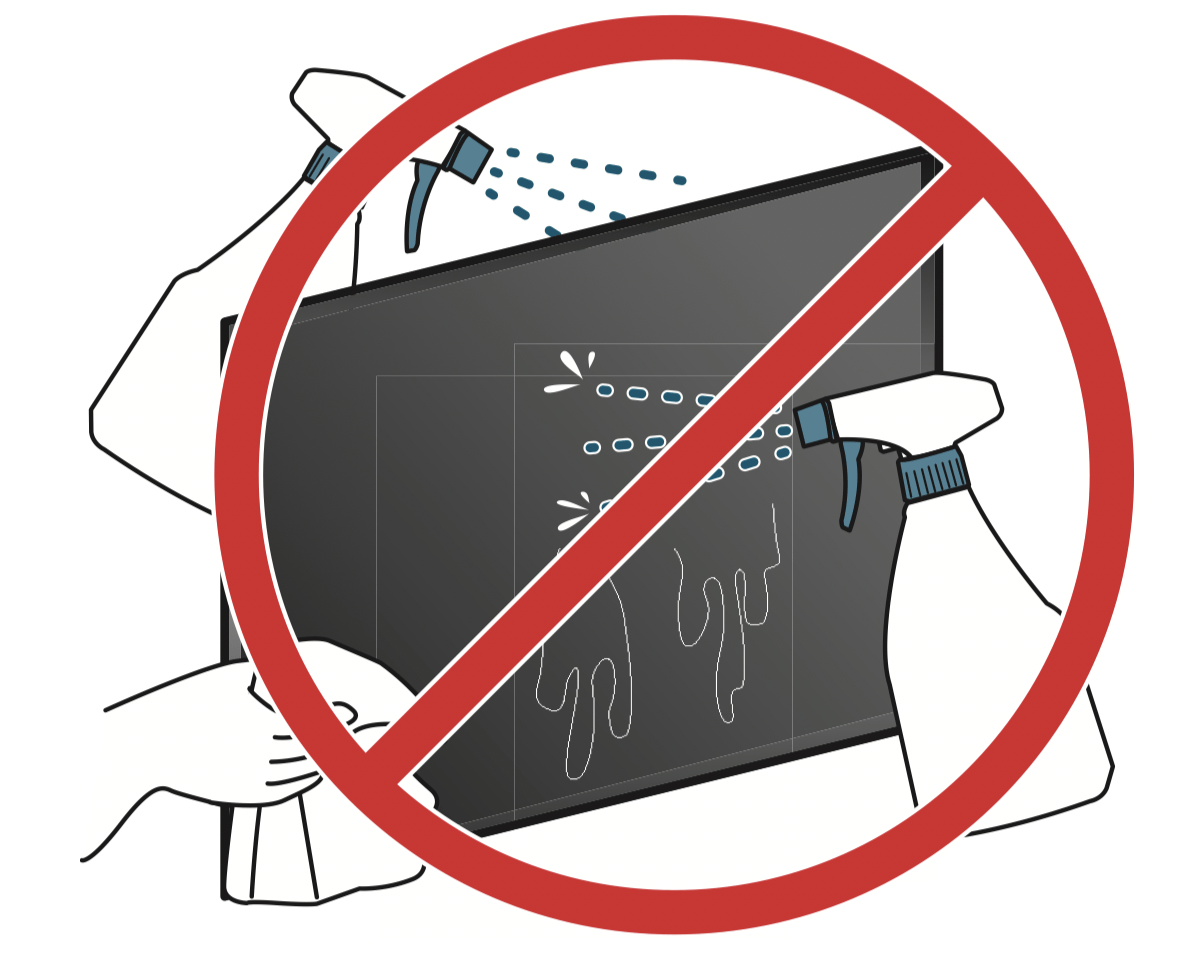
- Clean the front panel and other exterior surfaces of the unit with a soft microfiber cloth or lens brush. Before cleaning the panel, disconnect the AC power cord.
- Never use a solvent or alcohol. Do not spray insecticide liquid near the unit. Such chemicals may cause damage and discoloration to the exposed surfaces.
- Do not spray any liquids on the screen or other exterior surfaces of this unit. If liquids enter the unit, they could cause shorts, electric shocks or fire damage.
Servicing
Should your unit become inoperative, do not try to correct the problem yourself. There are no user serviceable parts inside. Call our toll free customer support line found on the cover of this user manual to locate an authorized service center.
IR signal check
If the remote control is not working properly, you can use a digital or cell phone camera to see if it is sending out an infrared signal.
e.g.) With a digital camera: Point the digital camera towards the remote control infrared diode at the front of the remote control. Press and hold any key on the remote control and look at the camera display. If an infrared pulsating light appears on the display, the remote control is sending out an IR signal.
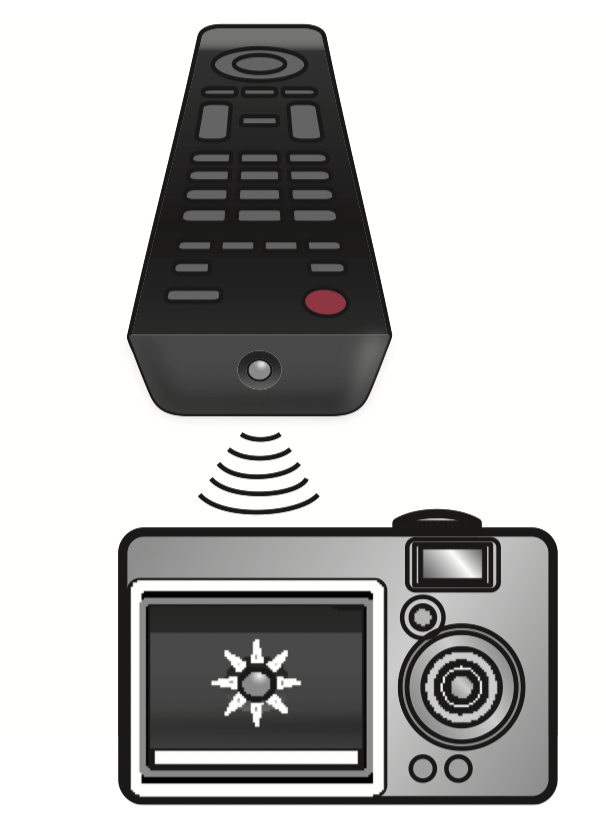
Note: Some cameras may have an IR filter or dual camera cell phones may have an IR filter in one of the camera's and both will not display the IR signal.
Useful tips
FAQ
| Question |
Answer |
|
My remote control does not work. What should I do?
|
- Check the antenna or cable connection to the main unit.
- Check the batteries on the remote control.
- Check if there is an obstacle between the infrared sensor window and the remote control.
- Test the IR signal output use IR signal check. If okay, then possible infrared sensor trouble.
- Aim the remote control directly at the infrared sensor window on the front of the unit.
- Reduce the distance to the unit.
- Re-insert or replace the AAA batteries with their polarities (+/–) as indicated on the remote control battery area.
- When there is an infrared-equipped device such as PC near this unit, it may interrupt the remote control signal on this unit. Move the infrared-equipped device away from this unit, change the angle of the device's infrared sensor or turn off the infrared communication function.
|
|
How come the initial setup appears every time I turn on this unit?
|
- Make sure to complete the initial setup before the unit goes into standby mode.
|
|
Why can I not watch some RF signal TV programs?
|
- The selected channel may not be broadcasting.
- The selected channel cannot be viewed by the Parental controls setting.
- The unit requires some kind of antenna input. An indoor antenna (Digital or VHF / UHF), an external antenna (Digital or VHF /UHF) or an RF coaxial cable from your wall cable or set-top box needs to be plugged into the unit.
|
|
How come there is no image from the connected external devices?
|
- Check if the correct input is selected by pressing (INPUTS).
- Check the antenna, cable or other input connection to the unit.
|
|
When I enter a channel number, why does it change automatically?
|
- Many digital channels have alternate channel numbers. The unit changes the numbers automatically to the ones signifying the broadcasting station's channel number. These basic numbers used for the previous analog broadcasts. (e.g., input digital ch# 30automatically changes to digital ch# 8.1)
|
|
Why are captions not displayed entirely? Or why are captions delayed behind the dialog?
|
- Closed captions that are delayed a few seconds behind the actual dialog are common for live broadcasts. Most captioning production companies can display a dialog to maximum of 220 words per minute. If a dialog exceeds that rate, selective editing is used to insure that the closed captions remain up-to date with the current TV screen dialog.
|
|
How can I set the clock?
|
- From the Android TV home screen, select Settings in the upper right of the screen. Scroll down to Preferences and select Date & time. Please set it automatically or manually.
|
Troubleshooting tips
If the unit does not perform properly when operated as instructed in this manual, Please check the following
Troubleshooting tips and all connections once before calling for service.
Power
No power
- Make sure the AC power cord is plugged in.
- Make sure that the AC outlet supplies the proper voltage, plug another electrical appliance into the AC outlet to ensure that the AC outlet operates normally.
- If a power failure occurs, unplug the AC power cord for 1 minute to allow the unit to reset itself.
Remote
Control buttons do not work.
- Do NOT press more than one button at the same time.
- Ensure that no buttons on the remote control are depressed and move freely.
- Re-insert or replace the AAA batteries with their polarities (+/–) as indicated on the remote control battery area.
Universal remote control does not work properly.
- Refer to the user manual of the universal remote control for the Philips code.
(Google Assistant) microphone on the remote control does not work.
- To pair the remote control, refer to the step “6 Connecting your devices” in the Quick start guide and see “How to connect to your Bluetooth® devices”.
Performance
Remote response is delayed or sluggish during initial use.
- Your television is automatically, downloading and installing the latest applications, for the best user experience.
- During this time, you may experience a delayed response from your remote control. Upon successful installation, your remote control will operate normally.
Accessibility
Television is speaking prompts out-loud.
- To enable or disable the talkback (text to speech) on your television, press (HOME) on your remote control, navigate to settings (found in the upper right corner of the home screen) and select accessibility, select talkback, press OK to toggle between on or off.
Shortcut: Press (OPTIONS) on your remote control seven times in rapid succession to enable text to speech.
Picture
Power is on but screen image is off.
- Check if the connection for your source device is properly secured.
- Check if the correct input is selected by pressing (INPUTS).
- Verify that your HDMI mode, for the input selected matches the resolution output of your source device. Change source input until you have picture and sound.
Sound
No sound is heard when using the HDMI digital connection.
- Some HDMI cables and devices may not be compatible with the TV due to different HDMI specifications.
No sound, distorted sound or incorrect audio sound is heard when using the HDMI-DVI connections.
- Make sure that the analog audio signals from the HDMI-DVI device are connected to the analog audio input L/R jacks.
- When using Composite analog video, make sure that the analog audio (L/R) connectors are mounted into the audio (L/R) input jacks.
Sound intermittent or no sound.
- Check if the audio cable is connected into the unit correctly. You switch to a different input and the volume changes.
- This unit will memorize the volume level from the last time you adjusted it.
- If the volume of the sound from another device is higher or lower, then the loudness will change.
- Make sure Auto volume leveling is set to On.
Picture & Sound
No sound with distorted picture occurs when using the HDMI digital connection.
- Some HDMI cables and devices may not be compatible with the TV due to different HDMI specifications.
No picture or sound
- Check if the power is on.
- Check whether all the cables to the unit are connected to the correct output jack on your separate device like Blu-ray Disc™ / DVD recorder.
- View other TV channels. The problem might be limited to the broadcasting station or weak signal strength.
- Unplug the AC power cord and wait for about 1 minute, then plug the AC power cord and turn on the unit again.
- Check whether the connection of the antenna or cable / satellite set-top box is connected correctly.
- Make sure that the selected input mode is connected to the working input jack.
- Make sure that the sound is not muted. Press (MUTE) so that the volume 2 bar and current volume level will appear on the TV screen.
- Make sure that the volume is NOT set to 0 or (MUTE). If so, use VOL + / – to adjust to the desired volume.
- Make sure that the headphone is NOT connected to the headphone audio output jack.
- Make sure that the TV speakers is NOT set to Off.
- Please make sure that the speaker of the TV is not set for Digital audio output.
- If there are issues with picture/color and/or sound when connecting an external device using the HDMI port, please try switching the HDMI EDID Version. (Refer to HDMI EDID Version)
Adjusted Picture or Sound settings are not effective every time the unit is turned on.
- You need to turn off the Retail mode setting. (Otherwise, the settings you adjusted will not be memorized after the unit goes into standby mode.)
You see a distorted picture or hear an unusual sound. (Analog TV - NTSC signal)
- You may be getting NTSC (Analog) TV signal (not HDTV signal) interference from electrical appliances, automobiles, motorcycles or fluorescent lights.
- Try moving the unit to another location to see if this is the cause of the problem.
Ghosts, lines or streaks in picture.
- Electrical interference from nearby appliances may affect picture quality.
- View other TV channels. The problem might be limited to the broadcasting station or weak signal strength.
Picture poor, sound intermittent or no sound
- View other TV channels. The problem might be limited to the broadcasting station or weak signal strength.
Screen
You switch to a different input and the screen size changes.
- This unit will memorize the viewing mode from the last time you used the particular input modes.
The display image does not cover the entire screen.
- If you are watching TV or using the composite video or HDMI with 480i input, select Picture format, and then switch to various screen modes. (Refer to Picture format)
Different color marks on the TV screen
- View other TV channels. The problem might be limited to the broadcasting station, missing data or pixelation due to weak signal strength.
Closed captions
Closed captions are displayed as a white box. No closed captions are displayed in the closed captions-supported program.
- Interference from buildings or weather conditions may cause closed captions to be incomplete if watching analog TV signals.
- Broadcasting station may shorten the program to insert advertisements. The closed caption decoder cannot read the information of the shortened program.
Black box is displayed on the TV screen.
- The text mode is selected for caption. Select CC-1, CC-2, CC-3 or CC-4.
Software update
A message appears on the screen prompting for software update again.
- When you start up the TV or a net service after executing the software update, a message may appear on the screen prompting for software update again. In this case, please execute the software update. (start from Settings > About > System update)
Network
Cannot connect to the network.
- Check if the broadband router and/or modem is correctly connected.
- Check if the Ethernet cable connection is properly made. Turn on the broadband router and/or modem.
- Check the network settings.
Sometimes video quality is poor when using the wireless LAN.
- The wireless network connection quality varies depending on the distance or obstacles (e.g. wall, basement, 2nd floor) between the TV wireless LAN adapter and the wireless router (access point), from other wireless networks, and brand and type of the wireless router (access point). When using the wireless LAN of the TV, it is suggested to place the wireless router as close as possible to the television.
Wireless LAN connection fails or wireless connection is poor.
- Check the installation location of the TV and wireless router (access point). Signal quality may be affected for the following reasons.
- Interference of other wireless devices, microwaves, fluorescent lights, etc., are placed nearby.
- There are floors or walls between the wireless router and TV.
- If the problems continue even after checking the above, try making a wired LAN connection.
Cannot use the wireless connection.
- Check if the wireless LAN Access Point (AP) (e.g. wireless router) is oriented properly or not placed too close between them.
- Once you have activated the wireless connection please wait 30 seconds for the connection to be established after turning on the unit, before trying to access network features.
Slow Data Connection or buffering.
- Check the settings between your router and ISP modem or gateway (if applicable).
- Connect to a stable wireless connection from home wireless or wired network.
- The use of mobile hot spots or public wireless connections is not recommended.
Cannot use Netflix feature.
- Check if the network connection is properly made.
- Some network services may not be available in your country. Cannot add movies or TV episodes to the Instant Queue.
Even though the speed of the internet connection improves during playback, the picture quality of Netflix streaming movie does not improve.
- The picture quality does not change during playback. It differs depending on the speed of internet connection at the time of loading.
Cannot use VUDU feature.
- VUDU is available only in the United States.
- Check if the network connection is properly made. Cannot rent or buy movies / TV episodes on VUDU.
The picture quality of a streaming movie (Netflix or VUDU) is poor.
- Check the speed of your internet connection. You need speeds of at least 8 Mbps to this player for high quality uninterrupted playback.
Streaming movie (Netflix or VUDU) often stops or starts buffering during playback.
- Contact your internet service provider to troubleshoot your internet connection for speed and line quality. Consistent line quality and speed are very important for internet video playback.
Cannot connect to the network while my PC is connected to the network.
- Check the content of your internet service contract to see if your internet service provider prevents multiple terminals connecting at the same time.
Cannot use WPS to connect to the access point.
- Connect the unit to the access point using scan or manual entry mode. If the access point’s security mode is set to WEP*, change the setting to others (recommended), then try WPS again. (For access point configuration, please consult its user manual or manufacturer.)
* WEP is not recommended to be used due to its major security flaws. Change the security protocol on the wireless router to others (recommended) mode.
Folder or files stored on home network media server are not displayed in the file list or cannot be played back.
- Check the setting on your home media server. (Refer to the user manual of the home media server.)
- Check the network connection and settings.
Note(s)
- The LCD screen is manufactured to provide many years of useful life. Occasionally a few non active pixels may appear as a fixed point of blue, green or red. This is not to be considered a defect in the LCD screen.
- Some functions are not available in specific modes, but this is not a malfunction. Read the description in this manual for more details on correct operations.