User Guide Television
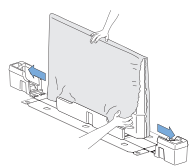
Installing the stands
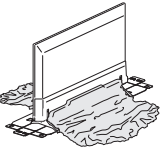
- Remove both of the bottom polystyrene foam bases. Carefully tear the plastic bag until the bottom corner of the TV is exposed. Support the top of the TV set at all times to prevent the TV from falling.
Note(s)
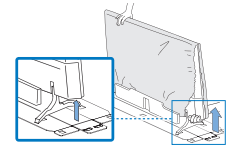
- Before installing the matching stand, remove the protective cardboard and carefully peel away the film from the area so that it will not get stuck between the unit and the stand.
- Lift up one side of the TV approx. 1 inch (2.5 cm) and insert the matching stand upward until it fits the main unit.
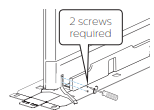
- Fasten the matching stand to the TV with 2 screws (included).

- In the same manner as step 2, install the other stand.
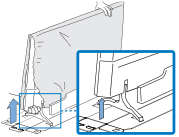
- Fasten the other stand to the TV with 2 screws (included).
- Both stands should now be securely fastened.
Note(s)
- A wide open space is recommended for assembly.
- A Phillips-head screwdriver is required to fasten the stands to the TV set.
- When attaching the stand, ensure that all screws are tightly fastened. If the stand is not properly attached, it could cause the unit to fall, resulting in injuries as well as damage to the unit.
- To remove the stand from this unit, unscrew the phillips-head screws by reversing the procedure. Be careful not to drop the stand when you remove
Installing the Batteries
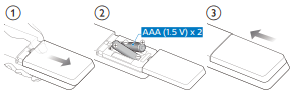
- Open the battery cover by firmly sliding down.
- Insert 2 AAA (1.5 V) batteries matching the polarity indicated inside battery compartment of the remote.
- Slide the cover back into position.
Caution(s)
- For remote that have the battery cover on the front, please take care to slide the cover down BEFORE lifting it off to prevent accidentally breaking the tabs that hold it in place.
Note(s)
- Remove the batteries if not using the remote for an extended period of time.
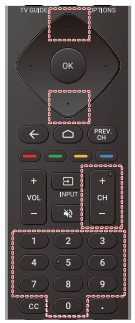
Remote
Control panel
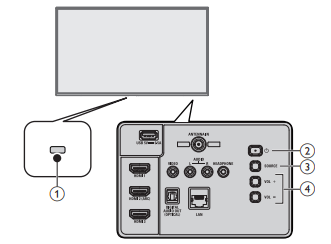
- Remote sensor - Receives IR signal from remote.
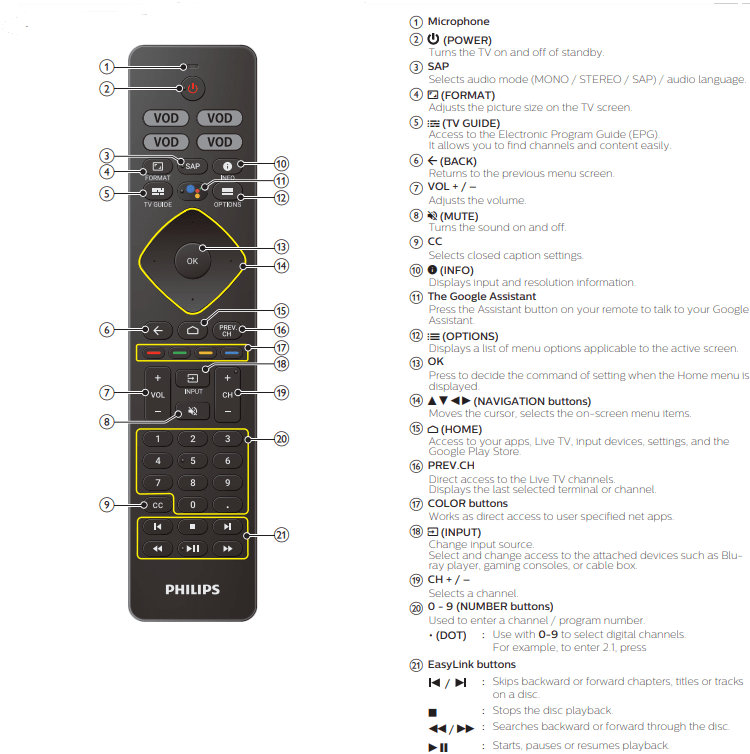
- [IMAGE] (POWER) - Turns the TV on or switches the TV into standby mode. Turns the TV on and off of standby.
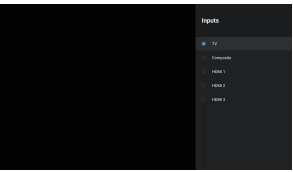
- SOURCE - Selects connected devices.
- VOL + / – Adjusts the volume.
- VOL + : Volume up
- VOL – : Volume down
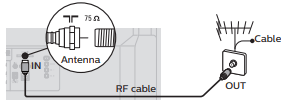
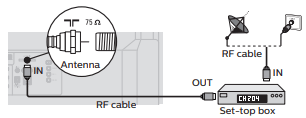
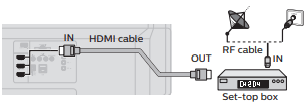
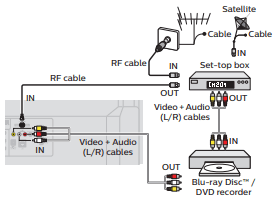
Connecting antenna or cable / satellite / IPTV set-top box
Be sure your antenna or another device is connected properly before plugging in the AC power cord.
If connecting to an antenna through an RF cable
- Any DTV programs that are broadcast in your area can be received for free through an antenna connection.
If connecting cable / satellite / IPTV set-top box using an RF cable
- If the TV is connected to a cable / satellite set-top box via a coaxial connection, set the TV to channel 3/4 or the channel specified by the service provider.
If connecting cable / satellite / IPTV set-top box using an HDMI cable
- If the TV is connected to a cable / satellite set-top box via an HDMI cable, make sure you select the correct source by using INPUT.
Connecting a cable / satellite / IPTV set-top box, Bluray Disc™ / DVD recorder via composite connectors and analog audio
- Do not place your recorder too close to the screen because some recorders can be susceptible to harmful interference from the TV.
Note(s)
- Depending on your antenna system, you may need different types of combiners (mixers) or separators (splitters) for HDTV signal. The minimum RF bandpass on these devices is 2,000 MHz or 2 GHz.
- For your safety and to avoid damage to this unit, please unplug the RF coaxial cable from the antenna input jack before moving the unit.
- If you did use an antenna to receive analog TV, it should also work for DTV reception. Outdoor or attic antennas will be more effective than a set-top box or inside antenna.
- To turn on your reception source easily between antenna and cable, install an antenna selector.
- If you are not receiving a signal from your cable service, contact the cable provider
Plugging in the AC power cord
- Make sure that the AC power cord must be plugged to an AC outlet after all the necessary connections are made.
Caution(s)
- Connect the analog audio signal cables from the external device to the analog audio L/R input jacks.
- If you have an amplifier, connect the HDMI cable to the HDMI input via your amplifier.
Note(s)
- Each time you plug in the AC power cord, no operations will be performed for several seconds. This is not a malfunction.
Selecting your connection quality
HDMI - Highest quality
Supports high-definition digital signals and gives highest picture and sound quality. Video and audio signals are combined in one cable. You must use HDMI for full high-definition video and to enable HDMI control (HDMI CEC).
Note(s)
- Philips HDMI supports HDCP (High-bandwidth Digital Contents Protection). HDCP is a form of digital rights management that protects high-definition content in Blu-ray Disc™ or DVDs.
- The HDMI-ARC connector on the TV features HDMI-ARC functionality. This allows output of TV audio to an HDMI-ARC-compliant device.
Composite - Basic quality

For analog connections. Composite video / Audio analog cable usually combine a yellow video cable with red / white audio (L/R) cables.
Connecting your devices
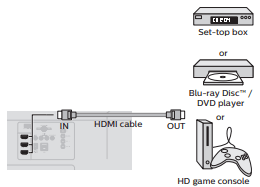
HDMI digital connection
HDMI connection offers the highest picture quality.
HDMI (High-Definition Multimedia Interface) transports highdefinition digital video and multi-channel digital audio through a single cable.
Note(s)
- If there are issues with picture/color and/or sound when connecting an external device using the HDMI port, please try switching the HDMI EDID Version. (Refer to HDMI EDID Version -> p. 16)
- Some HDMI cables and devices may not be compatible with the TV due to different HDMI specifications.
- Use an HDMI cable with the HDMI logo (a certified HDMI cable). High speed HDMI cable is recommended for the better compatibility.
- The unit accepts 480i / 480p / 720p / 1080i, 1080p, 2160p 24/30/60 Hz of video signals, 32 kHz / 44.1 kHz and 48 kHz of audio signals.
- This unit accepts LPCM, AC-3, DD+ audio signal.
- This unit accepts only signals in compliance with CTA-861-G.
HDMI-DVI connection
This unit can be connected to a device that has a DVI terminal. Use an HDMI-DVI conversion cable for this connection and it requires audio cable for analog audio signal as well.

Note(s)
- Some HDMI cables and devices may not be compatible with the TV due to different HDMI specifications.
- Use an HDMI cable with the HDMI logo (a certified HDMI cable). High speed HDMI cable is recommended for the better compatibility.
- The unit accepts 480p, 720p, 1080p and 2160p video signals. When connecting with HDMI-DVI, the operation is maximum 2160p@30 Hz.
- HDMI-DVI connection requires separate audio connections as well and the audio signals are output as analog (L/R) audio.
- DVI does not display 480i image which is not in compliance with CTA-861-G.
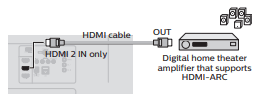
HDMI-ARC connection
HDMI-ARC allows you to use HDMI control to output TV audio directly to a connected audio device, without the need for an additional digital audio cable.
Note(s)
- The HDMI 2 connector is HDMI Audio Return Channel (ARC) compliant. Use it to output digital audio to an HDMI home theater system.
- Be sure that the device is HDMI CEC and ARC compliant and that the TV is connected to the device using an HDMI cable attached to HDMI-ARC connectors.
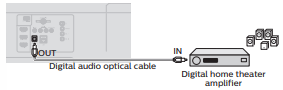
Digital audio output connection
If you connect this unit to an external digital audio device, you can enjoy multi-channel audio like 5.1ch digital broadcasting sound.
Use a digital audio optical cable to connect the unit to external digital audio devices.
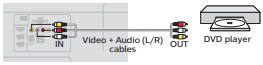
Composite analog video connection
Composite analog video connection offers standard picture quality for video devices connected to the unit.
If you connect to the unit's composite video (VIDEO) input jack, connect audio cables to the audio (L/R) input jacks. When the audio is monaural, then only connect to the audio L input jack.
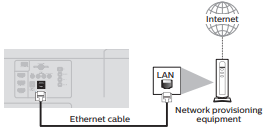
Connecting the TV to the internet using an Ethernet cable
Note(s)
- Please purchase shielded Ethernet cables at your local store and use them when you connect to network equipment.
- After connecting an Ethernet cable, set up necessary network settings. Network & Internet -> p. 23
- Do not insert any cable other than an Ethernet cable to the Ethernet port to avoid damaging the unit.
- If your telecommunications equipment (modem, etc.) does not have broadband router functions, connect a broadband router.
- If your telecommunications equipment (modem, etc.) has broadband router functions but there is no vacant port, then add a hub.
- For a broadband router, use a router which supports 10BASE-T / 100BASETX.
- Do not connect your PC directly to the Ethernet port of this unit
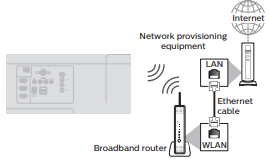
Connecting the TV to the internet using a wireless LAN
Note(s)
- After you make the wireless connection, set up the necessary network settings. Network & Internet -> p. 23
- Use a wireless LAN Access Point (AP) (e.g. broadband wireless router) which supports IEEE 802.1 1 a/b/g/n/ac. (n is recommended for stable operation of the wireless network.)
- This unit does not support Ad-hoc mode.
- Other radio devices or obstacles may cause interference to the wireless network connection.
PC connection
HDMI connection
This unit can be connected to your PC that has an HDMI terminal. Use an HDMI cable for this digital connection.

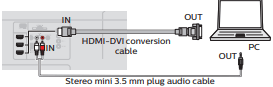
HDMI-DVI connection
This unit can be connected to your PC that has a DVI terminal.
Use an HDMI-DVI conversion cable for this video digital connection and it requires stereo mini 3.5 mm plug audio cable for analog audio signal as well.
The following PC-input video signals can be displayed:
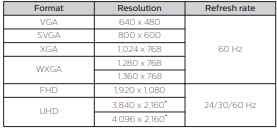
Other formats or non-standard signals will not be displayed correctly.
* When connecting with HDMI-DVI, the operation is maximum 2160p@30 Hz.
Note(s)
- Please purchase a HDMI-DVI conversion cable that has a ferrite core.
- The following operations may reduce noise.
Attach a ferrite core to the AC power cord of your PC.
Unplug the AC power cord and use the built-in battery of your portable / laptop PC.
- Some HDMI cables and devices may not be compatible with the TV due to different HDMI specifications.
- Use an HDMI cable with the HDMI logo (a certified HDMI cable). High speed HDMI cable is recommended for the better compatibility.
- The unit accepts 480p, 720p, 1080p and 2160p video signals only when using the HDMI connection and HDMI-DVI connection. When connecting with HDMI-DVI, the operation is maximum 2160p@30 Hz.
- HDMI-DVI connection requires separate audio connections as well and the audio signals are output as analog (L/R) audio.
- DVI does not display 480i image which is not in compliance with CTA-861-G.
Use your TV
Switching on your TV and putting it in standby mode
Turns the TV on and off of standby.
Press  (POWER) on the TV or the remote, then TV will go to suspend standby.
Press and hold (POWER) on the TV or the remote, then TV will go to standby mode completely.
Note(s)
- Energy consumption contributes to air and water pollution. When the AC power cord is plugged in, your TV consumes energy with a very low standby power consumption.
Adjusting volume
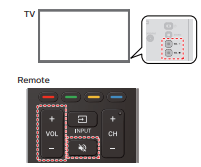
To decrease or increase volume
- Press VOL + / – on the TV or the remote.
VOL + : Volume up
VOL – : Volume down
To mute or unmute sound
- Press
 (MUTE) on the remote to mute the sound.
- Press (MUTE) again or VOL + / – to recover the original sound.
Switching channels
To change channels, you can do any of the following:
- Press CH + / –* on the remote.
- Use the NUMBER buttons* on the remote.
- Press
 on the remote for digital channels only.
Watching channels from an external device
Switching each input mode can easily switch with the remote between TV and external devices when they are connected to the unit.
Turn on the set-top box or the connected device.
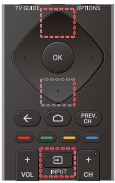
- Press
 (INPUT) and use to select the set-top box or the connected device and wait a few seconds till the picture appears.
Use the remote of the set-top box or the connected device to select channels.
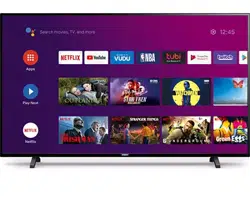
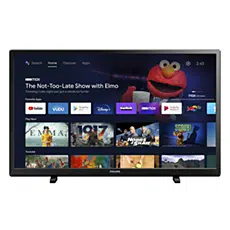
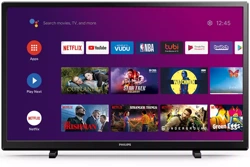
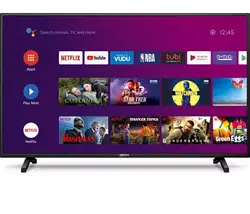
Apps
You can download the apps.
- Press
 (HOME) and use
  to select Apps, then press OK.
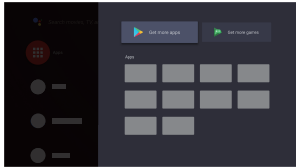
- Select "Get more apps" to open the Google Play Store apps.
- Search for the app or type of app you want to install.
- Select the app.
- Select install.
The Google Assistant
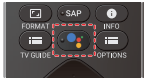
- Press the Google Assistant to launch the Google Assistant . You can operate what you want to do and what you want to ask by hands-free.
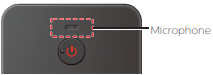
Microphone
Activating the Google Assistant on the home screen will launch a Google Query.
- Activating the Google Assistant within an app will allow you to search and find information only related to a specific app.
Speak into the microphone located on the top of your remote. Speech examples may be displayed depending on your model.
Picture format
Display modes can be selected when your TV receives a 16:9 or 4:3 video signal.
Press  (FORMAT) repeatedly to switch the TV aspect ratio.
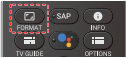
Automatic
- Displays a picture at maker recommended picrure format setting.
Full
- Displays a picture that is stretched out of proportion to fill the screen.
Unscaled
- Displays a picture at its original size.
4:3
- Displays a 4:3 picture at its original size. Sidebars appear on both edges of the screen
Movie expand
- Displays a American vista 16:9 picture at its original size.
TV screen information
You can display the currently selected channel or other information.
- Press
 (INFO).
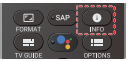
Note(s)
- The information display will automatically disappear in 5 seconds. This information is for cable/antenna broadcasts only. Information for streaming apps will vary on the app.
Getting more from your TV
This section describes the overview of the Settings menu displayed when you press (HOME) and use to Select Settings. The Settings menu consists of the function setting items below.
- Press (HOME) to display the Home menu.

- Use to select Settings, then press OK.
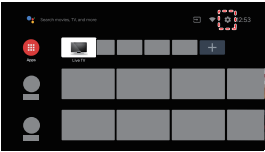
- Use to select the desired menu and an item, then press OK.
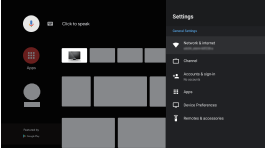
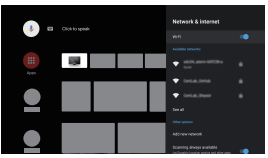
Network & Internet
Setup network connection settings in order to use apps or network upgrade functions.
- Press (HOME) and use to select Settings then press OK.
- Use to select Network & Internet, then press OK.
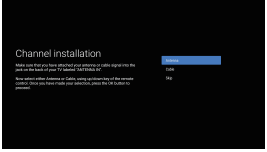
Add channels
To add for the first time or additional channels, please follow the steps below:
- On the Home menu, go to the Apps row and select How to…
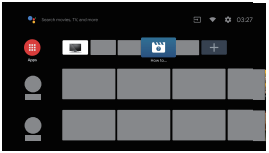
- Select Live TV to open channel installation page. Once open, select Setup and press OK.
- Select your signal type Antenna / Cable to start the channel installation.
Accounts & sign-in
- Register your Google Account.
- You can use multiple Google Accounts on your TV.
- Unleash your television's true potential. With a Google® account you can effortlessly expand your entertainment library via the Google Play Store and Google Play app and also keep apps up-to-date.
- While you can enjoy this Philips Android TV without a Google Account via the preinstalled selection of applications, we recommend a
- Google account to download additional apps from the Google Play Store or use the Google Assistant.
Note(s)
- Simply login with your Google account.
- It is recommended to create a new Google account specifically for your Android TV. A new account will prevent interference and syncing of your personal account. To create a new Google account
Useful tips
My remote does not work. What should I do?
- Check the antenna or cable connection to the main unit.
- Check the batteries on the remote.
- Check if there is an obstacle between the infrared sensor window and the remote.
- Test the IR signal output use IR signal check. -> p. 37
If okay, then possible infrared sensor trouble.
- Aim the remote directly at the infrared sensor window on the front of the unit.
- Reduce the distance to the unit.
- Re-insert or replace the AAA batteries with their polarities (+/–) as indicated on the remote battery area.
- When there is an infrared-equipped device such as PC near this unit, it may interrupt the remote signal on this unit. Move the infrared-equipped device away from this unit, change the angle of the device's infrared sensor or turn off the infrared communication function.
How come the initial setup appears every time I turn on this unit?
- Make sure to complete the initial setup before the unit goes into standby mode
Why can I not watch some RF signal TV programs?
- The selected channel may not be broadcasting.
- The selected channel cannot be viewed by the Parental Controls setting. -> p. 24
- The unit requires some kind of antenna input. An indoor antenna (Digital or VHF / UHF), an external antenna (Digital or VHF / UHF) or an RF coaxial cable from your wall cable or set-top box needs to be plugged into the unit.
How come there is no image from the connected external devices?
- Check if the correct input is selected by pressing
 (INPUT). -> p. 19
- Check the antenna, cable or other input connection to the unit.
When I enter a channel number, why does it change automatically?
- Many digital channels have alternate channel numbers. The unit changes the numbers automatically to the ones signifying the broadcasting station's channel number. These basic numbers used for the previous analog broadcasts. (e.g., input digital ch# 30 automatically changes to digital ch# 8.1)
Why are captions not displayed entirely? Or why are captions delayed behind the dialog?
- Closed captions that are delayed a few seconds behind the actual dialog are common for live broadcasts. Most captioning production companies can display a dialog to maximum of 220 words per minute. If a dialog exceeds that rate, selective editing is used to insure that the closed captions remain up-to date with the current TV screen dialog.
How can I set the clock?
- From the Android TV home screen, select Settings in the upper right of the screen. Scroll down to Device Preferences and select Date & time.
- Please set it automatically or manually.
Troubleshooting tips
Power
No power
- Make sure the AC power cord is plugged in.
- Make sure that the AC outlet supplies the proper voltage, plug another electrical appliance into the AC outlet to ensure that the AC outlet operates normally.
- If a power failure occurs, unplug the AC power cord for 1 minute to allow the unit to reset itself.
Remote
Control buttons do not work.
- Do NOT press more than one button at the same time.
- Ensure that no buttons on the remote are depressed and move freely.
- Re-insert or replace the AAA batteries with their polarities (+/–) as indicated on the remote battery area.
Universal remote does not work properly.
- Refer to the user manual of the universal remote for the Philips code.
The Google Assistant microphone on the remote does not work.
- To pair the remote, refer to the step “6 Connecting your devices” in the Quick start guide and see “How to connect to your Bluetooth® devices”.
Performance
Remote response is delayed or sluggish during initial use.
- Your television is automatically, downloading and installing the latest applications, for the best user experience.
- During this time, you may experience a delayed response from your remote. Upon successful installation, your remote will operate normally.
Accessibility
Television is speaking prompts out-loud.
- To enable or disable the talkback (text to speech) on your television, press (HOME) on your remote, navigate to settings (found in the upper right corner of the home screen) and select accessibility, select talkback, press OK to toggle between on or off.
Picture
Power is on but screen image is off.
- Check if the connection for your source device is properly secured.
- Check if the correct input is selected by pressing (INPUT).
- Verify that your HDMI mode, for the input selected matches the resolution output of your source device.
Change source input until you have picture and sound.
Sound
No sound is heard when using the HDMI digital connection.
- Some HDMI cables and devices may not be compatible with the TV due to different HDMI specifications.
No sound, distorted sound or incorrect audio sound is heard when using the HDMI-DVI connections.
- Make sure that the analog audio signals from the HDMI-DVI device are connected to the analog audio input L/R jacks.
- When using Composite analog video, make sure that the analog audio (L/R) connectors are mounted into the audio (L/R) input jacks.
No sound from Soundbar / Home theater using an HDMI cable.
- Please check to be sure the device is connected to the HDMI 2 (ARC) input on the TV.
Sound intermittent or no sound.
- Check if the audio cable is connected into the unit correctly.
You switch to a different input and the volume changes.
- This unit will memorize the volume level from the last time you adjusted it.
- If the volume of the sound from another device is higher or lower, then the loudness will change.
- Make sure Auto Volume Control is set to On.
Picture & Sound
No sound with distorted picture occurs when using the HDMI digital connection.
- Some HDMI cables and devices may not be compatible with the TV due to different HDMI specifications.
No picture or sound
- Check if the power is on.
- Check whether all the cables to the unit are connected to the correct output jack on your separate device like Blu-ray Disc™ / DVD recorder.
- View other TV channels. The problem might be limited to the broadcasting station or weak signal strength.
- Unplug the AC power cord and wait for about 1 minute, then plug the AC power cord and turn on the unit again.
- Check whether the connection of the antenna or cable / satellite set-top box is connected correctly.
- Make sure that the selected input mode is connected to the working input jack.