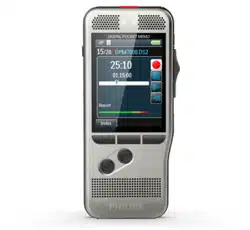
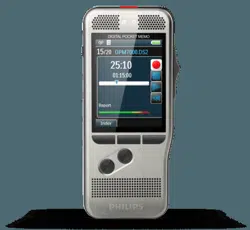
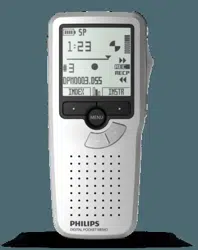
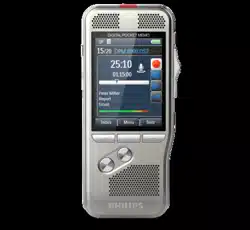
LED light Red: device is recording in overwrite or append mode Green: device is recording in insert mode Yellow: data is being transferred to/from the computer
Microphones
Screen
Function keys F1, F2, F3 Select the function displayed on the screen directly above the key
+/– File navigation in stop mode Volume control during playback Menu navigation
EOL/File lock, Priority Mark a file as finished and protect it from being deleted Prioritize urgent recordings during transcription
Slide switch ( REC, STOP, PLAY, REW)
ON/OFF
Speaker
Barcode scanner (DPM8500)
Open the battery cover
Docking station connector
USB connector Micro USB connection for the computer
Memory card slot (DPM8000)
Fast forward (FWD/ )
MIC External microphone socket (stereo jack plug, 3.5mm)
EAR Headphone socket (stereo jack plug, 3.5mm)
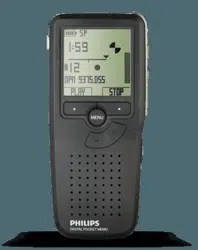
Start-up screen
Note: The position of the symbols may vary, depending on the model, the mode and the selected functions.
Voice activation is on When voice-activated recording is enabled, recording will start when you begin speaking. When you stop speaking, the recorder will automatically pause recording after three seconds of silence, and resume only when you begin speaking again. Voice-activated recording, p. 18.
Recording quality: QP, SP, MP3, PCM
Recording profile: Dictate, Meeting, Speech recognition, Personal The recording profile presets recording parameters such as recording quality and file format, microphone sensibility and the microphone mode. Profile, p. 25.
Edit mode: Overwrite recording, Insert recording, Append recording (Add to or overwrite a recording, p. 15)
File is encrypted (Encryption, p. 26)
A foot switch is connected to the docking station The recorder can be used for hands-free recording and transcription by connecting the optional Philips foot switch to the docking station. Hands-free recording and transcription, p. 20.
Battery charge level The bars indicate the battery level. When the recorder is charged, the bars keep scrolling until charging completes.
The priority level of the recording is set to ‘high’ (File lock and priority, p. 20)
EOL/File lock The recording is marked finished and protected from being deleted. File lock and priority, p. 20.
Microphone mode: Directional mode, 360 degree mode The microphone mode is preset by the selected recording profile to suit the recording conditions. Profile, p. 25. The microphone mode can be controlled by the integrated motion sensor. The motion sensor senses when the device is placed on the desk or held in the hand and sets the microphone mode accordingly.
Slide switch indicator
Sensitivity level indicator for voice-activated recording (Voice-activated recording, p. 18)
Current function of the function key F1, F2, F3
Level meter indicator
Keyword area One or more keywords, such as the author’s name, can be assigned to every recording. Keywords can be used to identify recordings and automatic file routing. Assign keywords (author ID and work type), p. 19.
Index mark indicator (Index marks, p. 18)
Instruction indicator (Instructions, p. 19)
Position indicator of current playback/recording
File length
Current recording/playback time
File name
Current file number/Total number of files
Overview of the docking station
Docking station connector
Charge indicator light
Download indicator light
USB connector Micro USB connection for the computer
Foot switch connector Connect the Philips foot control LFH2210 (optional) for hands-free dictation and transcription. Hands-free recording and transcription, p. 20.
Power supply connector Connect an optional power supply
Use your recorder
Note
You can customize the settings and behavior of your device (Settings, p. 24.)
The descriptions in this chapter are based on the default settings.
Recording
Record settings
Set the required recording profile before you start a recording session. The recording profile presets recording parameters such as recording quality and file format, microphone sensitivity and the microphone mode to suit the recording conditions. Profile, p. 25.
When voice-activated recording is enabled, recording will start when you begin speaking. When you stop speaking, the recorder will automatically pause recording after three seconds of silence, and resume only when you begin speaking again. Voice-activated recording, p. 18.
The recorder can be used for hands-free recording by connecting the optional Philips foot switch to the docking station. Hands-free recording, p. 20.
Caution: Do not remove the battery from the device while it is recording. Data may be damaged or lost or malfunctions may occur.
Create a new recording
Press F3 (New) to create a new recording.
To start recording, point the microphone toward the sound source and move the slide switch to the REC position. The LED lights in red in overwrite or append mode or green in insert mode while recording.
To stop recording, move the slide switch to the STOP position.
Note
Press F1 (Index) during recording or playback to insert an index mark (Index marks, p. 18).
Press and hold F3 (Instr) during recording to record an instruction (Instructions, p. 19).
If the recording time exceeds the available capacity, recording stops and a message is displayed. You can not make any more recordings. Delete the recordings which you no longer require, replace the memory card, or connect the device to a computer and transfer the files to your computer.
Tip: For best recording results, speak clearly and keep the microphone about 5 to 15 centimeters (2 to 6 inches) away from your mouth.
Add to or overwrite a recording
You can edit an existing recording by overwriting a part of it or inserting additional recording.
While the recorder is in stop mode, press F2 (Menu) and select Record > Edit mode.
Set the required editing mode (Edit mode, p. 26). Append mode: add additional recording after existing recording in a file. The symbol is displayed in the information bar at the top of the screen when in append mode and the LED lights in red while recording. Insert mode: insert additional recording without overwriting existing recording in a file. The symbol is displayed in the information bar at the top of the screen when in insert mode and the LED lights in green while recording. Overwrite mode: overwrite a previous recording starting from any point within the file. No symbol is displayed in the information bar at the top of the screen when in overwrite mode and the LED lights in red while recording.
Press + / – to select the file into which the insertion should be made.
When using the insert or overwrite mode, play, forward or rewind to the position where the insertion should be made.
To start recording, point the microphone toward the sound source and move the slide switch to the REC position. The LED lights in red in overwrite or append mode or green in insert mode while recording.
To stop recording, move the slide switch to the STOP position.
Note
When you edit, the recording quality of the original recording is used.
The Insert recording mode is not available when the recording format is MP3 or PCM.
Playback
Selecting a file
Press + while the device is in stop mode. The position indicator jumps to the end of a file. The position indicator jumps to the start of the next file.
Press – while the device is in stop mode. The position indicator jumps to the start of a file. The position indicator jumps to the end of the previous file.
Note:
If the file contains index marks or recorded instructions, press + / – to jump to the previous or the next index mark or instruction. The index number is displayed for one second.
Playback a recording
While the device is in stop mode, press + / – to select the file to play and locate the beginning of the recording.
Move the slide switch to the PLAY position to start playback.
Press + / – to adjust the volume.
Move the slide switch to the STOP position to stop playback. Playback is paused at the current position. The device returns to stop mode.
Tip: Turn on the noise reduction function for better playback quality. Noise reduction reduces the background noise and improves the intelligibility of quieter voices. (Noise reduction, p. 28).
Adjusting playback speed
Press F3 (Speed) repeatedly during playback to toggle between faster, slower and normal playback speed. Playback speed becomes faster (+30 %) and the icon will be displayed. Playback speed becomes slower (-25 %) and the icon will be displayed. Playback returns to normal speed and the icon will be displayed.
Quick search
You can scan backward or forward in the current file at a fast speed. This allows to find a specific part of the recording.
Move the slide switch to the REW position during playback or when the device is stopped to scan backward in the current file at a fast speed.
Press and hold FWD during playback or when the device is stopped to scan forward in the current file at a fast speed.
Note: If the file contains index marks or recorded instructions, scanning backward or forward stops for 1 second at the index mark or instruction.
Tip: Playback sound during quick search can be activated or deactivated. This allows you to listen to the recording while forwarding or rewinding. (Acoustic feedback, p. 27).
Delete
You can delete individual files from the device, part of a file or delete all files simultaneously.
Note
Deleted files can not be recovered.
Files that are marked finished and locked (EOL) cannot be deleted. Unlock it by pressing the EOL button.
Make sure that the memory card is not set to read-only (locked).
Delete a file
While the recorder is in stop mode, press + / – to select the file to be deleted.
Press F2 (Menu) and select File > Delete file.
Press F2 (OK) to confirm the deletion. The file is deleted. Sequential file numbers are reassigned automatically.
Delete part of a file
While the recorder is in stop mode, press F2 (Menu) and select File > Delete section.
Using the play, forward or rewind functions, navigate to the beginning of the section to be deleted.
While the recorder is in stop mode, press F3 (Mark).
Using the play, forward or rewind functions, navigate to the end of the section to be deleted. The section to be deleted is marked in red.
While the recorder is in stop mode, press F2 (Delete) to confirm the deletion of the marked section.
Delete all files
While the recorder is in stop mode, press F2 (Menu) and select File > Delete all.
Press F2 (OK) to confirm the deletion. All files are deleted.
Use more of your recorder
Voice-activated recording
When voice-activated recording is enabled, recording will start when you begin speaking. When you stop speaking, the device will automatically pause recording after three seconds of silence, and resume only when you begin speaking again. Use the voiceactivation threshold to set the volume at which the device should begin recording.
Activate the voice-activated recording feature in the settings menu (Settings, p. 24). When activated, the symbol is displayed in the information bar at the top of the screen.
To start recording, point the microphone toward the sound source and move the slide switch to the REC position. The devices switches to standby mode. Recording will start when you begin speaking (or the sound level is above the voice-activation threshold). When you stop speaking (or the sound level drops below the voice-activation threshold), the device will automatically pause recording after three seconds and the LED flashes.
Press + / – during recording to adjust the voice-activation threshold.
To stop recording, move the slide switch to the STOP position.
Index marks
Index marks can be used to mark certain points in a recording as points of reference.
To add an index mark, press F1 (Index) during recording or playback. The index number is displayed for one second. Up to 32 index marks can be set per file.
To locate an index mark, press + / – while the recorder is in stop mode (Selecting a file, p. 16).
To delete an index mark, play, fast forward or fast rewind to the index mark to be deleted. While the recorder is in stop mode, press F2 (Menu) and select File > Index clear.
Assign keywords (author ID and work type)
One or more keywords, such as the author’s name or a work type, can be assigned to every recording. Keywords can be used to identify recordings and automatic file routing in Philips SpeechExec software.
Note
Keywords must first be set up with Philips SpeechExec software. Advanced configuration, p. 22.
By default, the keyword category Author with the keywords ‘DPM8000/DPM8500’ and ‘- - -’ (empty) and the category Work type with the keywords ‘Memo’, ‘Letter’, ‘Fax’ and ‘Report’ are available.
Assign an author name
While the recorder is in stop mode, press F2 (Menu) and select File > Author. a list of author names is displayed.
Press + / – to select an author name.
Press F2 (OK) to assign the selected author name to the recording.
Assign a work type
While the recorder is in stop mode, press F1 (Work type) a list of work types is displayed.
Press + / – to select a work type.
Press F2 (OK) to assign the selected work type to the recording.
Instructions
Spoken instructions are recorded comments by the author that are directed to the person transcribing the recording. They usually contain information which is relevant to the recording but does not have to be typed out.
To record an instruction, press and hold F3 (Instr) during recording. The instruction is displayed as a blue line on the file position bar.
To locate an instructions, press + / – while the recorder is in stop mode (Selecting a file, p. 16).
To delete an instruction, follow the steps for deleting a part of a recording (Delete part of a file, p. 17).
Note: Instructions can only be recorded when the recording format is DSS/DSS Pro.
File lock and priority
Use the file lock function to prevent important files from being accidentally deleted and mark them as finished. With the priority-setting option, urgent recordings can be prioritized during transcription.
While the recorder is in stop mode, press the EOL button to lock the file and mark it as finished. The symbol is displayed. A new, empty recording is created.
To assign priority status to the recording, press the EOL button again within half a second. The symbol is displayed.
To make changes to the file, unlock it by pressing the EOL button.
Note
Philips SpeechExec software can be configured to download only those files from the device to the computer that are marked finished.
Locked files are deleted when the memory card is formatted or the delete-all-files function is used.
Hands-free recording and transcription
The recorder can be used for hands-free recording and transcription by connecting the optional Philips foot pedal LFH2210 to the docking station. In this operating mode, you can control the recording and playback functions with the foot pedal.
Tip
Use the auto-backspace feature to jump back the configured number of seconds in the recording when restarting playback.
To activate the auto-backspace feature, press F2 (Menu) on the recorder while the recorder is in stop mode and select Device > Auto backspace.
Hands-free recording
Make sure that the docking station is NOT connected to a computer via USB.
To activate the hands-free recording feature, press F2 (Menu) on the recorder while the recorder is in stop mode and select Device > Hands-free mode > Dictate.
Connect the foot pedal to the food pedal port on the rear side of the docking station and place the recorder in the docking station. The symbol is displayed in the information bar at the top of the screen.
Press the middle pedal of the foot pedal to enter recordstandby mode. To start recording, press the right pedal of the foot pedal. The behavior for starting and stopping recording depends on the setting of the switch on the underside of the foot control: N (Neutral) position: Press and hold the right pedal for recording. For short pauses, release the right pedal. T (Toggle) position: Press and release the right pedal to start recording. For short pauses, press the right pedal of the foot pedal again. To continue recording, press the right pedal of the foot pedal again.
To stop recording, press the left pedal of the foot pedal. To continue recording, repeat step 4.
Press and hold the left pedal of the foot pedal for fast rewind. When rewinding reaches the desired position, release the pedal.
When recording is stopped, press the right pedal of the foot pedal to start playback. The behavior for starting and stopping playback depends on the setting of the switch on the underside of the foot control: N (Neutral) position: Press and hold the right pedal for playback. When the pedal is released, playback is stopped. T (Toggle) position: Press and release the right pedal to start continuous playback. Press the right pedal again to stop playback.
Double click the left pedal of the foot pedal during recording to finish/lock (EOL) the current recording and create a new file.
Hands-free transcription
Make sure that the docking station is NOT connected to a computer via USB.
To activate the hands-free transcription feature, press F2 (Menu) on the recorder while the recorder is in stop mode and select Device > Hands-free mode > Transcribe.
Connect the optional Philips foot pedal to the food pedal port on the rear side of the docking station and place the recorder in the docking station. The symbol is displayed in the information bar at the top of the screen.
Press and hold the left pedal for fast rewind. When rewinding reaches the desired position, release the pedal.
Press and hold the middle pedal to fast forward. When forwarding reaches the desired position, release the pedal.
Press the right pedal to start playback.The behavior for starting and stopping playback depends on the setting of the switch on the underside of the foot control: N (Neutral) position: Press and hold the right pedal for playback. When the pedal is released, playback is stopped. T (Toggle) position: Press and release the right pedal to start continuous playback. Press the right pedal again to stop playback.
Note
If the docking station is connected to a computer, you can switch between USB mode and hands-free mode. In USB mode the recorder is displayed as an external drive on the connected computer.
The function is only available when the switch on the underside of the foot pedal is in the N position and the recorder is in the stop mode and at the end of the current recording.
To switch between USB mode and hands-free mode, double click the right pedal of the foot pedal and then hold the pedal for about 1 second.
Use Philips SpeechExec software
Philips SpeechExec software (Windows version only) can be used for advanced configuration of the recorder, automatic download, conversion and routing of files.
Note: For detailed information about SpeechExec software, refer to the SpeechExec help.
Advanced configuration
Philips SpeechExec software provides a wizard that guides users through the configurations and settings of the device. The wizard assists in configuring time format, sound feedback, voice-activated recording, display appearance, recording profiles, keywords, and file download to the computer.
Connect the recorder to the computer using the USB cable or the docking station.
Start Philips SpeechExec Pro software and click Settings > General settings on the menu bar and select DPM Configuration > DPM Wizard from the list on the left panel.
Click the Start Wizard… button to open the wizard and follow the on-screen instructions to customize the recorder.
Click the Finish button to close the wizard and confirm the transfer of the new settings to the recorder.
Note: When the recorder is connected to the computer for the first time, Windows detects the new hardware and automatically installs the required drivers. When the installation is complete, Windows may prompt you to restart the computer.
Download recordings to the computer
With USB mass storage support, the recorder is automatically displayed as an external drive when it is connected to the computer. It can then be accessed easily with any program as a regular drive.
Use Philips SpeechExec software for automatic download, conversion, and routing of files.
Make a recording with the recorder.
Start Philips SpeechExec Pro software.
Connect the recorder to the computer using the USB cable or the docking station.
By default, the recordings on the recorder will be downloaded automatically to the computer and moved to the Finished dictations folder of the work list.
Note: How and which files are downloaded after the recorder is connected to a computer can be configured in the settings menu of Philips SpeechExec software or with the configuration wizard.
Troubleshooting
Problem
Possible cause/solution
The device does not turn on
Battery is empty. Recharge the battery.
The device is turned off. Turn the power on. Power on/off, p. 12.
The device is in power-save mode. Lift up the recorder or press any button to reactivate it.
The device does not playback recordings
No recordings are saved in the device.
The device does not respond
Turn the power off and on again. Power on/off, p. 12.
I cannot hear anything from the speaker
Headphones are connected to the device. Unplug the headphones.
The volume is at the lowest setting. Adjust the volume level.
Recording does not start
There is no memory card in the device. Insert a memory card into the device. Insert and eject the memory card, p. 11
Memory card is not formatted correctly. Format the memory card in the device. Memory formatting, p. 29
The the available memory space for recording is full. Delete some files or move them to an external device.
The file is locked. Unlock the file. File lock and priority, p. 20
The memory card is locked. Unlock the memory card.
I cannot hear anything from the headphones
The headphones are incorrectly connected. Check the headphone connection.
#1 Would this be good for interviews and recording lectures in class?
This will be perfect for interviews and lectures recordings, this is a high-quality recorder which has many different settings to optimize the microphone recording to best match your needs, and it will automatically adjusts the microphone settings by laying down flat, also you can manually change from the recorder with smart buttons or through the computer on the software different microphone settings.
#2 How do i listen to pre-recorded audio? i have educational mp3 clips that i would like to transfer onto the sd card and listen while driving.
The DPM8000 is a Professional Digital Recorder, that can record dictation files on different file formats including mp3, but you can only listen back to files that were created on the digital recorder, it will not play MP3 files made on a different device.
It does not work out of the box. But our support team can customize the configurations if the DPM before shipping to ensure it will work with Dragon Dictate Medical for Mac. Please note: Not all features work with the Mac version if you can be more specific what your needs are we can confirm if that will work on a Mac.
#4 Does this product come with all the cords needed to plug in and a memory card?
It comes with a USB cord, and you can either connect that straight to your computer, or you can use the docking station which comes included, wehre you simply dock the pocket memo, and the files automatically upload to your SpeechExec software, which is also included. Below is a list of all contents included with the product: * Pocket Memo digital dictation recorder * Docking station * 4GB SD Memory card (pre-installed) * Rechargeable battery * USB cable * Pouch * DVD containing SpeechExac Pro software * Speech Recognition module * User manual


 REC,
REC,  STOP,
STOP,  PLAY,
PLAY,  REW)
REW) )
)

 Voice activation is on
  QP,
QP,  SP,
SP,  MP3,
MP3,  PCM
PCM Dictate,
  Meeting,
  Speech recognition,
  Personal
  Overwrite recording,
  Insert recording,
  Append recording (Add to or overwrite a recording, p. 15)
 File is encrypted (Encryption, p. 26)
 A foot switch is connected to the docking station
  Battery charge level
  The priority level of the recording is set to ‘high’ (File lock and priority, p. 20)
 EOL/File lock
  Directional mode,
  360 degree mode
 The LED lights in red in overwrite or append mode or green in insert mode while recording.
 icon will be displayed.
 icon will be displayed.
 icon will be displayed.
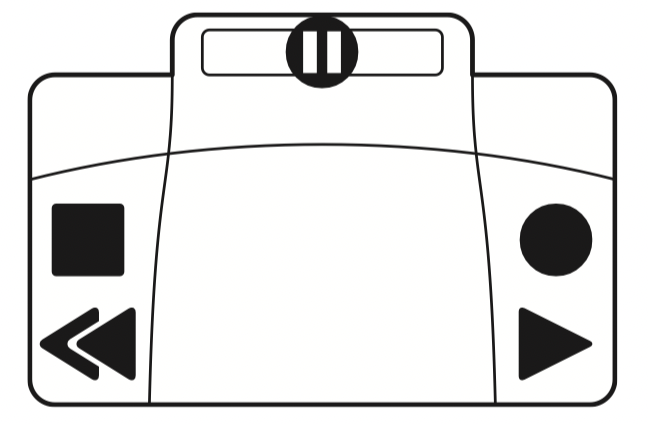
 on the rear side of the docking station and place the recorder in the docking station.