You can use your Remote Control to select channels which are Broadcast in Digital format and conventional Analog format. Also, Cable and Satellite subscribers can access their TV channels.
● Information display
You can display on the TV screen the Title, contents (DTV only) and other information on the current Program.
● Autoprogram
This Unit Automatically scans and memorizes channels available in your area, Eliminating difficult Setup procedures.
● Net TV
This unit lets you enjoy Internet services. Use the remote control to browse the Net TV pages. You can play movies and much more, all from your TV screen.
● Child lock
This feature allows you to Block children’s access to inappropriate Programs.
● Closed Caption decoder
Built-in Closed Caption decoder displays text for Closed Caption supported Programs.
● MTS / SAP tuner
Audio can be selected from the Remote Control.
● Auto Standby
If there is no Input Signal and no operation for 15 minutes, the Unit will go into Standby mode Automatically.
● Sleep Timer
You can set the Unit to go into Standby mode after a specific amount of time.
● Choices for On-screen language
Select your On-screen language: English, Spanish or French.
● Stereo sound function
● PLL frequency synthesized tuning
Provides free and easy channel selection and lets you tune directly to any channel using the number and decimal point “•” keys on the Remote Control.
● Various adjustments for Picture and Sound
Customizes picture quality suitable for your room and sets your sound preference.
● EasyLink via HDMI link
EasyLink allows your other HDMI link devices to be controlled by the HDMI cable connected to your TV.
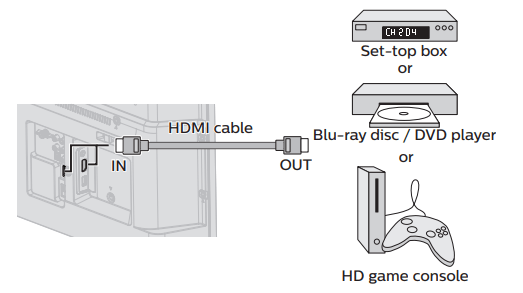
● HDMI Input
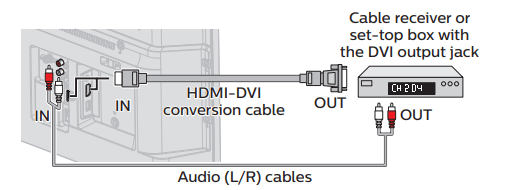
● HDMI-DVI Input
If your Video Device has a DVI Output jack, use an HDMI-DVI Conversion Cable to connect the Unit.
● Component Video Input
● PC Input
● AV Input
Audio and Video Input from an External Device.
● USB terminal
The Picture (JPEG), Music (MP3) and Video files stored on a USB Memory Stick can be played back on this unit.
● Digital Audio Output
● Headphone Audio Output
Headphone 3.5mm Stereo jack for personal listening.
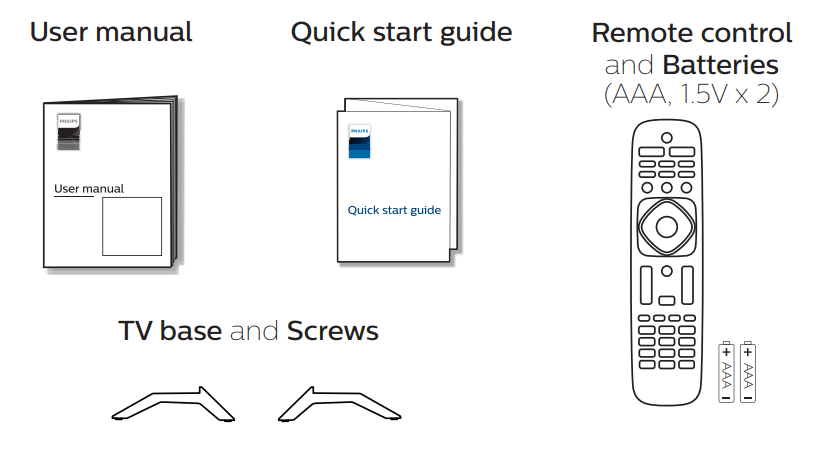
Supplied accessories
Screws packed with this unit.
Model
Quantity
Size
43PFL4902
4
M4 x 0 551”(14mm)
Note(s)
If you lose the screws, please purchase the above-mentioned Phillips head screws at your local store.
If you need to replace these accessories, please refer to the part name or No. with the illustrations and call our toll free customer support line found on the cover of this User manual.
When using a universal remote control to operate this unit.
Make sure the component code on your universal remote control is set to our brand. Refer to the instruction book accompanying your remote control for more details.
We do not guarantee 100% interoperability with all universal remote controls.
Symbols used in this User manual
The following is the description for the symbols used in this User manual. Description refers to:
If neither symbol appears, the operation is applicable to both.
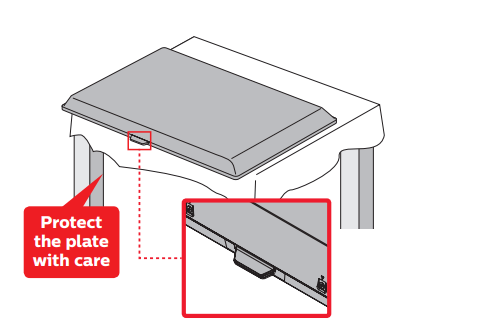
Attaching the base
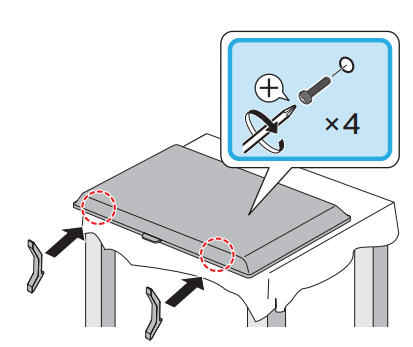
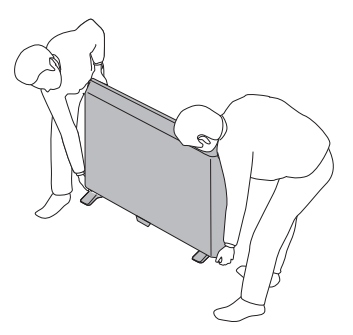
You must attach the base to the unit to have it as a table top unit Be sure the front and rear of the base match the proper direction For large screen TVs, at least 2 people are required for these steps
1
2
3
Note(s)
Make sure to use a table which can support the weight of this unit and is larger than this unit.
Make sure the table is in a stable location.
A Phillips-head screwdriver is required to fasten the stands to the TV set.
When attaching the base, ensure that all screws are tightly fastened. If the base is not properly attached, it could cause the unit to fall, resulting in injuries as well as damage to the unit.
To remove the base from this unit, unscrew the Phillips-head screws by reversing the procedure. Be careful not to drop the base when you remove it.
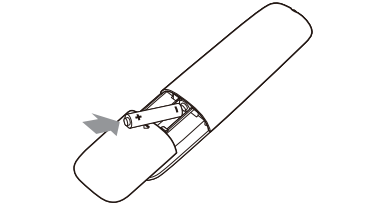
Installing the Remote Control Batteries
Slide the battery cover off the back of the Remote Control.
Insert 2 Supplied Batteries (AAA, 1.5V). Be sure the + and – ends of the Batteries line up with the markings inside the case.
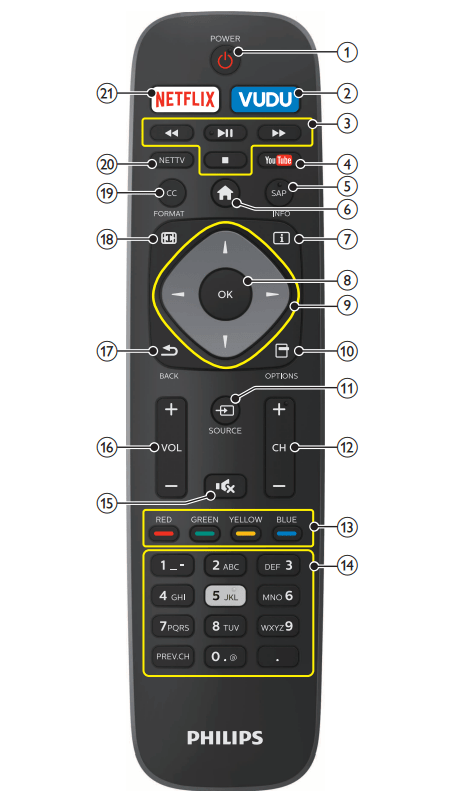
Press to decide the command of setting when the Home menu is displayed.
(NAVIGATION buttons)
Moves the cursor, selects the on-screen menu items.
OPTIONS
Displays a list of menu items applicable to the highlighted object or screen.
SOURCE
Selects connected devices.
CH+/ -
Selects a channel.
COLOR buttons
Works as direct access to user specified net apps.
(NUMBER buttons)
Used to enter a channel / program number.
(DOT) 9 to select digital channels.
For example, to enter 2.1, press
PREV.CH : Returns to the previously viewed channel.
(MUTE)
Turns the sound on and off.
VOL + / -
Adjusts the volume.
BACK
Returns to the previous menu operation.
FORMAT
Adjusts the picture size on the TV screen.
Selects closed caption settings (Off, On, CC w/ mute)
NETTV
Access to Net TV menu directly.
NETFLIX
Access directly to NetfLix.
Control Panel
1. Remote Control Sensor
Receives IR signal from Remote control.
2. CH +/ -
Selects a Channel. In the Menu screen, moves the Cursor Up (+)/ Down (-).
3. (POWER)
Turns the TV on or switches the TV into standby mode.
4. MENU
Opens the Main On-screen Menu.
5. SOURCE
Selects Connected devices.
6.VOL +/ -
Adjusts the Volume. In the Menu screen, moves the Cursor Left (+) / Right (-).
VOL + : Volume Up
VOL - : Volume Down
Terminals
7. 75 ohm cable / Antenna connection
Signal input from an antenna or cable / satellite set-top boxes
8. Analog audio (L/R) input jacks
Connect analog audio signals from,
-HDMI-DVI / Analog audio (L/R) jacks signal
-Component video / Analog audio (L/R) jacks signal
-Composite video / Analog audio (L/R) jacks signal
- PC connection / Analog audio (L/R) jacks signal with stereo mini 3 5mm plug audio cable on PC
9. Digital audio output jack
Digital audio (S/PDIF) output to home theaters and other digital audio systems
10. Component (Y/Pb/Pr) / Composite video (VIDEO) input jack(s) for VIDEO
Composite video input (VIDEO) jack is a shared jack with component video input (V) jack Green / Yellow color orientation depends on model
11. Ethernet port
For internet connection using an Ethernet cable with an RJ-45 connector
12. HDMI input jack(s)
Digital audio and video input from high definition digital devices such as DVD / Blu-ray disc players, cable / satellite set-top boxes, PC's, etc
13. Headphone Audio Output jack
Headphone 3.5mm stereo jack for personal listening.
14. USB terminal
Data Input from USB Memory Stick only.
Do not connect any device to this terminal such as Digital camera, keyboard, mouse, etc.
Connecting Antenna or Cable / Satellite / IPTV set-top box
Be sure your Antenna or another Device is connected properly before plugging in the AC Power Cord.
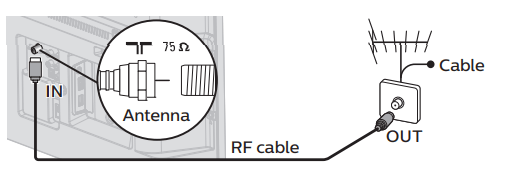
If connecting to an Antenna through an RF cable
Any DTV Programs that are Broadcast in your area can be received for free through an Antenna Connection.
If connecting Cable / Satellite / IPTV Set-top box using an RF cable
If the TV is connected to a Cable / Satellite Set-top Box via a Coaxial Connection, set the TV to channel 3/4 or the channel specified by the service provider.
If connecting Cable / Satellite / IPTV Set-top Box using an HDMI cable
If the TV is connected to a Cable / Satellite Set-top Box via an HDMI cable, make sure you select the correct Source by using SOURCE.
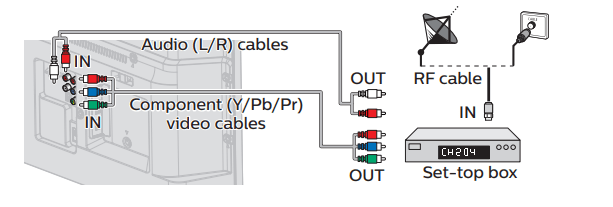
If connecting Cable / Satellite / IPTV Set-top box using Component Video Input
If the TV is connected to a cable / satellite set-top box via Component Video Input, make sure you select the correct Component Video Source by using SOURCE.
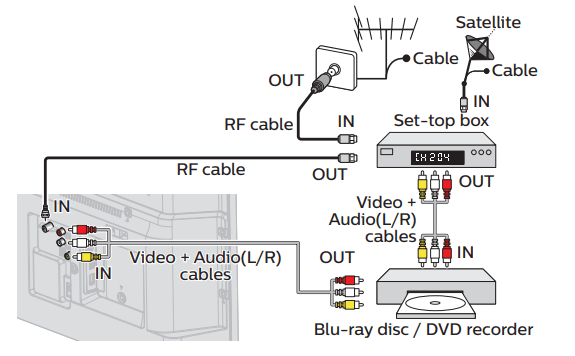
Connecting a Cable / Satellite / IPTV set-top box, Bluray disc / DVD recorder via composite connectors and analog audio
Do not place your recorder too close to the screen because some recorders can be susceptible to harmful interference from the TV
Note(s)
Depending on your antenna system, you may need different types of combiners (mixers) or separators (splitters) for HDTV signal. The minimum RF bandpass on these devices is 2,000 MHz or 2GHz.
For your safety and to avoid damage to this unit, please unplug the RF coaxial cable from the antenna input jack before moving the unit.
If you did use an antenna to receive analog TV, it should also work for DTV reception. Outdoor or attic antennas will be more effective than a set-top box or inside antenna.
To turn on your reception source easily between antenna and cable, install an antenna selector.
If you are not receiving a signal from your cable service, contact the cable provider.
Plugging in the AC power cord
Make sure that the AC power cord must be plugged to an AC outlet after all the necessary connections are made
Connecting your devices
HDMI digital connection
HDMI connection offers the highest picture quality
digital video and multi-channel digital audio through a single cable
HDMI-DVI connection
This unit can be connected to your device that has a DVI terminal Use an HDMI-DVI conversion cable for this connection and it requires audio cable for analog audio signal as well
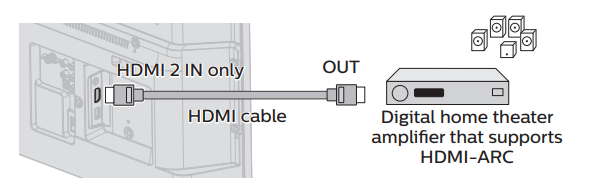
HDMI-ARC connection
HDMI-ARC allows you to use EasyLink to output TV audio directly to a connected audio device, without the need for an additional digital audio cable
Component analog video connection
Component analog video connection offers better picture quality for video devices connected to the unit
If you connect to the unit's component video (Y/Pb/Pr) input lacks, connect analog audio cables to the analog audio (L/R) input jacks
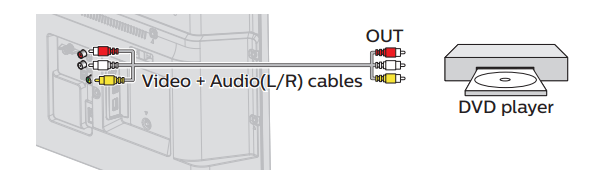
Composite analog video connection
Composite analog video connection offers standard picture quality for video devices connected to the unit
If you connect to the unit's component / composite video (Y/VIDEO) input jack (green), connect audio cables to the audio (L/R) input jacks When the audio is monaural, then only connect to the audio L input jack
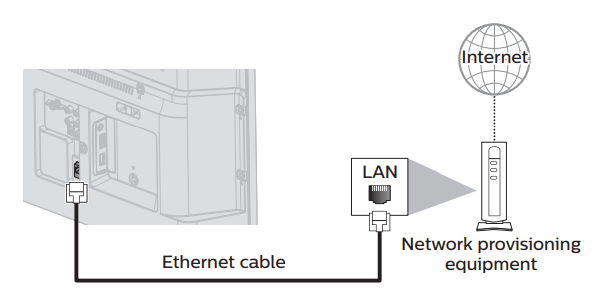
Connecting the TV to the internet using an Ethernet cable
Note(s)
Please purchase shielded Ethernet cables at your local store and use them when you connect to network equipment.
After connecting an Ethernet cable, set up necessary network settings. Connect to network →. p. 38
Do not insert any cable other than an Ethernet cable to the Ethernet port to avoid damaging the unit.
If your telecommunications equipment (modem, etc.) does not have broadband router functions, connect a broadband router.
If your telecommunications equipment (modem, etc.) has broadband router functions but there is no vacant port, then add a hub.
For a broadband router, use a router which supports 10BASE-T / 100BASE-TX.
Do not connect your PC directly to the Ethernet port of this unit.
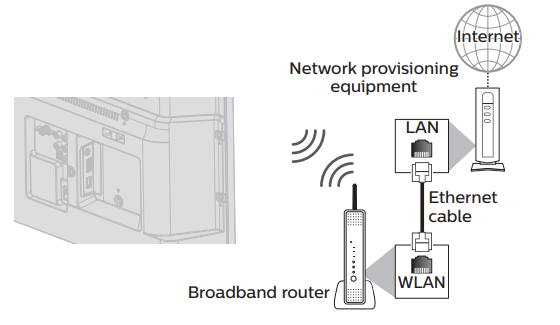
Connecting the TV to the internet using a wireless LAN
Note(s)
After you make the wireless connection, set up the necessary network settings. Connect to network →p. 38
Use a wireless LAN Access Point (AP) (eg. broadband wireless router) which supports IEEE 802.1 1 a/b/g/n/ac. (n is recommended for stable operation of the wireless network.)
This unit does not support Ad-hoc mode.
Other radio devices or obstacles may cause interference to the wireless network connection.
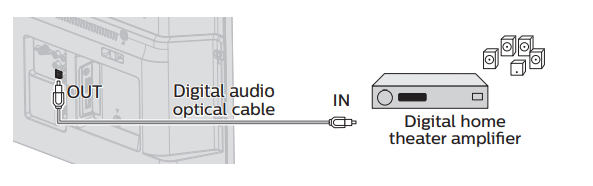
Digital audio output connection
If you connect this unit to an external digital audio device, you can en|oy multi-channel audio like 51ch digital broadcasting sound Use a digital audio optical cable to connect the unit to external digital audio devices
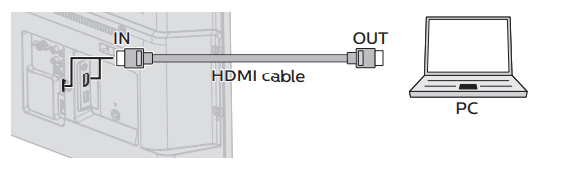
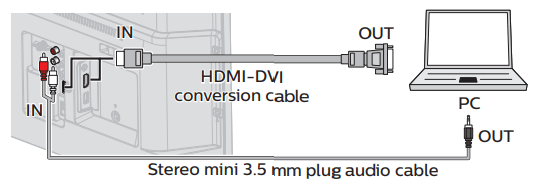
PC connection
HDMI connection
This unit can be connected to your PC that has an HDMI terminal Use an HDMI cable for this digital connection
HDMI-DVI connection
This unit can be connected to your PC that has a DVI terminal
Use an HDMI-DVI conversion cable for this video digital connection and it requires stereo mini 3 5mm plug audio cable for analog audio signal as well
The following PC-input video signals can be displayed:
Format
Resolution
Refresh rate
VGA
640 x 480
60Hz
SVGA
800 x 600
XGA
1,024 x 768
WXGA
1,280 x 768
1,360 x 768
FHD
1,920 x 1,080
24/30/60Hz
Other formats or non-standard signals will not be displayed correctly.
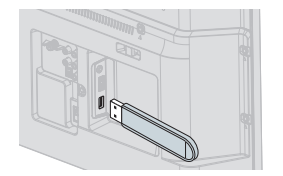
USB memory stick
This unit offers easy playback of picture, music and video files Insert the USB memory stick into the USB terminal shown below For a complete list of file formats and specifications supported, refer to USB Section p. 24
Use your TV
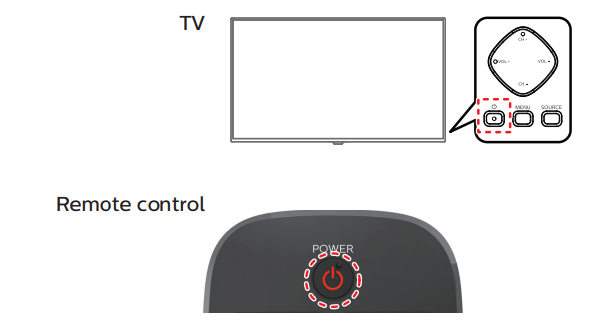
Switching on your TV and putting it in standby mode
To turn the TV on from standby or off to standby
Press on the TV or the remote control.
Adjusting volume
To decrease or increase volume
Press VOL + / - on the TV or the remote control.
VOL + : Volume up
VOL - : Volume down
To mute or unmute sound
Press on the remote control to mute the sound.
Press again or VOL + / - to recover the original sound.
Watching channels from an external device
Switching each input mode can easily switch with the remote control between TV and external devices when they are connected to the unit.
Turn on the set-top box or the connected device.
Press SOURCE and use to select the set-top box or the connected device and wait a few seconds till the picture appears.
Use the remote control of the set-top box or the connected device to select channels.
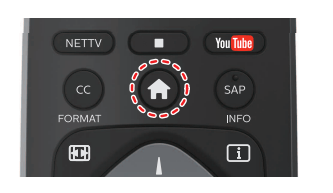
Access the Home menu
Press
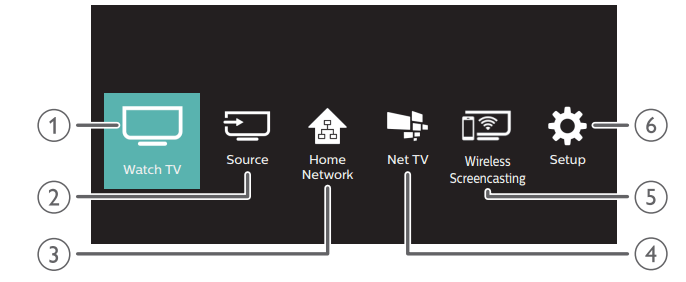
Guide to Home menu
Watch TV
Source
Home Network
Net TV
Wireless Screencasting
Setup
Switches back to the TV source if another source is selected.
To select connected devices.
Accesses Home network menus.
Accesses Net TV menus.
Accesses Wireless Screencasting menus.
Accesses menus that allow you to change picture, sound and other TV settings.
Changing Picture format
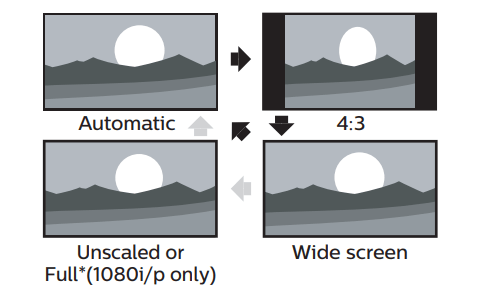
Display modes can be selected when your TV receives a 16:9 or 4:3 video signal.
Three types of display modes can be selected for a PC input signal. Press FORMAT repeatedly to switch the TV aspect ratio.
For 16:9 video signal
Automatic
Other than DTV and HDMI connected devices, enlarges the picture to best fit the screen. DTV and HDMI connected devices display the picture at its original size.
The subtitles may remain visible.
4:3
Displays a 16:9 picture at a 4:3 size; the picture is shortened horizontally. Sidebars appear on both edges of the screen.
Wide screen
Displays a 16:9 picture that is stretched horizontally and vertically.
Unscaled or Full*
(1080i/p only)
Displays a scaled 16:9 picture. Bars appear on both the upper and lower portions of the screen depending on the type of video signal.
* This part differs depending on the product you have.
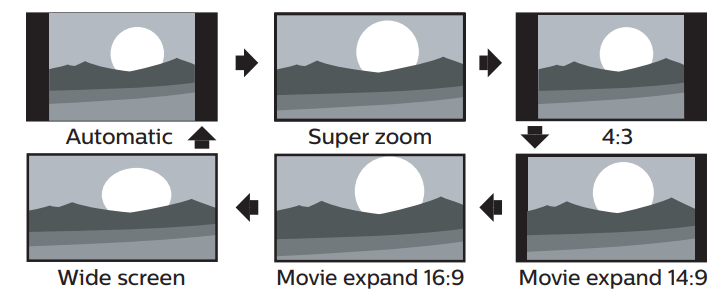
For 4:3 video signal
Automatic
Other than DTV and HDMI connected devices, enlarges the picture to best fit the screen.
DTV and HDMI connected devices display the picture at its original size. The subtitles may remain visible.
Super zoom
Displays a 4:3 picture at a 16:9 size; the picture is stretched horizontally and vertically and its left and right edges are enlarged. This crops out some of the top and bottom of the picture.
4:3
Displays a 4:3 picture at its original size. Sidebars appear on both edges of the screen.
Movie expand 14:9
Displays a 4:3 picture at a 14:9 size; the picture is stretched horizontally and vertically.
This crops out some of the top and bottom of the picture. Sidebars appear on both edges of the screen.
Movie expand 16:9
Displays a 4:3 picture at a 16:9 size; the picture is stretched horizontally and vertically. This crops out some of the top and bottom of the picture.
Wide screen
Displays a picture that is stretched out of proportion to fill the screen.
For PC input signal
This unit can also be connected to your PC that has a DVI terminal.
Use an HDMI-DVI conversion cable for this video connection and it requires stereo mini 3.5mm plug audio cable for analog audio signal as well.
Refer to 16:9 video signal on this page if the PC has HDMI output.
4:3
Displays a proportionately stretched picture. Sidebars appear on both edges of the screen.
Wide screen
Displays a picture that is stretched out of proportion to fill the screen.
Unscaled
Displays a picture in its original size.
If the signal source has side or top-bottom bars inserted into the picture, the Picture format function will not eliminate them.
Useful tips
Question
Answer
My remote control does not work.
What should I do?
Check the antenna or cable connection to the main unit
Check the batteries on the remote control
Check if there is an obstacle between the infrared sensor window and the remote control
Test the IR signal output use IR signal check → p. 53 If okay, then possible infrared sensor trouble
Aim the remote control directly at the infrared sensor window on the front of the unit
Reduce the distance to the unit
Re-insert or replace the AAA batteries with their polarities (+/-) as indicated on the remote control battery area
When there is an infrared-equipped device such as PC near this unit, it may interrupt the remote control signal on this unit Move the infrared-equipped device away from this unit, change the angle of the device's infrared sensor or turn off the infrared communication function
How come the initial setup appears every time I turn on this unit?
Make sure to complete the initial setup before the unit goes into standby mode
Why can I not watch some RF signal TV programs?
Autoprogram must be completed when you set up the unit for the first time or move it to a location where previously unavailable channels are broadcast
Make sure auto programming has been completed → p. 35
The selected channel may not be broadcasting
When Auto programming is interrupted and not completed, some channels will not be received Make sure to complete the Autoprogram → p. 35
The selected channel cannot be viewed by the Child lock setting → p. 36
The unit requires some kind of antenna input An indoor antenna (Digital or VHF / UHF), an external antenna (Digital or VHF / UHF) or an RF coaxial cable from your wall cable or set-top box needs to be plugged into the unit
How come there is no image from the connected external devices?
Check if the correct input mode is selected by pressing SOURCE p. 20
Check the antenna, cable or other input connection to the unit
When using the component video connection check that the green (V), blue (Pb/Cb) and red (Pr/Cr) connectors are connected to their corresponding colored lacks on the unit
When I enter a channel number, why does it change automatically?
Many digital channels have alternate channel numbers The unit changes the numbers automatically to the ones signifying the broadcasting station's channel number These basic numbers used for the previous analog broadcasts (e g, input digital ch# 30 automatically changes to digital ch# 81)
Why are captions not displayed entirely?
Or why are captions delayed behind the dialog?
Closed captions that are delayed a few seconds behind the actual dialog are common for live broadcasts Most captioning production companies can display a dialog to maximum of 220 words per minute If a dialog exceeds that rate, selective editing is used to insure that the closed captions remain up-to date with the current TV screen dialog
How can I set the clock?
There is no clock function on this unit
My PIN code no longer works, how can I change the child lock setting?
Although the default PIN code (0000) is supplied with the unit, the PIN code will be required once you set a PIN code in Child lock → p. 36
When you forget your PIN code, enter 07 1 1 in Change PIN to reset the PIN code → p. 37
When I start up the TV or a net service, a message appears on the screen prompting for software update again.
When you start up the TV or a net service after executing the software update, a message may appear on the screen prompting for software update again In this case, please select Update to start USB update or network update → p. 43
Troubleshooting tips
If the unit does not perform properly when operated as instructed in this manual,
Please check the following Troubleshootine tips and all connections once before calling for service.
Power
No power
Make sure the AC power cord is plugged in.
Make sure that the AC outlet supplies the proper voltage, plug another electrical appliance into the AC outlet to ensure that the AC outlet operates normally.
If a power failure occurs, unplug the AC power cord for 1 minute to allow the unit to reset itself.
Remote
Control buttons do not work.
Do NOT press more than one button at the same time.
Ensure that no buttons on the remote control are depressed and move freely.
Universal remote control does not work properly.
Refer to the User manual of the universal remote control for the Philips code.
Picture
Power is on but no screen image.
Check whether the connection for the antenna, cable or set-top box is connected correctly.
Check whether all the cables to the unit are connected to the correct output jack on your separate device like Blu-ray disc / DVD recorder.
Make sure that the selected input mode is connected to the working input jack.
Check if your computer is NOT in sleep mode when the input mode on this unit is in PC mode. Tap any key on the computer keyboard to wake it up.
Check if the correct input mode is selected by pressing ^ SOURCE.
No color
View other TV channels. The problem might be limited to the broadcasting station.
Adjust Color in Picture settings. →p. 28
Picture poor
Adjust Contrast and Brightness in Picture settings. →p. 28
For the best picture quality, watch “High Definition” wide screen programs. If the HD content is not available, watch “Standard Definition” programs instead.
You see pixelation on the screen.
When the capabilities of the unit exceed the capabilities of the digital broadcasting, the signal will be increased to match the capabilities of the display on the unit. This may cause pixelation, noise or trash.
Unusual picture appears and the TV does not operate.
Press the power button first. If it does not solve, follow the procedure below.
Press the buttons on the remote control in the order shown below.
Unplug the AC power cord, then wait for 1 minute, and then plug it in again.
Sound
No sound is heard when using the HDMI digital connection.
Some HDMI cables and devices may not be compatible with the TV due to different HDMI specifications.
No sound, distorted sound or incorrect audio sound is heard when using the HDMI-DVI connections.
Make sure that the analog audio signals from the HDMI-DVI device are connected to the analog audio input L/R jacks.
When using Component analog video or Composite analog video, make sure that the analog audio (L/R) connectors are mounted into the audio (L/R) input jacks.
Sound intermittent or no sound.
Check if the audio cable is connected into the unit correctly.
You switch to a different input and the volume changes.
This unit will memorize the volume level from the last time you adjusted it.
If the volume of the sound from another device is higher or lower, then the loudness will change.
Make sure Auto volume leveling is set to On. →p. 30
Picture & Sound
No sound with distorted picture occurs when using the HDMI digital connection.
Some HDMI cables and devices may not be compatible with the TV due to different HDMI specifications.
No picture or sound
Check if the power is on.
Check whether all the cables to the unit are connected to the correct output jack on your separate device like Blu-ray disc / DVD recorder.
View other TV channels. The problem might be limited to the broadcasting station or weak signal strength.
Unplug the AC power cord and wait for about 1 minute, then plug the AC power cord and turn on the unit again.
Check whether the connection of the antenna or cable / satellite set-top box is connected correctly.
Make sure that the selected input mode is connected to the working input jack.
Check if your computer is NOT in sleep mode when the input mode of this unit is in PC mode. Tap any key on the keyboard to wake up your computer.
Make sure that the sound is not muted. Press so that the volume bar and current volume level will appear on the TV screen.
Make sure that the volume is NOT set to 0 or If so, use VOL + / - to adjust to the desired volume.
Make sure that the headphone is NOT connected to the headphone audio output jack.
Make sure that the TV speakers is NOT set to Off
Adjusted Picture or Sound settings are not effective every time the unit is turned
on.
You must set Home in Location. p. 32 (Otherwise, the settings you adjusted will not be memorized after the unit goes into standby mode.)
You see a distorted picture or hear an unusual sound. (Analog TV - NTSC
signal)
You may be getting NTSC (Analog) TV signal (not HDTV signal) interference from electrical appliances, automobiles, motorcycles or fluorescent lights.
Try moving the unit to another location to see if this is the cause of the problem.
Ghosts, lines or streaks in picture.
Electrical interference from nearby appliances may affect picture quality.
View other TV channels. The problem might be limited to the broadcasting station or weak signal strength.
Picture poor, sound intermittent or no sound
View other TV channels. The problem might be limited to the broadcasting station or weak signal strength.
Child and rating lock
Forgotten PIN code.
Enter “07 1 1” to clear your password.
Screen
You switch to a different input and the screen size changes.
This unit will memorize the viewing mode from the last time you used the particular input modes.
The display image does not cover the entire screen.
If you are using the unit as a PC monitor, make sure that Horizontal position and Vertical position in Picture are set correctly. p. 28
If you are watching TV or using the Composite video, Component video or HDMI with 480i input, press FORMAT repeatedly to switch to various screen modes.
Different color marks on the TV screen
View other TV channels. The problem might be limited to the broadcasting station, missing data or pixelation due to weak signal strength.
Closed captions
Closed captions are displayed as a white box. No closed captions are displayed in the closed captions-supported program.
Interference from buildings or weather conditions may cause closed captions to be incomplete if watching analog TV signals.
Broadcasting station may shorten the program to insert advertisements.
The closed caption decoder cannot read the information of the shortened program.
Black box is displayed on the TV screen.
The text mode is selected for caption. Select CC-1, CC-2, CC-3 or CC-4.
Software update
A message appears on the screen prompting for software update again.
When you start up the TV or a net service after executing the software update, a message may appear on the screen prompting for software update again. In this case, please select Update to start USB update or network update. p. 43
Network
Cannot connect to the network.
Check if the Ethernet cable connection is properly made. Turn on the broadband router and/or modem.
Check the network settings.
Check if the broadband router and/or modem is correctly connected.
Sometimes video quality is poor when using the wireless LAN.
The wireless network connection quality vanes depending on the distance or obstacles (eg. wall, basement, 2nd floor) between the TV wireless LAN adapter and the wireless router (access point), from other wireless networks, and brand and type of the wireless router (access point). When using the wireless LAN of the TV, it is suggested to place the wireless router as close as possible to the television.
Wireless LAN connection fails or wireless connection is poor.
Check the installation location of the TV and wireless router (access point). Signal quality may be affected for the following reasons.
- Interference of other wireless devices, microwaves, fluorescent lights, etc., are placed nearby.
- There are floors or walls between the wireless router and TV.
- If the problems continue even after checking the above, try making a wired LAN connection.
Cannot use the wireless connection.
Check if the wireless LAN Access Point (AP) (eg. wireless router) is onented properly or not placed too close between them.
Once you have activated the wireless connection please wait 30 seconds for the connection to be established after turning on the unit, before trying to access network features such as Net TV.
Cannot use Netflix feature.
Check if the network connection is properly made.
Visit netflix on your PC and become a Netflix member.
Some network services may not be available in your country.
Cannot add movies or TV episodes to the Instant Queue.
Visit netflix on your PC.
Even though the speed of the internet connection improves during playback,
the picture quality of Netflix streaming movie does not improve.
The picture quality does not change during playback. It differs depending on the speed of internet connection at the time of loading.
Cannot use VUDU feature.
VUDU is available only in the United States and Mexico.
Check if the network connection is properly made.
Cannot rent or buy movies / TV episodes on VUDU.
You need to activate the VUDU account. For detailed information, please visit the service providers website
Log into your account and check your payment information.
The picture quality of streaming movie (Netflix, VUDU or CinemaNow) is poor.
Check the speed of your internet connection. You need speeds of at least 8 Mbps to this player for high quality uninterrupted playback.
Streaming movie (Netflix, VUDU or CinemaNow) often stops or starts buffering
during playback.
Contact your internet service provider to troubleshoot your internet connection for speed and line quality. Consistent line quality and speed are very important for internet video playback.
Cannot connect to the network while my PC is connected to the network.
Check the content of your internet service contract to see if your internet service provider prevents multiple terminals connecting at the same time.
Cannot use Easy Connect to connect to the access point.
Connect the unit to the access point using scan or manual entry mode. If the access point's security mode is set to WEP*, change the setting to others (recommended), then try Easy connect again. (For access point configuration, please consult its user manual or manufacturer.)
* WEP is not recommended to be used due to its major security flaws. Change the security protocol on the wireless router to others (recommended) mode.
Folder or files stored on home network media server are not displayed in the file
list or cannot be played back.
Check the setting on your home media server. (Refer to the user manual of the home media server)
Check the network connection and settings.
Cannot use Pandora feature.
Check if the network connection is properly made.
Pandora is available only in the United States.
You must create a Pandora account and activate this unit. Activating Pandora →p. 49
Wireless Screencasting
Connectivity with all Wireless Screencasting compatible devices is not guaranteed.
Devices that do not comply with Wireless Screencasting standards may have compatibility issues.
Information
Glossary
Analog TV (NTSC)
Acronym that stands for National Television Systems Committee and the name of analog broadcasting standards
Off the air analog TV signals are no longer being sent by major broadcasting stations in the USA.
ARC (Audio Return Channel) (HDMI 2 only)
HDMI-ARC allows you to use Philips EasyLink to output TV audio directly to a connected audio device, without the need for an additional digital audio cable Be sure that the device is HDMI CEC and ARC compliant, and that the TV is connected to the device using an HDMI cable attached to both HDMI-ARC connectors.
Aspect ratio
The width of a TV screen relative to its height Conventional TVs are 43 (in other words, the TV screen is almost square), widescreen models are 16 9 (the TV screen is almost twice as wide as its height)
CEC (Consumer Electronics Control)
This allows you to operate the linked functions between our brand devices with CEC feature and this unit We do not guarantee 100% interoperability with other brands of CEC compliant devices
Component video
This is a Video signal format that conveys each of 3 principal colors of light (red, blue and green) through different signal lines This allows the viewers to experience picture colors as original as it is There are several signal formats, including Y / Pb / Pr and Y / Cb / Cr
Dolby Digital
The system developed by Dolby Laboratories to compress digital sound It offers stereo sound (2ch) or multi-channel audio
DTV (ATSC)
Abbreviation that stands for Advanced Television Systems Committee and the name of the digital broadcasting standards
E-sticker
E-sticker is showing set features, technical information, etc on this TV set that is displayed on the TV screen mainly used by TV retailers Previously the information was on a printed sticker that was put on the display
HDMI (High-Definition Multimedia Interface)
Interface that supports all uncompressed, digital audio / video formats including set-top box, Blu-ray / DVD recorder or digital television, over a single cable
HDTV (High-Definition TV)
Ultimate digital format that produces high resolution and high picture quality
PIN code
A stored 4-digit number that allows access to parental control features
SAP (Secondary Audio Program)
Second-audio channel delivered separately from the Main-audio channel This audio channel is used as an alternate in bilingual broadcasting
SDTV (Standard Definition TV)
Standard digital format that is similar to the analog TV picture quality
Sonic Emotion Premium
Sonic Emotion Premium fills your surroundings with the right ambience, clarifies voice, and details the sound stage, making your experience more immersive and enjoyable
Maintenance
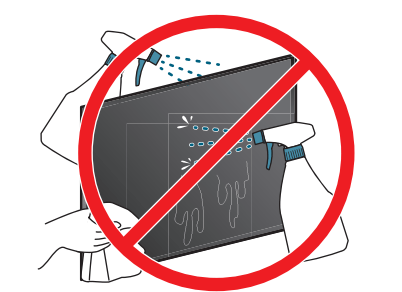
Cleaning
Clean the front panel and other exterior surfaces of the unit with a soft microfiber cloth or lens brush Before cleaning the panel, disconnect the AC power cord
Never use a solvent or alcohol Do not spray insecticide liquid near the unit Such chemicals may cause damage and discoloration to the exposed surfaces
Do not spray any liquids on the screen or other exterior surfaces of this unit If liquids enter the unit, they could cause shorts, electric shocks or fire damage
Servicing
Should your unit become inoperative, do not try to correct the problem yourself. There are no user serviceable parts inside. Call our toll free customer support line found on the cover of this User Manual to locate an authorized service center.
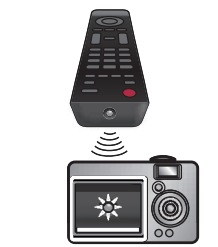
IR Signal Check
If the Remote Control is not working properly, you can use a Digital or Cell Phone Camera to see if it is sending out an infrared signal.
e.g.) With a Digital Camera:
Point the Digital Camera towards the Remote Control infrared diode at the front of the Remote Control. Press any key on the Remote Control and look at the Camera Display. If an infrared pulsating light appears on the Display, the Remote Control is sending out an IR signal.
Note: Some Cameras have an IR Filter and will not Display the IR signal.
#1 How to Connect the TV to the internet using an Ethernet cable?
Please purchase shielded Ethernet cables at your local store and use them when you connect to network equipment. • After connecting an Ethernet cable, set up necessary network settings. Connect to network p. 38 • Do not insert any cable other than an Ethernet cable to the Ethernet port to avoid damaging the unit. •If your telecommunications equipment (modem, etc.) does not have broadband router functions, connect a broadband router. •If your telecommunications equipment (modem, etc.) has broadband router functions but there is no vacant port, then add a hub. • For a broadband router, use a router which supports 10BASE-T / 100BASE-TX. • Do not connect your PC directly to the Ethernet port of this unit.

 (POWER)
 VUDU
VUDU EasyLink buttons
 :Searches backward or forward through the disc.
 : Starts, pauses or resumes playback.
 :Stops the disc playback.
 YouTube
 SAP
SAP (Home)
 INFO
INFO
 (NAVIGATION buttons)
 OPTIONS
 SOURCE
 CH+/ -
 COLOR buttons
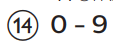 (NUMBER buttons)
 (MUTE)
 VOL + / -
 BACK
BACK FORMAT
 NETTV
NETTV NETFLIX
 (POWER)
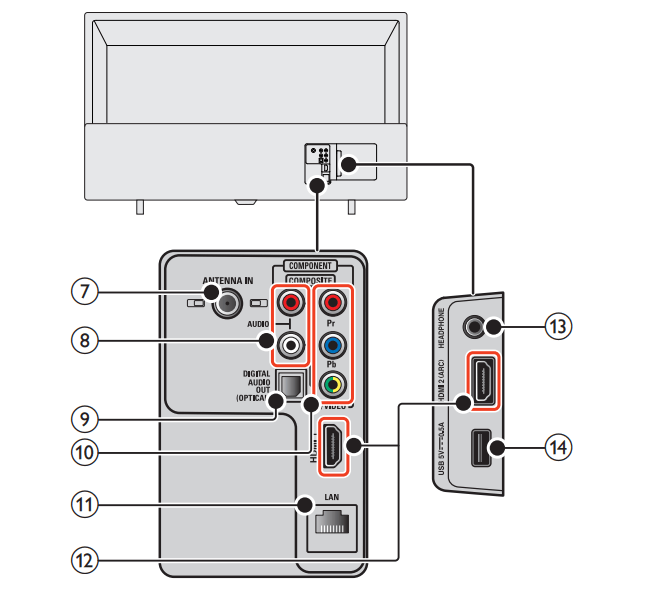

 SOURCE.
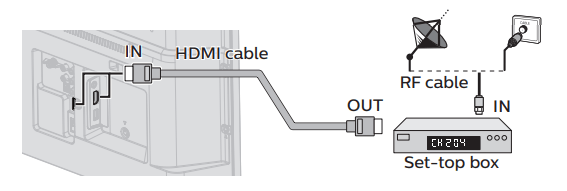

 on the TV or the remote control.
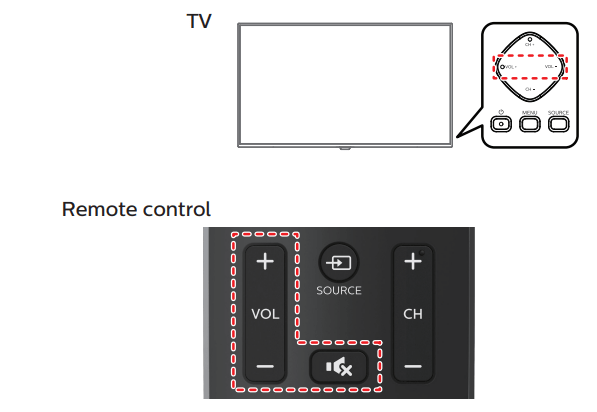
 on the remote control to mute the sound.
 SOURCE and use
  to select the set-top box or the connected device and wait a few seconds till the picture appears.
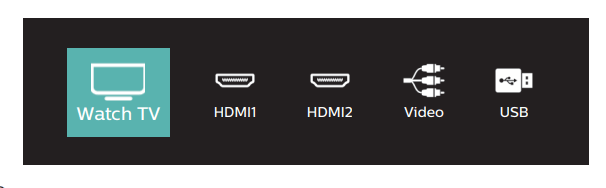

 FORMAT repeatedly to switch the TV aspect ratio.
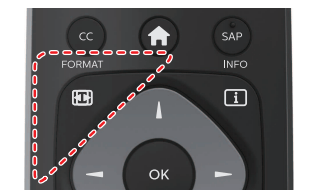

 SOURCE p. 20
 so that the volume bar and current volume level will appear on the TV screen.
 FORMAT repeatedly to switch to various screen modes.