You can scan for channels automatically or manually.
Note: Satellite/antenna/cable function may not be applicable in some models/ countries/regions.
Auto Scan
Automatically scan for channels to view programmes from TV source.
> TV
Alternatively, in Live TV, > Settings > Channel > Auto Scan.
If no TV channels were saved before, you will be prompted to do a channel search.
Satellite
• Single satellite: You can use single satellite if you only have one satellite equipped.
• DiSEqC: You can choose DiSEqC if you have DiSEqC equipment. Up to four satellites in DiSEqC 1.0 mode can be installed. If you are using a motorized antenna, you can use DiSEqC 1.2 mode.
• Unicable: If your house is equipped with Unicable satellite distribution, you should use this option.
Please make sure that you know the Unicable band and frequency that can be used. The information should be available on the equipment or the landlord can provide it.
Antenna
• Channel: Select from All Channels or Free Channels. This option may not be available depending on countries/regions/operators.
• Scan Mode: Select from digital channels only (DTV), digital and analogue channels (DTV+ATV) or analogue channels only (ATV). If you receive DVB-T or DVB-T2 signal, you can use DTV.
• LCN: Switch on/off LCN (Logical Channel Number). Please note that some operators are restricted to manually change the channel order. If you switch off LCN, then the channel list can be edited after channel scan.
This function may not be applicable in some models/countries/regions.
Cable
• Channel: Select from All Channels or Free Channels. This option may not be available depending on countries/regions/operators.
• Scan Mode: Select from digital channels only (DTV), digital and analogue channels (DTV+ATV) or analogue channels only (ATV).
Please note that some operators are restricted to manually change the channel order. If you switch off LCN, then the channel list can be edited after channel scan.
This function may not be applicable in some models/countries/regions.
Manual Scan
Manually scan for channels to view programmes from your TV sources through DTV or ATV.
In Live TV, > Settings > Channel > Advanced Settings > Manual Scan
DTV Manual Scan
Manually scan for DTV channels to view programmes from a TV source.
When the DTV Manual Scan screen appears, press button to select Antenna, Cable or Satellite, and select Start to commence the search of that channel. When the signal has been tuned, signal strength will be displayed on the screen.
ATV Manual Scan
Manually scan for ATV channels to view programmes from a TV source.
• Frequency: Input the channel frequency you want.
• Picture System: Select the Colour System.
• Sound System: Select the Sound System.
Live TV tutorial
After channel scanning is done for the first time, the screen will display Live TV operating tutorial, including:
: Load the info bar
: Load the channel list
: Open the electronic programme guide (only available in some models/countries/regions)
: Load onscreen menu
: Call up search function
: Jump to the previous channel
Note: The remote control buttons may vary depending on models/countries/ regions.
Related Topic
• Connecting an Antenna
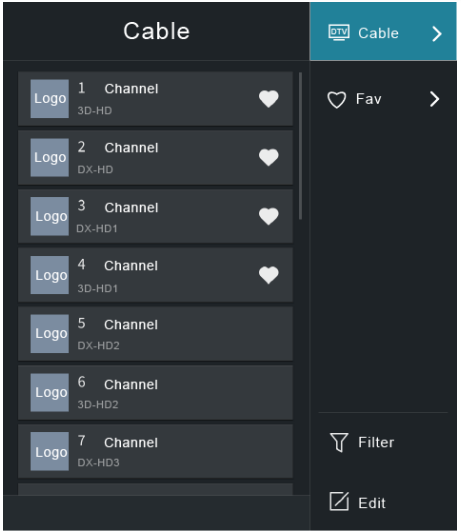
Channel List
Displaying the channel list
In Live TV, press button to display the Channel List menu.
Alternatively, in Live TV, > Channel List.
Entering the sub-menu of channel list
In Live TV, >
Introducing the sub-menu
In Live TV, >
TV List
Display Live TV channel categories, such as Cable and Antenna.
Fav
Display favourite lists 1 to 4.
Filter
Select channels by Content, HD, Child Lock, Scrambled and Sort.
Some options in Filter may not be available in some models/countries/ regions.
Edit
Edit the channel list.
Note: The sub-menu options may vary depending on models/countries/regions.
Connection
Wired Internet Connection
Connecting to a wired (Ethernet) network
To get access to the Internet in a wired way, it is recommended to use a modem or router that supports Dynamic Host Configuration Protocol (DHCP). Modems and routers that support DHCP automatically provide the IP address, subnet mask, gateway, and DNS, so you don't have to enter them manually. Most home networks already have DHCP.
See the illustration below.
After connecting to a wired (Ethernet) network:
> Settings > Network > Network Configuration
Set the TV network by selecting Network Configuration and press button to enter the submenu.
• Connection Type
Choose a wired (Ethernet) network connection to access the Internet.
• Ethernet
Display network status.
• IP Settings
Configure the IP setting for your network connection.
Wake on LAN
> Settings > Network > Wake on LAN
Using an Ethernet connection and switching on Wake on LAN, this feature can make you turn on the TV from the standby mode, and push content to be broadcast on the TV with an app supporting the screencast feature in your mobile device.
Note:
• To use this function, make sure your TV and mobile device are connected to the same network environment.
• Enabling this function may result in higher energy consumption.
Connecting Bluetooth Devices
You can connect to devices using Bluetooth technology.
> Settings > Network > Bluetooth
Note: Bluetooth function may not be applicable in some models/countries/ regions.
Connecting a Bluetooth remote
Pair the Bluetooth remote with the TV.
1. Pair the Bluetooth remote to the TV after you power the TV on, and set > Settings > Network > Bluetooth to On.
2. Keep the remote control within 3 metres from the TV. Press any button (except power and mic button) to pair with the TV.
Note:
• In special cases, press and hold button to pair.
• This function may not be applicable in some models/countries/regions.
• If an unknown error occurred with the remote, it could have been caused by interference. Try to remove what's causing the interference and pair it again.
• If an unknown error occurred with the remote while the battery power is normal, you can take out the batteries, press any key for 1~2 seconds, and insert them back. Then the remote will work normally.
• The remote cannot be paired to the TV while the TV is in standby mode.
Connecting Headphones
You can connect a pair of headphones (not provided) to the HEADPHONE port on your TV. While the headphone is connected, the sound from the built in speakers will be disabled.
Note:
• Headphone port may not be available in some models.
• Headphones with microphones are not supported.
• If Headphone with Speakers is selected manually in > Settings > Sound > Headphone > Headphone Mode, the headphone and the TV will have sound output at the same time.
• For more information about headphone settings, please refer to Picture and Sound > Using Headphones in this manual.
Connecting an Antenna
You can connect an antenna cable to your TV.
Using your remote, select Input icon in Home screen and select TV as the input source.
Related Topic
• Channel Scan
Using HDMI & CEC
Use the TV remote to control external devices that are connected to the TV by an HDMI cable. The external devices need to support HDMI & CEC function.
> Settings > System > HDMI & CEC
Connecting an external device through HDMI & CEC function
> Settings > System > HDMI & CEC > CEC Control
Allow HDMI devices to control each other.
1. Set CEC Control to On.
2. Connect an HDMI & CEC compatible device to the TV.
3. Turn on the connected external device. The device will be connected to the TV automatically. After connection is finished, you can access the menu of the connected device on your TV screen using your TV remote and control the device.
Enabling device auto power off
> Settings > System > HDMI & CEC > Device Auto Power Off
Set to On to turn off HDMI & CEC compatible external devices when the TV is turned off.
Enabling device auto power on
> Settings > System > HDMI & CEC > Device Auto Power On
Set to On to turn on HDMI & CEC compatible external devices when the TV is turned on.
This feature is applicable when TV input source is preset to the corresponding external device.
Enabling TV auto power on
> Settings > System > HDMI & CEC > TV Auto Power On
Set to On to turn on the TV when HDMI & CEC compatible external devices is turned on.
HDMI format function
> Settings > System > HDMI & CEC > HDMI Format
Please select Enhanced format if your HDMI device supports 4K HDR. If it does not support 4K HDR, please select Standard format. If you are not sure, please select Auto.
Note:
• HDMI cables must be used to connect HDMI & CEC compatible devices to your TV.
• The HDMI & CEC feature of the connected device must be turned on.
• If you connect an HDMI device that is not HDMI & CEC compatible, all the HDMI & CEC control features do not work.
• Depending on the connected HDMI device, the HDMI & CEC control feature may not work.
• The HDMI & CEC feature supports One Touch Play, Routing Control, System Standby, Device OSD Name Transfer, Remote Control Pass Through, Give Device Power Status, System Audio Control.
Picture and Sound
Adjusting the Picture Quality
Adjust picture mode, picture size and other advanced picture settings.
Choosing a picture mode
> Settings > Picture > Picture Mode
Select a preset picture mode to best suit the content you're viewing.
Options may differ depending on models. Please refer to the actual product.
• Standard
Best suited for watching normal content, such as News, Drama or Documentary.
• Cinema day
Best suited for watching movies in a bright environment.
• Cinema night
Best suited for watching movies with dark environment.
• Dynamic
Best suited for the content that requires vivid picture quality.
• Sports
Optimized picture for watching sports.
• Auto
The picture mode will be adjusted automatically.
Note: Auto mode may not be applicable in some models/countries/regions, and to use this function, you must choose Yes, Enable Enhanced Viewing in the Enhanced Viewing when you turn the TV on for the first time, or at > Settings > System > Advanced Settings > Enhanced Viewing. For more information, please refer to Accessibility and System > Enhanced Viewing in this manual.
Low Blue Light
Cinema day and Cinema night are designed to reduce the level of blue light to protect your eyes.
Go to > Settings > Picture > Picture Mode, and select Cinema day/Cinema night.
To reduce the eye strain and protect eyes when you watch TV for a period of time, you are suggested to:
• Take regular and frequent breaks to avoid watching TV for a long period of time. Long time of watching may cause you eye fatigue. It is not recommended to watch TV for more than one hour.
• Look away from the TV screen and look at distance objects during the breaks for at least 10 minutes for eye care.
• Relax yourself during a break by doing eye exercises or outdoor activities.
• The best recommended viewing distance is 3 times the vertical height of the TV screen.
Proper breaks and exercises are proved excellent help to relieve eye strain and fatigue.
This feature may not be applicable in some models/countries/regions.
Accessibility and System
Accessibility
> Settings > Accessibility
Accessibility function provides menu options and audio description to aid the visually or hearing impaired.
• Menu Scheme
Select menu scheme style from Dark, Light.
• High Contrast Menu
Improve contrast for visually impaired.
• Menu Transparency
Select menu transparency from Off, Medium, High.
• Audio Type
Audio Type
Select the audio type of programmes.
Voiceover Volume
Independently adjust the volume of voiceover.
• Subtitle Settings
Adjust Subtitle Settings for digital broadcast content.
Subtitle
Select whether to apply Subtitle to your TV. Select from Off, Subtitle, Hard of Hearing Subtitles.
Primary Subtitle
Set the default subtitle language for digital broadcast content.
Secondary Subtitle
Set the secondary subtitle language for digital broadcast content.
Note: The above functions may not be applicable in some models/countries/ regions.
Setting Time
> Settings > System > Time
Set the current time based on your location.
• Time Format
Set the time to display in a 12 or 24-hour format.
• Date/Time
Set the Date and Time. You can set the date and time to automatically sync with Internet/broadcast or manually setup by yourself. This function may not be applicable in some models/countries/regions.
• Time Zone
Select your time zone. This function may not be applicable in some models/countries/regions.
• Daylight Savings
Select whether to apply Daylight Savings Time to the TV.
This function may not be applicable in some models/countries/regions.
Using Timer
> Settings > System > Timer Settings
Adjust the timer settings to suit your preference.
• Sleep Timer
Set the sleep timer to automatically turn the TV Off within a specified time: Off, 15 Minutes, 30 Minutes, 60 Minutes, 90 Minutes, 120 Minutes or User Defined.
• Power On Timer
Set the clock for the time you want the TV to turn on automatically. You can set the time only once or set the time in specified date by weekly.
• Power Off Timer
Set the clock for the time you want the TV to turn off automatically. You can set the time only once or set the time in specified date by weekly.
• Menu Timeout
Set the amount of time that you would like for the menu to display: Off, 10s, 20s, 30s, 60s, 5 min.
• Auto Sleep
Set the amount of time that you would like for TV auto power off without any activity: Off, 3H, 4H.
This function may not be applicable in some models/countries/regions.
• Auto Standby with No Signal
TV will go standby if there is no signal and the timer times out.
Using Parental Control
> Settings > System > Parental Control
Turn on Parental Control to block children from being able to view certain programmes.
If you have not set the PIN code before, create and confirm PIN window displays. Using the D-pad on your remote, create the password.
If you have set the PIN code before, enter PIN window displays.
Set PIN code at > > Settings > System > System PIN.
• Locks
Turn on Locks to enable the Parental Control function.
You will see other Parental Control settings change from a greyed out state to highlighted. When this occurs, Block Time, Channel Block, Content Block, Input Block, App Block, or Reset to Default features are available to set.
• Block Time
Block the whole TV usage for a defined period of time, including Live TV, HDMI and apps.
• Channel Block
Block TV channels when you turn on the Parental Control feature. To use this function, please scan channels first.
• Content Block
Certain programme is blocked by age rating. The rating needs to be provided by the broadcaster.
• Input Block
Block content from devices that are connected to certain TV ports.
• App Block
Block access to certain apps.
• Reset to Default
Restore Parental Control back to the factory default setting.
Setting Language and Location
> Settings > System > Language and Location
Select the language used for this TV and your location.
• Location
Choose the location from where you will watch your TV.
• Menu Language
Set the default language for the TV menu.
• Primary Audio
Set the default audio output language for the type of digital broadcast content that you're viewing.
• Secondary Audio
Set the secondary audio output language for digital broadcast content.
• Digital Teletext
Adjust Teletext decoding.
Using Power Indicator
> Settings > System > Advanced Settings > Power Indicator
Set the Power Indicator light to stay On or Off when in standby mode.
Set the indicator light from Power, Always or Off.
Note: The above functions may not be applicable in some models/countries/ regions.
Enhanced Viewing
> Settings > System > Advanced Settings > Enhanced Viewing
You can turn on Enhanced Viewing features to enhance viewing experience.
• Automatic Content Recognition
Turn on Automatic Content Recognition (ACR) to enjoy amazing picture quality and audio quality adjustment for the content watching.
Note:
• This function may not be applicable in some models/countries/regions.
• To use this function, you should accept End User License Agreement and smart feature privacy policy/terms and conditions, and choose Yes, Enable Enhanced Viewing in the setting process.
You will see the other Enhanced Viewing settings change from a greyed out state to highlighted. When this occurs, Picture Mode Auto Adaptation and Sound Mode Auto Adaptation features will be enabled.
• Picture Mode Auto
Adaptation Automatically switch to the best picture mode for the content watching. This function may not be applicable in some models/countries/regions.
• Sound Mode Auto Adaptation
Automatically switch to the best audio mode for the content watching. This function may not be applicable in some models/countries/regions.
Setting Usage Mode
> Settings > System > Advanced Settings > Usage Mode
Set the TV to use in Home or Store mode.
• Home Mode
Select Home Mode for normal TV usage, and use less energy. If you want to switch to Store Mode when the TV is in Home Mode, press button to select Settings, and select System > Advanced Settings > Usage Mode, and choose Store Mode.
• Store Mode
Select Store Mode, and the TV will be on display in a retail setting. This mode effects E-Pos and other demo functions, and is only intended for use in retail stores.
When Store Mode is selected, press button on your remote control to enter store mode settings.
If you want to switch to Home Mode when the TV is in Store Mode, press button to select Settings, and select System > Advanced Settings > Usage Mode, and choose Home Mode.
Note: Enabling Store Mode could increase energy consumption.
Using Remote Control Service
> Settings > Support > Remote Control Service
Remote Control Service enables your TV to be controlled from the client server to let service agent diagnose the problem of your TV and dealing with the problem online efficiently.
To use this function:
1. Turn on Remote Control Service.
2. Select Agree All and Confirm in End User License Agreement page.
3. Select Generate PIN in Remote Control Service.
4. You can initiate a help request to service agent by hotline and provide the on-screen PIN.
Note:
• This function may not be applicable in some models/countries/regions.
• Steps above may vary. Please refer to the actual product.
• Keep the network connected when the Remote Control Service is running.
Upgrade
> Settings > Support > System Upgrade
Set your TV to receive the latest firmware.
• Auto Firmware Upgrade
Set your TV to automatically receive the latest firmware.
• Check Firmware Upgrade
Check to ensure that your TV has received the latest firmware. Please ensure your TV is connected to the Internet.
• Check OAD Upgrade
Check to ensure that your TV has received the latest firmware via the tuner.
Note:
• Please ensure your TV is connected to the Internet.
• This function is only applicable when Thailand and Malaysia are selected in Location.
• System App Auto Upgrade
Set your system applications to automatically upgrade to the latest version. App auto upgrade will be done in the background. May need your confirmation on new Privacy Notices to complete upgrade in the progress.
• Upgrade from USB
Upgrade TV software from USB device.
Note:
• Please ensure the USB flash drive insert to USB 2.0 port of the TV.
• The updating files must be available in root directory.
• The format of the USB must be FAT32 and the partition table type must be MBR.
Related Topic
• Connecting USB Devices
Reset to Factory Default
> Settings > Support > Reset to Factory Default
Restore your TV to the factory default. Reset will clear your personal setup and information.
Troubleshooting
Picture Issues
When the TV has a picture problem, these steps may help resolve the problem.
> Settings > Support > Self Diagnosis > Picture Test
• If the test picture does not appear or there is noise or distortion, the TV may have a problem. Contact the service company in your country/region.
• If the test picture is displayed properly, there may be a problem with an external device. Please check the connections.
• If the problem persists, check the signal strength or refer to the external device's user manual.
Problem
Possible Solutions
No picture, or black and white picture.
• Unplug the TV power cord from AC outlet and re-plug after 60 seconds.
• Check if the Colour Saturation is set to 50 or higher at
• The compression of video content may cause picture distortions, especially in fast moving pictures from sports programmes and action movies.
• If the signal reception is weak or poor, screen distortion may be visible but it is not a malfunction.
• Mobile phones used close to the TV (within 1m) may cause noise on analogue and digital channels.
The picture is blurry or flickering, or cuts out momentarily.
> Settings > Picture > Picture Mode Settings > Sharpness. You can try to increase or decrease the Sharpness.
• If you use an external antenna, check the direction, position and connection of the antenna.
• Adjust the direction of your antenna, or reset or fine tune the channel.
The picture appears red, purple, pink and other colours.
> Settings > Picture > Picture Mode Settings > Expert Settings > White Balance. You can try to
increase or decrease the White Balance.
Picture distorted or appear wavy.
• Some electrical appliances may affect the TV. If you turn off the appliance and the interference goes away, then move it further away from TV.
• Insert the power plug of the TV into another power outlet.
Sound Issues
When the TV has a sound problem, these steps may help resolve the problem.
> Settings > Support > Self Diagnosis > Sound Test
If the TV plays the Sound Test melody without distortion, there may be a problem with an external device or the broadcast signal's strength.
Problem
Possible Solutions
There is no sound or the sound is too low at maximum volume.
• Check the volume control of the device (cable or satellite box, DVD, Blu-ray, etc.) connected to your TV.
Picture is normal, but no sound.
• Check the volume settings.
• Check if 'Mute' mode is set to on.
The speakers are making an odd sound.
• Make sure that the audio cable is connected to the correct audio output connector on the external device.
• For antenna or cable connections, check the signal information.
• A low signal level may cause sound distortions.
Sound distorted or appears wavy.
• Some electrical appliances may affect the TV. If you turn off the appliance and the interference goes away, then move it further away from TV.
• Insert the power plug of the TV set into another power outlet.
Sound is blurry or cuts out momentarily.
• If you use an external antenna, check the direction, position and connection of the antenna.
• Adjust the direction of your antenna or reset or fine tune the channel.
Network Issues
When the TV has difficulties in connecting to the Internet, these steps may help resolve the problem.
> Settings > Support > Self Diagnosis > Network Test
If the TV network is connected, the screen will display Connected successfully.
Problem
Possible Solutions
The TV cannot connect to your network or apps.
• Make sure the TV has a network connection.
> Settings > Support > Self Diagnosis > Network Test.
• Contact your Internet service provider.
The wireless network connection failed.
• Make sure your wireless modem/router is on and connected to the Internet.
The wireless network signal is too weak.
• Position your wireless router, modem router, or access point in a central location. Avoid putting it in a corner.
External Device Connection Issues
When the TV has difficulties with external device connection, these solutions may help resolve the problem.
Problem
Possible Solutions
I have connected an external source to my TV but I get no picture and/or sound.
• Check whether the connection between the external device and your TV is correct.
• Make sure you have made the correct selection of input source.
The cable box is no signal or weak signal.
• If there is no signal occasionally, unplug cable from TV and re-plug after 60 seconds.
• If there is always no signal, or the signal cannot be restored after plugging and unplugging, you can try > Settings > System > HDMI & CEC > HDMI Format, to confirm whether the signal can be recognized.
• Change to another HDMI port.
• Change to another HDMI cable.
There is no sound.
• Check whether ARC is selected at > Settings > Sound > Speakers > Audio Out. If not, you need to check whether the external power amplifier device is connected to the ARC/eARC port or optical port of the TV.
> Settings > Sound > Speakers > Digital Audio Out. You can try to select PCM, Dolby Digital, or Dolby Digital Plus.
• Whether the power amplifier device port is connected correctly.
• If you select HDMI as input, you can try > Settings > System > HDMI & CEC > HDMI Format.
The remote control does not work.
• Confirm that TV still has power and is operational.
• Change the new batteries in the remote control.
• Check if the batteries are correctly installed.
• If some buttons don't work, but the volume buttons can work normally, it seems there is a problem with the application.
Apps
When some apps aren't playing, this may help resolve the problem.
Problem
Possible Solutions
Netflix can't be played.
> Settings > System > Application Settings > Netflix > Forced Closure, then reopen to try.
You can try to reset to the factory settings at > Settings > Support > Reset to Factory Default.
Media Files
When files aren't playing, this may help resolve the problem.
Problem
Possible Solutions
Some files can't be played.
• Most files can be played back, but you might experience problems with corrupted files or files with high-bitrate, unsupported resolution, unsupported container or codec formats.
Related Topic
• Media
Voice Service Issues
When some Voice service aren't playing, this may help resolve the problem.
Problem
Possible Solutions
Alexa can't be played.
• For more information about Alexa, please refer to Smart Functions > Using Voice Service > Alexa in this manual.
Google assistant can't be played.
• You can try to log in Google account.
• If you receive "I don't understand" of the voice recognition, please change account or log out the account.
• After logging in to the Google account, the recognition language may be different. You need to log in to the Google account on the web page to set the voice language.
• For more information about Google Assistant, please refer to Smart Functions > Using Voice Service > Google Assistant in this manual.
TV Status Diagnosis
> Settings > Support > Self Diagnosis
Perform self diagnosis to test sound, picture and connections.
Use Picture Test to help diagnose video issues and Sound Test to diagnose sound issues. You can also view signal strength information for over-theair digital signals by using Network Test and Input Connection Test. Additionally, you can view the status of the TV by using Status Check.
Recording/Timeshift Issues
When Timeshift or Schedule recording isn't working, these steps may help resolve the problem.
Problem
Possible Solutions
Schedule Recording cannot be used.
• Check if there is a storage device connected to the TV.
• Check the free space of the storage device. The function will not work if there isn't enough storage space in the device.
• Check whether your storage device is damaged. If so, it is suggested to format your storage device.
• Recording will automatically stop if the signal becomes too weak.
• Recording or timeshift function may not work because of the slow speed of read-write for USB flash drive.
• Recording or timeshift function may not work because the storage format of your device is unsupported.
• The Recording/Timeshift functions may not be applicable in some models/ countries/regions.
Related Topic
• PVR
• Timeshift
Other Issues
Use these procedures to resolve other issues that may occur.
Problem
Possible Solutions
The TV is hot.
• Watching TV for an extended period of time causes the panel to generate heat. The heat from the panel is dissipated through internal vents running along the top of the TV.
• After extended use, you may feel hot when touching it. This heat, however, is not a defect and does not affect the TV's functionality.
The TV smells of plastic.
• This smell is normal and will dissipate over time.
The plastic cabinet makes a "clicking" type of sound.
• The "clicking" sound can be caused when the temperature of the TV changes. This change causes the TV cabinet to expand or contract, which makes the sound. This is normal and the TV is OK.
When I turn on my TV, there is a delay for a few seconds before the picture appears. Is this normal?
• Yes, this is normal. The TV is initializing and searching for previous setting information.

 > TV
> TV > Settings > Channel > Auto Scan.
 button to select Antenna, Cable or Satellite, and select Start to commence the search of that channel. When the signal has been tuned, signal strength will be displayed on the screen.
 : Load the info bar
 : Load the channel list
 : Open the electronic programme guide (only available in some models/countries/regions)
 : Load onscreen menu
 : Call up search function
 : Jump to the previous channel
 >
>  Settings > Network > Network Configuration
 button to enter the submenu.
 Input icon in Home screen and select TV as the input source.
 button on your remote control to enter store mode settings.