SLOW JUICER
User guide.

2
GENERAL SAFETY
INFORMATION
• This juicer system has moving
parts, and is not intended for
use by children or persons
with reduced physical,
sensory, or mental capabilities,
or who lack experience
and knowledge of its safe
operation. Such persons
require close supervision and
thorough instruction on its
proper use and safe operation.
• Close supervision is necessary
when any appliance is used
by or near children. Children
should be supervised to
ensure that they do not play
with the appliance. Keep cord
out of reach of children. This
appliance is not a toy.
• To protect against fire,
electrical shock and injury to
persons, do not immerse the
appliance, motor base, cord,
or plug in water or any
other liquid.
• Unplug from outlet when not
in use, before putting on or
taking o parts, and before
cleaning or attempting to
move the appliance.
• To unplug, grasp the plug and
pull from the outlet. Never pull
from the power cord.
Avoid contact with
moving parts.
• Regularly inspect the power
cord, plug, and entire
appliance for any damage.
• Do not operate any appliance
with a damaged cord or
plug or after the appliance
malfunctions, or is dropped or
damaged in any manner.
• Contact NutriBullet
®
customer
service for assistance at
1 (800) 523-5993.
• The use of attachments not
recommended or sold by
NutriBullet
®
may cause fire,
electric shock, or injury.
Important safeguards.
Warning! To avoid the risk of serious injury, carefully read all instructions
before operating your NutriBullet
®
Slow Juicer. When using any electrical
appliance, basic safety precautions should always be observed, including
the following important information.
Save these instructions!
FOR HOUSEHOLD USE ONLY
!

3
• This appliance is for
household use only. Do
not use this appliance for
anything other than its
intended use.
Do not use outdoors.
Misuse may cause injury.
• Do not let the power cord
hang over the edge of a table
or countertop.
• Do not let the power cord
touch hot surfaces, including
stove, or become knotted
or tangled.
• Always make sure the juice
bowl cover is securely in place
and locked to the juice bowl
before the motor is turned
on. Do not attempt to unlock
the juice bowl cover from the
juice bowl while the juicer is in
operation.
• Always make sure the juicer
is turned o after each use.
Make sure the auger has
stopped rotating and the
motor has completely stopped
before disassembling. The
juicer will automatically turn
o if the juice bowl cover is
removed during operation.
• Do not push food into the
feed chute with your fingers
or utensils. Always use the
food pusher provided. Do not
place hand or fingers into the
feed chute when it is attached
to the appliance. If food
becomes lodged in the feed
chute, use the food pusher
provided to push it down. Turn
motor o and ensure that all
moving parts have stopped
before disassembling juicer to
remove the remaining food.
• Turn motor o, unplug unit,
and ensure that all moving
parts have stopped before
disassembling juicer to
remove the remaining food or
to clean.
• Do not use appliance if the
auger is damaged.
• This appliance has a
polarized plug (one prong
is wider than the other). To
reduce the risk of electric
shock, this plug will fit in a
polarized outlet only one way.
If the plug does not fit fully in
the outlet, reverse the plug.
If it still does not fit, contact a
qualified electrician. Do not
modify the plug in any way.
ADDITIONAL
SAFEGUARDS
• Remove and safely discard
any packaging material or
promotional labels before
using the juicer for the
first time.
• To eliminate a choking
hazard for young children,
remove and safely discard the
protective cover fitted to the
power plug of this appliance.
• Do not put any NON-food

4
items into the feed chute.
Always make sure the
juicer is properly and
completely assembled
before connecting to
a power outlet
and operating.
Ensure that the surface
where the appliance
operates is stable, level,
clean, and dry.
• Vibration may occur during
normal operation.
• Any significant spillage onto
the surface under or around
the appliance, or onto the
appliance itself, should be
cleaned and dried before
continuing to use
the appliance.
• When using this appliance,
provide adequate air space
above and on all sides
for circulation.
• Do not operate juicer for more
than 15 minutes at a time
when juicing at a rapid rate
or with firm pressure. Allow
the motor to rest for 1 (one)
minute between each use.
This juicer is only designed
to juice fresh fruits and
vegetables. Do not use any
frozen fruits or vegetables.
• Remove rind from all citrus
fruit before juicing.
• Do not juice stone fruit unless
pits or seed stone have
been removed.
Do not leave the appliance
unattended when in use.
Keep hands, fingers, hair,
clothing, as well as spatulas
and other utensils, away from
the feed chute opening during
operation.
Keep the appliance clean.
Refer to the Care and
Cleaning section for tips and
best practices.
Any maintenance other than
cleaning should be performed
by an authorized NutriBullet
®
Service Center.
Do not attempt to repair or
service this juicer yourself.
Contact NutriBullet
®
Customer
Service for assistance at
1 (800) 523-5993.
If any of the contained
instructions or warnings
are not understood, please
contact NutriBullet
®
Customer
Service for assistance at
1 (800) 523-5993.
WARNING!
!

5
6

Contents.
Thank you for purchasing the NutrBullet
®
Slow Juicer.
08 What’s included
09 Assembly Guide
10 Before first use
11 Assembly
14 Usage instructions
17 Juicing tips
19 Troubleshooting
20 Disassembly
22 Care and maintenance
23 Replacement parts
23 How to store
24 NutriBullet
®
Slow Juicer one-year
limited warranty
27 Warranty registration
8
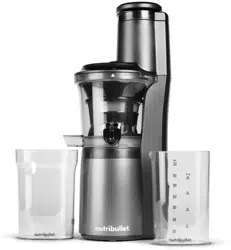
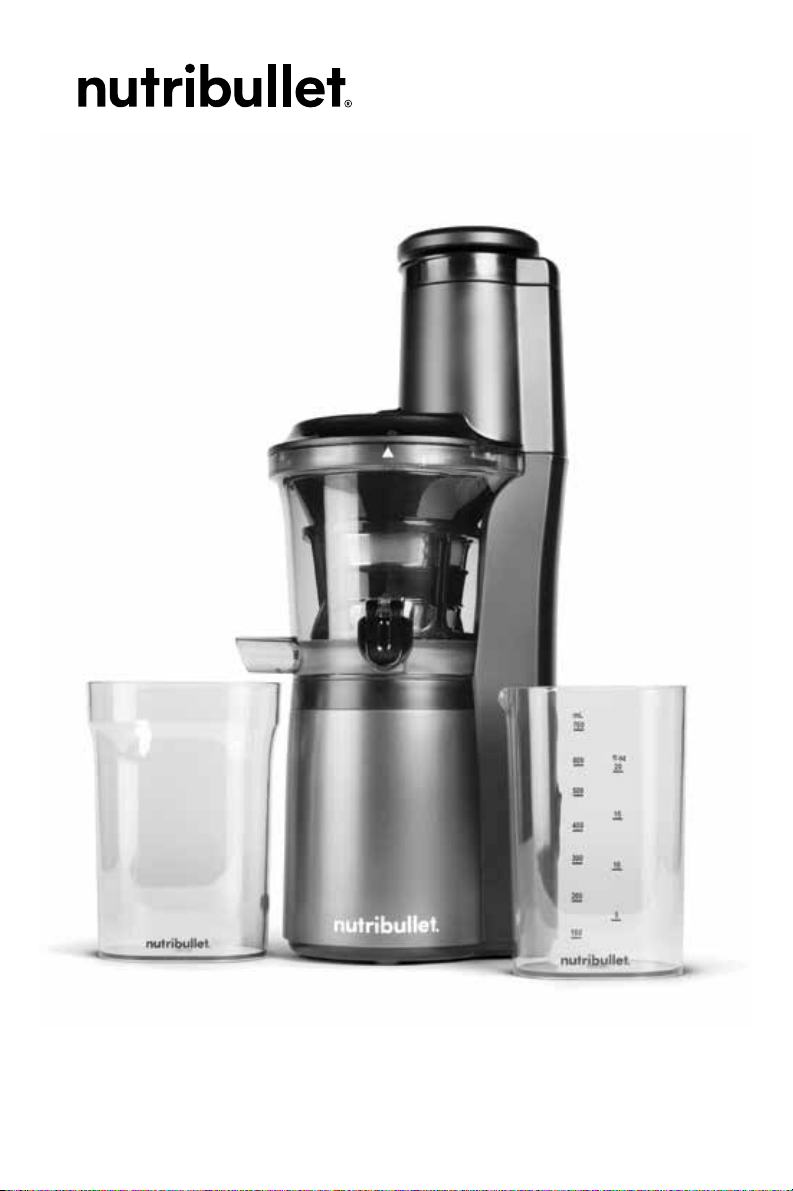
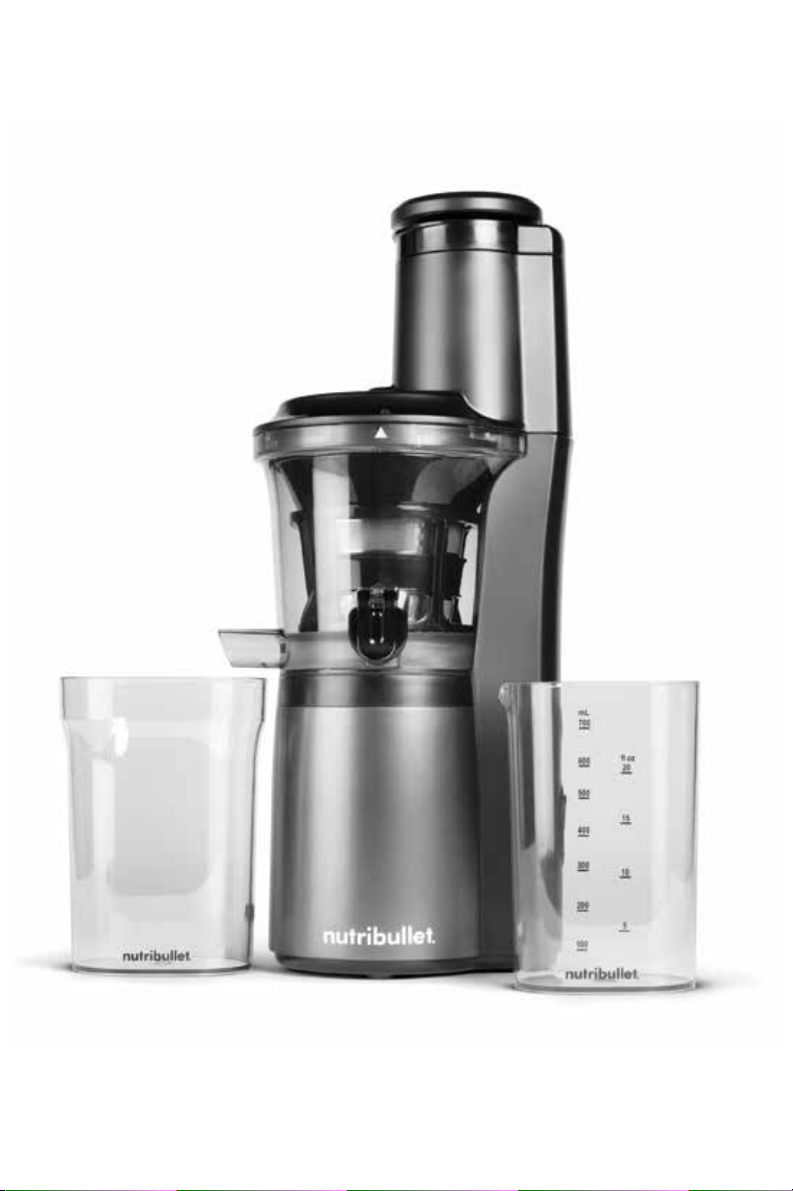
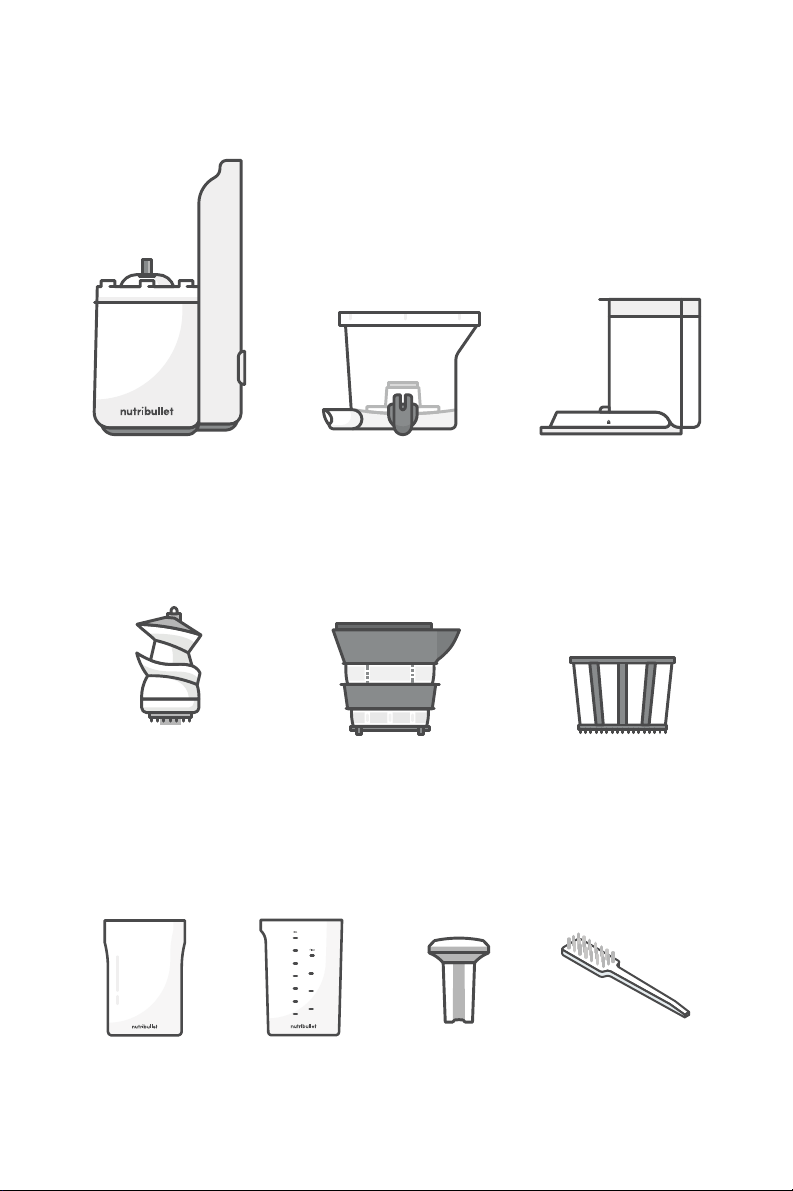
What’s included.
150 WATT MOTOR BASE JUICE BOWL
JUICE BOWL COVER
JUICING SCREENSTEELTIPPED AUGER
CLEANING BRUSHPULP
CONTAINER
ROTATING BOWL
BRUSH
FOOD PUSHER24 OZ JUICE
CONTAINER
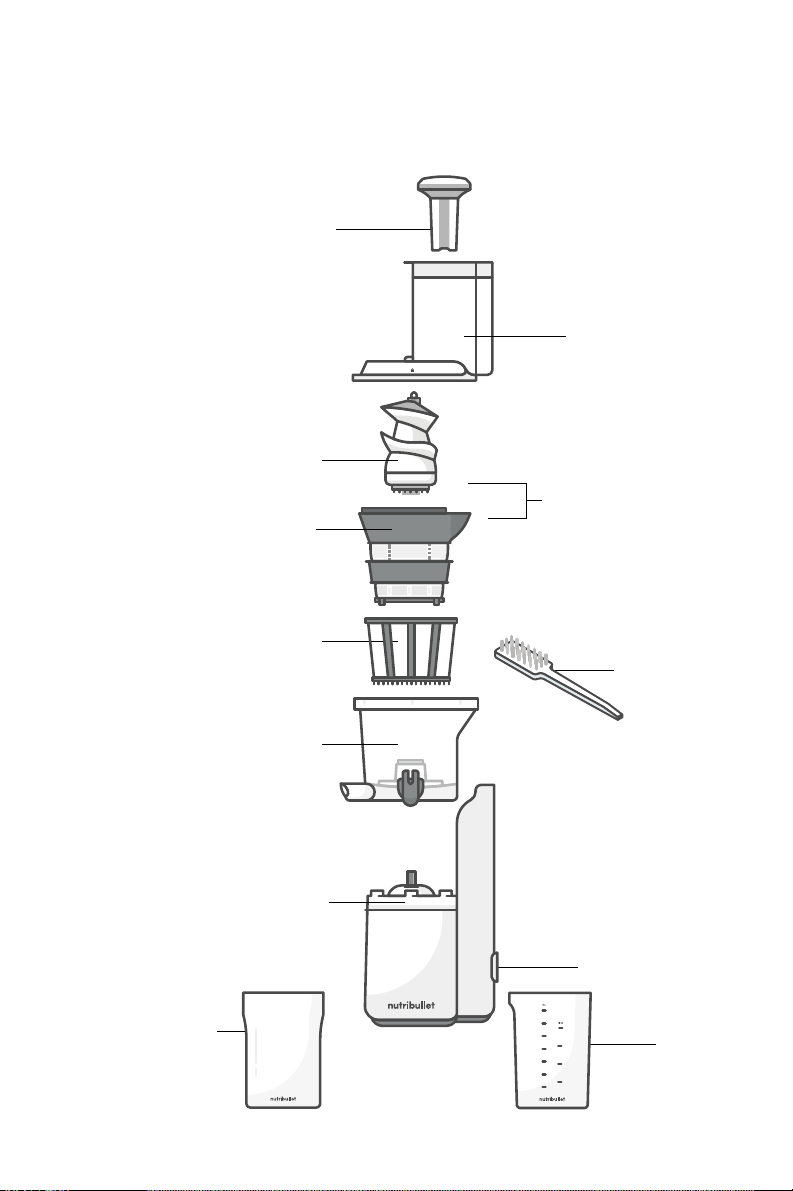
9
Assembly guide.
food pusher
grinding assembly
rotating bowl brush
juice bowl
with Juice Spout and spout
cover, and Pulp Spout
cleaning brush
power switch
pulp container
juice
container
150 watt motor base
juice bowl cover
with Feed Chute
and Juice Bowl Lid
auger
juicing screen
10
Before first use.
Before using your juicer for the first time, please take a moment to
perform the steps below.
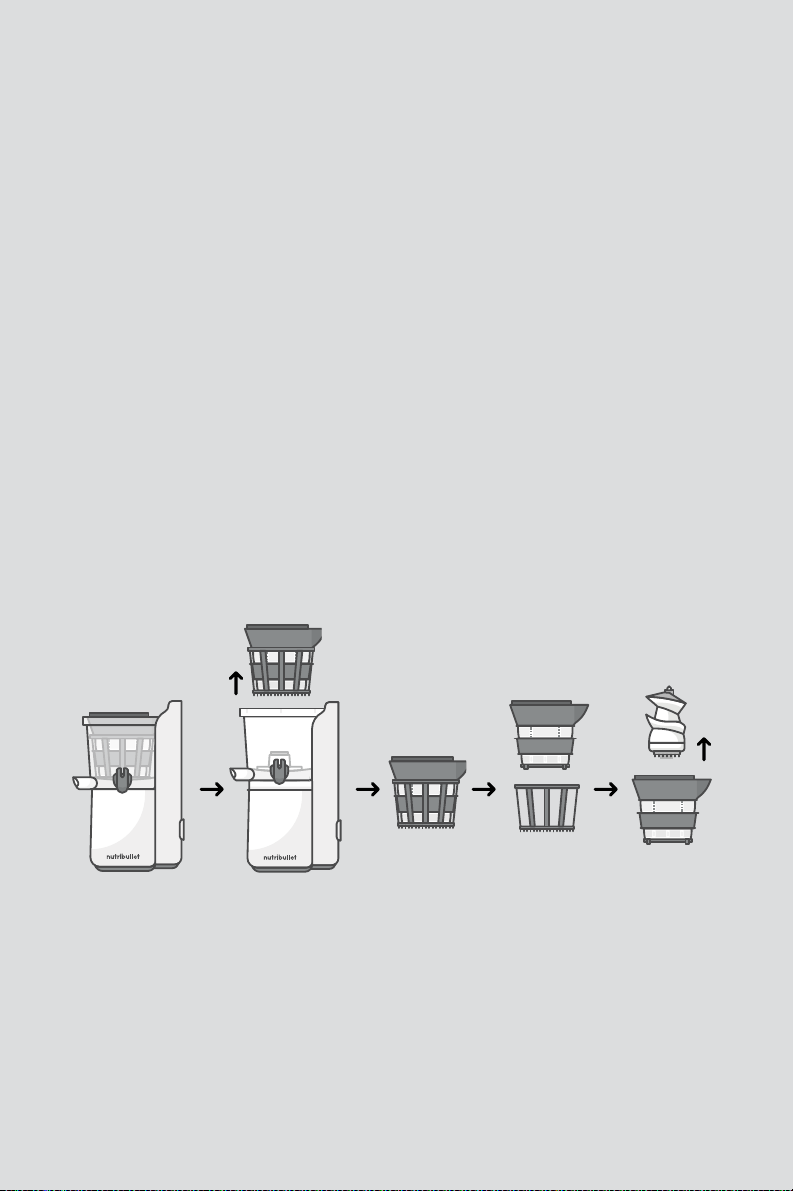
UNPACK
Open the box and remove the appliance with its various
components, placing all parts on a flat, level surface.
SEPARATE
A few parts will be packed together. Separate them using the
following 3 steps (see image):
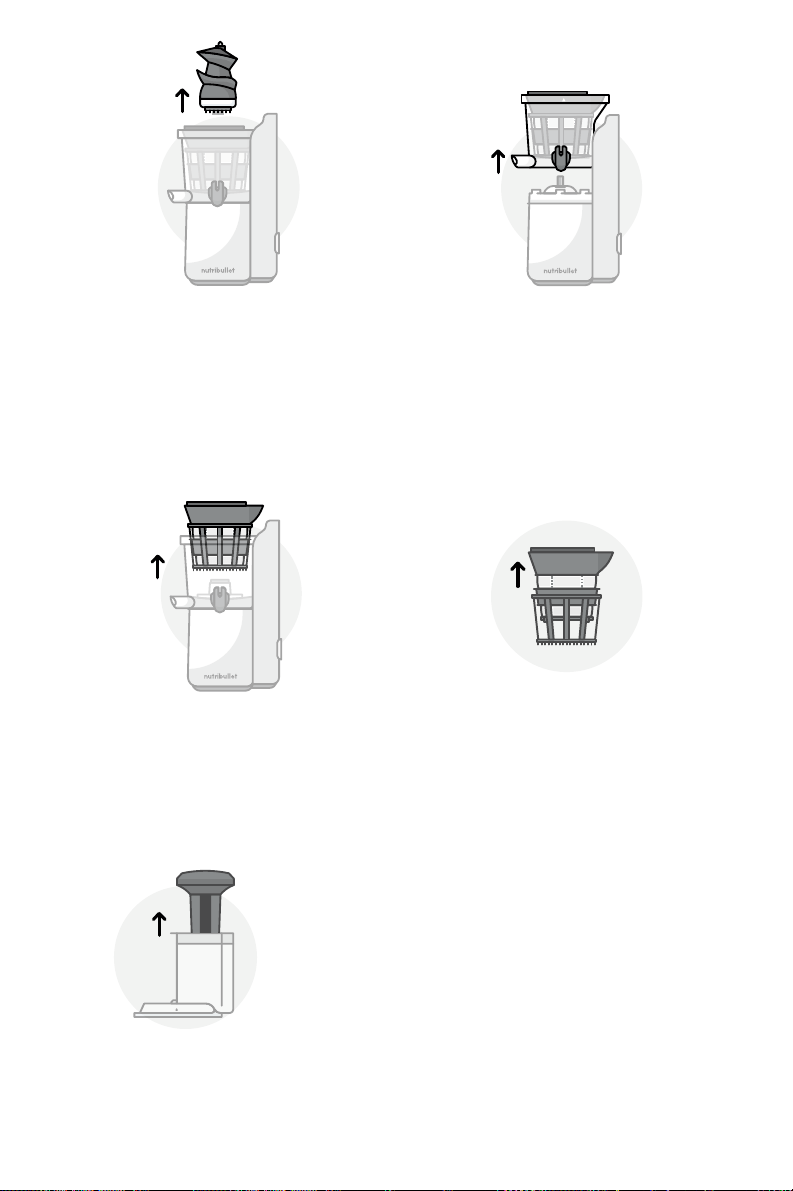
a. Lifting up, remove Grinding Assembly and Rotating Bowl Brush together
from the Juice Bowl.
b. Detach Rotating Bowl Brush by moving it down.
c. Lifting up, remove the Auger from Juicing Screen.
CLEAN
Immerse all detachable parts and accessories (not the base) in
warm, soapy water. Rinse and dry.
Clean the outside of the base with a clean, damp cloth.
WARNING: Never submerge the Motor Base in water or any other liquid.
(a)
(b)
(a)
(c)
11
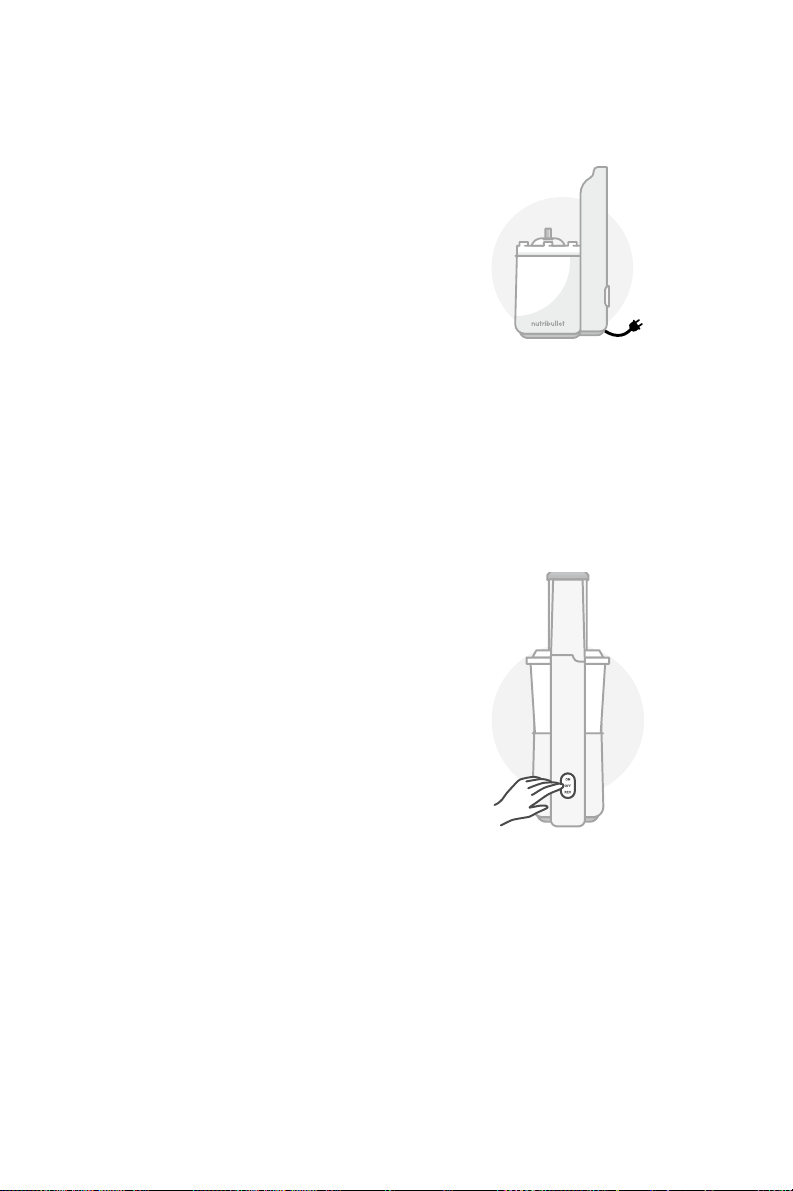
Assembly.
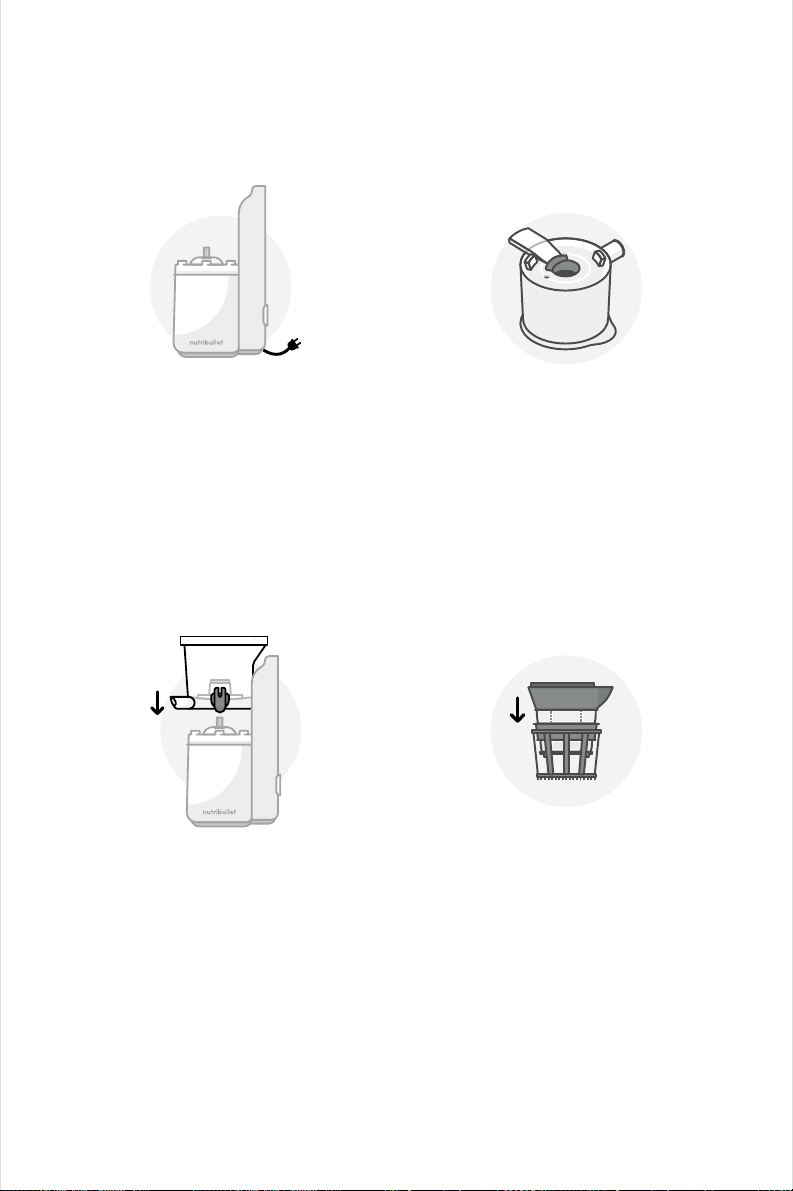
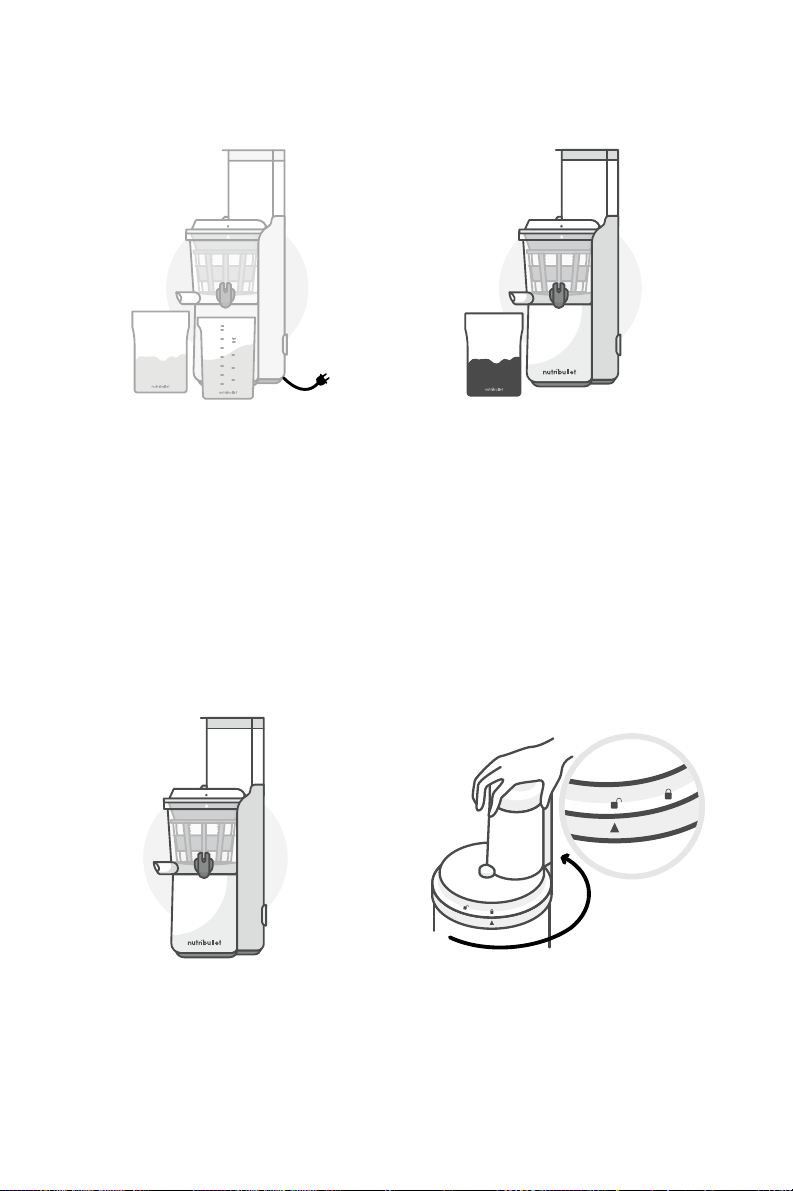
1 Before starting assembly,
check that the appliance
is unplugged and and the
power switch is off.
2 Check the position of the
pulp plug. Look at the
bottom of the Juice Bowl.
Make sure the pulp plug is
positioned properly in the
pulp spout (see image).
4 Put the Juice Screen into
the Rotating Bowl Brush.
3 Attach Juice Bowl to Motor
Base. Position the Juice
Bowl on top of the Motor
Base and push downwards,
making sure the bowl is
tightly fastened to the base
and locked securely in
place. The Juice Bowl must
be attached in its proper
position or the appliance
will not operate.
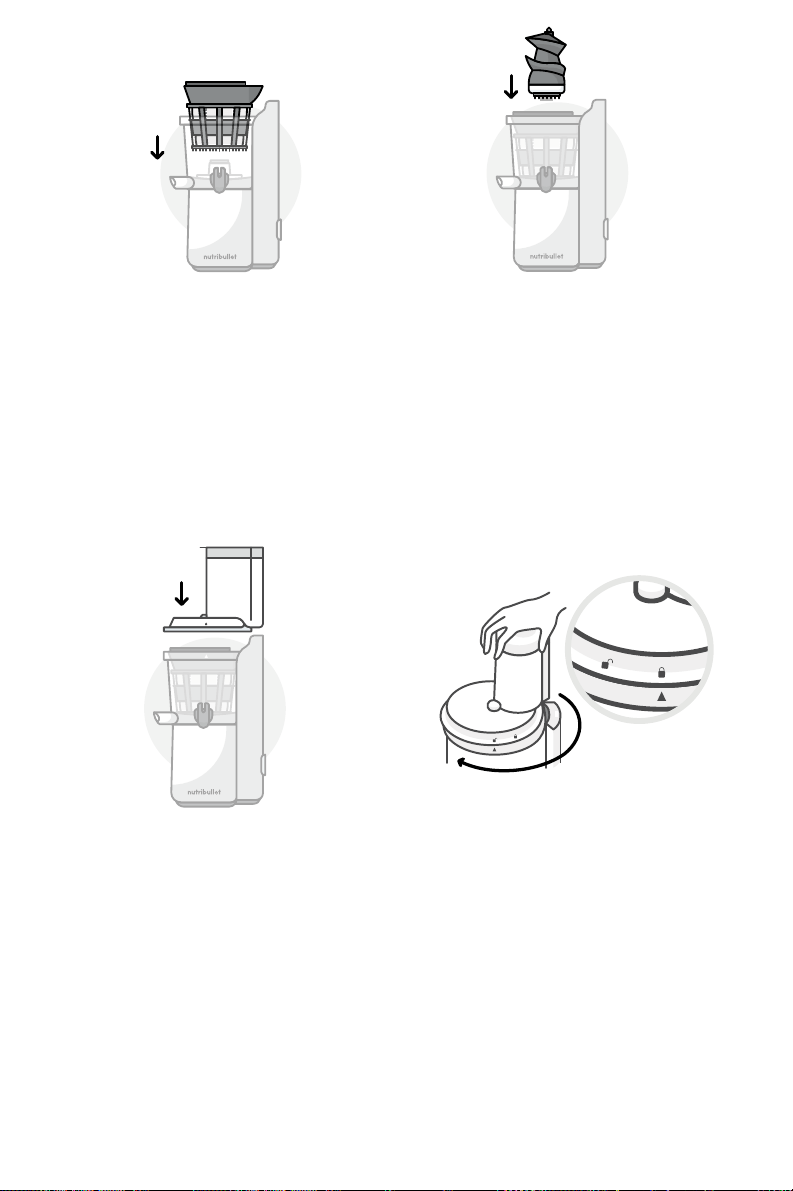
12
6 Put the Auger into the
strainer and ensure
the Auger is positioned
properly onto the center
axis. Turn and press down
on the head until it is
seated securely into place.
7 Place the Juice Bowl Cover
on top of the Juice Bowl,
making sure the “unlocked”
symbol on the lid aligns with
the arrow symbol on the
bowl. Rotate cover clockwise
to lock it in place.
NOTE: To ensure the Juice Bowl
Cover is fully locked, rotate it until
the “locked” symbol on the Juice
Bowl Cover aligns with the up-
triangle symbol on the Juice Bowl
(see closeup image).
Make sure the Juice Bowl Cover
is fully locked in position, or the
appliance will not operate. (To
remove the Juice Bowl Cover
from the Juice Bowl, rotate it
counter-clockwise.)
5 Place the screen and
brush assembly into the
Juice Bowl.
NOTE: You may need to turn it
slightly before it seats properly.
13
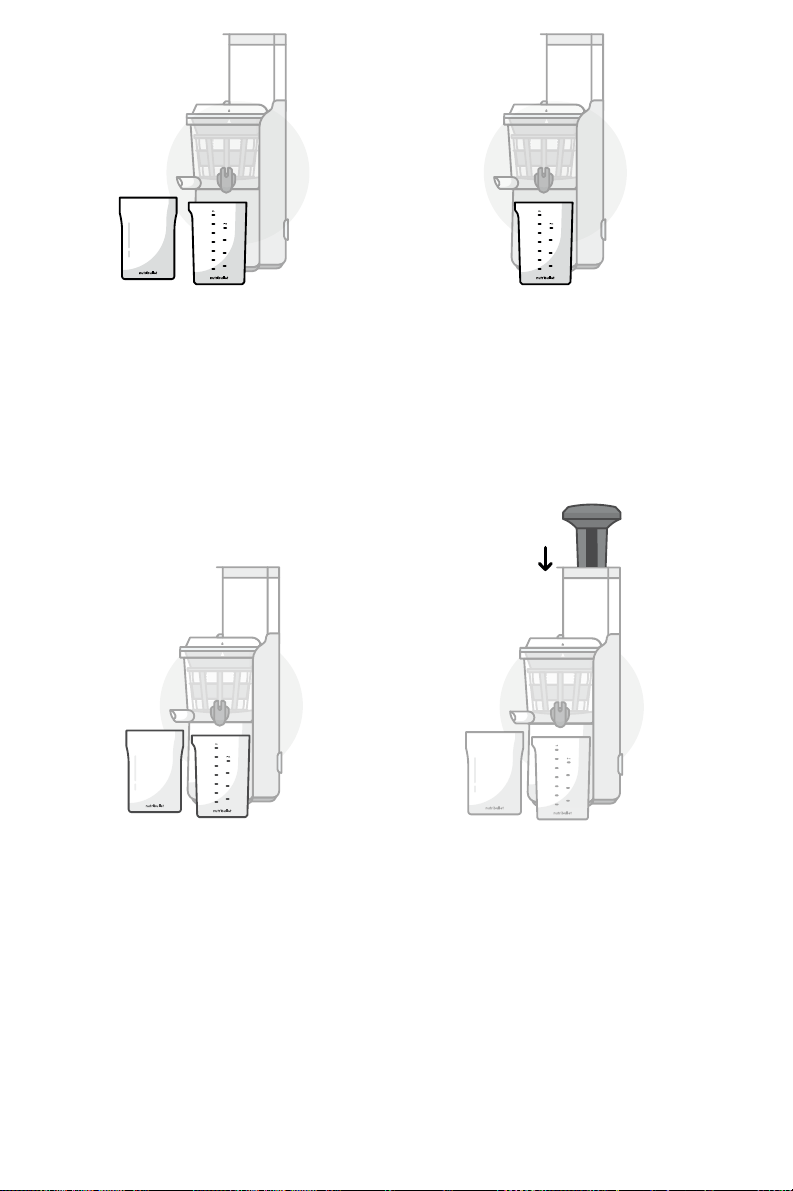
8 Place Juice and Pulp
Containers under spouts.
8a Position the Juice Container
below the juice spout, this is
on the right side of the Juice
Bowl with the spout cover.
8b Place the Pulp Container
below the pulp spout.
NOTE: The juice and Pulp
Containers must be in their proper
positions before juicing. During
operation, juice will flow into the
Juice Container from the juice
spout, while pulp will be ejected
from the pulp spout and collected
by the Pulp Container.
9 Put the Food Pusher into the
feed chute. The juicer is now
ready to operate.
14
Usage instructions.
1 Prepare foods for juicing,
and make sure non-
juiceable foods are not used.
• Remove any hard seeds, pits,
and skin – for example, peel
and pits should be removed
from oranges, lemons,
grapefruits, and melons.
• Cut foods into smaller pieces
if needed to fit into the feed
chute.
• Do not attempt to process
thick or hard foods that
don’t contain any juice
to extract (for example,
it is not recommended to
process bananas, avocados,
coconuts, or similar hard
foods, since these may
damage the motor).
2 Before plugging the power
cord into an outlet, make
sure the power switch is in
the “OFF” position.
3 The power switch has three
settings. Pressing the power
switch to the “ON” position
activates the motor and
starts making juice; pressing
the power switch to “OFF”
turns o the machine;
and “REV” means reverse
rotation, only used when
something is stuck and you
need to unclog the unit.
15
4 Make sure the juice and
Pulp Containers are in their
proper positions.
5 Plug the juicer into the
power outlet, then press
the power switch to the
“ON” position.
6 Drop the prepared fruits
or vegetables into the feed
chute and gently push
the items down into the
grinding assembly, using
the Food Pusher.
CAUTION: Never place your your
finger or hand into the
feed chute. Always use the food
pusher provided.
6a The appliance will start to
process the food items. After
a few moments, the juice will
flow out.
NOTE: For ecient juicing,
alternate feeding soft foods and
hard foods into the feed chute.
For example, follow leafy greens
with an apple slice, or orange with
a carrot. The harder produce will
help with processing the softer
produce and extract more juice.
CAUTION: The auger must stop
rotating before changing from "ON"
to "REV". Do not turn the power switch
from "ON" to "REV" or from "REV" to "ON"
without pressing the power switch to
"OFF" first. Once the appliance is "OFF"
and has stopped running completely
then turn the power switch from "OFF"
to "REV" or from "OFF" to "ON".

16
7 While you are juicing, you
may choose to open the
wide chute lid, which will
open the chute to 3-inches.
This will accommodate
larger pieces of fruits and
vegetables. When the wide
chute lid is in the open
position, the motor will
pause and the Auger will
stop rotating. After you
have inserted fruits and
vegetables into the large
chute, close the wide chute
lid to restart the motor and
continue juicing.
8 Once the Juice Container
is full, or all food has been
processed, turn the power
switch to “OFF”. If you have
more food to process,
empty the Juice and Pulp
Containers before starting
a new round of juice
extracting.
NOTE: Do not insert too much
food to extract at one time. During
operation, once the Juice Container
is full, you must stop the appliance
and empty the Juice and Pulp
Containers before the next
juicing cycle.
CAUTION: During operation, if the
Juice Bowl Lid is disconnected from
the Juice Bowl, the motor will stop.

17
PROPER PRODUCE PREP
Prepare fruit and veggies
before inserting them into
the juicer:
• Clean produce properly.
Rinse with lukewarm water,
produce wash, or water and
apple cider vinegar.
• Peel or remove skin as
needed. Foods with thick or
hard skin must be peeled
before being put into
the juicer.
• Remove rind from all citrus
fruits before juicing.
• Remove large pits and seeds
from stone fruit before
juicing. Stone fruit may be
used only if the seeds or pits
have been removed. Fruit with
hard cores must be pitted. The
cores of peach, plum, mango,
and apricot should not be put
into the feed chute, to avoid
any potential malfunction.
• Chop food items down to the
right size - small enough to
fit easily into the feed chute,
without having to force pieces
down with the Food Pusher.
Juicing tips.
• Foods with less moisture and
hard fiber: Cut into slices.
• Leafy vegetables and foods
with long, hard fiber (such as
celery and kale): Cut the stems
into 4 inch pieces and then roll
up the leaves well.
• For ecient juicing, alternate
feeding soft foods and hard
foods into the feed chute.
For example, follow leafy
greens with an apple slice, or
an orange with a carrot. The
harder produce will help with
processing the softer produce
and extract more juice.
• Frozen food items can be
put in the juicer after being
defrosted.
FEED CHUTE
• Never place your hand,
fingers, utensils, or other
foreign objects into the feed
chute while it is attached to
the appliance.
• Do not overload the feed
chute. Insert food gradually,
at a pace the juicer can
keep up with.
• Use only the provided Food
Pusher to push food into

18
the feed chute. Never use
fingers, utensils, or any other
apparatus.
• Never use excessive force to
push items into the feed chute.
• After inserting food, ensure
all items have moved down
the feed chute before
adding more.
• If any food gets stuck in the
feed chute, use the Food
Pusher to move it down
the chute.
• For best taste, consume fresh
juice and pulp within 72 hours
of juicing.
CAUTION: Do not operate the unit
without feeding food into it, to avoid
damaging the grinding assembly.
FOODS THAT CANNOT
BE JUICED:
• Foods that do not contain
juice to extract (for example,
bananas, avocados, coconuts)
• Stone fruits that have large
pits or seeds that have not
been removed
• Hard fruits or thick vegetables
rich in fiber and starch
• Frozen fruits or vegetables
19
PROBLEM: PARTS
ARE DIFFICULT TO
DISASSEMBLE
Solution: After finishing juicing,
in order to detach and clean
parts more easily, continue
to run the juicer for about 30
seconds without adding any
additional food in order to
process any food that might
be stuck in the Auger and
Juicing Screen.
Another tip: after you are done
extracting juice, pouring some
water in the feed chute to clean
it can help make it easier to
disassemble.
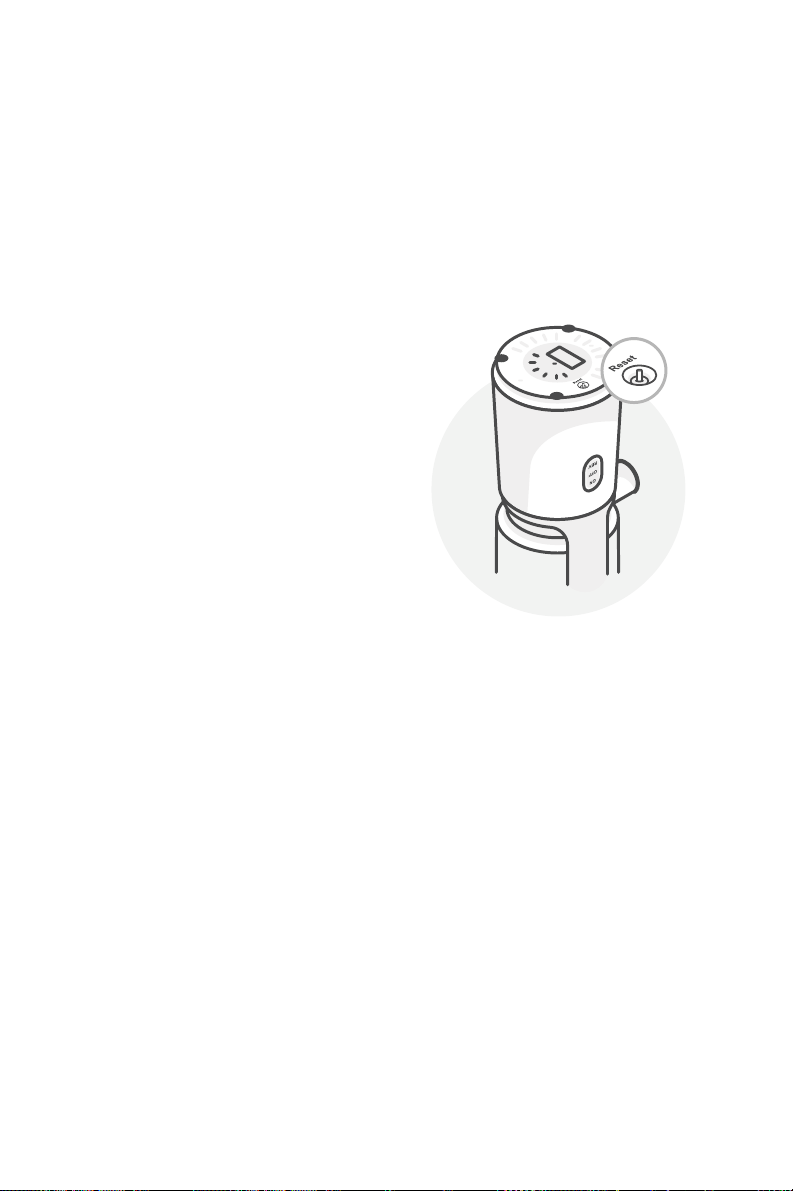
PROBLEM:
JUICER IS STUCK
AND WON'T OPERATE
Solution: If the juicer is stuck
and not operable, press the
power switch to the “OFF”
position. Then press the
RESET switch, which is located
at the bottom of the base
(see image).
Next, press and hold the power
switch in the “REV” position
for few seconds, then try
operating again.
Troubleshooting.
If this reverse function
does not work, turn o
the machine, unplug, and
reassemble it, using the
instructions given earlier in this
guide. After reassembly, try
turning on the machine to see
if normal function has been
restored.
PROBLEM: THE JUICER
TURNED OFF IN THE
MIDDLE OF JUICING
If the motor overheats, the
juicer will turn o.
Solution: If the juicer is
overheated and stops working,
unplug it and allow it to cool
down for at least fifteen
minutes before attempting to
use again.
20
Disassembly.
1 Make sure the juicer is
powered OFF, cooled
down completely, and
unplugged before starting
disassembly. Ensure that
the motor has completely
stopped, the grinding
assembly has stopped
moving, and all moving
parts have stopped before
disassembling juicer.
2 Remove the Juice Container
from under the juice spout.
To prevent drips, use the
spout cover to close the
juice spout.
3 Remove the Pulp Container
from under the pulp spout.
4 Twist the Juice Bowl
lid counter-clockwise
to unlock it, then lift to
remove it from the top of
the juicing jar.
21
5 Remove the Auger from the
bowl.
6 Detach and lift the Juice
Bowl (with the Rotating
Bowl Brush, Juicing
Screen, and Auger still
inside) o the top of the
base.
7 Remove the Rotating Bowl
Brush and Juicing Screen
together from the bowl.
8 Detach the Rotating Bowl
Brush from Juicing Screen
moving it downwards.
9 If the Food Pusher is inside
the feed chute, remove it.

22
Cleaning the NutriBullet
®
Slow
Juicer is quick and easy. All parts
(except for the base) can be
cleaned by simply rinsing with
warm soapy water, or most
parts are dishwasher safe. Here
are some tips for cleaning and
best practices.
1 Always make sure the
base is unplugged before
you begin assembly,
disassembly, cleaning, or
storage of the unit.
2 Detach and separate the
parts of the juicer (see
Disassembly section).
3 Empty the Pulp and Juice
Containers (store or
throw away pulp, store or
consume juice).
4 Clean the Juice Bowl
Cover, Food Pusher, Auger,
Juicing Screen, Rotating
Bowl Brush, Juice Bowl,
and the juice and Pulp
Containers under
running water.
CAUTION: Do not use a metal
sponge to clean, it will damage
the machine.
5 Clean all juicer parts,
except for the Motor Base,
in warm, soapy water. Or,
you can put all parts into
the dishwasher except for
the Auger.
CAUTION: ALWAYS clean the
Auger by hand with warm, soapy
water and a soft cloth. The Auger
is not dishwasher safe.
6 The Cleaning Brush can be
used for better cleaning
of the Juicing Screen. The
screen can be cleaned
completely using the small
Cleaning Brush. Use this
brush to scrub the Screen
under running water. Be
sure to properly clean
the screen every time you
juice. Leftover traces of
fruits and vegetables can
cause residue buildup in
the strainer, which can clog
the holes and may prohibit
maximum juice extraction.
CAUTION: The Juice Screen is
sharp, so handle carefully during
cleaning.
7 If you need to clean the
pulp spout, first pull
the pulp plug out of the
pulp spout, then clean it
Care and maintenance.

23
Replacement parts.
To order additional parts and
accessories, please visit our
website at nutribullet.com/
shop/accessories or feel free
to contact Customer Service:
1 (800) 523-5993.
thoroughly with the narrow
end of the Cleaning Brush.
The narrow end of the
Cleaning Brush is sized so
that it can fit inside of the
pulp spout to help remove
pulp that has been stuck.
Run water through the bowl
and pulp spout to help
remove any remaining pulp.
8 Wipe the outside of the base
with a clean, damp cloth.
WARNING: Never submerge
the Motor Base into water or other
liquid.
How to store.
To save juice for future use,
store it covered in the Juice
Container in your refrigerator.
You can also store pulp
the same way, in the Pulp
Container. For best taste,
consume juice and pulp within
72 hours. Store juicer in a safe
dry place where parts will not
be damaged and won’t cause
harm. When moving the juicer,
always grasp it by the base
(not the Juice Bowl or Juice
Bowl Cover).
9 Let all parts dry
thoroughly, then assemble
and store the appliance
in a dry place. The Juice
Container can be stored in
the Pulp Container.
PRO TIP: Clean your appliance
as soon as possible after juicing.
If allowed to sit, pulp may dry on
one or more parts (such as the
Juicing Screen), which can make
it more dicult to scrub away
residue. If any pulp residue does
cake onto any parts of the unit,
allow those parts to soak in hot
water for 30 minutes, which should
soften the residue and make it
easier to remove.

24
NutriBullet
®
Slow
Juicer one-year
limited warranty.
LIMITED WARRANTY
FOR NUTRIBULLET
®
NutriBullet's limited warranty
obligations are confined to the
terms set forth below:
NutriBullet, LLC (“NutriBullet”)
warrants this NutriBullet
®
against defects in materials
and workmanship for a period
of one year from the date of
original retail purchase. This
limited warranty is valid only in
the country in which the product
is purchased and comes with
the product at no extra charge,
however shipping and processing
fees will be incurred for returns,
replacements and or refunds.
If a defect exists, and NutriBullet
®
is obligated under this limited
warranty, at its option NutriBullet
®
will (1) repair the product at no
charge, using new or refurbished
replacement parts, (2) exchange
the product with a product
that is new or that has been
manufactured from new or
serviceable used parts and is at
least functionally equivalent to the
original product, or (3) refund the
purchase price of the product. A
replacement product assumes the
remaining warranty of the original
product. A repaired product has a
one-year warranty from the date
of repair. When a product or part
is exchanged, any replacement
item becomes your property
and the replaced item becomes
NutriBullet’s property. When a
refund is given, your product
becomes NutriBullet’s property.
OBTAINING WARRANTY SERVICE
For limited warranty service,
simply call our customer service
department at 1 (800) 523-5993
or contact us via email from our
website at nutribullet.com; click
the Contact Us link, fill out and
submit the customer contact form,
and we will be glad to help you.
When you contact our customer
service department, you will be
asked to provide your name,
address, telephone number, and
proof of the original purchase
(receipt) containing a description
of the product(s), purchase date,
and the appropriate NutriBullet
®
serial number(s). Before sending
your product for limited warranty
service, please make sure to
keep a copy of all relevant

25
documents for your files (receipt,
etc.). It is always recommended
to purchase product insurance
and tracking services when
sending your product for service.
Remember, shipping and
processing fees will be incurred
and are not covered by the one-
year limited warranty.
EXCLUSIONS & LIMITATIONS
This NutriBullet
®
One-Year
Limited Warranty applies only to
NutriBullet
®
products distributed
by or for NutriBullet that can be
identified by the “NutriBullet”
trademark, trade name, logo,
and bar code. This NutriBullet
Slow Juicer™ One-Year Limited
Warranty does not apply to any
other products that may appear
to be authentic, but were not
distributed/sold by NutriBullet.
Normal wear and tear is not
covered by this limited warranty.
This limited warranty applies to
consumer use only, and is void
when the product is used in a
commercial or institutional setting.
This limited warranty extends
only to the original consumer
purchaser and is not transferable.
In addition, proof of purchase
must be demonstrated.
Repair or replacement of
the product (or, if repair or
replacement is not feasible, a
refund of the purchase price)
is the exclusive remedy of the
consumer under this limited
warranty. NutriBullet shall not
be liable for any incidental or
consequential damages for
breach of this limited warranty
or any implied warranty on this
product.
This limited warranty gives you
specific legal rights, and you may
also have other rights which vary
from state to state. NutriBullet
is not liable for any damage to
products not covered by this
warranty (e.g., cups, book, User
Guide).
This limited warranty does not
apply: (a) to damage caused
by accident, abuse, misuse, or
misapplication; (b) to damage
caused by improper maintenance
(including unauthorized parts
service); (c) to a product or a
part that has been modified in
any way; (d) if any NutriBullet
®
serial number or trademark has
been removed or defaced; and/
or (e) if the product has been
used with an adapter/converter
and/or (f) if the product has been
used for commercial or industrial
purposes.
THIS LIMITED WARRANTY
AND THE REMEDIES SET
FORTH ABOVE ARE EXCLUSIVE
AND IN LIEU OF ALL OTHER
WARRANTIES, REMEDIES
AND CONDITIONS, WHETHER
ORAL OR WRITTEN, EXPRESS
OR IMPLIED. NUTRIBULLET

26
SPECIFICALLY DISCLAIMS ANY
AND ALL IMPLIED WARRANTIES,
INCLUDING, WITHOUT
LIMITATION, WARRANTIES OF
MERCHANTABILITY AND FITNESS
FOR A PARTICULAR PURPOSE. IF
NUTRIBULLET CANNOT LAWFULLY
DISCLAIM IMPLIED WARRANTIES
UNDER THIS LIMITED WARRANTY,
ALL SUCH WARRANTIES,
INCLUDING WARRANTIES OF
MERCHANTABILITY AND FITNESS
FOR A PARTICULAR PURPOSE
ARE LIMITED IN DURATION TO
THE DURATION OF THIS LIMITED
WARRANTY. No NutriBullet
®
reseller, agent, or employee
is authorized to make any
modification to this warranty.
NUTRIBULLET IS NOT
RESPONSIBLE FOR DIRECT,
SPECIAL, INCIDENTAL OR
CONSEQUENTIAL DAMAGES
RESULTING FROM ANY BREACH
OF WARRANTY OR CONDITION,
OR UNDER ANY OTHER LEGAL
THEORY, INCLUDING BUT NOT
LIMITED TO LOST PROFITS,
DOWNTIME, GOODWILL,
DAMAGE TO OR REPLACEMENT
OF EQUIPMENT AND PROPERTY.
NUTRIBULLET SPECIFICALLY
DOES NOT REPRESENT THAT IT
WILL BE ABLE TO REPAIR ANY
PRODUCT UNDER THIS LIMITED
WARRANTY.
Some states and provinces do not
allow the exclusion or limitation
of incidental or consequential
damages or exclusions or
limitations on the duration of
implied warranties or conditions,
so the above limitations or
exclusions may not apply to you.
This warranty gives you specific
legal rights, and you may also
have other rights that vary by
state or province.
27
Warranty registration.
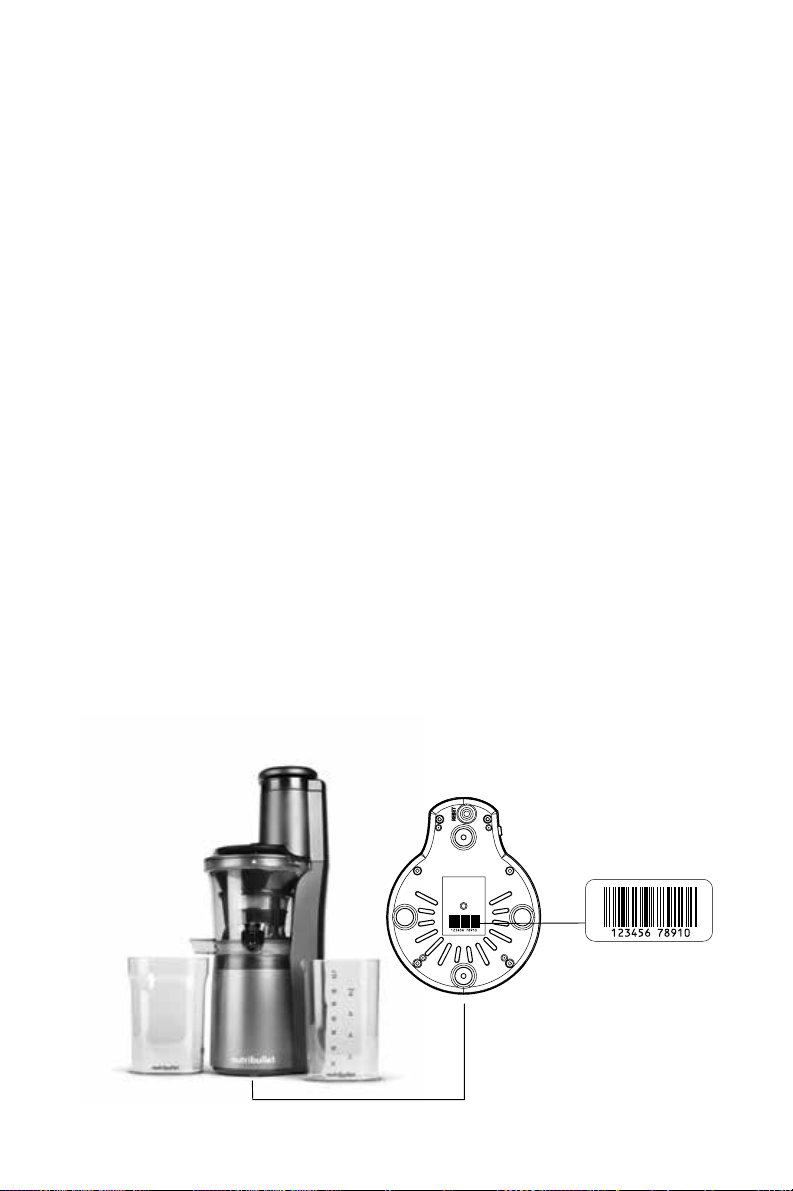
To find the serial number, check under the Motor Base. If you cannot find the serial
number, call customer service for assistance.
Please visit nutribullet.com/ warranty-registration or call
1 (800) 523-5993 to register your new NutriBullet
®
Slow Juice. You will
be asked to enter the Serial Number* of your product, along with the
purchase date and place of purchase.
The registration will enable us to contact you in the unlikely event
of a product safety notification. By registering your product, you
acknowledge you have read the instructions and understood the
warnings as set forth in the accompanying instructions.

1 (800) 523-5993 | nutribullet.com
NUTRIBULLET
®
is the registered trademark of CAPBRAN HOLDINGS, LLC
Copyright © 2021 CAPBRAN HOLDINGS, LLC. Distributed by CAPITAL BRANDS
DISTRIBUTION, LLC. LOS ANGELES, CA 90025 USA
All Rights Reserved. MADE IN CHINA
Illustrations may dier from the actual product. We are constantly striving
to improve our products, therefore the specifications contained herein
are subject to change without notice.
210216_NBJ50300