The standard charger provided will charge a fully depeleted battery in about 4 hours.
Plug the charger into an appropriate outlet before inserting the battery pack.
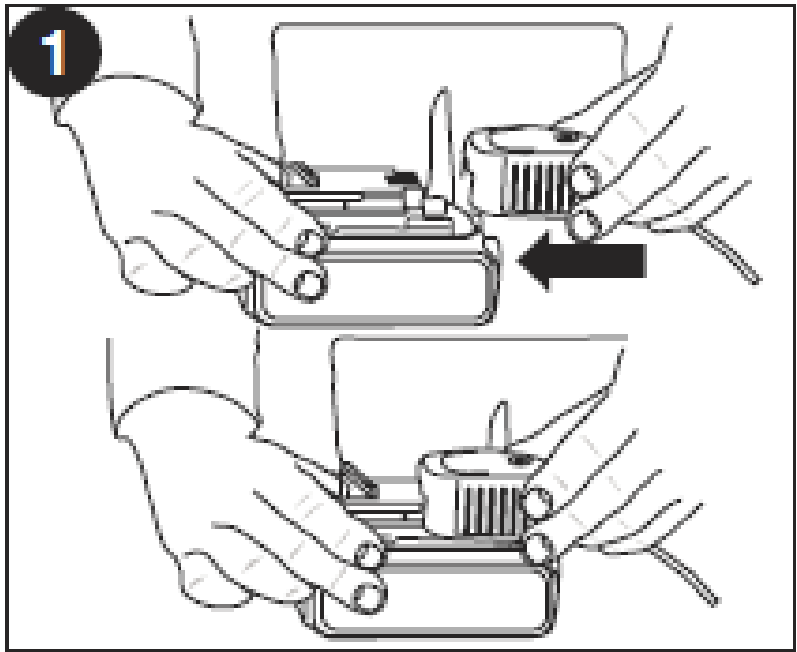
Insert the battery pack into the charger as shown In figure 1
The green LED will flash indicating that the battery is being charged.
The completion of the charge is indicated by the green LED remaining on continuously. The pack is fully charged and may be used at this time or left on the charger.
Figure 1
Recharge discharged batteries as soon as possible after use or battery life may be greatly diminished.
LEAVING THE BATTERY IN THE CHARGER
The charger and battery pack can be left connected with the green LED glowing indefinitely. The charger will keep the battery pack fresh and fully charged.
IMPORTANT NOTES
The longest life and best performance can be obtained if the battery pack is charged when the air temperature is between 60°F and 80°F (16°-27°C). DO NOT charge the battery pack in an air temperature below +40°F (+4.5°C), or above +105°F (+40.5°C). This is important and will prevent serious damage to the battery pack.
The charger and battery pack may become warm to touch while charging. This is a normal condition, and does not indicate a problem. To facilitate the cooling of the battery pack after use, avoid placing the charger or battery pack in a warm environment such as in a metal shed, or an uninsulated trailer.
If the battery pack does not charge properly:
Check current at receptacle by plugging in a lamp or other appliance
Check to see if receptacle is connected to a light switch which turns power off when you turn out the lights.
Move charger and battery pack to a location where the surrounding air temperature is approximately 60°F -80°F (16° - 27°C).
If charging problems persist, take the tool, battery pack and charger to your local service center.
The battery pack should be recharged when it fails to produce sufficient power on jobs which were easily done previously. DO NOT CONTINUE to use under these conditions. Follow the charging procedure. You may also charge a partially used pack whenever you desire with no adverse effect on the battery pack.
Foreign materials of a conductive nature such as, but not limited to, steel wool, aluminum foil, or any buildup of metallic particles should be kept away from charger cavities. Always unplug the charger from the power supply when there is no battery pack in the cavity. Unplug charger before attempting to clean.
Do not freeze or immerse charger in water or any other liquid.
WARNING: Shock hazard. Do not allow any liquid to get inside charger. Never attempt to open the battery pack for any reason. If the plastic housing of the battery pack breaks or cracks, return to a service center for recycling.
WARNING: Make certain the lock-off button is engaged to prevent 2 switch actuation before removing or installing battery.
INSTALLING AND REMOVING THE BATTERY PACK
TO INSTALL BATTERY PACK:
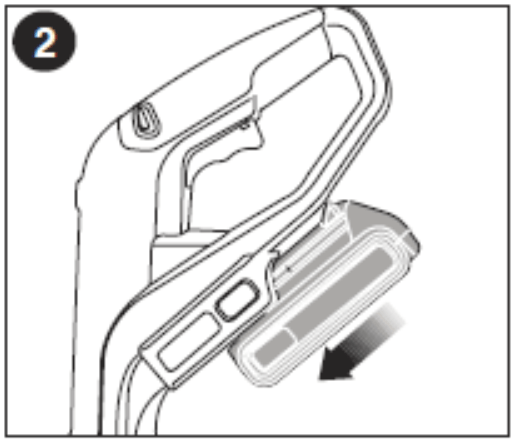
Insert battery pack into tool until fully seated and an audible click is heard (figure 2).
TO REMOVE BATTERY
PACK: Depress the battery release button in the back of the battery pack and pull battery pack out of tool.
Figure 2
OPERATING INSTRUCTIONS
WARNING: Always use proper eye protection that conforms to ANSI Z87.1 (CAN/CSA Z94.3) while operating this power tool.
CAUTION: Inspect area to be trimmed and remove any wire, cord, or string-like objects which could become entangled in the rotating line or spool. Be particularly careful to avoid any wire which might be bent outwardly into the path of the tool, such as barbs at the base of a chain link fence.
SWITCHING ON AND OFF
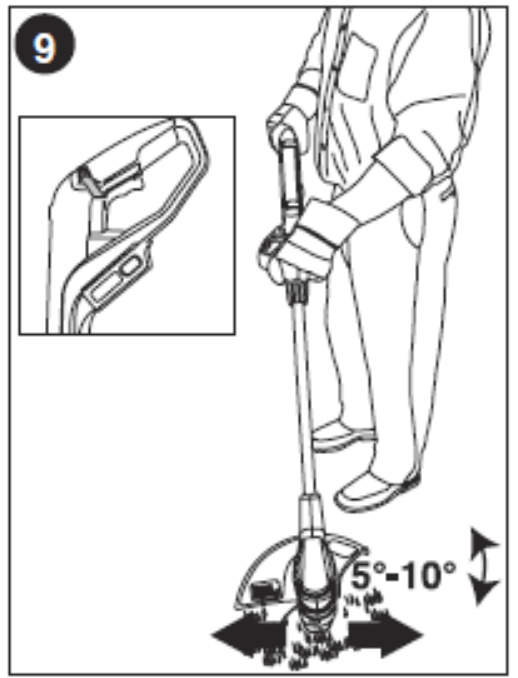
To switch the trimmer on, push the lock off button (shown in inset, figure 9) across from either side and then squeeze the trigger switch.
To switch the tool off, release the trigger switch.
With the unit on, angle unit and slowly swing the trimmer side to side as shown in figure 9.
Figure 9
CONVERT TO EDGING MODE
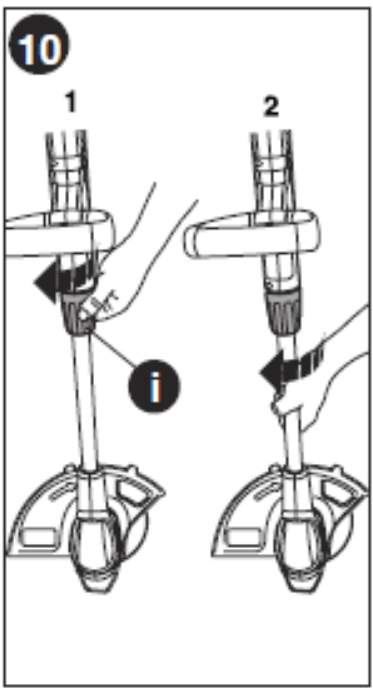
To operate as a maintenance edger, turn 10 the collar (i) as shown in part 1 of figure 10.
Hold the metal shaft and rotate the lower housing 180° as shown in part 2.
Turn the collar (i) until tight.
Figure 10
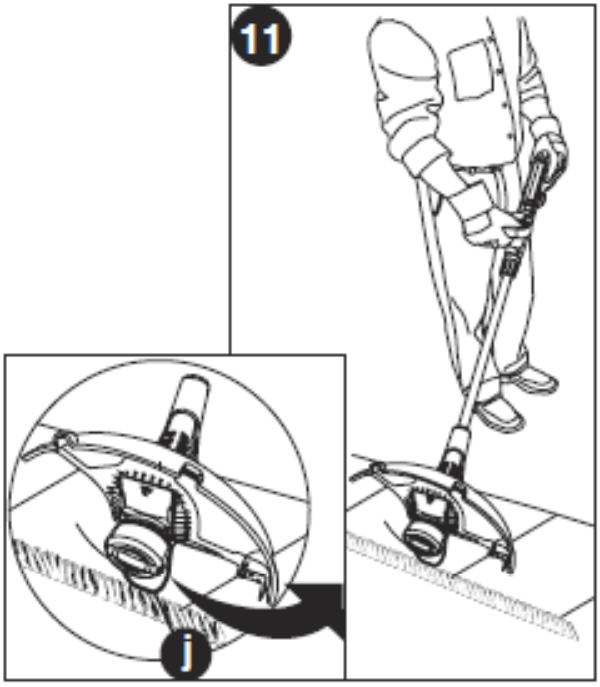
If desired, pull the wire edge guide (j) out from the motor housing until it clicks into the locked position as shown in figure 11 and position the trimmer above the surface as shown in figure 11.
Return to the trimming position by loosening the collar and rotating the lower housing back 180°.
Turn the collar until tight. When using the tool, retract the wire edge guide to the original position, out of the way.
CAUTION: Wire edge guide should only be used when in the edging mode. Keep wire edge guide in the retracted position when in the trimming mode.
Figure 11
CUTTING LINE / LINE FEEDING
Your trimmer uses .065 inch (1.65 mm) diameter, ROUND nylon line. During use, the tips of the nylon lines will become frayed and worn and the special self feeding spool will automatically feed and trim a fresh length of line. DO NOT BUMP unit on ground in attempt to feed line or for any other purposes. Cutting line will wear faster and require more feeding if the cutting or edging is done along sidewalks or other abrasive surfaces or heavier weeds are being cut.
REPLACEMENT ACCESSORIES
CAUTION: Before you begin trimming, only use the appropriate type of cutting line.
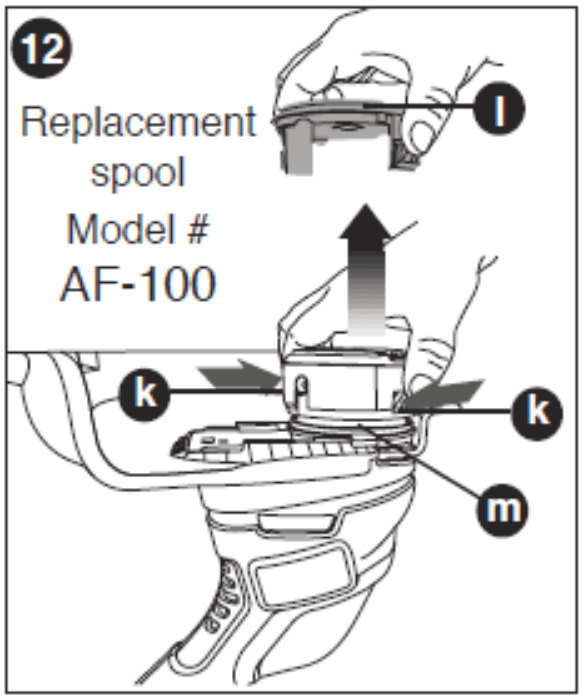
Use BLACK+DECKER replacement spool Model No. AF-100. Reload nylon line (either bulk or prewound replacement spool) as shown in this manual.
USE ONLY .065 inch (1.65 mm) DIAMETER ROUND NYLON MONOFILAMENT LINE. Do not use serrated or heavier gauge line, as they will overload the motor and cause overheating. This line is available at your local dealer or authorized service center.
Other replacement parts (guards, spool caps, etc.) are available through BLACK+DECKER service centers. To find your local service location call: 1-800-544-6986 or visit www. blackanddecker.com.
WARNING: The use of any accessory not recommended by BLACK+DECKER for use with this tool could be hazardous.
REPLACING THE SPOOL (FIGURES 12,13,14)
Remove battery from tool.
Depress the tabs (k) and remove the spool cap (1) from the spool housing (m) in the trimmer head (figure 12).
For best results, replace spool with BLACK+DECKER model # AF-100.
Grasp empty spool with one hand and spool housing with other hand and pull spool out.
Figure 12
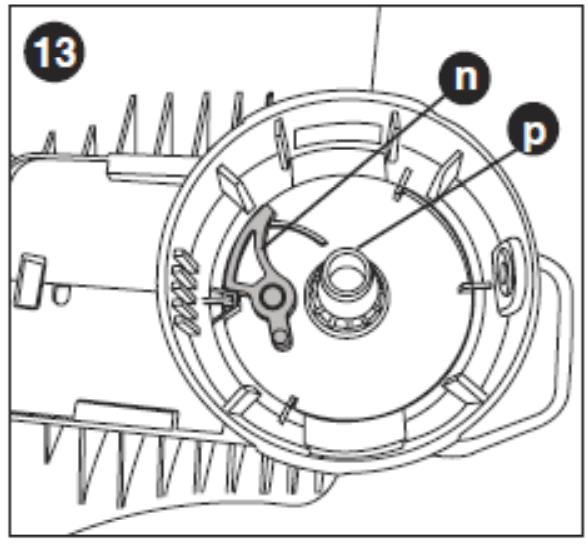
If lever (n) (figure 13) in base of housing becomes dislodged, replace in correct position before inserting new 13 spool into housing.
Remove any dirt and grass from the spool and housing.
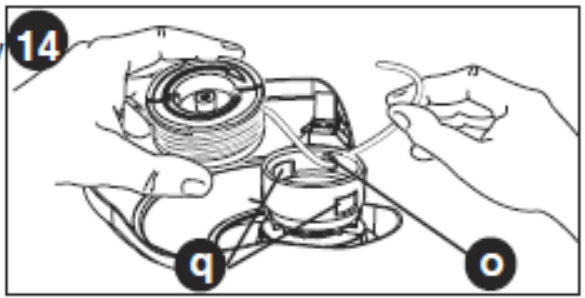
Unfasten the end of the cutting line and guide the line into the eyelet (6) figure 14.
Take the new spool and push it onto the boss (p) (figure 13) in the housing. Rotate the spool slightly until it is seated.
The line should protrude approximately 5-3/8 inches (136 mm) from the housing. Model #AF-100
Align the tabs on the spool cap with the slots (q) in the housing (figure 14).
Figure 13
Push the cap onto the housing until it snaps securely into place.
CAUTION: To avoid tool damage, if the cutting line protrudes beyond the trimming blade, cut it off so that it just reaches the blade.
Figure 14
REWINDING SPOOL FROM BULK LINE
USE ONLY .065 IN. ROUND DIAMETER LINE) (FIGURES 15, 16, 17) Bulk line is also available for purchase from your local retailer.
NOTE: Hand wound spools from bulk line are likely to become tangled more frequently than BLACK+DECKER factory wound spools. For best results, factory wound spools are recommended. To install bulk line, follow the steps below:
Remove battery from tool.
Remove the empty spool from the tool as described in "REPLACING THE SPOOL".
Remove any remaining cutting line from the spool.
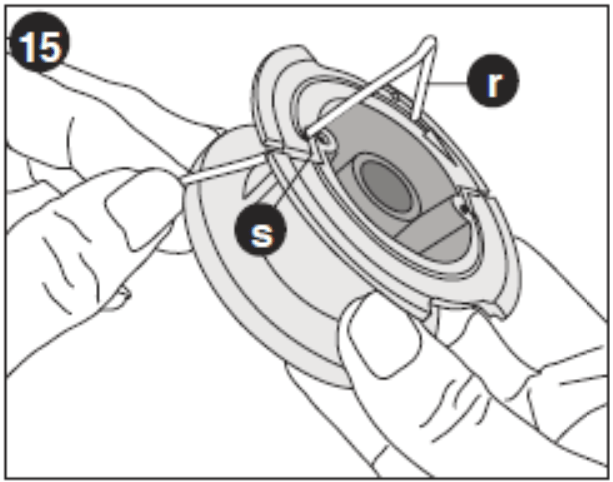
Make a fold at the end of the cutting line at about 3/4 inch (19mm)(r). Feed the cutting line into one of the line anchoring slots (s) as shown in figure 15.
Figure 15
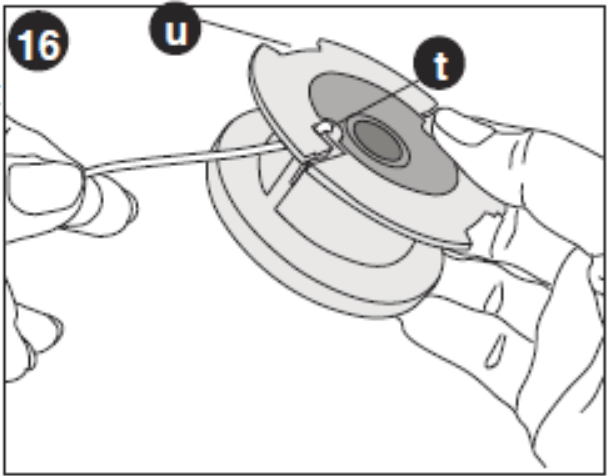
Insert the 3/4 inch (19mm) end of the bulk line into the hole (t) in the spool adjacent to the slot as shown in figure 16.
Figure 16
Wind the cutting line onto the spool in the direction of the arrow on the spool. Make sure to wind the line on neatly and in layers. Do not crisscross (figure 17).
When the wound cutting line reaches the recesses (u), cut the line. (figure 16).
Fit the spool onto the tool as described in "REPLACING THE SPOOL".
Figure 17
THE RBRCTM SEAL
The RBRCTM (Rechargeable Battery Recycling Corporation) Seal on the LI-ION battery (or battery pack) indicates that the costs to recycle the battery (or battery pack) at the end of its useful life have already been paid by BLACK+DECKER.
RBRCTM in cooperation with BLACK+DECKER and other RECYCLE battery users, has established programs in the United States to facilitate the collection of spent LI-ION batteries.
Help protect our environment and conserve natural resources by returning the spent LI-ION battery to an authorized BLACK+DECKER service center or to your local retailer for recycling. You may also contact your local recycling center for information on where to drop off the spent battery. RBRCTM is a registered trademark of the Rechargeable Battery Recycling Corporation.
MAINTENANCE
WARNING: To avoid serious injury, remove the battery from the tool before performing any maintenance.
Keep the air intake slots clean to avoid overheating.
Your trimmer line can dry out over time. To keep your line in top condition, store spare pre-wound spools or bulk line in a plastic, sealable bag with a tablespoon of water.
Plastic parts may be cleaned by using a mild soap and a damp rag.
The line cutter on the edge of the guard can dull over time. It is recommended you periodically touch-up the sharpness of the blade with a file.
IMPORTANT: To assure product SAFETY and RELIABILITY, repairs, maintenance and adjustment should be performed by authorized service centers or other qualified service organizations, always using identical replacement parts.
TROUBLESHOOTING
TOOL RUNS SLOWLY
Remove battery from tool.
Check that the spool housing can rotate freely. Carefully clean it if necessary.
Check that the cutting line does not protrude more than approximately 5-3/8 inches (136mm) from the spool. If it does, cut it off so that it just reaches the line trimming blade.
AUTOMATIC LINE FEED DOES NOT WORK
Remove battery from tool.
Remove the spool cap.
Pull the cutting line until it protrudes approximately 5-3/8 inches (136mm) from the spool. If insufficient cutting line is left on the spool, install a new spool of cutting line.
Ensure that the line is not crisscrossed on the spool as detailed in figure 17. If it is, unwind the cutting line, then wind it back on the spool neatly so that the lines do not cross.
Push the spool onto the housing until it snaps securely into place.
Align the tabs on the spool cap with the cut outs in the housing.
If the cutting line protrudes beyond the trimming blade, cut it off so that it just reaches the blade. If the automatic line feed still does not work or the spool is jammed, try the following suggestions:
Carefully clean the spool and housing.
Remove the spool and check if the lever in the spool housing can move freely.
Remove the spool and unwind the cutting line, then wind it on neatly again. Replace the spool into the housing.