BPT10WTB Unit dimensions (W x D x H): 17.72” x 15.59” x 29.33” Unit weight approx.: 74.61 lbs. BPT10HWTB Unit dimensions (W x D x H): 17.72” x 15.59” x 29.33” Unit weight approx.: 75.22 lbs. Electric Requirements: 115V ~ 60Hz
INSTALLATION GUIDE
LOCATION
The air conditioner should be placed on a firm floor to minimize noise and vibration. For safe and secure positioning, place the unit on a smooth, level floor strong enough to support the unit.
The unit has casters to aid placement, but it should be rolled on smooth, flat surfaces. Use caution when rolling on carpet surfaces. Do not attempt to roll the unit over objects.
The unit must be placed within reach of a properly rated grounded socket.
Never place any obstacles around the air inlet or outlet of the unit.
Allow 12 inches to 36 inches of space from the wall with window for efficient air-conditioning.
SUGGESTED TOOLS FOR WINDOW KIT INSTALLATION
Screwdrivers (medium size Phillips)
Tape measure or ruler
Knife or scissors
Saw (In the event that the window kit needs to be cutdown in size because the window is too narrow for direct installation)
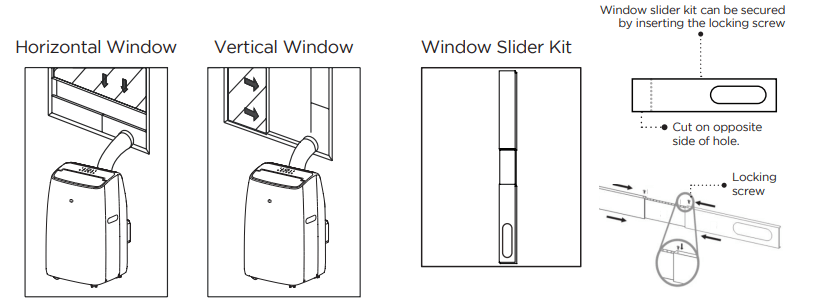
WINDOW SLIDER KIT INSTALLATION
Your window slider kit has been designed to fit most standard “Vertical” and “Horizontal” window applications; however, it may be necessary for you to improvise/modify some aspect of the installation procedures for certain types of window. Minimum and maximum window openings:
MAXIMUM : 50” (127 cm)
MINIMUM: 20.5” (52 cm)
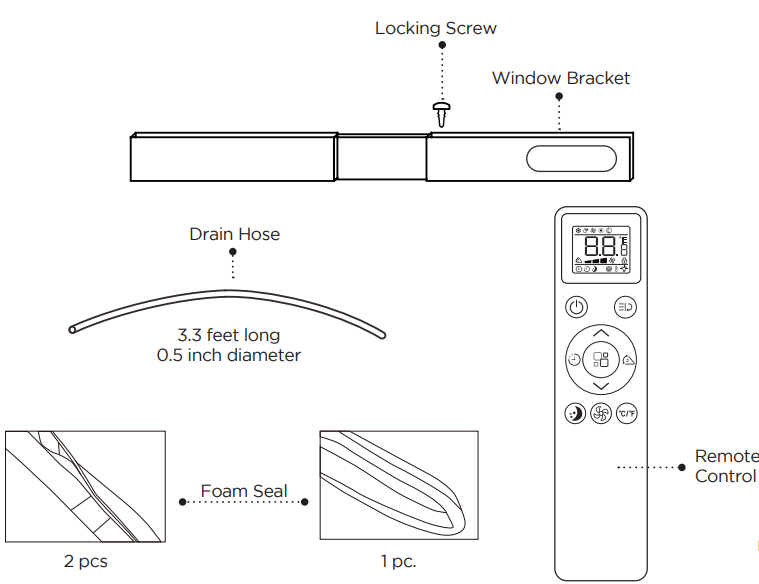
NOTE: · A plastic locking screw is holding the window slider kit together during shipment. Prior to installation, remove the locking screw, adjust to desired length and use provided locking screw to secure.
NOTE: · If the window opening is less than 20.5” the minimum length of the window slider kit, cut the one with a hole in it short to fit for the window opening. Never cut out the hole in window slider kit.
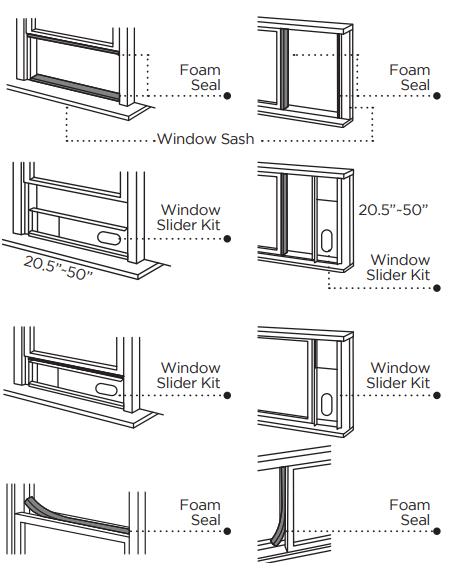
Cut the foam seal (adhesive type) to the proper length and attach it to the window sash.
Attach the window slider kit to the window sash. Adjust the length of the window slider kit according to the width of window. Shorten the adjustable window kit if the width of window is less than 20.5”.
Cut the foam seal (adhesive type) to the proper length and attach it on the top of the window.
Close the window securely against the window slider kit.
Secure the window slider kit to the window sash.
Cut the foam seal to an appropriate length and seal the open gap between the top window frame and outer window frame.
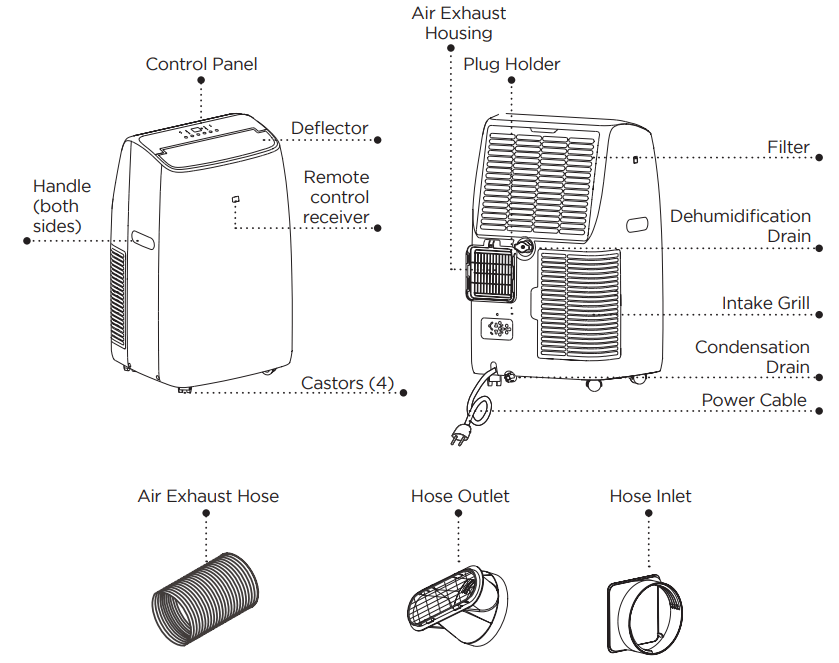
EXHAUST HOSE INSTALLATION
The air exhaust hose and hose inlet must be installed or removed from the portable air conditioner in accordance with the way it is being used:
COOL, AUTO, DEHUMIDIFY, HEAT (Heat model BPT10HWTB only): Air exhaust hose and hose inlet should be connected to the portable air conditioner.
FAN: Air exhaust hose and hose inlet should be disconnected from the portable air conditioner.
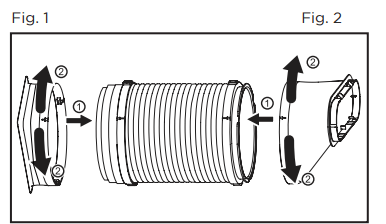
1. Align Arrow of hose inlet and hose. Turn either clockwise or counterclockwise to secure (Fig. 1).
2. Align arrow of hose outlet and hose. Turn either clockwise or counterclockwise to secure (Fig. 2).
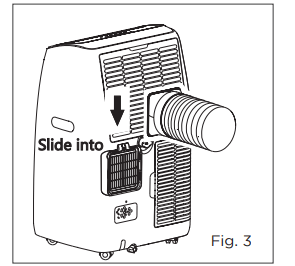
3. Attach the hose inlet onto the back of the unit. Align the hose inlet with the slots over the air exhaust housing and slide down. (Fig. 3).
4. Affix the hose outlet into the window slider kit and seal (Fig. 4 & 5).
NOTE: The exhaust hose can be compressed or extended moderately, but it is desirable to keep the length to a minimum. Also make sure that the hose does not have any sharp bends.
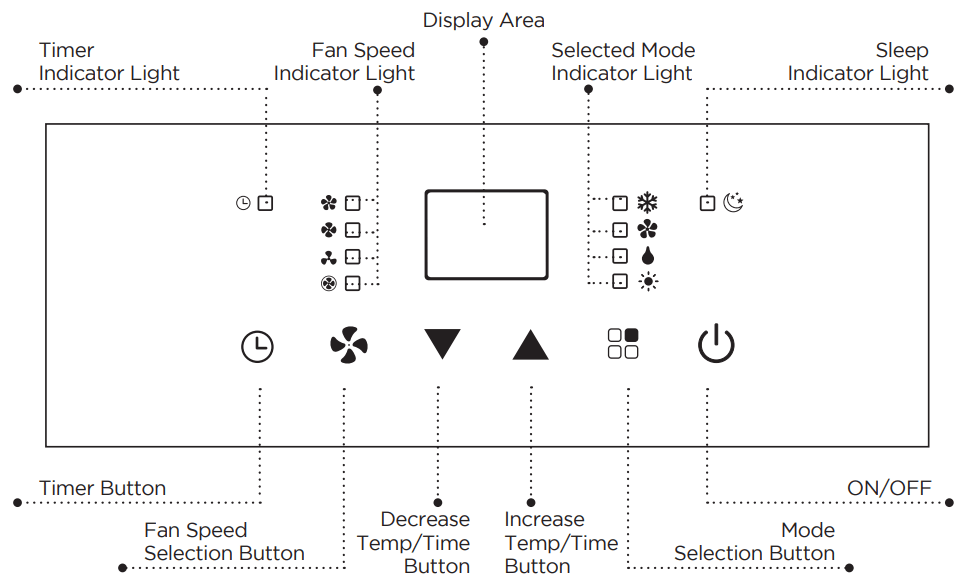
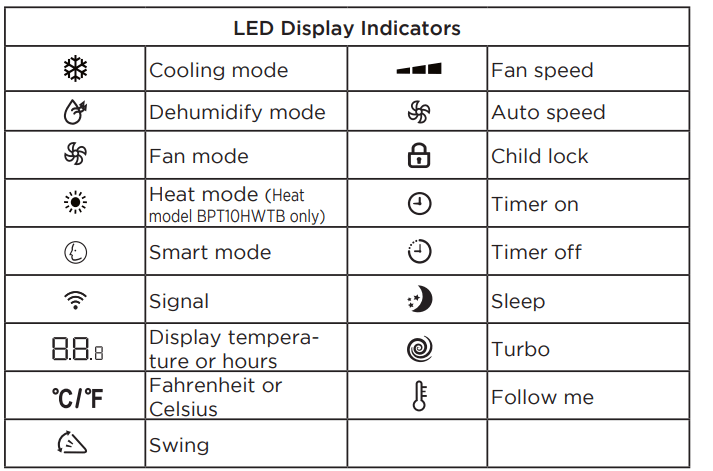
CONTROL PANEL
Pictures are for illustration purpose only. Your model may or may not have all the features.
OPERATING FROM THE CONTROL PANEL
The Control Panel enables you to manage all the main functions of the appliance, but to fully exploit its potential, you must use the remote control.
TURNING THE APPLIANCE ON
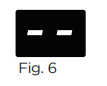
Plug into the dedicated electrical outlet. Two lines appear on the display indicating that the appliance is in standby. (Fig. 6)
Press the button until the appliance comes on. The last function active when it was turned off will appear.
Never turn the air conditioner off by unplugging from the outlet. Always press the button , then wait for a few minutes before unplugging. This allows the appliance to perform a cycle of checks to verify operation.
Note: Before pressing Power On button make sure the condensate drain plug in the rear of the unit is securely in place to avoid any leaking.
Press the MODE button until the light corresponding to the required Mode lights up
COOL MODE
Ideal for hot weather when you need to cool the room. To set operation of the appliance correctly, press the buttons until the desired temperature is displayed. (See Fig. 7)
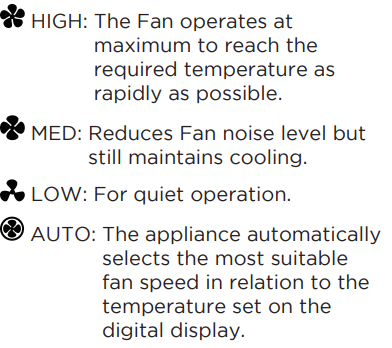
Then select the fan speed by pressing the Fan Speed Button until the light corresponding to the required fan speed lights up:
DEHUMIDIFY MODE
Ideal for reducing humidity in spring and autumn, during rainy spells or in damp rooms, etc.
Keep window and door closed for the best dehumidifying effect.
Exhaust hose attachment is not required to reduce humidity, however it is recommended in very humid rooms so the warm air can be exhausted outside.
DRAINING IN DEHUMIDIFICATION MODE
It is recommended that the dehumidification drain and drain hose can be used for continuous drainage.
WATER FULL - When the water level reaches a predetermined level, will be indicated on the display. The unit will have to be drained.
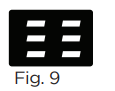
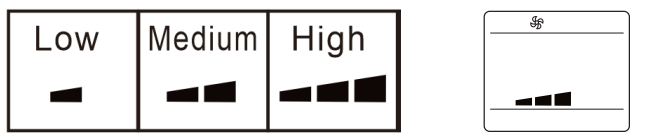
FAN MODE
Adjust fan speed by pressing the Fan Speed button as described for the cool mode. In this mode, AUTO fan cannot be selected. The fan speed selected will show in the display. One row for Low, Two rows for medium and three rows for high. (See fig. 9)
HEAT MODE (HEAT MODEL BPT10HWTB ONLY)
Press the MODE button until the HEAT mode indicator light appears. Select the target temperature by pressing the or button until the corresponding value is displayed. (Temperature range is 55˚to 81˚F).
Select the fan speed by pressing the Fan Speed Button until the light corresponding to the desired fan speed lights up: HIGH, MED, LOW, AUTO.
NOTE: At the beginning of this mode, you may have to wait a few seconds before the appliance starts to produce hot air.
In HEAT mode there will be water removed from the air and collected in the tank, when the tank is full, the appliance shuts down and "ft” (FULL TANK) appears on the display, the tank must be emptied (See water drainage page). The appliance will start up again.
Then operating in very cold rooms, the appliance defrosts automatically and may disrupt normal operation.
The fan will continue operating for a few seconds to lower the interior temperature even after the appliance shuts off. In this mode, the fan may operate for short periods even though the set temperature has been reached.
SMART MODE
Press the button repeatedly until the LED screen indicates the below.
Press the FAN Speed button 'S’ to select HIGH, MED, LOW or AUTO fan speed.
FOR COOL ONLY MODELS
• The air conditioner will automatically operate in FAN mode when the room temperature is below 73°F (23°C).
• It will operate in COOL mode when the room temperature is above 73°F (23°C).
FOR COOL AND HEAT MODELS
• The air conditioner will automatically operate in HEAT mode when the room temperature is below 68°F (20°C).
• It will operate in FAN mode when the room temperature is from 68°F (20°C) to 73°F (23°C).
• It will operate in COOL mode when the room temperature is above 73°F (23°C).
TIMER BUTTON
PROGRAMMING SHUT DOWN
Press the TIMER button when the unit is ON to select an auto STOP Time. Continue to press TIMER repeatedly to scroll through the time selections of 1-24 hours. Once you have reached the time you would like to select, wait about 5 seconds and the timer symbol will appear on the LCD screen indicating that the timer is active and the unit will STOP in the selected amount of hours.
PROGRAMMING START-UP
In Cooling Mode with the fan speed selected turn the air conditioner OFF. Continue to press TIMER repeatedly to scroll through the time selections of 1-24 hours. Once you have reached the time you would like to select, wait about 5 seconds and the timer symbol will appear on the LCD screen indicating that the timer is active and the unit will START in the selected amount of hours.
OPERATING FROM THE REMOTE CONTROL
BATTERY INSTALLATION (BATTERIES NOT INCLUDED)
(1) Slide open the battery compartment cover.
(2) Insert 2 x “AAA”batteries as shown.
(3) Slide back the battery cover.
Point the remote control at the receiver on the appliance. The remote control must be no more than 7 meters away from the appliance (without obstacle between the remote control and the receiver). The remote control must be handled with extreme care. Do not drop it or expose it to direct sun light or sources of heat.
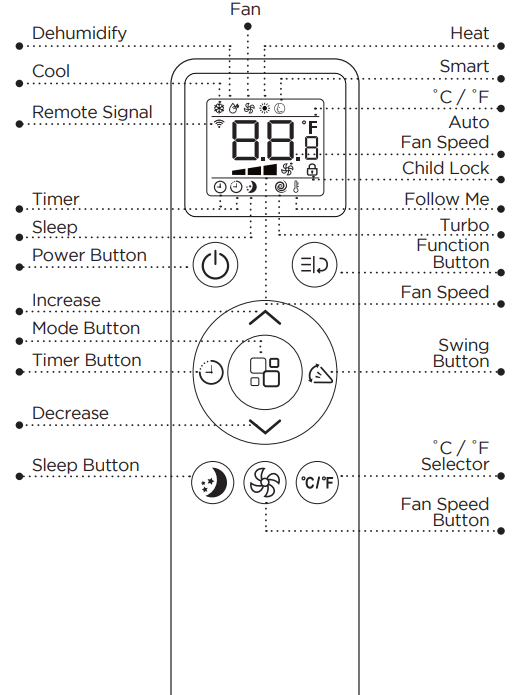
REMOTE CONTROL
POWER BUTTON: Press to Turn ON or OFF.
MODE BUTTON: Each time you press the button COOL, DEHUMIDIFY, FAN, HEAT (HEAT model BPT10HWTB only) is selected.
INCREASE: Increase the temperature setting to 90°F in COOL mode or 81°F in HEAT mode (HEAT model BPT10HWTB only). Also used to set time.
DECREASE: Decrease the temperature setting to 64°F in COOL mode or 55° F in HEAT mode (HEAT model BPT10HWTB only). Also used to set time.
FAN SPEED BUTTON: Used to select the HIGH, MED, LOW or AUTO fan speed. FUNCTION BUTTON: Access FOLLOW ME or TURBO functions.
TIMER BUTTON: Used to set a delay start or shut down time.
SWING BUTTON: Activate air swing of the louvers.
SLEEP BUTTON: Gradually increase the temperature in COOL mode or decrease the temperature in HEAT mode (HEAT model BPT10HWTB only).
°C / °F SELECTOR BUTTON: Select Fahrenheit or Celsius.
POWER BUTTON
Press to Turn Air Conditioner ON or OFF.
Will show on the remote LED screen when buttons are pressed to show that the remote control is sending a signal to the air conditioner.
MODE BUTTON
Press thebutton to scroll through (Heat model BPT10HWTB only) and
The corresponding symbol will illuminate on the LED display to indicate which mode is selected.
COOL
Select the target temperature 64°F-90°F (18°C-32°C) by pressing the buttons until the desired temperature is displayed on the LED screen.
Press the Fan Speed Button to select Low, Medium, High or Auto Speed.
DEHUMIDIFY &
Ideal for reducing humidity.
Keep window and door closed for the best dehumidifying effect.
Exhaust hose attachment is not required to reduce humidity, however it is recommended in very humid rooms so the warm air can be exhausted outside.
Draining in Dehumidify mode
It is recommended that the dehumidification drain and drain hose be used for continuous drainage.
WATER FULL - When the water level reaches a predetermined level, will be indicated on the display. The unit will have to be drained.
FAN
Press the Fan Speed Button to select Low, Medium or High Speed.
HEAT(HEAT model BPT10HWTB only)
Select the target temperature 55˚F- 81˚F (13˚C-27˚C) by pressing thebuttons until the desired temperature is displayed on the LED screen.
Press the Fan Speed Button to select Low, Medium, High or Auto Speed.
• In HEAT mode there will be water removed from the air and collected in the tank, when the tank is full, the appliance shuts down and “ft” (FULL TANK) appears on the display, the tank must be Emptied (See water drainage page). The appliance will start up again.
When operating in very cold rooms, the appliance defrosts automatically and may disrupt normal operation. The fan will continue operating for a few seconds to lower the interior.
Temperature even after the appliance shuts off. In this mode, the fan may operate for short periods even though the set temperature has been reached
SMART MODE
In SMART model the air conditioner will make automatic selections based on the room temperature.
FOR COOL ONLY MODELS
The air conditioner will automatically operate in FAN mode when the room temperature is below 73°F (23°C).
It will operate in COOL mode when the room temperature is above 73°F (23°C).
FOR COOL AND HEAT MODELS
The air conditioner will automatically operate in HEAT mode when the room temperature is below 68°F (20°C).
It will operate in FAN mode when the room temperature is from 68°F (20°C) to 73°F (23°C).
It will operate in COOL mode when the room temperature is above 73°F (23°C).
Press the FAN Speed button to select HIGH, MED, LOW or AUTO fan speed.
The control panel on the air conditioner LED display will indicate the below in this mode
SWING BUTTON
This button will activate the air swing of the louvers while in COOL, DEHUMDIFY and FAN modes.
Press the button , and the symbol will illuminate on the LED screen of the remote. The deflector will start to swing.
Press the button again, the symbol disappears. The deflector will stop swinging.
FUNCTION BUTTON
Press the to access FOLLOW ME and TURBO functions.
TURBO is ideal for a warm room. It will automatically set the temperature to 64°F (18°C) at HIGH Fan speed to cool the room in the shortest time.
This function only operates in COOL mode.
TO OPERATE TURBO
Press the Function button, TURBO symbol flashes on screen then press the function button again, the TURBO symbol will stop flashing and will illuminate on the LED screen indicating that TURBO is activated.
TO CANCEL TURBO
Press the Function button, TURBO symbol flashes on screen then press the function button again, the TURBO symbol will stop flashing and will no longer be illuminated in the LED screen indicating that TURBO function is deactivated.
FOLLOW ME
Parts of the room are cooler where there is a draft. Other parts are warmer due to direct sunlight. The FOLLOW ME Function allows the room to be cooled according to the room temperature, wherever the remote is located.
This function can be activated from the remote control ONLY. The remote control serves as a thermostat allowing for the precise temperature control at its location.
To activate the Follow Me function, point the remote control towards the appliance and press the FUNCTION button.
Press either the ' button until the FOLLOW ME symbol flashes on the LED screen.
Press the Menu button. The FOLLOW ME will stop flashing and illuminate on the LED screen.
The remote will display the actual temperature at its location. The remote control will send this signal to the air conditioner at 20 minute intervals.
If the unit does not receive the Follow Me/Temp Sensing signal during a 25 minutes interval, the follow me function will be canceled and will need to be reactivated.
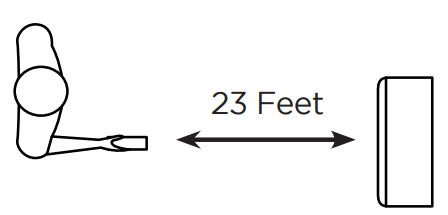
NOTE: The remote must be within 23 feet of the remote control receiver on the air conditioner unit. It should not have any obstructions.
To cancel this function, press the , then press either the button until theflashes onscreen, and then press the button to confirm the cancellation. The will stop flashing and disappear from the screen.
TIMER BUTTON
The timer can be used to delay the appliance start-up or shutdown.
PROGRAMMING START-UP
With the appliance ON select the settings that you would like to program at start-up. Example: COOL Mode, temperature, fan speed. Turn OFF the air conditioner.
Press the button twice, the LED screen will display hours, the symbol and symbol will flash .
Press the button to set the time when you want the appliance to switch on using the buttons (from 30 minutes to 24 hours).
During the first ten hours you can select half hour intervals. For times longer than ten hours, one hour intervals can be selected.
Press the button again to activate the selected time. The symbol and will be displayed on the LED screen . Remaining time will be displayed on the LED screen
To cancel the programmed start-up, press the button again or the button. The symbol will not be illuminated on the LED screen.
PROGRAMMING SHUT DOWN
With the appliance ON Press the button twice, the LED screen will display hours, the symbol and symbol will flash .
Press the button to set the time when you want the appliance to shut down using the buttons (from 30 minutes to 24 hours).
Press the button again to activate the selected time. The symbol and will be displayed on screen . Remaining time will be displayed on the LED screen.
To cancel the programmed shut-down, press the button again or the button. The symbol will not be illuminated on the LED scree
SLEEP BUTTON
• The SLEEP function maintains the room at optimum temperature without excessive fluctuations with silent operation. Fan speed is always at Low, while room temperature adjusts gradually to ensure the most comfortable environment operation of the appliance.
WHEN OPERATING IN COOL MODE
Press the button, and the symbol appears.
Selected temperature will increase by 1°F (1°C) per hour in a 2 hour period. This new temperature will be maintained for the next 6 hours, then the air conditioner will turn off.
WHEN OPERATING IN HEAT MODE
Press the button, and the symbol appears.
Selected temperature will decrease by 1°F (1°C) per hour in a 3 hour period. This new temperature will be maintained for the next 5 hours, then the air conditioner will turn off.
When you select the SLEEP function, the screen will reduce the brightness, and the fan speed is low.
The SLEEP function can be canceled at any time during operation by pressing the "Sleep”, "Mode” or "fan speed” button.
SLEEP function cannot be set In FAN or DEHUMIDIFY mode,
°C / °F SELECTOR BUTTON
When the appliance is powered on, press the °C / °F button, then you can select the unit of temperature from Fahrenheit or Celsius
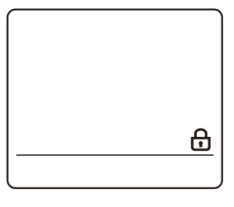
CHILD LOCK
• This function is used to prevent children from inadvertently changing the settings by pressing the remote control buttons.
• Press and hold the and N/' buttons simultaneously for at least 3 seconds to activate the child lock function. When it is activated the lock symbol will appear on the LED screen. Settings cannot be changed by pressing random bottoms on the remote.
• To deactivate the child lock, press and hold the and N/' buttons simultaneously for at least 3 seconds again. The lock symbol will not appear on the LED screen and the settings on the remote can be changed.
WATER DRAINAGE
Draining in Cooling Mode.
This air conditioner is equipped with auto water evaporation so the water compartment would not typically fill in cooling mode unless there is high humidity. Water drainage will generally only be required at the end of the season (see START-END OF SEASON OPERATIONS in cooling mode.)
NOTE: As a safety measure to positively prevent water spillage the air conditioner is equipped with a fail safe device if the water tank fills. The unit will completely stop, the control panel displays (FULL TANK). The compressor and fan will not restart until the tank has been drained.
Intermittent Draining in Cooling Mode.
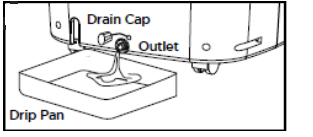
Unplug the unit from the power source. Carefully move the unit to a drain area over your basement floor or drip pan (not included). Remove the bottom drain cap.
Let the water drain away and replace the drain cap. Restart the machine until the symbol disappears. If the error repeats, call for service.
Continuous Draining for Cooling Mode
Unplug the unit from the power source. Remove the bottom drain cap. While doing this operation some residual water may spill so have a drip pan (not supplied) to collect the water.
Connect the drain hose (supplied) as shown in the diagram. The water can be continuously drained through the hose into a floor drain or drip tray.
WAIT 3 MINUTES BEFORE RESUMING OPERATION
After the unit has stopped, it cannot be restarted for 3 minutes. Operation will automatically restart after 3 minutes.
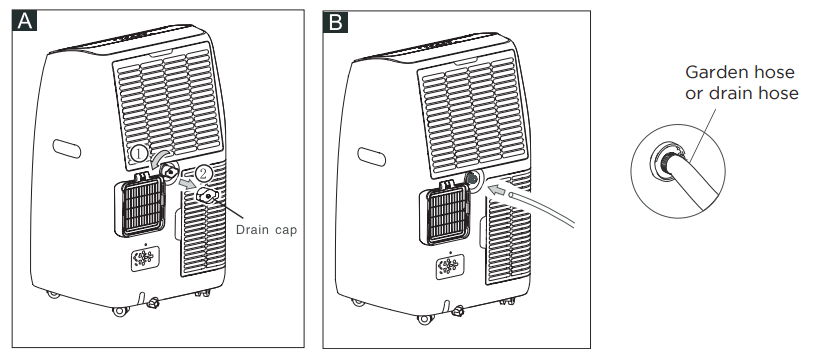
Continuous Draining for Dehumidification Mode.
Unplug the unit from the power source. Remove the drain cap located in the back center of the unit. While doing this operation some residual water may spill so have a drip pan (not supplied) to collect the water. Connect the drain hose (supplied) as shown in the diagram. The water can be continuously drained through the hose into a floor drain or bucket. Turn on the unit.
WAIT 3 MINUTES BEFORE RESUMING OPERATION
After the unit has stopped, it cannot be restarted for 3 minutes. Operation will automatically restart after 3 minutes
CLEANING & CARE
CLEANING
CLEANING THE FILTER
To keep your air conditioner working efficiently, you should clean the evaporator filter every week of operation.
The filter is housed in the intake grill.
Use a vacuum cleaner to remove dust accumulations
from the filter. If it is very dirty, immerse in warm water
and rinse a number of times. The water should be luke
warm. After washing, leave the filter to dry then re-insert the filter.
START - END OF SEASON OPERATIONS
START OF SEASON CHECKS
Make sure the power cable and plug are undamaged.
Follow the installation instructions precisely.
END OF SEASON OPERATIONS
See Water Drainage section to make sure the air conditioner is completely drained of water.
Clean the filter and dry thoroughly before reinstalling.
TROUBLESHOOTING
BEFORE YOU CALL FOR SERVICE
IF THE AIR CONDITIONER FAILS TO OPERATE:
A) Check to make sure that the air conditioner is plugged in securely. If it is not, remove the plug from the outlet, wait 10 seconds and plug it in again securely.
B) Check for a blown circuit fuse or a tripped main circuit breaker. If these seem to be operating properly, test the outlet with another appliance.
A. WARNING
IF NONE OF THE ABOVE SOLVES THE PROBLEM, CONTACT A QUALIFIED TECHNICIAN. DO NOT TRY TO ADJUST OR REPAIR THE AIR CONDITIONER YOURSELF. Any person who is involved with working on or breaking into a refrigerant circuit should hold a current valid certificate from an industry-accredited assessment authority, which authorizes their competence to handle refrigerants safely in accordance with an industry recognized assessment specification.
A, WARNING
Do not use means to accelerate the defrosting process or to clean other than those recommended by the manufacturer.
A WARNING
Servicing shall only be performed as recommended by the equipment manufacturer. Maintenance and repair requiring the assistance of other skilled personnel shall be carried out under the supervision of the person competent in the use of the flammable refrigerants.
Troubleshoot your problem by using the chart below. If the air conditioner still does not work properly, contact BLACK+DECKER customer service center or the nearest authorized service center. Customers must never troubleshoot internal components.
TROUBLE
POSSIBLE CAUSE
POSSIBLE REMEDY
Unit does not start when pressing ON/OFF button
A. FT appears in the display window
A. Drain the water
B. Room temperature is lower than set temperature (cooling mode)
B. Reset the temperature
Not cool enough
A. The windows or doors in the room are not closed
A. Make sure all the
windows and doors are closed
B. There are heat sources inside the room
B. Remove the heat sources if possible
C. Exhaust air duct is not connected or blocked
C. Connect the duct and make sure it can function properly
D. Temperature setting is too high
D. Decrease the set temperature
E. Air filter is blocked by dust
E. Clean the air filter
F. The unit will take approx 3 minutes of operation before cooling occurs.
F. A mircoprocessor control delays the compressor from operating until 3 mins have passed.
Noisy or vibration
A. The surface is not level or not flat enough
A. Place the unit on a flat, level surface if possible
Gurgling sound
A. The sound comes from the flowing of the refrigerant inside the air-conditioner
A. It is normal
Unit stops operating
A. The unit is defrosting.
B. PF appears in display window
A. Unit is in defrost mode and will restart automatically once excess frost has been removed.
B. This could be a probe failure. Contact customer service.
Remote is not working
A. Nothing Appears on the LED screen.
A. Change batteries.
B. The temperature and symbols appear on the LED screen but the selection cannot be changed.
B. Make sure the remote is being pointed at the remote control receiver on the unit within 23 feet away and that there are no obstructions.
C. The temperature and symbols appear on the LED screen but the FOLLOW ME function becomes disabled.
C. Make sure the remote is being pointed at the remote control receiver on the unit within 23 feet away and that there are no obstructions.
#1 Is Exhaust host necessary for heating also? Opening up window to fit the hose brings in lot of cold air.
The hose must be attached to allow the cold air to exhaust from the room. This is called reverse cycle. When you are in cool the hot air exhausts out of the room. If you have gaps in your window you can use insulating foam to seal them.


 button until the appliance comes on. The last function active when it was turned off will appear.

 buttons until the desired temperature is displayed. (See Fig. 7)

 will be indicated on the display. The unit will have to be drained.


 button repeatedly until the LED screen indicates the below.


 Will show on the remote LED screen when buttons are pressed to show that the remote control is sending a signal to the air conditioner.
 button to scroll through
 (Heat model BPT10HWTB only) and

 buttons until the desired temperature is displayed on the LED screen.
 to select Low, Medium, High or Auto Speed.
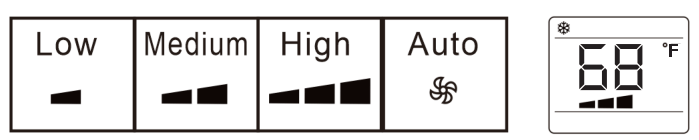
 will be indicated on the display. The unit will have to be drained.
 (HEAT model BPT10HWTB only)
  buttons until the desired temperature is displayed on the LED screen.

 to select HIGH, MED, LOW or AUTO fan speed.

 BUTTON
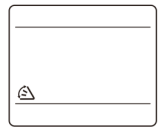
 BUTTON
 is ideal for a warm room. It will automatically set the temperature to 64°F (18°C) at HIGH Fan speed to cool the room in the shortest time.
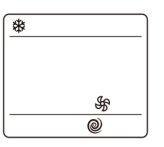

 button.
 ' button until the FOLLOW ME
  BUTTON
 button twice, the LED screen will display hours, the
  symbol will flash
  .
. . Remaining time will be displayed on the LED screen
 button. The
 BUTTON
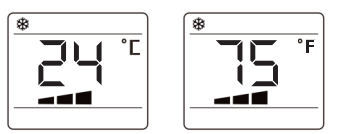
 (FULL TANK). The compressor and fan will not restart until the tank has been drained.