For assistance, call 1-866-439-9800 toll-free. Please have your owner’s manual and model number available for reference.
Note: The model number is printed on a label which can be found on the inside door, back or side of the base assembly.
Assembly Tips:
Select an area where you will assemble this product. To protect components, choose a smooth surface that’s free of cracks or openings.
Spread out all parts.
Tighten all hardware connections by hand first. Then, before completing each step, go back and fully tighten all hardware. Be careful not to over-tighten. That could damage surfaces or strip threads.
For best results, complete each step in the order presented.
To complete assembly you will need:
(1) Leak detection solution (instructions on how to make the solution are included in the “Operating Instructions” section of this manual).
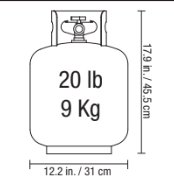
(1) Precision-filled LP gas grill tank with Acme Type 1 external threaded valve connection (standard grill size) (not included).
Typical assembly is approximately 20 minutes.
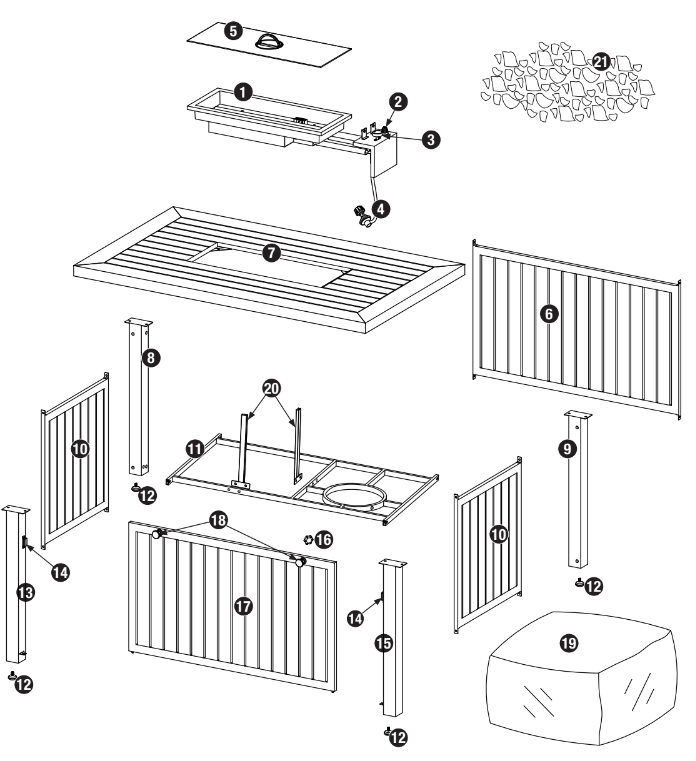
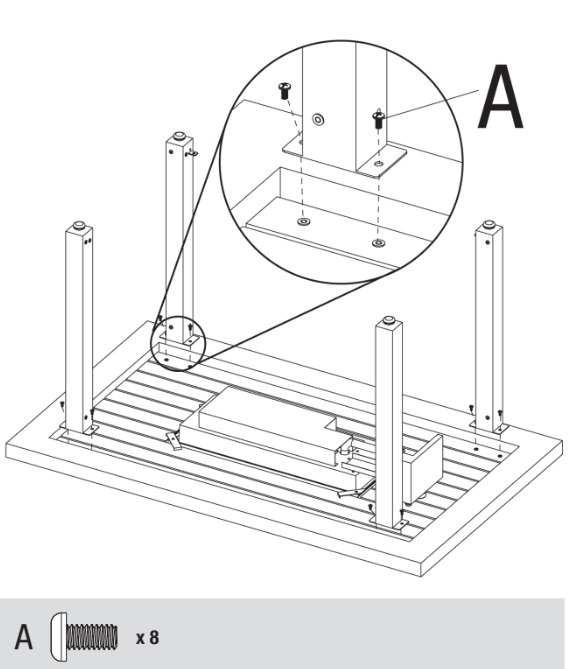
2. Attach Legs
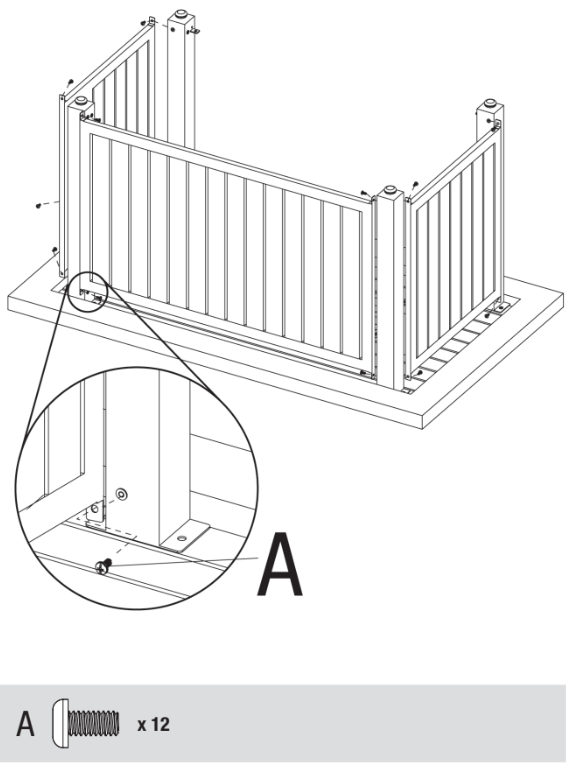
3.Attach Side Panels and Rear Panel
Note: Attach bottom screws before attaching top screws. Do not fully tighten srews until step 4.
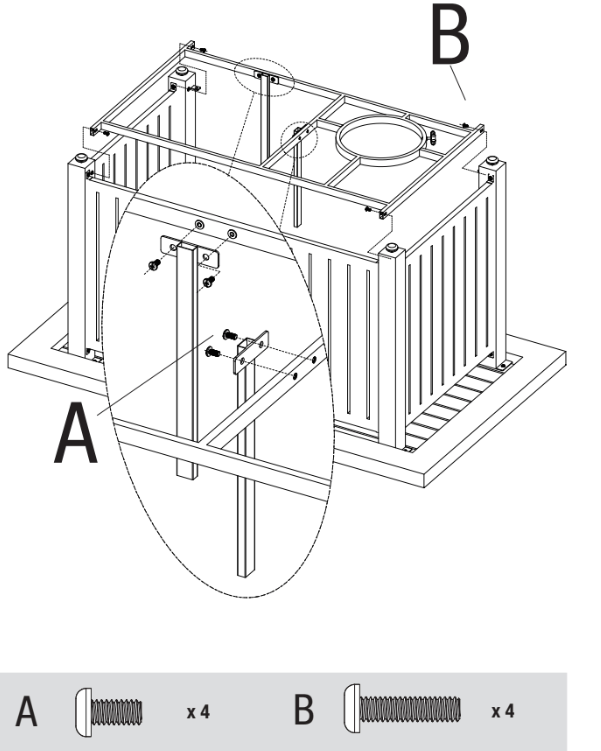
4. Attach Gas Tank Prevent Bar to Base, then Attach Base
Note: Tighten screws from steps 2 and 4.
5. Place Door
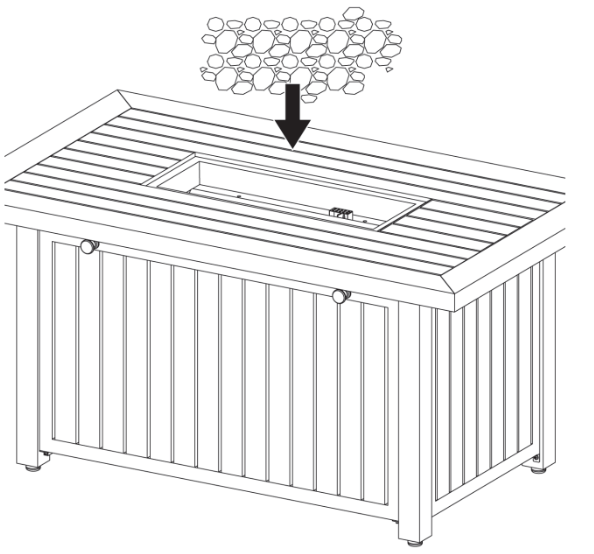
6. Place Fire Glass
Note: Fire glass should be 0.8-2.0 in (2-5 cm) long. Approx. 8.8 lb (4 kg) of fire glass is needed.
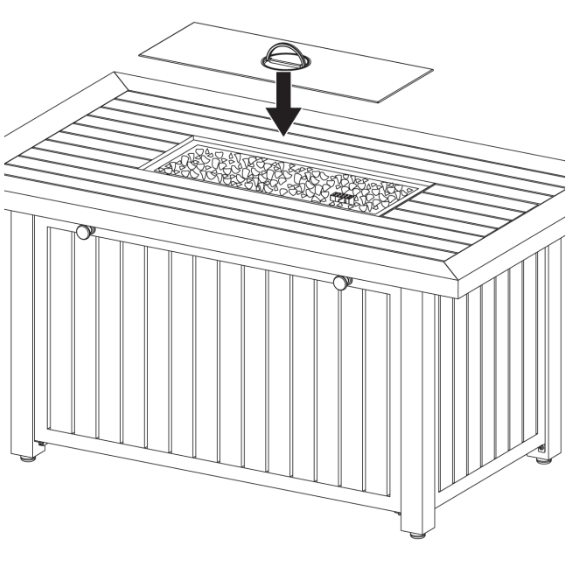
7. Place Table Insert
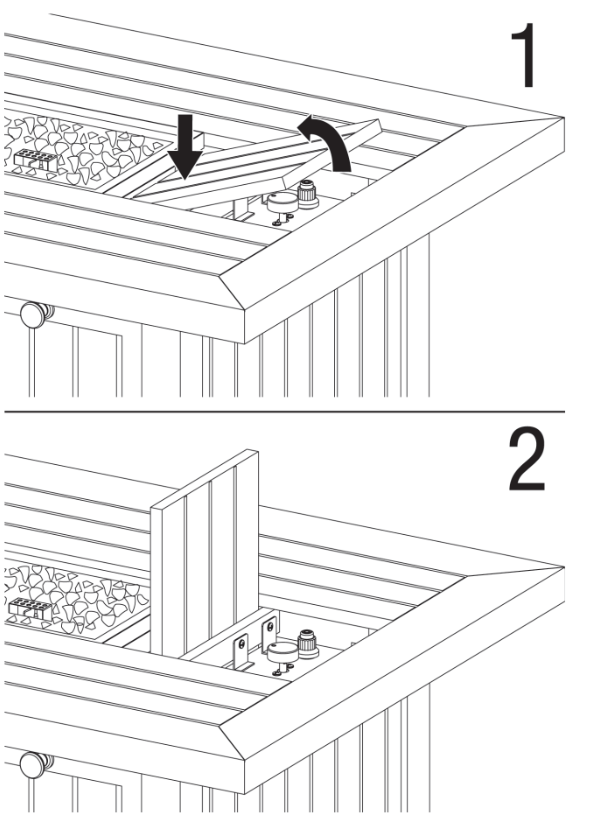
8. Open Control Panel
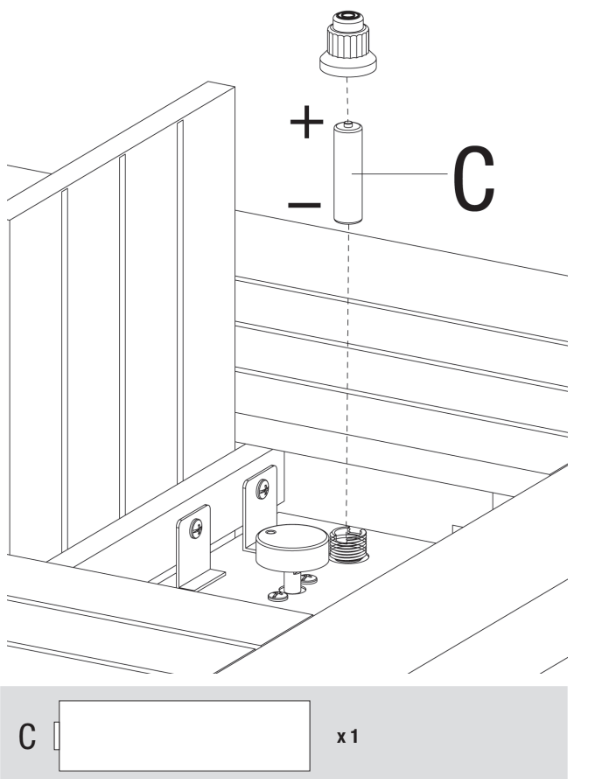
9. Insert Battery
Note: Remove plastic wrapper before installing battery.
10. IMPORTANT BEFORE USE HOW TO SEASON LAVA ROCK
Place the lava rocks into the fire pit bowl before turning on.
Follow the lighting instructions from the owner’s manual to light the fire pit.
Turn the fire pit to the highest heat.
Allow the lava rocks to heat at the maximum temperature for 30 minutes before enjoying fire pit.
Keep all people and any material that could burn at least 15 feet away from the fire pit while the lava rocks are being seasoned.
Repeat the process if your fire pit has been exposed to rain or moisture.
Keep your fire pit covered when not in use.
Installing LP Gas Tank
To operate, you will need one precision-filled standard grill LP gas tank with external valve threads.
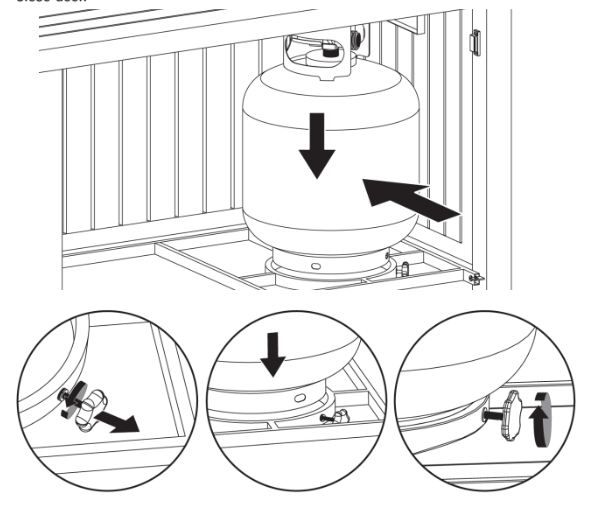
Inserting LP Gas Tank
Open door.
Loosen LP gas tank retainer bolt by turning counter-clockwise.
Place precision-filled LP gas tank upright into hole in outdoor fire pit base so the tank valve is facing the gas line connection.
Secure tank by turning LP gas tank retainer bolt clockwise until tight.
Close door.
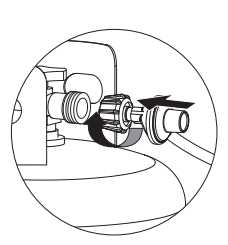
Connecting LP Gas Tank
Make sure the control knob is in the “ OFF” position (Figure 3).
Before connecting, be sure there is no debris caught in the head of the LP gas tank, head of the regulator valve or in the head of the burner or burner ports.
Connect regulator/hose assembly to tank by turning knob clockwise until it stops.
Perform leak check per “Checking for Leaks” section.
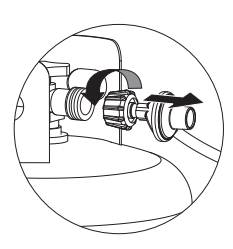
Disconnecting LP Gas Tank
Make sure the control knob is in the “ OFF” position (Figure 3).
Before disconnecting, make sure the LP gas tank valve is “CLOSED.”
Disconnect regulator/hose assembly from LP gas tank by turning knob counterclockwise until it is loose.
Place the protective cap cover on the LP tank and store the tank outdoors in a well ventilated area out of direct sunlight.
Operating Instructions
Checking for Leaks
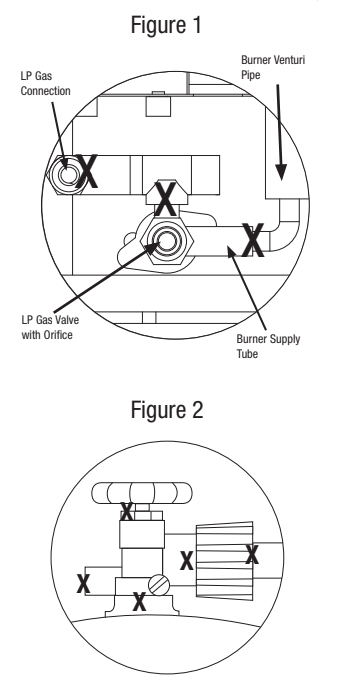
Burner Connections
Make sure the regulator hose and valve connections are securely fastened to the burner and the tank.
Visually check the connection between the burner/venturi tube and orifice.
Make sure the burner/venturi tube fits over the orifice.
Refer to diagram for proper installation (Figures 1 and 2).
If the burner/venturi tube does not rest flush to the orifice, as shown, please contact 1-866-439-9800 for assistance.
Tank/Gas Line Connection
Make 2-3 oz. of leak detection solution by mixing one part liquid dishwashing soap with three parts water.
Make sure control knobs are in the “ OFF” position (Figure 3).
Connect LP gas tank per “Installing LP Gas Tank” section.
Turn LP gas tank valve to “OPEN.”
Spoon several drops of solution, or use a squirt bottle, at all “X” locations (Figures 1 and 2).
a. If any bubbles appear, turn LP gas tank valve to “CLOSED,” reconnect and re-test.
b. If you continue to see bubbles after several attempts, turn LP gas tank valve to CLOSED” and disconnect LP gas tank, per Disconnecting LP Gas Tank” section. Contact for assistance.
c. If no bubbles appear after one minute, turn LP gas tank valve to “CLOSED,” wipe away solution and proceed.
Lighting
Make sure all labels, packaging and protective films have been removed from the outdoor fire pit.
Check for obstructions of airflow to the burner. Spiders, insects and webs can clog the burner/venturi tube. A clogged burner tube can lead to a fire.
Control knob must be in the “ OFF” position (Figure 3).
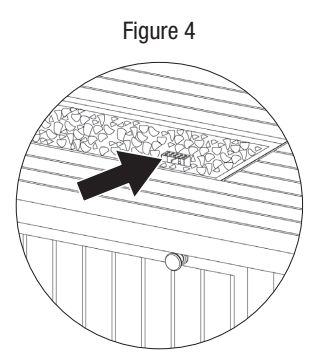
Clear small area of fire glass away from the igniter cover (Figure 4).
Connect LP gas tank per “Installing LP Gas Tank” section.
1. Turn LP gas tank valve to “OPEN.”
2. Push and turn control knob to ( HIGH). Continue to hold the control knob in to light.
3. After the fire pit lights, continue to hold the control knob in for 20 seconds to heat the thermocouple, a safety device that stops the gas flow when a firepit is not lit. Holding the knob in for 20 seconds warms it up so the gas flow will continue.
4. After 20 seconds, release and turn control knob counterclockwise to adjust flame to desired height.
5. After three attempts, if ignition does not occur, turn the burner control knob to “ OFF.”
6. Wait 5 minutes, fan with a newspaper or magazine, and repeat lighting procedure.
7. If igniter does not light burner:
a. Wearing heat-resistant gloves, position a lit long match or lit long butane lighter near the pilot housing.
b. Push and turn control knob to ( HIGH).
c. Remove match/lighter once burner is lit.
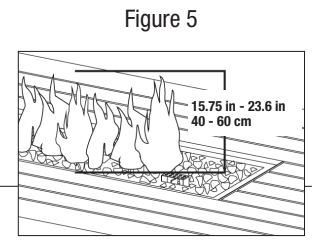
8. After lighting, observe the burner flame. Make sure all burner ports are lit and flame height matches illustration (Figure 5).
Turning Off
Turn LP gas tank valve to “CLOSED.”
Turn control knob to the “ OFF” position.
Disconnect LP gas tank per “Disconnecting LP Gas Tank” section.
Cleaning and Care
CAUTION:
All cleaning and maintenance should be done when outdoor fire pit is cool and with the fuel supply disconnected.
Do NOT clean any outdoor fire pit part in a self-cleaning oven. The extreme heat will damage the finish.
Do NOT enlarge valve orifices or burner ports when cleaning the valves or burners.
All components on this outdoor fire pit can become hot.
Do NOT clean this outdoor fire pit until all components are cool.
Notices
This outdoor fire pit should be thoroughly cleaned and inspected on a regular basis.
Abrasive cleaners will damage this product.
NEVER use oven cleaner to clean any part of this outdoor fire pit.
Before Each Use:
Keep the outdoor fire pit area clear and free from any combustible materials, gasoline, and other flammable vapors and liquids.
Do NOT obstruct the flow of the combustion of LP gas and the ventilation of air.
Keep the ventilation opening(s) of the LP gas tank area free and clear from debris.
Visually check the burner flames to make sure your outdoor fire pit is working properly (Figure 5).
See below for proper cleaning instructions.
Check all gas connections for leaks.
Check components for any signs of damage or rust.
Check for obstructions of airflow to the burner. Spiders, insects and webs can clog the burner/venturi tube. A clogged burner/venturi tube can lead to a fire.
If damage to any component is detected, do NOT operate until repairs are completed.
Cleaning Surfaces
Wipe surfaces clean with mild dishwashing detergent or baking soda mixed with water.
For stubborn stains, use a citrus-based cleaner and a nylon scrubbing brush.
Rinse clean with water.
Allow to air dry.
Maintenance
To enjoy years of outstanding performance from your heater, make sure you perform the following maintenance activities on a regular basis:
Keep exterior surfaces clean.
Perform routine maintenance.
Air flow must be unobstructed. Keep controls, burner, and circulating air passageways clean. Signs of possible blockage include:
Gas odor with extreme yellow tipping of flame.
Outdoor fire pit does NOT reach the desired temperature.
Lower burner on outdoor fire pit glow is excessively uneven.
Lower burner on outdoor fire pit makes popping noises.
Note: In a salt-air environment (such as near an ocean), corrosion occurs more quickly than normal. Frequently check for corroded areas and repair them before operating.
TIP: Use high-quality automobile wax to help maintain the appearance of your outdoor fire pit. Apply to exterior surfaces. Do NOT apply to burners, emitter screen or domes.
Cleaning Burner
WARNING: All cleaning should be done when appliance is cool and with the fuel supply disconnected per “Disconnecting LP Gas Tank.”
Remove the fire glass/lava rock.
Remove all dirt/dust from the burner, igniter cover and venturi area with a small brush and/ or compressed air.
Visually inspect the burner for any rust or damage. If damage is found, replace necessary parts with new from the manufacturer.
Clean any clogged burner ports with a stiff wire (such as an opened paper clip).
Carefully replace the fire glass/lava rock being cautious not to block the igniter cover.
Before Storing
Turn LP gas tank valve to “CLOSED.”
Turn control knob to the “ OFF” position.
Disconnect LP gas tank per “Disconnecting LP Gas Tank” section.
Clean all surfaces.
Lightly coat the burner with cooking oil to prevent excess rusting.
If storing the outdoor fire pit indoors, cover the outdoor fire pit and store in a cool dry location away from children and pets.
If storing the outdoor fire pit outdoors, cover the outdoor fire pit with a cover for protection from the weather.
Troubleshooting
Problem
Possible Cause
Prevention/Cure
Burner will not light using igniter
LP gas tank valve is closed
Make sure regulator is securely attached to the LP gas tank per “Installing LP Gas Tank,” then turn LP gas tank valve to “OPEN”
LP gas tank is low or empty
Exchange, refill or replace LP gas tank
LP gas leak
1. Turn LP gas tank valve to “CLOSED”
2. Wait 5 minutes for gas to clear
3. Follow “Checking for Leaks” section
Battery needs to be changed
Replace the “AA” battery (follow assembly step for inserting battery)
Electrode and burners are wet
Wipe dry with cloth
Electrode cracked or broken - sparks at crack
Replacement part(s) may be needed - contact Customer Care at 1-866-439- 9800
Wire loose or disconnected
Reconnect wire or replacement part(s) may be needed - contact Customer Care at 1-866-439-9800
Wire is shorting (sparking) between igniter and electrode
Replacement part(s) may be needed - contact Customer Care at 1-866-439- 9800
Thermocouple is not operating correctly
1. Disconnect LP Gas tank per “Disconnect LP Gas Tank” section. 2. Clean area around thermocouple.
3. Connect LP gas tank per “Connect LP Gas Tank” section.
4. Relight per “Lighting” section.
5. If the outdoor fire pit is still not working, please contact Customer Care at 1-866-439-9800 for additional assistance.
Bad igniter
Replacement part(s) may be needed - contact Customer Care at 1-866-439-9800
Burner will not light with match
No gas flow
Check if LP gas tank is empty
a. If empty, exchange, refill or replace LP gas tank
b. If LP gas tank is not empty, refer to “Sudden drop in gas flow or reduced flame height” (see below)
LP gas tank is low or empty
Exchange, refill or replace LP gas tank
LP gas leak
1. Turn LP gas tank valve to “CLOSED”
2. Wait 5 minutes for gas to clear
3. Follow “Checking for Leaks” section
Coupling nut and regulator not fully connected
Turn the coupling nut about one-half to three-quarters additional turn until solid stop. Tighten by hand only - do NOT use tools.
Obstruction of gas flow
1. Clear burner/venturi tube
2. Check for bent or kinked hose
Disengagement of burner to valve
Re-engage burner and valve
Spider webs or insect nest in burner/venturi tube
Clean burner/venturi tube
Thermocouple is not operating correctly
1. Disconnect LP Gas tank per “Disconnect LP Gas Tank” section. 2. Clean area around thermocouple.
3. Connect LP gas tank per “Connect LP Gas Tank” section.
4. Relight per “Lighting” section.
5. If the outdoor fire pit is still not working, please contact Customer Care at 1-866-439-9800 for additional assistance.
Burner ports clogged or blocked
Clean burner ports
Sudden drop in gas flow or reduced flame height
Out of gas
Exchange, refill or replace LP gas tank
Overfilling prevention device may have been activated
1. Turn control knob to “OFF”
2. Wait 30 seconds and light outdoor fire pit per “Lighting” section 3. If flames are still too low, reset the overfilling prevention device: a. Turn control knob(s) “OFF”
b. Turn LP gas tank valve to “CLOSED”
c. Disconnect regulator
d. Turn control knobs to (HIGH)
e. Wait two minutes
f. Turn control knobs to “OFF”
g. Reconnect regulator and leak check connections, being careful not to fully open valve
h. Light outdoor fire pit per “Lighting” section
Irregular flame pattern, flame does not run the full length of burner
Burner ports are clogged or blocked
Clean burner ports
Flame is yellow or orange
New burner may have residual manufacturing oils
Burn outdoor fire pit for 15 minutes and reinspect
Spider webs or insect nest in burner/venturi tube
Clean burner/venturi tube
Poor alignment of valve to burner/venturi tube
Ensure burner/venturi tube is properly engaged with valve
Flame goes out
High or gusting winds
Do not use outdoor fire pit in high winds
Low on LP gas
Exchange, refill or replace LP gas tank
Excess flow valve tripped
Refer to “Sudden drop in gas flow or reduced flame height”
Thermocouple is not operating correctly
1. Disconnect LP Gas tank per “Disconnect LP Gas Tank” section. 2. Clean area around thermocouple.
3. Connect LP gas tank per “Connect LP Gas Tank” section.
4. Relight per “Lighting” section.
5. If the outdoor fire pit is still not working, please contact Customer Care at 1-866-439-9800 for additional assistance.
Flashback (fire in venturi/burner tube(s))
Burner and/or burner/venturi tube is blocked
Clean burner and/or burner/venturi tube
Flame seems to lose heat when burning in cold weather - temperature below 50ºF
Ice has built up on the outside of the LP gas tank because the vaporization process is too slow
1. Turn off per “Turning Off” section
2. Replace with a spare LP gas tank
3. Reconnect LP gas tank per “Installing LP Gas Tank” section 4. Follow “Checking for Leaks” section
This outdoor fire pit, from the factory, is for use with LP gas only. The conversion to or attempted use of natural gas in this outdoor fire pit is dangerous, may cause bodily harm and will void your warranty.

 OFF” position (Figure 3).
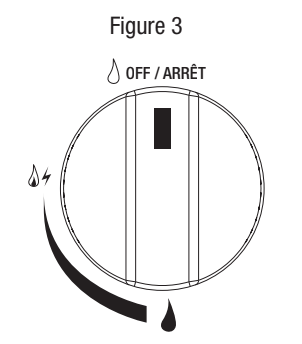
 HIGH). Continue to hold the control knob in to light.