Loading ...
Loading ...
Loading ...
4 5
EN
DE
FR
ES
IT
EN
DE
FR
ES
IT
Preparing for Use
1. Place the air fryer on a flat, stable and horizontal surface. Do not
place the air fryer on a surface that is not heat resistant.
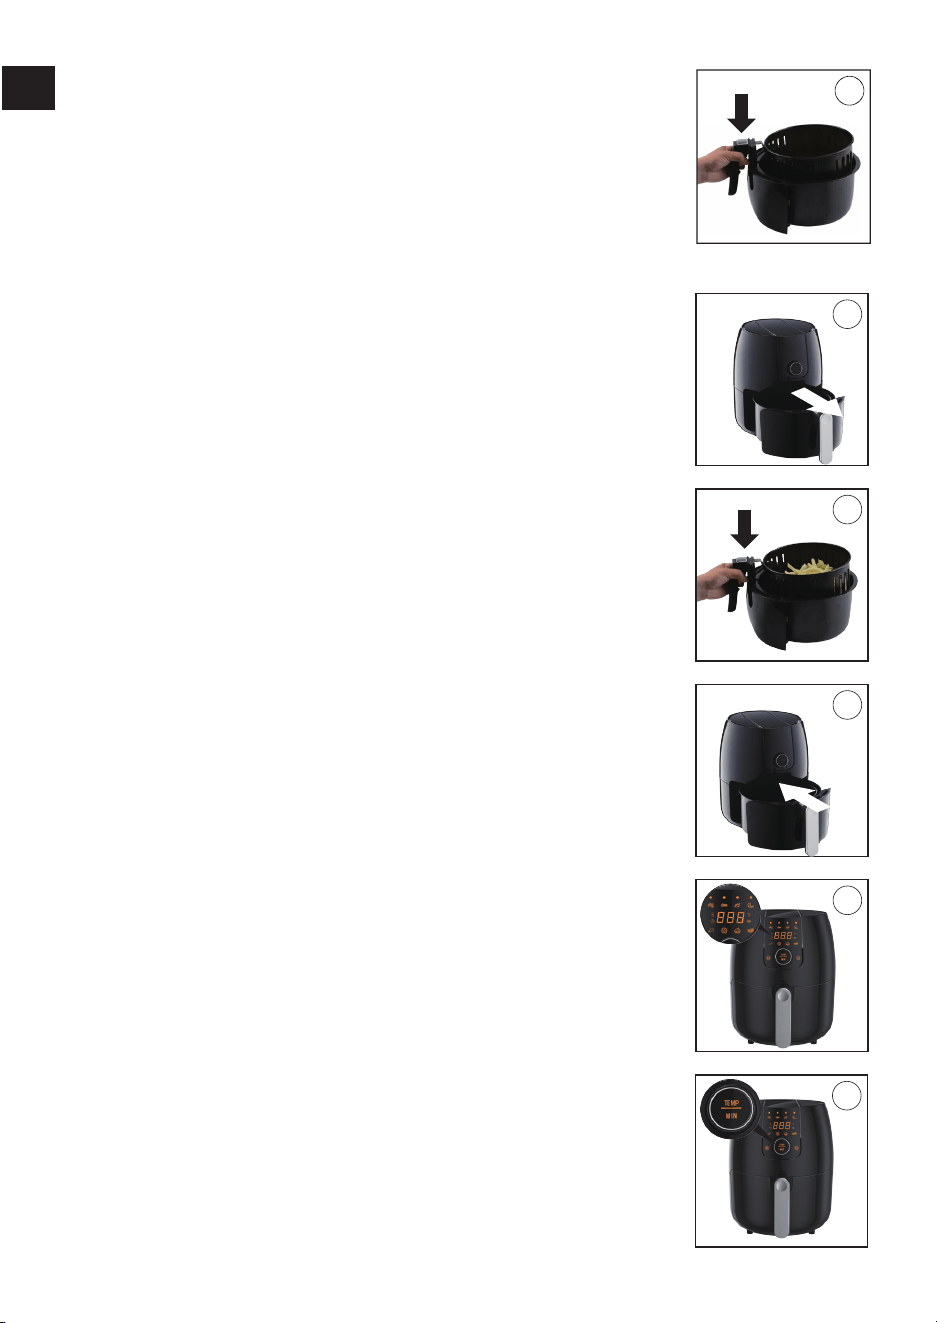
2. Properly place the basket in the pan (Fig A). Do not fill the pan with
oil or any other liquids.
A
USING THE AIR FRYER
1. Plug the power plug into a grounded outlet. The Power On/Off
button will light up.
2. Remove the pan from the air fryer by pulling the handle (Fig B).
3. Put the ingredients in the basket (Fig C).
Caution:
Never fill the basket beyond the MAX indicator or exceed
the amount indicated in this manual’s "Cooking Guide" section, as
this may affect the quality of cooking results.
4. Slide the pan back into the air fryer (Fig D).
Caution:
Do not directly touch the pan 30 minutes after use as
the pan will be very hot after cooking. Hold the pan only by the
handle.
5. Press the Power On/Off button to turn on the air fryer (Fig E).
6. The temperature indicator will blink and be set to 360ºF/180ºC by
default (Fig
F).
To change the temperature, turn the Quick Control dial.
To confirm the temperature, press the Quick Control dial.
7. After the temperature is confirmed, the time indicator will start
blinking and be set to 15 minutes by default.
To change the cooking time, turn the Quick Control dial.
To confirm the cooking time, press the Quick Control dial.
Note:
To change cooking time and temperatures during cooking,
press the Quick Control dial so the backlight blinks and use the
same procedures as above.
B
C
D
E
F
8. The air fryer will start cooking once the cooking time has been confirmed.
Tip:
To pause the cooking process, press the Preset Program button, turn the Quick
Control to desired menu program, or just change temperature and cooking time. Press
the Preset Program button again to resume operation.
Note:
Some ingredients require shaking of the basket and pan
halfway through cooking (see the “Cooking Guide” section). To
shake the ingredients, pull the pan out of the air fryer by the
handle, shake the pan, and slide the pan back into the air fryer
(Fig G).
9. The air fryer bell will ring 5 times when the set cooking time has
been reached. Pull the pan out of the air fryer and place it on the
heat-resistant surface.
Note:
After the set time has reached, the heating element will
stop working and the screen will display '0 min,' but the fan
will continue to run about 20 seconds to safely blow away the
remaining hot air. Finally, the timer bell will ring for 5 times when
the set time has been reached.
10. Check if the ingredients are ready.
Note:
If the ingredients are not yet ready, simply slide the pan
back into the air fryer and set the timer for a few extra minutes.
11. Push the Basket Release button cover forward and then press
down on the button and lift the basket out of the pan (Fig H &
Fig I).
12. Empty the ingredients into a bowl or onto a plate (Fig J). Always
remove the basket with ingredients from the first when serving
as hot oil or rendered fat may be in the bottom of the pan.
Tip:
To remove large or fragile ingredients, use a pair of tongs to
lift the ingredients out of the basket.
H
I
J
G
13. When the ingredients have been cooked and removed from the air fryer, new
ingredients can be placed into the basket immediately after and put into the air fryer for
cooking.
Choosing A Preset Cooking Program
1. After the air fryer is switched on, press the Preset program button. The Preset button will
light up and blink.
2. Turn the Quick Control dial to select the desired preset program.
3. Press the Power On/Off button to confirm the preset. The cooking temperature, then the
cooking time, will display on screen.
4. There are eight total preset programs: CHIPS, MEET, FISH, SHRIMP, CHICKEN, PIZZA, CAKE
and STEAK.
Loading ...
Loading ...
Loading ...