Documents: Go to download!
- Owner's manual - (English)

- PARTS IDENTIFICATION
- CONTROL PANEL
- BEFORE FIRST USE
- HOW TO USE
- CLEANING & MAINTENANCE
- COOKING TIME CHART
- HINTS & TIPS
- TROUBLESHOOTING GUIDE
Table of contents
Owners' Guide Airfryers
PARTS IDENTIFICATION

NOTE: The Frying Rack consists of a non-stick surface. To avoid scratching the nonstick surface, please use wooden or heatproof silicone utensils.
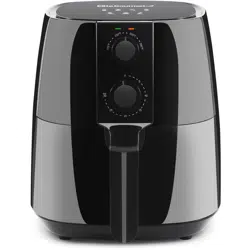
CONTROL PANEL
TEMPERATURE CONTROL KNOB
Use this knob to set the temperature between 175°F up to 395°F

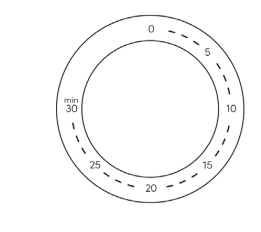
TIMER CONTROL KNOB
Use this knob to set the desired time setting between 1-minute and 30-minutes. The timer knob MUST be set in order for the appliance to begin heating

BEFORE FIRST USE
- Before using your Air Fryer for the first time, carefully remove all packaging material and recycle appropriately.
- Remove the parts from the box and wash the Drawer Pan and Frying Rack with warm, soapy water and a non-abrasive sponge.
IMPORTANT: DO NOT IMMERSE THE MAIN HOUSING IN WATER. Wipe the interior and exterior of appliance clean with a damp cloth.
IMPORTANT: THIS IS NOT A DEEP FRYER. DO NOT FILL THE APPLIANCE OR ITS DRAWER WITH OIL OR FRYING FAT. - Place the appliance on a flat, horizontal and stable surface (make sure surface is heat-resistant). Place away from walls and other appliances. Leave approximately 4 inches of space from nearby objects.
HOW TO USE
- Carefully pull out the Drawer Pan from the Main Fryer Body by pulling forward on the Handle. TIP: Never place food directly into the Drawer Pan without the Frying Rack inside. In place of using the Frying Rack, an oven-safe plate or bowl (not included) can be placed onto a wire rack (not included) into the Drawer Pan.
- Place the Frying Rack into the Drawer Pan (Figure 1).
- Place ingredients onto Frying Rack.
TIP: Do not fill the Drawer Pan over the MAX fill position. If cooking food that expands, make sure the cooked capacity will not exceed the MAX fill position. - Slide Drawer Pan back into the Main Body

CAUTION: Never place anything on top of the Main Body, for this will block the air flow and reduce the effect of hot air heating.
HOW TO PROGRAM FRYING TIME AND TEMPERATURE:
- Plug Power Cord into an electrical outlet. The Power Indicator will illuminate.
- Turn the Temperature Control Knob to the desired temperature and then turn the Timer Control Knob to the desired time setting (the Timer must be set in order for the unit to begin heating). TIP: It is recommended to preheat the air fryer on empty for 3 minutes if the appliance is cold or you can add 3 minutes to your desired time setting in order to pre-heat. The initial 15 minutes of use may result in minimal smell and smoke. This is normal and harmless and comes from the protective substance applied to the heating elements during manufacturing.
- The Heating Indicator will illuminate until the desired temperature is reached. During the cooking process, the heating light will turn on and off as the temperature is maintained.
- The Air Fryer will automatically Pause if the Drawer Pan is removed during the cooking cycle. Once replaced back into the fryer, the unit will continue its cooking cycle.
- NOTE: Any excess oil from food will collect at the bottom of the Drawer Pan.
CAUTION: Do not touch the Drawer Pan during and immediately after use, as it gets very hot. Only hold the Drawer Pan by the Handle.
NOTE: Any excess oil from food will collect at the bottom of the Drawer Pan.
DURING THE COOKING/FRYING PROCESS:
- Some recipes require stirring/mixing the contents mid-way through cooking (see Cooking Time Chart on page 9). You can do this in the middle of the cooking process by pulling the Drawer Pan out from the Main Fryer Body. Shake or stir the contents on the rack using a non-metallic utensil and then slide Drawer Pan back into the Main Fryer Body. TIP: If you set the timer to half the required cook time, you will hear the timer indicator when you have to stir the ingredients. However, this means that you will need to set the timer again to the remaining cook time after stirring.
- The air fryer will resume cooking once the Drawer Pan is closed.
CAUTION: During cooking, the Drawer Pan and Frying Rack will be very hot, only use the Drawer Pan Handle or oven mitts.
WHEN FRYING IS COMPLETE:
- When the timer completes its countdown, the timer bell will ring and the air fryer will stop heating - this signals it is time to remove your food.
- Carefully pull out the Drawer Pan from the Main Fryer Body by pulling forward on the Drawer Pan Handle and place on a flat, heat resistant surface.
- Check that your foods are ready. If not, then place the Drawer Pan back into the Main Fryer Body and set the timer for a few more minutes.
- Empty the contents of the Drawer Pan into a bowl or onto a plate using non-metallic tongs or a scoop. TIP: Do not turn the Drawer Pan and Frying Rack upside down together, as any excess oil that has collected in the bottom of the Drawer Pan will be poured onto the foods.
- When the next batch of ingredients is ready, the air fryer is instantly ready to use again.
- When cooking is complete, remove the Power Cord from the electrical outlet.
NOTE: You can also switch off the appliance manually by turning the Timer Control Knob to 0 at any time during the cooking process.
CAUTION: When sliding out the Drawer Pan, be careful of hot air and steam. Keep hands and face away from the opening.
See other models: MST-5240 ERO-2008NFFP ERO-2008SZ EAF-0201 ESM-2207
After cooking, the Drawer Pan and Frying Rack will be extremely hot to the touch. Do not touch surfaces of the Drawer Pan or Frying Rack directly.
CLEANING & MAINTENANCE
The Air Fryer should be cleaned thoroughly after every use.
- Make sure the Power Cord is disconnected from the electrical outlet and that the appliance has cooled down before attempting to clean.
- The Drawer Pan, Frying Rack and the inside of the appliance have a nonstick coating. Do not use metal utensils or abrasive cleaning materials on them, as this can damage the non-stick coating.
- Wipe the outside of the appliance with a damp cloth.
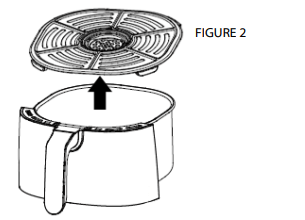
- Lift the Frying Rack upwards out of the Drawer Pan (Figure 2) and clean both with hot water, dishwashing soap and a non-abrasive sponge
- You can use a degreaser to remove any stuck-on residue. TIP: If food residue is stuck to the Frying Rack or the bottom of the Drawer Pan, place the Frying Rack into the Drawer Pan and fill with dishwashing soap and water and let soak for 10 minutes.
- Clean the inside of the appliance with hot water and a non-abrasive sponge.
- Never immerse the power cord, plug or the appliance body in water or any other liquids.
- Dry all parts after each use, re-assemble and store in a cool, dry location.

NOTE: The Drawer Pan and Frying Rack are dishwasher-safe (top rack only).
COOKING TIME CHART

STIR means the recipe requires mixing the contents mid-way through cooking. You can do this by carefully pulling out the Drawer Pan using the Handle, which will automatically pause the cooking process. Stir the contents using a nonmetallic utensil. Cooking will resume after you slide the Drawer Pan back into the Main Fryer Body.

NOTE: All information is for reference only and can be adjusted according to the user’s preference. They are approximations as foods differ in size and density. Cooking temperatures and times cannot be guaranteed.
HINTS & TIPS
- Smaller cuts of food usually require a slightly shorter cooking time than larger foods.
- A larger amount of food only requires a slightly longer cooking time and a smaller amount of food only requires a slightly shorter cooking time.
- Stirring or shaking smaller foods mid-way through the cooking process will improve the end result and can help cook more evenly.
- Adding a small amount of oil to fresh potatoes can result in a crispier result. Cook your ingredients in the air fryer within a few minutes after adding the oil.
- Do not air fry extremely greasy foods such as sausages in the air fryer.
- Snacks that can be prepared in an oven can also be prepared in the air fryer.
- The air fryer can also reheat foods. To reheat foods, set the temperature to 300°F for up to 10 minutes.
- To cook frozen foods, add an additional 3-5 minutes to your cook time.
BAKING/STEAMING FOODS:
- Place a wire rack (not included) onto the bottom of the Drawer Pan and place an oven-safe dish onto the wire rack if you want to bake a cake/quiche, steam foods or if you want to air fry delicate foods or foods with fillings.
- Use pre-made dough to prepare foods with fillings quickly and easily. Pre-made dough also requires a shorter cooking time than home-made dough.
- For steaming foods, generally, 1-2 cups of water provides approximately 5-10 minutes of steam time. Add water to the Drawer Pan. Place wire rack (not included) into the Drawer Pan. Place food into an oven-safe dish (not included) and place dish onto the wire rack.
HOMEMADE FRENCH FRIES:
- The optimum amount for air frying crispy fries is 17.5oz. or a little over 1 lb.
- When making your own French fries, follow these steps:
- Peel potatoes and slice them into strips.
- Wash and dry them thoroughly.
- Mix potato strips in a bowl with ½ tablespoon of olive oil, make sure they are evenly coated.
- Using your hands or tongs, place the potato strips onto the frying rack.
NOTE:
Add 3 minutes to the cooking time if you begin cooking while the air fryer is still cold.
When cooking/baking foods that rise, the Drawer Pan should not be filled more than halfway
Do not pour the potato sticks from the bowl onto the Frying Rack to avoid transferring any excess oil into the Drawer Pan.
Do not cook frozen, raw foods in the air fryer.
TROUBLESHOOTING GUIDE
| PROBLEM | POSSIBLE CAUSE | SOLUTION |
| The air fryer does not work. | The appliance is not plugged in. | Plug the Power Cord into an electrical outlet. |
| You have failed to set the timer. | Turn the timer knob to set the right time needed for cooking. | |
| The appliance is defective | ||
| Food is not completely cooked/fried. | There is too much food in the Drawer Pan. | Use smaller batches of food in the Drawer Pan. Small batches of food will cook more evenly. |
| The cooking temperature is set too low. | Increase the temperature setting. Check “Cooking Time Chart” found in this manual. | |
| The cooking time is too short. | Increase the time setting. Check “Cooking Time Chart” found in this manual. | |
| Food is raw and frozen solid. | Raw frozen foods should be thawed before cooking in the air fryer. Exceptions to this are pre-cooked frozen foods. | |
| Food is unevenly cooked | Certain foods need to be stirred mid-way through the cooking process. | Foods that overlap inside the Drawer Pan need to be stirred mid-way through cooking. |
| Fried snacks are not crispy. | You used a type of snack meant to be prepared in a traditional deep fryer | Use oven snacks or lightly brush some oil onto the snacks for a crispier result. |
| I cannot close the Drawer Pan properly | The Drawer Pan is too full | Do not overfill the Drawer Pan. |
| The Drawer Pan is not properly placed inside. | Make sure there is no obstruction for the Drawer Pan to close properly. | |
| White smoke is emitting out of the appliance during use. | You are preparing food with a high oil content. | When cooking with oily foods, oil will drain into the Drawer Pan. When the air fryer heats up, the pan heats up the oil and produces white smoke. This does not adversely affect the air fryer or your cooking process. |
| The pan has built-up oil residue from previous uses. | White smoke is caused by oil leftover in the Drawer Pan. Make sure to thoroughly clean the Drawer Pan after every use | |
| Home-made French fries are coming out unevenly cooked. | Your potatoes are not fresh or are frozen. | Make sure to use fresh and firm potatoes, not frozen potatoes, for home-made French fries. |
| Potato strips were not well rinsed prior to frying. | Thoroughly rinse sliced potato to remove all starch prior to frying. | |
| Home-made French fries are not crispy after air frying. | Crispy results are directly linked to the amount of oil used and water content of the potato. | Potato strips need to be thoroughly dried before adding oil. |
| Slice potato strips thinner if you want them crispier. | ||
| Use a bit more oil on the potato strips prior to frying if you want crispier results. |

