If this appliance is equipped with a polarized plug (one blade is wider than the other), please follow the below instructions:
To reduce the risk of electrical shock, this plug is intended to fit into a polarized outlet only one way. If you are unable to fit the plug into the electrical outlet, try reversing the plug. If the plug still does not fit, contact a qualified electrician. Never use the plug with an extension cord unless the plug can be fully inserted into the extension cord. Do not alter the plug of the product or any extension cord being used with this product. Do not attempt to defeat the safety purpose of the polarized plug.
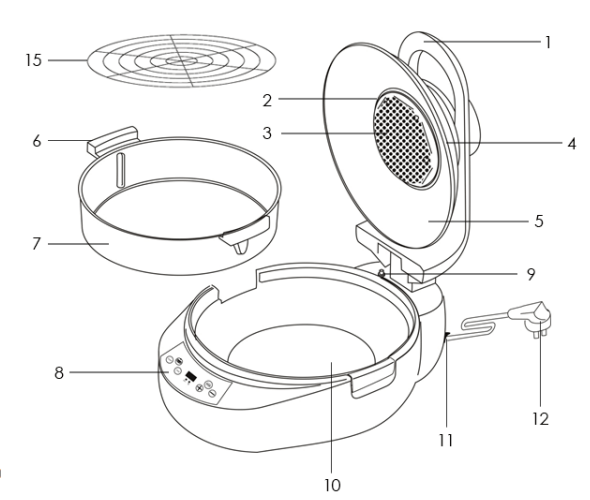
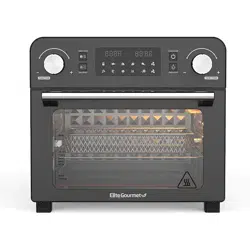
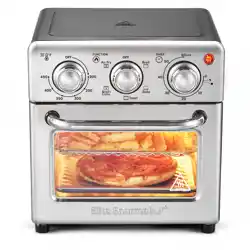
PARTS IDENTIFICATION
1. Lid Handle 2. Heater Cover 3. Top Heater 4. Vent 5. Glass Lid 6. Pan Handles 7. Cooking Pan 8. Control Panel 9. Safety Switch 10. Bottom Heater 11. Power Switch 12. Power Cord 13. Ventilating Fan 14. Top Plate 15. Stainless Steel Rack
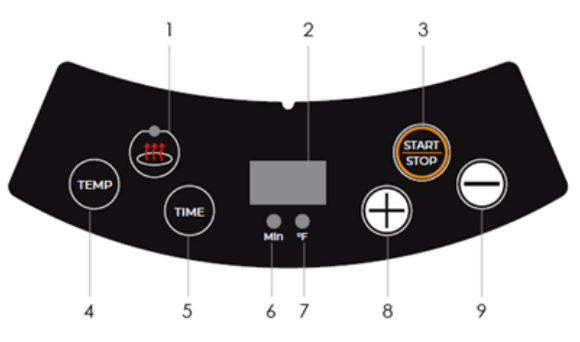
CONTROL PANEL
1. Bottom Heater Button 2. Time/Temp Digital Display 3. Start/Stop Button 4. Temperature Button 5. Timer Button 6. Time Indicator 7. Temperature Indicator 8. Increase Button 9. Decrease Button
BEFORE FIRST USE
Read all instructions and important safeguards.
Remove all packaging materials and check that all items have been received in good condition.
Tear up all plastic bags and recycle them properly as they can pose a suffocation or choking risk to children.
Wash the Cooking Pan (7) & Rack (15) in warm, soapy water. Rinse and dry thoroughly.
Place Air Fryer on a dry, level countertop or table. Keep the edge of the Air Fryer at least 3 inches away from any objects.
Close the Lid (5) securely and attach the Power Cord (12) to the Air Fryer and the electrical outlet. Turn on the Power Switch (11). Set the timer for 6 minutes and set the temperature to 248°F. Press the START/STOP button to heat up the unit.
There may be some minor smoking and light odor coming from the unit, this is normal and will stop after a couple of minutes.
After the timer has turned off and the Air Fryer has cooled, wipe the inside of the pan again.
HOW TO USE
1. Lift the Glass Lid (5).
2. Add food ingredients to the Cooking Pan (7). Distribute food evenly throughout the pan to ensure even cooking.
3. Shut the Glass Lid (5) when ready to cook.
4. Connect the Power Cord (12) to a grounded wall 120V AC outlet and turn ON the Power Switch (11) located on the back of the unit. The machine will beep and the Digital Display will show 000.
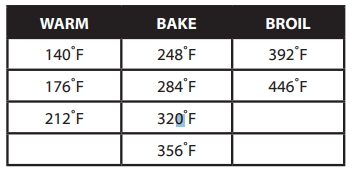
5. Press the Temperature Button, the unit will beep and the Digital Display will default to 356°F.
6. Press the + or – button to increase or decrease temperature setting to a Programmed Temperature below:
7. Press the Timer Button, the unit will beep and the Digital Display will default to 0 minutes.
8. Press the + or – button to increase or decrease cooking time by 2-min increments up to a maximum of 180-minutes. (Hold button for rapid increase/decrease).
9. After you have set the temperature and timer, press the START/STOP Button to begin cooking. (Regular cooking will use both Top and Bottom Heating Elements.)
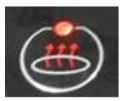
10. Press the Bottom Heater Button to operate ONLY the bottom heating element.
11. When the timer completes its countdown, the Air Fryer will beep three times and the heating system will stop – this signals it is time to remove your food. (Please note that the fan motor will continue to operate in order to cool down the machine, this will stop within approximately five-minutes.
NOTE: Lifting the lid during operation will automatically stop the cooking process. Cooking will resume once you close the lid. You can also switch off the appliance by manually pressing the START/STOP Button at any time during the cooking process. To turn OFF the unit completely, use the power switch on the back of the unit.
12. Carefully lift the Glass Lid (5). Keep your face and hands away from the hot steam when opening the lid. If removing the Cooking Pan (7), it must be placed onto a heat-resistant pad.
13. Check that your food is ready. If not, put the Cooking Pan (7) back into the main body and set the timer for a few more minutes.
14. Empty the contents of the Cooking Pan (7) into a bowl or onto a plate using non-metallic utensils.
NOTE: Wooden, heat-proof silicone or nylon utensils are recommended for use with this air fryer. Metal utensils may scratch the nonstick coating.
15. Turn off the Power Switch (11) and unplug the Power Cord (12) from wall outlet.
CLEANING & MAINTENANCE
It is recommended to clean the Air Fryer after every use.
Do not use abrasive cleansers as they may cause damage to the nonstick coating.
Before cleaning, unplug the unit and let it cool completely.
Wipe the outside of the unit with a damp cloth only.
Clean the cooking pan and rack with hot water and mild dish detergent.
Clean the glass lid with hot soapy water and a non-abrasive sponge.
Dry all parts after each use, re-assemble and store in a cool, dry location.
HELPFUL TIPS
Suggested cooking times and temperatures will vary depending on the quantity of ingredients used. The cooking pan has a nonstick coating, so it is not necessary to add additional oil to every dish. Keep in mind that it is best practice to season foods after they have been cooked to avoid scorching your dish.
Use the table on the next page to help select the best settings for the ingredients you’re preparing. Please not that this is only a guide; you will need to ensure your food is properly cooked before serving.
Save time and energy by toasting bagels, croissants, bread slices, French rolls and more. Set the temperature to 212°F and toast until desired darkness is achieved.
The air fryer should be operated on a separate electrical circuit from other operating appliances. If the electric circuit is overloaded with other appliances, this appliance may not operate properly.
There is a clear plastic film on the control panel. Please remove and discard before using.
When ready to cook connect the Power Cord to a grounded wall 120V AC outlet.
Turn on the power switch on the back of the Air Fryer. Press Time and + or – buttons for desired cook time. Press TEMP and + or – buttons to set desired cooking temperature. Press the START/STOP button to begin cooking.
The default setting operates both the top halogen-heating element with fan and the bottom-heating element. If desired, press the BOTTOM HEATER BUTTON to operate ONLY the bottom-heating element, the indicator light will be illuminated. (See image below).
During cooking, you may see the halogen light cycle on and off and hear clicking from the Air Fryer. This is a normal function of temperature control.
Cooking will pause when you open the lid to stir, then resume when you close the lid.
TROUBLESHOOTING GUIDE
PROBLEM
POSSIBLE CAUSE
SOLUTION
The air fryer does not work.
The appliance is not plugged in.
Plug the power cord (12) into an electrical outlet.
You did not flip the POWER Switch (11) on the back of the unit.
Make sure the Glass Lid (5) is completely closed in order to activate the Safety Switch (9) and begin operation.
The appliance is defective.
Contact customer service.
Food is not completely cooked/fried.
There is too much food in the Cooking Pan (7).
Use smaller batches of food in the Cooking Pan (7) to cook more evenly.
The cooking temperature is set too low.
Increase the temperature setting. Check “Cooking Time Chart” found in this manual.
The cooking time is too short.
Increase the time setting. Check “Cooking Time Chart” found in this manual.
Food is raw and frozen solid.
Raw frozen foods should be thawed before cooking in the air fryer. Exceptions to this are pre-cooked frozen foods.
Food is unevenly cooked.
Certain foods need to be stirred mid-way through the cooking process.
Foods that overlap inside the Cooking Pan (7) need to be stirred mid-way through cooking.
Fried snacks are not crispy.
You used a type of snack meant to be prepared in a traditional deep fryer.
Use oven snacks or lightly brush some oil onto the snacks for a crispier result.
I cannot close the Glass Lid (5).
The Cooking Pan (7) is too full.
Do not overfill the Cooking Pan (7).
White smoke is emitting out of the appliance during use.
You are preparing food with a high oil content.
When cooking with oily foods, oil will drain into the Cooking Pan (7). When the air fryer heats up, the pan heats up the oil and produces white smoke. This does not adversely affect the air fryer or your cooking process.
The pan has built-up oil residue from previous uses.
White smoke is caused by oil leftover in the Cooking Pan (7). Make sure to thoroughly clean the Cooking Pan (7) after every use.
Home-made French fries are coming out unevenly cooked.
Your potatoes are not fresh or are frozen.
Make sure to use fresh and firm potatoes, not frozen potatoes, for home-made French fries.
Potato strips were not well rinsed prior to frying.
Thoroughly rinse sliced potato to remove all starch prior to frying.
Home-made French fries are not crispy after air frying.
Crispy results are directly linked to the amount of oil used and water content of the fresh potato strips.
Potato strips need to be thoroughly dried before adding oil.
Slice potato strips thinner if you want them crispier.
Use a bit more oil on the potato strips prior to frying if you want crispier results.
#1 Can I bake a cake and in this? And how big of a pan can I use?
Its small. Not big enough for a cake.
#2 Do any of your recommend washing any parts and/or heating an empty load for 1ST time usage?
I definitely washed everything thoroughly before I cooked anything in it. Then used the airfryer on a low heat setting for 5 minutes to dry the machine. Hope that helps.
#3 How long does it take for the chemical/plastic smell to go away? It smells horrible when it is running.
I haven’t smelled. The longest time I used is 45 minutes at one time. It works great. No horrible smell.