Loading ...
Loading ...
Loading ...

Your grill arrives nearly ready to
use and requires little assem-
bly. By carefully following these
steps, you will be assured of safe
initial operation.
1) Cut the main strap holding
the grill to the pallet. With as-
sistance, remove grill from pallet
and place into desired location.
2) Carefully cut the cable ties
securing the warming rack and
rotisserie spit (if equipped). Re-
move these parts and set aside.
3) Remove the grill racks, then
remove any loose items from the
rebox, including the rotisserie
motor and L.P. hose.
4) Carefully remove the bri-
quette trays by lifting the front
of the tray and sliding it towards
the front of the grill.
5) Inspect briquette trays for
loose or missing briquettes. If
found, follow procedure at right
to reinstall.
6) Cut and remove wire and/or
cable ties from burners. ProSear
burners may be secured from
the bottom side. Remove styro-
foam block from under ProSear
burner cover.
7) Re-install briquette trays by
reversing procedure from step 4.
8) Re-install grill racks.
You are now ready to proceed
with the utility connections.
TO REPLACE BRIQUETTES
The special Lynx ceramic bri-
quettes are secured to the trays
with stainless steel clips. To in-
sert a briquette into the tray, it
is necessary to remove the clip
from one side of the empty slot.
This is done by bending the re-
taining tabs for the clip located
on the back side of the briquette
tray as shown below.
Unpacking and Assembly
6
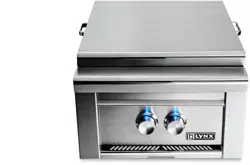
Figure 6-1
- Identication of items needing to be removed and/or assembled prior to use.
Carefully cut and
remove main strap.
Discard blocks and
foam padding.
Cut and
remove cable
ties holding
rotis spit.
Remove all
wire ties and
padding from
burners.
Rotis motor, elec-
trical transformer,
etc. in boxes in
firebox.
Loading ...
Loading ...
Loading ...