RLV4305
Programmable Thermostat
Owner’s
Guide
69-2613ES-01.book Page -1 Thursday, November 10, 2011 11:38 AM

Overview
About your new thermostat ................................................................... 1
Controls ................................................................................................. 2
Display................................................................................................... 3
Installation
Installation guidelines ............................................................................ 4
Wiring .................................................................................................... 5
Thermostat mounting ............................................................................ 6
Clock and day setting ............................................................................ 7
Operation
Automatic (Auto) mode.......................................................................... 8
Manual (Man) mode ............................................................................ 10
Away mode.......................................................................................... 10
Standby mode ..................................................................................... 10
Appendices
Advanced settings ............................................................................... 11
In case of difficulty............................................................................... 14
Resetting the thermostat (default settings).......................................... 15
Power outage ...................................................................................... 16
Specifications ......................................................................................16
Limited warranty .................................................................................. 17
Table of contents
69-2613ES-01.book Page 0 Thursday, November 10, 2011 11:38 AM

RLV4305
1
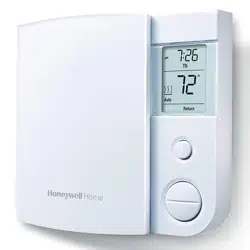
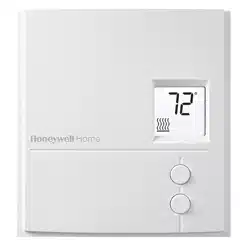
This thermostat is designed to control an electric heating system such as a
baseboard heater, a radiant ceiling, a convector or a fan-forced heater.
The thermostat CANNOT be used with:
• a resistive load under 0.83 A
• a resistive load over 14.6 A
• a system driven by a contactor or a relay (inductive load)
• a central heating system
SUPPLIED PARTS
• One (1) thermostat
• Two (2) 6-32 mounting screws
• Two (2) solderless connectors
About your new thermostat
Do you need assistance?
We are here to help.
Call 1-800-468-1502.
69-2613ES-01.book Page 1 Thursday, November 10, 2011 11:38 AM
Owner’s Guide
2
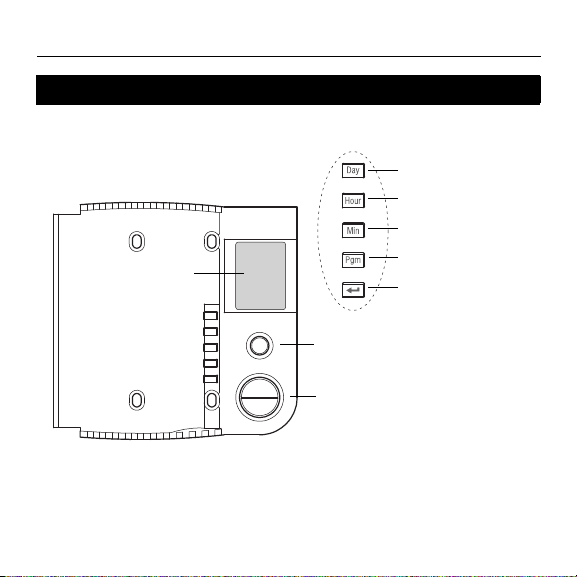
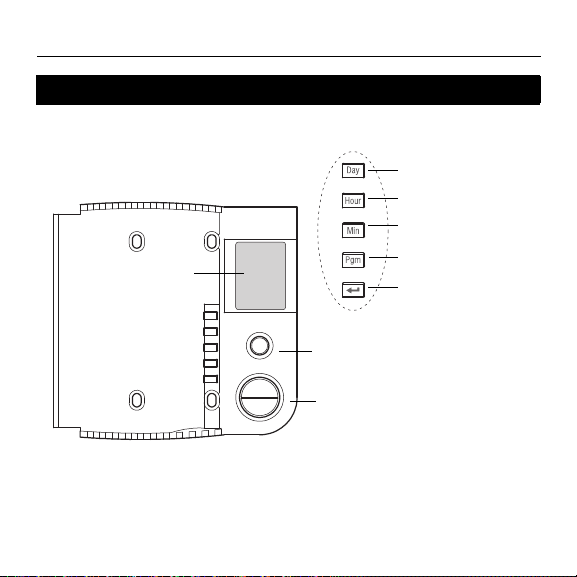
Controls
Mode button
(see pages 8 & 10)
Day button
Hour button
Program button
Minute button
Up and Down buttons
Return button
Backlit screen *
* The screen is backlit for 12 seconds when you press any button.
69-2613ES-01.book Page 2 Thursday, November 10, 2011 11:38 AM

RLV4305
3
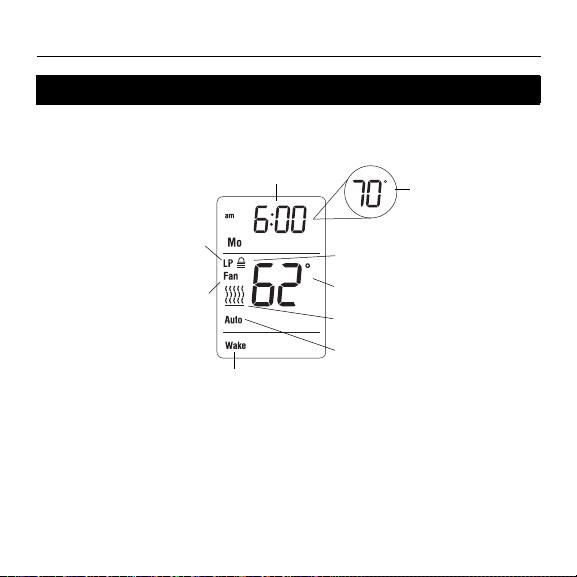
Display
Room temperature
Heating intensity indicator
Time and day
Mode indicator
(see pages 8 & 10)
Appears when power to
the thermostat is cut off
(see page 7)
Setpoint
temperature *
Appears if the
thermostat is configured
for a fan-forced heater
(see page 11)
Period indicator
(see page 8)
Indicates that the settings
are locked (see page 11)
* To display the set temperature (setpoint), press the Up or Down
button once. The thermostat will display the setpoint instead of the
clock for 5 seconds.
69-2613ES-01.book Page 3 Thursday, November 10, 2011 11:38 AM

Owner’s Guide
4
TURN OFF POWER TO THE HEATING SYSTEM AT THE MAIN
POWER PANEL TO AVOID ELECTRICAL SHOCK.
All cables and connections must comply with local electrical
codes.
This thermostat has tinned copper wires for line and load connec-
tions. Special CO/ALR solderless connectors must be used if
these wires will be connected to aluminium conductors.
Install the thermostat onto an electrical box.
Install the thermostat about 5’ (1.5 m) high, on an inside wall facing
the heater.
Avoid locations where there are air drafts (such as the top of a
staircase or an air outlet), dead air spots (such as behind a door),
or direct sunlight.
Do not install the thermostat on a wall that conceals chimney or
stove pipes.
The thermostat wires are not polarized; either wire can be con-
nected to the load or to the power supply.
Installation guidelines
69-2613ES-01.book Page 4 Thursday, November 10, 2011 11:38 AM

RLV4305
5
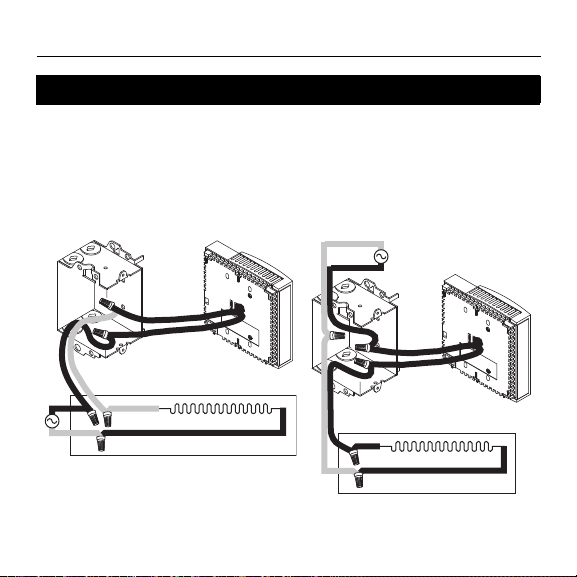
Connect the thermostat wires to the power and to the load using
solderless connectors for copper wires.
Wiring
2-wire Installation
4-wire Installation
69-2613ES-01.book Page 5 Thursday, November 10, 2011 11:38 AM

Owner’s Guide
6
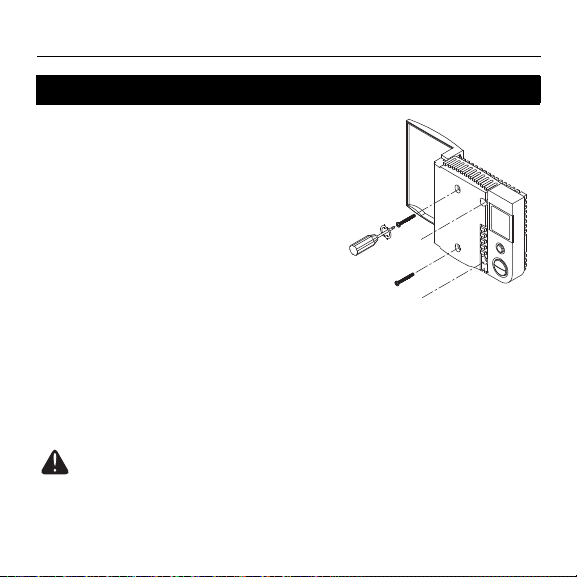
1) Push the excess wires back inside
the electrical box.
2) Secure the thermostat to the
electrical box using the provided
screws.
3) Insert the screws through either the
right or left pair of mounting holes
on the thermostat.
NOTE: If there is a protective film or
sticker on the thermostat’s screen, peel it
off.
4) Apply power to the heating system. Verify the installation by
checking that the heater can be turned on by raising the setpoint
using the Up button and off by lowering the setpoint using the
Down button.
WARNING: Keep the thermostat's air vents clean and free from
obstructions.
Thermostat mounting
69-2613ES-01.book Page 6 Thursday, November 10, 2011 11:38 AM

RLV4305
7
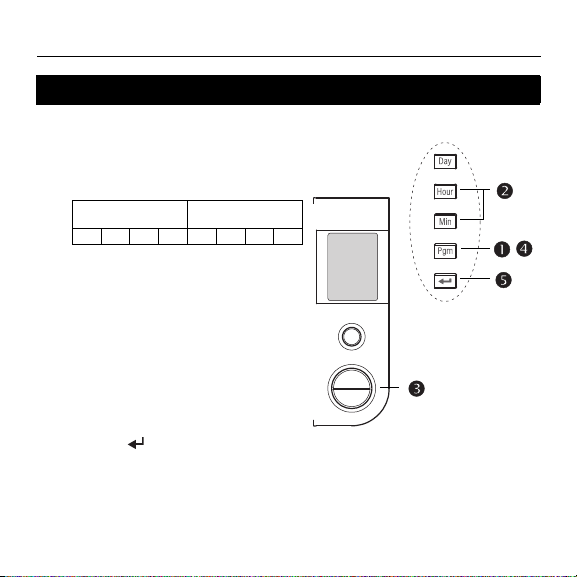
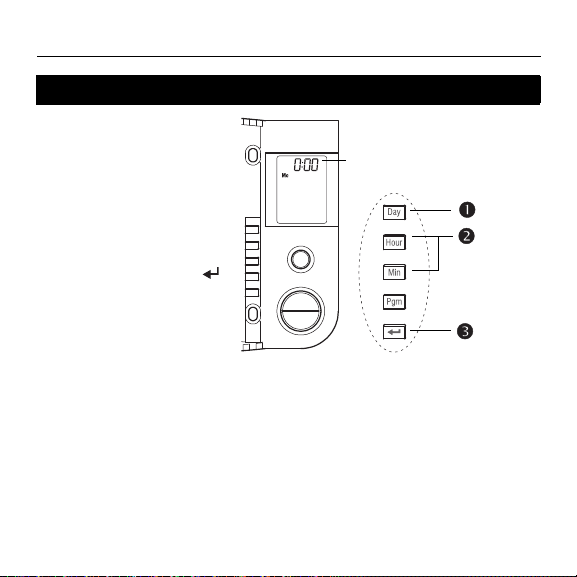
1) Press the Day button
to set the day.
2) Use the Hour and Min
buttons to set the
clock.
3) Press the button to
exit.
Clock and day setting
The clock must be set
when the time is incorrect
or flashes on the screen.
69-2613ES-01.book Page 7 Thursday, November 10, 2011 11:38 AM
Owner’s Guide
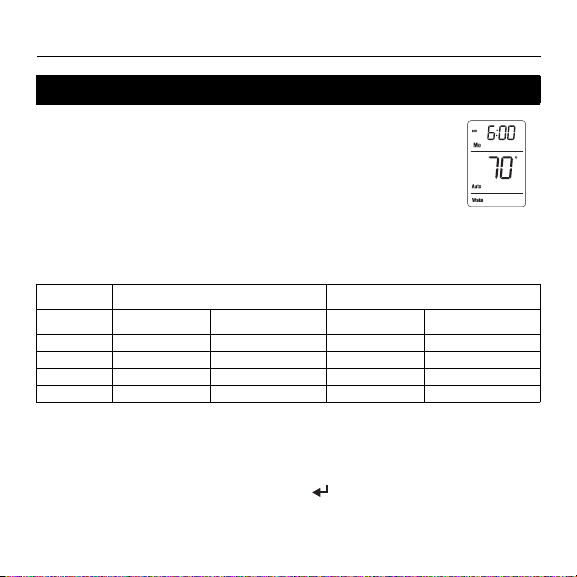
8
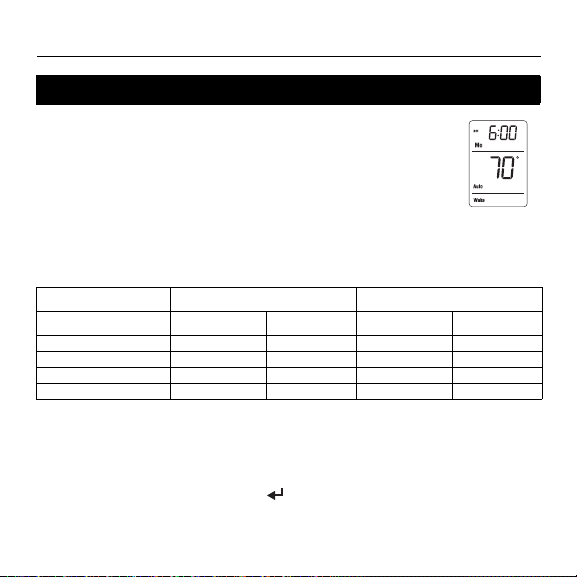
In Automatic mode, the thermostat adjusts its temperature set-
point according to the period of the day. To place the thermostat in
this mode, press the Mode button until Auto appears on the
screen. The current period name also appears (unless the ther-
mostat has not been programmed with a schedule).
You can program up to 4 periods (Wake, Leave, Return or Sleep)
in a day. You can set 2 different programs: one for the weekdays
(Monday to Friday) and another one for the weekend (Saturday
and Sunday).
The thermostat uses the following default schedule:
Temporary Override
You can temporarily modify the setpoint temperature while the thermostat is in
Automatic mode using the Up or Down button. The new setpoint will be used until
the beginning of the next period. During the override, Auto flashes on the screen.
You can cancel the override by pressing the button.
Automatic mode
Monday to Friday Saturday & Sunday
Period Start Time Temperature Start Time Temperature
Wake
6:00 am 70°F (21.0°C) 6:00 70°F (21.0°C)
Leave
8:00 am 62°F (16.5°C) --:-- - -
Return
6:00 pm 70°F (21.0°C) --:-- - -
Sleep
10:00 pm 62°F (16.5°C) 10:00 pm 62°F (16.5°C)
69-2613ES-01.book Page 8 Thursday, November 10, 2011 11:38 AM
RLV4305
9
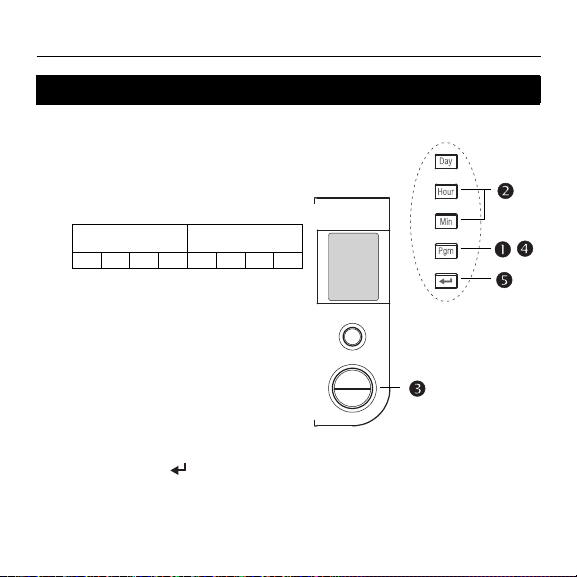
To modify the schedule:
1) Press the Pgm button. Each time you press
the Pgm button, the thermostat displays
one of the periods of the schedule in the
following order:
2) Press the Hour and Min buttons to set the
start time of the displayed period.
NOTE: To cancel the period, press the
Mode button. Instead of displaying the start
time of the period, the thermostat will dis-
play --:--. During operation, the thermostat
will skip over that period.
3) Press the Up or Down button to set the
temperature.
4) To set another period, press the Pgm
button and repeat steps 2 and 3.
5) Press the button to return to normal
display.
Automatic mode (cont’d)
Weekdays
(MO TU WE TH FR)
Weekend
(SA SU)
12341234
69-2613ES-01.book Page 9 Thursday, November 10, 2011 11:38 AM

Owner’s Guide
10
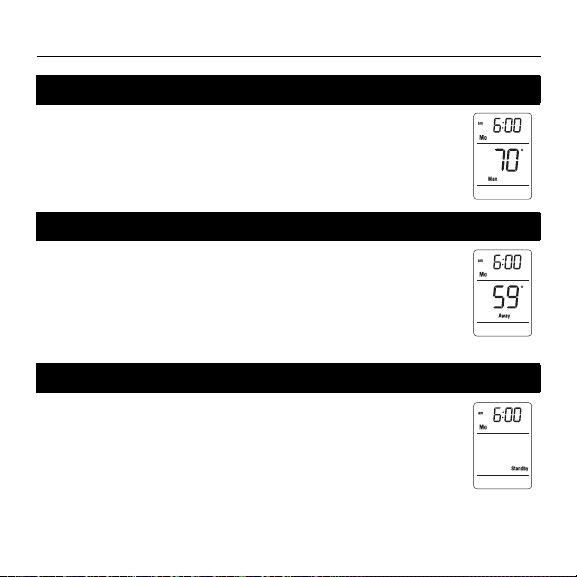
To place the thermostat in Manual mode, press the Mode
button until Man appears on the screen. In this mode, any
modification to the temperature setpoint must be done
manually. To set the temperature, press the Up or Down
button. The default setting is 70°F (21.0°C).
To place the thermostat in Away mode, press the Mode button
until Away appears on the screen. This mode is a quick way to
lower the temperature to a predetermined setting before you go
away for an extended length of time. The temperature is 59°F
(15.0°C) by default and can be modified using the setup menu
(see page 11).
To disable heating, press the Mode button until Standby
appears on the screen. In this mode, the setpoint temperature
cannot be displayed or modified. For frost protection, heating
will turn on only to prevent the room temperature from dropping
below 41°F (5°C).
Manual (Man) mode
Away mode
Standby mode
69-2613ES-01.book Page 10 Thursday, November 10, 2011 11:38 AM
RLV4305
11
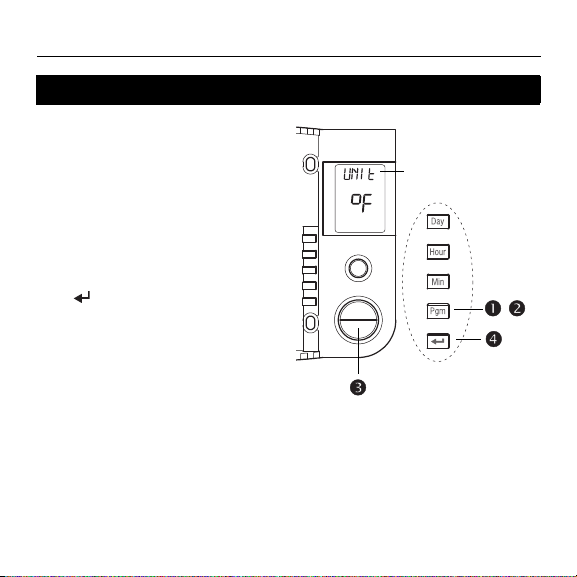
1) Press the Pgm button for 3
seconds.
2) To display the next parameter,
press the Pgm button.
3) To modify the displayed
parameter, press the Up or
Down button.
4) To exit the menu, press the
button or do not press any
button for 1 minute.
Advanced settings
The first parameter
appears when the
menu is displayed.
69-2613ES-01.book Page 11 Thursday, November 10, 2011 11:38 AM

Owner’s Guide
12
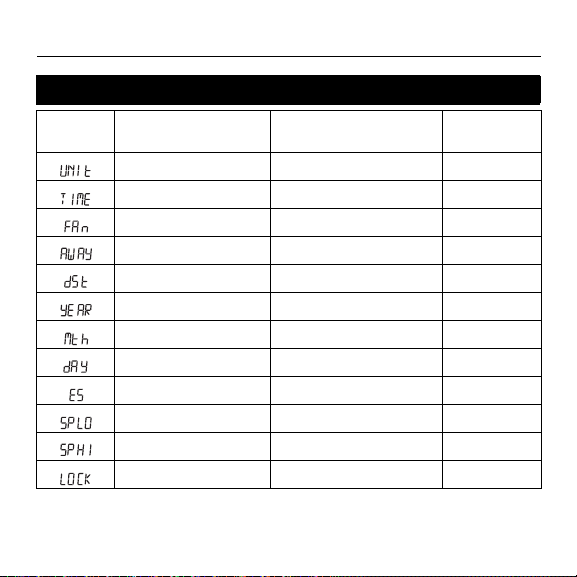
Advanced settings (cont’d)
Display Parameter Options Default setting
Temperature unit °C / °F °F
Time format 12 hr / 24 hr 12 hr
Fan
1
No / Yes No
Away temperature
2
41°F - 86°F (5.0°C - 30.0°C) 59°F (15.0°C)
Daylight Saving Time
3
On / Off Off
Year
4
00 - 99 09
Month
4
01 -12 01
Day
4
01 - 31 01
Early Start
5
On / Off Off
Minimum setpoint 41°F - 86°F (5.0°C - 30.0°C) 41°F (5.0°C)
Maximum setpoint 41°F - 86°F (5.0°C - 30.0°C) 86°F (30.0°C)
Keypad lock
6
On / Off Off
69-2613ES-01.book Page 12 Thursday, November 10, 2011 11:38 AM

RLV4305
13
1
Fan
Place at Yes if you have a fan-forced heater (to prevent premature burnout of the motor).
Leave at No for better temperature regulation if you do not have a fan-forced heater.
2
Away temperature
Set the temperature you wish to use when the thermostat is in Away mode (see
page 10).
3
Daylight Saving Time
When the Daylight Saving Time function is enabled (On), the thermostat automatically
switches to Daylight Saving Time on the second Sunday of March and to normal time on
the first Sunday of November.
4
Year, Month, Day
These parameters are available only if the Daylight Saving Time function is enabled
(On).
5
Early Start
Early Start is used in Automatic mode only. When Early Start is enabled (On), the
thermostat determines when to start heating so the desired temperature is attained at
the beginning of Wake and Return periods. When Early Start is disabled (Off), heating
starts only at the beginning of Wake and Return periods; thus there is a delay before
you reach the desired temperature.
6
Keypad lock
The settings are locked. The temperature adjustment buttons only allow you to view the
temperature setpoint.
Advanced settings (cont’d)
69-2613ES-01.book Page 13 Thursday, November 10, 2011 11:38 AM
Owner’s Guide
14
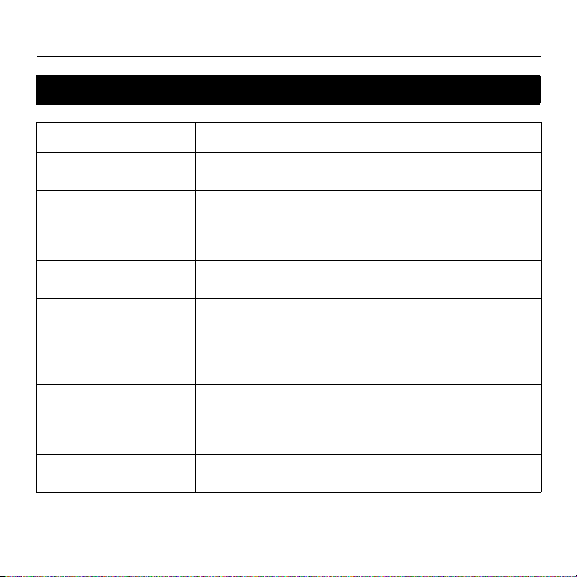
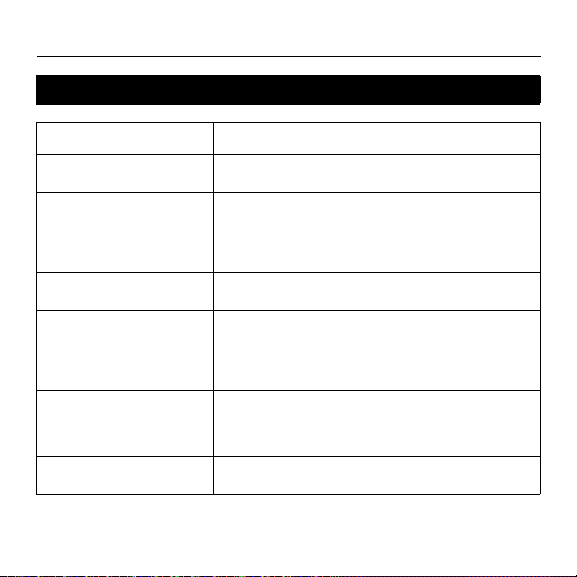
In case of difficulty
PROBLEM SOLUTIONS
Thermostat is hot.
This condition is normal. Ensure that the heater capac-
ity does not exceed the thermostat’s maximum load.
Wrong temperature is
displayed.
Correct it if any of the following situations exists:
• The thermostat is exposed to an air draft.
• The thermostat is located near or above a heat
source such as a light dimmer.
Wrong time is displayed.
The thermostat was without power for more than 5
hours.
Temperature does not
change according to the
programmed schedule.
Check that the thermostat is in Automatic mode.
Check the schedule and clock settings. If the thermo-
stat is configured in 12-hour format, ensure that PM
appears on the screen when afternoon times are dis-
played.
LP appears on the
screen or the screen is
blank despite there is no
power outage.
The thermal circuit breaker in the heater is opened.
This can happen if the heater is obstructed by furniture
or curtain and has overheated, or if the thermal circuit
breaker is defective or too sensitive.
The settings cannot be
changed.
The settings are locked (see page 13).
69-2613ES-01.book Page 14 Thursday, November 10, 2011 11:38 AM
RLV4305
15
WARNING: All parameters, except the clock (time and day), return to
their default settings when the thermostat is reset.
1) Press the Mode button until Standby appears on the screen.
2) Press the button for 6 seconds.
3) The thermostat will display rSt (reset) for 2 seconds to indicate it is
reset and will then return to normal display.
During a power outage, the thermostat display remains lit for the first 2
minutes. During this time, the LP (low power) indicator appears and all
buttons are disabled. Then the screen turns blank. The settings are
stored in memory. When power returns, the thermostat returns to the
mode of operation preceding the power outage. If the power failure has
exceeded 5 hours, the clock and date must be re-adjusted.
Resetting the thermostat (default settings)
Power outage
69-2613ES-01.book Page 15 Thursday, November 10, 2011 11:38 AM

Owner’s Guide
16
Supply: 120/240 VAC, 60 Hz
Minimum load: 0.83 A (resistive only)
200 W @ 240 V AC
100 W @ 120 V AC
Maximum load: 14.6 A (resistive only)
3500 W @ 240 V AC
1750 W @ 120 V AC
Display range: 32°F to 99°F (0°C to 50.0°C)
Setpoint range: 41°F to 86°F (5.0°C to 30.0°C)
Resolution: 1°F (0.5°C)
Storage temperature: -4°F to 120°F (-20°C to 50°C)
Specifications
69-2613ES-01.book Page 16 Thursday, November 10, 2011 11:38 AM

RLV4305
17
Honeywell warrants this product, excluding battery, to be free from defects in the workmanship or mate-
rials, under normal use and service, for a period of one (1) year from the date of purchase by the con-
sumer. If at any time during the warranty period the product is determined to be defective or
malfunctions, Honeywell shall repair or replace it (at Honeywell's option).
If the product is defective,
(i) return it, with a bill of sale or other dated proof of purchase, to the place from which you pur-
chased it, or
(ii) call Honeywell Customer Care at 1-800-468-1502. Customer Care will make the determination
whether the product should be returned to the following address: Honeywell Return Goods,
Dock 4 MN10-3860, 1885 Douglas Dr N, Golden Valley, MN 55422, or whether a replacement
product can be sent to you.
This warranty does not cover removal or reinstallation costs. This warranty shall not apply if it is shown
by Honeywell that the defect or malfunction was caused by damage which occurred while the product
was in the possession of a consumer.
Honeywell's sole responsibility shall be to repair or replace the product within the terms stated above.
HONEYWELL SHALL NOT BE LIABLE FOR ANY LOSS OR DAMAGE OF ANY KIND, INCLUDING
ANY INCIDENTAL OR CONSEQUENTIAL DAMAGES RESULTING, DIRECTLY OR INDIRECTLY,
FROM ANY BREACH OF ANY WARRANTY, EXPRESS OR IMPLIED, OR ANY OTHER FAILURE OF
THIS PRODUCT. Some states do not allow the exclusion or limitation of incidental or consequential
damages, so this limitation may not apply to you.
THIS WARRANTY IS THE ONLY EXPRESS WARRANTY HONEYWELL MAKES ON THIS PRODUCT.
THE DURATION OF ANY IMPLIED WARRANTIES, INCLUDING THE WARRANTIES OF MERCHANT-
ABILITY AND FITNESS FOR A PARTICULAR PURPOSE, IS HEREBY LIMITED TO THE ONE-YEAR
DURATION OF THIS WARRANTY. Some states do not allow limitations on how long an implied warranty
lasts, so the above limitation may not apply to you.
This warranty gives you specific legal rights, and you may have other rights which vary from state to
state.
If you have any questions concerning this warranty, please write Honeywell Customer Relations, 1985
Douglas Dr, Golden Valley, MN 55422 or call 1-800-468-1502.
Limited warranty
69-2613ES-01.book Page 17 Thursday, November 10, 2011 11:38 AM

Automation and Control Systems
Honeywell International Inc.
1985 Douglas Drive North
Golden Valley, MN 55422
http://yourhome.honeywell.com
Printed in USA
69-2613ES-01 11-2011
69-2613ES-01.book Page 18 Thursday, November 10, 2011 11:38 AM
RLV4305
Termostato programable
Guía del
usuario
69-2613ES-01.book Page -1 Thursday, November 10, 2011 11:38 AM

Visión general
Acerca de su nuevo termostato............................................................. 1
Controles ............................................................................................... 2
Visualizador........................................................................................... 3
Instalación
Instrucciones de instalación .................................................................. 4
Conexions ............................................................................................. 5
Instalación del termostato......................................................................6
Configuración de hora y día .................................................................. 7
Funcionamiento
Modo Auto (automático) ........................................................................ 8
Modo Man (manual) ............................................................................ 10
Modo Away (ausente) ......................................................................... 10
Modo Standby (en espera) .................................................................. 10
Apéndices
Configuraciones avanzadas ................................................................ 11
En caso de inconvenientes ................................................................. 14
Reinicio del termostato (configuraciones predeterminadas) ............... 15
Corte de energía ................................................................................. 16
Especificaciones..................................................................................16
Garantía limitada ................................................................................. 17
Índice
69-2613ES-01.book Page 0 Thursday, November 10, 2011 11:38 AM

RLV4305
1
Este termostato está diseñado para controlar un sistema eléctrico de calefacción,
como un calentador de zócalo, un techo radiante, un convector o un calentador
impulsado por ventilador.
El termostato NO se puede utilizar con:
• una carga resistiva inferior a 0.83 A
• una carga resistiva superior a 14.6 A
• un sistema accionado por un contactor o un relé (carga inductiva)
• un sistema de calefacción central
PIEZAS SUMINISTRADAS
• Un (1) termostato
• Dos (2) tornillos de montaje de 6-32
• Dos (2) conectores sin soldadura
Acerca de su nuevo termostato
¿Necesita asistencia?
Estamos aquí para ayudarle.
Llame al 1-800-468-1502.
69-2613ES-01.book Page 1 Thursday, November 10, 2011 11:38 AM
Guía del usuario
2
Controles
Botón de modo
(consulte las págs. 8 y 10)
Botón de día
Botón de hora
Botón de
programación
Botón de minutos
Botones de ajuste
arriba y abajo
Botón Intro
Pantalla con
luz de fondo *
* La pantalla se ilumina durante 12 segundos cuando presiona cualquier botón.
69-2613ES-01.book Page 2 Thursday, November 10, 2011 11:38 AM
RLV4305
3
Visualizador
Temperatura ambiente
Indicador de intensidad
de calefacción
Día y hora
Indicador de modo
(consulte las págs. 8 y 10)
Aparece cuando se corta
la energía al termostato
(consulte la pág. 7)
Temperatura del
punto de ajuste *
Aparece si el termostato
está configurado para
calentador impulsado
por ventilador
(consulte la pág. 11)
Indicador de período
(consulte la pág. 8)
Indica que las configuraciones
están bloqueadas (consulte la
pág. 11)
* Para mostrar la temperatura configurada (punto de ajuste), presione el
botón de ajuste arriba o abajo una vez. El termostato mostrará el punto de
ajuste en lugar del reloj durante 5 segundos.
69-2613ES-01.book Page 3 Thursday, November 10, 2011 11:38 AM

Guía del usuario
4
CORTE LA ENERGÍA ELÉCTRICA AL SISTEMA DE CALEFACCIÓN EN
EL PANEL DE ALIMENTACIÓN PRINCIPAL PARA EVITAR UNA
DESCARGA ELÉCTRICA.
Los cables y las conexiones deben cumplir con los códigos de electric-
idad locales.
Este termostato tiene cables de cobre estañado para las conexiones
de línea y de carga. Se deben utilizar conectores especiales sin solda-
dura CO/ALR si los cables se conectarán a conductores de aluminio.
Instale el termostato en una caja eléctrica.
Instale el termostato a, aproximadamente, 5 pies (1.5 m) de altura, en
una pared interior y orientado hacia el calentador.
Evite lugares donde haya corrientes de aire (p. ej., la parte superior de
una escalera o una salida de aire), áreas donde el aire esté viciado (p.
ej., detrás de una puerta) o espacios que reciban la luz directa del sol.
No instale el termostato en una pared que oculte chimeneas o tuberías
de estufas.
Los cables del termostato no están polarizados; cualquier cable se
puede conectar a la carga o al suministro eléctrico.
Instrucciones de instalación
69-2613ES-01.book Page 4 Thursday, November 10, 2011 11:38 AM
RLV4305
5
Conecte los cables del termostato al suministro eléctrico o a la
carga utilizando conectores sin soldadura para cables de
cobre.
Conexiones
Instalación de 2 cables
Instalación de 4 cables
69-2613ES-01.book Page 5 Thursday, November 10, 2011 11:38 AM
Guía del usuario
6
1) Empuje los cables sobrantes dentro
de la caja eléctrica.
2) Use los tornillos incluidos para
sujetar el termostato a la caja
eléctrica.
3) Inserte los tornillos en el par de
orificios de montaje ubicados a la
derecha o izquierda del termostato.
NOTA: Si hay una película protectora o
una etiqueta adhesiva en la pantalla del
termostato, retírela.
4) Conecte la energía del sistema de calefacción. Compruebe la
instalación controlando que el calentador se pueda encender y
apagar; para ello, suba el punto de ajuste con el botón de ajuste
arriba y bájelo con el botón de ajuste abajo, respectivamente.
ADVERTENCIA: Mantenga los conductos de ventilación del ter-
mostato limpios y sin obstrucciones.
Instalación del termostato
69-2613ES-01.book Page 6 Thursday, November 10, 2011 11:38 AM
RLV4305
7
1) Presione el botón Day
(día) para configurar
el día.
2) Use los botones Hour
(hora) y Min (minutos)
para configurar el
reloj.
3) Presione el botón
para salir.
Configuración de hora y día
El reloj se debe configurar
cuando la hora sea incorrecta
o destelle en la pantalla.
69-2613ES-01.book Page 7 Thursday, November 10, 2011 11:38 AM
Guía del usuario
8
En el modo automático, el termostato regula el punto de ajuste de la
temperatura según el momento del día. Para poner el termostato en
este modo, presione el botón Mode (modo) hasta que aparezca Auto
(automático) en la pantalla. También se muestra el nombre del período
actual (a menos que el termostato no esté programado con un
cronograma).
Puede programar hasta 4 períodos (Wake [despertar], Leave [salir],
Return [regresar], Sleep [dormir]) en un día. Puede configurar 2
programas diferentes: uno para los días de semana (lunes a viernes) y
otro para el fin de semana (sábado y domingo)
El termostato usa el siguiente cronograma predeterminado:
Anulación temporal
Puede usar el botón de desplazamiento hacia arriba o hacia abajo para modificar tem-
poralmente la temperatura del punto de ajuste mientras el termostato está en modo
automático. El nuevo punto de ajuste se usará hasta el comienzo del siguiente período.
Durante la anulación, en la pantalla destella la palabra Auto (automático). Puede can-
celar la anulación presionando el botón .
Modo automático
Lunes a viernes Sábado y domingo
Período Hora de inicio Temperatura Hora de inicio Temperatura
Wake (despertar) 6:00 am 70°F (21.0°C) 6:00 70°F (21.0°C)
Leave (salir) 8:00 am 62°F (16.5°C) --:-- - -
Return (regresar) 6:00 pm 70°F (21.0°C) --:-- - -
Sleep (dormir) 10:00 pm 62°F (16.5°C) 10:00 pm 62°F (16.5°C)
69-2613ES-01.book Page 8 Thursday, November 10, 2011 11:38 AM
RLV4305
9
Para modificar el cronograma:
1) Presione el botón Pgm (programación).
Cada vez que presiona el botón Pgm
(programación), el termostato muestra uno
de los períodos del cronograma en el
siguiente orden:
2) Presione los botones Hour (hora) y Min
(minutos) para configurar la hora de inicio
del período mostrado.
NOTA: Para cancelar el período, presione
el botón Mode (modo). En lugar de mostrar
la hora de inicio del período, el termostato
mostrará --:--. Durante el funcionamiento,
el termostato omitirá ese período.
3) Presione el botón de ajuste arriba o abajo
para configurar la temperatura.
4) Presione el botón de ajuste arriba o abajo
para configurar la temperatura.
5) Presione el botón para volver a la
pantalla normal.
Modo automático (cont.)
Días de la semana
(MO TU WE TH FR)
Fines de semana
(SA SU)
12341234
69-2613ES-01.book Page 9 Thursday, November 10, 2011 11:38 AM
Guía del usuario
10
Para poner el termostato en modo manual, presione el botón Mode
(modo) hasta que aparezca Man (manual) en la pantalla. En este
modo, cualquier cambio en el punto de ajuste de la temperatura se
debe efectuar manualmente. Presione el botón de ajuste arriba o
abajo para configurar la temperatura. La configuración
predeterminada es 70° F (21° C).
Para poner el termostato en modo ausente, presione el botón Mode
(modo) hasta que aparezca Away (ausente) en la pantalla. Este
modo es una manera rápida de reducir la temperatura hasta una
configuración predeterminada antes de ausentarse durante un
período prologando. La temperatura predeterminada es 59° F (15°
C), y se puede modificar con el menú de configuración (consulte la
pág. 11).
Para desactivar la calefacción, presione el botón Mode (modo)
hasta que aparezca Standby (en espera) en la pantalla. En este
modo, la temperatura del punto de ajuste no se puede mostrar ni
modificar. Para proteger contra el congelamiento, la calefacción se
encenderá únicamente para evitar que la temperatura ambiente
descienda por debajo de 41° F (5° C).
Modo manual
Modo ausente
Modo en espera
69-2613ES-01.book Page 10 Thursday, November 10, 2011 11:38 AM

RLV4305
11
1) Presione el botón Pgm
(programación) durante
3 segundos.
2) Para visualizar el siguiente
parámetro, presione el botón
Pgm (programación).
3) Presione el botón de ajuste
arriba o abajo para
modificara el parámetro
mostrado.
4) Para salir del menú, presione
el botón o no presione
ningún botón durante 1
minuto.
Configuraciones avanzadas
El primer pará-
metro aparece
cuando se muestra
69-2613ES-01.book Page 11 Thursday, November 10, 2011 11:38 AM
Guía del usuario
12
Configuraciones avanzadas (cont.)
Visualizador Parámetro Opciones
Configuración
predeterminada
Unidad de temperatura °C / °F °F
Formato de horas 12 hr / 24 hr 12 hr
Ventilador
1
No/Yes (No/Sí) No
Temperatura en ausente
2
41°F - 86°F (5.0°C - 30.0°C) 59°F (15.0°C)
Horario de verano
3
On/Off (activado/desactivado) Off (desactivado)
Año
4
00 - 99 09
Mes
4
01 -12 01
Día
4
01 - 31 01
Arranque anticipado
5
On/Off (activado/desactivado) Off (desactivado)
Punto de ajuste mínimo 41°F - 86°F (5.0°C - 30.0°C) 41°F (5.0°C)
Punto de ajuste máximo 41°F - 86°F (5.0°C - 30.0°C) 86°F (30.0°C)
Bloqueo del teclado
6
On/Off (activado/desactivado) Off (desactivado)
69-2613ES-01.book Page 12 Thursday, November 10, 2011 11:38 AM

RLV4305
13
1
Ventilador
Elija Yes (sí) si tiene un calentador impulsado por ventilador (para evitar el recalentamiento
prematuro del motor). Elija No para una mejor regulación de temperatura si no cuenta con un
calentador impulsado por ventilador.
2
Temperatura en ausente
Configure la temperatura que desea tener cuando el termostato esté en modo Away (ausente)
(consulte la pág. 10).
3
Horario de verano
Cuando la función de horario de verano está On (activada), el termostato cambia
automáticamente al horario de verano el segundo domingo de marzo, y al horario normal el
primer domingo de noviembre.
4
Año, mes, día
Estos parámetros están disponibles únicamente si la función de horario de verano está On
(activada).
5
Arranque anticipado
El arranque anticipado se usa únicamente en modo automático. Cuando el arranque anticipado
está On (activado), el termostato determina cuándo arrancar la calefacción para que se
alcance la temperatura deseada al inicio de los períodos Wake (despertar) y Return (regresar).
Cuando el arranque anticipado está Off (desactivado), la calefacción arranca únicamente al
comienzo de los períodos Wake (despertar) y Return (regresar); por lo tanto, hay una demora
hasta alcanzar la temperatura deseada.
6
Bloqueo del teclado
Las configuraciones están bloqueadas. Los botones de ajuste de la temperatura únicamente
permiten ver el punto de ajuste de la temperatura.
Advanced settings (cont’d)
69-2613ES-01.book Page 13 Thursday, November 10, 2011 11:38 AM
Guía del usuario
14
En caso de inconvenientes
PROBLEMA SOLUCIONES
El termostato está caliente.
Esto es normal. Asegúrese de que la capacidad del
calentador no supere la carga máxima del termostato.
Se muestra una temperatura
incorrecta.
Corríjala si se presenta cualquiera de las siguientes
situaciones:
• El termostato está expuesto a una corriente de aire.
• El termostato está ubicado cerca o encima de una fuente
de calor, como un atenuador de luz.
Se muestra una hora
incorrecta.
El termostato estuvo sin energía eléctrica durante más de 5
horas.
La temperatura no cambia en
función del cronograma
programado.
Compruebe que el termostato esté en modo automático.
Compruebe las configuraciones del reloj y el cronograma. Si
el termostato está configurado con un formato de 12 horas,
asegúrese de que aparezca PM en la pantalla cuando se
muestren las horas de la tarde.
Aparece LP en la pantalla, o la
pantalla está en blanco a pesar
de que no hay un corte de
energía.
El interruptor de circuito térmico del calentador está abierto.
Esto puede ocurrir si el calentador está obstruido por algún
mueble o cortina y se sobrecalentó, o si el interruptor de
circuito térmico está defectuoso o es demasiado sensible.
No se pueden modificar las
configuraciones.
Las configuraciones están bloqueadas (consulte la pág. 13).
69-2613ES-01.book Page 14 Thursday, November 10, 2011 11:38 AM

RLV4305
15
ADVERTENCIA: Todos los parámetros, excepto el reloj (hora y día), vuel-
ven a las configuraciones predeterminadas cuando se reinicia el termostato.
1) Presione el botón Mode (modo) hasta que aparezca Standby (en
espera) en la pantalla.
2) Presione el botón durante 6 segundos.
3) En el termostato aparecerá rSt (reset [reinicio]) durante 2 segundos
para indicar que se reinició y, luego, volverá a la pantalla normal.
Durante un corte de energía, la pantalla del termostato permanece
encendida durante los primeros 2 minutos. Durante ese tiempo, aparece el
indicador LP (low power [suministro eléctrico bajo]) y se deshabilitan todos
los botones. A continuación, la pantalla se pone en blanco. Las
configuraciones se guardan en la memoria. Cuando vuelve la energía
eléctrica, el termostato regresa al modo de funcionamiento previo al corte
de energía. Si la falla eléctrica supera las 5 horas, se debe ajustar
nuevamente la hora y la fecha.
Reinicio del termostato (configuraciones predeterminadas)
Corte de energía
69-2613ES-01.book Page 15 Thursday, November 10, 2011 11:38 AM

Guía del usuario
16
Alimentación: 120/240 V CA, 60 Hz
Carga mínima: 0.83 A (únicamente resistiva)
200 W a 240 V CA
100 W a 120 V CA
Carga máxima: 14.6 A (únicamente resistiva)
3500 W a 240 V CA
1750 W a 120 V CA
Rango de visualización: 32°F a 99°F (0°C a 50.0°C)
Rango del punto de ajuste: 41°F a 86°F (5.0°C a 30.0°C)
Resolución: 1°F (0.5°C)
Temperatura de almacenamiento: -4°F a 120°F (-20°C a 50°C)
Especificaciones
69-2613ES-01.book Page 16 Thursday, November 10, 2011 11:38 AM

RLV4305
17
Honeywell garantiza por un período de un (1) año, a partir de la fecha de compra por el consumidor, que este pro-
ducto, sin incluir las baterías, no presentará defectos en los materiales ni en lo referente a la mano de obra, en
condiciones normales de uso y de servicio. Si en cualquier momento, durante el período de vigencia de la
garantía, se determina que el producto es defectuoso o que funciona mal, Honeywell lo reparará o lo reemplazará
(a elección de Honeywell).
Si el producto es defectuoso:
I. Devuélvalo al lugar donde lo compró, acompañado por la factura de compra o de otra prueba de compra que
incluya la fecha.
II. Llame al servicio de atención al cliente de Honeywell, al 1-800-468-1502. El servicio de atención al cliente
determinará si el producto debe devolverse a la siguiente dirección: Honeywell Return Goods, Dock 4 MN10-
3860, 1885 Douglas Dr N, Golden Valley, MN 55422; o si se le enviará un producto de reemplazo.
Esta garantía no cubre los costos de desinstalación y reinstalación. Esta garantía no será válida si se demuestra
que el defecto o el mal funcionamiento se deben a un daño que ocurrió cuando el producto estaba en posesión del
consumidor.
La única responsabilidad de Honeywell será la de reparar o reemplazar el producto de acuerdo con los términos
aquí establecidos. HONEYWELL NO SERA RESPONSABLE DE NINGUNA PERDIDA NI DE NINGUN DAÑO DE
NINGUN TIPO, INCLUIDOS LOS DAÑOS IMPREVISTOS O DERIVADOS QUE RESULTEN, DIRECTA O INDI-
RECTAMENTE, DEL INCUMPLIMIENTO DE CUALQUIER GARANTIA, EXPRESA O IMPLICITA, O DE
CUALQUIER OTRA FALLA DE ESTE PRODUCTO. Algunos estados no permiten la exclusión o la limitación de
los daños imprevistos o derivados, por lo tanto, es posible que la limitación no se aplique.
ESTA ES LA UNICA GARANTIA EXPRESA QUE HONEYWELL HACE SOBRE ESTE PRODUCTO. LA DURA-
CION DE CUALQUIER GARANTIA IMPLICITA, INCLUIDAS LAS GARANTIAS DE APTITUD E IDONEIDAD PARA
UN FIN DETERMINADO, QUEDA, POR EL PRESENTE, LIMITADA A LA DURACION DE UN AÑO DE ESTA
GARANTIA. Algunos estados no permiten limitaciones en cuanto a la duración de las garantías implícitas. Por lo
tanto, es posible que la limitación anterior no se aplique en su caso.
Esta garantía le brinda derechos legales específicos, y usted puede tener otros derechos que varían para cada
estado.
Si tiene preguntas acerca de esta garantía, escriba a Honeywell Customer Relations, 1985 Douglas Dr, Golden
Valley, MN 55422, o llame al 1-800-468-1502.
Garantía limitada
69-2613ES-01.book Page 17 Thursday, November 10, 2011 11:38 AM

Sistemas para automatización y control
Honeywell International Inc.
1985 Douglas Drive North
Golden Valley, MN 55422
http://yourhome.honeywell.com
Impreso en EE.UU.
69-2613ES-01 11-2011
69-2613ES-01.book Page 18 Thursday, November 10, 2011 11:38 AM