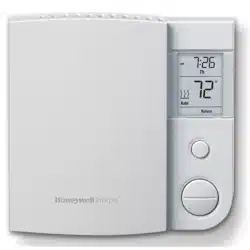
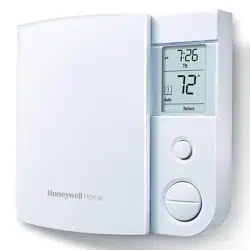
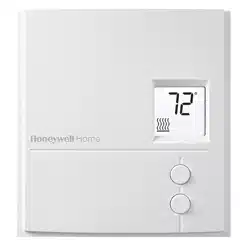
Owner 's Guide for Thermostat
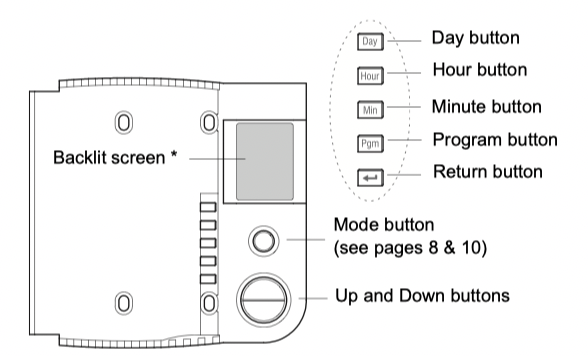
Controls
* The screen is backlit for 12 seconds when you press any button.
Display
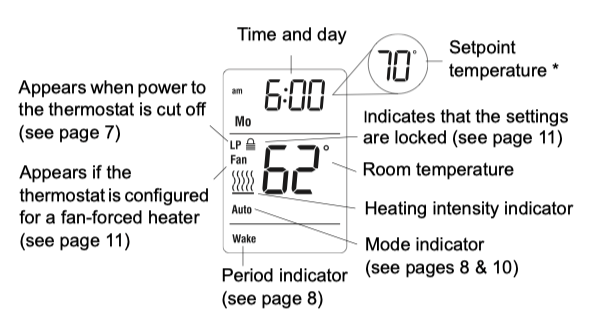
* To display the set temperature (setpoint), press the Up or Down button once. The thermostat will display the setpoint instead of the clock for 5 seconds.
Installation guidelines
TURN OFF POWER TO THE HEATING SYSTEM AT THE MAIN POWER PANEL TO AVOID ELECTRICAL SHOCK.
- All cables and connections must comply with local electrical codes.
- This thermostat has tinned copper wires for line and load connections. Special CO/ALR solderless connectors must be used if these wires will be connected to aluminium conductors.
- Install the thermostat onto an electrical box.
- Install the thermostat about 5’ (1.5 m) high, on an inside wall facing the heater.
- Avoid locations where there are air drafts (such as the top of a staircase or an air outlet), dead air spots (such as behind a door), or direct sunlight.
- Do not install the thermostat on a wall that conceals chimney or stove pipes.
- The thermostat wires are not polarized; either wire can be connected to the load or to the power supply.
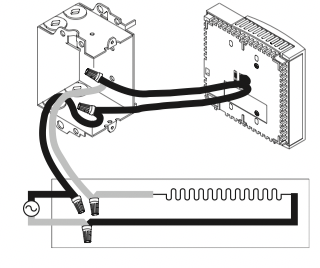
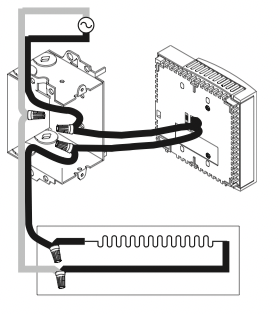
Wiring
Connect the thermostat wires to the power and to the load using solderless connectors for copper wires.
2-wire Installation
4-wire Installation
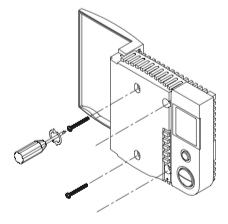
Thermostat mounting
1) Push the excess wires back inside the electrical box.
2) Secure the thermostat to the electrical box using the provided screws.
3) Insert the screws through either the right or left pair of mounting holes on the thermostat.
NOTE: If there is a protective film or sticker on the thermostat’s screen, peel it off.
4) Apply power to the heating system. Verify the installation by checking that the heater can be turned on by raising the setpoint using the Up button and off by lowering the setpoint using the Down button.
WARNING: Keep the thermostat's air vents clean and free from obstructions.
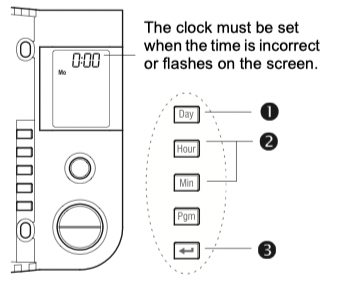
Clock and day setting
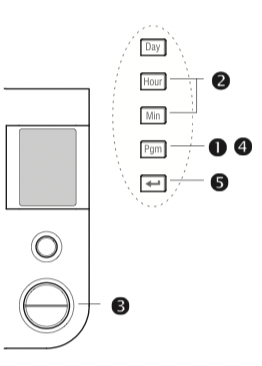
1) Press the Day button to set the day.
2) Use the Hour and Min buttons to set the clock.
3) Press the button to exit.
Automatic mode
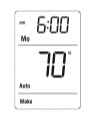
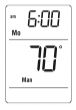
In Automatic mode, the thermostat adjusts its temperature setpoint according to the period of the day. To place the thermostat in this mode, press the Mode button until Auto appears on the screen. The current period name also appears (unless the thermostat has not been programmed with a schedule).
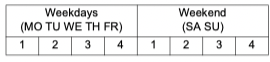
You can program up to 4 periods (Wake, Leave, Return or Sleep) in a day. You can set 2 different programs: one for the weekdays (Monday to Friday) and another one for the weekend (Saturday and Sunday).
The thermostat uses the following default schedule:
| |
Monday to Friday
|
Saturday & Sunday
|
|
Period
|
Start Time.
|
Temperature.
|
Start Time.
|
Temperature.
|
|
Wake
|
6:00 am
|
70°F (21.0°C)
|
6:00
|
70°F (21.0°C)
|
|
Leave
|
8:00 am
|
62°F (16.5°C)
|
--:--
|
--
|
|
Return
|
6:00 pm
|
70°F (21.0°C)
|
--:--
|
--
|
|
Sleep
|
10:00 pm
|
62°F (16.5°C)
|
10:00 pm
|
62°F (16.5°C)
|
Temporary Override
You can temporarily modify the setpoint temperature while the thermostat is in Automatic mode using the Up or Down button. The new setpoint will be used until the beginning of the next period. During the override, Auto flashes on the screen. You can cancel the override by pressing the button.
To modify the schedule:
1) Press the Pgm button. Each time you press the Pgm button, the thermostat displays one of the periods of the schedule in the following order:
2) Press the Hour and Min buttons to set the start time of the displayed period.
NOTE: To cancel the period, press the Mode button. Instead of displaying the start time of the period, the thermostat will display --:--. During operation, the thermostat will skip over that period.
3) Press the Up or Down button to set the temperature.
4) To set another period, press the Pgm button and repeat steps 2 and 3.
5) Press the button to return to normal display.
Manual (Man) mode
To place the thermostat in Manual mode, press the Mode button until Man appears on the screen. In this mode, any modification to the temperature setpoint must be done manually. To set the temperature, press the Up or Down button. The default setting is 70°F (21.0°C).
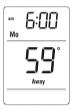
Away mode
To place the thermostat in Away mode, press the Mode button until Away appears on the screen. This mode is a quick way to lower the temperature to a predetermined setting before you go away for an extended length of time. The temperature is 59°F (15.0°C) by default and can be modified using the setup menu (see page 11).
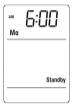
Standby mode
To disable heating, press the Mode button until Standby appears on the screen. In this mode, the setpoint temperature cannot be displayed or modified. For frost protection, heating will turn on only to prevent the room temperature from dropping below 41°F (5°C).
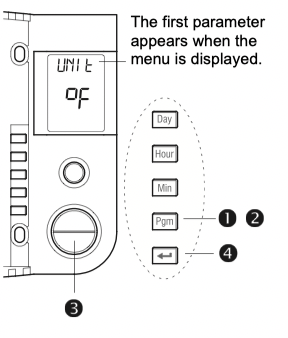
Advanced settings
1) Press the Pgm button for 3 seconds.
2) To display the next parameter, press the Pgm button.
3) To modify the displayed parameter, press the Up or Down button.
4) To exit the menu, press the button or do not press any button for 1 minute.
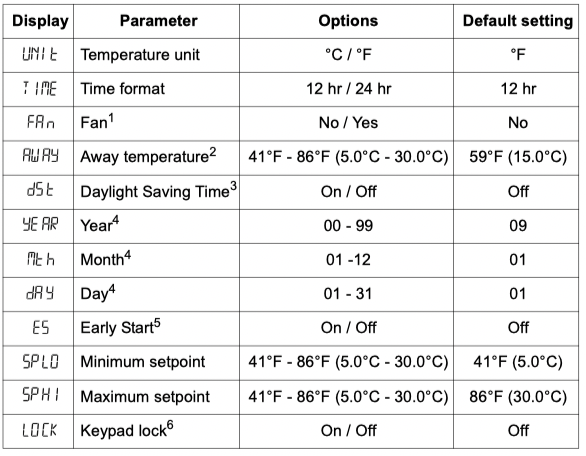
1. Fan
Place at Yes if you have a fan-forced heater (to prevent premature burnout of the motor). Leave at No for better temperature regulation if you do not have a fan-forced heater.
2. Away temperature
Set the temperature you wish to use when the thermostat is in Away mode (see page 10).
3. Daylight Saving Time
When the Daylight Saving Time function is enabled (On), the thermostat automatically switches to Daylight Saving Time on the second Sunday of March and to normal time on the first Sunday of November.
4. Year, Month, Day
These parameters are available only if the Daylight Saving Time function is enabled (On).
5. Early Start
Early Start is used in Automatic mode only. When Early Start is enabled (On), the thermostat determines when to start heating so the desired temperature is attained at the beginning of Wake and Return periods. When Early Start is disabled (Off), heating starts only at the beginning of Wake and Return periods; thus there is a delay before you reach the desired temperature.
6. Keypad lock
The settings are locked. The temperature adjustment buttons only allow you to view the temperature setpoint.
In case of difficulty
|
PROBLEM
|
SOLUTIONS
|
|
Thermostat is hot.
|
This condition is normal. Ensure that the heater capac- ity does not exceed the thermostat’s maximum load.
|
|
Wrong temperature is displayed.
|
Correct it if any of the following situations exists:
• The thermostat is exposed to an air draft.
• The thermostat is located near or above a heat source such as a light dimmer.
|
|
Wrong time is displayed.
|
The thermostat was without power for more than 5 hours.
|
|
Temperature does not change according to the programmed schedule.
|
Check that the thermostat is in Automatic mode. Check the schedule and clock settings. If the thermo- stat is configured in 12-hour format, ensure that PM appears on the screen when afternoon times are dis- played.
|
|
LP appears on the screen or the screen is blank despite there is no power outage.
|
The thermal circuit breaker in the heater is opened. This can happen if the heater is obstructed by furniture or curtain and has overheated, or if the thermal circuit breaker is defective or too sensitive.
|
|
The settings cannot be changed.
|
The settings are locked (see page 13).
|
Resetting the thermostat (default settings)
WARNING: All parameters, except the clock (time and day), return to their default settings when the thermostat is reset.
1) Press the Mode button until Standby appears on the screen.
2) Press the button for 6 seconds.
3) The thermostat will display rSt (reset) for 2 seconds to indicate it is reset and will then return to normal display.
Power outage
During a power outage, the thermostat display remains lit for the first 2 minutes. During this time, the LP (low power) indicator appears and all buttons are disabled. Then the screen turns blank. The settings are stored in memory. When power returns, the thermostat returns to the mode of operation preceding the power outage. If the power failure has exceeded 5 hours, the clock and date must be re-adjusted.
Specifications
Supply: 120/240 VAC, 60 Hz
Minimum load: 0.83 A (resistive only)
200 W @ 240 V AC
100 W @ 120 V AC
Maximum load: 14.6 A (resistive only)
3500 W @ 240 V AC
1750 W @ 120 V AC
Display range: 32°F to 99°F (0°C to 50.0°C)
Setpoint range: 41°F to 86°F (5.0°C to 30.0°C)
Resolution: 1°F (0.5°C)
Storage temperature: -4°F to 120°F (-20°C to 50°C)