User GUide • GUÍa del UsUario
Kwikset
1-866-863-6584
www.kwikset.com
49526 / 01
Before programming, install the lock on your
door. Follow the instructions in the Installation
Guide, on the reverse side of this manual.
Antes de la programación, instale la cerradura en la
puerta. Siga las instrucciones que se describen en la
Guía de instalación, al dorso de este manual.
QUick start
InIcIo rápIdo
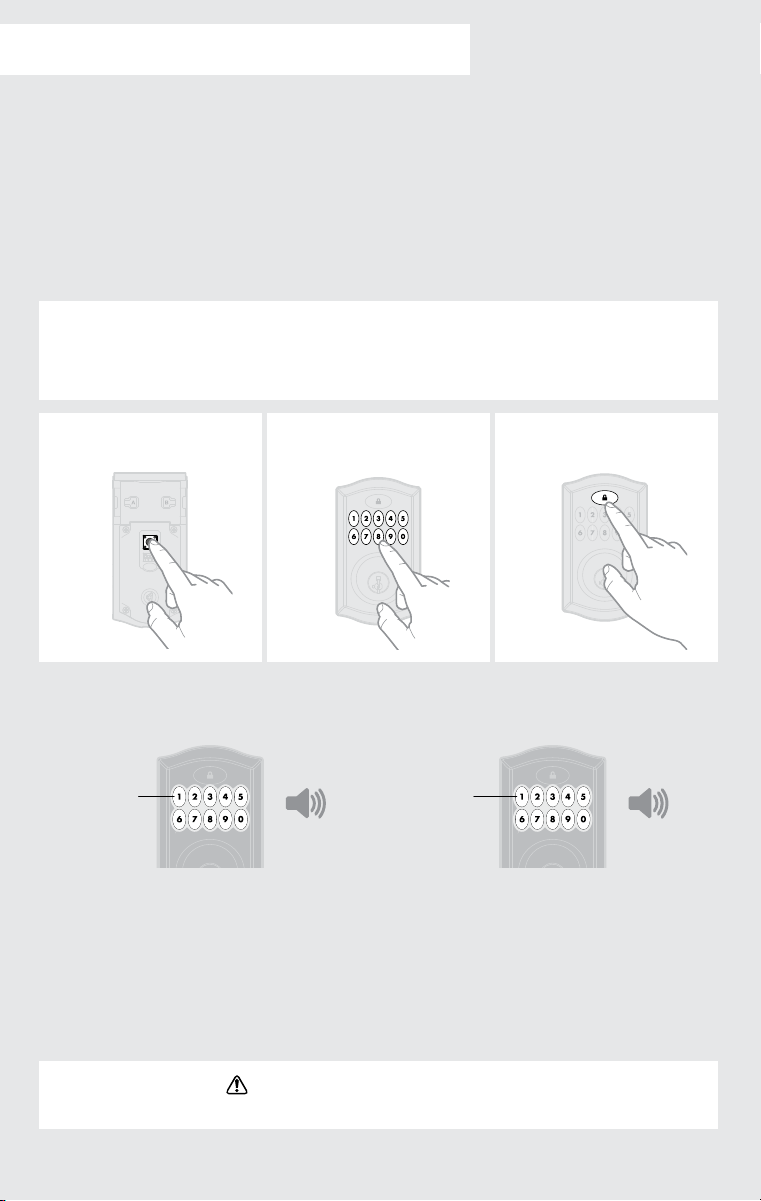
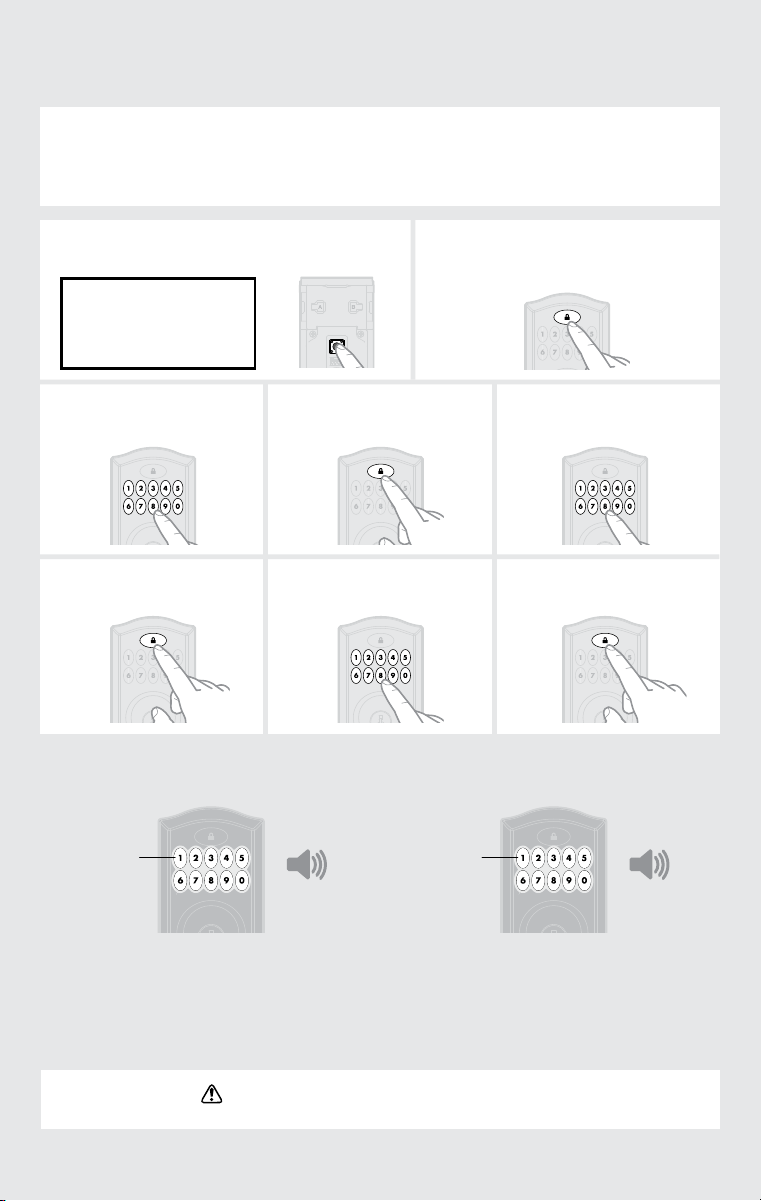
adding User codes at the lock (Without a Master code)
cómo agregar códigos de usuario en la cerradura (sin un código maestro)
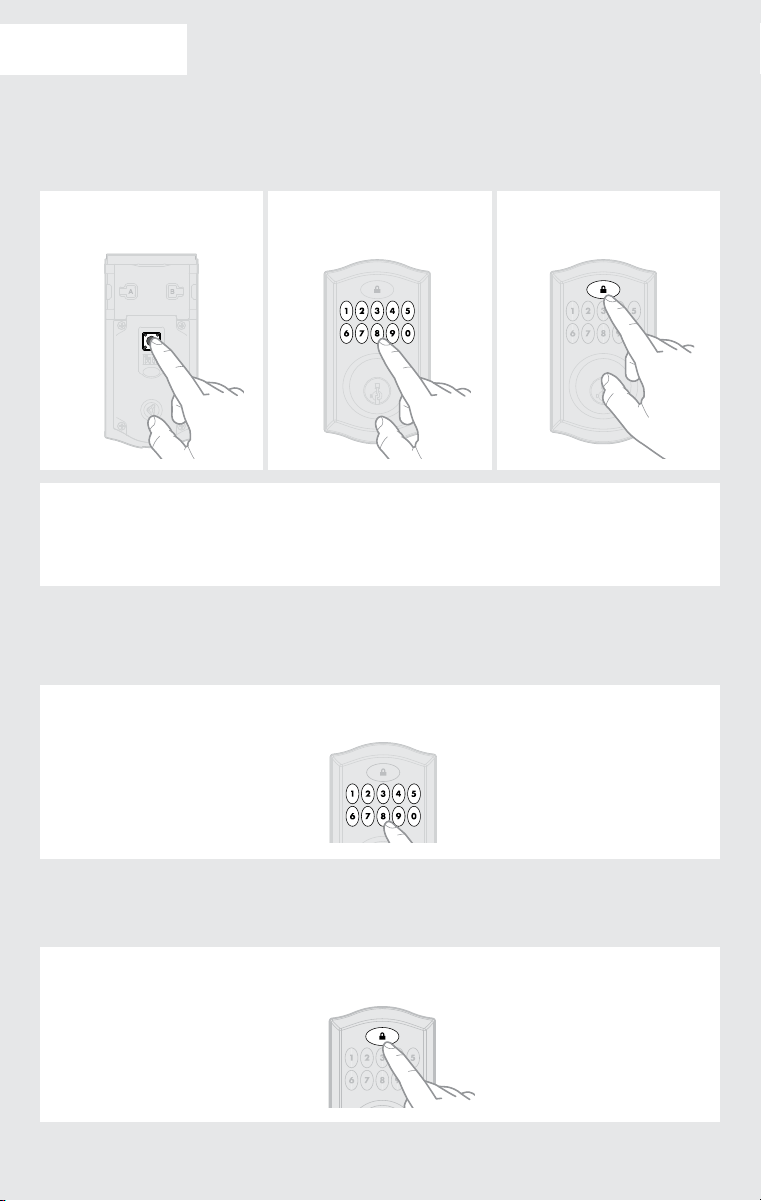
Unlocking the door
cómo abrir la puerta
locking the door
cómo cerrar la puerta
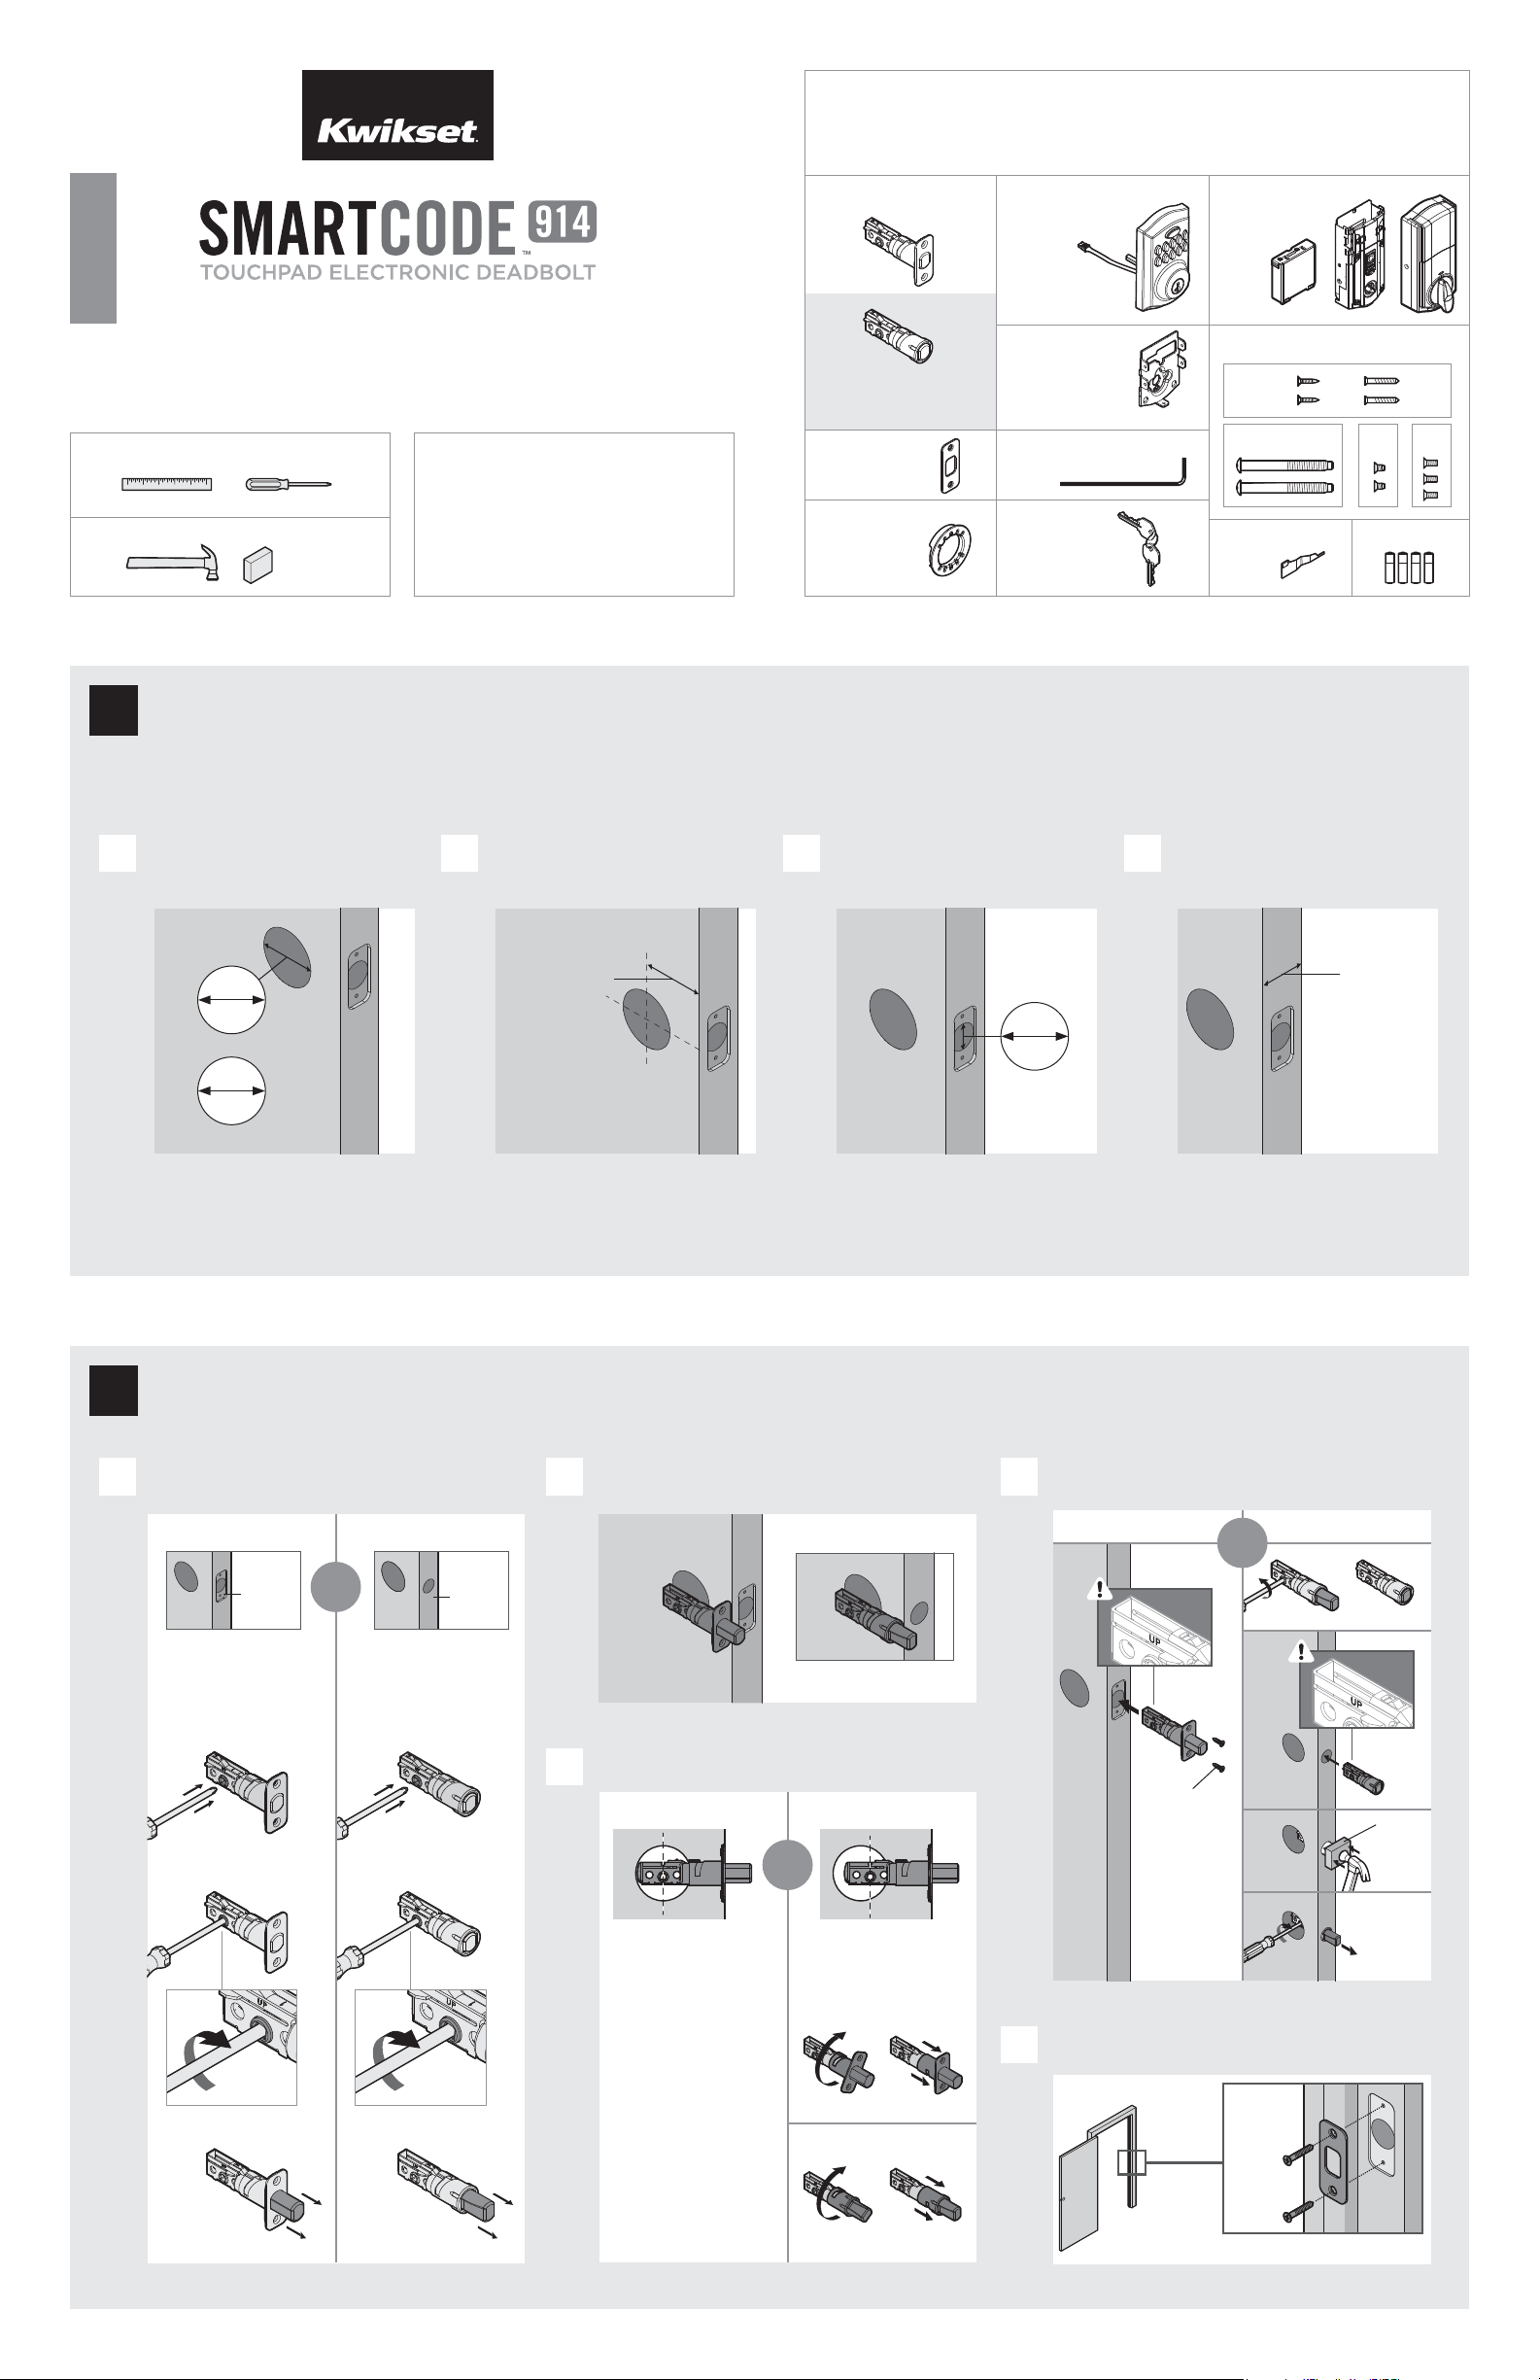
1 2 3
Press Program button once.
Presione el botón Programa una sola vez.
Enter new 4-8 digit user code.
Ingrese un nuevo código de usuario de
4-8 dígitos.
Press Lock button once.
Presione el botón de bloqueo una sola vez.
Note: During programming, if no button is pressed for ve seconds, the system will time out
(indicated by three beeps and a red ashing keypad), and you will need to restart the procedure.
Nota: Durante la programación, si no se presiona ningún botón por 5 segundos, el sistema expirará
(se indica por medio de tres pitidos y el teclado titilando en color rojo) y necesitará reiniciar el procedimiento.
Enter user code.
Ingrese un código de usuario.
Press Lock button once.
Presione el botón de bloqueo una sola vez.
If no user codes are programmed,
the Lock button will be disabled.
Si no se programan códigos de usuario,
el botón de bloqueo no estará habilitado.
2

Quick Start 2
Inicio rápido
Contents 3
Contenidos
Need Help? 3
¿Necesita ayuda?
SmartCode at a Glance 4
Una mirada rápida sobre SmartCode
Switches 5
Interruptores
Prevent Unauthorized Entry 6
Prevenga la entrada desautorizada
Getting Started 6
Primeros pasos
lock inclusion 7
Inclusión en la cerradura
Lock Exclusion 8
Exclusión de la cerradura
system Notes 8
Notas del sistema
Programming Codes 9
Códigos de programación
Programming without a Master Code 10
Programación sin código maestro
Programming with a Master Code 12
Programación con un código maestro
Normal Operation 17
Funcionamiento normal
Factory reset 18
Efectúe el reinicio de fábrica
Status LED Colors 19
Colores del estado del LED
Keypad Warnings 20
Advertencias del teclado
Troubleshooting 21
Solución de problemas
Frequently Asked Questions 22
Preguntas frecuentes
Changing the Batteries 23
Cambio de baterías
Regulatory Compliance 24
Cumplimiento Normativo
User Code Assignments 25
Asignaciones de códigos de usuario
Important Safeguards 26
Medidas de protección importantes
coNteNts
contenIdos
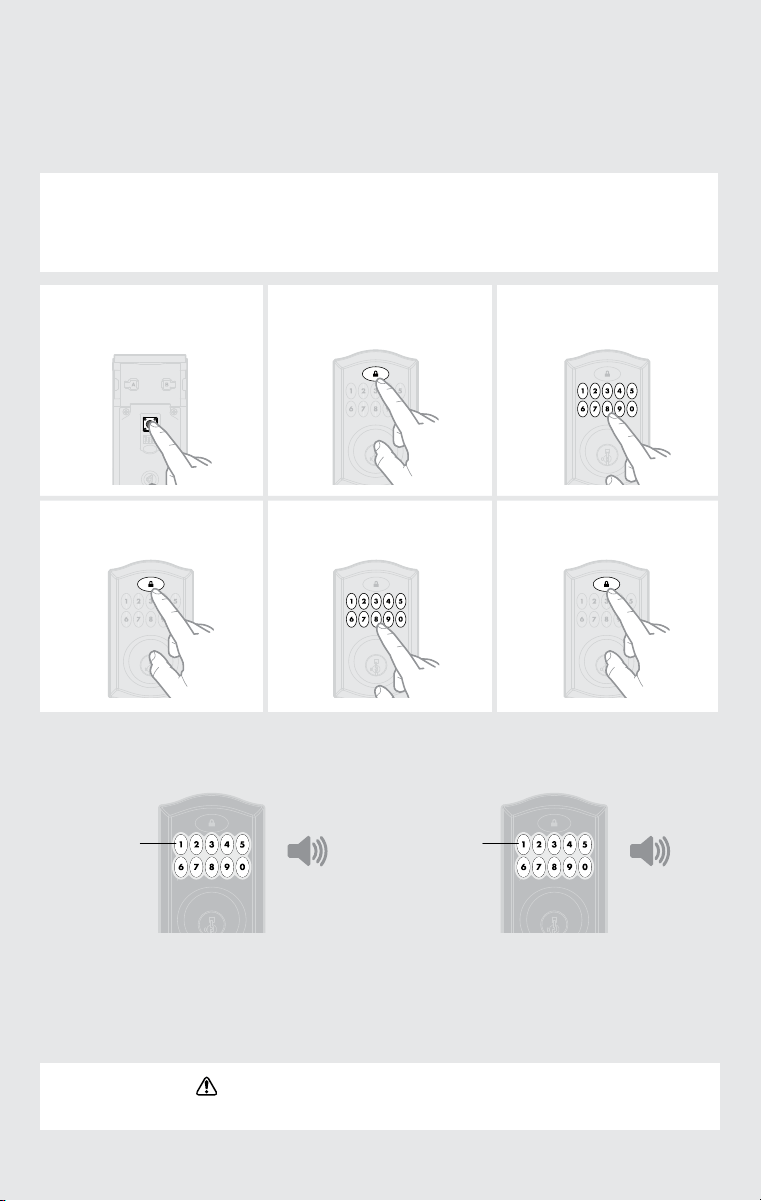
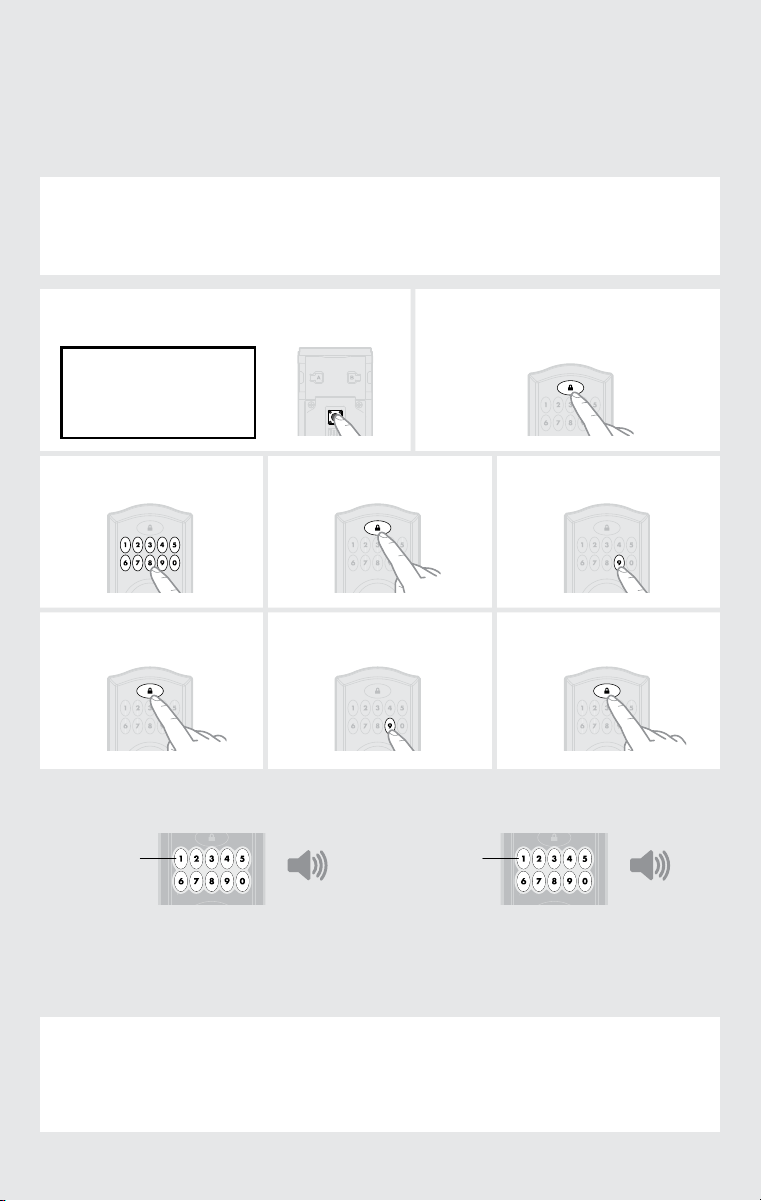
QUick start
InIcIo rápIdo
adding User codes at the lock (Without a Master code)
cómo agregar códigos de usuario en la cerradura (sin un código maestro)
Unlocking the door
cómo abrir la puerta
locking the door
cómo cerrar la puerta
1 2 3
Press Program button once.
Presione el botón Programa una sola vez.
Enter new 4-8 digit user code.
Ingrese un nuevo código de usuario de
4-8 dígitos.
Press Lock button once.
Presione el botón de bloqueo una sola vez.
Note: During programming, if no button is pressed for ve seconds, the system will time out
(indicated by three beeps and a red ashing keypad), and you will need to restart the procedure.
Nota: Durante la programación, si no se presiona ningún botón por 5 segundos, el sistema expirará
(se indica por medio de tres pitidos y el teclado titilando en color rojo) y necesitará reiniciar el procedimiento.
Enter user code.
Ingrese un código de usuario.
Press Lock button once.
Presione el botón de bloqueo una sola vez.
If no user codes are programmed,
the Lock button will be disabled.
Si no se programan códigos de usuario,
el botón de bloqueo no estará habilitado.
Need Help?
¿necesIta ayuda?
If you have programming, use or warranty questions, our highly trained Technical Support team can provide you
with the assistance you need.
Si tiene preguntas sobre la programación, el uso o la garantía de la cerradura, nuestros equipos de soporte técnico
altamente capacitados pueden brindarle la ayuda que usted necesita.
Kwikset
1-866-863-6584
www.kwikset.com
Service Hours
5:00am – 6:00pm PST Mon-Friday
6:30am – 4:00pm PST Saturday
Closed Sunday
Horas de atención al público
5:00am – 6:00pm PST Lunes – Viernes
6:30am – 4:00pm PST Sábado
Cerrado los domingos
3
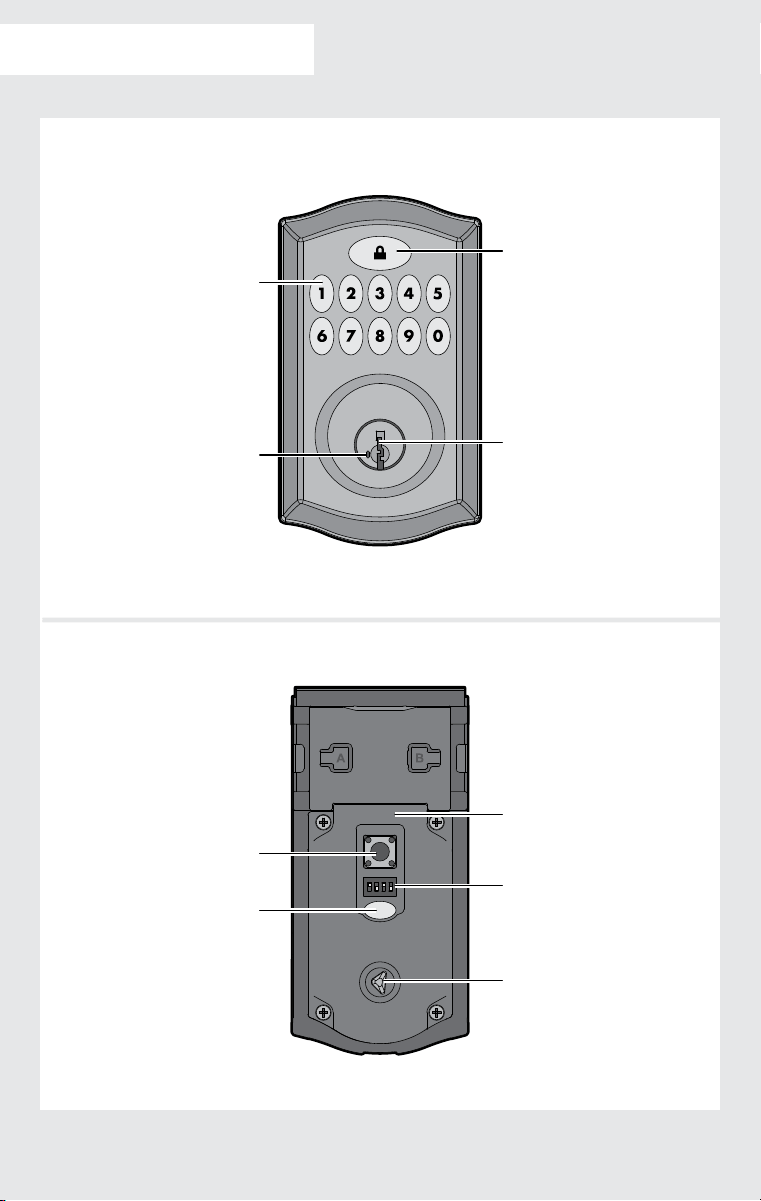
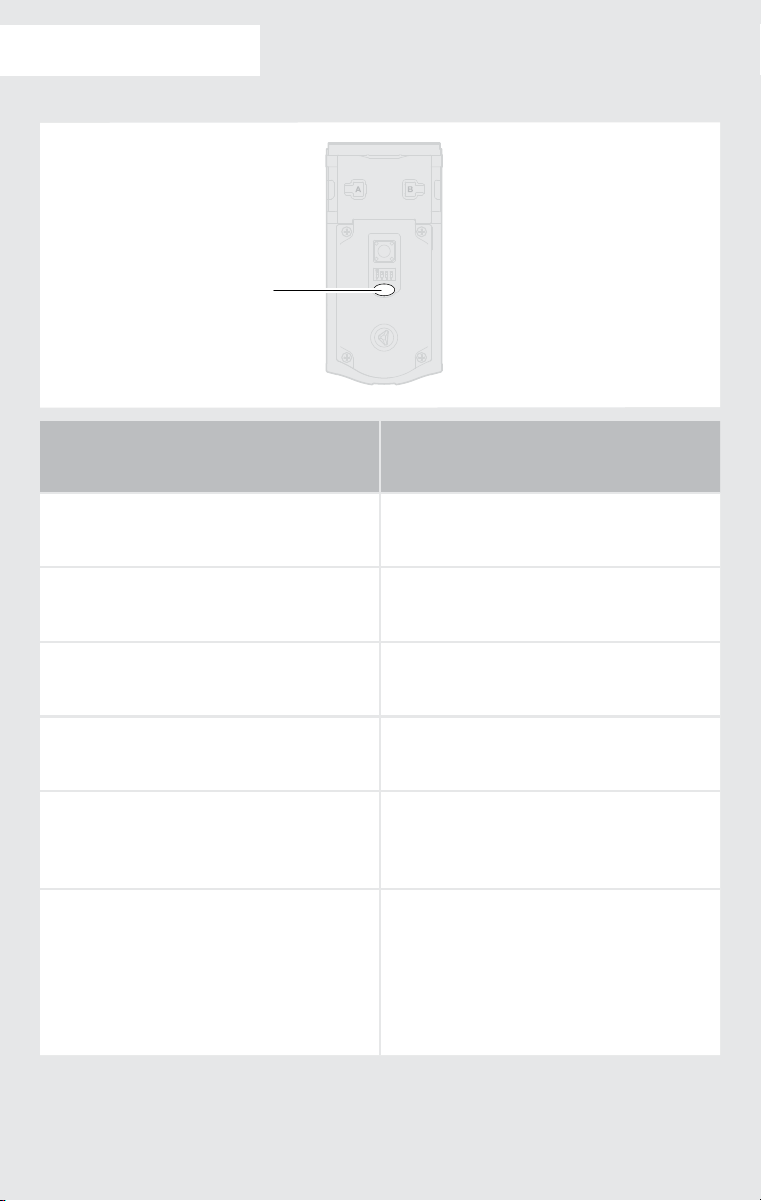
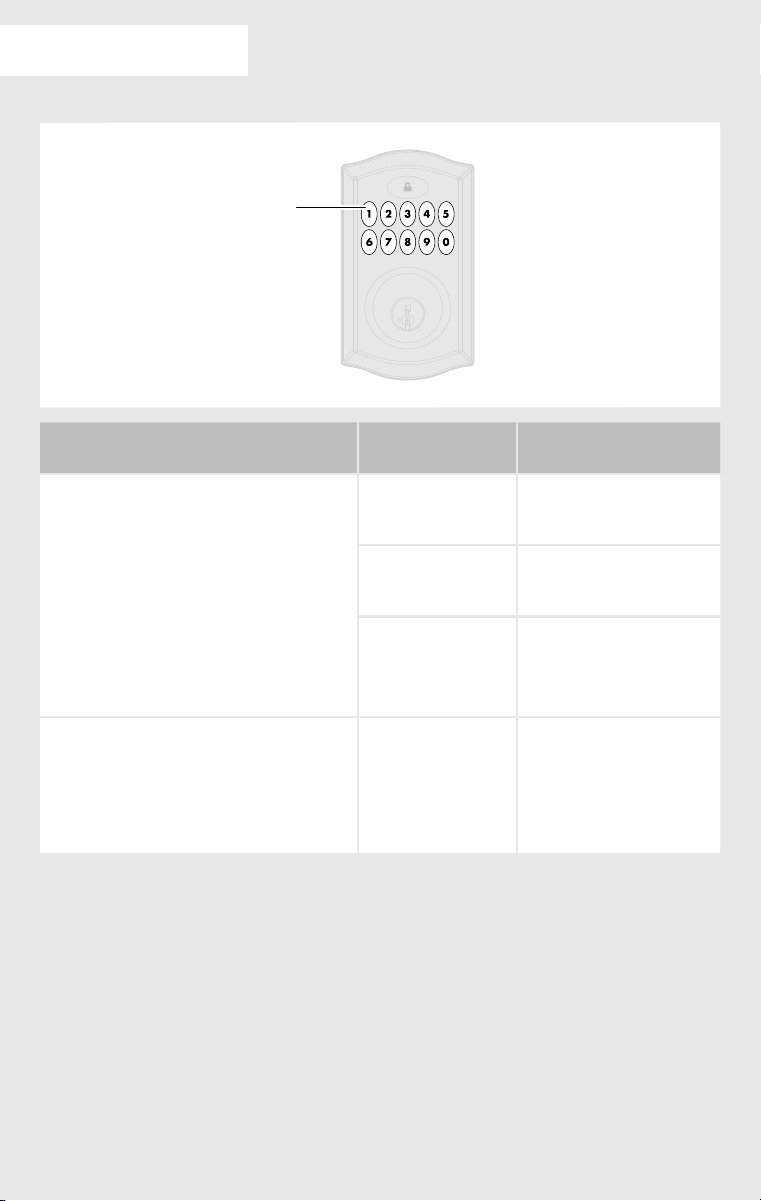
sMartcode at a GlaNce
una mIrada rápIda sobre smartcode
Interior (cover removed)
Interior (sin tapa)
Program button
Botón programa
Status LED
Estado del LED
Switches
Interruptores
Back panel
Panel posterior
Turnpiece shaft
Eje de la perilla gire
SmartKey tool hole
Agujero de la herramienta
Smartkey
Keypad
Teclado numérico
Keyway
Chavetero
Lock button
Botón de bloqueo
Exterior
Exterior
4

sMartcode at a GlaNce
una mIrada rápIda sobre smartcode
Interior (cover removed)
Interior (sin tapa)
Program button
Botón programa
Status LED
Estado del LED
Switches
Interruptores
Back panel
Panel posterior
Turnpiece shaft
Eje de la perilla gire
SmartKey tool hole
Agujero de la herramienta
Smartkey
Keypad
Teclado numérico
Keyway
Chavetero
Lock button
Botón de bloqueo
Exterior
Exterior
sWitcHes
Interruptores
2 3 4
ON
1
OFF
Switch 1: Door lock status LED blinks every 6 seconds. ON position is factory default.
Switch 2: Lock automatically re-locks door 30 seconds after unlocking. OFF position is factory
default. If this switch is turned on, it will be disabled if all codes are deleted from the lock.
Switch 3: Beeping sound enabled. When disabled, keypad buttons light red or amber when pressed.
ON position is factory default.
Note: It is recommended that the beeping sound is enabled during programming.
Switch 4: Feature not used.
Interruptor 1: La luz LED parpadea cada 6 segundos para indicar el estado de la cerradura de la puerta.
Posición ON de fábrica.
Interruptor 2: La cerradura se bloquea automáticamente 30 segundos después de que la puerta ha sido desbloqueada.
La posición OFF es predeterminada de la fábrica. Si este interruptor está activado, se deshabilitará en la
medida en que se hayan eliminado todos los códigos de la cerradura.
Interruptor 3: Se habilita el sonido de pitido. Cuando está inhabilitado, los botones del teclado se encenderán con luz
roja o ámbar al ser presionados. Posición ON de fábrica.
Nota: Se recomienda habilitar el sonido tipo pitido durante la programación.
Interruptor 4: Función no utilizada.
5
preveNt UNaUtHorized eNtry
prevenga la entrada desautorIzada
caUtioN: prevent unauthorized entry. since anyone with access to the back panel can
change the user codes, you must restrict access to the back panel and routinely check the user
codes to ensure they have not been altered without your knowledge. the use of a master code
can help protect your system’s settings.
WarNiNG: this Manufacturer advises that no lock can provide complete security by itself.
this lock may be defeated by forcible or technical means, or evaded by entry elsewhere on
the property. No lock can substitute for caution, awareness of your environment, and common
sense. Builder’s hardware is available in multiple performance grades to suit the application.
in order to enhance security and reduce risk, you should consult a qualied locksmith or other
security professional.
PRECAUCIÓN: Prevenga la entrada desautorizada. Cualquier persona con el acceso al panel posterior puede
cambiar los códigos de usuario, usted debe restringir el acceso al panel posterior y comprobar rutinariamente ambos
códigos para asegurar que los códigos de usuario propios no han sido alterados sin su conocimiento. El uso de un
código maestro puede ayudarlo a proteger las configuraciones de su sistema.
ADVERTENCIA: Este Fabricante hace saber que no hay cerrojos que puedan proporcionar completa seguridad
por sí mismos. Puede hacerse que falle este cerrojo forzándolo o utilizando medios técnicos, o puede evadirse
entrando por otra parte de la propiedad. No hay cerrojos que puedan hacer de sustitutos para la precaución, el estar
al tanto del entorno, y el sentido común. Pueden obtenerse piezas de ferretería de constructor con diversos grados
de rendimiento para ajustarse a la aplicación. Para realzar la seguridad y reducir los riesgos, debe consultar con un
cerrajero capacitado u otro profesional de seguridad.
GettiNG started
prImeros pasos
install the smartcode lock
Instalar la cerradura smartcode
Before programming your SmartCode lock, make sure to install the lock on your door. See the
Installation Guide on the reverse side of this manual for complete instructions.
Antes de programar su cerradura SmartCode, asegúrese de instalar la cerradura en su puerta. Consulte la Guía de
instalación que se encuentra al dorso de este manual conocer las instrucciones completas
6
preveNt UNaUtHorized eNtry
prevenga la entrada desautorIzada
caUtioN: prevent unauthorized entry. since anyone with access to the back panel can
change the user codes, you must restrict access to the back panel and routinely check the user
codes to ensure they have not been altered without your knowledge. the use of a master code
can help protect your system’s settings.
WarNiNG: this Manufacturer advises that no lock can provide complete security by itself.
this lock may be defeated by forcible or technical means, or evaded by entry elsewhere on
the property. No lock can substitute for caution, awareness of your environment, and common
sense. Builder’s hardware is available in multiple performance grades to suit the application.
in order to enhance security and reduce risk, you should consult a qualied locksmith or other
security professional.
PRECAUCIÓN: Prevenga la entrada desautorizada. Cualquier persona con el acceso al panel posterior puede
cambiar los códigos de usuario, usted debe restringir el acceso al panel posterior y comprobar rutinariamente ambos
códigos para asegurar que los códigos de usuario propios no han sido alterados sin su conocimiento. El uso de un
código maestro puede ayudarlo a proteger las configuraciones de su sistema.
ADVERTENCIA: Este Fabricante hace saber que no hay cerrojos que puedan proporcionar completa seguridad
por sí mismos. Puede hacerse que falle este cerrojo forzándolo o utilizando medios técnicos, o puede evadirse
entrando por otra parte de la propiedad. No hay cerrojos que puedan hacer de sustitutos para la precaución, el estar
al tanto del entorno, y el sentido común. Pueden obtenerse piezas de ferretería de constructor con diversos grados
de rendimiento para ajustarse a la aplicación. Para realzar la seguridad y reducir los riesgos, debe consultar con un
cerrajero capacitado u otro profesional de seguridad.
GettiNG started
prImeros pasos
install the smartcode lock
Instalar la cerradura smartcode
Before programming your SmartCode lock, make sure to install the lock on your door. See the
Installation Guide on the reverse side of this manual for complete instructions.
Antes de programar su cerradura SmartCode, asegúrese de instalar la cerradura en su puerta. Consulte la Guía de
instalación que se encuentra al dorso de este manual conocer las instrucciones completas
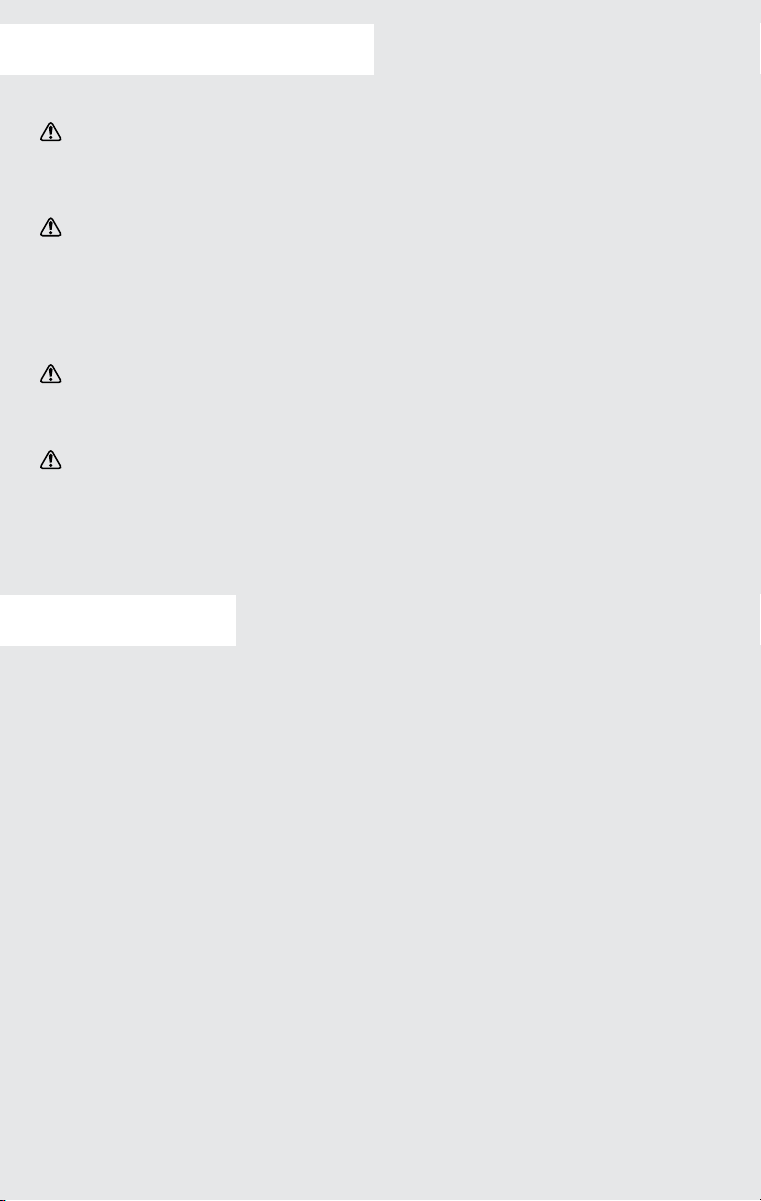
door Handing process
proceso de orientación de la puerta
The door handing process, Step 23 in the Installation Guide (on the reverse side of this manual), is crucial
for lock operation. To check if the door handing process was completed, temporarily place the battery cover
on the lock interior, but do not secure with the provided screws. Make sure the turnpiece rotates smoothly.
If it doesn’t rotate smoothly, the door handing process was not performed correctly, and Step 23 should be
performed again.
El proceso de orientación de la puerta, descrito en el paso 23 de la Guía de instalación (al dorso de este manual), es
fundamental para el funcionamiento de la cerradura. Para verificar si se completó el proceso de orientación de la puerta,
coloque, de manera temporal, la tapa de la batería en el interior de la cerradura, pero no la fije con los tornillos provistos.
Verifique que la perilla gire con fluidez. Si no gira con fluidez, el proceso de orientación de la puerta no se efectuó
correctamente, por lo que deberá repetir el paso 23.
lock iNclUsioN
InclusIón en la cerradura
“Inclusion” refers to the process in which the lock is added to a Z-Wave or ZigBee controller.
“Inclusión” es el proceso de cómo agregar la cerradura al controlador Z-Wave o ZigBee.
z-Wave
The Inclusion process must be performed during lock installation. During Inclusion, the lock must be
within 12" (30.5 cm) of a Z-Wave controller. If the Inclusion process was not performed during lock
installation, remove the lock’s interior assembly from the door, follow steps 16-18 in the Installation
Guide (on the reverse side of this manual), and reinstall the interior assembly.
El proceso de inclusión debe realizarse durante la instalación de la cerradura. Durante la inclusión, la cerradura debe estar,
como mínimo, a 12" (30,5 cm) de distancia del controlador Z-Wave. Si el proceso de inclusión no fue realizado durante la
instalación de la cerradura, retire el conjunto interior de la cerradura de la puerta, siga los pasos 16 a 18 descritos en la
Guía de instalación (al dorso de este manual) y vuelva a instalar el conjunto interior.
zigBee
The Inclusion process may be performed during or after lock installation. If the Inclusion process was
not performed during lock installation, follow step 25 in the Installation Guide.
El proceso de inclusión puede realizarse durante o después de la instalación de la cerradura. Si el proceso de inclusión no
fue realizado durante la instalación de la cerradura siga en la Guía de instalación.
1 2
7
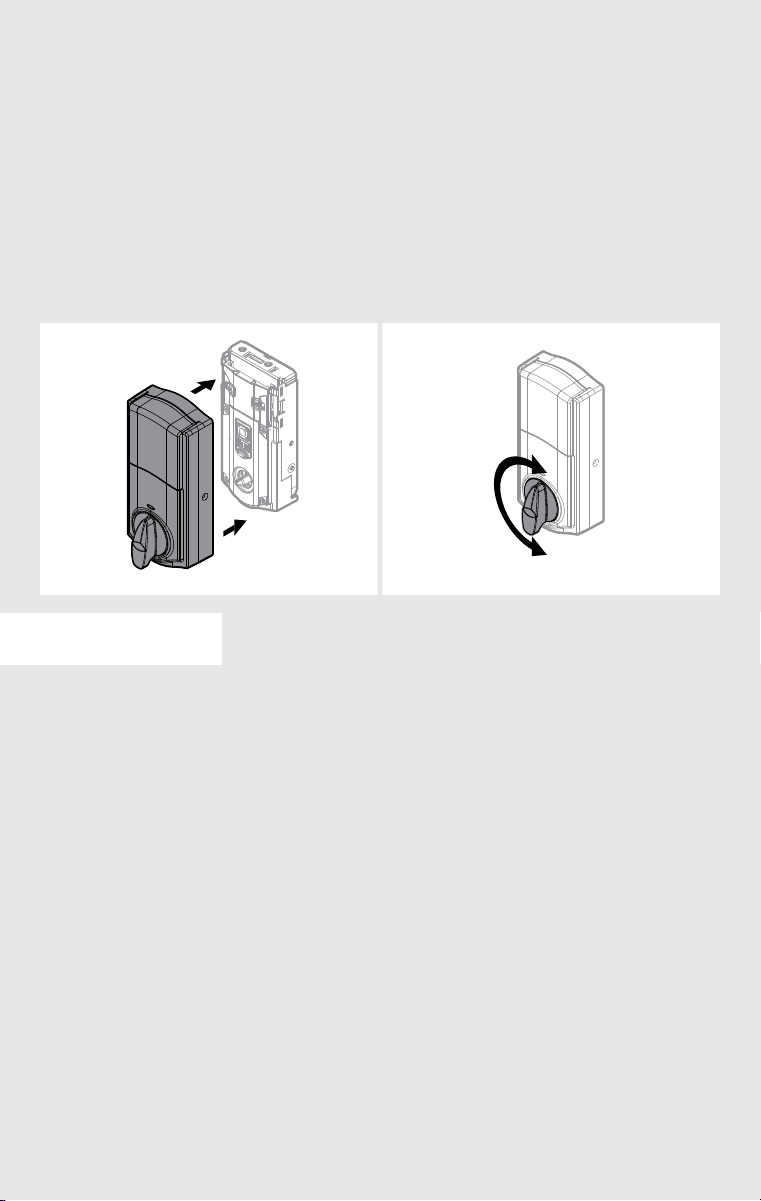
lock exclUsioN
exclusIón de la cerradura
“Exclusion” refers to the process in which the lock is removed from a Z-Wave or ZigBee controller.
Initiate the Exclusion process at your Z-Wave or ZigBee controller. Refer to your control system
instructions for more information. For Z-Wave locks, press button “A” on the lock one time to Exclude
it from your system. For ZigBee locks, press button "B" on the lock nine times to Exclude it from your
system.
“Exclusión” es el proceso de cómo eliminar la cerradura desde el controlador Z-Wave o ZigBee. Inicie el proceso de
exclusión en el controlador Z-Wave o ZigBee. Remítase a las instrucciones del sistema de control para obtener más
información. Para las cerraduras Z-Wave, presione una vez el botón "A" de la cerradura para excluirla de su sistema. Para
las cerraduras ZigBee, presione nueve veces el botón "B" de la cerradura para excluirla de su sistema.
systeM Notes
notas del sIstema
z-Wave
1. In order to fully utilize this product, you must have a Z-Wave controller compatible with door locks.
2. During the Inclusion process, ensure that the lock is within 12" (30.5 cm) of the controller. The
controller and lock must remain stationary for a total of 60 seconds in order to complete the
encrypted data exchange so that the lock to be properly displayed in the Z-Wave control system.
If this does not occur, a typical indication from the controller would be "Secure Connection Failure."
3. Z-Wave is a “Wireless mesh network,” and results may vary based on building construction
and communication path, with 35 feet+ being typical installed distance. It may be necessary to
install additional Z-Wave beaming capable devices that can serve as repeaters to enhance the
communication path between the lock and controller for a more robust Z-Wave network.
1. Para utilizar este producto en su totalidad, debe tener un controlador Z-Wave compatible con las cerraduras de las puertas.
2. Durante el proceso de inclusión, verifique que la cerradura se encuentre a 12" (30,5 cm) del controlador. El
controlador y la cerradura deben permanecer fijas por un período de 60 segundos para completar el intercambio de
datos encriptados, de manera tal que la cerradura pueda mostrarse correctamente en el sistema de control Z-Wave.
Si esto no ocurre, una indicación típica del controlador será: "Fallo en la conexión segura".
3. Z-Wave es una "red de malla inalámbrica" y los resultados pueden variar según la construcción del edificio y la ruta
de comunicación. La distancia típica de instalación es más de 35 pies. Puede ser necesario instalar dispositivos
Z-Wave con capacidad de transmisión adicional que puedan funcionar como repetidores para ampliar la ruta de
comunicación entre la cerradura y el controlador y obtener, de esta manera, una red Z-Wave más robusta.
Z-Wave
Press button “A” once.
Presione el botón “A” una sola vez.
ZigBee
Press button “B” nine times.
Presione el botón “B” nueve veces.
8

zigBee
ZigBee is a “Wireless mesh network,” and results may vary based on building construction and
communication path, with 35 feet+ being typical installed distance. It may be necessary to install
additional ZigBee devices to enhance the communication path between the lock and controller for a
more robust ZigBee network.
ZigBee es una "red de malla inalámbrica" y los resultados pueden variar según la construcción del edificio y la ruta de
comunicación. La distancia típica de instalación es más de 35 pies. Puede ser necesario instalar dispositivos ZigBee para
ampliar la ruta de comunicación entre la cerradura y el controlador y obtener, de esta manera, una red ZigBee más robusta.
proGraMMiNG codes
códIgos de programacIón
It is recommended that you add and delete all codes through your Z-Wave or ZigBee control system. If
your system does not allow this, the following pages will provide instructions for how to add and delete
codes at the lock.
The programming portion of this book is divided into two sections: “Programming Without A Master
Code” and “Programming With A Master Code.” Using a master code is an optional, added-security
measure. It is not enabled by default. A master code is used to add and delete user codes, but it cannot
unlock the door (unless the same code is programmed as a user code, though this is not recommended).
Se recomienda que agregue y elimine todos los códigos a través del sistema de control de Z-Wave o ZigBee. Si su sistema
no lo permite, las páginas siguientes proporcionarán las instrucciones para agregar y eliminar códigos en la cerradura.
La parte de programación de este libro se divide en dos secciones: “Programación sin código maestro” y “Programación
con un código maestro.” Utilizar un código maestro es una medida de seguridad añadida y opcional. No se habilita en
forma predeterminada. Un código maestro se utiliza para añadir y eliminar códigos de usuario, pero no puede abrir ni cerrar
una puerta (salvo que el mismo código se programe como un código de usuario, aunque no es lo recomendado).
programming without a Master code page 10
Programación sin código maestro
programming with a Master code page 12
Programación con un código maestro
lock exclUsioN
exclusIón de la cerradura
“Exclusion” refers to the process in which the lock is removed from a Z-Wave or ZigBee controller.
Initiate the Exclusion process at your Z-Wave or ZigBee controller. Refer to your control system
instructions for more information. For Z-Wave locks, press button “A” on the lock one time to Exclude
it from your system. For ZigBee locks, press button "B" on the lock nine times to Exclude it from your
system.
“Exclusión” es el proceso de cómo eliminar la cerradura desde el controlador Z-Wave o ZigBee. Inicie el proceso de
exclusión en el controlador Z-Wave o ZigBee. Remítase a las instrucciones del sistema de control para obtener más
información. Para las cerraduras Z-Wave, presione una vez el botón "A" de la cerradura para excluirla de su sistema. Para
las cerraduras ZigBee, presione nueve veces el botón "B" de la cerradura para excluirla de su sistema.
systeM Notes
notas del sIstema
z-Wave
1. In order to fully utilize this product, you must have a Z-Wave controller compatible with door locks.
2. During the Inclusion process, ensure that the lock is within 12" (30.5 cm) of the controller. The
controller and lock must remain stationary for a total of 60 seconds in order to complete the
encrypted data exchange so that the lock to be properly displayed in the Z-Wave control system.
If this does not occur, a typical indication from the controller would be "Secure Connection Failure."
3. Z-Wave is a “Wireless mesh network,” and results may vary based on building construction
and communication path, with 35 feet+ being typical installed distance. It may be necessary to
install additional Z-Wave beaming capable devices that can serve as repeaters to enhance the
communication path between the lock and controller for a more robust Z-Wave network.
1. Para utilizar este producto en su totalidad, debe tener un controlador Z-Wave compatible con las cerraduras de las puertas.
2. Durante el proceso de inclusión, verifique que la cerradura se encuentre a 12" (30,5 cm) del controlador. El
controlador y la cerradura deben permanecer fijas por un período de 60 segundos para completar el intercambio de
datos encriptados, de manera tal que la cerradura pueda mostrarse correctamente en el sistema de control Z-Wave.
Si esto no ocurre, una indicación típica del controlador será: "Fallo en la conexión segura".
3. Z-Wave es una "red de malla inalámbrica" y los resultados pueden variar según la construcción del edificio y la ruta
de comunicación. La distancia típica de instalación es más de 35 pies. Puede ser necesario instalar dispositivos
Z-Wave con capacidad de transmisión adicional que puedan funcionar como repetidores para ampliar la ruta de
comunicación entre la cerradura y el controlador y obtener, de esta manera, una red Z-Wave más robusta.
Z-Wave
Press button “A” once.
Presione el botón “A” una sola vez.
ZigBee
Press button “B” nine times.
Presione el botón “B” nueve veces.
9
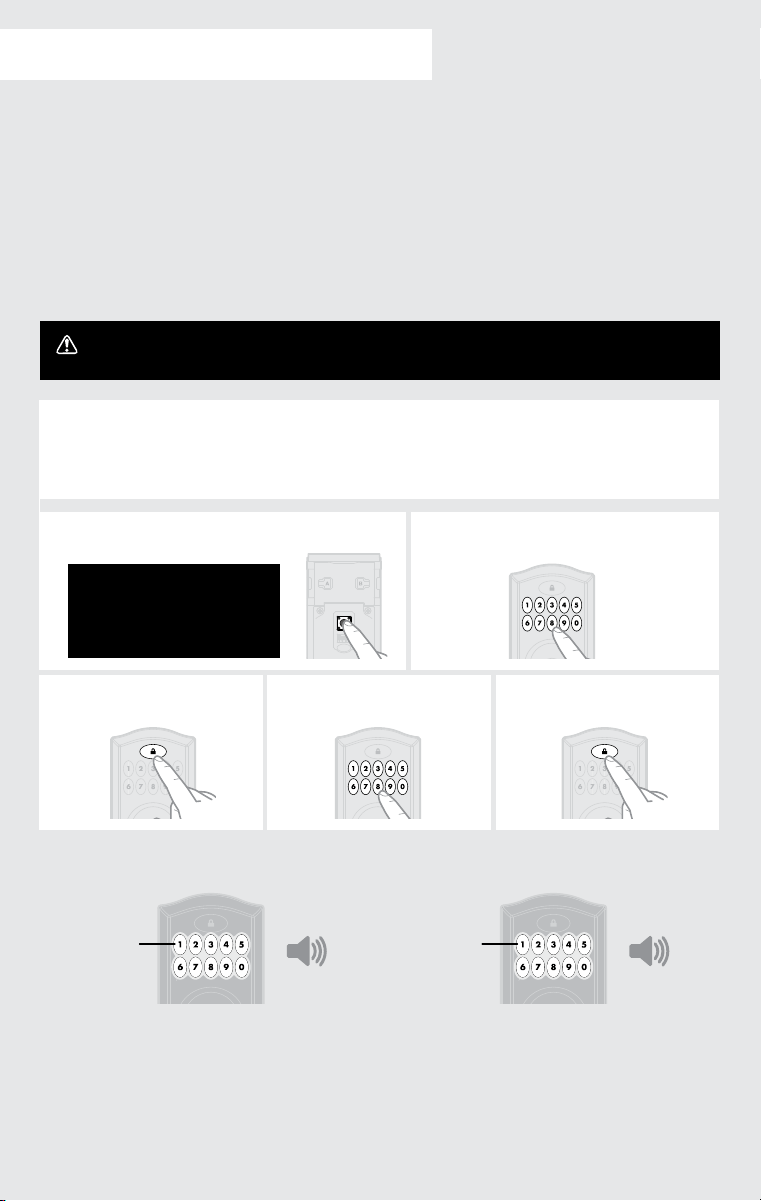
proGraMMiNG WitHoUt a Master code
programacIón sIn códIgo maestro
adding User codes
cómo agregar códigos de usuario
A total of 30 user codes may be programmed. Each user code must be 4-8 digits, depending on your control system.
Use the space provided on page 25 to keep track of the person assigned to each user code position.
Se puede programar un total de 30 códigos de usuario. Cada código de usuario debe tener entre 4 y 8 dígitos, según su sistema de control. Use
el espacio provisto en la página 25 para llevar un registro de la persona asignada a cada posición del código de usuario.
1 2 3
If programming is successful:
Si la programación es satisfactoria:
If programming is unsuccessful:
Si la programación no es satisfactoria:
Note: During programming, if no button is pressed for ve seconds, the system will time out
(indicated by three beeps and a red ashing keypad), and you will need to restart the procedure.
Nota: Durante la programación, si no se presiona ningún botón por 5 segundos, el sistema expirará
(se indica por medio de tres pitidos y el teclado titilando en color rojo) y necesitará reiniciar el procedimiento.
The keypad will ash green once, and you will
hear one beep (if switch #3 is on).
El teclado numérico titilará en color verde una vez y usted
escuchará un pitido (si el interruptor Nº 3 se encuentra
encendido).
Enter new user code.
Ingrese un nuevo código de usuario.
Press Lock button once.
Presione el botón de bloqueo una sola vez.
green
verde
(x1) (x1)
red
rojo
(x3) (x3)
Test the user code to make sure it unlocks the door.
Pruebe el código de usuario para asegurarse de que abra la puerta.
Check that this code is not already programmed, and
use a different code if needed. Also, make sure the lock
has room for an additional code. If all 30 codes are
programmed, delete a code to make room for this one.
Verique que el código no haya sido programado previamente, y
use un código diferente de ser necesario. Además, verique que
la cerradura tenga espacio para un código nuevo. Si fueron
programados los 30 códigos, borre uno de ellos para que haya
espacio para el nuevo código.
Press Program button once.
Presione el botón Programa una sola vez.
10
deleting a single User code
eliminar un solo código de usuario
Note: All codes may be deleted at once if the master code is enabled. See page 16.
Nota: Pueden eliminarse todos los códigos de una sola vez si el código maestro está habilitado. Consulte la página 16.
1 2 3
Press Program button once.
Presione el botón Programa una sola vez.
Press Lock button once.
Presione el botón de bloqueo una sola vez.
Enter user code.
Ingrese el código de usuario.
Re-enter user code.
Reingrese el código de usuario.
4 5 6Press Lock button once.
Presione el botón de bloqueo una sola vez.
Press Lock button once.
Presione el botón de bloqueo una sola vez.
If programming is successful:
Si la programación es satisfactoria:
If programming is unsuccessful:
Si la programación no es satisfactoria:
green
verde
(x1) (x1)
red
rojo
(x3) (x3)
Note: During programming, if no button is pressed for ve seconds, the system will time out
(indicated by three beeps and a red ashing keypad), and you will need to restart the procedure.
Nota: Durante la programación, si no se presiona ningún botón por 5 segundos, el sistema expirará
(se indica por medio de tres pitidos y el teclado titilando en color rojo) y necesitará reiniciar el procedimiento.
Attempt this procedure again, making sure to
enter the same valid code in steps 3 and 5.
Repita este procedimiento, asegurándose de ingresar el
mismo código válido en los pasos 3 y 5.
The keypad will ash green once, and you will hear
one beep (if switch #3 is on).
El teclado numérico titilará en color verde una vez y usted
escuchará un pitido (si el interruptor Nº 3 se encuentra
encendido).
Test the user code to make sure it no longer unlocks the door.
Pruebe el código de usuario para asegurarse de que no abra más la puerta.
11
proGraMMiNG WitH a Master code
programacIón con un códIgo maestro
enabling and setting the Master code
Habilitar y configurar el código maestro
The master code is used to add and delete user codes, but it cannot unlock the door (unless the same code
is programmed as a user code, though this is not recommended). The master code must be 4–8 digits.
El código maestro se utiliza para añadir y eliminar códigos de usuario, pero no puede abrir ni cerrar una puerta (salvo que
el mismo código se programe como un código de usuario, aunque no es lo recomendado). El código maestro deve tener
entre 4 y 8 dígitos.
WARNING: Do not forget your master code. Once enabled, it is required to delete codes from the system.
ADVERTENCIA: No olvide su código maestro. Una vez habilitado, deberán eliminarse los códigos del sistema.
1 2
Enter new master code.
Ingrese un nuevo código maestro.
Press and HOLD Program button.
Mantenga presionado el botón Programa.
Press and hold until the keypad
flashes green (about 5 seconds)
Mantenga presionado hasta el teclado
numérico proyecta una luz verde (5 seg)
Re-enter master code.
Reingrese el código maestro.
4 53
Press Lock button once.
Presione el botón de bloqueo una sola vez.
Press Lock button once.
Presione el botón de bloqueo una sola vez.
If programming is successful:
Si la programación es satisfactoria:
If programming is unsuccessful:
Si la programación no es satisfactoria:
The keypad will ash green once, and you will hear
one beep (if switch #3 is on).
El teclado numérico titilará en color verde una vez y usted
escuchará un pitido (si el interruptor Nº 3 se encuentra
encendido).
Make sure the master code has not been programmed
already. Attempt this procedure again, making sure to
enter the same new master code in steps 2 and 4.
Verique que aún no se haya programado el código maestro.
Repita este procedimiento, asegurándose de ingresar el mismo
código maestro nuevo en los pasos 2 y 4.
green
verde
(x1) (x1)
red
rojo
(x3) (x3)
Note: During programming, if no button is pressed for ve seconds, the system will time out
(indicated by three beeps and a red ashing keypad), and you will need to restart the procedure.
Nota: Durante la programación, si no se presiona ningún botón por 5 segundos, el sistema expirará
(se indica por medio de tres pitidos y el teclado titilando en color rojo) y necesitará reiniciar el procedimiento.
12
disabling the Master code
deshabilitar el código maestro
1 2 3
Press and HOLD Program button.
Mantenga presionado el botón Programa.
Press Lock button once.
Presione el botón de bloqueo una
sola vez.
Enter master code.
Ingrese el código maestro.
Re-enter master code.
Reingrese el código maestro.
4 5 6
Press Lock button once.
Presione el botón de bloqueo una sola vez.
Press Lock button once.
Presione el botón de bloqueo una sola vez.
Press and hold until
the keypad flashes
green (about 5 seconds)
Mantenga presionado hasta
el teclado numérico proyecta
una luz verde (5 seg)
If programming is successful:
Si la programación es satisfactoria:
If programming is unsuccessful:
Si la programación no es satisfactoria:
Note: During programming, if no button is pressed for ve seconds, the system will time out
(indicated by three beeps and a red ashing keypad), and you will need to restart the procedure.
Nota: Durante la programación, si no se presiona ningún botón por 5 segundos, el sistema expirará
(se indica por medio de tres pitidos y el teclado titilando en color rojo) y necesitará reiniciar el procedimiento.
green
verde
(x1) (x1)
red
rojo
(x3) (x3)
The keypad will ash green once, and you will hear
one beep (if switch #3 is on).
El teclado numérico titilará en color verde una vez y usted
escuchará un pitido (si el interruptor Nº 3 se encuentra
encendido).
Make sure the master code has been enabled
before trying to disable it. Attempt this procedure
again, making sure to enter the same master code
in steps 3 and 5.
Verique que se haya habilitado el código maestro antes de
intentar deshabilitarlo. Repita este procedimiento,
asegurándose de ingresar el mismo código maestro en los
pasos 3 y 5.
A quick way to determine that the master code has been disabled is to make sure switch
#3 is on, and then press the Program button once. If you don't immediately hear three
beeps, the master code is disabled.
Una manera rápida de determinar si el código maestro fue deshabilitado es vericar que el interruptor n. ° 3
esté encendido y luego presione el botón Program (Programa) una vez. Si no escucha tres pitidos de
inmediato, el código maestro no está habilitado.
13

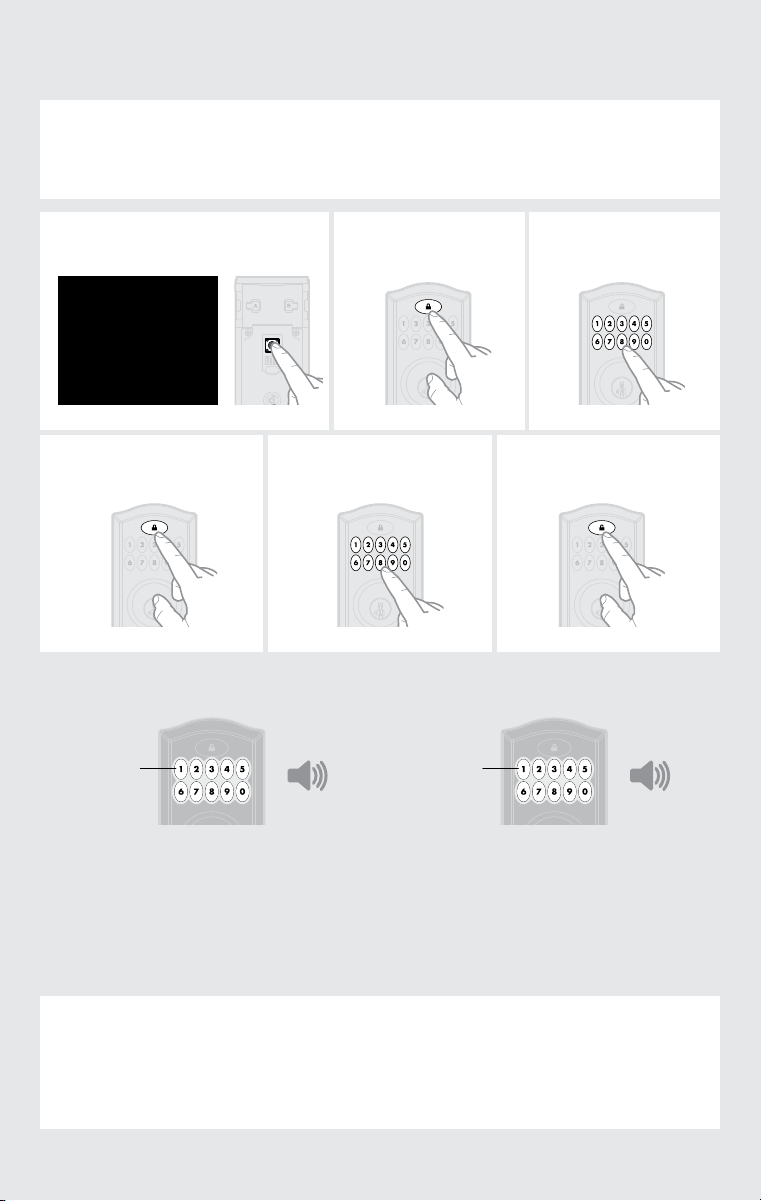
adding User codes (With a Master code)
cómo agregar códigos de usuario (con un código maestro)
A total of 30 user codes may be programmed. Each user code must be 4-8 digits, depending on your control system.
Use the space provided on page 25 to keep track of the person assigned to each user code position.
Se puede programar un total de 30 códigos de usuario. Cada código de usuario debe tener entre 4 y 8 dígitos, según su sistema de control. Use
el espacio provisto en la página 25 para llevar un registro de la persona asignada a cada posición del código de usuario.
1 2
Enter MASTER code.
Ingrese el código maestro.
Press Program button once.
Presione el botón Programa una sola vez.
Enter new user code.
Ingrese un nuevo código de usuario.
4 53
Press Lock button once.
Presione el botón de bloqueo una sola vez.
Press Lock button once.
Presione el botón de bloqueo una sola vez.
If programming is successful:
Si la programación es satisfactoria:
If programming is unsuccessful:
Si la programación no es satisfactoria:
The keypad will ash green once, and you will
hear one beep (if switch #3 is on).
El teclado numérico titilará en color verde una vez y usted
escuchará un pitido (si el interruptor Nº 3 se encuentra
encendido).
green
verde
(x1) (x1)
red
rojo
(x3) (x3)
The keypad will ash green, and you will
hear three beeps. This is a reminder that
the master code is enabled.
El teclado numérico titilará en color verde y usted
escuchará tres pitidos. Este es un recordatorio de
que el código maestro está habilitado.
Note: During programming, if no button is pressed for ve seconds, the system will time out
(indicated by three beeps and a red ashing keypad), and you will need to restart the procedure.
Nota: Durante la programación, si no se presiona ningún botón por 5 segundos, el sistema expirará
(se indica por medio de tres pitidos y el teclado titilando en color rojo) y necesitará reiniciar el procedimiento.
Test the user code to make sure it unlocks the door.
Pruebe el código de usuario para asegurarse de que abra la puerta.
1. Check that this code is not already programmed,
and use a different code if needed.
2. Make sure the lock has room for an additional
code. If all 30 codes are programmed, delete a
code to make room for this one.
3. Make sure to enter a valid master code in step 2.
1. Verique que el código no haya sido programado previamente,
y use un código diferente de ser necesario.
2. Verique que la cerradura tenga espacio para un código nuevo. Si
fueron programados los 30 códigos, borre uno de ellos para que
haya espacio para el nuevo código.
3. Verique que ingresar el mismo código válido en el paso 2.
14
deleting a single User code (With a Master code)
eliminar un solo código de usuario (con un código maestro)
Test the user code to make sure it no longer unlocks the door.
Pruebe el código de usuario para asegurarse de que no abra más la puerta.
1
Press Program button once.
Presione el botón Programa una sola vez.
2
Press Lock button once.
Presione el botón de bloqueo una sola vez.
3
Enter MASTER code.
Ingrese el código maestro.
Press Lock button once.
Presione el botón de bloqueo una sola vez.
4
Enter user code.
Ingrese el código de usuario.
5
6
Press Lock button once.
Presione el botón de bloqueo una sola vez.
8
Press Lock button once.
Presione el botón de bloqueo una sola vez.
7
Re-enter user code.
Reingrese el código de usuario.
green
verde
(x1) (x1)
red
rojo
(x3) (x3)
If programming is successful:
Si la programación es satisfactoria:
If programming is unsuccessful:
Si la programación no es satisfactoria:
Note: During programming, if no button is pressed for ve seconds, the system will time out
(indicated by three beeps and a red ashing keypad), and you will need to restart the procedure.
Nota: Durante la programación, si no se presiona ningún botón por 5 segundos, el sistema expirará
(se indica por medio de tres pitidos y el teclado titilando en color rojo) y necesitará reiniciar el procedimiento.
Attempt this procedure again, making sure to enter
a valid master code and the that same valid user
codes are entered in steps 5 and 7.
Repita este procedimiento, asegurándose de ingresar un código
maestro válido y ingresar el mismo código válido en los pasos 5 y 7.
The keypad will ash green once, and you will
hear one beep (if switch #3 is on).
El teclado numérico titilará en color verde una vez y usted
escuchará un pitido (si el interruptor Nº 3 se encuentra
encendido).
The keypad will ash green,
and you will hear three beeps.
El teclado numérico titilará en color
verde y usted escuchará tres pitidos.
15
deleting all User codes (with a Master code)
eliminar todos los códigos de usuario (con un código maestro)
Note: The Auto-Lock feature (switch #2) will be disabled if all codes are deleted. See page 5.
Nota: La función de cierre automático (el interruptor Nº 2) se deshabilitará si se eliminan todos los códigos. Vea la página 5.
Press “9” six times.
Presione el botón “9” seis veces.
5
green
verde
(x1) (x1)
red
rojo
(x3) (x3)
If programming is successful:
Si la programación es satisfactoria:
If programming is unsuccessful:
Si la programación no es satisfactoria:
3 Enter MASTER code.
Ingrese el código maestro.
Press Lock button once.
Presione el botón de bloqueo una sola vez.
4
6
Press Lock button once.
Presione el botón de bloqueo una sola vez.
8
Press Lock button once.
Presione el botón de bloqueo una sola vez.
7
Press “9” six times.
Presione el botón “9” seis veces.
Note: During programming, if no button is pressed for ve seconds, the system will time out
(indicated by three beeps and a red ashing keypad), and you will need to restart the procedure.
Nota: Durante la programación, si no se presiona ningún botón por 5 segundos, el sistema expirará
(se indica por medio de tres pitidos y el teclado titilando en color rojo) y necesitará reiniciar el procedimiento.
1
Press Program button once.
Presione el botón Programa una sola vez.
The keypad will ash green,
and you will hear three beeps.
El teclado numérico titilará en color
verde y usted escuchará tres pitidos.
Attempt this procedure again, making sure to
enter a valid master code in step 3.
Repita este procedimiento, asegurándose de ingresar un código
maestro válido en el paso 3.
The keypad will ash green once, and you will hear
one beep (if switch #3 is on).
El teclado numérico titilará en color verde una vez y usted
escuchará un pitido (si el interruptor Nº 3 se encuentra
encendido).
2
Press Lock button once.
Presione el botón de bloqueo una sola vez.
A quick way to determine that all codes have been deleted is to press the Lock button while the door is open.
If the latch bolt does not extend to lock, then all codes have been successfully deleted.
Una manera rápida de determinar que se hayan eliminado todos los códigos es presionando el botón Lock (Cerrar) mientras la puerta
está abierta. Si el perno de retención no se extiende para cerrar, esto signica que se eliminaron satisfactoriamente todos los códigos.
16
NorMal operatioN
FuncIonamIento normal
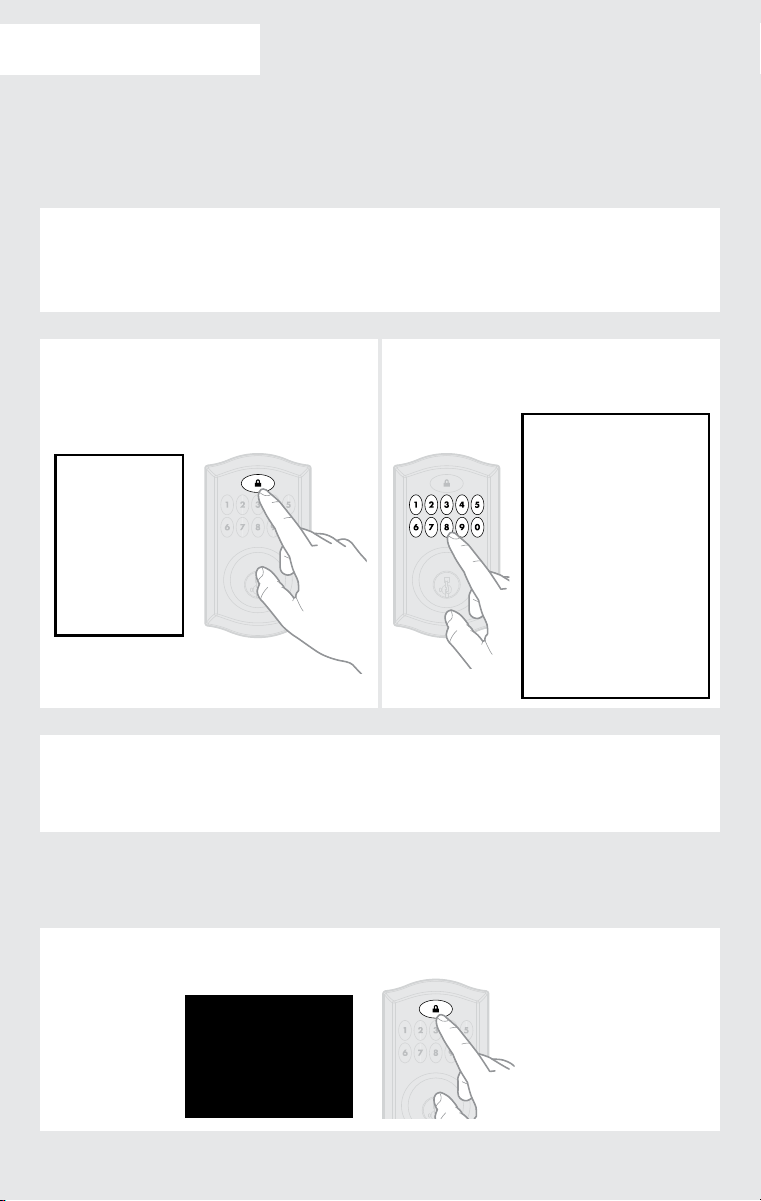
Unlocking the door
cómo abrir la puerta
locking the door
cómo cerrar la puerta
21 Enter user code.
Ingrese el código de usuario.
Optional — Press Lock button once.
Opcional — Presione el botón de bloqueo una sola vez.
Pressing the Lock
button will light up
the keypad, helpful
in low light areas.
Al presionar el botón de
bloqueo se iluminará el
teclado, lo que resulta
útil en áreas con poca
iluminación.
If switch #3 is on, the
keypad will beep on each
button press.
If switch #3 is off, the
keypad will turn red or
amber on each button press.
Si el interruptor Nº 3 se encuentra
encendido, el teclado emitirá un
pitido cada vez que se presiona un
botón.
Si el interruptor Nº 3 no se
encuentra encendido, el teclado
cambiará a color rojo o ámbar cada
vez que se presiona un botón.
If three incorrect codes are entered consecutively or if three time outs occur within one minute, the keypad will
lockout for 60 seconds, after which you may try the code again.
Si se ingresan tres códigos incorrectos en forma consecutiva o si el sistema expirará tres veces en un minuto, el teclado numérico se
bloqueará por 60 segundos; después de dicho período, puede ingresar el código nuevamente.
Note: If no button is pressed for ve seconds, the system will time out
(indicated by one beep and a red ashing keypad), and you will need to restart the procedure.
Nota: Si no se presiona ningún botón por 5 segundos, el sistema expirará
(se indica por medio de un pitido y el teclado titilando en color rojo) y necesitará reiniciar el procedimiento.
Press Lock button once.
Presione el botón de bloqueo una sola vez.
If no user codes are
programmed, the Lock
button will be disabled.
Si no se programan códigos de
usuario, el botón de bloqueo
no estará habilitado.
17
Factory reset
eFectúe el reInIcIo de FábrIca
If you wish to restore your SmartCode lock to factory default settings and delete all codes associated
with it, perform the following procedure.
Si desea restaurar su cerradura SmartCode según los ajustes predeterminados de fábrica y elimine todos los códigos
asociados, realice el siguiente procedimiento.
Note: Once the lock is reset, it may need to be re-included in your control system. Perform the Inclusion process
again to add the lock back into your network and controller. Z-Wave locks: perform steps 16-18 in the Installation
Guide, on the reverse side of this manual. ZigBee locks: perform See Step 25 in the Installation Guide.
Nota: Una vez reiniciada la cerradura, tal vez se necesite ser reincluida en su sistema de control. Realice el proceso de inclusión
nuevamente para volver a agregar la cerradura a su red y controlador. Cerraduras Z-Wave: realice los pasos 16-18 en la Guía de
instalación, al dorso de este manual. Cerraduras ZigBee: realice el paso 25 en la Guía de instalación.
1
Remove battery pack.
Retire el conjunto de baterías.
3
2
status LED
Estado de LED
Press and HOLD the Program
button while reinserting the
battery pack.
Keep holding the button for 30
seconds until the status LED
ashes red.
Mantenga presionado el botón
Programa mientras instala el conjunto
de baterías
Mantenga presionado el botón por 30
segundos hasta que el LED de estado
titile en color rojo.
Press the Program button once more.
When the LED ashes green, the lock
has been reset.
Presione el botón Program (Programa) una
vez más. Si el LED titila en color verde signica
que se ha reiniciado la cerradura.
A quick way to determine that the lock has been reset is to press the Lock button while the door is
open. If the latch bolt does not extend to lock, then the lock has been successfully reset.
Una manera rápida de determinar que se ha reiniciado la cerradura es presionando el botón Lock (Cerrar) mientras la puerta
está abierta. Si el perno de retención no se extiende para cerrar, la cerradura se ha reiniciado satisfactoriamente.
Note: Once the lock is reset, it must re-learn the orientation of your door. Remove the battery pack and perform
the Door Handing Process, step 23 in the Installation Guide (located on the reverse side of this manual).
Nota: Una vez reiniciada la cerradura, debe volver a aprender la orientación de la puerta. Retire el conjunto de baterías y realice el proceso de
orientación de la puerta, el paso 23 en la Guía de instalación (al dorso de este manual).
18
statUs led colors
colores del estado del led
Status LED
Estado del LED
status led color
Color del estado del LED
lock status
Estado de la cerradura
Blinking green
Parpadeando en verde
Unlocked
Desbloqueado
Blinking green and red
Parpadeando en verde y rojo
Unlocked, Low Battery
Desbloqueado, batería baja
Blinking amber
Parpadeando en ámbar
Locked
Bloqueado
Blinking amber and red
Parpadeando en ámbar y rojo
Locked, Low Battery
Bloqueado, batería baja
Blinking red (even when switch #1 is off)
Parpadeando en rojo (incluso cuando el interruptor Nº 1 está
desactivado)
Low Battery
Batería baja
solid red
Color rojo sólido
Door Handing Process in Step 23 of the Installation
Guide did not work properly. See Troubleshooting on
page 21.
El proceso de orientación de la puerta descrito en el paso 23 de la
guía de instalación no funcionó correctamente. Consulte Solución
de problemas on la página 21.
19
keypad WarNiNGs
advertencIas del teclado
Keypad
Teclado numérico
Warning
Advertencia
reason
Razón
solution
Solución
keypad ashes red with fast beeping sound (if
switch #3 is on) for 3 – 4 seconds.
El teclado numérico proyecta una luz roja con un pitido
rápido (en caso de que el interruptor Nº 3 se encuentre
encendido) por 3 – 4 segundos.
Low battery
Batería baja
Replace battery
Reemplazar la batería
Door not locked
Puerta no cerrada
Relock door
Cierre la puerta de nuevo
No user code
programmed
No se programó ningún
código de usuario.
Program at least one user code
Programe al menos un código de
usuario.
keypad ashes red with slow beeping sound
(if switch #3 is on) for 15 seconds
El teclado numérico proyecta una luz roja con un pitido lento
(en caso de que el interruptor Nº 3 se encuentre encendido)
por 15 segundos.
Three incorrect codes
entered or three time
outs.
Se ingresaron tres códigos
incorrectos o el sistema
había expirado tres veces.
Re-enter code after 60 second
keypad lockout
Reingresar el código después de 60
segundos de bloqueo del teclado.
20

troUBlesHootiNG
solucIón de problemas
problem
Problema
reason
Razón
solution
Solución
turnpiece does not rotate
smoothly after installation
La perilla no gira con fluidez luego de
la instalación.
Door Handing Process was
not executed in Step 23 of the
Installation Guide.
No se ejecutó el proceso de orientación
de la puerta en el paso 23 en la Guía
de instalación.
Perform Step 23.
Realice el paso 23.
Door alignment issue (latch and
strike are misaligned) causes
components to go out of sync.
Un problema en la alineación de la puerta
(el pestillo y la placa están desalineados)
hace que los componentes queden fuera
de sincronización.
Repair the door so the latch and
strike are aligned. Lock and unlock
the door using the keypad. The
components will syncronize.
Repare la puerta de manera tal que el
pestillo y la placa queden alineados. Use
el teclado numérico para abrir y cerrar la
puerta. Los componentes se sincronizarán.
status led is solid red after
door Handing process
El estado del LED es color rojo sólido
después del proceso de orientación de
la puerta
Lock interior assembly is not
mounted perpendicular to the
ground
El conjunto interior de la cerradura no está
instalado en forma perpendicular al piso.
Remount lock interior assembly as
illustrated in the Installation Guide.
Vuelva a instalar el conjunto interior de la
cerradura, tal como se ilustra en la Guía
de instalación.
Door preparation is incorrect,
causing latch to bind.
La preparación de la puerta es incorrecta,
lo que impide el empalme del pestillo.
Ensure door preparation is in
accordance with the door drilling
instructions, available online.
Verifique que la preparación de la
puerta se efectúe de acuerdo con las
instrucciones de perforación de la puerta,
disponibles en línea.
Battery level is too low.
El nivel de la batería es demasiado bajo.
Use a fresh set of batteries.
Use un nuevo conjunto de baterías.
lock doesn’t operate correctly.
La cerradura no funciona
correctamente.
Incorrect or incomplete
initialization.
Iniciación incorrecta o incompleta.
Remove battery pack. Press and
hold the Program button for 10
seconds, then perform Step 23 in
the Installation Guide.
Retire el conjunto de baterías. Mantenga
presionado el botón Programa por 10
segundos y luego realice el paso 23 de
la Guía de instalación.
21

problem
Problema
reason
Razón
solution
Solución
lock doesn’t operate correctly
after removing and replacing
the battery pack.
La cerradura no funciona correctamente
después que el conjunto de baterías es
retirado y reemplazado.
Incorrect initialization due to
remaining charge.
Iniciación incorrecta causada por la carga
de la batería.
Remove battery pack. Press
and hold the Program button for
10 seconds, then reinsert the
battery pack. If successful, the
LED will flash green and you will
hear a beep, indicating proper
initialization. If unsuccessful,
attempt this procedure again.
Retire el conjunto de baterías. Mantenga
presionado el botón Programa por 10
segundos y reinstale el conjunto de
baterías. Si el proceso fue satisfactorio,
el LED titilará en color verde y
escuchará un pitido, que indica que se
inició correctamente. De lo contrario,
repita el proceso una vez más.
i can see the lock in my
controller, but i can't control it.
Puedo ver la cerradura en mi
controlador, pero no puedo controlarla.
Light module or switch is not
beaming capable.
El módulo o interruptor de luz no tiene
capacidad de transmisión.
Ensure that the light module or
switch being used is beaming
capable.
Verifique que el módulo o interruptor de
luz que se utiliza tenga capacidad de
transmisión.
FreQUeNtly asked QUestioNs
preguntas Frecuentes
ENGLISH
How long will the lock operate on a set of batteries?
based on 10 operations per day, a single set of alkaline batteries will operate the lock for over a year.
What type of batteries do you recommend?
For best results, use new non-rechargeable alkaline batteries only.
I am planning to be away for several months; will my lock operate when I get back?
When the system is idling, it consumes minimum power (very close to battery shelf life.) With alkaline
batteries, the lock should be operable after years of idle.
I replaced my batteries less than a year ago and need to replace them again.
check door alignment. If the smartcode makes several attempts to lock or unlock the door, it may
mean that the door is warped and the latch does not line up correctly with the strike. operating the lock
excessively reduces battery life. avoid turning on the keypad light unnecessarily.
What settings should I use to get the maximum battery life out of my lock?
set switches #1, #2, and #3 to the oFF position.
22
ESPAÑOL
¿cuánto tiempo durará un paquete de baterías para la cerradura?
suponiendo 10 operaciones diarias, un solo conjunto de pilas alcalinas permitirá que la cerradura funcione durante
más de un año.
¿Qué tipo de baterías es mejor?
para obtener los mejores resultados, use sólo baterías nuevas alcalinas.
estaré fuera por varios meses y quiero saber si cuando regrese funcionará mi cerradura.
cuando el sistema está inactivo, consume una cantidad mínima de corriente eléctrica (muy similar a la vida útil en
desuso de la batería). con las pilas alcalinas, se espera que la cerradura funcione aún después de varios años de
inactividad.
cambié la batería hace menos de un año y otra vez necesito una nueva.
Inspeccione la alineación de la puerta. si el sistema smartcode hace varios intentos de destrabar o trabar la
puerta, puede deberse a que la puerta esté pandeada y el pestillo no esté correctamente alineada con la placa. el
funcionamiento en exceso de la cerradura reduce la vida útil de la batería. evite encender la luz del telclado numérico
innecesariamente.
¿Qué conguración debo usar para conseguir la mayor vida útil de la batería de la cerradura?
coloque los interruptores nº 1, nº 2 y nº 3 en la posición desactivada.
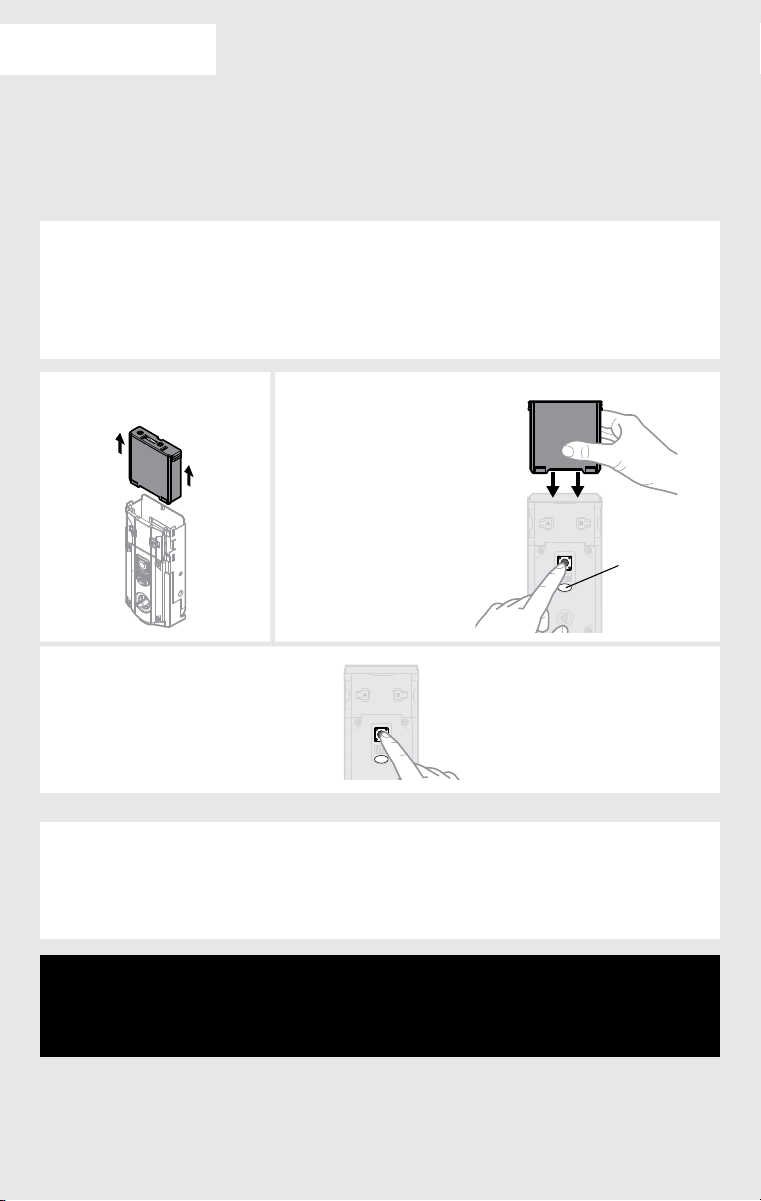
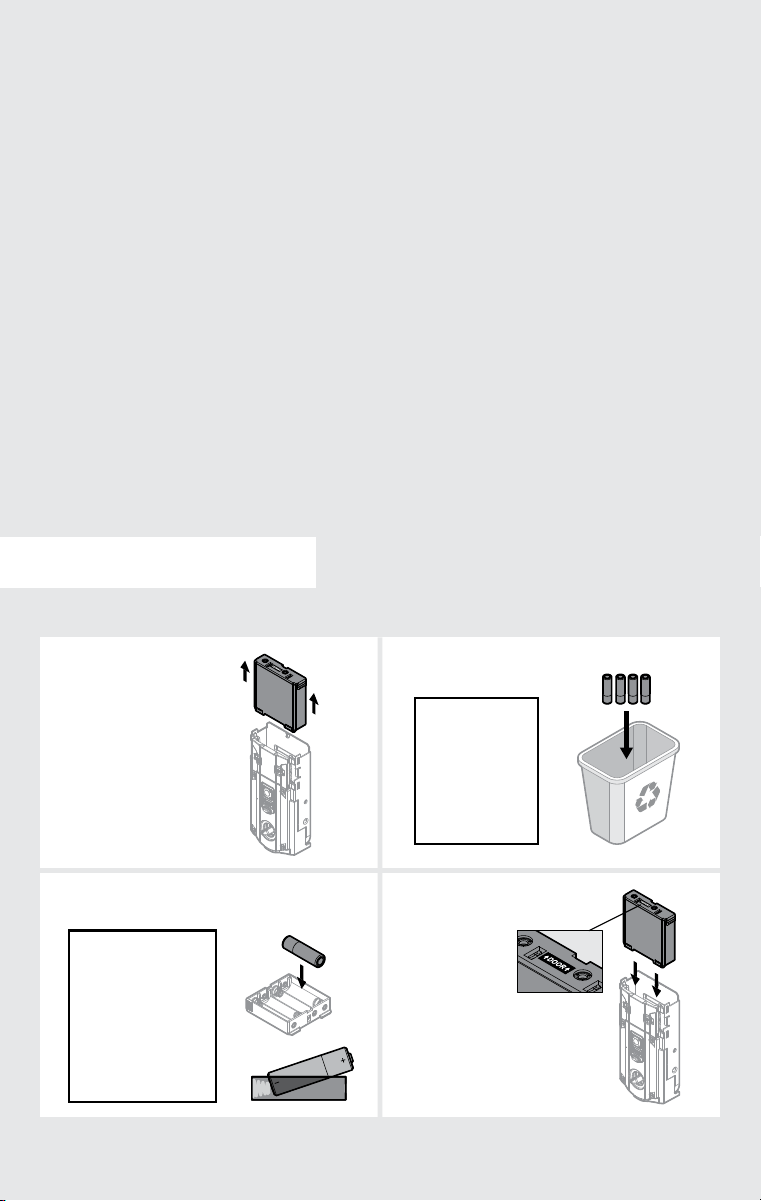
cHaNGiNG tHe Batteries
cambIo de baterías
x4
AA
1
Remove battery pack.
Retire el conjunto de baterías.
2
Dispose of batteries.
Deseche las baterías.
3
Install new batteries in battery pack.
Instale baterías nuevas en el conjunto de baterías.
4
Reinstall battery pack.
Reinstale el conjunto de baterías.
Ensure correct polarity.
For best results, use
new non-rechargeable
Alkaline batteries only.
Compruebe que la polaridad
sea la correcta. Para
obtener los mejores
resultados, use sólo baterías
nuevas alcalinas.
Dispose according
to local laws and
regulations.
Deseche acuerdo con
las leyes y
reglamentaciones
locales.
23

reGUlatory coMpliaNce
cumplImIento normatIvo
This product complies with standards established by the
following regulatory bodies:
• Federal Communications Commission (FCC)
• Industry Canada
FCC
This device complies with Part 15 of the FCC Rules.
Operation is subject to the following two conditions:
( 1 ) this device may not cause harmful interference, and
( 2 ) this device must accept any interference received,
including interference that may cause undesired
operation.
This equipment has been tested and found to comply
with the limits for a Class B digital device, pursuant to
Part 15 of the FCC Rules. These limits are designed
to provide reasonable protection against harmful
interference in a residential installation. This equipment
generates, uses, and can radiate radio frequency energy
and, if not installed and used in accordance with the
instructions, may cause harmful interference to radio
communications. However, there is no guarantee that
interference will not occur in a particular installation. If
this equipment does cause harmful interference to radio
or television reception, which can be determined by
turning the equipment off and on, the user is encouraged
to try to correct the interference by one or more of the
following measures:
• Reorient or relocate the receiving antenna.
• Increase the separation between the equipment
and receiver.
• Connect the equipment into an outlet on a circuit
different from that to which the receiver is
connected.
• Consult the dealer or an experienced radio/TV
technician for help.
industry canada
This Class B digital apparatus complies with Canada
ICES-003. CAN/CSA-C22.2 NO. 14-05 (Industrial
Control Equipment) Operation is subject to the
following two conditions: ( 1 ) this device may not
cause interference, and ( 2 ) this device must accept
any interference, including interference that may
cause undesired operation of the device.
Este producto cumple con las normas establecidas por los siguientes
organismos reguladores:
• Comisión Federal de Comunicaciones (FCC)
• Industry Canada
FCC
Este dispositivo cumple con la 15ª parte del reglamento de la FCC.
Su funcionamiento está sujeto a las siguientes dos condiciones:
( 1 ) este dispositivo no deberá causar ninguna interferencia
dañina, y ( 2 ) este dispositivo deberá aceptar cualquier
interferencia recibida, incluyendo aquélla que podría causar un
funcionamiento no deseado.Se realizaron pruebas a este equipo
cuyos resultados revelaron que cumple con los límites establecidos
para un dispositivo digital de la Clase B, conforme a la 15ª parte
del reglamento de la FCC. Estos límites han sido impuestos para
proporcionar protección razonable contra interferencias dañinas
en una instalación residencial. Este equipo genera, utiliza y puede
irradiar energía de radiofrecuencia y, si no se instala y utiliza según
lo que indican las instrucciones, podría causar interferencia dañina
en radiocomunicaciones. Sin embargo, no hay garantía de que la
interferencia no ocurrirá en determinadas instalaciones. Si este
equipo efectivamente causa interferencia en la recepción de radio
o televisión, la cual puede determinarse encendiendo y apagando
el equipo, sugerimos al usuario que intente corregir dicha
interferencia tomando una o más de las siguientes medidas:
• Volver a orientar o ubicar la antena receptora.
• Incrementar la distancia entre el equipo y el recibidor.
• Conectar el equipo a una toma de corriente en un circuito
distinto del circuito en el cual esté conectado el recibidor.
• Consultar con el distribuidor o un técnico de radio y TV con
experiencia para obtener su ayuda.
industry canada
Este aparato digital de clase B cumple con la norma Canada
ICES-003. CAN/CSA-C22.2 No. 14-05 (Equipo de Control
Industrial) Su funcionamiento está sujeto a las siguientes dos
condiciones: ( 1 ) este dispositivo no deberá causar ninguna
interferencia dañina, y ( 2 ) este dispositivo deberá aceptar
cualquier interferencia, incluyendo aquélla que podría causar el
funcionamiento no deseado del dispositivo.
IMPORTANT! Changes or modifications not
expressly approved by the manufacturer
could void the user’s authority to operate the
equipment.
¡IMPORTANTE! Todo cambio o modificación no
aprobado expresamente por el fabricante podría
desautorizar al usuario para operar el equipo.
24
User code assiGNMeNts
asIgnacIones de códIgos de usuarIo
Use the spaces provided to write the name of the person assigned to each user code position.
Utilice los espacios provistos para escribir el nombre de la persona asignada a cada posición del código de usuario.
1
2
3
4
5
6
7
8
9
10
11
12
13
14
15
16
17
18
19
20
21
22
23
24
25
26
27
28
29
30
25

iMportaNt saFeGUards
medIdas de proteccIón Importantes
1. Read all instructions in their entirety.
2. Familiarize yourself with all warning and caution statements.
3. Remind all family members of safety precautions.
4. Restrict access to your lock's back panel and routinely check your
settings to ensure they have not been altered without your knowledge.
5. Protect your user codes and master code.
1. Lea las instrucciones en su totalidad.
2. Familiarícese con todas las definiciones de advertencia y precaución.
3. Recuerde a todos los integrantes de su familia las precauciones de seguridad.
4. Limite el acceso al panel posterior de la cerradura y verifique en forma rutinaria las
configuraciones para comprobar que no hayan sido alteradas sin su conocimiento.
5. Proteja su códigos de usuario y código maestro.
26