49526 / 01
INSTALLATION GUIDE • GUÍA DE INSTALACIÓN
R
Q
A
C
D
B
E
F
G
H
J
M
L
N
P
K
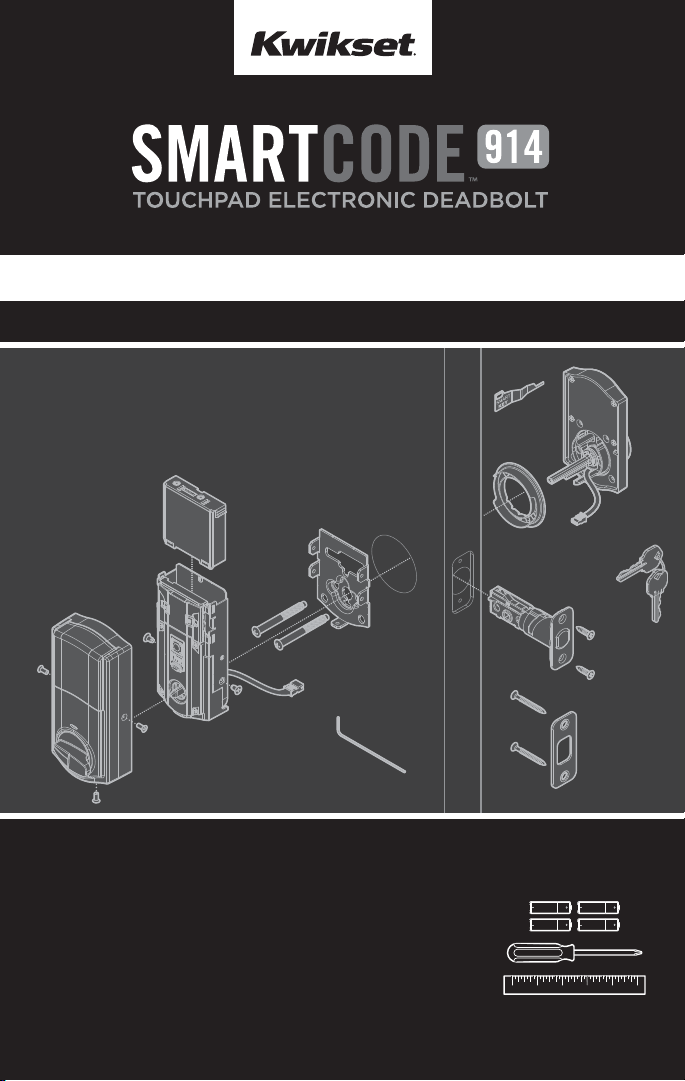
Tools Needed
Herramientas necesarias
AA
AA
AA
AA
Use and programming instructions are
located on the reverse side of this manual.
Las instrucciones de uso y programación se
encuentran al dorso de este manual.
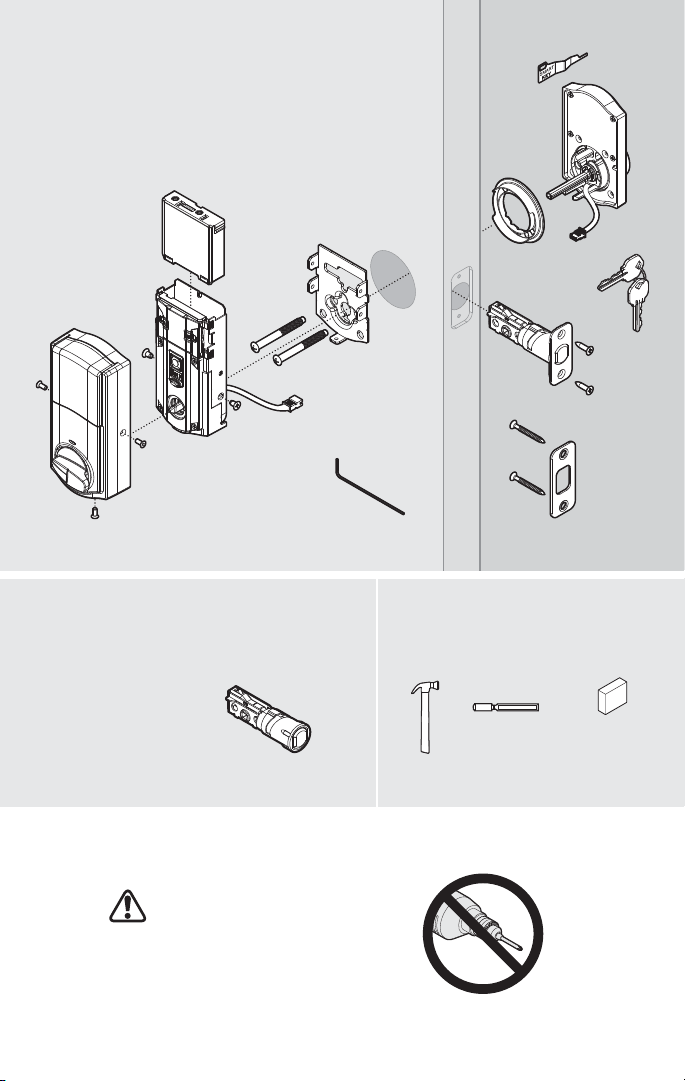
Options for Select
Models Only
Opciones solamente para
modelos selectos
Do not use electric drill or electric
screwdriver to tighten screws.
No utilice el taladro eléctrico o destornillador
eléctrico para apretar los tornillos.
Additional Tools Needed for “A2”
Herramientas adicionales necesarias para “A2”
wood block
bloque de madera
chisel
cincel
A2
Q
A
C
D
B
E
R
F
H
J
M
L
N
P
K
Parts in the box
Piezas en la caja
G
2

Glossary of Parts
Glosario de piezas
If you have installation questions, our highly trained Technical Support teams can provide you
with the assistance you need.
Si tiene preguntas sobre la instalación, nuestros equipos de soporte técnico altamente capacitados pueden brindarle la
ayuda que usted necesita.
Need help?
¿Necesita ayuda?
Kwikset
1-866-863-6584
www.kwikset.com
Service Hours
5:00am – 6:00pm PST Mon-Friday
6:30am – 4:00pm PST Saturday
Closed Sunday
Horas de atención al público
5:00am – 6:00pm PST Lunes – Viernes
6:30am – 4:00pm PST Sábado
Cerrado los domingos
A. Latch
El pestillo
A2. Drive-In Latch
El pestillo de inserción
B. Latch Mounting Screws
Los tornillos del pestillo
C. Strike
La placa
D. Strike Mounting Screws
Los tornillos de la placa
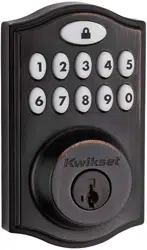
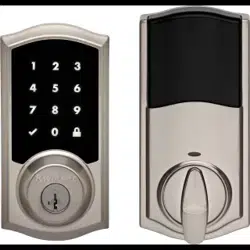
E. Exterior Keypad
El teclado numérico exterior
F. Adapter Ring
Anillo de adaptador
G. Mounting Plate
La placa de montaje
H. Mounting Plate Screws
Los tornillos de la placa de
montaje
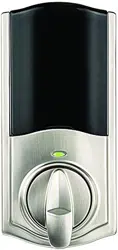
J. Interior Assembly
El ensamble interior
K. Interior Assembly Screws
Los tornillos del ensamble interior
L. Battery Pack
El paquete de bateriás
M. Battery Cover
La tapa de la batería
N. Battery Cover Screws
Los tornillos de la tapa de la
batería
P. Hex Wrench
Llave hexagonal
Q. SmartKey Tool
La herramienta SmartKey
R. Keys
Las llaves
3
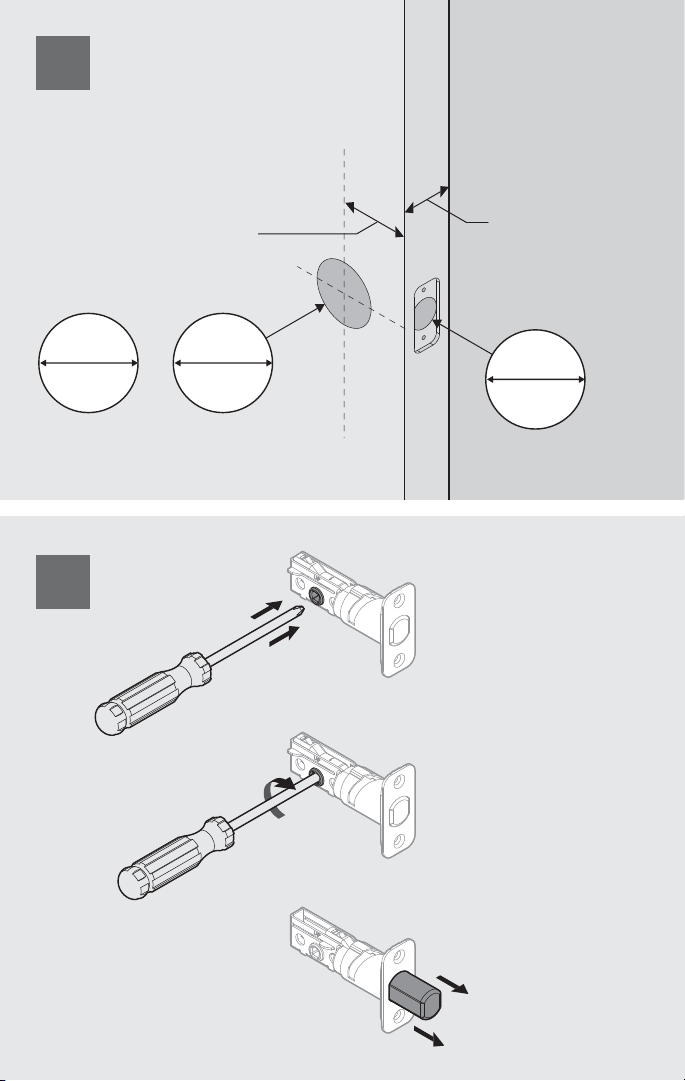
1"
25 mm
2-1/8"
54 mm
1-1/2"
38 mm
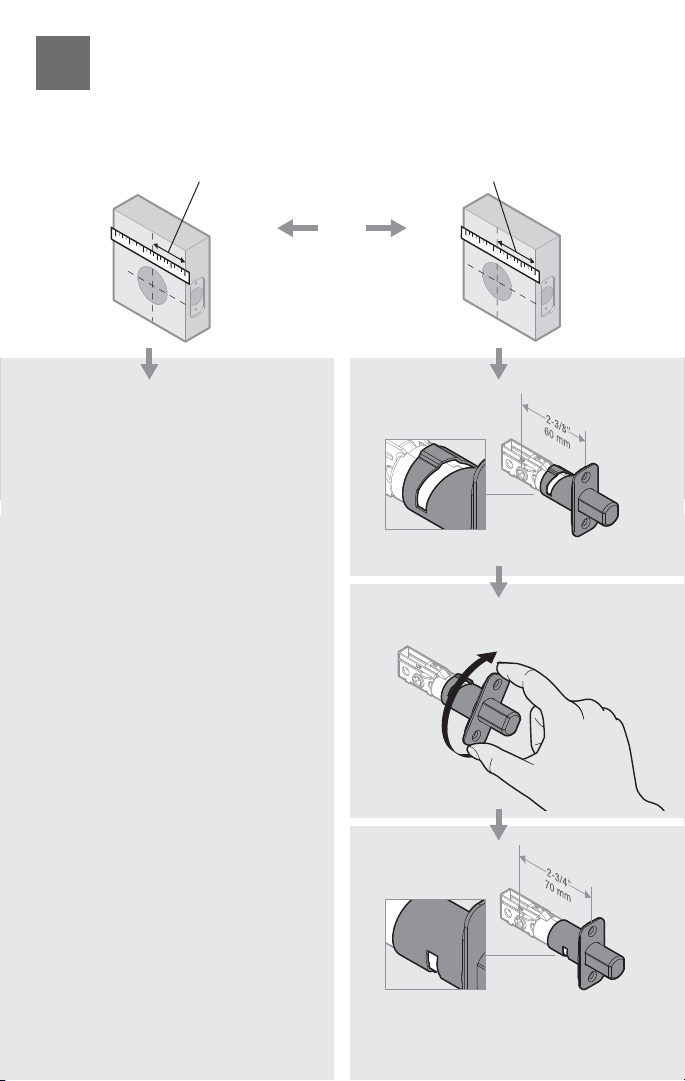
1-3/8" – 1-3/4"
35 mm – 44 mm
2-3/8" (60 mm)
or tP
2-3/4" (70 mm)
or
o
Check Dimensions
Revise las medidas
A / A2
See template on page 19
or 20 if needed.
Ver la plantilla en la página
19 o 20 si es necesario.
4
1
2
180°
A/A2
94
Adjust Latch “A” or “A2” (if needed)
Ajuste el pestillo “A” o “A2” (si es necesario)
2-3/8" (60 mm) 2-3/4" (70 mm)
or
o
Proceed to Step 4.
Vaya al paso 4.
5
3

A
B
x2
A2
wood block
bloque de madera
Door edge chiseled
Borde de puerta cincelado
Door edge not chiseled
Borde de puerta no cincelado
or
o
6
4
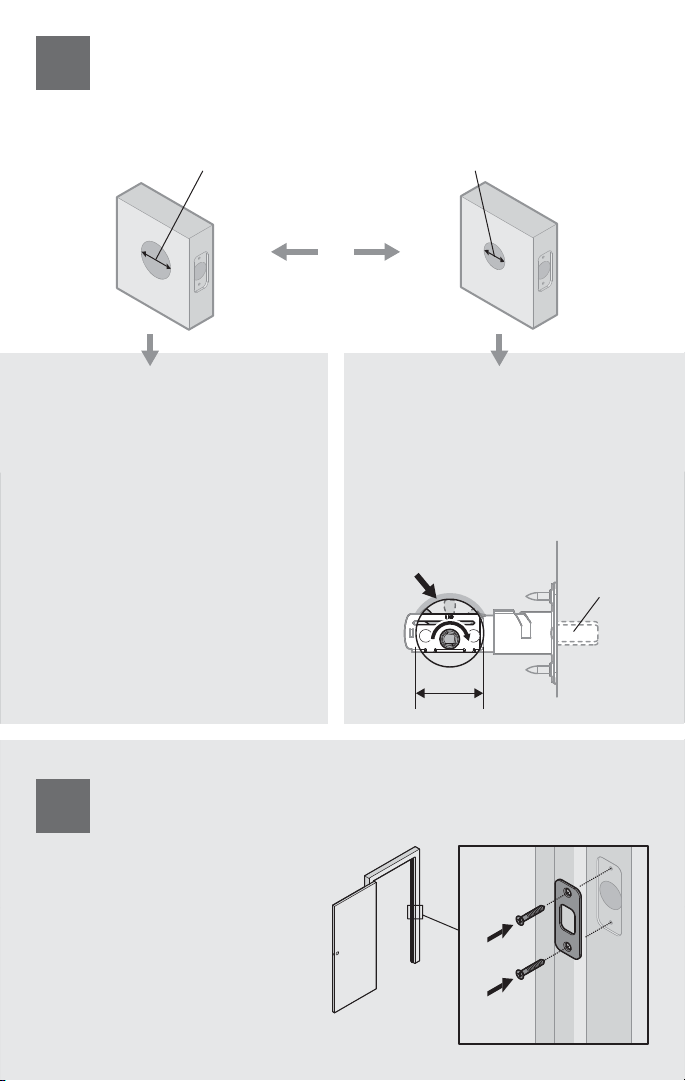
1-1/2"
38 mm
Test if latch bolt fully extends and retracts.
Chisel out area inside hole as needed so
latch can operate smoothly.
Pruebe si el perno de retención se extiende y retrae por
completo. Cincele el área en el interior del orificio
según sea necesario para que el pestillo pueda operar
sin problemas.
latch bolt
perno de
retención
chisel
cincelar
x2
C
D
If needed, see the door drilling
instructions, available on the
SmartCode 914 product page of
www.kwikset.com.
Si es necesario, consulte las
instrucciones para la perforación de
la puerta, disponibles en la página
del producto SmartCode 914 de
www.kwikset.com.
or
o
2-1/8" (54 mm)
1-1/2" (38 mm)
Determine the diameter of the hole in your door:
Determine el diámetro del orificio de la puerta:
Proceed to Step 6.
Vaya al paso 6.
7
5
6
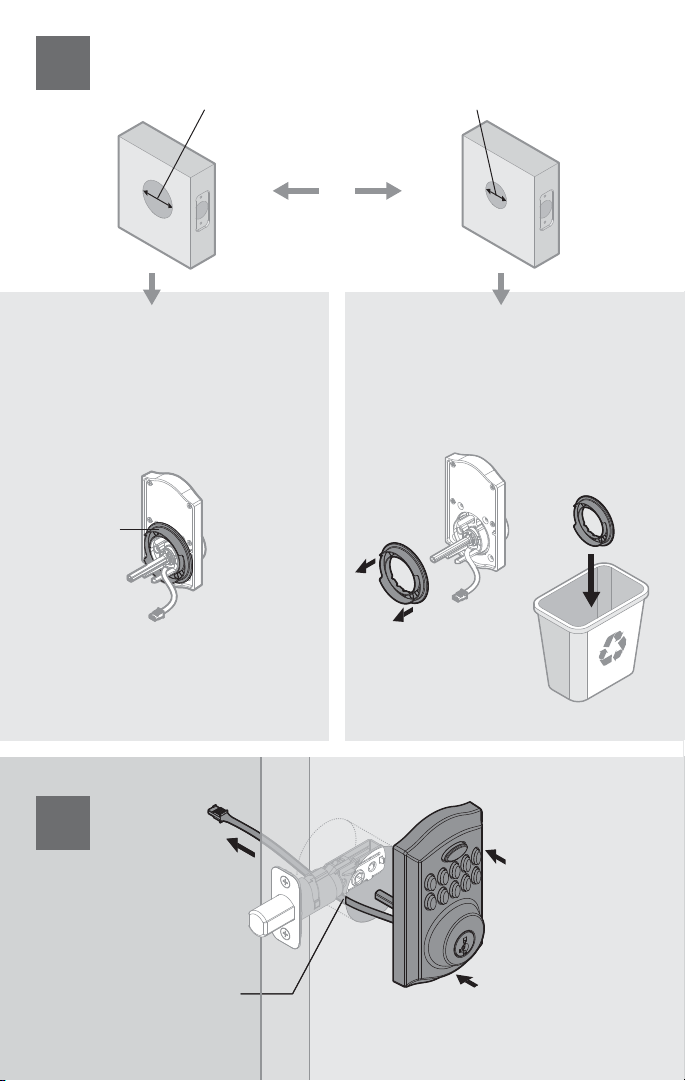
E
Cable goes
underneath latch
El cable va por
debajo del pestillo
F
F
F
E
E
Make sure “F” is installed on “E”
Verifique que "F" se instale en "E".
Remove and discard “F”
Retire y deseche "F"
or
o
2-1/8" (54 mm)
1-1/2" (38 mm)
8
7
8

G
Route cable through center hole,
then push cable into bottom hole.
Conecte el cable a través del orificio central y
luego empújelo hacia el orificio de abajo.
Keep parallel to
edge of door
Mantenga paralelo al
borde de la puerta.
Tighten screws evenly
Ajuste los tornillos en forma uniforme
H
(x2)
9
9
10
M
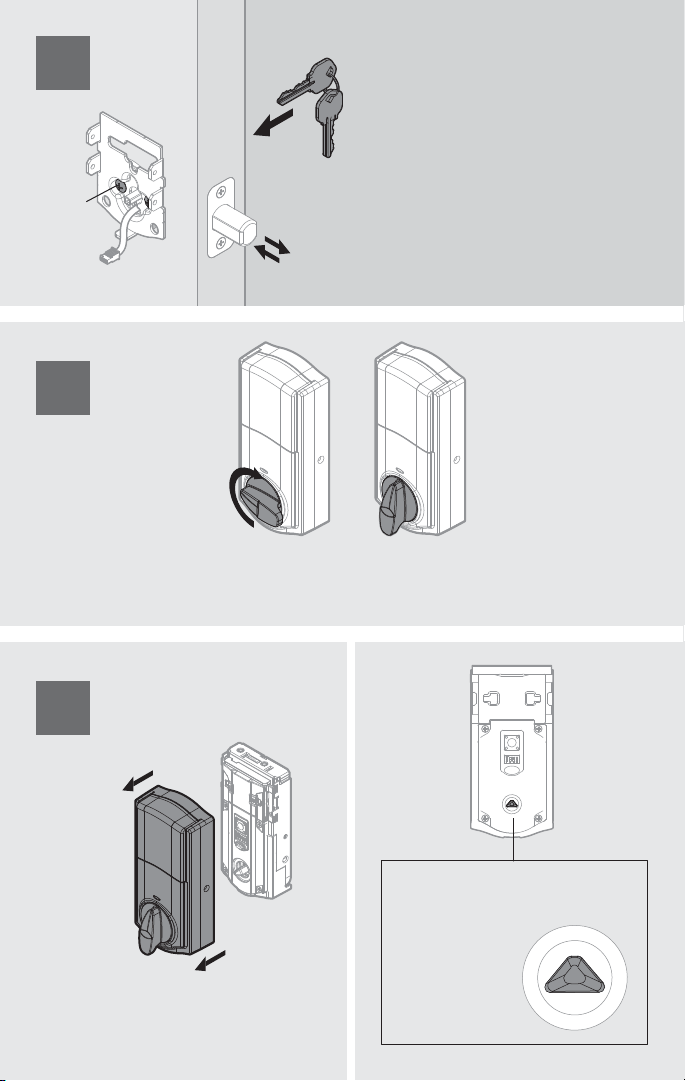
Insert key and test latch. If latch
does not extend or retract smoothly,
adjust screws (H).
Remove key when finished and make
sure the latch bolt is fully extended.
Inserte la llave para probar el pestillo. Si el pestillo
no se extiende o retrae con suavidad, ajuste los
tornillos (H).
Retire la llave cuando haya terminado y
compruebe que el perno de retención esté
extendido por completo.
R
H
Make sure turnpiece is in the vertical position.
Compruebe que la perilla esté en la posición vertical.
J
J
M
Separate “M” and “J”
Separe "M" y "J"
Make sure turnpiece
shaft is rotated as shown:
Verifique que el eje de la perilla
gire tal como se ilustra:
10
11
12
13
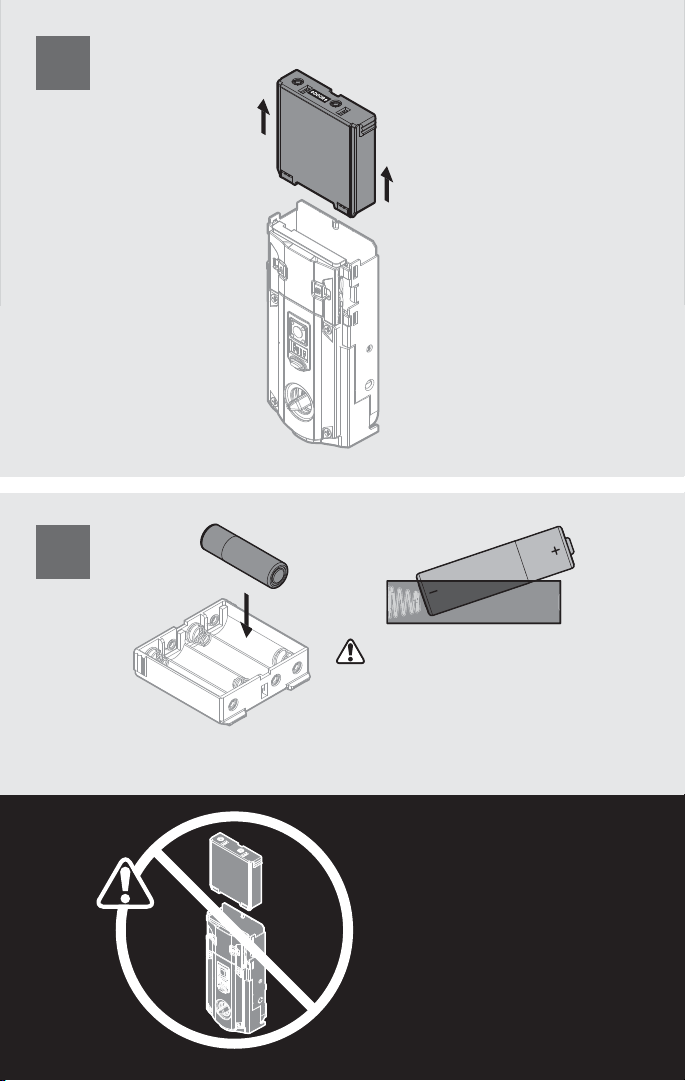
Separate “L” and “J”
Separe “L” y “J”
J
L
x4
AA
L
Ensure correct polarity. For best
results, use new non-rechargeable
Alkaline batteries only.
Compruebe que la polaridad sea la correcta.
Para obtener los mejores resultados, use sólo
baterías nuevas alcalinas.
Do not install battery pack yet.
Todavía no instale el conjunto de
baterías.
11
14
15
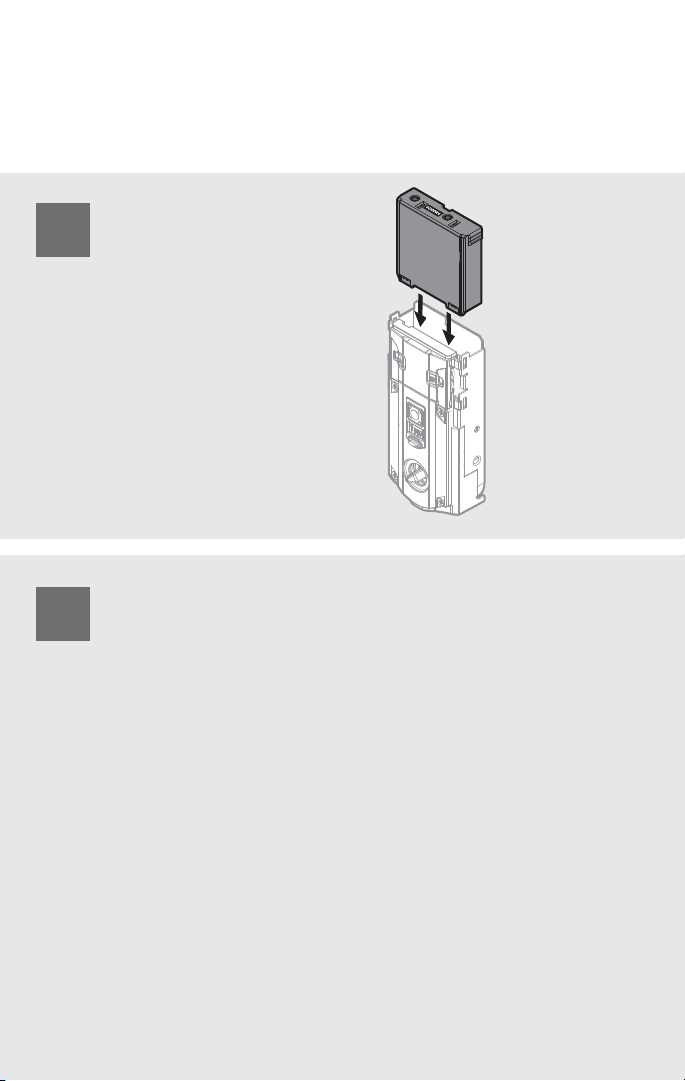
Z-Wave locks only:
Temporarily install battery pack
Solo cerraduras Z-Wave:
Instale temporalmente el conjunto
de baterías
Perform the Inclusion Process:
Realice el proceso de inclusión:
J
L
Note: “Inclusion” refers to the process in which the lock is added to a Z-Wave or ZigBee
controller. “Exclusion” refers to the process in which the lock is removed from a Z-Wave or
ZigBee controller.
Hold the lock interior a maximum of 12" (30.5 cm) from your Z-Wave controller, and initiate the
Inclusion process at the controller. Refer to your Z-Wave control system instructions for more
information. Press button “A” on the lock one time to Include it in your system. The controller
and lock must remain stationary for a total of 60 seconds during the Inclusion process.
If Inclusion is unsuccessful, initiate the Exclusion process at the controller, then press
button “A” on the lock one time. Once the lock is fully excluded from the system, repeat the
Inclusion process.
Nota: “Inclusión” es el proceso de cómo agregar la cerradura al controlador Z-Wave o ZigBee. “Exclusión” es el proceso de
cómo eliminar la cerradura desde el controlador Z-Wave o ZigBee.
Mantenga el interior de la cerradura a una distancia máxima de 12" (30,5 cm) del controlador Z-Wave y inicie el proceso
de inclusión en el controlador. Remítase a las instrucciones del sistema de control de Z-Wave para obtener más
información. Presione el botón "A" de la cerradura una vez para incluirlo en su sistema. El controlador y la cerradura
deben permanecer fijos por un período de 60 segundos durante el proceso de inclusión.
Si el proceso de inclusión no es satisfactorio, inicie el proceso de exclusión en el controlador y luego pulse el botón "A" de
la cerradura una vez. Una vez que la cerradura fue excluida por completo del sistema, repita el proceso de inclusión.
Z-Wave locks only (ZigBee locks, proceed to step 19)
Solo cerraduras Z-Wave (para las cerraduras ZigBee, avance al paso 19)
16
17
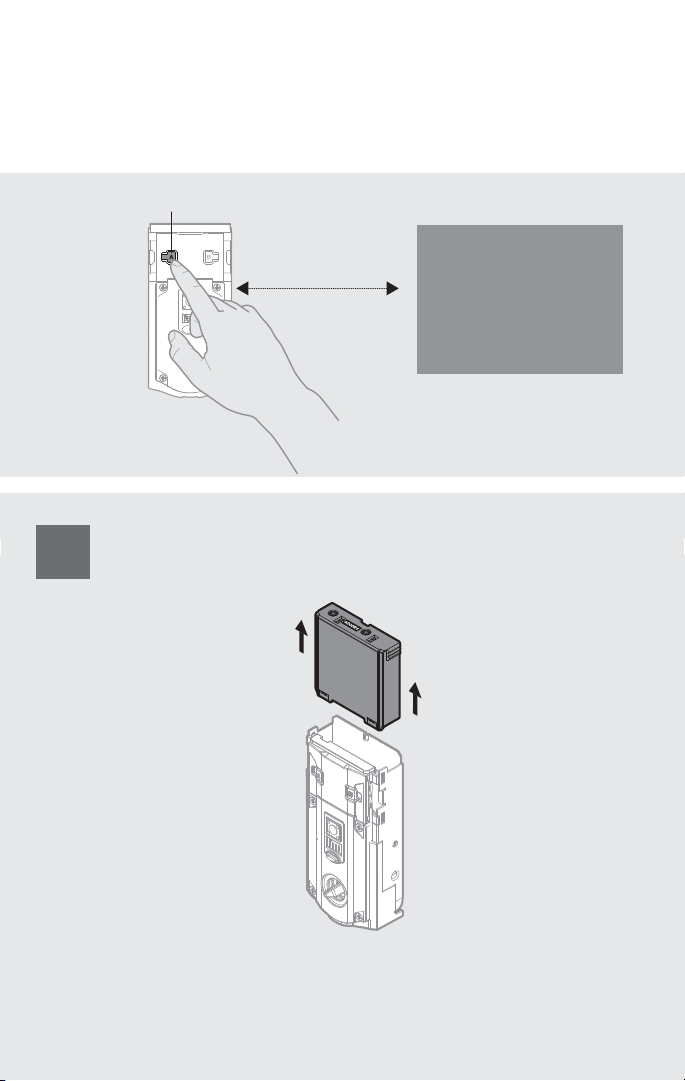
Remove battery pack
Retire el conjunto de baterías
L
12" (30,5 cm)
Z-Wave Controller
Controlador Z-Wave
Press button
“A” once.
Presione el botón
“A” una sola vez.
A
Z-Wave locks only (ZigBee locks, proceed to step 19)
Solo cerraduras Z-Wave (para las cerraduras ZigBee, avance al paso 19)
Proceed to Step 19.
Vaya al paso 19.
13
18

J
J
Lay excess cable flat inside the
bottom of the interior housing (J).
Acomode el exceso de cable en el fondo del
alojamiento interior (J).
Ensure tight
cable connection.
Asegúrese de que la
conexión sea firme.
align
alinear
J
20
21
14
19
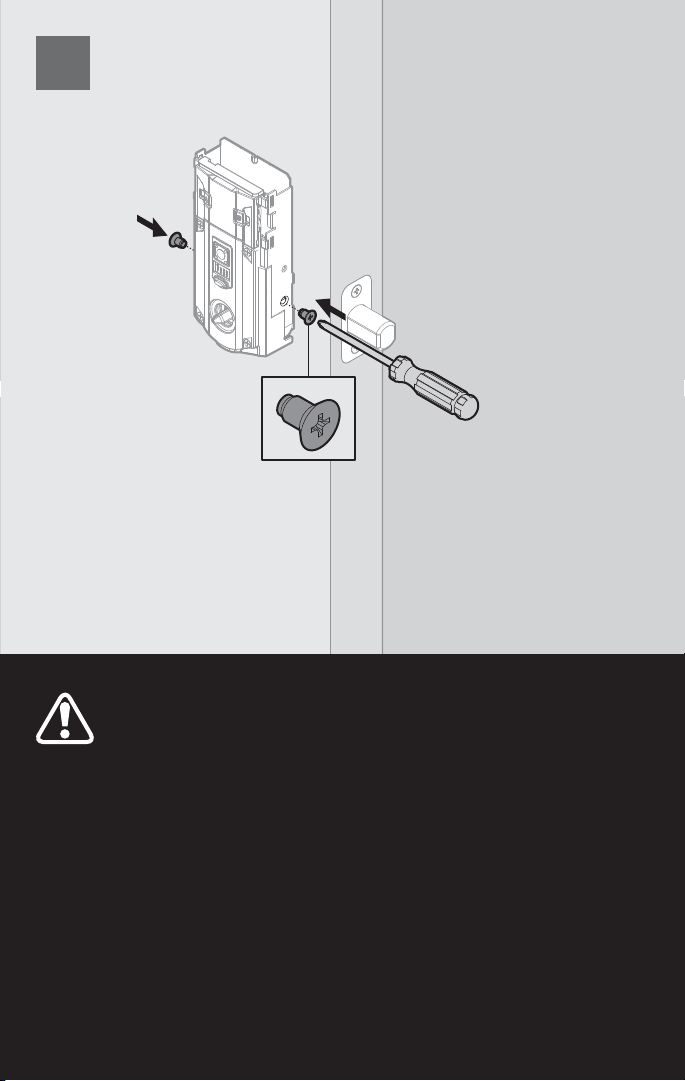
K
x2
You are about to perform the Door Handing
Process, which is crucial for lock operation.
The lock will not work properly unless you read
and follow all instructions in step 23.
Está a punto de realizar el proceso de orientación de la
puerta, que es fundamental para el funcionamiento de la
cerradura. La cerradura no funcionará correctamente a
menos que lea y siga todas las instrucciones detalladas
en el paso 23.
15
22
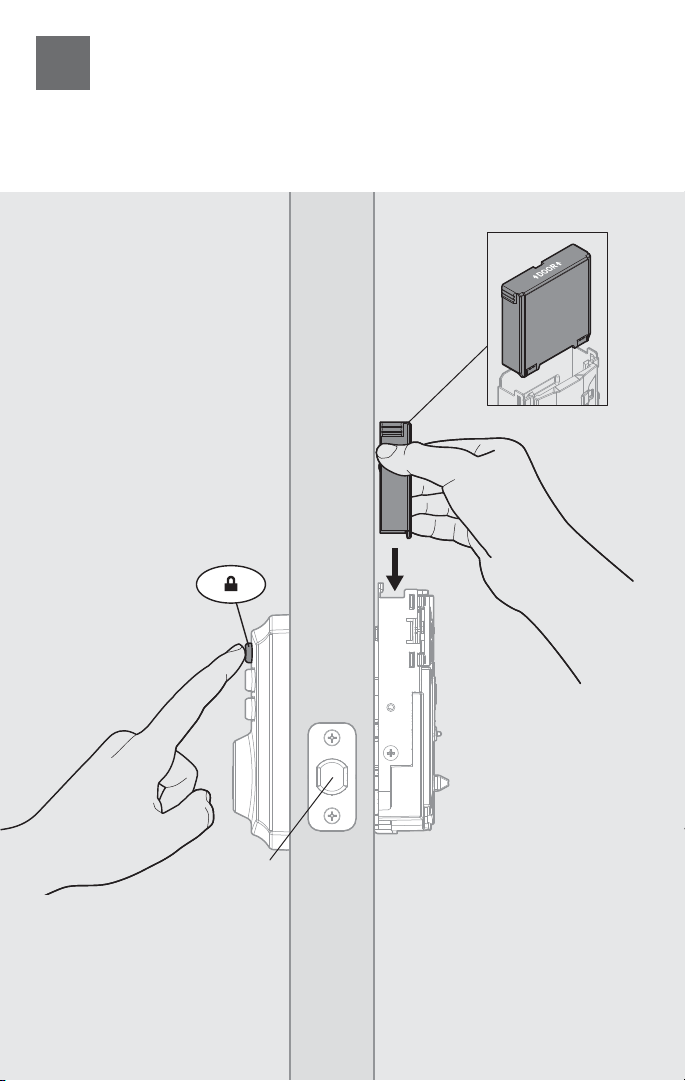
L
latch bolt
perno de
retención
Press and hold the Lock
button while installing
battery pack (L).
Hold button until the
latch bolt starts moving
on its own.
Mantenga presionado el botón
de bloqueo mientras instala el
conjunto de baterías (L).
No suelte el botón hasta que el
perno de retención comience a
moverse por sí solo.
HOLD
Mantenga
presionado
DOOR HANDING PROCESS
PROCESO DE ORIENTACIÓN DE LA PUERTA
This step will teach your lock the orientation of your door.
Este paso enseñará a la cerradura la orientación de la puerta.
16
23
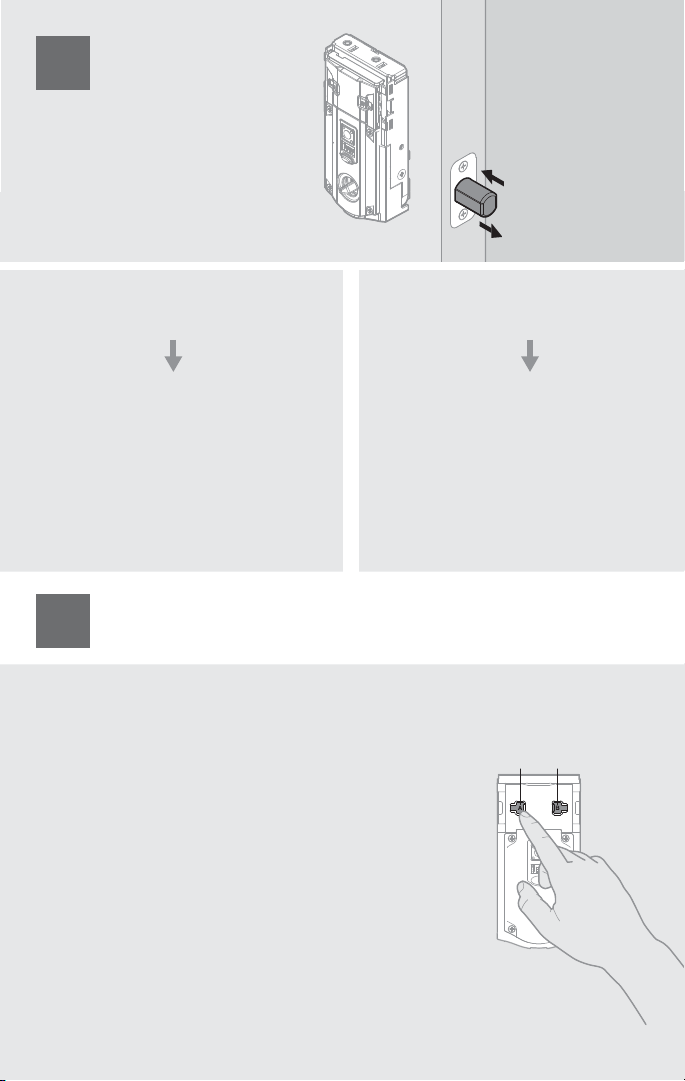
A B
YES
Si
NO
No
Note: “Inclusion” refers to the process in which the lock is added to a
Z-Wave or ZigBee controller. “Exclusion” refers to the process in which
the lock is removed from a Z-Wave or ZigBee controller.
Initiate the Inclusion process at your ZigBee controller. Refer to your
ZigBee control system instructions for more information. Press button
“A” on the lock four (4) times to Include it in your system.
If Inclusion is unsuccessful, initiate the Exclusion process at the controller,
then press button “B” nine (9) times. Once the lock is fully excluded from
the system, repeat the Inclusion process.
Nota: “Inclusión” es el proceso de cómo agregar la cerradura al controlador Z-Wave o ZigBee.
“Exclusión” es el proceso de cómo eliminar la cerradura desde el controlador Z-Wave o ZigBee.
Inicie el proceso de inclusión en el controlador. Remítase a las instrucciones del sistema de
control de ZigBee para obtener más información. Presione el botón “A” de la cerradura cuatro
veces para incluirlo en su sistema.
Si el proceso de inclusión no es satisfactorio, inicie el proceso de exclusión en el controlador y luego
pulse el botón “B” de la cerradura nueve veces. Una vez que la cerradura fue excluida por completo
del sistema, repita el proceso de inclusión.
Perform the Inclusion Process:
Realice el proceso de inclusión:
Did the latch bolt retract
and extend on its own
when the battery pack
was installed?
¿El perno de retención se retrajo
y extendió por sí solo cuando se
instaló el conjunto
de baterías?
24
25
Remove battery pack, wait 15
seconds, then attempt Step
23 again.
Retire el conjunto de baterías,
espere 15 segundos y luego vuelva
a realizar el paso 23.
Door Handing Process was
successful! Proceed to Step 25
after latch bolt stops moving.
¡El proceso de orientación de la puerta
se realizó satisfactoriamente! Avance
al paso 25 una vez que el perno de
retención deje de moverse.
ZigBee locks only (Z-Wave locks, proceed to step 26)
Solo cerraduras ZigBee (para las cerraduras Z-Wave, avance al paso 26).
17
M
N
P
Q
x3
ball tip
punta de bola
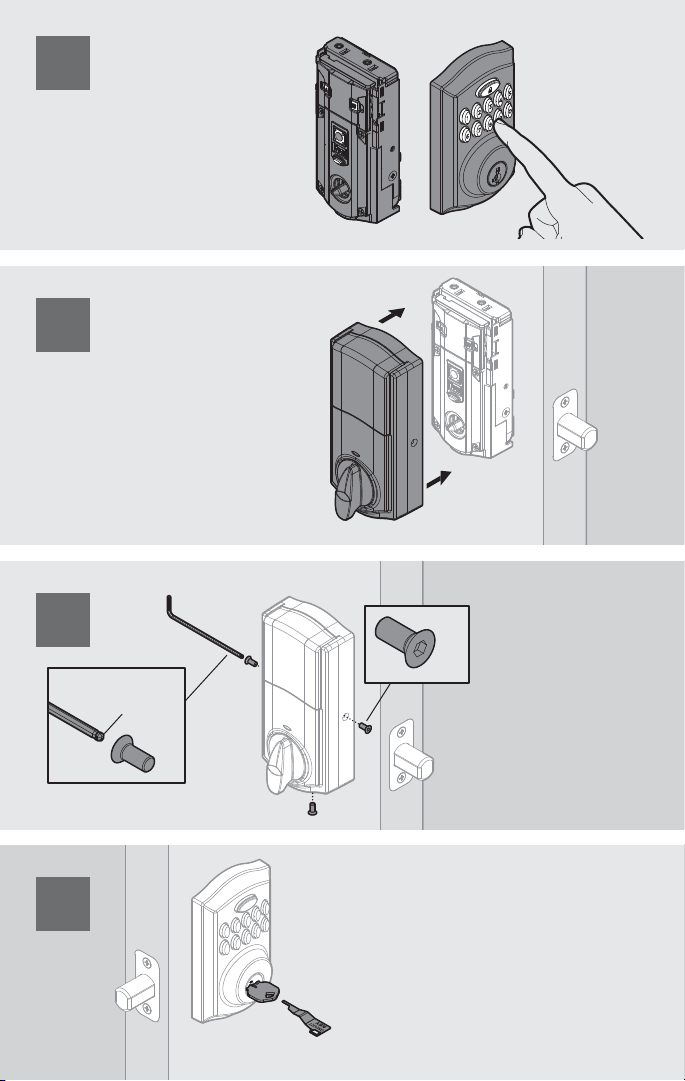
If needed, rekey the lock to work with your
existing key. See the supplied SmartKey
Rekey instructions for more information.
Si es necesario, regenere la clave de la cerradura para
trabajar con la llave que ya tiene. Consulte las
instrucciones suministradas de regeneración de clave
de Smartkey para obtener más información.
Program the lock. See the
User Guide on the reverse
side of this manual.
Programe la cerradura. Consulte
la Guía del usuario que se
encuentra al dorso de este
manual.
Install “M” after the lock has
been programmed.
Instale "M" después de que la
cerradura a sido programada.
Keep “P” in a safe
place, as you will need
it to access the back
panel for additional
programming.
Mantenga "P" en un lugar
seguro, ya que lo necesitará
para acceder al panel
posterior para realizar ajustes
de programación adicionales.
26
27
28
29
18
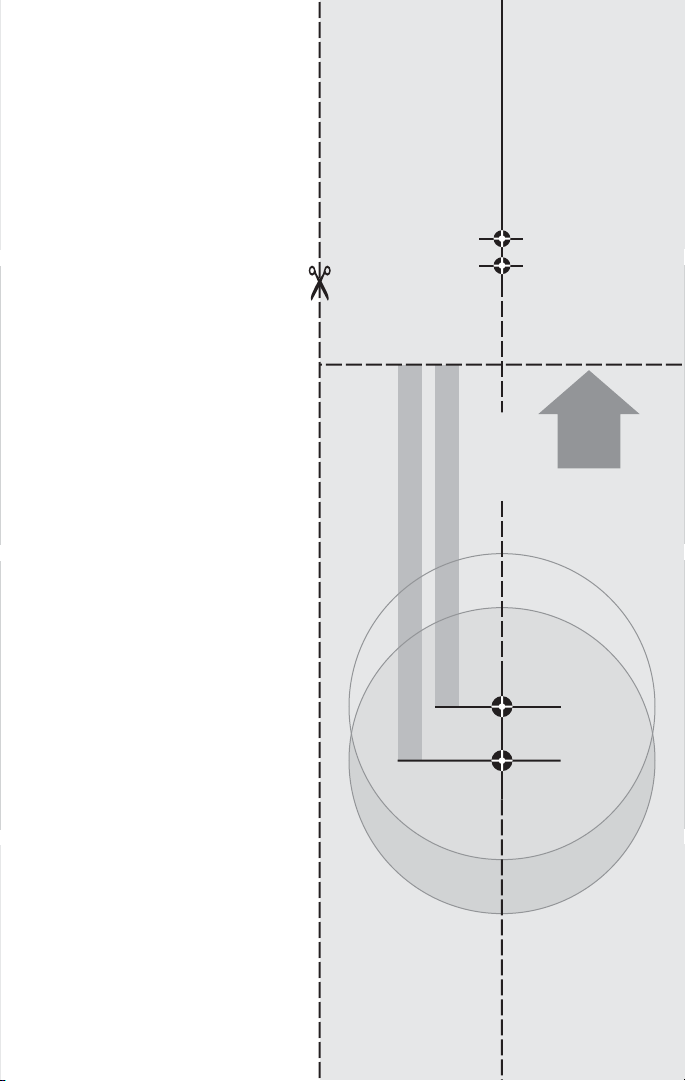
Fold
Doble
1-3/4" (44 mm)
1-3/8" (35 mm)
2-3/8" (60 mm)
2-3/4" (70 mm)
Edge s"ORDE
Backset
Distancia al centro
Faces&RENTE
Centerline
Linea central
Cut out the template on the right
and place it on the exterior side of
the door. Complete door drilling
instructions are available on the
SmartCode 914 product page of
www.kwikset.com.
Recorte la plantilla de la derecha y colóquela
en el lado de afuera de la puerta. Las
instrucciones completas para la perforación
de la puerta están disponibles en la página
del producto SmartCode 914 de
www.kwikset.com.
Template
Plantilla
19
Fold
Doble
1-3/4" (44 mm)
1-3/8" (35 mm)
2-3/8" (60 mm)
2-3/4" (70 mm)
Edge s"ORDE
Backset
Distancia al centro
Faces&RENTE
Centerline
Linea central
20

WARNING: This Manufacturer advises that no lock can provide complete security by itself. This
lock may be defeated by forcible or technical means, or evaded by entry elsewhere on the property.
No lock can substitute for caution, awareness of your environment, and common sense. Builder’s
hardware is available in multiple performance grades to suit the application. In order to enhance
security and reduce risk, you should consult a qualifi ed locksmith or other security professional.
CAUTION: Prevent unauthorized entry. Since anyone with access to the back panel can change the
user codes, you must restrict access to the back panel and routinely check the user codes to ensure
they have not been altered without your knowledge. The use of a Master Code can help protect your
system’s settings.
ADVERTENCIA: Este Fabricante hace saber que no hay cerrojos que puedan proporcionar completa
seguridad por sí mismos. Puede hacerse que falle este cerrojo forzándolo o utilizando medios técnicos, o
puede evadirse entrando por otra parte de la propiedad. No hay cerrojos que puedan hacer de sustitutos
para la precaución, el estar al tanto del entorno, y el sentido común. Pueden obtenerse piezas de ferretería
de constructor con diversos grados de rendimiento para ajustarse a la aplicación. Para realzar la seguridad y
reducir los riesgos, debe consultar con un cerrajero capacitado u otro profesional de seguridad.
PRECAUCIÓN: Prevenga la entrada desautorizada. Cualquier persona con acceso al panel posterior puede
cambiar los códigos de usuario, usted debe restringir el acceso al panel posterior y comprobar rutinariamente
ambos códigos para asegurar que los códigos de usuario propios no han sido alterados sin su conocimiento.
El uso de un código maestro puede ayudarlo a proteger las confi guraciones de su sistema.
© 2013 Kwikset Corporation
Kwikset
1-866-863-6584
www.kwikset.com
For warranty information:
Si desea información sobre la garantía:
21