* Not all signal cables (DP, HDMI, VGA cables) will be provided for all countries and regions. Please check with the local dealer or AOC branch office for confirmation.
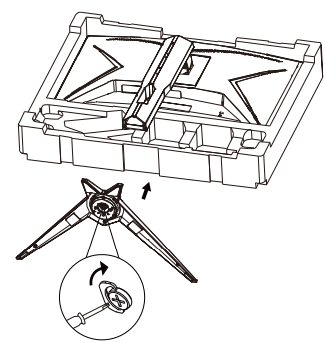
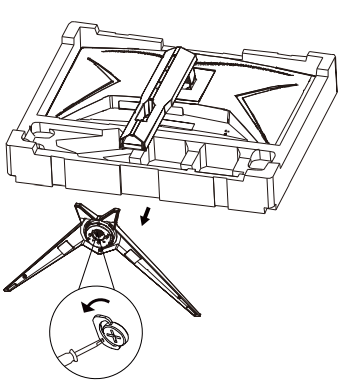
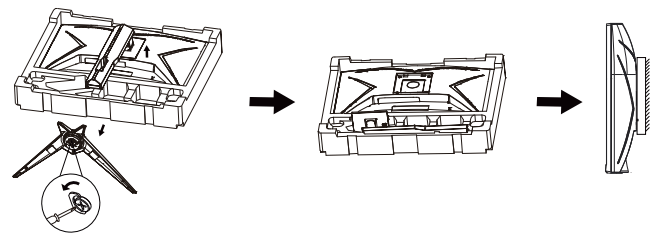
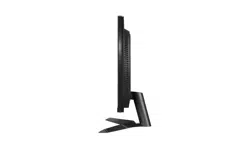
Setup Stand & Base
Please setup or remove the base following the steps as below.
Setup:
Remove:
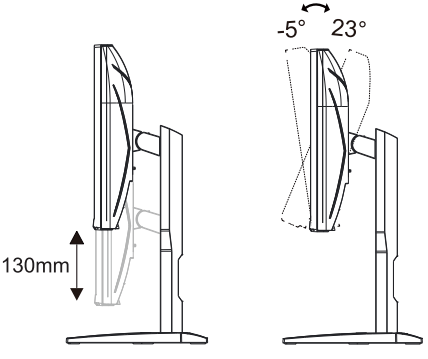
Adjusting Viewing Angle
For optimal viewing it is recommended to look at the full face of the monitor, then adjust the monitor’s angle to your own preference.
Hold the stand so you will not topple the monitor when you change the monitor’s angle. You are able to adjust the monitor as below:
NOTE: Do not touch the LCD screen when you change the angle. It may cause damage or break the LCD screen
Connecting the Monitor
Cable Connections In Back of Monitor and Computer:
HDMI-2
HDMI-1
DP
D-SUB
Earphone
Power
Connect to PC
Connect the power cord to the back of the display firmly.
Turn off your computer and unplug its power cable.
Connect the display signal cable to the video connector on the back of your computer.
Plug the power cord of your computer and your display into a nearby outlet.
Turn on your computer and display.
If your monitor displays an image, installation is complete. If it does not display an image, please refer Troubleshooting.
To protect equipment, always turn off the PC and LCD monitor before connecting.
Wall Mounting
Preparing to Install An Optional Wall Mounting Arm.
This monitor can be attached to a wall mounting arm you purchase separately. Disconnect power before this procedure. Follow these steps:
Remove the base.
Follow the manufacturer’s instructions to assemble the wall mounting arm.
Place the wall mounting arm onto the back of the monitor. Line up the holes of the arm with the holes in the back of the monitor.
Reconnect the cables. Refer to the user’s manual that came with the optional wall mounting arm for instructions on attaching it to the wall.
Noted: VESA mounting screw holes are not available for all models, please check with the dealer or official department of AOC.
Radeon™ R9/R7 200 series (R9 270/X, R9 280/X except)
Adjusting
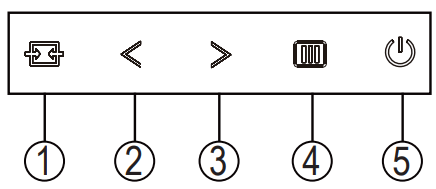
Hotkeys
Source/Auto/Exit
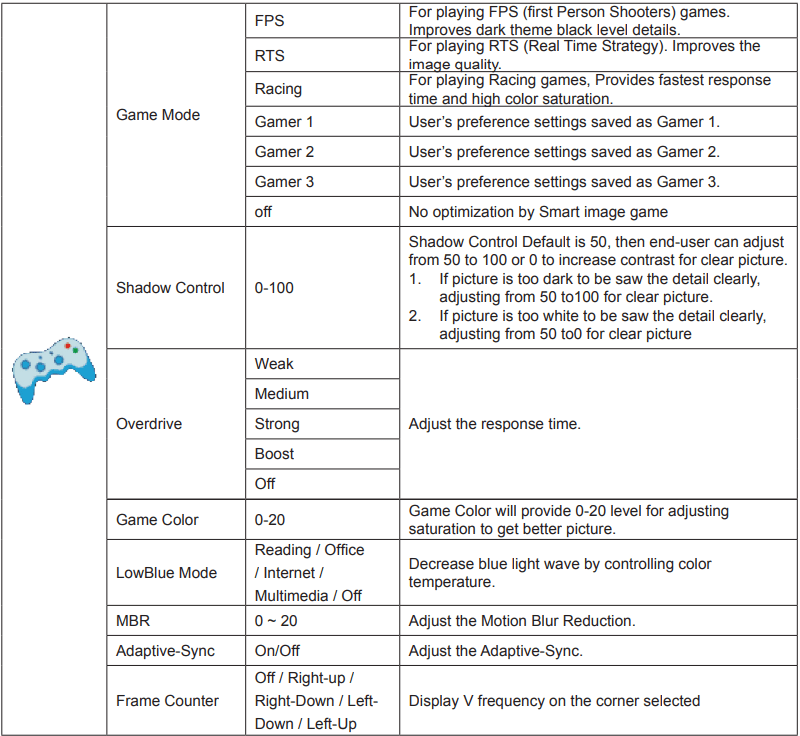
Game Mode/<
Dial Point/>
Menu/Enter
Power
Power
Press the Power button to turn on the monitor.
Menu/Enter
When there is no OSD, Press to display the OSD or confirm the selection. Press about 2 second to turn off the monitor.
Game Mode/<
When there isno OSD, press ”<” key to open game mode function, then press ”<” or “>” key to select game mode (FPS, RTS, Racing, Gamer 1, Gamer 2 or Gamer 3) basing on the different game types.
Dial Point/>
When there is no OSD, press Dial Point button to show / hide Dial Point.
Source/Auto/Exit
When the OSD is closed, press Source/Auto/Exit button will be Source hot key function. When the OSD is closed, press Source/Auto/Exit button continuously about 2 second to do auto configure (Only for the models with D-Sub).
OSD Setting
Basic and simple instruction on the control keys.
Press the MENU-button to activate the OSD window.
Press < or > to navigate through the functions. Once the desired function is highlighted, press the MENU-button to activate it, press < or > to navigate through the sub-menu functions. Once the desired function is highlighted, press MENU-button to activate it.
Press < or > to change the settings of the selected function. Press AUTO–button to exit. If you want to adjust any other function, repeat steps 2-3.
OSD Lock Function: To lock the OSD, press and hold the MENU-button while the monitor is off and then press power button to turn the monitor on. To un-lock the OSD - press and hold the MENU-button while the monitor is off and then press power button to turn the monitor on.
Notes:
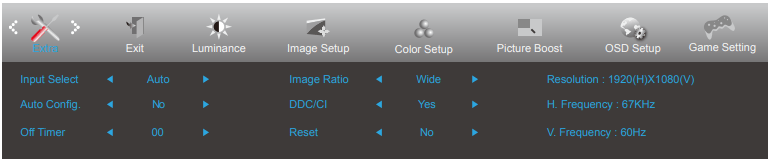
If the product has only one signal input, the item of “Input Select” is disable to adjust.
DCR, Color Boost and Picture Boost, for these states that only one state can exist
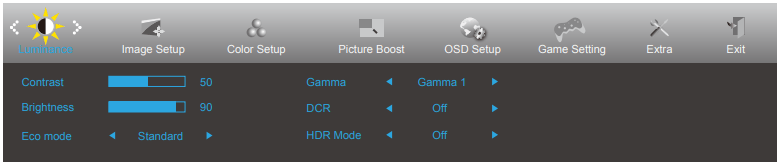
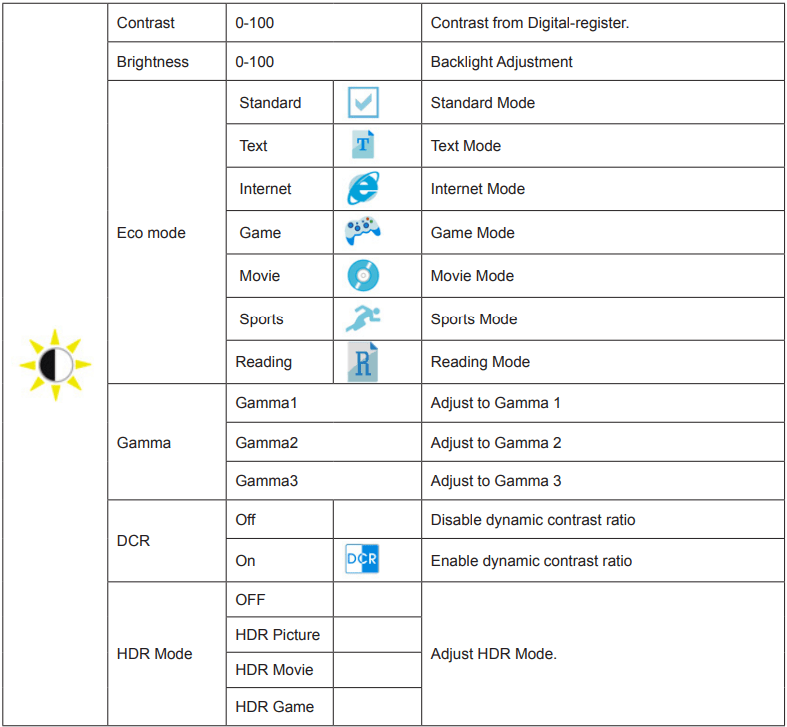
Luminance
Note: When “HDR Mode” is set to “non-off”, the items “Contrast”, “Brightness”, “Gamma” cannot be adjusted
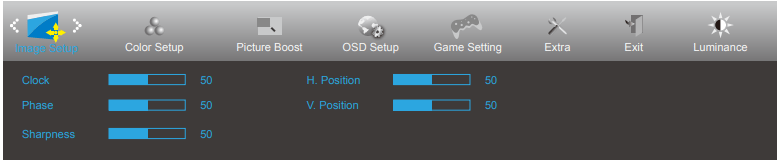
Image Setup
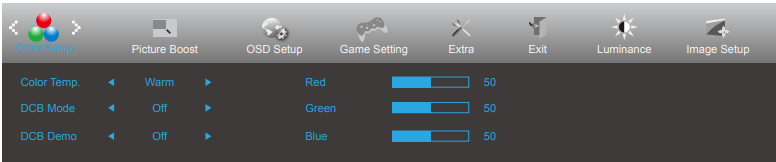
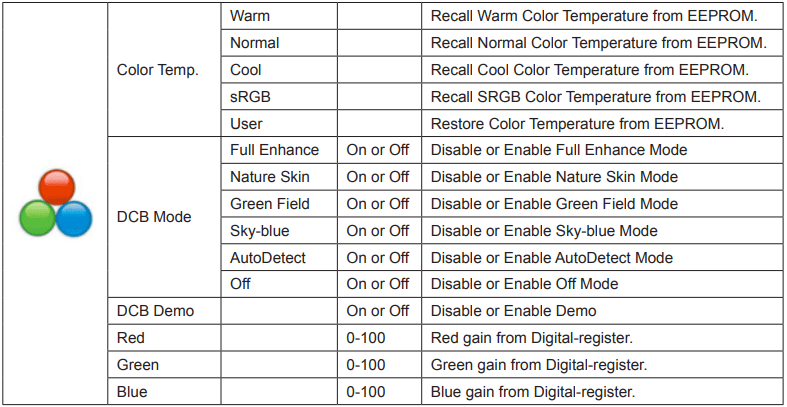
Color Setup
Note: When “HDR Mode” under “Luminance” is set to “non-off”, all items under “Color Setup” cannot be adjusted.
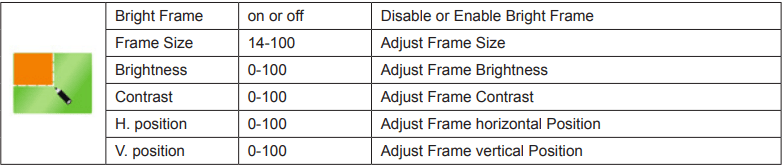
Picture Boost
Note: Adjust the brightness, contrast, and position of the Bright Frame for better viewing experience. When “HDR Mode” under “Luminance” is set to “non-off”, all items under “Picture Boost” cannot be adjusted.
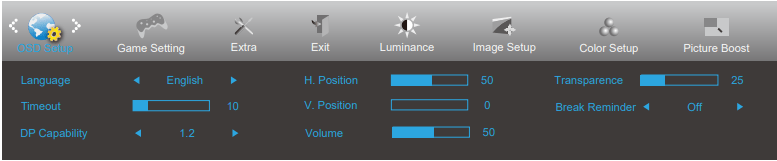
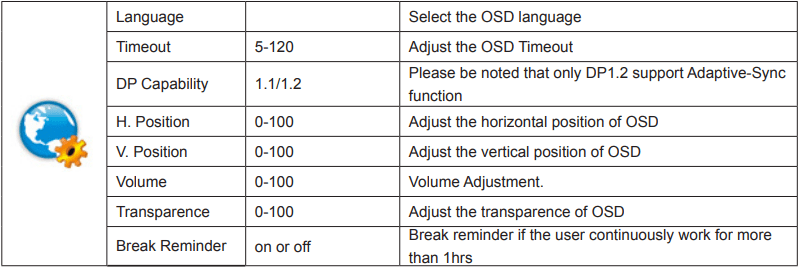
OSD Setup
Note: If the DP video content supports DP1.2, please select DP1.2 for DP Capability; otherwise, please select DP1.1
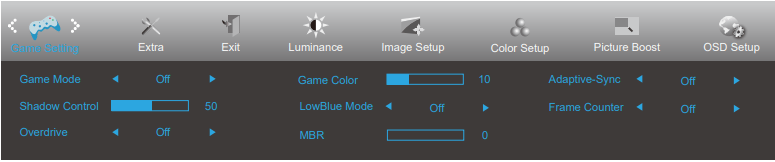
Game Setting
Note: The function MBR and Overdrive Boost are available only when Adaptive-Sync is off and the vertical frequency is up to 75 Hz. When “HDR Mode” under “Luminance” is set to “non-off”, the items “Game Mode”, “Shadow Control”, “Game Color”, “Low Blue Mode” cannot be adjusted.
Extra
Exit
LED Indicator
Status
LED Color
Full Power Mode
White
Active-off Mod
Orange
Troubleshooting
Problem & Question
Possible Solutions
Power LED Is Not ON
Make sure the power button is ON and the Power Cord is properly connected to a grounded power outlet and to the monitor.
No images on the screen
Is the power cord connected properly?
Check the power cord connection and power supply.
Is the cable connected correctly?
(Connected using the VGA cable)
Check the VGA cable connection.
(Connected using the HDMI cable)
Check the HDMI cable connection.
(Connected using the DP cable)
Check the DP cable connection.
* VGA/HDMI/DP input is not available on every model.
If the power is on, reboot the computer to see the initial screen (the login screen), which can be seen.
If the initial screen (the login screen) appears, boot the computer in the applicable mode (the safe mode for Windows 7/8/10) and then change the frequency of the video card.
(Refer to the Setting the Optimal Resolution)
If the initial screen (the login screen) does not appear, contact the Service Center or your dealer.
Can you see “Input Not Supported” on the screen?
You can see this message when the signal from the video card exceeds the maximum resolution and frequency that the monitor can handle properly.
Adjust the maximum resolution and frequency that the monitor can handle properly.
Make sure the AOC Monitor Drivers are installed.
Picture Is Fuzzy & Has Ghosting Shadowing Problem
Adjust the Contrast and Brightness Controls.
Press to auto adjust.
Make sure you are not using an extension cable or switch box. We recommend plugging the monitor directly to the video card output connector on the back.
Picture Bounces, Flickers Or Wave Pattern Appears In The Picture
Move electrical devices that may cause electrical interference as far away from the monitor as possible.
Use the maximum refresh rate your monitor is capable of at the resolution you are using.
Monitor Is Stuck In Active OffMode”
The Computer Power Switch should be in the ON position.
The Computer Video Card should be snugly fitted in its slot.
Make sure the monitor’s video cable is properly connected to the computer.
Inspect the monitor’s video cable and make sure no pin is bent.
Make sure your computer is operational by hitting the CAPS LOCK key on the keyboard while observing the CAPS LOCK LED. The LED should either turn ON or OFF after hitting the CAPS LOCK key.
Missing one of the primary colors (RED, GREEN, or BLUE)
Inspect the monitor’s video cable and make sure that no pin is damaged. Make sure the monitor’s video cable is properly connected to the computer.
Screen image is not centered or sized properly
Adjust H-Position and V-Position or press hot-key (AUTO).
Picture has color defects (white does not look white)
Adjust RGB color or select desired color temperature.
Horizontal or vertical disturbances on the screen
Use Windows 7/8/10 shut-down mode to adjust CLOCK and FOCUS. Press to auto-adjust.
Regulation & Service
Please refer to Regulation & Service Information which is in the CD manual (to find the model you purchase in your country and to find Regulation & Service Information in Support page.)