User Manual for Motocycles
Operation Guide
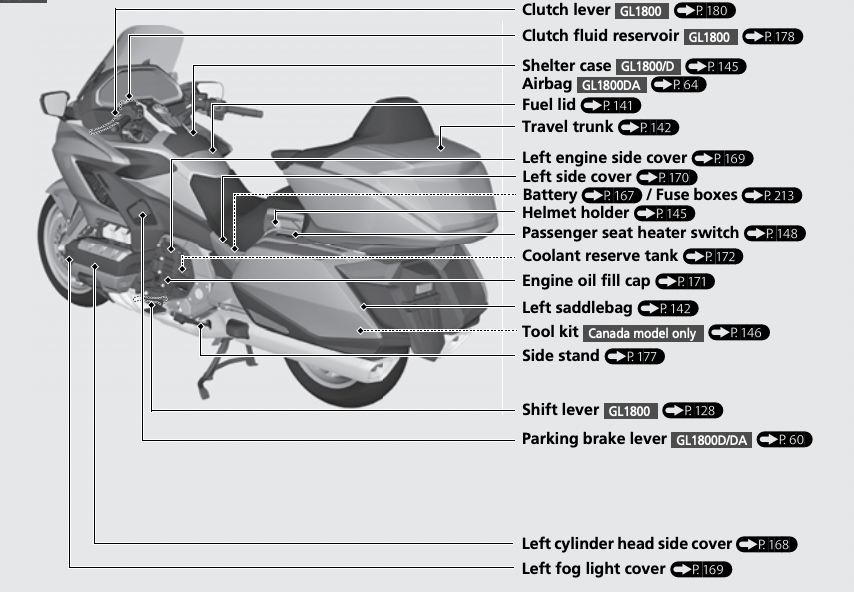
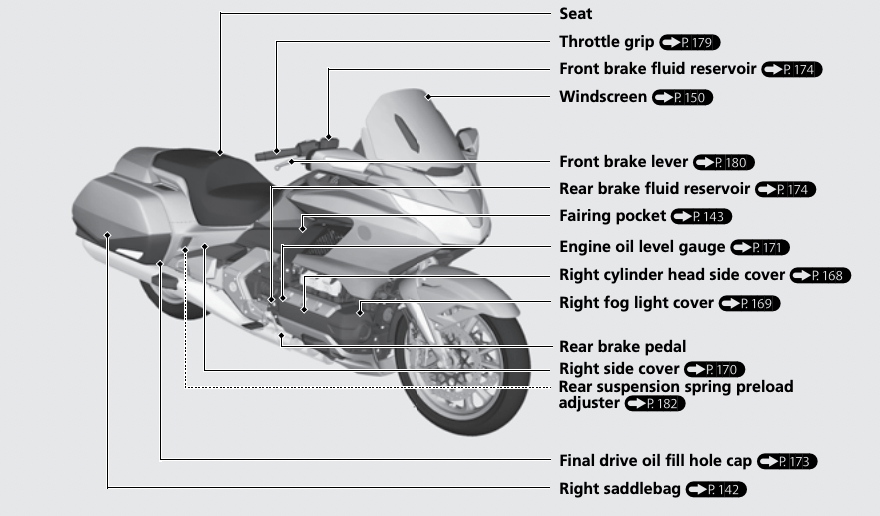
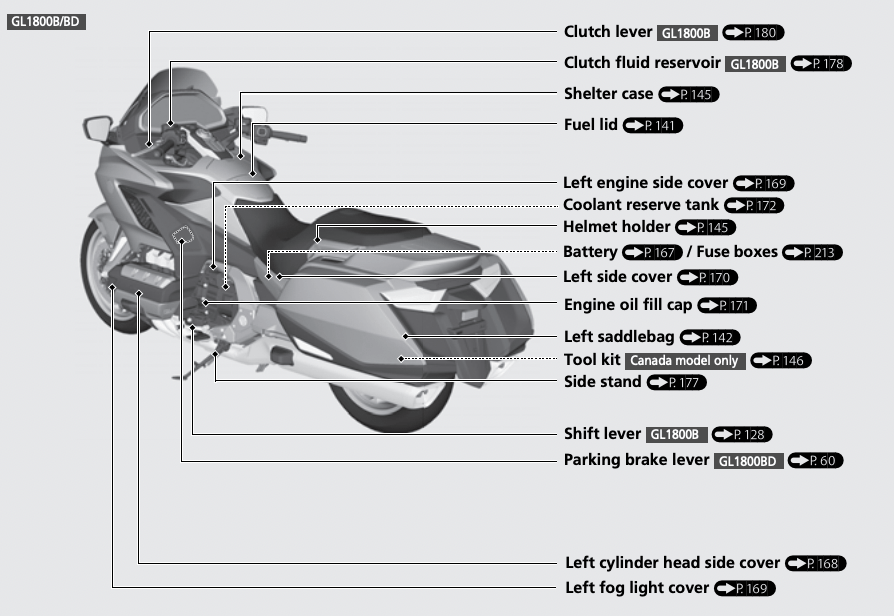
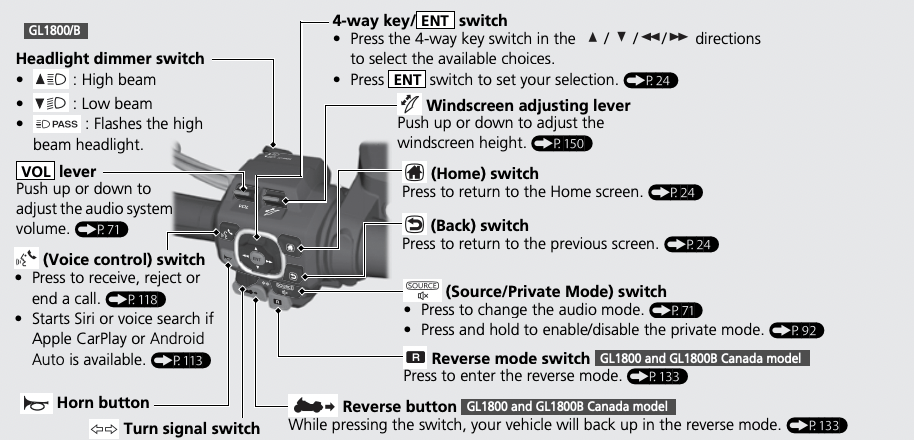
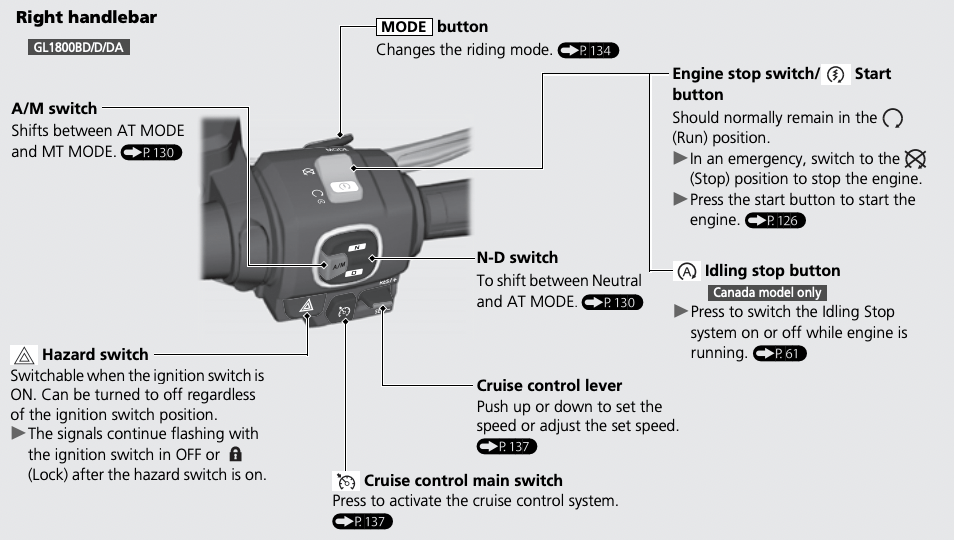
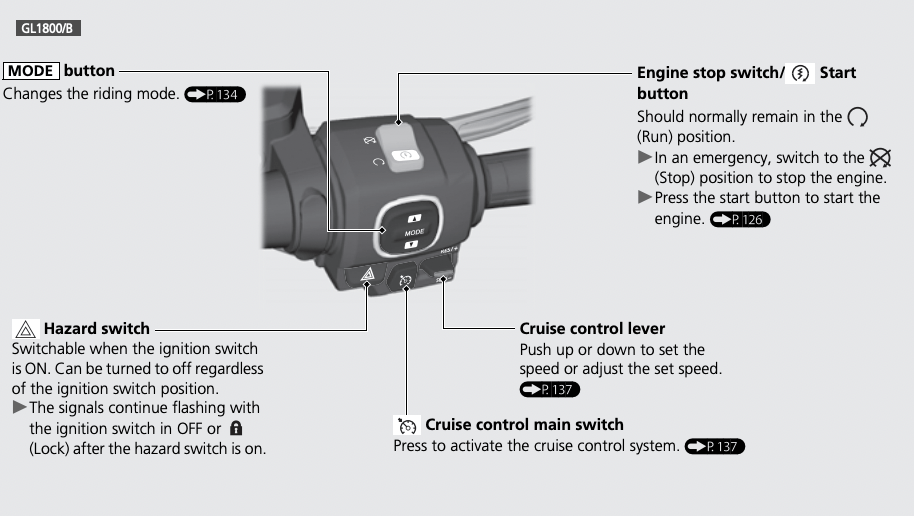
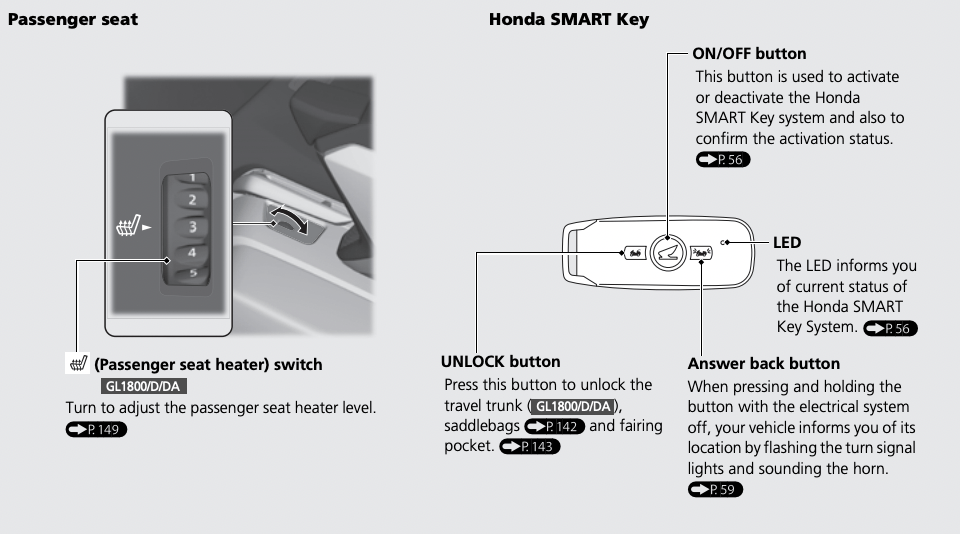
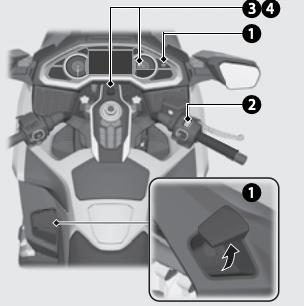
Parts Location

Instruments
 Display Check
When the ignition switch is turned ON, all of the modes and digital segments will show on the INFO 1, INFO 2 and INFO 3 displays, and the opening symbol will show on the multi-information display. If the displays do not show when they should, have your dealer check for problems.
Multi-information
Display Your vehicle is equipped with a multiinformation display that presents various functions and settings.
• Certain manual functions and settings are disabled or inoperable while the vehicle is in motion. You cannot select a grayed-out menu until the vehicle is stopped.
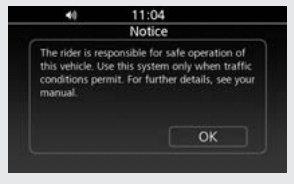
When the ignition switch is turned ON or ACC, the Notice message appears on the screen for a few second. Read the Notice message.
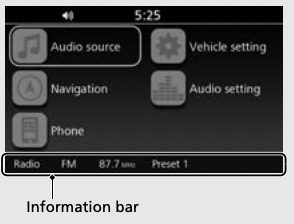
Home Screen
From this screen, you can go to various functions and setup options. When the ignition switch is turned ON or ACC, you will see the screen you used last
To return to the Home screen:
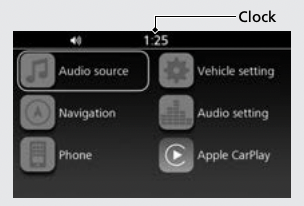
Audio Source
Enters the current audio mode. (P71)
Vehicle Setting
Enters the vehicle setting menu screen. (P28)
Navigation
Displays the navigation screen. (Refer to the Navigation System manual.)
Audio Setting
Enters the audio setting menu screen. (P73)
Phone
Enters the phone screen. (P118)
Apple CarPlay™
Appears the menu icon when Apple CarPlay is available. (P111)
Android Auto™
Appears the menu icon when Android Auto is available. (P114)
To select a desired setting menu: (P24)
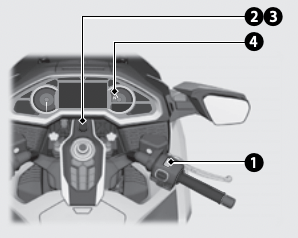
Basic Operations
You can operate and set the various functions of your vehicle using the interface dial and buttons on the center panel and/or switches on the left handlebar. However, you cannot operate some functions by the center panel switches/Interface dial while the vehicle is in motion.
To Select a Desired Setting Menu
To operate with the interface dial on the center panel: Rotate (Interface dial) or move in the eight possible directions to select the available choices.
Rotate  (Interface dial) or move
  in the eight possible directions to select the available choices.
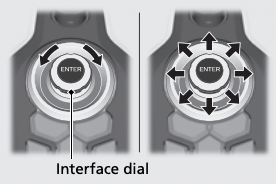
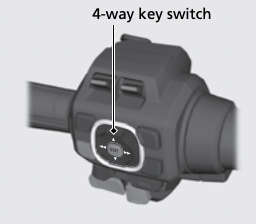
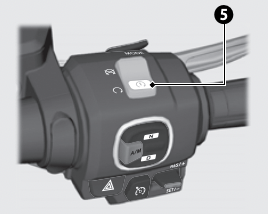
To operate with the 4-way key switch on the left handlebar:
Press  to select the available choices. Some menus will only use the up and down function.
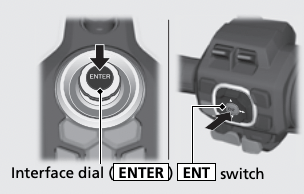
To Set Your Selection
To operate with the interface dial on the center panel:
Press  to set your selection.
To operate with the 4-way key switch on the left handlebar:
Press  switch located at the center of the 4-way key switch to set your selection.
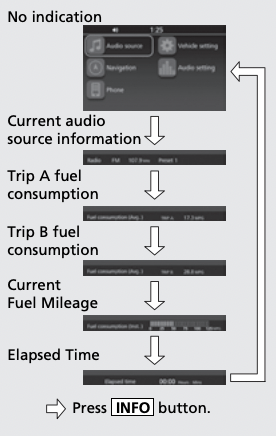
Information Bar
Displays various information (current audio source info., vehicle info., help info., or system info.) on the information bar
Normally, when you press button, the current audio source information or vehicle information is displayed.

To change the current audio source information or vehicle information, press button until the desired information is displayed. The information bar cycles through the information as follows:
In the following cases, the information bar will appear or change from the current indication.
• Helpful information (P27): When your vehicle has helpful information to notify you of.
• System information (P27): When your vehicle has system information to notify you of.
When your vehicle has information to notify you of, only the highest priority information is displayed. Once you close an interrupt information by pressing button, it will not be displayed again until the ignition switch is turned ON again.
Indicators
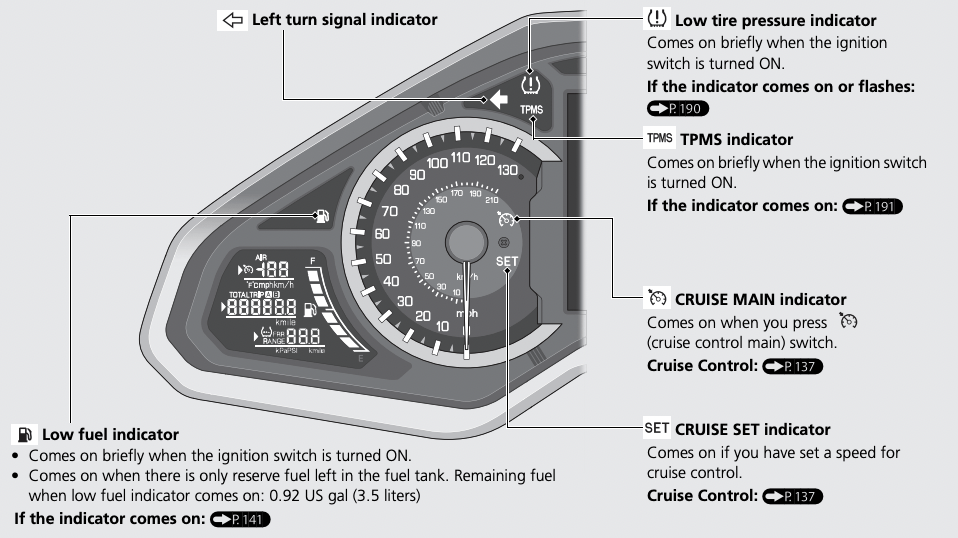

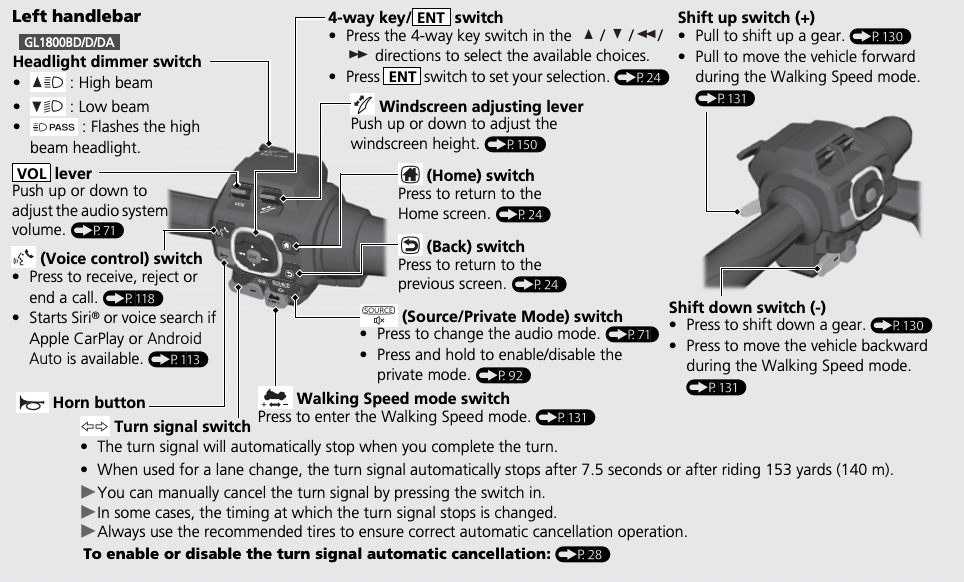
• The turn signal will automatically stop when you complete the turn.
• When used for a lane change, the turn signal automatically stops after 7.5 seconds or after riding 153 yards (140 m).
- You can manually cancel the turn signal by pressing the switch in.
- In some cases, the timing at which the turn signal stops is changed.
- Always use the recommended tires to ensure correct automatic cancellation operation.
To enable or disable the turn signal automatic cancellation: (P28)
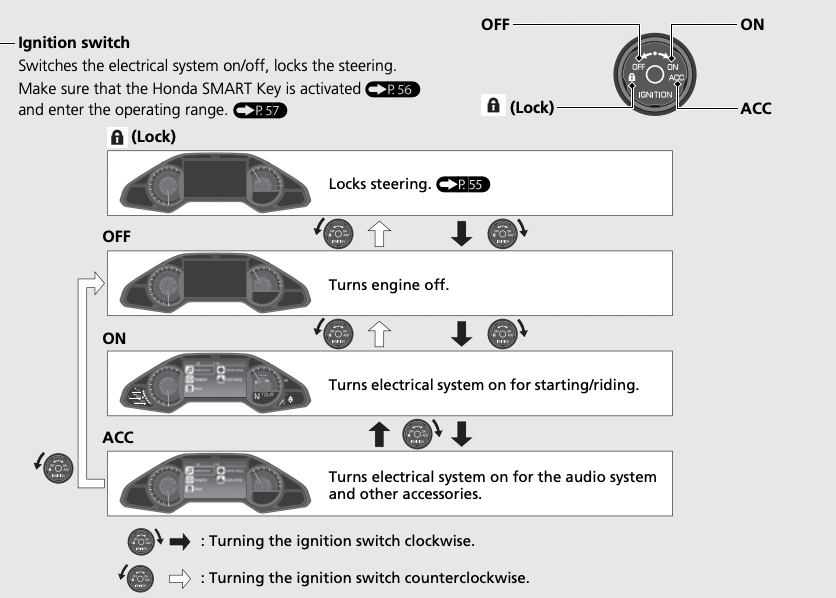
Steering Lock
Lock the steering when parked to help prevent theft. A U-shaped wheel lock or similar device is also recommended.
- When using a U-shaped wheel lock or similar device, be careful not to damage the wheels.
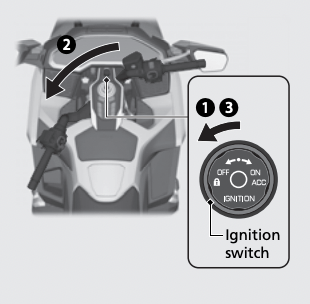
Locking
- Turn the ignition switch to OFF. (P49)
- Turn the handlebars all the way to the left or right.
- Turn the ignition switch counterclockwise.
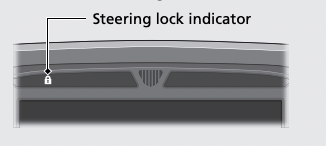
- The steering lock indicator comes on briefly and the steering is automatically locked.
- If the steering lock indicator blinks and the alarm sounds, the steering has not been locked completely because the steering was not positioned all the way to the left or right.
If this occurs, reposition the handlebars all the way to the left or right, then turn the ignition switch counterclockwise (The steering can also be locked by positioning it all the way to the left or right while the alarm is sounding).
Unlocking
- Make sure that the Honda SMART Key is activated (P56) and enter the operating range. (P57)
- Turn the ignition switch clockwise.
- The steering is unlocked automatically.
Starting the Engine
Start your engine using the following procedure, regardless of whether the engine is cold or warm.
This vehicle is equipped with a Honda SMART Key system. Always keep Honda SMART Key on you when you ride the vehicle. (P56)
NOTICE
• If the starter operates but the engine does not start, turn the ignition switch to OFF and wait 10 seconds before trying to start the engine again to recover battery voltage.
• Extended fast idling and revving the engine can damage the engine, and the exhaust system.
• Snapping the throttle or fast idling for more than about 5 minutes may cause exhaust pipe discoloration.
• The engine will not start if the throttle is fully open.
GL1800/B
- Make sure the engine stop switch is in the
 (Run) position.
- Unlock the steering. (P55)
- Turn the ignition switch to ON. (P49)
- Shift the transmission to
 Neutral ( indicator comes on). Alternatively, pull in the clutch lever to start your vehicle with the transmission in gear so long as the side stand is raised.
5. Press the start button with the throttle completely closed.
GL1800BD/D/DA
- Check the parking brake (
 parking brake indicator comes on).
- Make sure the engine stop switch is in the (Run) position.
- Unlock the steering. (P55)
- Turn the ignition switch to ON. (P49)
- Make sure the
 indicator comes on. If the indicator does not come NOTICE on. (P129)
5. Press the start button with the throttle completely closed.
6. Make sure the parking brake lever is released before riding.
If the engine does not start:
- Open the throttle fully and press the start button once.
- Repeat the normal starting procedure.
- If the engine starts, open the throttle slightly if idling is unstable.
- If the engine does not start, wait 10 seconds before trying steps 1 & 2 again
If Engine Will Not Start (P186)
Quick Engine Starting
You can also start the engine by the following procedure.
- Make sure the status of the Honda SMART Key is active (P56) and enter the operating range. (P57)
- While applying the brake lever or pedal firmly, press and hold the start button until engine starts
- The steering lock is automatically unlocked at the same time.
- The quick engine starting will not operate if the transmission is in gear. The process will stop with the ignition switch ON. Start the engine with normal starting procedure. (P126)
- The engine will not start unless you perform the quick starting with correct conditions such as applying the brake. The process will stop with the ignition switch ON. Start the engine with normal starting procedure. (P126)
When You Stop the Engine
- To stop the engine, put the gear to Neutral ( indicator comes on).
- Turn the ignition switch to OFF.
- If you turn the ignition switch to OFF when the vehicle in gear, the engine will shut off with the clutch disengaged.
3. Set the parking brake when you park the vehicle. (P60)
Riding Mode
You can change the riding mode. The following parameters change according to each riding mode.
• Engine output characteristic
• Brake feel
• DCT characteristic
• Toque Control operating level
• Suspension damping characteristic
Riding mode indicator
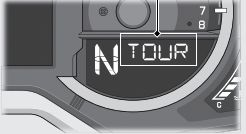
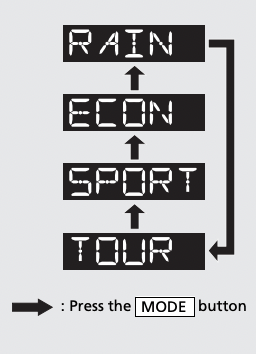
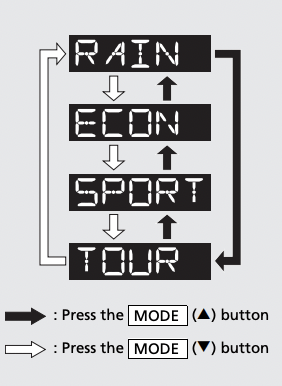
The following riding modes are available:
 mode:
mode:
TOUR mode provides an engine and braking feel and suspension damping characteristics optimized for comfortable riding in situations such as long distance touring.
 mode:
mode:
SPORT mode has a quicker and more powerful engine feel, harder braking feel, and harder suspension damping characteristics than with TOUR mode. For models equipped with DCT, shifting characteristics are oriented to maintain middle and high engine speeds.
 mode:
mode:
ECON mode has a gentler engine feel than with TOUR mode. For models equipped with DCT, shifting characteristics are oriented to maintain low and middle engine speeds.
 mode:
mode:
RAIN mode has a gentler engine feel and softer suspension damping characteristics than with TOUR mode. For models equipped with DCT, shifting characteristics are gentler than those with TOUR mode.
Selecting the Riding Mode
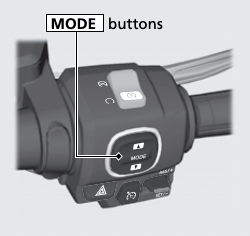
Press the MODE button while the throttle is fully closed.
- The riding mode indicator blinks until the riding mode is changed.
- The riding mode does not change until the throttle is fully closed.
- Each time the ignition switch is turned to ON, the riding mode will automatically be set to mode.
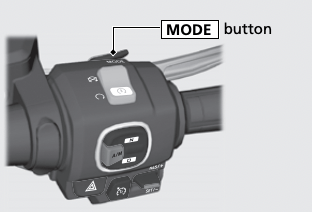
Press one of the MODE buttons ( or
or  ) while the throttle is fully closed.
- The riding mode indicator blinks until the riding mode is changed.
- The riding mode does not change until the throttle is fully closed.
- Each time the ignition switch is turned to ON, the riding mode will automatically be set to mode.
If all the segments of the riding mode indicator are displayed, see your dealer for servicing.
Maintenance
Importance of Maintenance
Importance of Maintenance
Keeping your vehicle well-maintained is absolutely essential to your safety and to protect your investment, obtain maximum performance, avoid breakdowns, and reduce air pollution. Maintenance is the owner’s responsibility. Be sure to inspect your vehicle before each ride, and perform the periodic checks specified in the Maintenance Schedule. -> P. 154
WARNING Improperly maintaining your vehicle or failing to correct a problem before you ride can cause a crash in which you can be seriously hurt or killed. Always follow the inspection and maintenance recommendations and schedules in this owner’s manual.
For information about the exhaust emission and noise emission requirements of the U.S. Environmental Protection Agency (EPA), the California Air Resources Board (CARB), and the Environment and Climate Change Canada (ECCC). P. 232
USA Maintenance, replacement or repair of the emission control devices and systems may be performed by any vehicle repair establishment or individual using parts that are “certified“ to EPA standards.
Maintenance Safety
Always read the maintenance instructions before you begin each task, and make sure that you have the tools, parts, and skills required.
We cannot warn you of every conceivable hazard that can arise in performing maintenance. Only you can decide whether or not you should perform a given task.
Follow these guidelines when performing maintenance.
● Stop the engine and turn the ignition switch to OFF.
● Place your vehicle on a firm, level surface using the side stand, center stand (GL1800/D/DA ) or a maintenance stand to provide support.
● Allow the engine, muffler, brakes, and other high-temperature parts to cool before servicing as you can get burned.
● Run the engine only when instructed, and do so in a well-ventilated area.
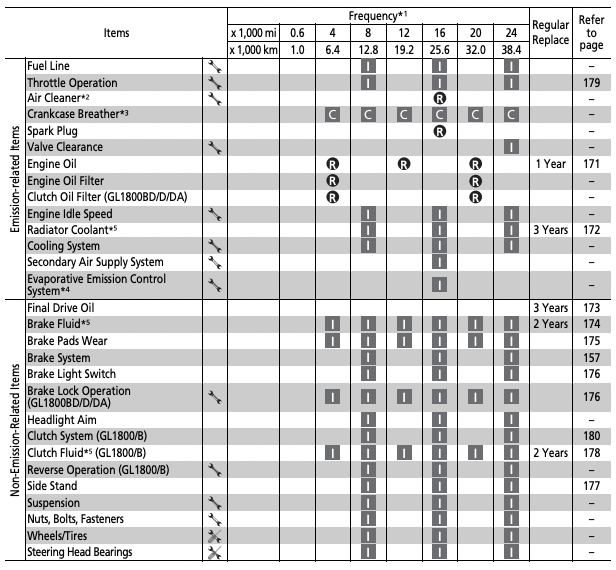
Maintenance Schedule
The maintenance schedule specifies the maintenance requirements necessary to ensure safe, dependable performance, and proper emission control.
Maintenance work should be performed in accordance with Honda’s standards and specifications by properly trained and equipped technicians. Your dealer meets all of these requirements. All scheduled maintenance is considered a normal owner operating cost and will be charged to you by your dealer. Keeping an accurate maintenance record will help ensure your vehicle is properly maintained. P. 156
Make sure whoever performs the scheduled maintenance completes the maintenance record. Retain all service documents. If you sell your vehicle, these service documents should be transferred with the vehicle to the new owner.
Maintenance Level
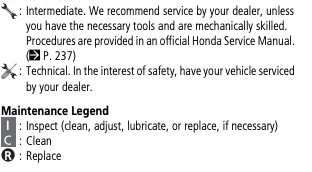
Notes:
*1 : At higher odometer reading, repeat at the frequency interval established here.
*2 : Service more frequently when riding in unusually wet or dusty areas.
*3 : Service more frequently when riding in rain or at full throttle.
*4 : 50 STATE (meets California)
*5 : Replacement requires mechanical skill.
Maintenance Record
 Maintenance Fundamentals
Pre-ride Inspection
To ensure safety, it is your responsibility to perform a pre-ride inspection and make sure that any problem you find is corrected. A pre-ride inspection is a must, not only for safety, but because having a breakdown, or even a flat tire, can be a major inconvenience.
Check the following items before you get on your vehicle:
● Tire tread wear and air pressures are within limits P. 164
● Lights, horn, and turn signals operate normally
Check the following items if you are carrying a passenger or cargo:
● Combined weight is within load limits P. 244, 246
● Cargo is secured properly
● Suspension is adjusted to suit load P. 181, 182
Check the following items after you get on your vehicle:
● Throttle action moves smoothly without binding P. 179
● Brake lever and pedal operate normally
● Check the fuel level and refuel when needed P. 15, 141
● Engine stop switch functions properly P. 48
Check the following items at regular intervals:
● Oil level is between the upper and lower level marks 2 P. 171
● Brake fluid level is
Front: above the LWR mark P. 174
Rear: above the LWR mark P. 174
● GL1800/B Clutch fluid level is above the LWR mark P. 178
● Engine coolant level is between the UPPER and LOWER level marks P. 172
● Side stand functions properly P. 177
● GL1800BD/D/DA Parking brake works properly P. 176
Periodic Checks
You should also perform other periodic maintenance checks at least once a month regardless of how often you ride, or more often if you ride frequently. Also, check the odometer reading against the Maintenance Schedule and perform all maintenance that is due. P. 154
| Tires and wheels |
Check the air pressure (P. 164), examine tread for wear and damage (P. 164), and check the wheels for damage. |
| Fluid levels |
Check the engine oil level (P. 171), engine coolant level (P. 172), clutch fluid level ( GL1800/B) (P. 178), final drive oil level (P. 173) and brake fluid level (P. 174). |
| Lights |
Check that the headlight, brake lights, taillights, turn signals and license plate light are working properly. |
| Controls |
Check the freeplay of the throttle grip (P. 179). Check the clutch lever (GL1800/B ) (P. 180), front brake lever (2 P. 180), rear brake pedal, and parking brake (GL1800BD/D/DA ) (P. 176) operate properly. |
| Fuses |
Check that you have a full supply of spare fuses. |
| Nuts & bolts |
Check the major nuts and bolts, and tighten as needed. |
Replacing Parts
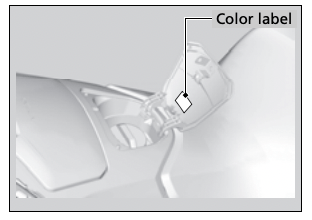
Always use Honda Genuine Parts or their equivalents to ensure reliability and safety. When ordering colored components, specify the model name, color and code mentioned on the color label. The color label is attached on the reverse side of the fuel lid. P. 141
WARNING Installing non-Honda parts may make your vehicle unsafe and cause a crash in which you can be seriously hurt or killed. Always use Honda Genuine Parts or equivalents that have been designed and approved for your vehicle.
Battery
Your vehicle has a maintenance-free type battery. You do not have to check the battery electrolyte level or add distilled water. Clean the battery terminals if they become dirty or corroded. Do not remove the battery cap seals. There is no need to remove the cap when charging.
NOTICE
An improperly disposed of battery can be harmful to the environment and human health. Always confirm local regulations for proper battery disposal instruction.
What to do in an emergency
If any of the following occur, immediately see your doctor.
● Electrolyte splashes into your eyes:
- Wash your eyes repeatedly with cool water for at least 15 minutes. Using water under pressure can damage your eyes.
● Electrolyte splashes onto your skin:
- Remove affected clothing and wash your skin thoroughly using water.
● Electrolyte splashes into your mouth:
- Rinse mouth thoroughly with water, and do not swallow.
WARNING The battery gives off explosive hydrogen gas during normal operation. A spark or flame can cause the battery to explode with enough force to kill or seriously hurt you. Wear protective clothing and a face shield, or have a skilled mechanic do the battery servicing.
WARNING: Battery posts, terminals, and related accessories contain lead and lead compounds.
Wash your hands after handling.
Cleaning the Battery Terminals
1. Remove the battery. P. 167
2. If the terminals are starting to corrode and are coated with a white substance, wash with warm water and wipe clean.
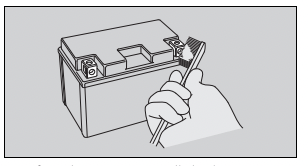
3. If the terminals are heavily corroded, clean and polish the terminals with a wire brush or sandpaper. Wear safety glasses.
4. After cleaning, reinstall the battery.
The battery has a limited life span. Consult your dealer about when you should replace the battery. Always replace the battery with another maintenance-free battery of the same type.
Charging
If you use electrical accessories that drain the battery or you do not ride frequently, we recommend that you charge the battery every 30 days using a charger designed specifically for your Honda, which can be purchased from your dealer. Read the information that came with your battery charger and follow the instructions on the battery. Avoid using an automobile-type battery charger, as these can overheat a vehicle battery and cause permanent damage.
Make sure the ignition switch is turned to OFF before charging the battery
NOTICE Improper charging can damage the battery. If you can’t charge the battery or it appears unable to hold a charge, contact your dealer.
NOTICE Jump starting using an automobile battery can damage your vehicle’s electrical system and is not recommended. Bump starting is also not recommended.
NOTICE Installing non-Honda electrical accessories can overload the electrical system, discharging the battery and possibly damaging the system.
Fuses
Fuses protect the electrical circuits on your vehicle. If something electrical on your vehicle stops working, check for and replace any blown fuses. P. 213
Inspecting and Replacing Fuses
Turn the ignition switch OFF to remove and inspect fuses. If a fuse is blown, replace with a fuse of the same rating. For fuse ratings, see “Specifications.” P. 245, 247
NOTICE Replacing a fuse with one that has a higher rating greatly increases the chance of damage to the electrical system.
If a fuse fails repeatedly, you likely have an electrical fault. Have your vehicle inspected by your dealer.
Engine Oil
Engine oil consumption varies and oil quality deteriorates according to riding conditions and time elapsed. Check the engine oil level regularly, and add the recommended engine oil if necessary. Dirty oil or old oil should be changed as soon as possible.
Selecting the Engine Oil
For recommended engine oil, see “Specifications.” P. 244, 246
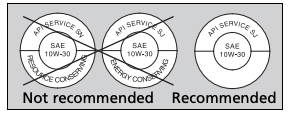
If you use non-Honda engine oil, check the label to make sure that the oil satisfies all of the following standards:
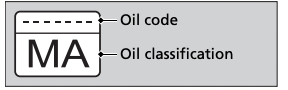
● JASO T 903 standard*1: MA
● SAE standard*2: 10W-30
● API classification*3: SJ or higher
*1. The JASO T 903 standard is an index for engine oils for 4-stroke motorcycle engines. There are two classes: MA and MB. For example, the following label shows the MA classification
*2. The SAE standard grades oils by their viscosity.
*3. The API classification specifies the quality and performance rating of engine oils. Use SJ or higher oils, excluding oils marked as “Energy Conserving” or “Resource Conserving” on the circular API service symbol.
Troubleshooting
Engine Will Not Start
Starter Operates But Engine Does Not Start
Check the following items:
● Check the correct engine starting sequence P. 126
● Check that there is gasoline in the fuel tank
● Check if the PGM-FI (Programmed Fuel Injection) Malfunction Indicator Lamp (MIL) is on
- If the indicator lamp is on, contact your dealer as soon as possible.
Starter Does Not Operate
Check the following items:
● Check the correct engine starting sequence P. 126
● Check for a blown fuse P. 213
● Check for a loose battery connection
(P. 167) or battery terminal corrosion
(P. 160)
● Check the condition of the battery P. 212
If the problem continues, have your vehicle inspected by your dealer.
Overheating (High coolant temperature indicator is on)
The engine is overheating when the following occurs:
● High coolant temperature indicator comes on.
● The 6th (H) segment flashes in the coolant temperature gauge.
● Acceleration becomes sluggish. If this occurs, pull safely to the side of the road and perform the following procedure. Extended fast idling may cause the high coolant temperature indicator to come on. Also the 6th (H) segment will flash
NOTICE Continuing to ride with an overheated engine can cause serious damage to the engine.
1. Stop the engine (P. 49), and then turn the ignition switch to ON.
2. Check that the radiator fan is operating, and then turn the ignition switch to OFF.
If the fan is not operating:
Suspect a fault. Do not start the engine. Transport your vehicle to your dealer.
If the fan is operating:
Allow the engine to cool with the ignition switch turned OFF.
3. After the engine has cooled, inspect the radiator hose and check if there is a leak. P. 172
If there is a leak:
Do not start the engine. Transport your vehicle to your dealer.
4. Check the coolant level in the reserve tank. P. 172
- Add coolant as necessary.
5. If 1 - 4 check normal, you may continue riding, but closely monitor the coolant temperature gauge.
Warning Indicators On or Flashing
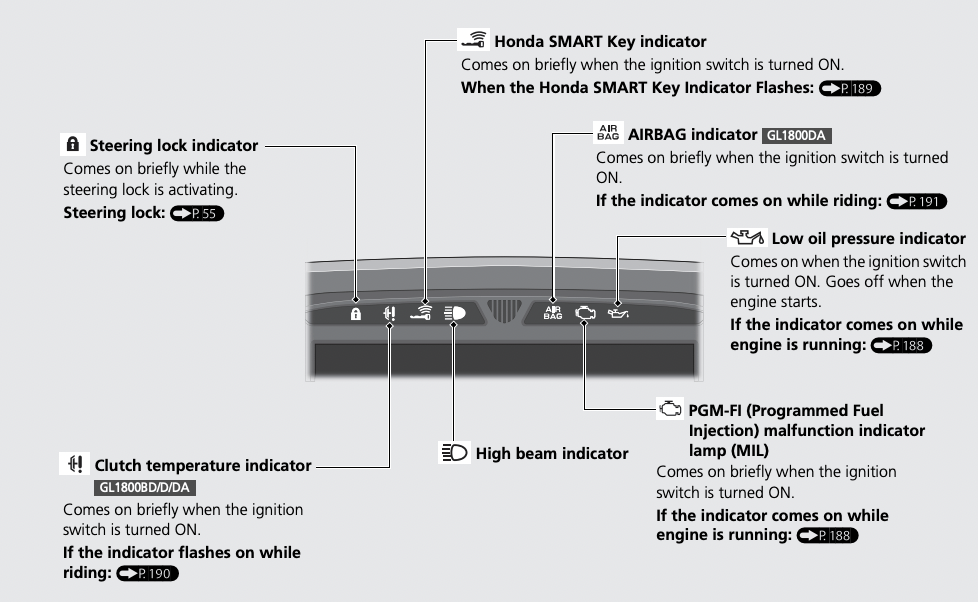
Low Oil Pressure Indicator
If the low oil pressure indicator comes on, pull safely to the side of the road and stop the engine.
NOTICE Continuing to ride with low oil pressure can cause serious damage to the engine.
1. Check the engine oil level, and add oil as necessary. P. 171
2. Start the engine.
- Only continue riding if the low oil pressure indicator goes off. Rapid acceleration may momentarily cause the low oil pressure indicator to come on, especially if the oil is at or near the low level.
If the low oil pressure indicator stays on when the oil level is at the proper level, stop the engine and contact your dealer. If the engine oil level goes down rapidly, your vehicle may have a leak or another serious problem. Have your vehicle inspected by your dealer.
PGM-FI (Programmed Fuel Injection) Malfunction Indicator Lamp (MIL)
If the indicator comes on while riding, you may have a serious problem with the PGMFI system. Reduce speed and have your vehicle inspected by your dealer as soon as possible.
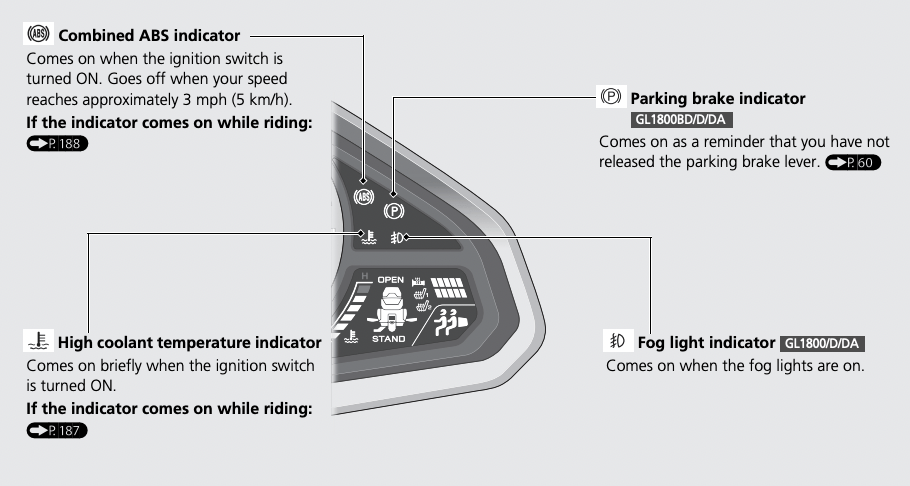
Combined ABS Indicator
If the Combined ABS indicator operates in one of the following ways, your brakes will continue to work as a conventional system, but without the Combined ABS function. Reduce your speed and have your vehicle inspected by your dealer as soon as possible.
● Indicator does not come on when the ignition switch is turned ON
● Indicator does not go off at speeds above 3 mph (5 km/h)
● Indicator comes on or starts flashing while riding
The combined ABS indicator may flash if:
● The front wheel leaves the ground for 1 second or more
● You turn the rear wheel while your vehicle is lifted off the ground.
This is normal but the Combined ABS is not in operation. To activate the system again, turn the ignition switch to OFF, and then to ON again.
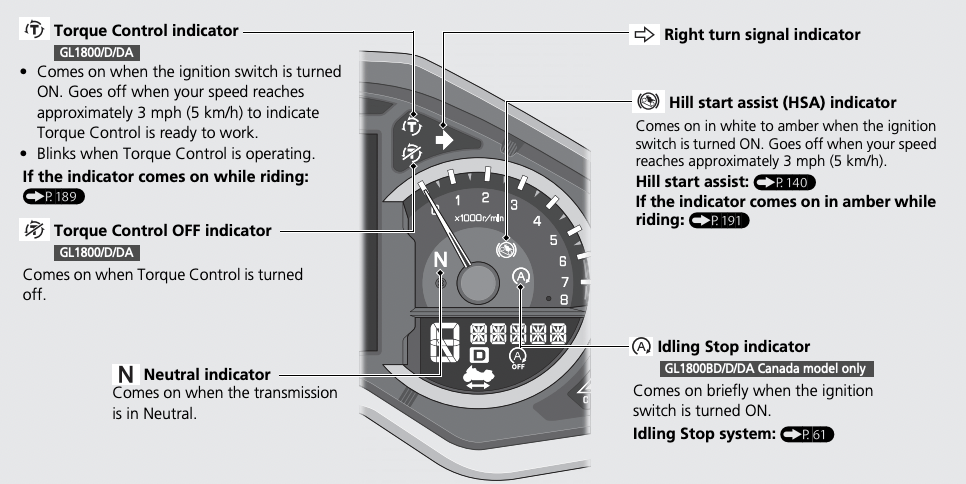
Torque Control Indicator
GL1800/D/DA
If the indicator operates in one of the following ways, you may have a serious problem with the Torque Control. Reduce your speed and have your vehicle inspected by your dealer as soon as possible.
● Indicator comes on while riding.
● Indicator does not come on when the ignition switch is turned on.
● Indicator does not go off at speeds above 3 mph (5 km/h). Even when the Torque Control indicator is on, your vehicle will have normal riding ability without Torque Control function.
- When the indicator comes on while the Torque Control is in operation, you will have to completely close the throttle to regain normal riding ability
The Torque Control indicator may come on if you rotate the rear wheel while your vehicle is lifted off the ground. In this case, turn the ignition switch to OFF and then ON again. The Torque Control indicator will go off after your speed reaches 3 mph (5 km/h)
Honda SMART Key Indicator
If the Honda SMART Key Indicator Flashes 5 times When the Ignition Switch is Turned ON
Replacing the Honda SMART Key Battery P. 183
When the Honda SMART Key Indicator is Flashing While the Electrical System is On
The Honda SMART Key indicator flashes when communication between your vehicle and Honda SMART Key stops after turning on the ignition switch. It is probably caused by the following:
● Strong radio waves or noise are affecting the system
● You lost the Honda SMART Key while riding
However, this does not affect the operation of your vehicle until the ignition switch turned OFF.
You may not be able to turn off the electrical system when losing the Honda SMART Key while riding, or if the battery is low, or because the system is affected by strong radio waves or noise. If this occurs, turn the ignition switch counterclockwise and hold it until the electrical system shut off.
If you do not have the Honda SMART Key, the electrical system can be activated by means of emergency procedures. P. 198
Clutch Temperature Indicator
GL1800BD/D/DA
The clutch temperature indicator flashes if the clutch temperature becomes unusually high.
If the indicator flashes, pull safely to the side of the road and shift the transmission to neutral, then idle the engine.
When the indicator goes off, riding can be restarted.
If this occurs frequently, contact your dealer.
NOTICE Continuing to ride with high clutch temperature can cause serious damage to the clutch.
Low Tire Pressure Indicator
If the low tire pressure indicator flashes, check your tires as soon as possible. If the low tire pressure indicator lights constantly, one or more of your tires is significantly underinflated. You should stop and check your tires as soon as possible. For more information on temporary repair, refer to “Emergency Repair Using a Tire Repair Kit.” P. 202
Check the air pressure when the tires are cold. (This means the vehicle has been parked for at least 3 hours.) Adjust to the recommended tire pressures if necessary. P. 244, 246
When the low tire pressure indicator flashes or comes on, but you continue to ride, the low tire pressure indicator will go off in some cases. It is still necessary to check the air pressures of both tires after the tires cool because air in the tires is expanded with heat
If the low tire pressure indicator does not go off after inflating the tires to the specified values, have your dealer to check the system as soon as possible.
Riding on an underinflated tire causes the tire to overheat and can lead to tire failure.
Under-inflation also reduces fuel efficiency and tire tread life, and may affect the vehicle’s handling and stopping ability.
Because tire pressure varies by temperature and other conditions, the low tire pressure indicator may turn on unexpectedly.
Please note that the TPMS is not a substitute for proper tire maintenance, and it is the rider’s responsibility to maintain correct tire pressure, even if under-inflation has not reached the level of turning on the low tire pressure indicator.
For example, if you check and fill your tires in a warm area, then ride in extremely cold weather, the tire pressure will be lower than measured and could be underinflated and cause the low tire pressure indicator to turn on. Or, if you check and adjust your tire pressure in cooler conditions, and ride into extremely hot conditions, the tire may become overinflated. However, the low tire pressure indicator will not turn on if the tires are overinflated.
TPMS Indicator
The TPMS indicator comes on if there is a problem with the tire pressure monitoring system.
If this occurs, the system will shut off and no longer monitor tire pressure. Have the system checked by your dealer as soon as possible.
Also the TPMS indicator may light for the following reasons:
● Interference of other electronic devices by using the same radio frequency.
● Using replacement wheels not equipped with tire pressure sensors.
AIRBAG Indicator
GL1800DA
The AIRBAG indicator comes on if there is a problem with the airbag system.
If the indicator does not come on, or comes and stays on when the ignition switch is turned on, or comes on while you are riding, have your vehicle inspected by your dealer as soon as possible as the airbag may not deploy when it could help save your life.
WARNING Ignoring the airbag indicator can result in serious injury or death in a severe frontal impact if the airbag system does not work properly. Have your vehicle checked by a dealer as soon as possible if the airbag indicator alerts you to a possible problem.
Hill Start Assist (HSA) Indicator
If the hill start assist (HSA) indicator comes on in amber in one of the following ways, you may have a serious problem with the HSA system. Reduce speed and have your vehicle inspected by your dealer as soon as possible.
● Indicator comes on in amber while riding.
● Indicator does not come on when the ignition switch is turned to ON.
● Indicator does not go off at speeds above 3 mph (5 km/h).
● Even when the hill start assist (HSA) indicator comes on in amber, your vehicle will have normal riding ability without HSA function.
If the hill start assist (HSA) indicator comes on in white while stopping the vehicle, this is normal and the HSA is working properly.
Other Warning Indications
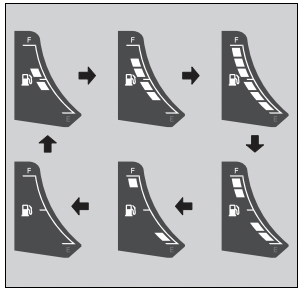
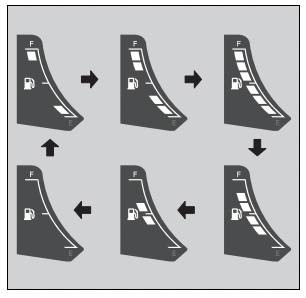
Fuel Gauge Failure Indication
If the fuel system has an error, the fuel gauge segments will be displayed as shown in the illustration. If this occurs, see your dealer as soon as possible.
Handle Grip Heater Failure Indication
If the handle grip heater system has an error, the handle grip heater indicator will blink. If this occurs, see your dealer as soon as possible.
Seat Heaters Failure Indication
GL1800/D/DA
If the seat heater system has an error, the seat heater indicator will blink. If this occurs, see your dealer as soon as possible.
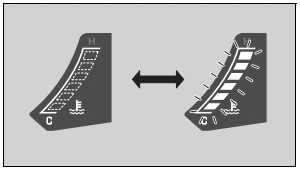
Coolant Temperature Gauge Failure Indication
If the cooling system has an error, all segments will blink as shown in the illustration. If this occurs, see your dealer as soon as possible.
If the “-” is Blinking in the Gear Position Indicator While Riding (GL1800BD/D/DA)
If the “-” is blinking in the gear position indicator while riding, you may have a serious problem with the Dual Clutch Transmission system. Park your vehicle in a safe place and have your vehicle inspected by dealer immediately. It may be possible to ride your vehicle by following the steps below.
1. Turn the ignition switch to OFF.
2. Turn the ignition switch to ON and start the engine.
If you cannot start the engine:
Turn the ignition switch to OFF and move the vehicle back and forth slightly (to disengage the gears). Turn the ignition switch to ON again and start the engine.
If you still cannot start the engine:
Start the engine while applying the brake lever or pressing the brake pedal.
If you can shift from N to D range:
When a gear position is shown in the gear position indicator, you can ride in that gear. Take your vehicle to your dealer riding at a safe speed.
If you can't shift from N to D range and the “-” is blinking:
Possible damage to the DCT is preventing you from riding. Have your vehicle inspected by your dealer immediately.
When the Idling Stop System Does Not Operate Properly (GL1800BD/D/DA Canada model)
Idling Stop Indicator Does Not Come On
When the Idling Stop indicator does not come on, perform the followings.
If the Idling Stop system is off
Press the start/Idling Stop button or set the Idling Stop system at the multi-information display.
If the engine is cold:
Warm up the engine. The Idling Stop system does not operate when the engine is cold.
If you did not ride the vehicle after engine starts:
Ride the vehicle at speeds of over 6 mph (10 km/h). The Idling Stop system does not operate until you ride once.
If PGM-FI malfunction indicator lamp (MIL) lights:
When the PGM-FI malfunction indicator lamp (MIL) lights, the Idling Stop system does not operate for protection of the engine. See your dealer.
If the battery voltage is low:
Ride the vehicle for a while, then stop the engine and then restart the engine, referring to the correct engine starting procedure (P. 126). The Idling Stop system may not operate if the battery voltage is low. If this occurs frequently, contact your dealer.
If the temperature of the battery is cold:
Ride the vehicle for a while. The Idling Stop system does not operate when the battery is cold.
Engine is Not Stopped by the Idling Stop System While the Idling Stop Indicator is On
When the engine is not stopped by Idling Stop system while the Idling Stop indicator is on, perform the following.
If the vehicle does not stop completely:
Stop the vehicle completely. The Idling Stop system operates if the speed is only at 0 mph (0 km/h).
If the throttle is not closed completely
Close the throttle completely.
If the Hill start assist (HSA) is operated:
The Idling Stop system does not stop the engine while the HSA is operated.
When the transmission is shifted in Neutral:
The Idling Stop system does not stop the engine when the transmission is shifted in Neutral (N side of the N-D switch is pressed).
Engine Does Not Start Even If the Throttle is Opened
Engine does not start even if the throttle is opened, perform the followings.
If the side stand is down:
While the engine is stopped by the Idling Stop system, if you operate the side stand, the flashing Idling Stop indicator changes flashing to off, and the Idling Stop system is cancelled. Restart the engine with the start/ Idling Stop button, referring to the starting procedure (P. 126) for standard engine starting.
If the rider does not sit astride the vehicle
When the rider has not been sitting astride the vehicle for approx. 3 minutes, the Idling Stop indicator changes from flashing to off and you cannot restart the engine, even if you open the throttle. Restart the engine with the start/Idling Stop button, referring to the starting procedure for standard engine starting.
If the start/Idling Stop button is operated:
While the engine is stopping by the Idling Stop system, if you press the start/Idling Stop button, the Idling Stop system will be cancelled.
Restart the engine with the start/Idling Stop button, referring to the starting procedure (P. 126) for standard engine starting.
If the Idling Stop indicator flashes, but engine does not start even if the throttle is opened, perform the followings.
Battery lead is loose:
Check the battery terminals.
When the Honda SMART Key System Does Not Operate Properly
When the Honda SMART Key system does not work properly, perform the following.
● Check that the Honda SMART Key system is activated. Lightly press the ON/OFF button on the Honda SMART Key. If the Honda SMART Key LED does not blink 3 times, activate the Honda SMART Key system. P. 56
If the Honda SMART Key LED does not respond, replace the battery of the Honda SMART Key. P. 183
● Check that there is no communication failure in the Honda SMART Key system. The Honda SMART Key system uses lowintensity radio waves. The Honda SMART Key system may not work properly in the following conditions:
- When there are facilities nearby that generate strong radio waves or noise such as TV towers, power stations, radio stations, or airports.
- When you carry the Honda SMART Key with a laptop or wireless communication device such as a radio or mobile phone.
- When the Honda SMART Key comes into contact with or is covered by metal objects.
● Check that a registered Honda SMART Key is used. Use a registered Honda SMART Key. The Honda SMART Key system cannot be activated without a registered Honda SMART Key.
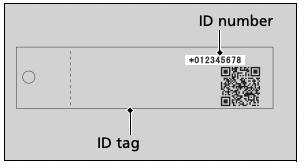
● Make sure that you do not use a broken Honda SMART Key. If you use a broken Honda SMART Key, the Honda SMART Key system cannot be activated. Bring the emergency key and ID tag to your dealer.
● Check the battery condition and battery lead in your vehicle. Check the battery and battery terminals. If the battery is weak, contact your dealer.
If the Honda SMART Key system cannot be activated due to other causes, contact your dealer.
Activating the Electrical System in an Emergency
The electrical system can be activated by inputting the ID number.
Set to ID number input mode
1. Open the left and right saddlebags by the emergency procedures. P. 200
2. Press and hold the start button for more than 4 seconds.
- The buzzer sounds and the system enters the ID number input mode.
3. Check the ID number on the ID tag.
ID number input
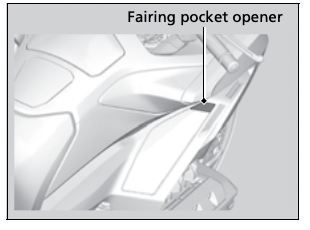
You can input your ID number by pressing the fairing pocket opener and the start button. Input the ID number on the ID tag starting with the digit on the left by pressing the fairing pocket opener.
The ID number is input according to the number of times the fairing pocket opener is pressed. Press the fairing pocket opener the desired number of times, then press the start button to fix the current digit (the buzzer sounds), and input the next digit, and then repeat until all the digits are input.
While inputting the ID number, if the button is not pressed for about 20 seconds, the inputted ID number is cancelled and the system returns to the state before ID number input (the buzzer sounds).
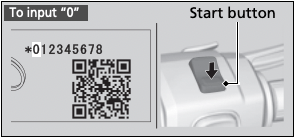
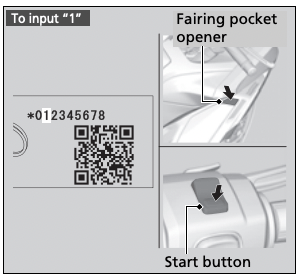
Example:
• To input “0”, press the start button without pressing the fairing pocket opener, and then input next digit.
• To input “1”, press the fairing pocket opener once, and then press the start button to input the next digit.
ID number input success:
After the last digit of the ID number is inputted and the start button is pressed, the ID number is authenticated. The steering will be unlocked (if it is locked) and the electrical system activated. You can start the engine.
You can turn off the engine and electrical system and also lock the steering using the ignition switch. To activate the electrical system again, repeat the procedures for ID number input.
ID number input failure:
If the ID number is not authenticated after inputting, the steering cannot be unlocked and the electrical system will not activate. Repeat the procedures for ID number input from the beginning.
ID number input cancel
If you input the wrong number, you can cancel ID number input by not pressing the button for about 20 seconds (the buzzer sounds). Repeat the procedures for ID number input from the beginning.
If the Saddlebags or Travel Trunk Won't Open
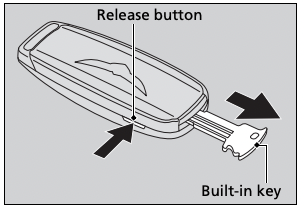
The built-in key can be used to open the left saddle bag when the Honda SMART Key battery becomes weak. If you lose the Honda SMART Key, the left saddlebag can be unlocked using the emergency key. P. 216
To remove the built-in key, pull it out by pressing the release button on the Honda SMART Key. To reinstall the built-in key, push the builtin key into the Honda SMART Key until it clicks.
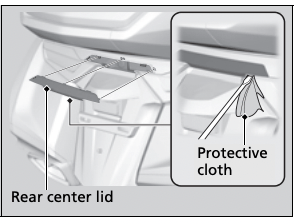
To Open the Saddlebags Emergency
1. Remove the rear center lid by using a flat head screwdriver covered with a protective cloth.
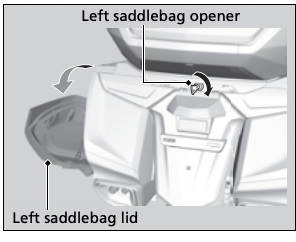
2. Remove the built-in key from the Honda SMART Key
3. Insert the built-in key or emergency key in the left saddlebag opener and turn it clockwise to open the left saddlebag.
4. Release the right saddlebag opener from the prong in the left saddlebag. Pull the right saddlebag opener to open the right saddlebag.
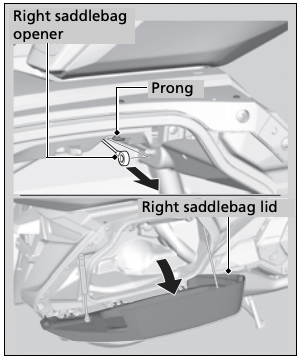
5. Install the right saddlebag opener onto the prong before closing the saddlebags
To Open the Travel Trunk Emergency
GL1800/D/DA
1. Open the left and right saddlebags. P. 200
2. Release the travel trunk opener from the prong in the right saddlebag. Pull the travel trunk opener to open the travel trunk.
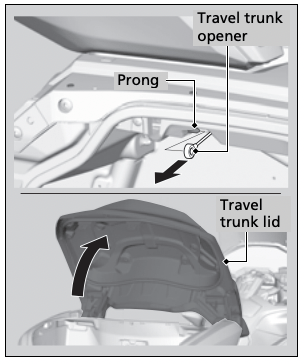
3. Install the travel trunk opener onto the prong before closing the right saddlebag.
Tire Puncture
Repairing a puncture or removing a wheel requires special tools and technical expertise. We recommend you have this type of service performed by your dealer. After an emergency repair, always have the tire inspected/replaced by your dealer.
Emergency Repair Using a Tire Repair Kit
If your tire has a minor puncture, you can make an emergency repair using a tubeless tire repair kit. Follow the instructions provided with the emergency tire repair kit. Riding your vehicle with a temporary tire repair is very risky. Do not exceed 30 mph (50 km/h). Have the tire replaced by your dealer as soon as possible.
NOTICE Using a puncture-repairing agent can damage the TPMS sensors, causing the TPMS indicator to turn on. Have your vehicle checked by your dealer as soon as possible.
NOTICE Use caution not to damage the TPMS sensor if an internal plug patch must be used to repair the tire. If you have a tire professionally repaired at a non-Honda facility, we recommend that you have the work checked by your dealer. TPMS wheels require special handling when changing the tire. Failure to follow the proper tire replacement procedure can result in damage to the TPMS sensor.
WARNING Riding your vehicle with a temporary tire repair can be risky. If the temporary repair fails, you can crash and be seriously injured or killed. If you must ride with a temporary tire repair, ride slowly and carefully and do not exceed 30 mph (50 km/h) until the tire is replaced.
Audio System Trouble
| Symptom |
Cause/remedy |
Unable to pair Bluetooth® device
|
Some Bluetooth® devices and application software you use may be incompatible with the audio system and/or the operable functions may be limited. |
| Check that the audio system and Bluetooth® device are both in the pairing mode. 2 P. 85, 90 |
| The audio system may not be properly connected when another Bluetooth® device is being paired at the same time. Check your surroundings to make sure no other device being paired is present before re-pairing. Presence of a Bluetooth® device in the vicinity sometimes affects the pairing due to radio wave interference, etc. |
| When connecting a Bluetooth® device, make sure no other Bluetooth® device readied for pairing is present. Presence of a Bluetooth® device in the vicinity sometimes affects the pairing due to radio wave interference, etc. |
| When you repeatedly fail in pairing, delete the paired device once, then try pairing again. 2 P. 85, 88 |
| Unable to connect Bluetooth® device |
Depending on the Bluetooth® device and application software you use, it may take some time for the audio system to connect to a device and to start playing an audio file. |
| The connection may be temporarily disconnected when starting the engine, which is normal and not a malfunction. The Bluetooth® device will be reconnected after the engine is started. |
| Check that your Bluetooth® device has been paired. Referring to the instruction manual of your Bluetooth® device, check that your Bluetooth® device is in connectable state. |
| Some Bluetooth® devices and application software you use may not connect automatically. For connecting, follow the instructions in the instruction manual of your Bluetooth® device. |
| The Bluetooth® devices that can be connected at the same time are limited to one Bluetooth® device and two Bluetooth® headsets. |
| If the problem continues after the above-described inspection, delete the paired device once, then try pairing again. P. 85, 88, 90 |
| The Bluetooth® connection cannot be established while launching Apple CarPlay/Android Auto. Quit Apple CarPlay/Android Auto, then try pairing again. P. 85, 88 |
| While connected to Apple CarPlay/Android Auto, Bluetooth function is disabled |
| Connected, but does not play |
Some Bluetooth® devices and application software you use may be incompatible with the audio system and/or audio files may not be played properly. Check the recommended specifications. P. 84 |
| Depending on the Bluetooth® device and application software you use, an audio file may not play automatically. For playing, follow the instructions in the instruction manual of your Bluetooth® device. |
| Depending on the Bluetooth® device and application software you use, an audio file may not play normally after receiving a telephone call, etc. Check that your Bluetooth® device is in playable state. |
| Takes some time to start playing after turning the power on or changing the audio mode. |
Right after the power is turned on or the audio mode is changed, the audio system may take some time to connect to an audio device and to start playing an audio file. Also, the audio system may not allow any audio control operation while preparing to play an audio file. |
| Sounds skip Noises mix |
Presence of another Bluetooth® device or a device that emits electromagnetic waves such as communication equipment in the vicinity sometimes affects the communication. |
| Due to the characteristics of Bluetooth®, though in rare cases, the system operation may become unstable. When it remains unstable, turn off the power to the audio system or the device being used, and then turn it on again. |
| The storage location of the Bluetooth® device sometimes affects the audio system and communication. When sounds skip or noises mix, change the location of the device. For example, when the device is kept in a pocket of clothing sandwiched in between the rider and passenger, the communication may be affected. For Bluetooth® antenna locations, refer to Audio System Location. P. 68 Also, weather, buildings in the vicinity, road conditions, etc. can sometimes affect the communication. |
| Depending on the Bluetooth® device and application software you use, an audio file may not play normally after receiving a telephone call, etc. Change the audio mode (P. 71) or turn off the power to the audio system and then turn it on again. If the skipping of sounds or mixing of noises continues, check the status of your Bluetooth® device. |
| If the skipping of sounds or mixing of noises continues, delete the paired device once, then try pairing again. P. 85, 88 |
| Check the recommended specifications. P. 84 |
| Noise sometimes mixes at the place where radio wave is weak |
| Audio volume from headset is small/big |
Adjust the volume while in the individual modes. P. 71 |
| Check the volume setting of the paired headset. |
No or inaccurate display
|
Depending on the audio device and the audio file, nothing may be displayed or the display may be inaccurate in some cases. Check the information on available tags. P. 105 |
| When the information in an audio file such as the artist name and track title is in a non-compliant tag format, it may be indicated by “.” or no information will be shown. |
| Depending on the type of the album art used for the music information of audio files, the album art may not be displayed. The system supports ID3v2 as available tag for album art. Check the album art format of the audio file. |
| The system does not support album art display via Bluetooth® connection. |
| About USB device |
Some USB devices may be incompatible with the audio system and/or their operable functions may be limited. |
| When the audio system does not recognize the USB device connected to the USB connector, turn the ignition switch OFF and then turn it on again. |
| When a large number of files are stored in the USB device, it sometimes takes a long time before an audio file starts playing. Reduce the number of files in the USB device |
| Check that the audio files stored in the USB device is in a playable file format. P. 105 |
| USB failure |
USB function may be unusable when the system failure occurs. USB connection may recover by turning the ignition switch OFF, and then ON again. |
Bluetooth® handsfree calling cannot be available.
|
Connected Bluetooth® device may be unsupported device. Check the supported Bluetooth® version/profiles. P. 84 |
| When the Bluetooth® connection is unstable due to surrounding conditions or radio wave conditions, the handsfree calling functions may not be available. |
| To use the Bluetooth® handsfree calling, a headset connection is necessary. Connect a paired headset.P. 90 |
| During a call, headset volume is small/big. |
Adjust the volume during a call. P. 71 |
| Passenger's headset is no sound. |
If [Private mode] is enabled, no sound comes from the passenger's headset. Check [Private mode] setting. P. 92 |
| About Phonebook |
Since the phonebook is stored in the system, it may be displayed even when connecting another phone. |
| Bluetooth® Handsfree Calling |
Depending on the connection status, the times displayed in call history on the vehicle side or the phone side may differ. |
| Depending on your mobile carrier plan, available functions may differ. |
| A display delay may occur depending on the number of phone books, call history and music data etc. stored in the connected device. |
Apple CarPlay cannot be available.
|
Connected iPhone may be unsupported model. Check the compatible model with Apple CarPlay. |
| Connected iPhone may be unsupported iOS version. Update the iPhone to the newer version. |
| To use Apple CarPlay, a headset connection is necessary. Connect a paired headset. P. 90 |
| When connecting your iPhone, if it is recognized as iPod, disconnect the USB cable once, enable the Apple CarPlay (P. 81), and then reconnect the USB cable again. |
| When a mobile network communication is unstable due to surrounding conditions or signal strength conditions, Apple CarPlay functions may not be available. |
| When the paired headset connection is broken due to headset battery depletion or communication failure, Apple CarPlay cannot be used until the connection is restored. |
| The screen will not switch to Apple CarPlay automatically, other than when the ignition switch is turned to OFF with Apple CarPlay is activated. |
| Apple CarPlay cannot be available with USB connection via the USB 2 connector. Check the USB connection, and then reconnect the USB 1 connector if necessary. |
| Some USB cables may be incompatible with Apple CarPlay. Use certified cable to connect the iPhone. |
| You have not agreed to enable Apple CarPlay. Reconnect the iPhone and enable to use CarPlay on the disclaimer screen. P. 112 |
| Apple CarPlay setting on your iPhone may be disabled. Disconnect iPhone and enable the Apple CarPlay setting on your iPhone. |
Android Auto cannot be available.
|
Connected Android phone may be unsupported model. Check the compatible model with Android Auto. 2 P. 114 |
| Connected Android phone may be unsupported Android version. Update the Android phone to the newer version. |
| To use Android Auto, a headset connection is necessary. Connect a paired headset. 2 P. 90 |
| When a mobile network communication is unstable due to surrounding conditions or signal strength conditions, Android Auto functions may not be available. |
| When the paired headset connection is broken due to headset battery depletion or communication failure, go back to the Home screen, and pair the headset connection again. 2 P. 90 |
| Android Auto cannot be available with USB connection via the USB 2 connector. Check the USB connection, and then reconnect the USB 1 connector if necessary. |
| Some USB cables may be incompatible with Android Auto. For Android Auto, the USB cables should be certified by USB-IF to be compliant with USB 2.0 Standard. |
| You have not agreed to enable Android Auto. Reconnect the Android phone and enable to use Android Auto on the disclaimer screen. 2 P. 115 |
| Android Auto setting on your Android phone may be disabled. Disconnect Android phone and enable the Android Auto setting on your Android phone. |
| Connected, but does not operate Apply CarPlay/Android Auto. |
You cannot operate Apple CarPlay/Android Auto by the center panel switches/Interface dial while the vehicle is in motion. Operate with the left handlebar switches or park your vehicle in a safe place, then operate. |
| Some functions of Apple CarPlay/ Android Auto is not available. |
Some functions may be limited due to condition of mobile network communication. |
| Apple CarPlay/Android Auto screen is too dark/bright |
Selecting [Day / Night] menu in [Vehicle setting], you can select daytime mode or nighttime mode in the navigation map or an application such as Maps (P. 32), also adjust backlight brightness by [Auto dimmer meter illumination] menu in [Vehicle setting] (P. 31). |
| The multi-function display is too dark/bright |
When the ignition switch is in the ACC, [Auto Dimmer Meter Illumination] function does not work. Turn the ignition switch to ON. |
| The map color tone has Day/Night color tones and it changes according to the surrounding brightness. You can select daytime mode or nighttime mode. P. 32 |
| Audio system cannot operate. |
Certain manual functions and settings are disabled or inoperable while the vehicle is in motion. You cannot select a grayed-out menu until the vehicle is stopped. |
| Set menu in [Vehicle setting] does not be reflected or inoperable. |
In [Vehicle setting], certain items cannot be selected and display information is limited when the ignition switch is in ACC. The set menu will be reflected to the previous setting when the ignition switch is turned ON. |
| When turning the ignition switch OFF and ON continuously. |
Since the system restart takes time, it may take time until the screen is appeared. |
| High temperature/overcurrent protection |
To protect the system, some operations may be limited temporarily. The system automatically recovers after the cause is solved. |
| About Idling Stop system (GL1800D/DA Canada model) |
When the Idling Stop system is activated, sound may not come out temporarily for system protection, but sound will recover automatically. |
| Radio receiver sensitivity |
The sensitivity of receiver is affected by the object which interrupts a radio wave nearby the radio antenna (top of the right saddlebag). |
| Software update |
The statements in this owner's manual may not match your vehicle's Audio System after performing the software update (map data update). |
If the problem continues after the above-described inspection, have your vehicle inspected by your dealer.
Electrical Trouble
Battery Goes Dead
Charge the battery using a motorcycle battery charger. Remove the battery from the vehicle before charging. Do not use an automobile-type battery charger, as these can overheat a motorcycle battery and cause permanent damage. If the battery does not recover after recharging, contact your dealer.
NOTICE Jump starting using an automobile battery is not recommended, as this can damage your vehicle’s electrical system. Bump starting is also not recommended.
Burned-out Light Bulb
All light bulbs on the vehicle are LEDs. If there is an LED which is not turned on, see your dealer for servicing.
Blown Fuse
Before handling fuses, see “Inspecting and Replacing Fuses.” P. 162
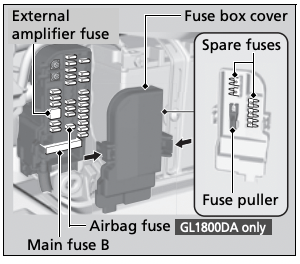
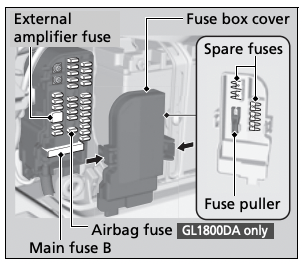
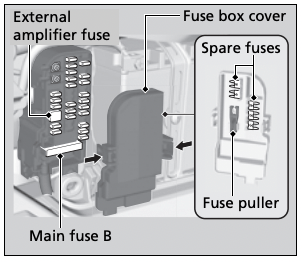
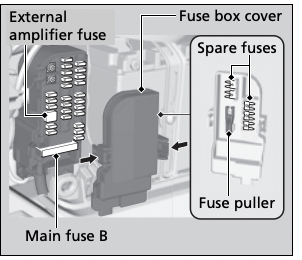
Fuse Box Fuses
1. Remove the left side cover. P. 170
2. Remove the fuse box cover.
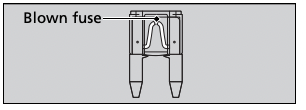
3. Pull the fuses out one by one with the fuse puller and check for a blown fuse. Always replace a blown fuse with a spare fuse of the same rating.
- Spare fuses and fuse puller are provided on back side of the fuse cover.
4. Install the parts in the reverse order of removal.
Main Fuse B, Speed Limiter Fuse and External Amplifier Fuse
To check and replace the main fuse B, speed limiter fuse and external amplifier fuse, see your dealer for servicing.

Ignition Main Fuse & ACC Main Fuse
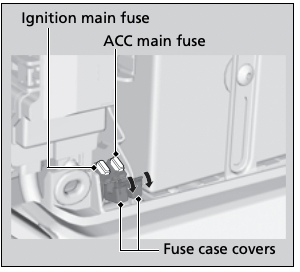
1. Remove the left side cover. P. 170
2. Remove the fuse case covers.
3. Pull the fuses out one by one with the fuse puller and check for a blown fuse. Always replace a blown fuse with a spare fuse of the same rating.
- Spare fuses and fuse puller are provided on back side of the fuse box cover.
4. Install the parts in the reverse order of removal.
NOTICE If a fuse fails repeatedly, you likely have an electrical problem. Have your vehicle inspected by your dealer.