Honda 2021 PIONEER 1000 Scooter
Product's Documents
Below are documents related to this product, you can read online or download:
- Owner's manual - (English) Read Online | Download pdf

User manual Motor Sport

SXS1000M3P/M3D/M5P/M5D
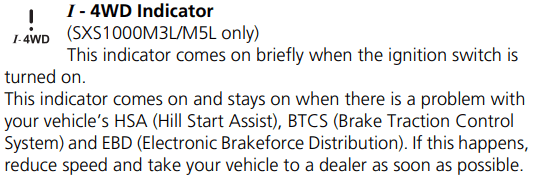
SXS1000M3L/M5L
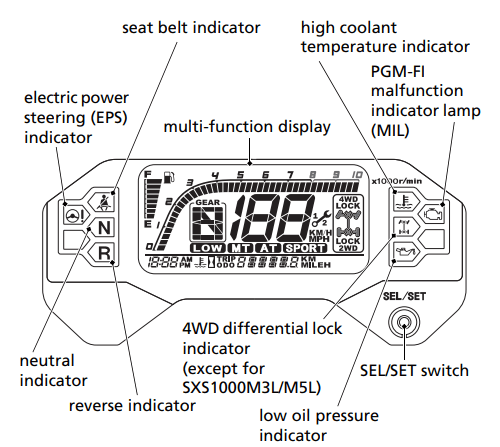
The indicators and displays on your Honda SXS keep you informed, alert you to possible problems, and make your driving safer and more enjoyable. Refer to the indicators frequently. Their functions are described on the following pages.
Lamp Check
The indicators come on and go off sequentially when you turn the ignition switch to the ON (q) position.
If one of these indicators does not come on key ON check, have your dealer check for problems.
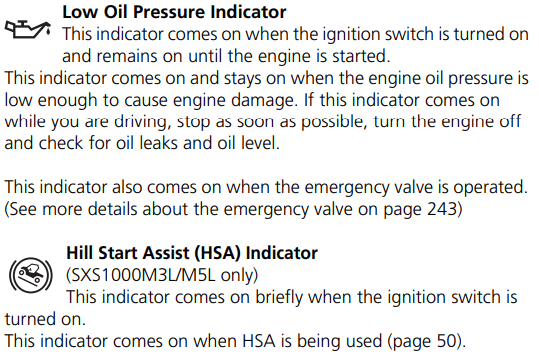
SXS1000M3L/M5L only
Display Check
When the ignition switch is turned ON (q), the multi-function display will temporarily show all the modes and digital segments and initial message. So, you can make sure the liquid crystal display is functioning properly.
If any part of this display does not come on during the key on check, have your dealer check for problems.
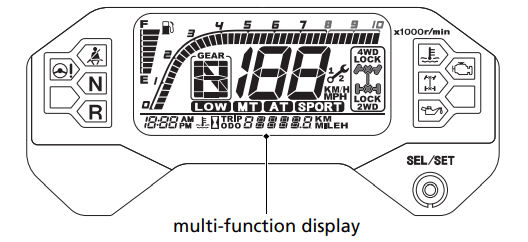
SXS1000M3P/M3D/M5P/M5D
SXS1000M3L/M5L
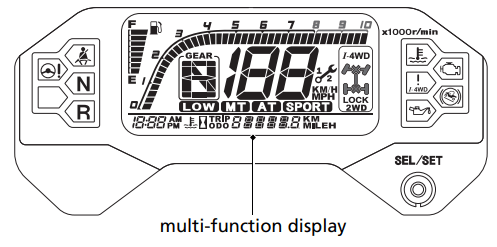
Multi-function Display
The multi-function display consists of the following function displays:
Drive mode indicator
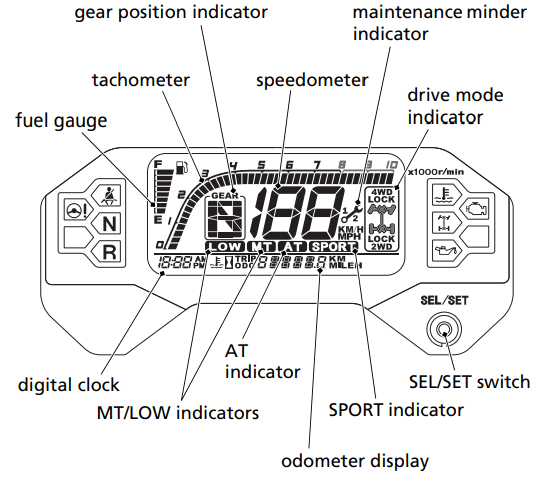
This display shows speed in miles or kilometers per hour.
Mileage Unit Change
The speedometer, odometer, tripmeter and maintenance tripmeter show in either “MPH” and “MILE” or “KM/H” and “KM”.
To change the mileage unit, press and hold the SEL/SET switch for more than 5 seconds in odometer mode (page 29) with the vehicle stopped.

Speedometer Blinking
If the speedometer digits and seat belt indicator blink simultaneously, while you are driving, maximum vehicle speed will be limited to no more than 15 mph (24 km/h) by the seat belt speed limiting system (page 68).
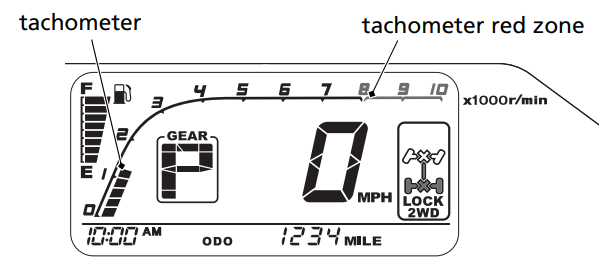
Tachometer
This display shows the engine speed in revolutions per minute (rpm). Do not operate the engine in the tachometer red zone. Excessive engine speed can adversely affect engine life.
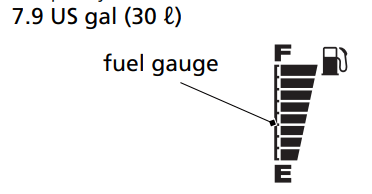
Fuel Gauge
The fuel gauge shows the approximate fuel supply available. The fuel tank capacity is:
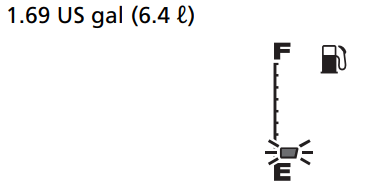
When the last segment blinks, you should refill the tank as soon as possible. The amount of fuel remaining when the blinking starts is approximately:
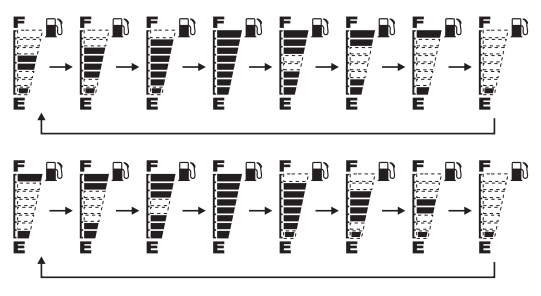
Fuel gauge failure:
If the fuel system has an error, the fuel gauge indicators will be displayed as shown in the illustrations. If this occurs, see your dealer as soon as possible.
Odometer Display
This display includes odometer, tripmeter, coolant temperature gauge, hour meter, maintenance tripmeter, and maintenance hour meter.
Each time you press the SEL/SET switch, mode will change as shown in the illustration.
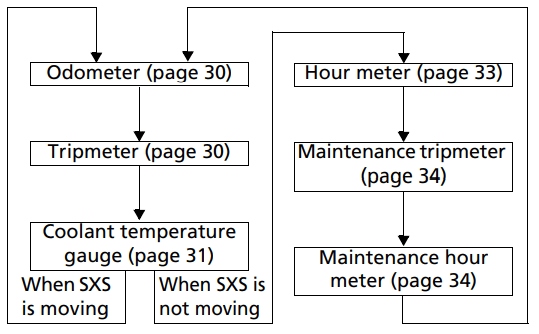
If there are unusual indications with your SXS, and SEL/SET switch is not pressed for 10 seconds, a message will automatically appear in the display
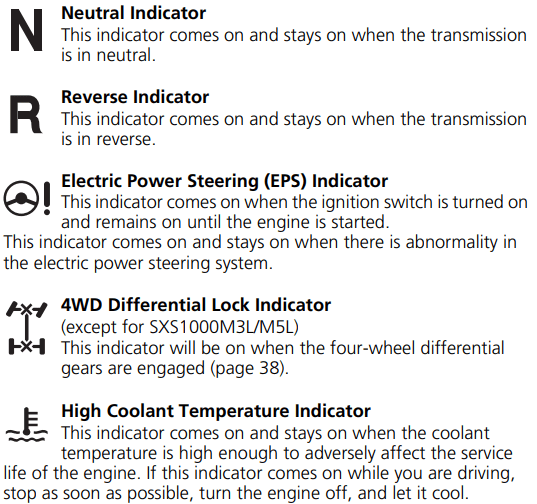
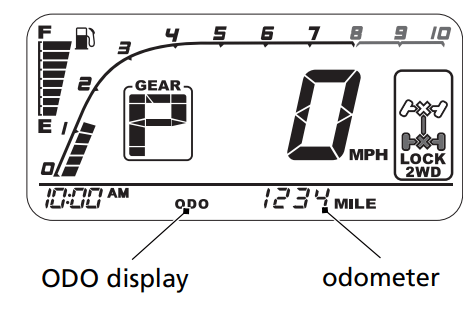
Odometer
The odometer shows the total miles or kilometers ridden with the ODO display. The odometer locks at 999,999 when the readout exceeds 999,999.
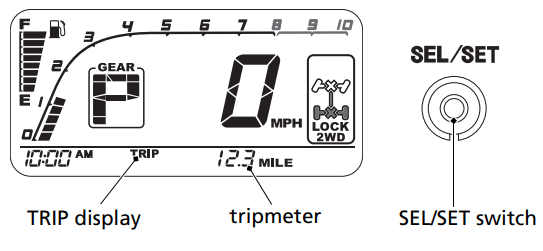
Tripmeter
The tripmeter shows the number of miles or kilometers ridden with the TRIP display, since you last reset the tripmeter. The tripmeter returns to 0.0 when the readout exceeds 999.9.
To reset the tripmeter, press and hold the SEL/SET switch with the display in the tripmeter mode.
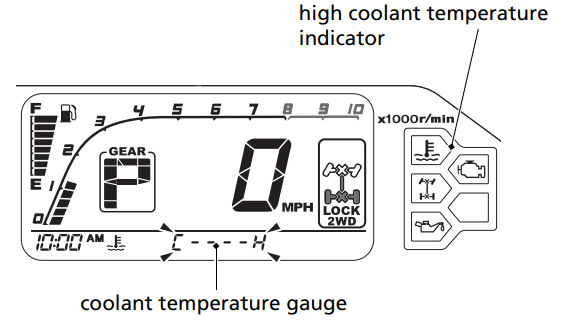
Coolant temperature gauge
The coolant temperature gauge shows engine coolant temperature with the coolant temperature display. When the segment begins to move above the C (Cold) display, the engine is warm enough for the SXS to be ridden. When the coolant temperature is low, the coolant temperature gauge will display “Lo”. The normal operating temperature range is within the section between the H and C displays.
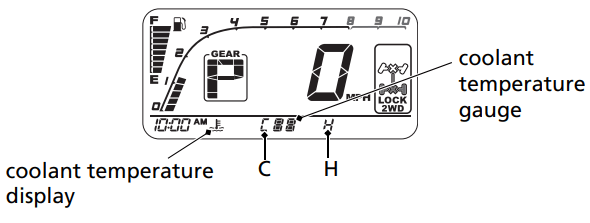
If all sections of the coolant temperature gauge, including segment H and high coolant temperature indicator are on (automatically appears in the display), stop the engine and check the reserve tank coolant level.
Read pages 248 – 249 and do not drive the SXS until the problem has been corrected.
Coolant temperature gauge failure:
If the coolant temperature system has an error, the coolant temperature gauge will blink and appear in the display, and high coolant temperature indicator will turned on. If this occurs, see your dealer as soon as possible.
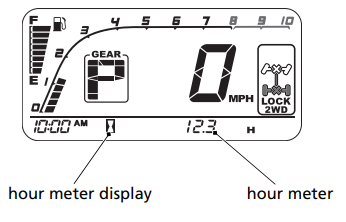
Hour meter
The hour meter display shows accumulated hours while the ignition is ON (q). The hour meter locks at 99,999.9 when the readout exceeds 99,999.9.
Maintenance Minder Indicator
The maintenance minder indicator appears in the display when the mileage or operating hours on your Honda SXS reaches the maintenance interval specified on the maintenance schedule (page 129).
Reset the indicator after each scheduled maintenance is performed. If the scheduled maintenance is performed before the maintenance minder indicator appears, be sure to reset the maintenance minder after performing the scheduled maintenance.
Resetting the indicator:
To reset the indicator, press and continue to hold the SEL/SET switch and turn the ignition switch to ON (q). The indicator message will light up, and after 2 seconds will blink twice, the maintenance minder indicator is reset.
Also the maintenance tripmeter and maintenance hour meter will reset.
See more details about maintenance minder indicator on page 127.

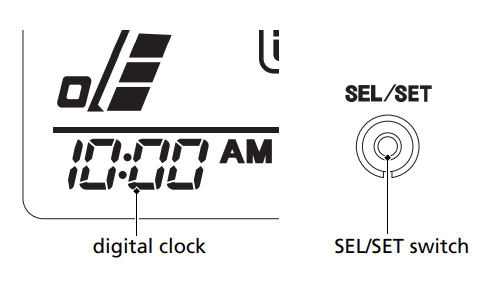
Digital Clock
The digital clock shows the hour and minutes with the 12-hour clock display.
To set the time:
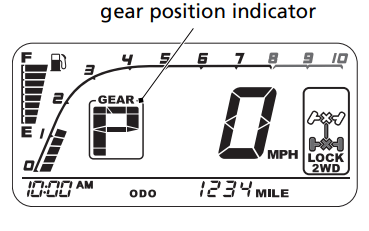
Gear Position Indicator
The gear position indicator shows the selected shift position by the shift select lever (page 43).
The indicator displays: P for park, N for neutral, R for reverse, H for high-range, L for low-range, and 1 – 6 for gear positions (shift paddles operation)
“–” will be displayed on the gear position indicator when the transmission is not shifted into gear properly. Before driving, check that the gear position is properly displayed on the gear position indicator.
If the gear position indicator blinks, see If the Transmission Is Not Functioning Properly, page 241.
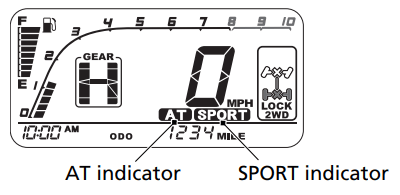
AT Indicator, MT Indicator / LOW Indicator
These indicators display the transmission mode of the SXS.
The indicators display: AT for automatic shift mode, MT for manual shift mode.
To switch between AT mode and MT mode, press the AT/MT switch (page 48). When MT mode is selected in low-range (L), the LOW indicator also comes on.
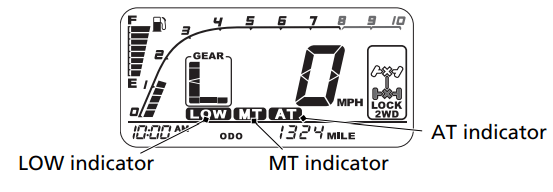
SPORT Indicator
When AT mode is selected, pressing the SPORT switch displays the SPORT indicator (page 49)
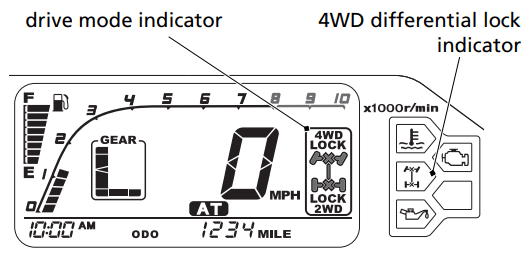
Drive Mode Indicator (SXS1000M3P/M3D/M5P/M5D)
The drive mode indicator shows the selected drive mode by the drive mode select lever (page 44, 108).
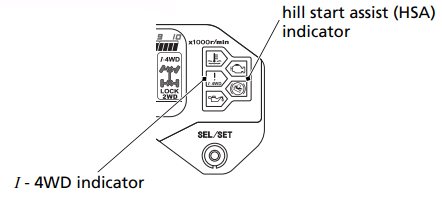
4WD differential lock indicator
This indicator comes on when the differential gears are engaged.
Drive Mode Indicator (SXS1000M3L/M5L)
The drive mode indicator shows the selected drive mode by the drive mode select lever (page 46, 108).

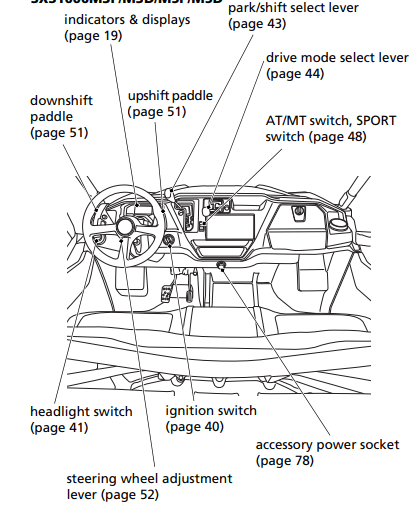
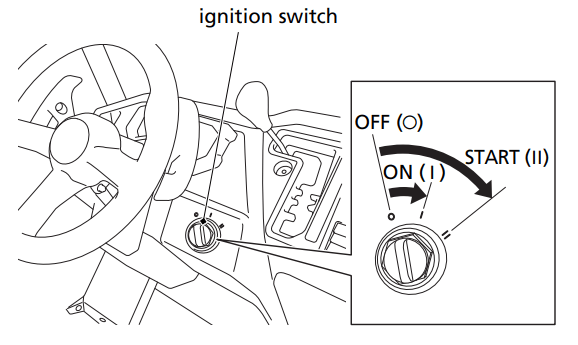
Ignition Switch
The ignition switch is a three-position, key-operated switch used to start and stop the engine.
OFF (O) — The engine and all electrical circuits are off. The key can be inserted and removed only when it is in this position.
ON (l) — The electrical circuits are on. You can use the accessory power socket in this position.
START (ll) — This position is used only to start the engine. The key will automatically return to the ON (q) position when you let go of it.
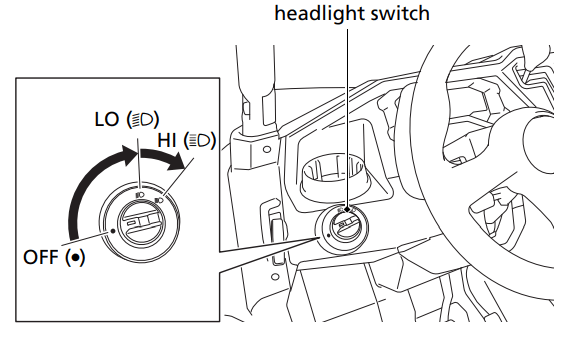
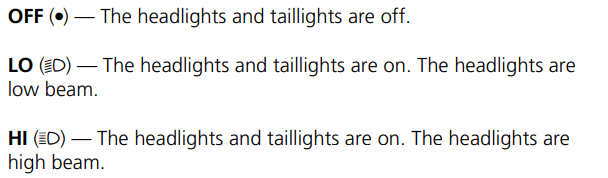
Headlight Switch (SXS1000M3P/M3D/M5P/M5D)
The headlight switch is located on the front console, to the left of the steering wheel. This switch turns the headlights and taillights on and off, and changes between low beam or high beam.
Starting & Stopping the Engine
For safety, we recommend that you start the engine in a wellventilated area. If that is not practical, move the vehicle outdoors as soon as possible. The engine’s exhaust contains carbon monoxide, a colorless and odorless gas that can cause illness and even death.
WARNING Running the engine of your vehicle while in an enclosed or even partially enclosed area can cause a rapid build-up of toxic carbon monoxide gas. Breathing this colorless, odorless gas can quickly cause unconsciousness and lead to death. Only run your vehicle's engine when it is located in a well ventilated area outdoors.
The starter motor will operate when the shift select lever is in the park (P) or neutral (N) position, or the brake pedal is pressed. You should do the following checks and adjustments before you drive your vehicle.
Before START:
Starting the engine:
-394885.png)
To stop the engine, turn the ignition switch to the OFF (w) position. Remember to shift into the park (P) position and remove the key if you plan to leave the vehicle.
Shifting Gears
You can move forward or in reverse by shifting the shift select lever from P or N, to R, H, or L. Your Honda SXS is equipped with a dual clutch transmission, which is an automatically controlled 6-speed transmission.
When the shift select lever is in the high-range (H) or low-range (L) position, you can switch between AT mode and MT mode by pressing the AT/MT switch. In AT mode, you can use the shift paddles to temporarily select a gear.
To avoid damaging the transmission, move the shift select lever only when the vehicle is stopped and the engine is idling. Select a driving mode appropriate for your driving environment and driver visibility.
NOTICE
Under extreme constant high load usage, the temperature of the clutch can rise over the allowable temperature limit for the clutch material. In this usage condition, clutch slippage and burning may occur.
avoid damaging the clutch, follow the proper usage of the subtransmission dual range as described. To prevent clutch damage, do not use the throttle to hold the vehicle stationary on an incline or try to tow an immovable object.
Shift Position and Meter Display
-618932.png)
-328594.png)
Driving by operating the shift paddles while MT mode is selected
To upshift the transmission, pull the right side upshift paddle once. To downshift the transmission, pull the left side downshift paddle once.
GEAR SHIFTING SEQUENCE
-837734.png)
After starting the engine and letting it warm up, follow this procedure:
Selecting a Drive Mode
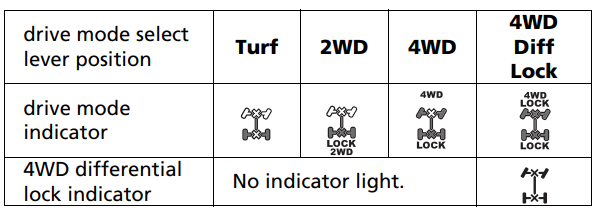
Turf
This mode supplies power to the rear wheels only. This mode is for driving on turf.
2WD
This mode supplies power to the rear wheels, and locks the rear differential. This mode is best for surfaces that provide good traction.
4WD (SXS1000M3P/M3D/M5P/M5D)
This mode supplies power to the front and rear wheels, and locks the rear differential.
Steering will require slightly more effort than with 2WD. This mode is recommended for driving on surfaces that provide relatively poor traction.
4WD Diff Lock (SXS1000M3P/M3D/M5P/M5D)
This mode supplies power to the front and rear wheels, and locks the rear and front differential.
As a result, steering will require extra space and effort. Select this mode to maximize available traction.
I - 4WD (SXS1000M3L/M5L)
This mode supplies power to the front and rear wheels, and locks the rear differential. In addition, Brake Traction Control System (BTCS) will work to enhance vehicle stability in slippery conditions.
Brake Traction Control System (BTCS):
BTCS applies the front brake in slippery conditions to help prevent loss of traction due to wheel spin when applying the accelerator pedal.
When applying the brake while BTCS is operating, the brake pedal will have a flutter feel. This is normal.
Before using the drive mode select lever to change from one mode to another, be sure the vehicle is stopped and the engine is idling. See page 44 for additional information.
Parking
SXS1000M3P/M3D/M3L/M5L
Look for a clear, level parking area with a firm surface. Avoid parking on a slope or on loose or slippery surfaces, if possible. If you must park on a slope, block the wheels to help keep the vehicle from sliding.
After bringing your vehicle to a stop:
SXS1000M5P/M5D
The SXS1000M5P/M5D is equipped with an auto leveling rear shock absorber. (See page 194 for more information)
Look for a clear, level parking area with a firm surface. Parking on top of obstructions or terrain features taller than about 7.9 inches (200 mm) could result in the SXS1000 becoming stuck if the cargo bed is loaded and the vehicle settles (up to 4.5 inches [114 mm]) while parked. Avoid parking on a slope or on loose or slippery surfaces, if possible. If you must park on a slope, block the wheels to help keep the vehicle from sliding.
After bringing your vehicle to a stop:
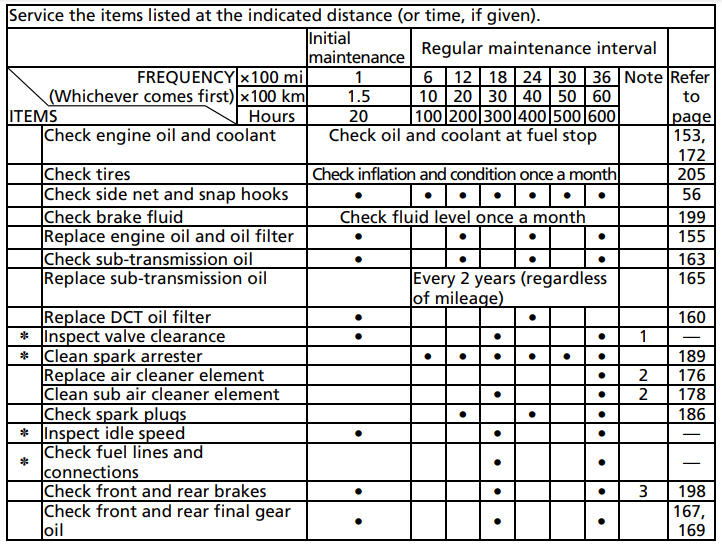
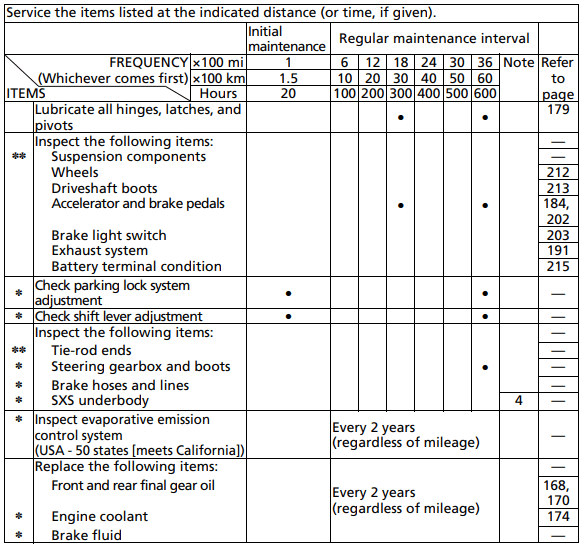
The required Maintenance Schedule that follows specifies how often you should have your Honda SXS serviced, and what things need attention. It is essential to have your Honda SXS serviced as scheduled to maintain safe, dependable performance, and proper emission control.
The service intervals in this Maintenance Schedule are based on average driving conditions. Some items will need more frequent service if you drive in unusually wet or dusty areas or at full throttle. Consult your dealer for recommendations applicable to your individual needs and use.
Some items in the Maintenance Schedule can be performed with basic mechanical skills and hand tools. Procedures for these items are provided in this manual. Other items involve more extensive procedures and may require special training, tools, and equipment. We recommend that you have your dealer perform these tasks unless you have advanced mechanical skills and the required tools and equipment. Procedures for such items in this schedule are provided in an official Honda Service Manual available for purchase (page 284).
If you do not feel capable of performing a given task or need assistance, remember that your Honda dealer knows your Honda SXS best and is fully equipped to maintain and repair it. If you decide to do your own maintenance, use only Honda Genuine Parts or their equivalents for repair or replacement to ensure the best quality and reliability.
Perform the pre-drive inspection (page 92) and owner maintenance in this section at each scheduled maintenance period.
Maintenance Minder Messages on the Multi-function Display The maintenance minder indicator appears in the multi-function display when the mileage or operating hours on your Honda SXS reaches the maintenance interval specified on the maintenance schedule.
Maintenance Minder Indicators:
 | Initial Maintenance Appears at 100 miles (150 km) or 20 operating hours, whichever comes first. See Initial Maintenance on the maintenance schedule |
 | Regular Maintenance Interval 1 Appears 600 miles (1,000 km) or 100 operating hours after the Initial Maintenance is performed and maintenance minder is reset (page 34). See Regular Maintenance Interval for 100, 300, and 500 operating hours (or corresponding mileage interval, whichever comes first) in the maintenance schedule. |
 | Regular Maintenance Interval 2 Appears 600 miles (1,000 km) or 100 operating hours after Regular Maintenance Interval 1 is performed and maintenance minder is reset (page 34). See Regular Maintenance Interval for 200, 400, and 600 operating hours (or corresponding mileage interval, whichever comes first) in the maintenance schedule. |
Each item on the maintenance schedule requires some mechanical knowledge. Certain items (particularly those marked * and **) may require more technical information and tools. Consult your dealer.
* Should be serviced by your dealer, unless you have the proper tools and service data, and are mechanically qualified. Refer to the official Honda Service Manual (page 284).
** In the interest of safety, we recommend these items be serviced only by your dealer.
Should be serviced by your dealer, unless you have the proper tools and service data, and are mechanically qualified. Refer to the official Honda Service Manual (page 284).
Note 1 Inspect valve clearance as needed, if engine is noisy.
Note 2 Service more frequently when operating in dusty areas, sand or snow.
Note 3 Service more frequently when operated in muddy conditions.
* Should be serviced by your dealer, unless you have the proper tools and service data, and are mechanically qualified. Refer to the official Honda Service Manual (page 284).
** In the interest of safety, we recommend these items be serviced only by your dealer.
Note 4 Check the underbody whenever the under guard has been hit.


If Your Engine Quits or Won’t Start
Proper operation and maintenance can prevent starting and engine performance problems. In many cases, the cause of the problem may be a simple operational oversight.
If you have a problem starting the engine — or experience poor engine performance — the following information may help you. If you can’t correct the problem, see your dealer.
If your SXS won’t start, listen as you turn the ignition key to the START (p) position. If you don’t hear the starter motor turning, refer to the Starter motor doesn’t operate symptom. If you can hear the starter motor working normally, refer to the Starter motor works, but the engine won’t start symptom.
-117655.png)
-411998.png)
-497311.png)
If the Transmission Is Not Functioning Properly
If the gear position indicator is blinking, perform the following:
“P”, “R”, “N”, “H” or “L” is blinking:
You can drive in either AT mode or MT mode. See your dealer as soon as possible.
“1”, “2”, “3”, “4”, “5” or “6” is blinking:
At high-range (H) or low-range (L), you can drive only in the gear position that is blinking. You can also drive in reverse (R).
To avoid damaging the clutch, we recommend that you drive in lowrange (L). The engine brake may not work, so please drive slowly. See your dealer as soon as possible.
“–” is blinking:
Check for SXS failure again. Perform the following procedure.
The gear position (“1”, “2”, “3”, “4”, “5” or “6”) is blinking:
At high-range (H) or low-range (L), you can drive only in the gear position that is blinking. You can also drive in reverse (R).
To avoid damaging the clutch, we recommend that you drive in lowrange (L). The engine brake may not work, so please drive slowly. See your dealer as soon as possible.
If “-” continues to blink:
Change the gear position by using the gear change tool, and tighten the emergency valve. Perform the following procedure.
If you cannot shift properly, shift the shift select lever to the highrange (H) position, and while pushing the gear change tool in the direction you want to rotate, rock the vehicle back and forth. When the transmission shifts, return the shift select lever to the park (P) position.
UNDER CARGO BED
-983177.png)
8. Return the gear change tool to the tool kit.
9.Check that “E” is blinking. Next, tighten the emergency valve. Proceed to “E” is blinking.
If “–” is not displayed in the gear position indicator and you change the gear position by using the gear change tool, the DCT system will automatically stop. To reactivate the system, turn the ignition switch to the OFF (w) position, and then turn it back to the ON (q) position.
“E” is blinking:
Tighten the emergency valve. Perform the following procedure.
UNDER CARGO BED
-172384.png)
4. Tighten the bolt and the lock plate.
5. Install the rear mudguard lid.
6. Turn the ignition switch to the START ( ll ) position, and then start the engine.
7.Check that the gear position(“1”, “2”, “3”, “4”, “5” or “6”) is blinking.
8.At high-range (H) or low-range (L), you can drive only in the gear position that is blinking. You can also drive in reverse (R). To avoid damaging the clutch, we recommend that you drive in low-range (L). The engine brake may not work, so please drive slowly. See your dealer as soon as possible.
How you handle a flat tire on the trail depends on how serious the tire damage is, and what tools and supplies you have with you.
If you have a slow leak or a minor puncture, use the plug method to make a temporary repair. (The plug method is applied from the outside of the tire and is the same as that for conventional tubeless tires.)
A plug-type repair kit, available at most auto parts stores or service stations, provides a plug, an installation tool, tire cement, and an instruction sheet. Follow the instructions provided with the repair kit to make a temporary repair.
As soon as possible, have the tire permanently repaired by your dealer.
Any tire that cannot be repaired should be replaced.
Whenever the Honda SXS is to be operated far from service facilities or available transportation, we recommend that you carry a tire pump and a repair kit with the vehicle.
If the leak is more serious, or a temporary repair doesn't hold, the tire must be replaced. The tire will also need to be replaced if it is damaged (page 207). Replacing a tire involves removing and reinstalling the wheel (page 246).
If you are unable to repair a flat tire on the trail, you will need to send for help. We strongly recommend that you do not try to drive with a flat tire. The Honda SXS will be hard to handle, and if the tire comes off the rim, it may lock up the wheel and cause you to crash or overturn.
Emergency Wheel Removal/Installation
Refer to Safety Precautions on page 125
-257146.png)
Removal
Installation
If a torque wrench was not used for installation, see your dealer as soon as possible to verify proper assembly. Improper assembly may lead to loss of control and braking capability
Normally, the high coolant temperature indicator will only light momentarily when you turn the ignition ON (q). Occasionally, it may flicker at or near idling speed.
High coolant temperature may be caused by restriction of air flow to the radiator (such as mud caked on the radiator), extended idling, an oil leak, a coolant leak, a low oil level, a low coolant level, or extended operation under adverse conditions. If the all sections of the coolant temperature gauge including segment H and high coolant temperature indicator are on while you’re driving, don’t ignore it. Pull safely to a stop. Stop the engine as soon as it’s safe to do so, and let it cool.
NOTICE
Continuing to drive with high coolant temperature or an overheated engine can cause serious engine damage.
If the fan is not working, turn the engine off. Open the fuse box (page 251) and check the radiator fan fuse. If the fuse is blown, replace it with the proper (same rating) spare fuse. Start the engine. If the all sections of the coolant temperature gauge including segment H and high coolant temperature indicator stay on, turn the engine off.
If the radiator fan is working, visually check the coolant level in the reserve tank, located under the front hood. It isn’t necessary to touch the radiator system.
If the indicator doesn’t turn off, do not drive. The engine needs repair.
Transport your Honda SXS to a dealer (page 228).
If the temperature drops to normal, check the coolant level. If it has gone down, add more coolant.
If the coolant temperature gauge and indicator return to normal, resume driving. If there is a leak, do not drive the SXS until the leak is repaired by your dealer.
If there’s a mild coolant leak, you can drive for a while, carefully watching the coolant temperature gauge and indicator. Be prepared to stop and add more coolant or water. If the leak is bad, transport your Honda SXS to your dealer (page 228).
All of the electrical circuits on your Honda SXS have fuses to protect them from damage caused by excess current flow (short circuit or overload).
If something electrical on your Honda SXS stops working, the first thing you should check for is a blown fuse.
-773471.png)
Check all the fuses before looking elsewhere for another possible cause of the problem. Replace any blown fuses and check component operation.
The main fuse and circuit fuses are located in the fuse box under the front hood. The electric power steering (EPS) fuse is located under the front hood.
The brake traction control system (BTCS) fuse is located under the front hood. (SXS1000M3L/M5L only)
Recommended Fuses
-559680.png)
Main Fuse Access
-855482.png)
Circuit Fuse Access
5. To check or replace a circuit fuse, pull the fuses out one by one with the fuse puller located behind the fuse box cover. If the fuse is blown, replace it with a spare fuse of the same rating.
If you do not have a replacement fuse with the proper rating for the circuit, install one with a lower rating.
NOTICE Replacing a fuse with one that has a higher rating greatly increases the chance of damage to the electrical system.
6. Install the fuse box cover.
7. Install the front hood.
-448903.png)
Electric Power Steering (EPS) Fuse Access
-635697.png)
-659280.png)
Brake Traction Control System (BTCS) Fuse Access (SXS1000M3L/ M5L only)
-828922.png)
If you do not have a spare fuse and you cannot drive the Honda SXS without fixing the problem, take a fuse of the same rating or a lower rating from one of the other circuits that you can do without temporarily.
If you replace a blown fuse with a spare fuse that has a lower rating, replace the fuse with the correct rating as soon as you can. Also remember to replace any spare fuses that were installed.
If the replacement fuse of the same rating burns out in a short time, there is probably a serious electrical problem on your Honda SXS. Leave the blown fuse in that circuit and have your Honda SXS checked by your dealer
Personal safety is your first priority after a crash. If you or anyone else has been injured, take time to assess the severity of the injuries and whether it is safe to continue driving. If you cannot drive safely, send someone for help. Do not drive if you will risk further injury.
If you decide that you are capable of driving your SXS safely, first evaluate the condition of your SXS. If the engine is still running, turn it off and look it over carefully; inspect it for fluid leaks, check the tightness of critical nuts and bolts securing such parts as the steering wheel, control levers, brakes, and wheels.
If there is minor damage, or you are unsure about possible damage but decide to try driving the Honda SXS back to your base, drive slowly and cautiously.
Sometimes, crash damage is hidden or not immediately apparent. When you get home, thoroughly check your Honda SXS and correct any problems you find. Also, be sure to have your dealer check the frame suspension, seat belts, and occupant protective structure after any serious crash.
Be sure to record your key number. Store the spare key and recorded key number in a safe location. You’ll need this number to have a duplicate key made.
If you lose your key and aren’t carrying a duplicate, either get your spare or have one made. If you don’t know your key number, call the dealer where you purchased your Honda SXS. They may have it listed in their records. If they don’t, transport your Honda SXS to them or the nearest dealer. The dealer will probably have to remove the ignition switch assembly to find the key number so they can make a key for you.
-203254.png)
If the battery is low, the starter motor doesn’t operate or works poorly, and you can’t start the engine. Jump starting your Honda SXS should be avoided. Instead, the battery should be removed and recharged (page 218). If you can’t charge the battery or it appears unable to hold a charge, contact your dealer.
WARNING
The battery gives off explosive hydrogen gas during normal operation. A spark or flame can cause the battery to explode with enough force to kill or seriously hurt you. Wear protective clothing and a face shield, or have a skilled mechanic do the battery maintenance.
NOTICE
If a battery sits in extreme cold, the electrolyte inside can freeze. Attempting to jump start with a frozen battery can cause it to rupture.
Use a battery that is the same as the one in the vehicle or an equivalent.
-687363.png)
The brake lines, control cables, and other components can be damaged as you drive in dense brush or over rocky terrain. Making a trailside repair depends on how serious the damage is and what tools and supplies you have with you.
If your Honda SXS becomes immersed in water (water level is above the floorboard), inspect the vehicle to avoid severe engine damage by following these steps:
-148942.png)
– If the sub air cleaner is wet, water may have entered the air intake system. Do not start engine.
– If the sub air cleaner is dry, the engine can be restarted.
3. Take your Honda SXS to your dealer for service as soon as possible, even if you succeeded in starting the engine.
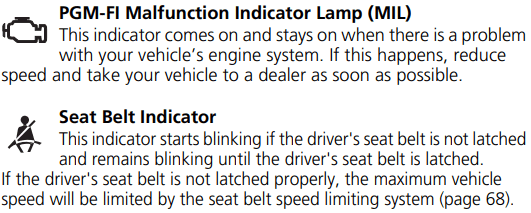
If the driver's side seat belt is not latched properly, the maximum vehicle speed will be limited to no more than 15 mph (24 km/h) by the seat belt speed limiting system (page 68).
Also the seat belt indicator and speedometer digits blink.
Make sure that the driver's side seat belt is latched properly. If the problem persists, see your dealer.