To control the hearing aids using the Bose Hear app, you must connect your phone with the hearing aids.
To connect your phone, follow the steps below.
Step 1: Download the Bose Hear app (see page 19).
Step 2: Insert the batteries and fully close the battery doors to power on the hearing aids (see page 20).
Step 3: Follow the app instructions to connect the hearing aids and learn how to wear and use them with video tutorials.
Download the Bose Hear app
The Bose Hear app lets you set up the hearing aids, adjust them to fit your hearing needs, and manage settings.
Step 1: On your smartphone, use your web browser to visit app Bose /SC and download the Bose Hear app. Or, download from the App Store or Google Play store.
Step 2: Insert the batteries so the app can find the hearing aids (see page 20).
Insert the batteries
Step 1: Gently pull the tab on the bottom of the hearing aid until the battery door fully opens.
Step 2: Insert one of the provided size 312 batteries in the door with the sticker facing up and the rounded side facing down.
Step 3: Peel the sticker off the battery, securing it with your other hand. This activates the battery.
Step 4: Fully close the battery door. You feel two clicks, and after a short delay, the hearing aid powers on.
Step 5: Repeat steps 1 – 4 for the other hearing aid.
Step 6: Follow the app instructions to connect the hearing aids and learn how to wear and use them with video tutorials.
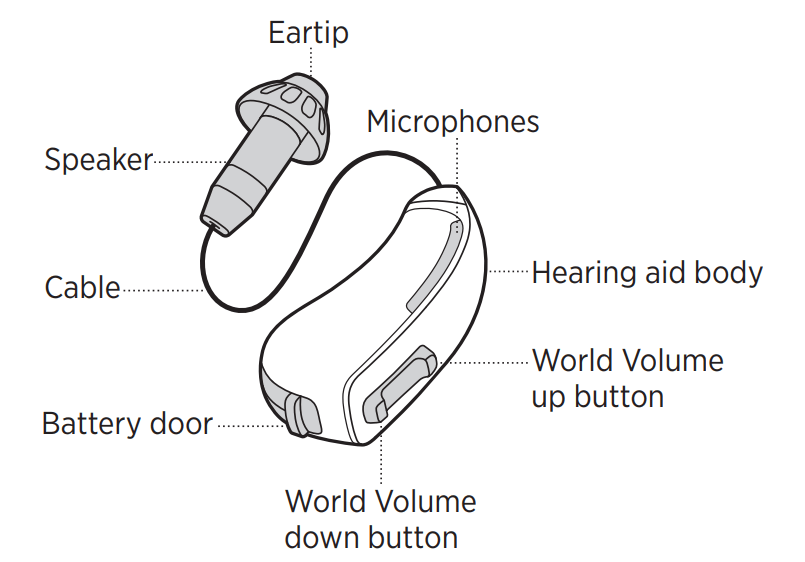
Hearing aid and app controls
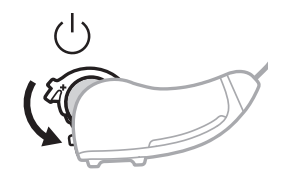
Power on
To power on, fully close the battery door on each hearing aid.
You feel two clicks as each door closes. If you’re wearing the hearing aids, after 3 seconds, you hear a tone; 6 seconds later, the hearing aids power on.
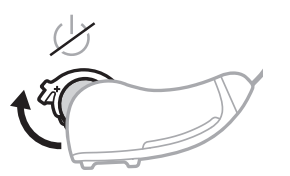
Power off
To power off, partially open the battery door on each hearing aid until you feel a click.
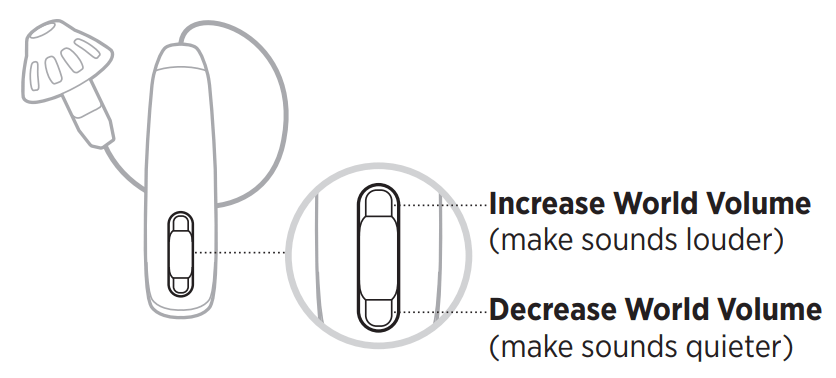
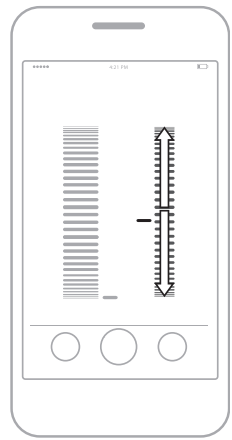
World Volume
You can make sounds louder or quieter by adjusting World Volume.
Adjust World Volume using the hearing aid controls
The World Volume buttons are located on the back of each hearing aid.
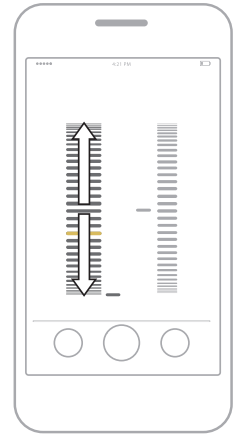
Adjust World Volume using the Bose Hear app
In the Bose Hear app, from the home screen, do one of the following:
• To increase World Volume (make sounds louder): Drag the World Volume wheel up.
• To decrease World Volume (make sounds quieter): Drag the World Volume wheel down.
Treble and bass
You can make voices sound clearer using the treble and bass controls in the Bose Hear app.
Adjust treble and bass
In the Bose Hear app, from the home screen, do one of the following:
• To increase treble (make sounds brighter): Drag the Treble and Bass wheel up.
• To increase bass (make sounds deeper): Drag the Treble and Bass wheel down.
Care and maintenance
Store the hearing aids
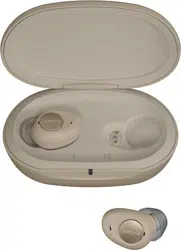
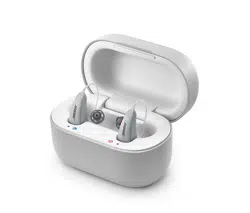
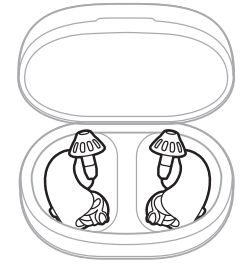
To protect the hearing aids, store them in the case with the battery doors partially open when you’re not using them.
Maintain the hearing aids
To prevent damage and preserve sound quality, it’s important to regularly maintain the hearing aids and replace components.
Moisture
Moisture can damage the hearing aids or cause them to fail.
Keep the hearing aids dry
• Never wear the hearing aids in the shower, bath, or pool.
• Protect the hearing aids from prolonged exposure to rain. • Never apply hairspray, cologne, creams, or other cosmetics while wearing the hearing aids.
If the hearing aids become excessively wet
• Open both battery doors, remove the batteries, and leave the hearing aids and batteries in the case overnight with the lid open to dry.
• To thoroughly dry the hearing aids, store them in a container with desiccants or in a hearing aid drying case. This can help if you live in a humid climate or sweat often.
Daily maintenance
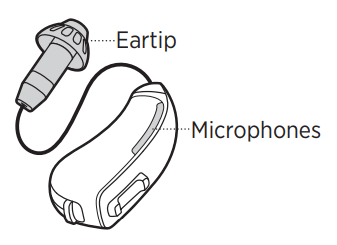
Maintain the eartips and microphones: After removing the hearing aids, remove earwax and debris from the eartips and microphones using the provided hearing aid brush or a soft, lint-free cloth.
Weekly maintenance
Maintain the cable and hearing aid body: Wipe the outside of the cable and hearing aid body with a soft, lint-free cloth.
Quarterly maintenance
Replace the eartips: Replace the eartips every 3 months (see page 56). If they become discolored or stiff or if they fall off when you remove the hearing aids, replace them immediately
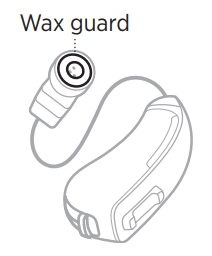
Replace the wax guards: Replace the white plastic screens at the ends of each speaker every 3 months. To order replacement wax guards, call the Bose Hear Better Team
If the wax guards get blocked by earwax buildup or you notice that the hearing aids sound quieter than usual, replace the wax guards and the eartips immediately.
Yearly maintenance
Replace the cables: Replace the cables every year (see page 56). If the hearing aids sound quieter than usual or if audio is crackly or intermittent, replace the cables immediately
Replacement components
Replacement components can be ordered through the Bose Hear Better Team.
• Open or closed eartips, size 1, 2, or 3
• Carrying case
• Batteries, size 312
• Cable, size 1, 2, or 3
• Hearing aid brush
Update the hearing aids
The hearing aids update automatically when connected to the Bose Hear app. Follow the app instructions.
Troubleshooting
Try these solutions first
If you experience problems with the hearing aids, try these general solutions first:
• Open and fully close the battery doors
• Replace the batteries
• Download the Bose Hear app and run available software updates
• Make sure that your phone supports Bluetooth Low Energy (also called Bluetooth Smart). All phones that are compatible with iOS 10 and newer and most phones that are compatible with Android™ 5.0 and newer support Bluetooth Low Energy.
• If Bluetooth communication is disrupted while in proximity to a Wi-Fi® device or other 2.4 GHz ISM band emitter, move away from the potential interfering source by at least 10 feet (3 meters) to help regain connectivity.
• If your hearing aids do not operate as intended, including with the Bose Hear app, please ensure that they are paired with the appropriate phone
Other solutions
If you could not resolve your issue, see the table below to identify symptoms and solutions to common problems. If you are unable to resolve your issue, contact the Bose Hear Better Team.
Problem
Solutions
Hearing aids don’t power on (no amplification)
Make sure both battery doors are fully closed. You should feel two clicks.
While wearing the hearing aids, close the battery doors and wait 3 seconds. If you hear a tone, the hearing aids are powering on (see page 31).
Make sure both batteries are inserted correctly (see page 20).
Clear any debris or grease from the batteries.
Replace the batteries (see page 20).
Unable to locate the Bose Hear app
Type app Bose/SC into the address bar of your phone’s web browser, not a search bar or separate search application.
On your phone, open the App Store or Google Play store and search for “Bose Hear.”
note: There are many apps from Bose. Make sure to download the Bose Hear app.
Hearing aids don’t connect to phone
On your phone:
• Turn the Bluetooth feature off and then on.
• Delete the hearing aids from the Bluetooth list on your phone. Connect again.
Open and fully close both battery doors (see page 31). This causes the hearing aids to enter Bluetooth pairing mode for 3 minutes. If it takes longer than that to connect them to your phone using the app, repeat to reset the timer.
Move your phone closer to the hearing aids and away from any interference or obstructions.
If another previously-connected phone is within range, turn the Bluetooth feature off on that phone.
Clear the hearing aid device lists (see page 49).
Connect the hearing aids to a different phone (see page 19).
Replace the batteries (see page 20).
Bose Hear app doesn’t work on phone
Restart your phone.
Make sure the Bose Hear app is compatible with your phone. Visit the Bose Hear page on the App Store or Google Play store for compatibility information.
Uninstall the Bose Hear app on your phone, then reinstall the app (see page 19).
World Volume doesn’t adjust
Try adjusting World Volume using the hearing aid controls (see page 32).
Try adjusting World Volume using the Bose Hear app (see page 33).
Open and fully close both battery doors (see page 31).
Poor sound quality
Clear any debris or wax buildup from the eartips and microphones (see page 53).
Dry the hearing aids: Open both battery doors, remove the batteries, and leave the hearing aids and batteries in the case overnight with the lid open (see page 53).
Replace the batteries (see page 20).
Make sure that the Ear Balance controls are adjusted to your desired settings (see page 37).
Replace the wax guards (see page 55).
Replace the cables (see page 56).
Hearing aids aren’t loud enough (not enough amplification)
Increase World Volume (see page 32).
Clear any debris or wax buildup from the eartips and microphones (see page 53).
If you’re using open eartips, try replacing them with the same size closed eartips (see page 76).
Replace the wax guards (see page 55).
Replace the cables (see page 56).
Hearing aids are uncomfortable
Make sure that you’re putting the hearing aids on correctly (see page 24).
Choose another eartip size (see page 75). You may need a different size for each ear.
Check whether you need a different size cable (see page 29).
It can take time to get used to the feeling of wearing hearing aids. If necessary, you can wear them for a few hours at a time to start (see page 41).
Hearing aids falling out of ears
Make sure that you’re placing the eartips in your ears correctly. Remember to insert each eartip deep into your ear canal until the cable is flat against your ear and the eartip feels secure (see page 24).
Choose another eartip size (see page 75). You may need a different size for each ear.
Eartips falling off
Securely fasten the eartips to the speakers (see page 77).
Replace the eartips (see page 56).
Eartips discolored or stif
Replace the eartips (see page 56)
Eartip stuck in ear
Contact a hearing health care professional for removal.
Lost eartips
Contact the Bose Hear Better Team for replacement eartips (see page 56).
Cable detached from hearing aid
Refer to the replacement cable quick start guide for instructions on reattaching the cable
Hearing aids whistle
Make sure that you’re placing the eartips in your ears correctly. Remember to insert each eartip deep into your ear canal until the cable is flat against your ear and the eartip feels secure (see page 24).
Choose another eartip size (see page 75). You may need a different size for each ear.
If you’re using open eartips, try replacing them with the same size closed eartips (see page 76).
Decrease World Volume (see page 32).
Can’t hear phone call
On your phone, increase the volume.
If you’re in private, turn on speakerphone and hold your phone in front of you.
Make sure you’re not pressing your phone too hard against your ear. This can block the hearing aid microphones and cause the call to sound muffled.
Try holding your phone so that the phone speaker is slightly above and behind your ear. This puts it closer to the hearing aid microphones.
note: It can take some practice to learn how to hold your phone relative to the hearing aid. Experiment with different positions to find what works best for you.
Hearing aids whistle when on the phone
Tilt your phone speaker slightly away from the hearing aid on that ear.
Hearing aids sound different from each other
Adjust World Volume (see page 32). This syncs audio settings between the hearing aids.
Sound of own voice is too loud
Practice listening to new sounds and talking with a friend in a familiar environment before you use the hearing aids for conversation (see page 41).
If you’re using closed eartips, try replacing them with the same size open eartips (see page 76).
Eartip troubleshooting
Check if the eartips are too big or too small
If one or both eartips match the descriptions below, try a different eartip size (see page 75).
Too big:
• The eartip feels painful or uncomfortable.
• It’s difficult to insert the eartip into your ear canal.
• The bend in the cable close to the eartip doesn’t sit flat against your ear.
Too small:
• The eartip feels loose or insecure.
• If you shake your head and open your mouth, the eartip feels painful or moves.
Correct size:
• The eartip feels secure, though it may feel strange at first.
• If you shake your head and open your mouth, the eartip feels comfortable and doesn’t move.
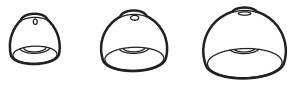
Eartip sizes
The eartip size is marked on the eartip packaging as size 1, size 2, or size 3.
Size 2 open eartips come attached to the hearing aids.
note: Eartip size doesn’t relate to cable length. You might have a different eartip size and cable size for the same hearing aid.
Try another eartip size
If the eartips don’t feel comfortable or secure, choose another eartip size.
note: You may need to try all three eartip sizes or use a different size eartip for each ear.
Step 1: Based on the sizing information on page 73, if the default size 2 eartips are too big, try size 1. If they’re too small, try size 3 (see page 74).
Step 2: From the eartip packaging, select the pair of eartips that matches your current eartip type (see page 76).
Step 3: Change the eartips (see page 77).
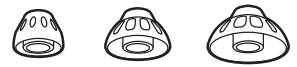
Eartip types
Within each eartip size, there are two types of eartips: open and closed.
Open eartips (attached to the hearing aids) help your voice sound more natural. They have holes around the center of the eartip.
Closed eartips provide more bass and allow you to comfortably use a higher World Volume setting.
Try another eartip type
During first-time setup, use the default open eartips and focus on finding the correct size for each ear.
After using the hearing aids for some time, though, if you feel like you need more amplification or hear whistling at higher World Volume settings, consider trying closed eartips.
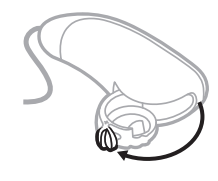
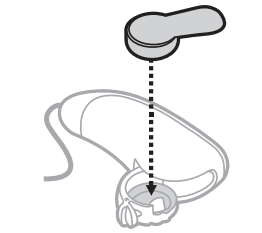
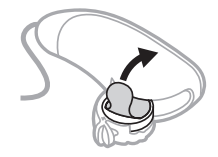
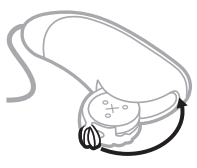
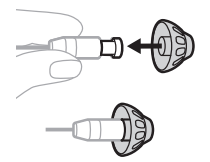
Change the eartips
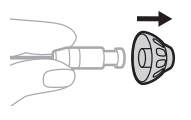
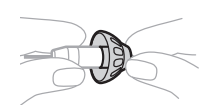
Step 1: Hold the speaker and firmly pull the current eartip off.
Step 2: Choose a new eartip size (see page 75) and/or eartip type (see page 76).
Step 3: Align the opening of the new eartip with the speaker and slide the eartip onto the speaker.
Step 4: Gently tug the eartip to make sure that it’s securely fastened on the speaker.
Step 5: Repeat steps 1 – 4 for the other hearing aid, if necessary.
Step 6: Put on the hearing aids (see page 24).
Step 7: Check your fit (see page 28).
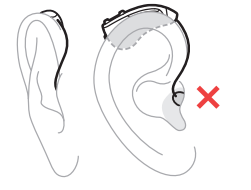
Cable size troubleshooting
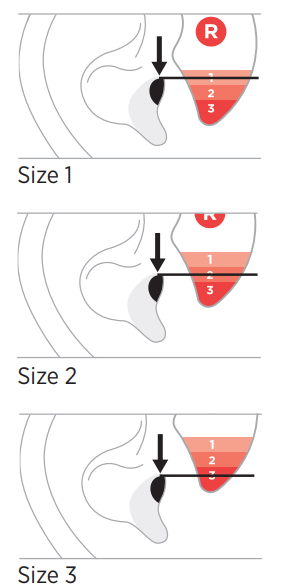
Check if the cables are too long or too short
If one or both cables match the descriptions below, use the provided cable sizing tool to measure your exact size (see page 81). If you need a different size, you can order a free replacement.
Too long:
• The cable bends away from your head or hangs above your ear.
• The hearing aid body sits far back behind your ear or feels loose.
Too short:
• The cable feels tight or pulls the eartip partially out of your ear canal.
• If you look straight in a mirror, you see the hearing aid body over the top of your ear.
Correct size:
• If you shake your head, the hearing aid body feels secure.
• The cable runs close to the side of your head.
• The hearing aid body sits near the top of your ear.
Measure your cable size
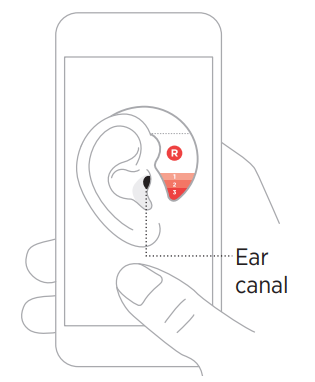
Step 1: Ask a friend or family member to help (recommended). They can make things easier by checking that the cable sizing tool is on your ear correctly and taking a photo for you.
Step 2: Locate the cable sizing tool provided in the box.
You’ll use it to measure which cable size you need for each ear.
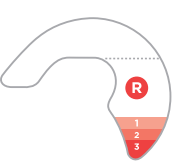
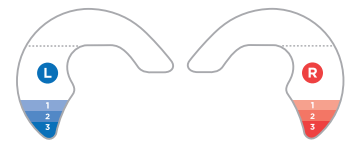
Step 3: Compare the red and blue sides of the tool.
Use the red side to measure your right ear and the blue side to measure your left ear.
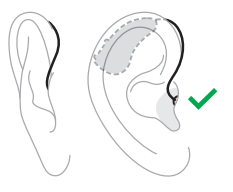
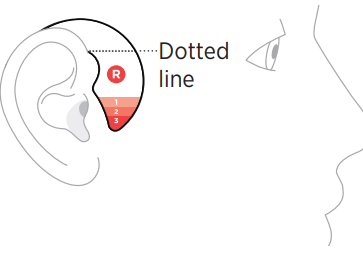
Step 4: Place the tool on your right ear. It should hook around the front of your ear and lie flat against the side of your head.
Make sure that the dotted line near the top of the tool is level and aligned with the top of your ear.
Step 5: Ask a friend or family member to take a photo of your ear.
Make sure that you can see your ear canal in the photo.
note: If you’re taking the photo yourself, rest your elbow on a surface and hold your phone facing you. Position yourself so that you can see your face in your phone’s front-facing camera display. Then, turn your head and take a photo of your ear.
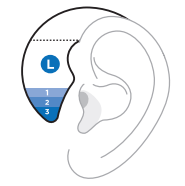
Step 6: Look at the photo and see which colored band aligns with the top of your ear canal.
The number in the band is the cable size you need.
Step 7: Repeat steps 4 – 6 for your left ear.
note: You may need a different cable size for each ear.
Step 8: Compare your measurements for each ear.
• If you need size 2: Size 2 cables come attached to the hearing aids, so you already have the correct size for that ear.
• If you need size 1 or 3: Order a free replacement cable through the Bose Hear Better Team.

 Too big:
 Correct size:
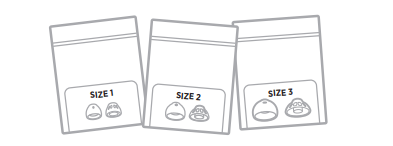
 Too long:
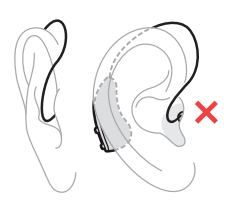
 Correct size: