

Bar code
ES-
Read the manual carefully and ensure you have fully understood
its contents before operating this device for the first time.
English
I
Important Safety Precautions
Disposal of Used Electrical & Electronic Equipment
This symbol alerts user about the presence of a
dangerous voltage not isolated inside the product
which can be sufficiently powerful to constitute a
risk of electrocution.
Do not open the back cover.
In no case the user is allowed to operate inside the TV set.
Only a qualified technician is entitled to operate.
This symbol alerts user about the presence of
important operating instructions and maintenance
in the document enclosed in the package.
ATTENTION
RISK OF SHOCK
ELECTRIC
Packaging and electrical goods should be recycled appropriately, and not treated as household
waste. Please dispose of this equipment at your applicable collection point for the recycling of
electrical & electronic equipment waste. By ensuring the correct disposal of this product, you
will help prevent potentially hazardous to the environment and to human health, which could
otherwise be caused by unsuitable waste handling of this product. The recycling of materials
will help conserve natural resources. Please do not therefore dispose of your old electrical and
electronic equipment with your household waste. For more detailed information about recycling
of this product, please contact your local city office, your household waste disposal service or
the shop where you purchased the product.
Warning
Never place a television set in an unstable location. A television set may fall, causing serious personal injury
or death. Many injuries, particularly to children, can be avoided by taking simple precautions such as:
Using stands recommended by the manufacturer of the television set.
Only using furniture that can safely support the television set.
Ensuring the television set is not overhanging the edge of the supporting furniture.
Not placing the television set on tall furniture (for example, cupboards or bookcases) without anchoring
both the furniture and the television set to a suitable support.
Not placing the television set on cloth or other materials that may be located between the television set and
supporting furniture.
Educating children about the dangers of climbing on furniture to reach the television set or its controls.
If your existing television set is being retained and relocated, the same considerations as above should be
applied.
II
Important Safety Precautions
Please read the following safeguards for your TV and retain for future reference.
Always follow all warnings and instructions marked on the television.
1. A note about safety and operating instructions
Read and follow all safety and operating instructions, and retain them safely for future reference.
2. Heed Warnings
Adhere to all warnings on the appliance and in the operating instructions.
3. Cleaning
Unplug the TV from the wall outlet before cleaning. Do not use liquid, abrasive, or aerosol cleaners. Cleaners
can permanently damage the cabinet and screen. Use a lightly dampened cloth for cleaning.
4. Wall Mount Bracket
Wall mount bracket is only available for some models. If wall bracket is not supplied with this product, you can
buy it at the local market.
Please refer to the Installing the Wall Mount Bracket page of Quick Setup Guide for dimensions.
5. Water and Moisture
Avoid dripping or splashing of liquids onto the product. Objects filled with liquids, such as vases, should not be
placed on the product.
6. Setting
Do not place this TV on an unstable cart, stand or table. Placing the TV on an unstable base can cause the
TV to fall, resulting in serious personal injuries as well as damage to the TV. Use only a cart, stand, bracket or
table recommended by the manufacturer or salesperson.
7. Ventilation
Slots and openings in the cabinet are provided for ventilation, to ensure reliable operation of the TV and to
protect it from overheating. Do not cover the ventilation openings in the cabinet and never place the set in a
confined space such as built-in cabinet unless proper ventilation is provided. Leave a minimum 10cm gap all
around the unit.
8. Power Source
This TV should be operated only from the type of power source indicated on the marking label. If you are not
sure of the type of power supplied to your home, consult your appliance dealer or local power company.
9. Power-Cord Protection
Power- supply cords should be routed so that they are not likely to be walked on or pinched by items placed
upon or against them, paying particular attention to cords at plug, wall outlets, and the point where they exit
from the TV. MAIN plug is used as the disconnect device, the disconnect device shall remain readily operable.
10. Lightning
For added protection for this TV during a lightning storm, or when it is left unattended and unused for long
periods of time, unplug it from the wall outlet and disconnect the antenna or cable system. This will prevent
damage to the TV due to lightning or power-line surge.
Safeguards

III
Important Safety Precautions
11. Power Lines
An outside antenna system should not be located in the vicinity of overhead power lines or other electric light
or power circuits, or where it can fall into such power lines or circuits. Where installing an outside antenna
system, extreme care should be taken to keep from touching such power lines or circuits as contact with them
might be fatal.
12. Overloading
Do not overload wall outlets and extension cords as this can result in a risk of fire or electric shock.
13. Object and Liquid Entry
Never push objects of any kind into this TV through openings as they may touch dangerous voltage points or
short-out parts that could result in fire or electric shock. Never spill liquid of any kind on or into the TV.
14. Outdoor Antenna Grounding
If an outside antenna or cable system is connected to the TV, be sure the antenna or cable system is
grounded so as to provide some protection against voltage surges and built-up static charges.
15. Servicing
Do not attempt to service this TV yourself as opening or removing covers may expose you to dangerous
voltage or other hazards. Refer all servicing to qualified service personnel.
16. Damage Requiring Service
Unplug the TV from the wall outlet and refer servicing to qualified service personnel under the following
conditions:
(a) When the power - supply cord or plug is damaged.
(b) If liquid has been spilled, or objects have fallen into the TV.
(c) If the TV has been exposed to rain or water.
(d) If the TV does not operate normally by following the operating instructions. Adjust only those controls that
are covered by the operating instructions as an improper adjustment of other controls may result in damage
and will often require extensive work by a qualified technician to restore the TV to its normal operation.
(e) If the TV has been dropped or the cabinet has been damaged.
(f) When the TV exhibits a distinct change in performance - this indicates a need for service.
17. Replacement Parts
When replacement parts are required, be sure the service technician has used replacement parts specified by
the manufacturer or have the same characteristics as the original part. Unauthorized substitutions may result
in fire, electric shock or other hazards.
18. Safety Check
Upon completion of any service or repair to the TV, ask the service technician to perform safety checks to
determine that the TV is in safe operating condition.
19. Heat
The product should be situated away from heat sources such as radiators, heat registers, stoves, or other
products (including amplifiers) that produce heat.
20. Fire
The product should be situated away from naked flame sources such as lighted candle.
21. Off-gassing
The TV smells of plastic is normal and will dissipate over time.

1
Contents
Live TV ............................................................................................................................................................. 3
Channel Scan ...................................................................................................................................................3
Channel Edit .....................................................................................................................................................3
Channel List......................................................................................................................................................4
Favourite...........................................................................................................................................................5
EPG (GUIDE) ...................................................................................................................................................6
PVR ..................................................................................................................................................................7
Recording List...................................................................................................................................................8
Timeshift ...........................................................................................................................................................9
Connection .................................................................................................................................................... 10
Establishing a Wired Internet Connection ......................................................................................................10
Establishing a Wireless Internet Connection ..................................................................................................10
Connecting Bluetooth Devices ....................................................................................................................... 11
Using HDMI&CEC ..........................................................................................................................................12
Connecting a Digital Audio System to Use eARC/ARC .................................................................................. 13
Connecting an AV device, a PC or a Game Console with an HDMI cable .....................................................13
Connecting USB Devices ...............................................................................................................................14
Multi-screen ..................................................................................................................................................15
Screen Sharing ............................................................................................................................................... 15
Content Sharing..............................................................................................................................................15
Smart Functions ...........................................................................................................................................16
Getting Familiar with the Home Screen .......................................................................................................... 16
Apps ...............................................................................................................................................................17
Using Far-Field Google Assistant to Control your TV ..................................................................................... 18
Installing Mobile App to Control your TV ........................................................................................................18
Media .............................................................................................................................................................. 19
Picture and Sound ........................................................................................................................................ 22
Adjusting the Picture Quality ..........................................................................................................................22
Adjusting the Sound Quality ...........................................................................................................................25
Accessibility and System ............................................................................................................................29
Using Parental Control ...................................................................................................................................29
Configuring Device Preferences Settings ....................................................................................................... 29
Configuring Advanced System Settings .........................................................................................................31
Troubleshooting ...........................................................................................................................................34
Picture Problem ..............................................................................................................................................34
2
Sound Problem ............................................................................................................................................... 34
Picture and Sound Problem............................................................................................................................34
Internet Problem .............................................................................................................................................35
Recording/Timeshift Function Isn’t Working ...................................................................................................35
My File Won’t Play ..........................................................................................................................................35
Other Issues ...................................................................................................................................................36
Disclaimer:
Images throughout this document are for illustrative purposes only and may differ from the actual product.
Parts of the software function change with the system upgrade..
Contents
3
Live TV
Channel Scan
Auto Scan
INPUT
>
Channels
If no TV channels were saved before, you will be prompted to do a channel search.
or
In Live TV,
/ /
>
Channels
>
Auto Scan
Automatically scan for channels to view programmes from your TV source.
Manual Scan
In Live TV, / /
>
Channels
>
Advanced Settings
•
DTV Manual Scan
Manually scan for programmes in digital signals.
•
ATV Manual Scan
Manually scan for programmes in analogue signals.
Channel Edit
In Live TV, / /
>
Channels
>
Channel Edit
Manually edit the channel list order to your preference.
Editing channels
Press
ok
button on the selected channel then a checkbox will appear. You can select multiple channels at
the same time to move or delete.
Delete: Press
>
button to delete the selected channel.
Move: Press
<
button to move the selected channel.
NOTE
• Moving the channels could be restricted in some models/countries/regions.
• If channel scan has LCN option, LCN should be set to Off.
Restore: Press
R/G/Y/B
/ / button to call out the four-color menu to select the
RED
icon or press
the
RED
button to enter the list of deleted channels. Press
<
button to restore the deleted channel.
123
Go to: Select a channel by selecting the position number in this list.
Cable
1 BBC
2 3D-HD
3 DX-HD
Go to
Deleted CH List
123
Move
Delete
Edit the channels
4
Live TV
Editing favourite channels
You can add, move, and delete favourite channels
.
Exporting to USB
Allow you to export the current channel list to a USB storage device.
Importing from USB
Allow you to import a previously exported channel list via a USB storage device.
Channel List
Displaying the channel list
In Live TV, press
ok
or
CH.LIST
button on the remote to display the Channel List menu.
Entering the sub-menu of channel list
ok
or
CH.LIST
>
<
Channel list menu
Cable
1 BBC
2 3D-HD
3 DX-HD
Add to Favourite
FAV1
CH List Select
Channel List
Search
Edit
Sub-menu
Introducing the sub-menu
1. Channel List
ok
or
CH.LIST
>
<
>
Channel List
All
Display the channels that have been automatically searched.
Favourite List
Display favourite lists 1 to 4. (Four favourite lists at most can be added).
Add fav list
Add an additional favourite list.
2. Search
Quick access to channels.
3. Edit
Edit the channel list.
5
Favourite
Viewing your favourite list
Press
ok
or
CH.LIST
button to call out the Channel list, and the channel list appears on the right side of the screen.
A heart-shaped icon will appear next to your favourite channel.
Editing the favourite list
There are 2 ways to enter the edit menu:
ok
or
CH.LIST
>
<
>
Edit
>
Favourite1-Favourite 4
or
/ /
>
Menu
>
Channels
>
Channel Edit
>
Favourite1-Favourite 4
The Edit Favourites screen appears.
Channel Management
Cable
Favourite 1
Export to USB
Import from USB
• Adding channels to a favourite list
Select the
Add channels
to add the selected channel to the favourite list.
• Moving channels in a favourite list
Select a channel in a favourite list, press
<
button to move it.
• Deleting channels from a favourite list
Select a channel in a favourite list, press
>
button to remove it.
Favourite 1
Add channels
1 BBC
2 3D-HD
123
Go to
Move
Delete
NOTE
• These steps should be operated under Channels inputs.
• Before you edit the favourite lists, complete channel scan first.
• You can add channels from various reception types to the favourite list.
Live TV
6
EPG (GUIDE)
It provides convenience to check TV programmes that will be available in the next 7 days. The information
displayed by the EPG (GUIDE) is made available by the commercial television networks for digital channels
only. The EPG (GUIDE) also provides a simple way to record your favourite programmes and a reminder
function
which can switch channel automatically at scheduled time so that you will not miss programmes of
interest.
(The availability and amount of programme information will vary, depending on the particular
broadcaster).
NOTE
The EPG (GUIDE) function is only available for digital channels. Analogue channels are not supported.
In Live TV, press
EPG
/
GUIDE
button on the remote or press / /
button to enter the Menu, then choose
the
EPG (GUIDE)
to display channel information on programme guide list.
• Watch
When a current programme is selected, press the
ok
button to switch to the channel you want to see.
• PVR/Reminder
Press
>
/
>
button to select the channels. Press
<
/
>
button to select programme based on the
time
schedule.
Press
ok
button on the remote to select PVR or Reminder.
NOTE
• PVR/Reminder in the Guide(EPG) is only available for programmes that haven’t been aired yet.
• A storage device (space should be no less than 2G, transfer rate should be no less than 5MB/s) must
be attached to the television for recording purposes.
It is strongly recommended to use USB mobile hard
disk drive instead of USB flash drive as the storage device.
• The TV will record the programme even in standby mode.
• The PVR function may not be applicable in some models/countries/regions.
• Page Up/Down
Press
CH
/
CH
button to move the programme list page up/down.
• Schedule
To view a list of scheduled reminders and recordings.
Press
R/G/Y/B
/ / button on the remote to call out the colour menu to select the
RED
icon or press the
RED
button on the remote directly according to the actual remote in the accessory bag.
• Detail
To display details of the selected programme.
Press
R/G/Y/B
/ / button on the remote to call out the colour menu, select the
GREEN
icon or press
the
GREEN
button on the remote directly according to the actual remote in the accessory bag.
This function may not be applicable in some models/countries/regions
• 24-
To select programmes of the previous day.
Press
R/G/Y/B
/ / button on the remote to call out the colour menu, select the
YELLOW
icon or press
the
YELLOW
button on the remote directly according to the actual remote in the accessory bag.
• 24+
To select programmes of the next day.
Press
R/G/Y/B
/ / button on the remote to call out the colour menu, select the
BLUE
icon or press the
Live TV

7
BLUE
button on the remote directly according to the actual remote in the accessory bag.
PVR
The PVR function allows you to easily record digital television content for later viewing. The function is only
available for digital channels. To use PVR, you must connect a USB device for recording. The format of the
storage disk should be NTFS, FAT32. The PVR will not function if a data storage device has not been connected.
• Schedule Recording
Press
EPG
/
GUIDE
button
or press / /
button on your remote to access the
Menu
, and then select
EPG
(GUIDE)
.
Select the upcoming programme, press
ok
button to select
PVR
and set the appointment time and period.
The reservation is successful.
Press the
RED
button or press
R/G/Y/B
/ / button on the remote to call out the colour menu, then
select
the
RED
icon to view the scheduled recording. In the schedule recording list, you can readjust the
reservation information that has been set.
• Instant Recording
Press
>
button to select PVR.
Select a USB storage drive, the device speed will be tested if it is used for the first time.
You can manually stop recording or choose to automatically match the programme time.
• Standby Recording
If you press the power button during recording, a pop-up window appears on the screen. Select
Standby
Recording
, and the TV will go into standby mode but the recording process is still going on. If you press
power button again to wake up the TV, the recording process will not be affected. After recording, the
recorded file will be automatically saved to the disk.
• Background Recording
You can switch to an app or another source (e.g. HDMI) during recording, a pop-up window appears on the
screen. Select
Yes
to switch, and the recording process is still going on. When the recording is done,
the
recorded file will be automatically saved to the disk. If you want to manually stop recording, press
INPUT
>
Channels
to switch back to the channel that is in the recording process, and then press
>
>
ok
button to
stop.
NOTE
• The storage space of your USB device should be no less than 2G (for 15 minutes high definition video). It is
strongly recommended to use USB mobile hard disk drive instead of USB flash drive as the storage device.
• If the transfer rate of your hard disk is too slow, a pop-up notice will appear. In this case, you can use
another disk with higher speed.
• The PVR function doesn’t support analogue channels.
• The schedule recording function is not available while you are watching a programme that is currently being
broadcast.
• Some broadcasters may restrict to record the programme.
• During the recording progress, channels locked with Channel Lock (password needed) are disabled to
watch.
• The PVR function may not be applicable in some models/countries/regions.
Live TV
8
Recording List
Accessing the recording list
View the list of recorded programmes and scheduled recordings.
To enter the recording list:
>
>
Recording List
or
In
EPG (GUIDE)
, Press the
RED
button or press
R/G/Y/B
/ / to select
RED
icon, and then select
Recorded
.
Managing the recording list
>
>
Recording List
>
Recorded
You can watch or delete recorded programmes.
• Delete the recorded programme
Select
Edit
, select a recorded programme in the recording list, and press
>
button to remove it.
• Watch
Select a recorded programme in the recording list, and press
ok
button to watch it.
Recorded Scheduled
Edit
925 NPO 1 HD
Sport Tour
20:00 2020/09/23
0.4min 36.6MB
Managing the schedule recording list
>
>
Recording List
>
Scheduled
You can change scheduled recording information or cancel scheduled recordings.
• Delete the scheduled programme
Select
Edit
, select a scheduled programme in schedule list, and press
>
button to remove it.
• Edit scheduled programme
Select a scheduled programme in schedule list, press
ok
button to adjust the scheduled programme.
ScheduledRecorded
Schedule Recording
BASKETBALL
26 NPO 2 HD 20:29-20:30
Recording mode
Start Time
End Time
Repeat
Time
20 20
20 30
Once
Save Cancel
Live TV
9
NOTE
• The Recording List function is only applicable in some models/countries/regions.
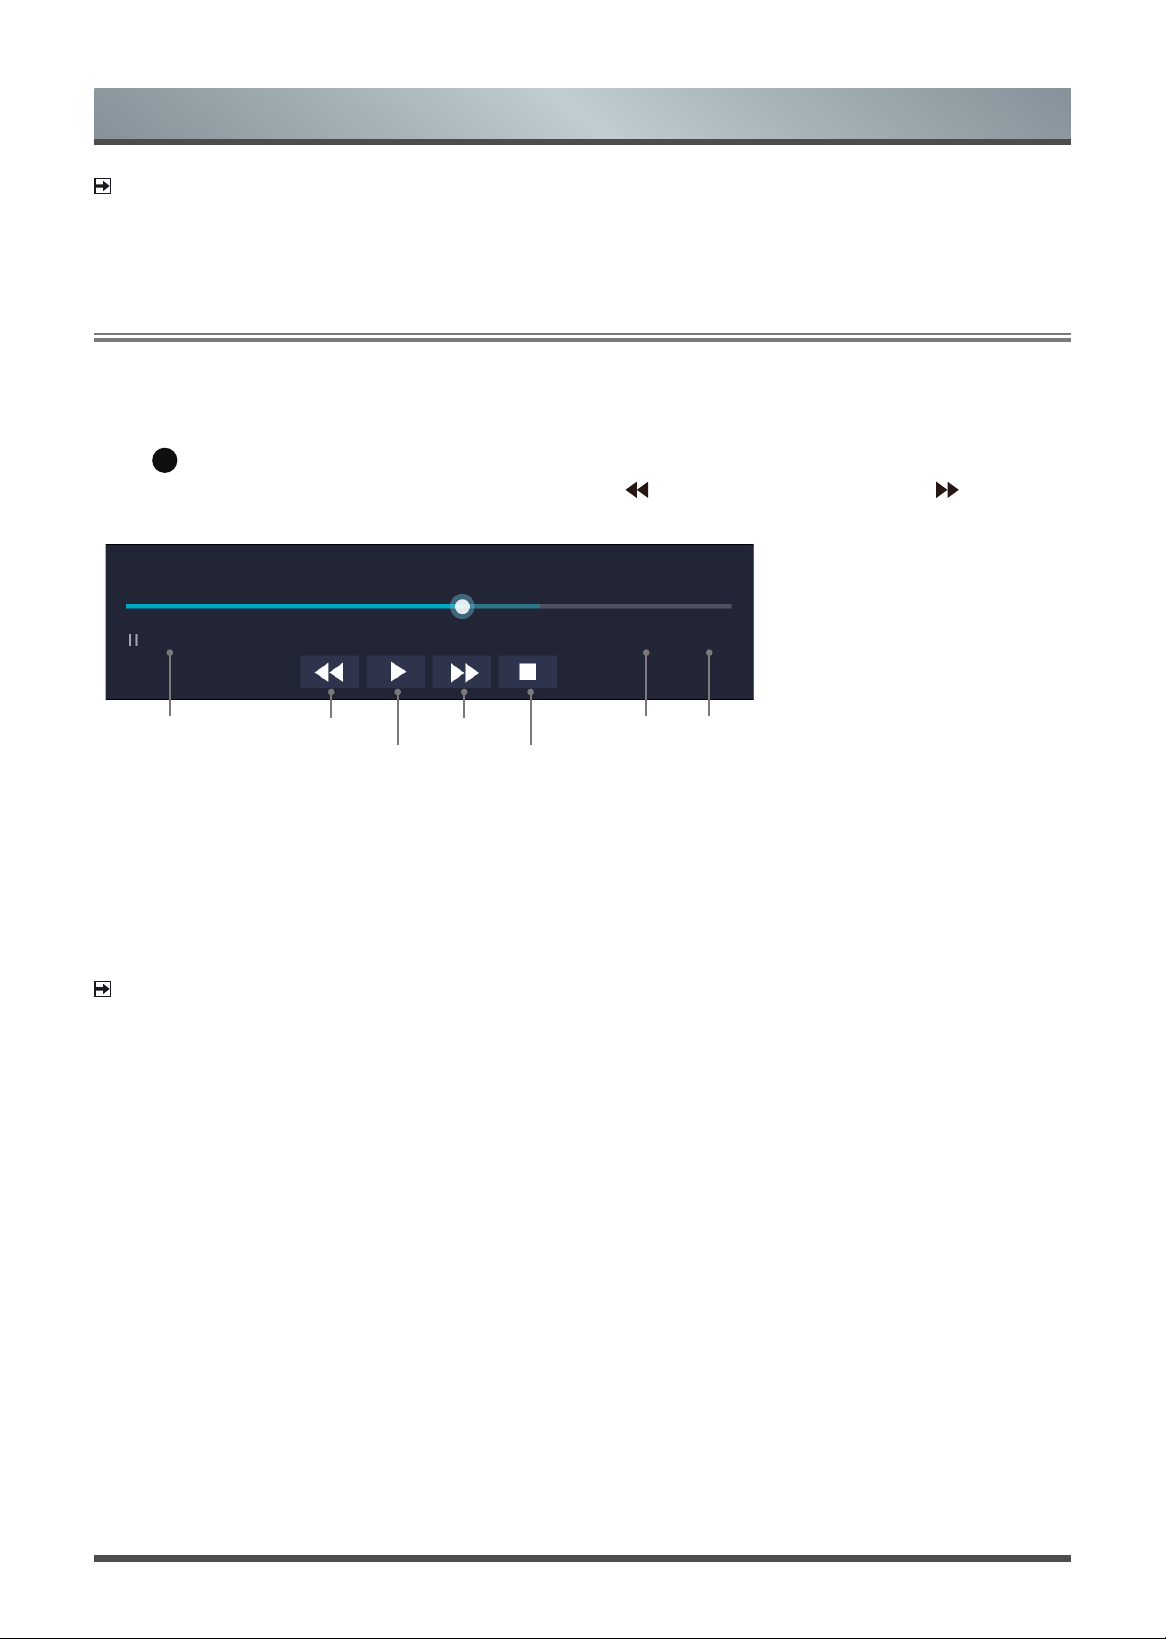
Timeshift
This option allows you to pause and rewind live TV. This function operates by recording temporarily to
a storage device. Please ensure your storage device is connected and there is enough free disk space.
Otherwise the recording will not commence.
Press
>
button on the remote
to select T.Shift and then the menu will appear, select the
II
icon to pause the
live broadcast and select the
►
icon to play. Select the icon to rewind and select the icon to fast
forward. Select the
■
icon to exit the function and watch the current broadcast.
T.Shift
-00:00:26
1 2
3
4
5
6 7
00:02:19/00:03:24
1. Rewind time 5. Stop Timeshift
2. Rewind 6. Current time
3. Pause / Play 7. Total time
4. Fast forward
NOTE
• The T.Shift function doesn’t support analogue channels.
• The storage space of the USB device should be no less than 1G. It is strongly recommended to use USB
mobile hard disk drive instead of USB flash drive as the storage device.
• The Timeshift function may not be applicable in some models/countries/regions.
Live TV
10
Connection
Establishing a Wired Internet Connection
Connecting to a wired (Ethernet) network
Press
/ /
button to select icon, and select
Network & Internet
.
To get access to the Internet in a wired way, it is recommended to use a modem or router that supports
Dynamic Host Configuration Protocol (DHCP). Modems and routers that support DHCP automatically provide
the IP address, subnet mask, gateway, and DNS, so you don't have to enter them manually. Most home
networks already have DHCP.
See the illustration below.
LAN
Modem CableLAN Cable
LAN Cable
External Modem
(ADSL / VDSL / Cable TV)
IP Sharer (Router)
(with DHCP server)
Using Wake on LAN
Press
/ /
button to select icon, select
Network & Internet
, and set
Wake on LAN
and
Wake on
Cast
to On.
Using an Ethernet connection and switching on Wake on LAN and Wake on Cast, you can turn on the TV from
the standby mode, and push content to be broadcast on the TV with an app supporting the screencast feature
in your mobile device.
NOTE
• To use this function, make sure your TV and mobile device are connected to the same network.
• Enabling this function may result in higher energy consumption.
Establishing a Wireless Internet Connection
Connecting to a wireless network
Press
/ /
button to select icon, and select
Network & Internet
>
Wi
.
To connect to an available wireless network, make sure that you have the wireless router’s SSID and
password before attempting to connect.

11
Connection
To get access to the Internet in a wireless way:
1. Turn on your Wi-Fi.
2. The list of networks will display automatically.
3. Select a wireless network from the list, input the password.
4. If the network connection does not appear in the list, select
See all
to display all the list, or select
Add new
network
to input a Wi-Fi name, select the type of security mode, and enter password.
Using Wake on Wireless Network
Press
/ /
button to select icon, select
Network & Internet
, and set
Wake on Wireless Network
and
Wake on Cast
to On.
Using a wireless network connection and switching on Wake on Wireless Network and Wake on Cast, you can
turn on the TV from the standby mode, and push content to be broadcast on the TV with an app supporting the
screencast feature in your mobile device.
NOTE
• To use this function, make sure your TV and mobile device are connected to the same network.
• Enabling this function may result in higher energy consumption.
Connecting Bluetooth Devices
Connecting a Bluetooth device
To pair a Bluetooth device, such as Bluetooth headphones, speakers, keyboards, mouse or even moblie
devices:
1. Before pairing your Bluetooth devices, make sure they're in pairing mode and put devices within range of
the TV. To put your Bluetooth devices in pairing mode, refer to the user manual of devices.
2. Press
/ /
button to select icon, and select
Remotes & Accessories
>
Add accessory
to turn
on the pairing mode.
A list of available Bluetooth devices will be displayed.
3. Select the desired device from the list, then follow the onscreen instructions.
If you are prompted to enter a passcode, refer to the instruction in user manual of the device.
After pairing is completed, the device is connected and is stored to the TV.
NOTE
• You need to unpair a paired device first if the maximum number of paired devices was reached.
Listening to the TV through Bluetooth devices
1. Pair the Bluetooth audio devices using the TV’s Bluetooth function. Refer to the user manual of your audio
device such as Bluetooth speaker, sound bar and headphones for detailed connection steps and usage.
2. Press
/ /
button to select icon, select
Sound
>
Audio Output
, and then select the
Bluetooth
option to listen to the audio through bluetooth devices.
NOTE
• Compatibility issues may occur depending on the Bluetooth device.
• The TV and Bluetooth device may disconnect depending on the distance between them.

12
Using HDMI&CEC
Use the TV's remote to control external devices that are connected to the TV by an HDMI cable. The external
devices need to support HDMI&CEC function.
Connecting an external device through HDMI&CEC function
Press
/ /
button to select icon, and select
Device Preferences
>
Inputs
>
HDMI control
.
1. Set
HDMI control
to On.
2. Connect an HDMI&CEC compliant device to the TV.
3. Turn on the connected external device. The device will be connected to the TV automatically. After
connection is finished, you can access the menu of the connected device on your TV screen using your TV
remote and control the device.
Enabling device auto power off
Press
/ /
button to select icon, and select
Device Preferences
>
Inputs
>
Device auto power
off
.
Set to On to turn off CEC compatible external devices when the TV is turned off.
Enabling TV auto power on
Press
/ /
button to select icon, and select
Device Preferences
>
Inputs
>
TV auto power on
.
Set to On to turn on the TV when CEC compatible external devices is turned on.
Using HDMI 2.0 Format function
Press
INPUT
button on your remote to select
HDMI
, and then press / /
button to select
HDMI 2.0
Format
.
Please select the Enhanced format if your HDMI device supports 4K HDR and above. If it does not support 4K
HDR, please select Standard format.
NOTE
• HDMI cables must be used to connect HDMI&CEC compatible devices to your TV.
• The HDMI&CEC feature of the connected device must be turned on.
• If you connect an HDMI device that is not HDMI&CEC compatible, all the HDMI&CEC control features do
not work.
• Depending on the connected HDMI device, the HDMI&CEC control feature may not work.
• The HDMI&CEC feature supports One Touch Play, Routing Control, System Standby, Device OSD Name
Transfer, Remote Control Pass Through, Give Device Power Status, System Audio Control.
Connection
13
Connecting a Digital Audio System to Use eARC/ARC
If you’d like to use the Enhanced Audio Return Channel (eARC) / the Audio Return Channel (ARC) feature to
send sound from the TV back down an HDMI cable to a digital sound system, you can connect it to the HDMI
(eARC/ARC) port of your TV.
HDMI cable
(not included)
HDMI
eARC/ARC
HDMI
By using this feature, you can also control the sound system with your TV remote instead of using the remotes
for each device.
After the connection:
1. Power on the sound system.
2. Press
/ /
button to select icon, and select
Sound
>
Audio Output
>
eARC
/
ARC
.
If the device support eARC function, first select
Sound
>
eARC
to set it to On.
NOTE
• It works only when the TV is connected to the audio receiver that supports the eARC/ARC function.
• If the device has an Input Selector feature then make sure to change it to TV.
• When this port is used for eARC/ARC function, it can be used as signal input when DVD is connected to
an amplifier and the amplifier is connected to the TV at the same time. (Some amplifiers may not support
series connection.)
Connecting an AV device, a PC or a Game Console with an HDMI cable
You can connect an AV device, a PC or a Game Console with an HDMI cable.
HDMI cable
(not included)
HDMI
HDMI
DVD/Blu-Ray/AV receiver/
Set-top Box/Game Console
PC
After the connection:
1. Power on the device.
2. Press
INPUT
button on your remote, select the corresponding
HDMI
as the input source.
NOTE
• Refer to the
"
Quick Setup Guide
"
for more connection information.
• Some devices such as DVD player require HDMI signal to be set to output in the device’s settings. Please
Connection
14
consult your device’s user manual for instructions.
• If there is no sound from your TV, change the device's audio settings.
Connecting USB Devices
Connect the USB devices such as hard drives, USB sticks and digital cameras for browsing photos, listening
to music.
USB
• Support the USB disk 4G, 8G, 16G, 32G, 64G, 128G and other common market size, and 8T hard drive is
currently supported.
• Support format: NTFS, FAT32.
• Certain digital cameras may not be compatible with the TV.
Connection

15
Multi-screen
Screen Sharing
Mirror content from your mobile device to the TV. View videos, photos and more from your device on your TV
screen.
/
/
>
Apps
>
Screen Sharing
• Turn on the casting function of your Android/Windows10 device.
The setting icon may vary depending on the device. The feature may be called “Wireless display”, “Smart
view”, “Wireless projection”, etc.
• Find the TV name in the searching list of your device and select it.
Wait for the connection progress to complete and the content on your device will be displayed on the TV.
NOTE
• Some mobile devices may not support casting.
Content Sharing
Share videos, music or pictures from your Android/iOS/PC device to the TV screen.
Press
/ /
button to select icon, select
Network & Internet
, and select
Content Sharing
.
• Turn on the contents sharing function of your Android/iOS/PC device.
• Find the TV name in the searching list of your device and select it.
Wait for the connection progress to complete and select the content you want to share.
NOTE
• TV and your Android/iOS/PC device need to connect to the same network.
• Some devices may not support contents sharing function. If your device doesn’t support contents sharing,
you can download an app that supports the function.
Mirror content from
your
device

16
Getting Familiar with the Home Screen
Smart Functions
The simple design of the Home screen menu makes it easy to navigate. And you can easily add or delete
applications in the Home interface according to your needs.
To access the Home screen, press the / / button on your remote and use the D-pad to make your
selection.
To exit the Home screen, press
INPUT
button on your remote or use the D-pad to move the
cursor to
Inputs icon on the top of the
screen, press
ok
button to enter, and select your desired input source.
Indicators and icons on the top of the Home screen
• Google Assistant
You can search movies, adjust volume, and more by speaking.
• Google Search
You can search movies, adjust volume, and more by typing.
• Notifications
Notifications can come from the system, an external device, an application, the media player, etc.
• Inputs
Select the Input source depending on the device you have connected to your TV.
• Network & Internet
You can set up the Network & Internet.
• Settings
Settings lets you configure the TV, set app options, add accounts, and change other preferences.
• Time
You can always view the current time on the Home screen.
Names of sections that appear on the Home screen
The Home screen displays the following section:
• Apps
This is the location where you have access to all the apps on your TV. You can enjoy a wide range of
services including video streaming.
• Play Next
You can select types of content for play next
.
You can also manually add a programme to play next by long-pressing on a programme in the Home
screen.
• Recommended content
Here the premium content will display on the screen, and you can quickly enter contents that you want.
Managing apps on the apps row
Select an app on the apps row you want to open, remove or move, and long press
ok
button to manage.
If the favourite app is not on Home screen, you can add app to the apps row via the Apps page. Select your
favourite app and long press
ok
button, and then select
Add to favourites
.

17
Smart Functions
Apps
/ / >
Apps
Numerous factory-installed apps are available for you to choose for your entertainment preferences.
Installing an app
To install an app:
1. / / >
Apps
>
Get more apps
>
Google Play
.
2. Use the navigation buttons on your remote to select the app that you want to install.
3. Select the
Install
.
The selected app is installed on the TV.
NOTE
• To use this function, the TV must be connected to the Internet.
• Adding apps is free, but it might cost you money when using some apps.
Managing installed apps
• Removing an app
You can only delete apps that you’ve installed to the TV. Factory-installed apps can not be deleted.
To delete an app:
1. From the Apps screen, use the navigation buttons on your remote to
select the app that you want to
remove. Long press the
ok
button.
2. Select
Uninstall
.
3. A dialogue message displays and asks whether you want to uninstall this app. Press the
ok
button to
confirm and the icon is removed from the apps screen.
NOTE
• If an app is deleted, the information related to that app is also removed.
• Moving app icons around
To move an app:
1. From the apps screen, use the navigation buttons on your remote to select the app that you want to
move. Long press the
ok
button.
2. Select
Move
.
3. Use the navigation buttons on your remote to move the location of app. Press the
ok
button to confirm.

18
The Google Assistant can answer your questions or help you change TV configuration.
Before using this function, connect the TV to the Internet and sign in your Google account.
Select /
icon on the top of Home screen and follow the onscreen instructions to complete sign in.
How to use the Google Assistant function via the control button on the TV
1. Turn on the build-in microphone of far-field Google Assistant on the TV.
2. Start a conversation by saying “OK Google” or “Hey Google”, and the dialogue bar appears at the bottom of
the TV screen. At the same time, indicator lights illuminate.
3. Continue speaking, such as “What’s the weather” or “Volume up”.
Screenless Mode
You can talk to the Google Assistant even when the screen is off.
In Screenless Mode, the Google Assistant is always available to help even when the screen is not on. Just say
“OK Google” or “Hey Google” to start a conversation.
This feature will affect standby power consumption. To turn it off, go to / / button to select icon,
and select
Advanced System
>
Support
>
Screenless Mode
.
NOTE
• The far-field Google Assistant and some of its features are only available in selected countries, regions
and languages.
Using Far-Field Google Assistant to Control your TV
Press
/ /
button to select icon, and select
Advanced System
>
Mobile App Installation
.
You can scan the Mobile App download QR code on screen to install the app on your smartphone to control
your TV, such as turning the TV on or off, typing in with your mobile's keyboard, and sharing pictures or videos
from your mobile to TV. This app is available on both Android and iOS.
To connect your TV after installing the mobile app
1. Agree with end user license, and disclaimer and privacy policies on TV. If you are not sure whether you
have agreed, press /
/
button to select icon, and select
Device Preferences
>
About
>
Legal
information
>
End User License Agreement/EULA & Privacy
to check it.
2. Make sure your mobile phone and TV are connected in the same network.
3. To use this function, switch on
Content Sharing
at
Network & Internet
>
Content Sharing
.
4. Open the moblie app and select the TV device you want to connect.
5. Enter the PIN code on the mobile phone, and the connection is established.
Installing Mobile App to Control your TV
Smart Functions

19
Smart Functions
Media
Media is a central location for you to view or listen to different types of content, such as photos, music and
movies. You can view media content through the following methods:
• A USB thumb drive or hard drive
• Compatible mobile phone, tablet or other personal devices: you can stream movies, music and photos that
are stored on compatible personal device and play or view the content on your TV.
Browsing content
You have two ways to enter Media:
• Insert a USB device, a prompt message appears, choose whether to go to the media.
• When your USB device is connected to the TV but TV doesn't show Media page, press / / button
to select
Apps
>
Media
.
To browse content based on the type that you wish to access:
1. Navigate to the appropriate menu tab on the screen and select
All Media
,
Videos
,
Photos
,
Music
.
2. Click on the name of the folder that contains your content.
3. Make your selection to play or view the content.
To exit the Media centre, press the
/
button on your remote.
Media format list
NOTE
• Due to differences in programming tools and other factors, some of the file formats that are listed may or
may not be supported.
Video:
Number Video Codec Resolution Bit Rate Profile Container
1 VP9 8192
× 4320 @ 30fps 60
Mbps
.
Profile 0 (4208bit)
Profile 2, (420, 10bit)
MKV (.mkv)
WebM (.webm)
2 HEVC/H.265 8192
× 4320 @ 60fps 200Mbps
Main/Main10
Profile, High Tier
@Level 6.
1
MP4 (.mp4, .mov) / 3GPP (.3gpp, .3gp)
MPEG transport stream (.ts, .trp, .tp) /
MKV (.mkv) / FLV (.flv) / AVI (.avi) / H265 (.265)
3 MPEG1/2 1920 × 1080 @ 60fps 80Mbps MP@HL
MPEG program stream (.DAT, .VOB, .MPG, .MPEG) /
MPEG transport stream (.ts, .trp, .tp) / MP4 (.mp4,
.mov) / 3GPP (.3gpp, .3gp) / AVI (.avi) / MKV (.mkv) /
ASF (.asf) / WMV (.wmv) / OGM (.ogm)
4 MPEG4 1920 × 1080 @ 60fps 80Mbps
. Simple Profile
. Advanced Simple
Profile@Level 5
. GMC is not supported
MP4 (.mp4, .mov) / 3GPP (.3gpp, .3gp) / AVI (.avi)
/ MKV (.mkv) / ASF (.asf) / WMV (.wmv) / FLV (.flv) /
OGM (.ogm) / MPEG transport stream (.ts, .trp, .tp) /
MPEG program stream (.DAT, .VOB, .MPG, .MPEG)
5
Sorenson
H.263
1920 × 1080 @ 60fps 80Mbps FLV (.flv) / AVI (.avi)
6
H.263 1920 × 1080 @ 60fps 80Mbps
FLV (.flv) / MP4 (.mp4, .mov) / 3GPP (.3gpp, .3gp) /
AVI (.avi) / ASF (.asf) / WMV (.wmv)
7 H.264 8192
× 4320 @ 30fps 200Mbps
Main, High and High10
profile up to level 6.0
FLV (.flv) / MP4 (.mp4, .mov) / 3GPP (.3gpp, .3gp)
/ MPEG transport stream (.ts, .trp, .tp) / ASF (.asf) /
WMV (.wmv) / AVI (.avi) / MKV (.mkv) / OGM (.ogm) /
MPEG program stream (.DAT, .VOB, .MPG, .MPEG)
/ H264 (.264)
20
8 WMV3
1920 × 1080 @ 60fps 80Mbps
ASF (.asf) /
AVI (.avi) /
MKV (.mkv) / WMV (.wmv) /
3GPP (.3gpp, .3gp)
/ MP4 (.mp4, .mov) / OGM (.ogm)
9 VC1 1920 × 1080 @ 60fps 80Mbps
.
Advanced Profile@
Level 3
. Simple Profile
. Main Profile
MPEG transport stream (.ts, .trp, .tp) / ASF (.asf) /
WMV (.wmv) / AVI (.avi) / MKV (.mkv) / 3GPP (.3gpp,
.3gp) / MP4 (.mp4, .mov) / VC1 (.vc1)
10 Motion JPEG 1920 × 1080 @ 30fps 30Mbps
AVI (.avi) / 3GPP (.3gpp, .3gp) / MP4 (.mp4, .mov) /
MKV (.mkv) / FLV (.flv) / OGM (.ogm)
11 VP8 1920 × 1080 @ 60fps 60Mbps
MKV (.mkv) / WebM (.webm) / FLV (.flv) / 3GPP
(.3gpp, .3gp) / MP4 (.mp4, .mov) / AVI (.avi) / OGM
(.ogm)
12 AV1 8192
× 4320 @ 30fps 60Mbps Main Profile @Level 6.0
MP4 (.mp4, .mov) / 3GPP (.3gpp, .3gp) / MKV (.mkv)
/ WebM (.webm)
Audio:
Number Audio Codec Sample rate Channel Bit Rate Container
Note
1
MPEG1/2
Layer1
16kHz ~ 48kHz Up to 2
32Kbps ~
448Kbps
MP3 (.mp3)
/ AVI (.avi) / ASF (.asf) /
WMV (.wmv) / DivX (.divx) / MKV (.mkv,
.mka) / 3GPP (.3gpp, .3gp) / MP4 (.mp4,
.mov, .m4a) / MPEG transport stream
(.ts, .trp, .tp) / MPEG program stream
(.DAT, .VOB, .MPG, .MPEG) / FLV (.flv)
/ WAV (.wav) / OGM (.ogm)
2
MPEG1/2
Layer2
16kHz ~ 48kHz Up to 2 8Kbps ~ 384Kbps
3
MPEG1/2/2.5
Layer3
8kHz ~ 48kHz Up to 2 8Kbps ~ 320Kbps
4
AC3(DD)
32kHz,
44.1kHz,48kHz
Up to 5.1
32Kbps ~
640Kbps
AC3(.ac3) / AVI (.avi) / MKV (.mkv,
.mka) / DivX (.divx) / 3GPP (.3gpp,
.3gp) / MP4 (.mp4, .mov, .m4a) / MPEG
transport stream (.ts, .trp, .tp) / MPEG
program stream (.DAT, .VOB, .MPG,
.MPEG) / WMV (.wmv) / ASF (.asf) /
OGM (.ogm)
5
EAC3(DDP)
32kHz,
44.1kHz,48kHz
Mono,
Stereo,
7.1CH
up to 15
object
and Lfe
decoder
can render
to 5.1.2
Up to
6.144Mbps
EAC3(.ec3) / AVI (.avi) / MKV (.mkv,
.mka) / DivX (.divx) / 3GPP (.3gpp,
.3gp) / MP4 (.mp4, .mov, .m4a) / MPEG
transport stream (.ts, .trp, .tp) / MPEG
program stream (.DAT, .VOB, .MPG,
.MPEG) / WMV (.wmv) / ASF (.asf) /
OGM (.ogm)
6
AAC-LC,
HEAAC
8kHz ~ 48kHz Up to 5.1
16Kbps ~
576Kbps
AAC (.aac) / AVI (.avi) / MKV (.mkv,
.mka) / DivX (.divx) / 3GPP (.3gpp,
.3gp) / MP4 (.mp4, .mov, .m4a) / MPEG
transport stream (.ts, .trp, .tp) / MPEG
program stream (.DAT, .VOB, .MPG,
.MPEG) / FLV (.flv) / RM (.rm, .rmvb,
.ra) / WAV (.wav) / WMV (.wmv) / ASF
(.asf) / OGM (.ogm)
7
WMA7, WMA8,
WMA9
8kHz ~ 48kHz Up to 2
32Kbps ~
192Kbps
ASF (.asf) / WMV (.wma, .wmv) / AVI
(.avi) / MKV (.mkv, .mka) / 3GPP (.3gpp,
.3gp) / MP4 (.mp4, .mov)
WMA7,
WMA8,
WMA9
Standard
8
WMA9 Pro 16kHz ~ 48kHz Up to 5.1
48Kbps ~
384Kbps
ASF (.asf) / WMV (.wma, .wmv) / AVI
(.avi) / 3GPP (.3gpp, .3gp) / MP4 (.mp4,
.mov)
Smart Functions
21
9
VORBIS 6kHz ~ 48kHz Up to 5.1 8Kbps ~ 500Kbps
MKV (.mkv, .mka) / WebM (.webm) /
3GPP (.3gpp, .3gp) / MP4 (.mp4, .mov,
.m4a) / Ogg (.ogg) / WMV (.wmv) / ASF
(.asf) / AVI (.avi)
Supports
stereo
decoding
only
10
DTS, DTS HD
32kHz,
44.1kHz,48kHz
Up to 5.1 32Kbps ~ 1.5Mbps
MPEG transport stream (.ts, .trp, .tp) /
MPEG program stream (.DAT, .VOB,
.MPG, .MPEG) / WAV (.wav) / MKV
(.mkv, .mka) / 3GPP (.3gpp, .3gp) /
MP4 (.mp4, .mov, .m4a) / AVI (.avi) /
OGM (.ogm) / DTS (.dts)
11
DTS
LBR (express)
32kHz,
44.1kHz,48kHz
Up to 5.1 32Kbps ~ 1.5Mbps
MP4 (.mp4, .mov) / 3GPP (.3gpp, .3gp)
/ MPEG transport stream (.ts, .trp, .tp)
12
FLAC 8kHz ~ 192kHz Up to 5.1
128Kbps ~
2304Kbps
MKV (.mkv, .mka) / FLAC (.flac)
13
OPUS 8kHz ~ 48kHz Up to 5.1 6Kbps ~ 510Kbps MKV (.mkv, .mka) / WebM (.webm)
14
AC4 44.1kHz,48kHz
Max.11
channels
Max.10
objects
Up to 6140Kbps
MPEG transport stream (.ts, .trp, .tp) /
3GPP (.3gpp, .3gp) / MP4 (.mp4, .mov,
.m4a) / AC4 (.ac4)
15
MPEG-H
16kHz, 24kHz, 32kHz,
48kHz
Up to 2
20Kbps ~
1200Kbps
3GPP (.3gpp, .3gp) / MP4 (.mp4, .mov,
.m4a)
16
DRA
32kHz,
44.1kHz,48kHz
Up to 5.1
32Kbps ~
9612Kbps
MPEG transport stream (.ts, .trp, .tp)
17
APE
32kHz,
44.1kHz,48kHz
Up to 2
500Kbps ~
1.5Mbps
APE (.ape)
18
AMR-NB 8kHz 1
4.75Kbps ~ 12.2
Kbps
3GPP (.3gpp, .3gp) / MP4 (.mp4, .mov,
.m4a)
19
AMR-WB 16kHz 1
6.6Kbps ~ 23.85
Kbps
3GPP (.3gpp, .3gp) / MP4 (.mp4, .mov,
.m4a)
Photo:
Number Image Photo
Resolution
(width x height)
(MTK suggests)
Remark
1
JPEG
Base-line 15360 x 8640 The limitation of max resolution depending on DRAM size
2 Progressive 1024 x 768 The limitation of max resolution depending on DRAM size
3 PNG 9600 x 6400 The limitation of max resolution depending on DRAM size
4 BMP 9600 x 6400 The limitation of max resolution depending on DRAM size
5 GIF 6400 x 4800 The limitation of max resolution depending on DRAM size
6 Webp 3840 x 2160 The limitation of max resolution depending on DRAM size
7 HEIF 4000 x 3000 The limitation of max resolution depending on DRAM size
Smart Functions

22
Picture and Sound
Adjusting the Picture Quality
Using the backlight function
Press
/ /
button to select icon, and select
Picture
>
Backlight
.
You can change the overall brightness of the screen.
• Local Dimming
Enable the TV to automatically adjust the backlight by sections according to the changes in the image and
increase the contrast.
• Dynamic Backlight Control
Enhance the contrast ratio between light and dark areas of the picture.
• Backlight Level
Adjust how bright you want images to appear, lower settings create darker images.
• Automatic Light Sensor
Enable the TV to automatically adjust the picture settings according to the amount of ambient light in your
room.
• Light Sensor Shift
Adjust the lower point of the dynamic backlight adjustment scope. This is a money-saving feature because
it reduces power consumption.
NOTE
• Some functions above may not be applicable in some models/countries/regions.
Enabling OLED light
Press
/ /
button to select icon, and select
Picture
>
OLED Light
.
Set the overall brightness of the screen.
NOTE
• This function may not be applicable in some models/countries/regions.
Adjusting peaking brightness dynamic range
Press
/ /
button to select icon, and select
Picture
>
Peaking Brightness Dynamic Range
.
Adjust the maximum brightness of the screen area.
NOTE
• This function may not be applicable in some models/countries/regions.
Choosing a picture mode
Press
/ /
button to select icon, and select
Picture
>
Picture Mode
.
You can select the picture mode that provides the best viewing experience.
LowBlueLightforTUVCertication
Cinema is designed to reduce the level of blue light to protect your eyes.
Press
/ /
button to select icon, and select
Picture
>
Picture Mode
, and select
Cinema
.
To reduce the eye strain and protect eyes when you watch TV for a period of time, you are suggested to:
• Take regular and frequent breaks to avoid watching TV for a long period of time. Long time of watching may
cause you eye fatigue. It is not recommended to watch TV for more than one hour.
• Look away from the TV screen and look at distance objects during the breaks for at least 10 minutes for eye
23
Picture and Sound
care.
• Relax yourself during a break by doing eye exercises or outdoor activities.
• The best recommended viewing distance is 3 times the vertical height of the TV screen.
Proper breaks and exercises are proved excellent help to relieve eye strain and fatigue.
NOTE
• This feature may not be applicable in some models/countries/regions. Low blue light certification may vary
by model.
• Low Blue Light can only be supported when the Color Temperature is set to
Low
.
Adjusting the picture quality for each picture mode
Press
/ /
button to select icon, and select
Picture
>
Contrast
,
Brightness
,
Colour
,
Tint
or
Sharpness
.
Choose a picture mode and then adjust the settings.
• Contrast
Adjust the Contrast level to increase or decrease how bright images appear.
• Brightness
Adjust the Brightness level to generate lighter or darker images.
• Colour
Adjust the colour intensity of the picture for a more vibrant image.
• Tint
Adjust the colours from green to magenta tint to view the natural skin tones of people on the screen.
• Sharpness
Adjust how sharp or soft edges of images appear.
Changing the aspect ratio
Press
/ /
button to select icon, and select
Picture
>
Aspect Ratio
.
You can change the size of the picture displayed on the TV screen.
• Automatic
Automatically switch Aspect Ratio between 16:9 and 4:3 based on the signal information.
• 16:9
Best suited for 16:9 Widescreen content. This will also stretch 4:3 content to Widescreen.
• 4:3
Best suited for 4:3 content.
• Panoramic
Provides a full-screen image by stretching the edges whilst leaving the middle untouched.
• Movie Zoom
Provides a full-screen image by zooming in on the movie.
• Direct
Point to point display also known as 1:1 Pixel Mapping.
Enabling smart scene function
Press
/ /
button to select icon, and select
Picture
>
Smart Scene
.
Set to On to enable your TV to recognize the scene in the content watching and enhance the picture quality on

24
Picture and Sound
all input sources.
NOTE
• Some specific application has explicit constraints that the content recognition is not allowed.
Conguringadvancedpicturesettings
Press
/
/
button
to select
icon
, and
select
Picture
>
Advanced Settings
.
Youcancongurepicturemodesettingsthatprovidesthebestviewingexperience.
• Overscan
Change the video size settings to slightly crop the edges of the displayed image.
• Colour Temperature
Adjust how warm (red) or cool (blue) the white areas of an image appears.
• Motion Enhancement
Reduce seeing afterimages that are left on the screen when viewing fast-moving objects.
If you select
Custom
,youcancongure
Blur Reduction
and
Judder Reduction
manually.
• Motion Clearness
Improve the clarity when viewing fast moving scenes.
• Noise Reduction
Improve how clear the picture appears by reducing noise.
• Digital Noise Reduction
Improve picture clarity by reducing video noise.
• HDMI Dynamic Range
Adjust the HDMI signal range to be more suitable for the content. (HDMI mode only)
• Active Contrast
Automatically darken dark areas and lighten light areas of images to see more details.
• Enhanced Viewing Angle
Set to On to optimize your viewing angle, and you will enjoy a better watching experience.
• Colour Space
Change the range of colours the TV displays.
• Instant Game Response
Enjoy a low latency experience with external device (e.g, Xbox
,
PS5) connected to the TV when playing
games.
Set to Auto to identify and enter a low latency experience automatically when switching between game and
non game.
• FreeSync
Enjoy a smooth viewing experience by eliminating screen tearing and stuttering when FreeSync is turned
on.
Be sure to set this function only for the external devices that support the AMD Radeon FreeSync feature.
NOTE
• Some functions above may not be applicable in some models/countries/regions.
Conguringcalibrationsettings
Press
/ /
button to select
icon
, and
select
Picture
>
Calibration Settings
.
Adjust the colour space and Gamma to best suit the content you’re viewing.
• Colour Tune
Adjust the Hue, Saturation and Brightness of colour settings.

25
Picture and Sound
• White Balance
Adjust the intensity of red, green and blue lights to view the true colours of all images in the picture.
• Gamma
Adjust the Gamma to alter how the TV will respond to the grayscale content. In a dark room choose a
Higher number like 2.4. In a brighter area select a Lower number like 2.0. In general, 2.2 is normally
recommended.
• Gamma Calibration
Adjust selected Gamma curve.
• RGB Only
View images based on default settings or choose the colour red, blue or green.
NOTE
• Some functions above may not be applicable in some models/countries/regions.
Enabling panel refresh
Press
/
/
button
to select
icon
, and
select
Picture
>
Panel Refresh
.
Use panel refresh to reduce image retention effects.
NOTE
• This function may not be applicable in some models/countries/regions.
Enabling low blue light function
Press
/
/
button to select
icon
, and
select
Picture
>
Low Blue Light
.
Eye care: reduce the emission of blue light.
NOTE
• This function may not be applicable in some models/countries/regions.
Applying the current picture settings to other input sources
Press
/
/
button
to select
icon
, and
select
Picture
>
Apply Picture Settings
.
Apply current picture mode to all sources or just current source.
Sources include both external devices and OTT (Over the Top) sources.
Resetting the picture settings
Press
/
/
button
to select
icon
, and
select
Picture
>
Reset
.
Reset current picture settings back to the factory setting.
Adjusting the Sound Quality
Enabling system sounds
Press
/ /
button
to select icon, and select
Sound
>
System Sounds
.
Set to On to open the default system sound.
Choosing a sound mode
Press
/ /
button
to select icon, and select
Sound
>
Sound Mode
.
You can select a preset sound mode suitable for the content type or the listening environment.
26
Picture and Sound
Selecting speakers
Press
/ /
button
to select icon, and select
Sound
>
Audio Output
.
Select the speakers that you want to have audio output.
Enabling eARC
Press
/ /
button
to select icon, and select
Sound
>
eARC
.
Connect an audio device that supports eARC via HDMI-eARC, and set eARC to On to enjoy premium sound
quality.
Enabling TV speaker
Press
/ /
button
to select icon, and select
Sound
>
TV Speaker
.
Turn on or off the TV speaker.
If ARC or Bluetooth is selected in Audio Output, configuration here is unavailable.
Setting sound mode
Press
/ /
button
to select icon, and select
Sound
>
DTS Height Virtualization
/
DTS
Clear Dialogue
/
DTS Bass Enhancement
/
DTS Loudness Control
/
Subwoofer
/
Bass Boost
/
Dolby
Atmos
/ / / /
Wall Mount Setup
.
• DTS Height Virtualization
Experience immersive audio from as few as two channels of audio with virtual height and multi-channel
virtual surround.
• DTS Clear Dialogue
Improve dialogue clarity to better hear what is being said, even in dramatic action scenes with sound
effects.
• DTS Bass Enhancement
Extend low bass frequency performance of small speakers to deliver a rich listening experience.
• DTS Loudness Control
Automatic control over drastic volume changes while watching TV programmes or movies, providing a more
comfortable and consistent volume.
• Subwoofer
Built-in subwoofer switch.
• Bass Boost
Built-in bass adjustment.
• Dolby Atmos
Set Dolby Atmos to On to enhance the richness of sound, and you can enjoy an immersive listening
experience.
•
Optimize overall sound quality by increasing bass, making dialogue clear and natural, and widening the
sound field.
•
Provide surround sound experience with psycho-acoustic processing to place sounds beside, behind, and
above the viewer. For best results use with Total Sonics.

27
•
Maintain consistent loudness levels from wide dynamic range programmes, loud commercials, and channel
or input changes.
• Wall Mount Setup
Automatically optimize the sound based on the position of the TV.
NOTE
• Some functions above may not be applicable in some models/countries/regions.
Conguringadvancedsoundsettings
Press
/ /
button to select icon, and select
Sound
>
Advanced Settings
.
Tune the audio settings and quality of the TV.
• Balance
Adjust the left and right speaker strength to optimize audio for a specific location.
• Auto Volume Control
Activate to prevent the volume from changing when you switch TV channels.
• Digital Audio Out
Select the digital audio output format that best suits the audio device type.
NOTE
• When using optical connection, PCM and Dolby Digital are suggested.
• If your external audio device does not support Dolby or DTS, PCM is suggested.
• Digital Audio Delay
Adjust the digital audio output delay time to sync sound from an external speaker with the images on the
TV.
NOTE
• Digital Audio Out and Digital Audio Delay functions are only applicable when Audio Output is set to ARC
or when external audio players are connected via DIGITAL AUDIO OUT jack.
• Lip Sync
Synchronize the displayed image with the audio output.
• Equalizer
Boost the volume at different frequencies.
• Headphone Mode
Change the way how
audio is sent through the type of device that’s connected to your TV Audio Out port.
NOTE
• This function may not be applicable in some models/countries/regions.
• Headphone Volume
Independently adjust the volume of audio out devices.
NOTE
• This function may not be applicable in some models/countries/regions.
Picture and Sound

28
Picture and Sound
Conguringaudiotype
Press
/ /
button
to select icon, and select
Sound
>
Audio Type
.
• Audio Type
Select the audio type of programmes.
• Voiceover Output
Select the voiceover audio out.
NOTE
• If the model does not have headphone jack, this function will be hidden.
• This function is not available when Audio Type is Normal.
• This function is not available when Headphone Mode is Headphone Only and headphone is not
connected.
• Voiceover Volume
Independently adjust the volume of voiceover for visually impaired on digital channels. This function is only
available when Audio Type is Visually Impaired.
NOTE
• Audio Type function may not be applicable in some models/countries/regions.
Resetting the sound settings
Press /
/
button
to select icon
,
and select
Sound
>
Reset
.
Reset current sound settings to factory mode.

29
Accessibility and System
Using Parental Control
Press / / button
to select icon, and select
Parental Control
.
The Parental Control setting allows you to block content that is not appropriate for children to watch.
• Locks
Turning Parental Control On
1. Turn on Locks to enable the Parental Control function.
2. Create PIN window displays. Using the D-pad on your remote, create the password.
3. You will see other Parental Control settings change from a greyed out state to highlighted. When this
occurs, begin adding other settings to the
Block Time
,
Channel Block
,
Programme Block
,
Input
Block
,
Change PIN
or
Reset
features.
• Block Time
Block certain channels, programmes and inputs during certain periods of time.
• Channel Block
Block selected channels.
• Programme Block
Block programmes by ratings.
• Input Block
Block selected inputs.
• Change PIN
Change the PIN that you use to access Parental Control.
NOTE
• If you forget your password, call the Consumer Electronics Care Centre.
• Reset
Reset Parental Control back to the factory setting.
Configuring Device Preferences Settings
Press / / button
to select icon, and select
Device Preferences
.
Date & time
• Automatic date & time
Set to On to use network-provided time.
You can also set the current time manually when Off is selected.
• Set date
Set the date.
• Set time
Set the time.
• Set time zone
Select your time zone.

30
Accessibility and System
• Daylight Savings
Select whether to apply Daylight Savings time to the TV.
NOTE
• This function may not be applicable in some models/countries/regions.
• Use 24-hour format
Set the time to display in a 12 or 24-hour format.
Language
Adjust the default Language settings for the TV.
Keyboard
Adjust the default settings for the keyboard.
Inputs
View the state of devices that connect to the TV: Connected Input and Standby Inputs, and set Consumer
Electronic Control (CEC) function.
For more about Consumer Electronic Control (CEC) settings, Please refer to “Connection > Using HDMI&CEC”
section in this manual.
Storage
View the TV storage.
Home screen
• Customise channels
Add or delete the app channel row from the Home screen.
• Enable video previews
Enable or disable the video previews.
• Enable audio previews
Enable or disable the audio previews.
• Reorder apps/Reorder games
Rearrange the Apps screen.
• Android TV Home/Android TV core services
See the information of open source software licences.
Google Assistant
View permissions about accounts and limit the search results.
Chromecast built-in (Chromecast Android Shell)
Enable your app to stream video and audio to the TV.
Screen saver
Enable Screen saver when the TV is idle.

31
Location
Use different modes to access location information. Each mode uses different sources to estimate the TV’s
location.
Usage & Diagnostics
Help improve Android performance by automatically sending diagnostics information.
Security & restrictions
Supervise unknown sources for safety and check installed apps for harmful behaviour.
Accessibility
Provide menu options and audio description to aid the visually or hearing impaired.
• High-contrast text
Improves contrast for visually impaired.
• Text to speech
Let you specify text-to-speech engine details and speech rate.
• Services
This menu function contains some service applications, you can choose to open if you need it.
Reset
Reset to clear your personal setup and information.
About
View the version information, the status of network, and other information. You can also update the software
version or change the TV’s name.
• System update
Provide software updates to continuously enhance your TV and correct any issues that may impact your
user experience; therefore, recommend you to keep your TV connected to the Internet to automatically
receive updates when they are available.
• Device name
Choose a name for your TV. The name will be shown to devices that are available for sharing data.
Configuring Advanced System Settings
Press / / button to select icon, and select
Advanced System
.
Timer
• Power On Timer Type
Set the type Off, Daily, Once.
• Power On Timer
Set the clock for the time you want the TV to turn on automatically.
Accessibility and System

32
• Power Off Timer Type
Set the type Off, Daily, Once.
• Power Off Timer
Set the clock for the time you want the TV to turn off automatically.
Power
• Sleep Timer
Set the sleep timer to automatically turn the TV off within a specified time: Off, 10 Minutes, 20 Minutes, 30
Minutes, 40 Minutes, 50 Minutes, 60 Minutes, 90 Minutes and 120 Minutes.
• Power On Mode
TV will be powered on based on the mode when TV is reconnected with AC power.
• Auto Sleep
Set the amount of time that you’d like your TV to automatically power off without any activity: Off, 3H, 4H.
NOTE
• This function may not be applicable in some models/countries/regions.
Power LED
Set the Power Ind
icator light to stay On or Off when standby mode.
Store Mode
When selecting Store Mode to On, the TV will be on display in a retail setting, and E-Streamer and other demo
functions are effected.
NOTE
• Enabling Store Mode could increase energy consumption.
Support
• HbbTV
Enable or disable HbbTV functionality for all channel. (Only available for digital channels.)
NOTE
• This function may not be applicable in some models/countries/regions.
• Do Not Track
Tell websites and some applications your tracking preference.
NOTE
• This function may not be applicable in some models/countries/regions.
• Setup Wizard (Setup assistant)
Use the Setup assistant for instructions to help you set up your TV.
• Send Diagnostics and Usage Information
Allow to send the diagnostics and usage of the report.
• Screenless Mode (only for models with far-fielded Google Assistant)
Talk to the Google Assistant even when the screen is off.
In Screenless Mode, the Google Assistant is always available to help even when the screen is not on. Just
say “OK Google”.
This feature will affect standby power consumption when it is set to On.
Accessibility and System

33
NOTE
• The far-field Google Assistant and some of its features are only available in selected countries, regions
and languages.
• Remote Control Service
Remote Control Service features enable your TV to be controlled from the client server to let after-sales
diagnosetheproblemofyourTVanddealingwiththeproblemonlineefciently.
To use this function:
1. Turn on
Remote Control Service
.
2. You can initiate a help request to call centres by hotline and provide PIN to the client server centre.
NOTE
• This function may not be applicable in some models/countries/regions.
• Keep the network connected when the Remote Control Service is running.
• E-Manual
View the embedded E-Manual. Please refer to “E-Manual” section for more information.
Mobile Device Connection Tips
Follow the on-screen instructions to learn more about the Screen Sharing
and the Content Sharing.
Mobile App Installation
Scan the Mobile App download QR code on screen to install the app on your smartphone to control your TV.
For more about RemoteNOW Download settings, please refer to “Smart Functions > Installing Mobile App to
control your TV” section in this manual.
Clear Cache
Clear cache of applications and system.
Help
• System Message
View system message, including: Serial Number, Service Code, Software Version, etc.
NOTE
• Serial Number may not be displayed depending on models/countries/regions.
• Signal Diagnosis
Perform self diagnosis to test Video Format, Audio Format, Colour Depth, etc.
NOTE
• This function may be called Signal information in some countries/regions.
Accessibility and System
34
Troubleshooting
Picture Problem
When the TV has a picture problem, please review the list of problems and solutions below.
Problem Possible Solutions
No picture, or black and
white picture.
•UnplugTVfromACoutletandre-plugafter60seconds.
•CheckthattheSaturationissetto50orhigher.
•TrydifferentTVchannels.
The picture is distorted.
•Thecompressionofvideocontentmaycause picturedistortions,especiallyin
fast moving pictures from sports programmes and action movies.
•Ifthesignalreceptionisweakorpoor,screendistortionmaybevisiblebutitis
not a malfunction.
•MobilephonesusedclosetotheTV(within1m)maycausenoiseonanalogue
and digital channels.
NOTE
• If the problem persists, check the signal strength or refer to the external device’s user manual.
Sound Problem
When the TV has a sound problem, these solutions may help resolve the problem.
Problem Possible Solutions
There is no sound or
the sound is too low at
maximum volume.
•Checkthevolumecontrolofthedevice(cableorsatellitebox,DVD,Blu-ray,
etc.) connected to your TV.
Picture is normal, but
no sound.
•Checkthevolumesettings.
•Checkif'Mute'modeissettoon.
The speakers are
making an odd sound.
•Makesurethattheaudiocableisconnectedtothecorrectaudiooutput
connector on the external device.
•Forantennaorcableconnections,checkthesignalinformation.
•Alowsignallevelmaycausesounddistortions.
Picture and Sound Problem
When the TV has a sound and picture problem, these solutions may help resolve the problem.
Problem Possible Solutions
No sound and picture.
•CheckifthepowercordispluggedintoapoweredACoutlet.
•ChecktoseeiftheLEDlightisonornot.Ifitis,thentheTVisreceivingpower.
•Pressthe button
on the remote control to activate the unit from Standby.
I have connected an
external device to my
TV but I get no picture
and/or sound.
•Checkwhethertheconnectionbetweenthe externaldeviceandyourTVis
correct.
•Makesureyouhavemadethecorrectselectionofinputsource.
35
Troubleshooting
Sound and picture
distorted or appear
wavy.
•SomeelectricalappliancesmayaffectTVset.Ifyouturnofftheapplianceand
the interference goes away, then move it further away from TV.
•InsertthepowerplugoftheTVsetintoanotherpoweroutlet.
Sound and picture
is blurry or cuts out
momentarily.
•Ifyouuseanexternalantenna,checkthedirection,positionandconnectionof
the antenna.
•Adjustthedirectionofyourantennaorresetornetunethechannel.
Internet Problem
When the TV has difficulties in connecting to the Internet, these solutions may help resolve the problem.
Problem Possible Solutions
The TV cannot connect
to your network or apps.
•MakesuretheTVhasanetworkconnection.
•ContactyourInternetserviceprovider.
The wireless network
connection failed.
•Makesureyourwirelessmodem/routerisonandisconnectedtotheInternet.
The wireless network
signal is too weak.
•Positionyourwirelessrouter,modemrouter,oraccesspoint inacentral
location. Avoid putting it at a corner.
Recording/Timeshift Function Isn’t Working
When Timeshift or Schedule recording aren’t working, these solutions may help resolve the problem.
Problem Possible Solutions
Schedule Recording
cannot be used.
•CheckifthereisaUSBdeviceconnectedtotheTV.
•Recordingwillautomaticallystopifthesignalbecomestooweak.
•CheckthefreespaceoftheUSBdevice.Thefunctionwillnotworkifthereisn't
enough storage space on the USB device.
NOTE
• The Recording/Timeshift functions may not be applicable in certain models/countries/regions.
My File Won’t Play
When files aren’t playing, this may help resolve the problem.
Problem Possible Solutions
Somelescan'tbe
played.
•Thisproblemmayoccurwithhigh-bitrateles.Mostlescanbeplayedback,
butyoumightexperienceproblemswithhigh-bitrateles.

36
Other Issues
Use these procedures to resolve other issues that may occur.
Problem Possible Solutions
The TV is hot.
Watching TV for an extended period of time causes the panel to generate heat.
The heat from the panel is dissipated through internal vents running along the top
of the TV.
After extended use, you may feel hot when touching it. This heat, however, is not
a defect and does not affect the TV's functionality.
The TV smells of
plastic.
This smell is normal and will dissipate over time.
The plastic cabinet
makes a “clicking”
type of sound.
The “clicking” sound can be caused when the temperature of the TV
changes. This change causes the TV cabinet to expand or contract, which
makes the sound. This is normal and the TV is OK.
Troubleshooting
