1
Important Safety Instructions
CAUTION
RISK OF ELECTRIC SHOCK
DO NOT OPEN
CAUTION: TO REDUCE THE RISK OF ELECTRIC SHOCK, DO NOT REMOVE COVER (OR BACK). NOUSER-
SERVICEABLE PARTS INSIDE. REFER SERVICING TO QUALIFIED SERVICE PERSONNEL.
This ‘bolt of lightning’ indicates uninsulated material within your unit which may cause an electric shock. For
the safety of everyone in your household, please do not remove product covering.
The ‘exclamation mark’ calls attention to features within the enclosed literature to prevent operating and
maintenance problems.
This equipment is a Class II or double insulated electrical appliance. It has been designed in such a way that
it does not require a safety connection to electrical earth.
WARNING: To reduce the risk of fire or electric shock, this apparatus should not be exposed to rain, moisture
placed in the vicinity or objects filled with liquids (such as vases).
CAUTION: To prevent electric shock, fully insert the plug. For regions with polarized plugs: Please match wide
blade to wide slot.
IMPORTANT SAFETY INSTRUCTIONS
1. Read these instructions.
2. Keep these instructions.
3. Heed all warnings.
4. Follow all instructions.
5. Do not use this apparatus near water.
6. Clean only with a dry cloth.
7. Do not block any of the ventilation openings. Install in accordance w
ith the manufacturers instructions.
8. Do not install near any heat sources such as radiators, heat registers, stoves or other apparatus (including
amplifiers) that produce heat.
9. Do not
defeat the safety purpose of the polarized or grounding-type plug. A polarized plug has two blades
with one wider than the other. A grounding type plug has two blades and a third grounding prong. The wide
blade or the third prong are provided for your safety. When the provided plug does not fit into your outlet,
consult an electrician for replacement of the obsolete outlet.
10. Protect the power cord from being walked on or pinched, particularly at plugs, convenience
receptacles and
the point where they exit from the apparatus.
11. Only use attachments/accessories specified by the manufacturer.
12. Use only with a cart, stand, tripod, bracket or table specified by the manufacturer or sold with the
apparatus. When a cart is used, use caution when moving the cart/apparatus to avoid injury from
tip-over.
13. Unplug this apparatus during lightning storms or when unused for long periods of time.
14. Refer all servicing to qualified ser
vice personnel. Servicing is required when the apparatus has been damaged
in any way, such as if the power-supply cord or plug is damaged, liquid has been spilled or objects have fallen
into the apparatus, or when the apparatus has been exposed to rain or moisture, does not operate normally, or
has been dropped.
15. Apparatus should not be exposed to dripping or splashing, and objects filled with liquids, such as vases,
sho
uld not be placed on the apparatus.
2
Safety Instructions
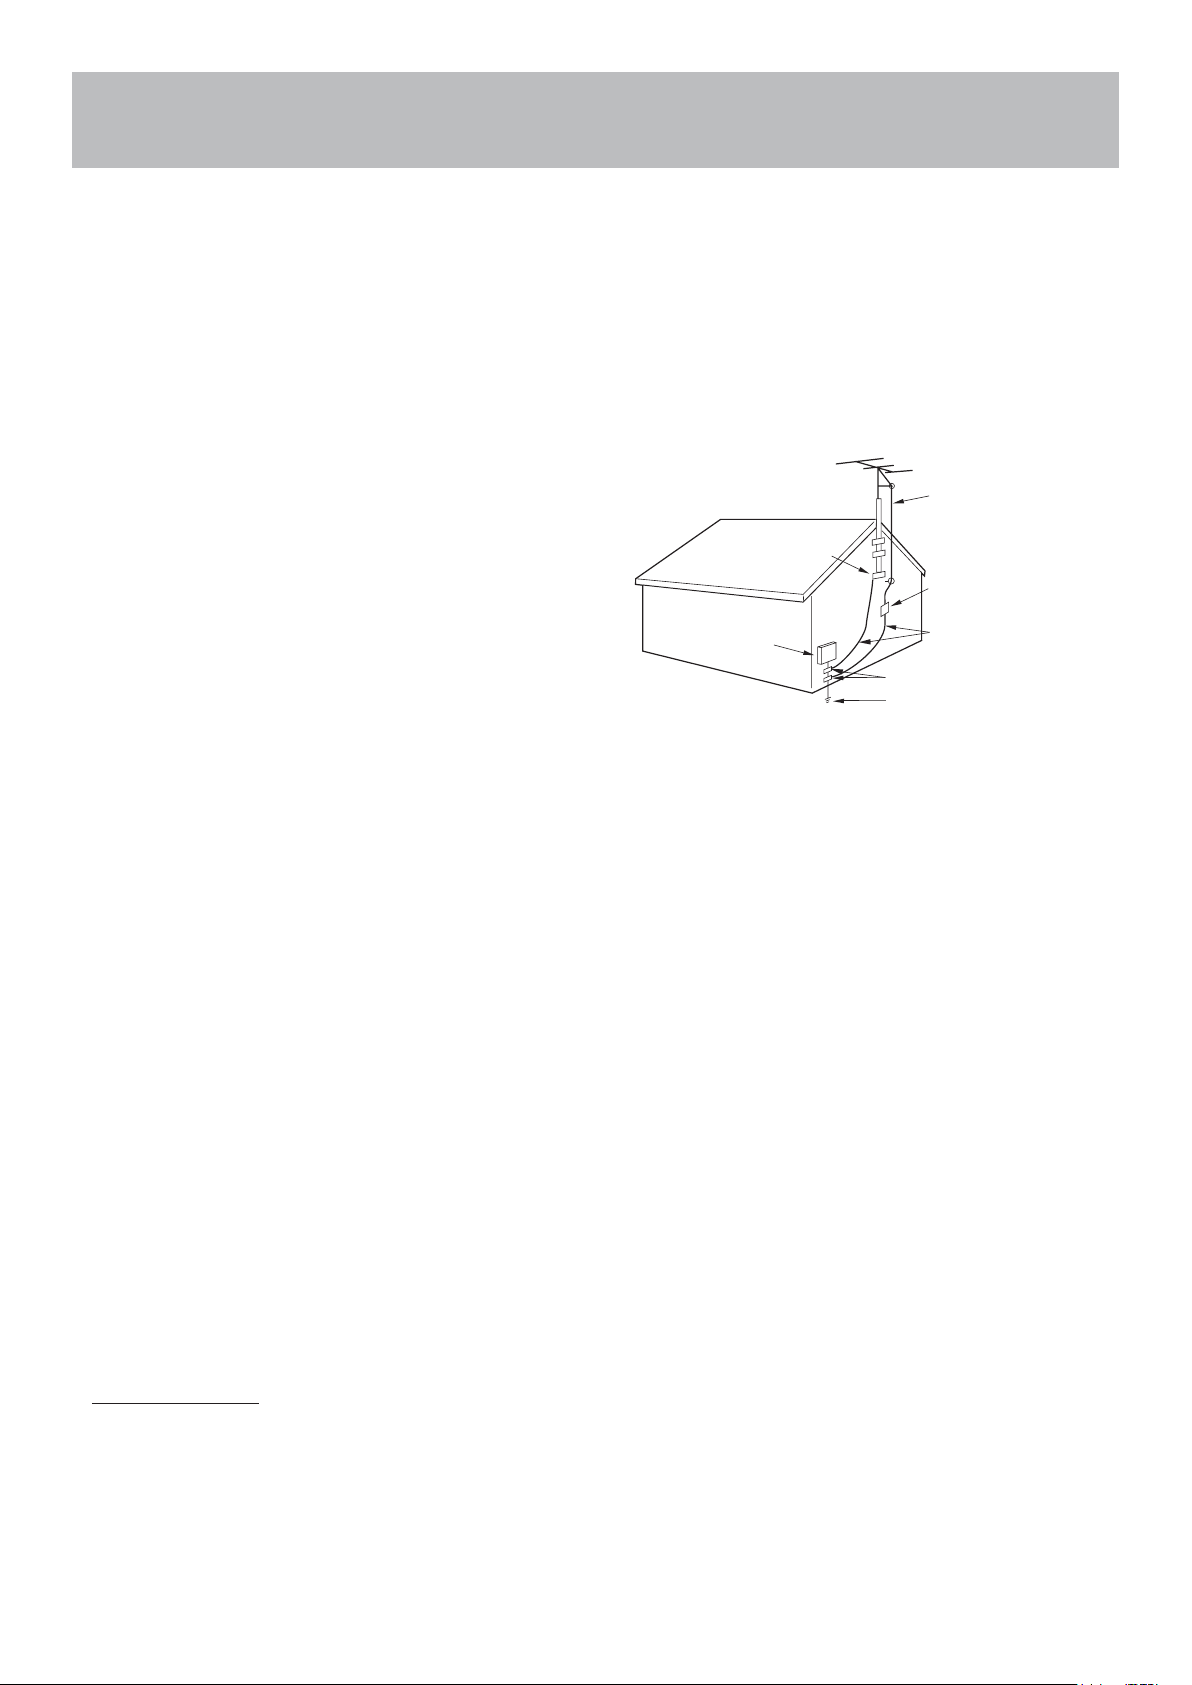
16. An outside antenna system should not be located in the vicinity of overhead power lines or other electric
light or power circuits, or where it can fall into such power lines or circuits. When installing an outside antenna
system, extreme care should be taken to eliminate touching power lines or circuits as contact might be fatal.
17. Do not overload wall outlets, extension cords, or integral convenience receptacles as this can result in a risk of
fire or electric shock.
18. Never push objects of any kind into this product through openings as they may touch short-out parts or
dangerous voltage points that could result in a fire or electric shock. Never spill liquid of any kind on the
product.
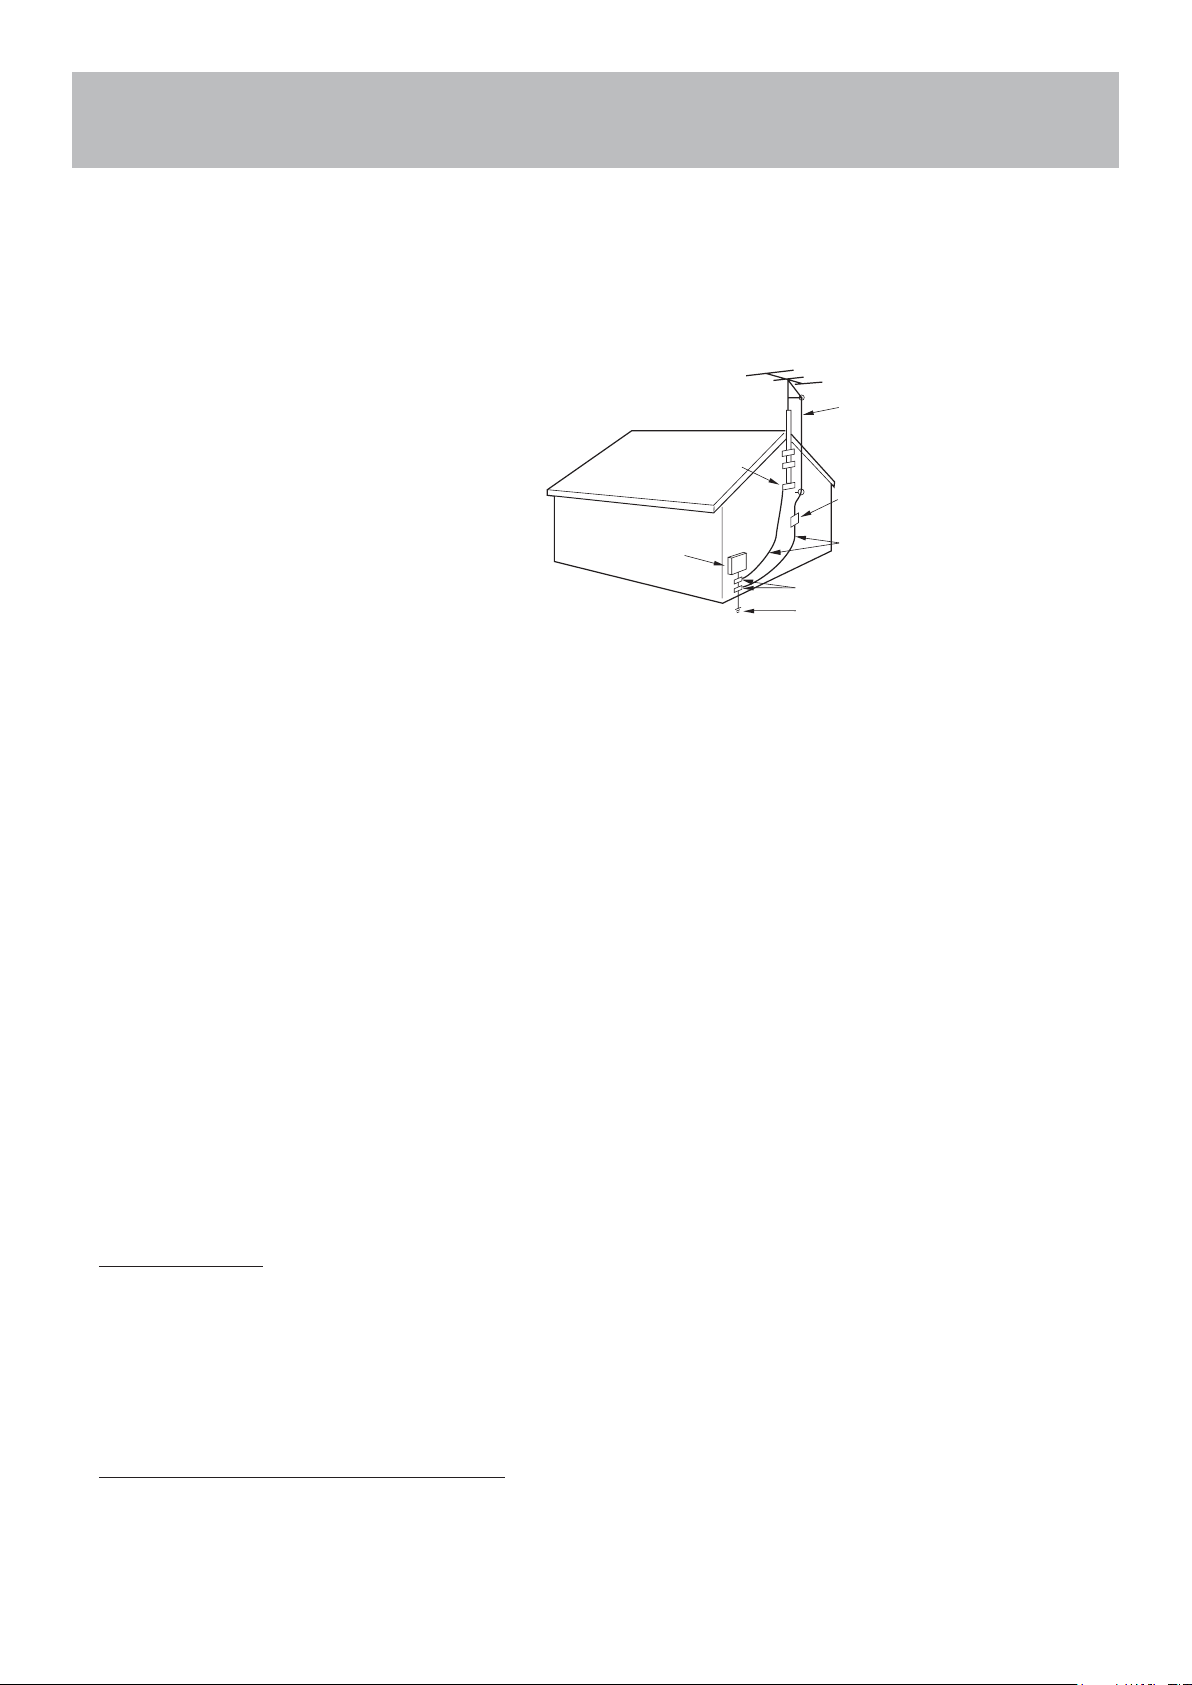
19. If an outside antenna is connected to the
television
equipment, be sure the antenna system is grounded so
as to provide some protection against voltage surges
and built up static charges. Section 810 of the National
Electrical Code provides information with respect to
proper grounding of the mast and supporting structure,
grounding of the lead-in wire to an antenna discharge
unit, size of grounding conductors, location of antenna
discharge unit, connection to grounding electrodes,
and requirements for the grounding electrodes.
20. NOTE TO CABLE/TV INSTALLER: This reminder is
provided to call the CATV system installer’s attention
to Article 820-40 of the National Electric Code (U.S.A.).
The code provides guidelines for proper grounding and, in particular, specifies that the cable ground shall be
connected
to the grounding system of the building, as close to the point of the cable entry as practical.
21. When replacement parts are required, be sure the service technician uses replacement parts specified by the
manufacturer or those that have the same characteristics as the original part. Unauthorized substitutions may
result in fire, electric shock or other hazards.
22. Upon completion of any service or repairs to this unit, ask the service technician to perform safety checks to
determine that the unit is in proper operating condition.
23. When you connect the product to other equipment, turn off the power and unplug from the wall outlet. Failure
to do so may cause an electric shock and serious personal injury. Rea
d the owner’s manual of the other
equipment carefully and follow the instructions when making any connections.
24. Sudden high volume may cause hearing or speaker damage. When you use headphones (if the unit is
equipped with a headphone jack), keep the volume at a moderate level. If you use headphones continuously
with high volume, you may suffer hearing damage.
25. Do not allow the product to output distorted sound for extended periods of time. This may cause speaker
overheating and fire.
26. The socket-outlet must be installed near the unit and easily accessible.
27. The main plug is used as the disconnect and shall remain readily operable.
28. Batteries (battery pack or batteries installed) shall not be
exposed to excessive heat such as sunshine, fire or
the like.
CONDENSATION
Moisture will form in the operating section of the unit if the unit is brought from cool surroundings into a warm
room or if the temperature of the room rises suddenly. When this happens the unit’s performance will be impaired.
To prevent this, let the unit stand in its new surroundings for about an hour before switching on, or make sure the
room temperature rises gradually.
Condensation may also form during the summer if the unit is exposed to the breeze from an air conditioner. In such
cases, change the location of the unit.
NEC-NATIONAL
ELECTRICAL
CODE S2898A
POWER SERVICE GROUNDING
ELECTRODE SYST EM
(NEC ART 250, PART H))
GROUND CLAMPS
GROUND CLAMP
ANTENNA
DISCHARGE UNIT
(NEC SECTION 810- 20)
EXAMPL E OF ANTENNA GROUNDING AS PER
THE NATIONAL ELECTRICAL CODE
ANTENNA
LEAD IN WIRE
GROUNDING
CONDUCTORS
(NECSECTION 810- 21 )
ELECTRIC SERVICE
EQUIPMENT

3
Safety Instructions
HOW TO HANDLE THE LCD PANEL
● Do not press hard or jolt the LCD panel. It may cause the LCD panel glass to break and injury may occur.
● If the LCD panel is broken, make absolutely sure you do not touch the liquid in the panel. This may cause skin
inflammation.
● If the liquid gets in your mouth, immediately gargle and consult with your doctor. Also, if the liquid gets in your
eyes or touches your skin, consult your doctor after rinsing for at least 15 minutes in clean water.
Possible Adverse Effects on LCD Panel: If a fixed (non-moving) pattern remains on the LCD panel for lo ng
periods of time, the image can become permanently engrained and cause subtle but permanent ghost images.
This type of damage is NOT COVERED BY YOUR WARRANTY. Never leave your L
CD panel on for long periods of
time while it is displaying the following formats or images:
● Fixed images, such as stock tickers, video game patterns, TV station logos and websites.
● Special formats that do not use the entire screen. For example, viewing letterbox style (16:9) media on a
normal (4:3) display (black bars at top and bottom of screen); or viewing normal style (4:3) media on a wide
screen (16:9) display (black bars on left and right sides of screen).
The following symptoms are not signs of malfunction but technical limitation. Ther efore we disclaim any
responsibility for these symptoms.
● LCD panels are manufactured using an extremely high level of precision technology, however sometimes
parts of the scree
n may be missing picture elements or have luminous spots. This is not a sign of a
malfunction.
● Do not install the LCD panel near electronic equipment that produces electromagnetic waves. Some
equipment placed too near this unit may cause interference.
● Effect on infrared devices – there may be interference while using infrared devices such as infrared cordless
headphones.
Power source: This LED TV is designed to operate on 100~240 volt 50/60 Hz, AC current. Insert the power cord
into a 100~240 volt 50/60 Hz outlet.
To prevent electric shock, do not use the LED TV’s (polarized) plug with an extension cord, receptacle, or other
outlet unless the blades and ground terminal can be fully inserted to prevent bla
de exposure.
Warning: To reduce the risk of fire or electric shock, do not expose this apparatus to rain or moisture.
Caution: Never remove the back cover of the LED TV as this can expose you to very high voltages and other
hazards. If the TV does not operate properly, unplug the LED TV and call your authorized dealer or service center.
Adjust only those controls that are covered in the instructions, as improper changes or modifications not
expressly approved by Furrion could void the user’s warranty.
COMPLIANCE
FCC Statement
Note: : This equipment has been tested and found to comply with the limits for a Class B digital device, pursuant to
Part 15 of the FCC Rules. These limits are designed to provide reasonable protection against harmfu
l interference
in a residential installation. This equipment generates, uses and can radiate radio frequency energy and, if not
installed and used in accordance with the instructions, may cause harmful interference to radio communications.
However, there is no guarantee that interference will not occur in a particular installation. If this equipment does
cause harmful interference to radio or television reception, which can be determined by turning the equipment off
and on, the user is encouraged to try to correct the interference by one or more of the following measures:
– Reorient or relocate the receiving antenna.
– Increase the separation between the equipment a
nd receiver.
4
Safety Instructions
– Connect the equipment into an outlet on a circuit different from that to which the receiver is connected.
– Consult the dealer or an experienced radio/TV technician for help.
WARNING: Changes or modifications to this unit not expressly approved by the party responsible for compliance
could void the user’s authority to operate this equipment under FCC Rules.
This device complies with part 15 of the FCC Rules. Operation is subject to the following two conditions:
1. This device may not cause harmful interference.
2. This device must accept any interference received, including interference that may cause undesired
operation.
SAFETY PRECAUTIONS
WARNING: Never place a television set in an unstable location. A tele
vision set may fall, causing serious personal
injury or death. Many injuries, particularly to children, can be avoided by taking simple precautions such as:
– Using cabinets or stands recommended by the manufacturer of the television set.
– Only using furniture that can safely support the television set.
– Ensuring the television set is not overhanging the edge of the supporting furniture.
– Not placing the television set on tall furniture (for example, cupboards or bookcases) without anchoring both
the furniture and the television set to a suitable support.
– Not placing the television set on cloth or other materials that may be located between the television set and
supporting furniture.
– Educating children abo
ut the dangers of climbing on furniture to reach the television set or its controls.
If your existing television set is being retained and relocated, the same considerations as above should be applied.
The unit emits heat when in operation. Do not place any covers
or blankets on the unit, this may cause overheating. Do not block
ventilation holes, or set up near radiators. Do not place in direct
sunlight. When placing on a shelf, leave 4 inches (10 cm) free space
around the entire unit.
NOTES WHEN MOUNTING THE LED TV ON THE WALL
If the unit is to be mounted on the wall, contact the retailer where you purchased the LED TV for advice, and have
the equipment professionally installed. Incomplete or impro
per installation may cause injury to you and/or damage
to the LED TV.
NOTICE FOR TV CABINET
If the unit is to be mounted on a cabinet smaller than the length of the unit, it could result in an unstable location.
The unit may tumble over, making a risk of personal, possibly fatal injury. This would also damage the product
seriously. Accordingly, Furrion accepts no responsibility or liability for any injuries or property damage resulting
from the improper installation.
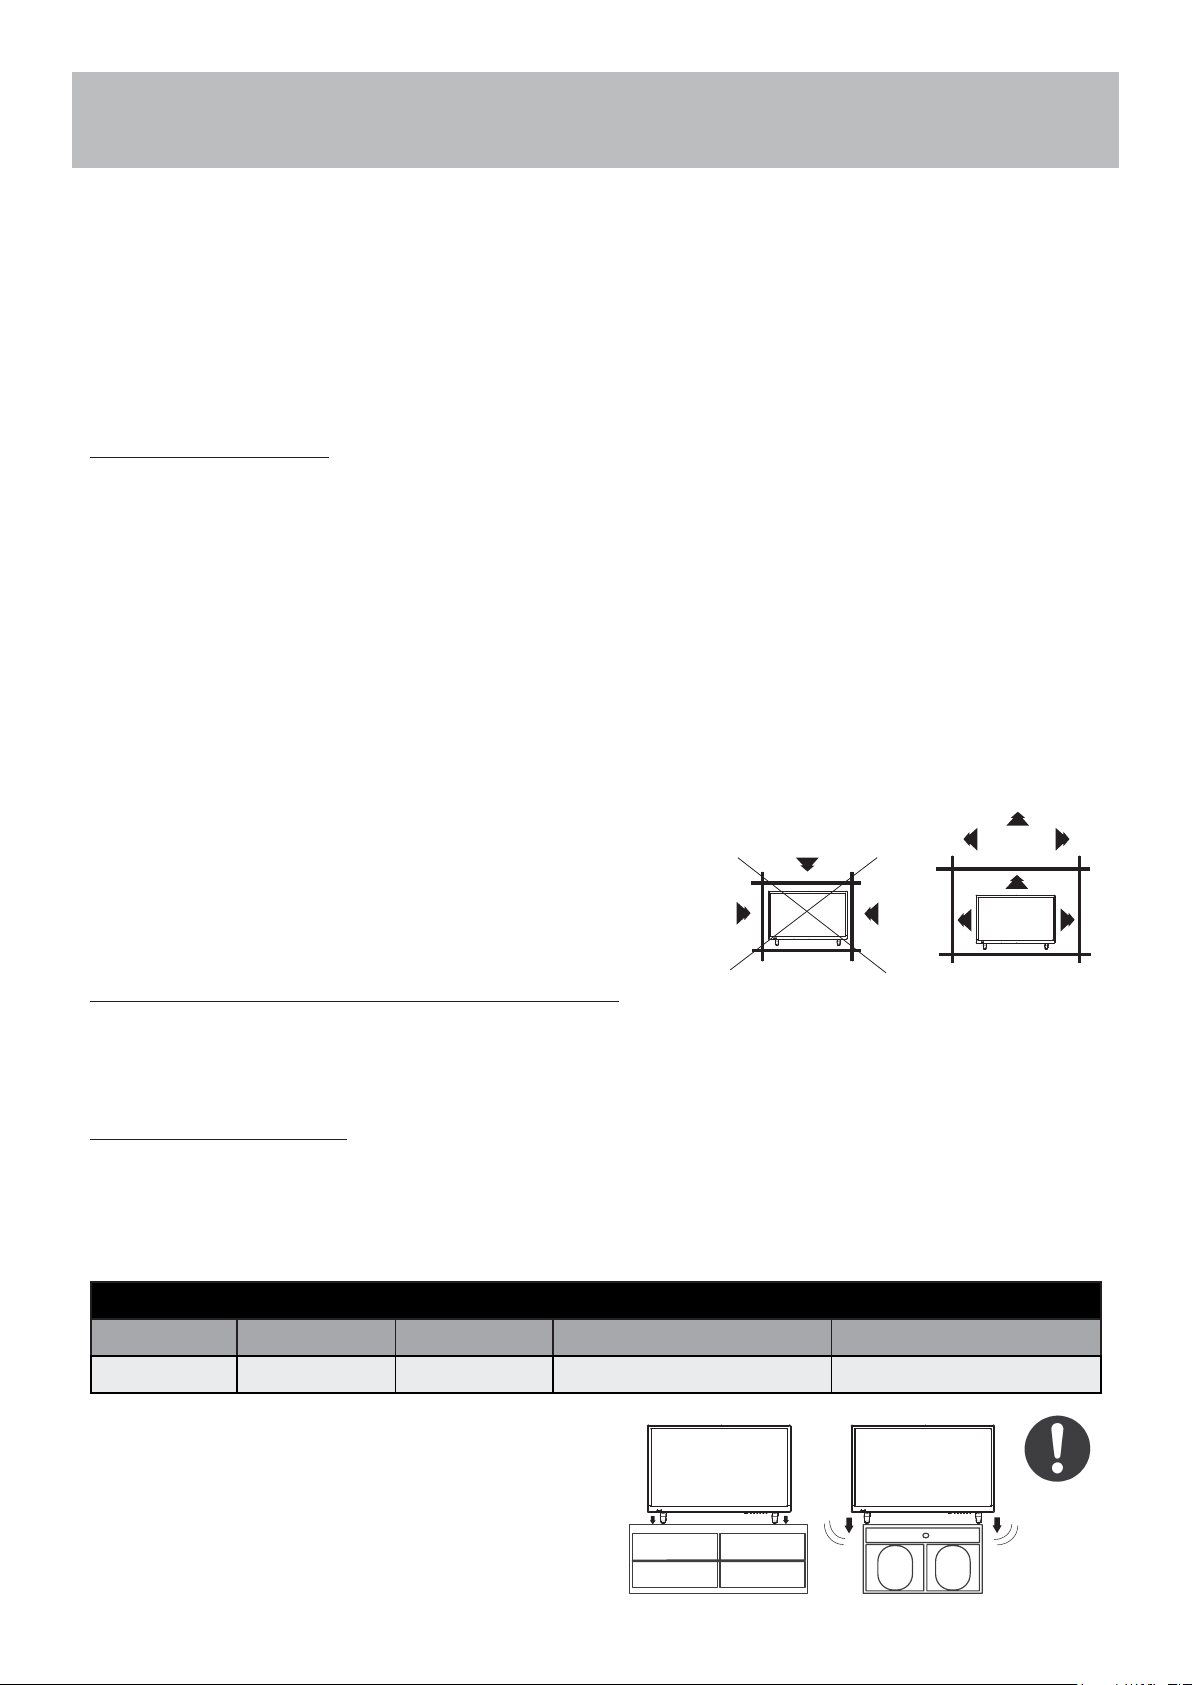
VESA MOUNTING PATTERN
Model Width mm Height mm Screw Size Quantity
FEHS28CAA 200 100 M5*8mm 4
WARNING:
● Do not use this TV with wall mounts that allow the TV
to tilt vertically. Vertical tilting wall mounts may cause
structural damage to the TV.
● Use ONLY fixed or horizontal swiveling wall mounts
with this TV.
4 inches
YES !! NO !!

5
Avertissements de sécurité
MISE EN GARDE
RISQUE DE CHOC ELECTRIQUE
NE PAS OUVRIR
MISE EN GARDE: POUR RÉDUIRE LE RISQUE DE CHOC ÉLECTRIQUE, NE RETIREZ PAS LE COUVERCLE
(OU L’ARRIÈRE). AUCUNE PIÈCE RÉPARABLE PA R L’UTILISATEUR. RENVOYER L’ENTRETIEN AU
PERSONNEL DE SERVICE QUALIFIÉ.
Le symbole «éclair» indique que votre appareil contient des éléments non isolés susceptibles de provoquer
un choc électrique. Pour votre sécurité et celle de votre entourage, veuillez ne pas démonter la structure de
protection du produit.
Le «point d’exclamation» a pour objectif d’attirer votre attention sur certains aspects de la documentation
accompagnant le produit, afin d’éviter des problèmes de fonctio nnement et d’entretien.
Il s’agit d’un produit de Classe II ou appareil électrique à double isolation conçu de sorte à ne nécessiter
aucun raccordement sécurisé à la masse électrique.
ATTENTION: Pour réduire le risque d’inc endie ou d’électrocution, cet appareil ne doit pas être exposé à la pluie ou
à l’humidité, et les objets remplis de liquide, tels que les vases, ne doivent pas être placés sur cet appareil.
MISE EN GARDE: Pour éviter l es chocs électriques, insérez complètement la fich e. Pour les régions à prises
polarisées: Pour éviter les chocs électriques, associez la lame large à la fente large.
CONSIGNES IMPORTANTES SUR LA SÉCURITÉ
1. Lisez ces instructions.
2. Conservez ces instructions.
3. Tenez compte de tous
les avertissements.
4. Suivez toutes les instructions.
5. Ne pas utiliser cet appareil près de l’eau.
6. Nettoyez uniquement avec un chiffon sec.
7. Ne bloquez aucune des ouvertures de ventilation. Installez conformément aux instructions du fabricant.
8. Ne l’installez pas à proximité de sources de chaleur telles que des radiateurs, des bouches de chaleur, des
poêles ou tout autre appareil (y compris les amplificateurs) pr oduisant de la chaleur.
9. Ne pas mettre en échec l’objectif de sécurité de la fiche polar isée ou mise à la terre. Une fiche polarisée
possède deux lames dont l’une est plus large que l’autre. Une fiche de type mise à la terre comporte deux
lames et une troisième broche de mise à la terre. La lame large ou la troisièm
e broche sont fournies pour votre
sécurité. Lorsque la prise fournie ne rentre pas dans votre prise, consultez un électricien pour le remplacement
de la prise obsolète.
10. Protégez le cordon d’alimentation de tout piétinement ou pincement, en particulier au niveau des prises, des
prises de courant et du point de sortie de l’appareil.
11. Utilisez uniquement les accessoires / accessoires spécifiés par le fabricant.
12. Utilisez uniqu ement avec un chariot, un support, un trépied, un support ou une table spécifié par le fabricant ou
vendu avec l’appareil. Lorsqu’un chariot est utilisé, soyez prudent lorsque vous déplacez la
combinaison chariot / appareil pour éviter les blessures causées par un renversement.
13. Débranchez cet appareil pe
ndant les orages ou lorsqu’il n’est p as utilisé pendant de longues
périodes.
14. Confiez toute réparation à un technicien qualifié. Un entretien est requis lorsque l’appareil a
été endommagé de quelque manière que ce soit, par exemple si le cordon d’alimentation ou la fiche est
endommagé, du liquide a été renversé ou des objets sont tombés dans l’appareil ou lorsque l’appareil a été
exposé à la pluie ou à l’humidité. ne fonctionne pas normalement ou a été abandonné.
15. Les appareils ne doivent pas être exposés aux gouttes ou aux éclaboussures, et les objets remplis de liquides,
tels que les vases, ne doivent pas être placés sur l’appareil.
16. Un système d’antenne extérieure ne doit pas être placé à pr
oximité de lignes électriques aé riennes ou
d’autres circuits électriques ou d’éclairage, ou à un endroit o ù il pourrait tomber sur de telles lignes ou circuits
électriques. Lors de l’installation d’un système d’antenne exté rieur, il faut faire très attention à ne pas toucher
de telles lignes ou circuits électriques, car un contact avec e ux pourrait être fatal.
6
Avertissements de sécurité
17. Ne surchargez pas les prises murales, les rallonges ou les prises de courant intégrées car cela peut entraîner un
risque d’incendie ou d’électrocution.
18. Ne poussez jamais d’objets de quelque sorte que ce soit dans ce produit à travers les ouvertures, car ils
pourraient toucher des points de tension dangereux ou court-circuiter des pièces, ce qui pourrait provoquer un
incendie ou une électrocution. Ne jamais renverser un liquide quelconque sur le produit.
19. Si une antenne extérieure est connectée
au téléviseur, assurez-vous que le
système de l’anten ne est mis à la terre
afin de fournir une protection contre les
surtensions et l’accumulation de charges
électrostatiques. La Section 810 du
Code national de l
’électricité fournit des
informations concernant la mise à la terre
correcte du mât et de la structure de
support, la mise à la terre du câble d’entrée
vers une unité de décharge de l’antenne,
la taille des conducteurs de mis e à la terre,
l’emplacement de l’unité de décharg e de
l’antenne, la connexion aux prises de terre et
les exigences relatives aux prises de terre.
20. NOTE À L’ATTENTION DES
INSTALLATEURS (TÉLÉVISION/CÂBLE): Le présent rappel vise à attirer l’attention des installateurs de
systèmes de télévision/câble sur l’Article 820-40 du Code national de l’électricité des États-Unis. Le Code
fournit des directives pour une mise à la terre correcte et, en particulier, dispose que le câble de terre doit être
relié au rése
au de mise à la terre du bâtiment, au plus près que possible du point d’entrée du câble.
21. Lorsque des pièces de rechange sont nécessaires, assurez-vous q ue le technicien utilise les pièces de
rechange spécifiées par le fabricant ou celles qui ont les même s caractéristiques que la pièce d’origine. Des
substitutions non autorisées peuvent entraîner un incendie, un choc électrique ou d’autres dangers.
22. À la fin de toute réparation ou entretien de cet appareil, dema ndez au technicien de service d’effectuer des
vérifications de sécurité pour déterminer si l’appareil est en bon état de fonctionnement.
23. Lorsque vous connectez le produit à un autre équipement, mettez l’appareil hors tension et débranchez tout
l’équipement d
e la prise murale. Ne pas le faire peut provoquer un choc électrique et des blessures graves.
Lisez attentivement le mode d’emploi de l’autre équipement et s uivez les instructions lors des connexions.
24. Un son soudain et à fort volume peut causer une perte d’audition ou des haut-parleurs. Lorsque vous utilisez un
casque (si l’appareil est éq uipé d’une prise casque), maintenez le volume à un niveau modéré. Si vous utilisez un
casque en continu avec un volume sonore élevé, cela peut causer des dommages auditifs.
25. Ne laissez pas le produit produire un son déformé pendant une période prolongée. Cela peut provoquer une
surchauffe et un incendie du haut-parleur.
26. La prise de courant doit être ins
tallée près de l’unité et facilement accessible.
27. La prise secteur est utilisée comme sectionneur et doit rester facilement accessible.
28. Les piles (batteries ou batteries installées) ne doivent pas êt re exposées à une chaleur excessive comme les
rayons du soleil, le feu ou tout autre source de chaleur semblable.
CONDENSATION
De l’humidité se forme dans la section de fonctionnement de l’a ppareil si l’appareil est amené d’un environnement
frais dans une pièce chaude ou si la température de la pièce augmente brusquement. Lorsque cela se produit, les
performances de l’unité seront altérées. Pour éviter cela, laissez l’appareil dans son nouvel environnement pendant
environ une heure avant de l’allumer ou assure
z-vous que la température de la pièce augmente progressivement.
De la condensation peut également se former pendant l’été si l’appareil est exposé à la brise d’un climatiseur. Dans
ce cas, changez l’emplacement de l’unité.
COMMENT MANIPULER LE PANNEAU LCD
● N’appuyez pas trop fort et ne secouez pas le panneau LCD. Cela peut provoquer une cassure de la vitre du
panneau LCD et des blessures.
● Si le panneau LCD est cassé, assurez-vous de ne pas toucher le liquide dans le panneau. Cela peut provoquer
une inflammation de la peau.
CODE NATIONAL DE
L'ÉLECTRICITÉ S 289 8A
SYST ÈM E D'ÉLECT RO DE DE MISE À LA TERRE
DU SERVICE ÉLECTRIQUE
(ART. 250, PARTIE H DU CODE NATIONAL DE
L'ÉLECTRICITÉ)
COLLIERS DE MISE À LA TERRE
COLLIER DE MISE
À LA TERRE
ANT ENNE
UNITÉ DE DÉCHARGE
(SECTION 810-20 DU CODE NATIONAL
DE L'ÉLECT RI CITÉ)
EXE MPLE DE MISE À LA TERRE D'UNE ANTENNE
CONFORME AU COD E NATIONAL DE L'ÉLECTRICITÉ.
CÂBLE D'ENTRÉE
D'ANTENNE
CONDUCTEURS DE MISE À LA TERRE
(SECTION 810-21 DU CODE NATIONAL
DE L'ÉLECT RI CITÉ)
ÉQ UIPE MENT DE
SERVICE ÉLECTRIQUE

7
Avertissements de sécurité
● Si le liquide pénètre dans votre bouche, se gargariser immédiatement et consulter votre médecin. En outre,
sile liquide pénètre dans vos yeux ou touche votre peau, consultez votre médecin après un rinçage d’au moins
15minutes dans de l’eau propre.
Effets négatifs possibles sur le panneau LCD: Si un motif fixe (non mobile) reste sur l’écran LCD pendant de
longues périodes, l’image peut s’incruster de manière permanente dans le panneau LCD et provoquer des images
fantômes subtiles mais permanentes. Ce type de dommage n’est PAS COUVERT PAR VOTRE GARANTIE.
Nelaissez jamais votre panneau LCD allumé pendant de longues périodes pendant qu’il affiche les formats ou
images suivants:
● Images fixes, telles que des tickers boursiers, des modèles de jeux vidéo, des logos de stations de télévision et
des sites Web.
● Formats spéciaux qui n’utilisent pas tout l’écran. Par exemple, afficher un média de style boîte aux lettres (16:9)
sur un affichage normal (4: 3) (barres noires en haut et en bas de l’écran); ou en visualisant un média de style
normal (4: 3) sur un écran large (16: 9) (barres noires sur les côtés gauche et droit de l’écran).
Les symptômes s
uivants ne sont pas des signes de dysfonctionnement mais une limitation technique. Par
conséquent, nous déclinons toute responsabilité pour ces symptômes.
● Les panneaux LCD sont fabriqués à l’aide d’une technologie de précision de très haut niveau, mais il arrive
parfois que des éléments d’image manquent ou que des points lumineux apparaissent sur certaines parties de
l’écran. Ce n’est pas un signe de dysfonctionnement.
● N’installez pas le panneau LCD à proximité d’un équipement électronique produisant des ondes
électromagnétiques. Certains équipements placés trop près de cet appareil peuvent provoquer des
interférences.
● Effet sur les périphériques infrarouges - Il peut y avoir des i nterférences lors de l’utilisation de périphériques
infrarouges tels qu’un casque sans fil infrarouge.
Source d’énergie: Ce téléviseur LED est conçu pour fonctionner sur 100 ~ 240volts 50/60 Hz, courant alternatif.
Insérez le cordon d’alimentation dans une prise 100 ~ 240volts 50/60 Hz.
Pour éviter les chocs électriques, n’utilisez pas la prise (polarisée) du téléviseur à DEL avec une rallonge, une prise
ou une autre prise à moins que les lames et la borne de mise à la terre puissent être complètement insérées pour
éviter l’exposition des lames.
Attention: Pour réduire le risque d’incendie ou d’électrocution, n’exposez pas cet appareil à la pluie ou à l’humidité.
Mise en garde: Ne retirez jamais le couvercle arrière du téléviseur à DEL car cela peut vous exposer à des
tensions très élevées et à d’autres dangers. Si le téléviseur ne fonctionne pas correctement, débranchez le
téléviseur à DEL et appelez votre revendeur ou centre de service agréé.
Réglez seulement les contrôles qui sont couverts dans les instructions, car des changements ou des modifications
non expressément approuvés par Furrion pourraient annuler la garantie de l’utilisateur.
CONFORMITÉ
Déclaration de la FCC
Remarque: Le présent équipement a été testé et déclaré conforme aux limitations pour appareils numériques
de classe B, aux termes de la Section 15 des règlements de la FCC. Ces limitations sont conçues pour fournir une
protection raisonnable contre les interférences nocives dans un environnement domestique. Cet appareil génère,
utilise et peut émettre de l’énergie RF (radiofréquence) et peut, en cas d’installation ou d’utilisation non conforme
aux instructions, engendrer des interférences nuisibles au niveau des communications radio.
Rien ne garantit toutefois l’absence d’interféren
ces dans le cadre d’une installation particulière. Si cet équipement
produit des interférences perturbant la réception de la radio ou de la télévision (ce que vous pouvez déterminer en
éteignant et en allumant l’équipement), nous vous recommandons d’essayer d’éliminer les interférences d’une des
façons suivantes:
– Réorientez ou déplacez l’antenne de réception.
– Augmentez l’espacement entre l’équipement et le récepteur.
– Branchez l’appareil sur une prise de courant située sur un circuit différent de celui sur lequel le récepteur est
branché.
– Consultez votre fournisseur ou un technicien radio/TV expérimenté.Augmentez la distance entre l’équipement
et le récepteur.
8
Avertissements de sécurité
AVERTISSEMENT: Toute modification ou tout changement apporté(e) à ce produit e t non expressément
approuvé(e) par la partie responsable de la conformité est susceptible d’engendrer une annulation du droit
d’utilisation de cet équipement par l’utilisateur aux termes des Règles de la FCC.
Le présent appareil est conforme aux exigences de la Section 15 des Règles de la FCC. Le fonctionnement est
assujetti aux deux conditions suivantes:
1. Le présent appareil ne doit pas causer d’interférences nuisibles.
2. Le présent appareil doit accepter toutes les interférences reçues, y compris celles susceptibles de provoquer
un fonctionnement non souhaité.
PRÉCAUTIONS DE SÉCURITÉ
AVERTISSEMENT: Ne placez jamais un téléviseur à un endroit instable. Il pourrait tomber et causer des blessures
graves, voire mortelles. Un grand nombre de blessures, particulièrement aux enfants, peut être évité au moye
n de
précautions simples, comme:
– Utilisation d’armoires ou de supports recommandés par le fabricant du téléviseur.
– N’utiliser que des meubles pouvant supporter le téléviseur en toute sécurité.
– S’assurer que le téléviseur ne surplombe pas le bord des meubles de soutien.
– Ne pas placer le téléviseur sur des meubles hauts (par exemple, des armoires ou des bibliothèques) sans
ancrer à la fois le mobilier et le téléviseur à un support approprié.
– Ne pas placer le téléviseur sur un chiffon ou d’autres matériau x pouvant être placés entre le téléviseur et les
meubles de soutien.
– Éduquer les enfants sur les dangers de grimper sur les meubles pour atteindre le téléviseur ou ses commandes.
Si votre téléviseur existant est conservé et déplacé, les mêmes considérations que ci-dessus doivent être
appliquées.
L’unité émet de la chaleur lorsqu’elle est en marche. Ne pl
acez pas de
couvertures ou de couvertures sur l’appareil, cela pourrait provoquer
une surchauffe. Ne bloquez pas les orifices de ventilation ou i nstallez-
les près des radiateurs. Ne pas placer en plein soleil. Lorsque vous le
placez sur une étagère, laissez un espace libre de 4 pouces (10 cm)
autour de l’ensemble de l’unité.
REMARQUES LORS DU MONTAGE DE LA TV LED SUR LE MUR
Si l’unité doit être installée sur le mur, contactez le revendeur chez qui vous avez acheté le téléviseur LED pour
obtenir des conseils et faites installer l’équipement par un professionnel. Une installation incomplète ou incorrecte
peut vous blesser et / ou endommager le téléviseur LED.
AVIS POUR LE CABINET TV
Si l’unité doit être montée sur une armoire plus petite que la longueur de l’unité, cela pourrait entraîner un
emplacement instable et l’unité pourrait dégringoler, ce qui pourrait entraîner d
es blessures personnelles, voire
mortelles. En outre, cela endommagerait sérieusement le produit . En conséquence, Furrion n’accepte aucune
responsabilité pour toute blessure ou dommage matériel résultant d’une mauvaise installation.
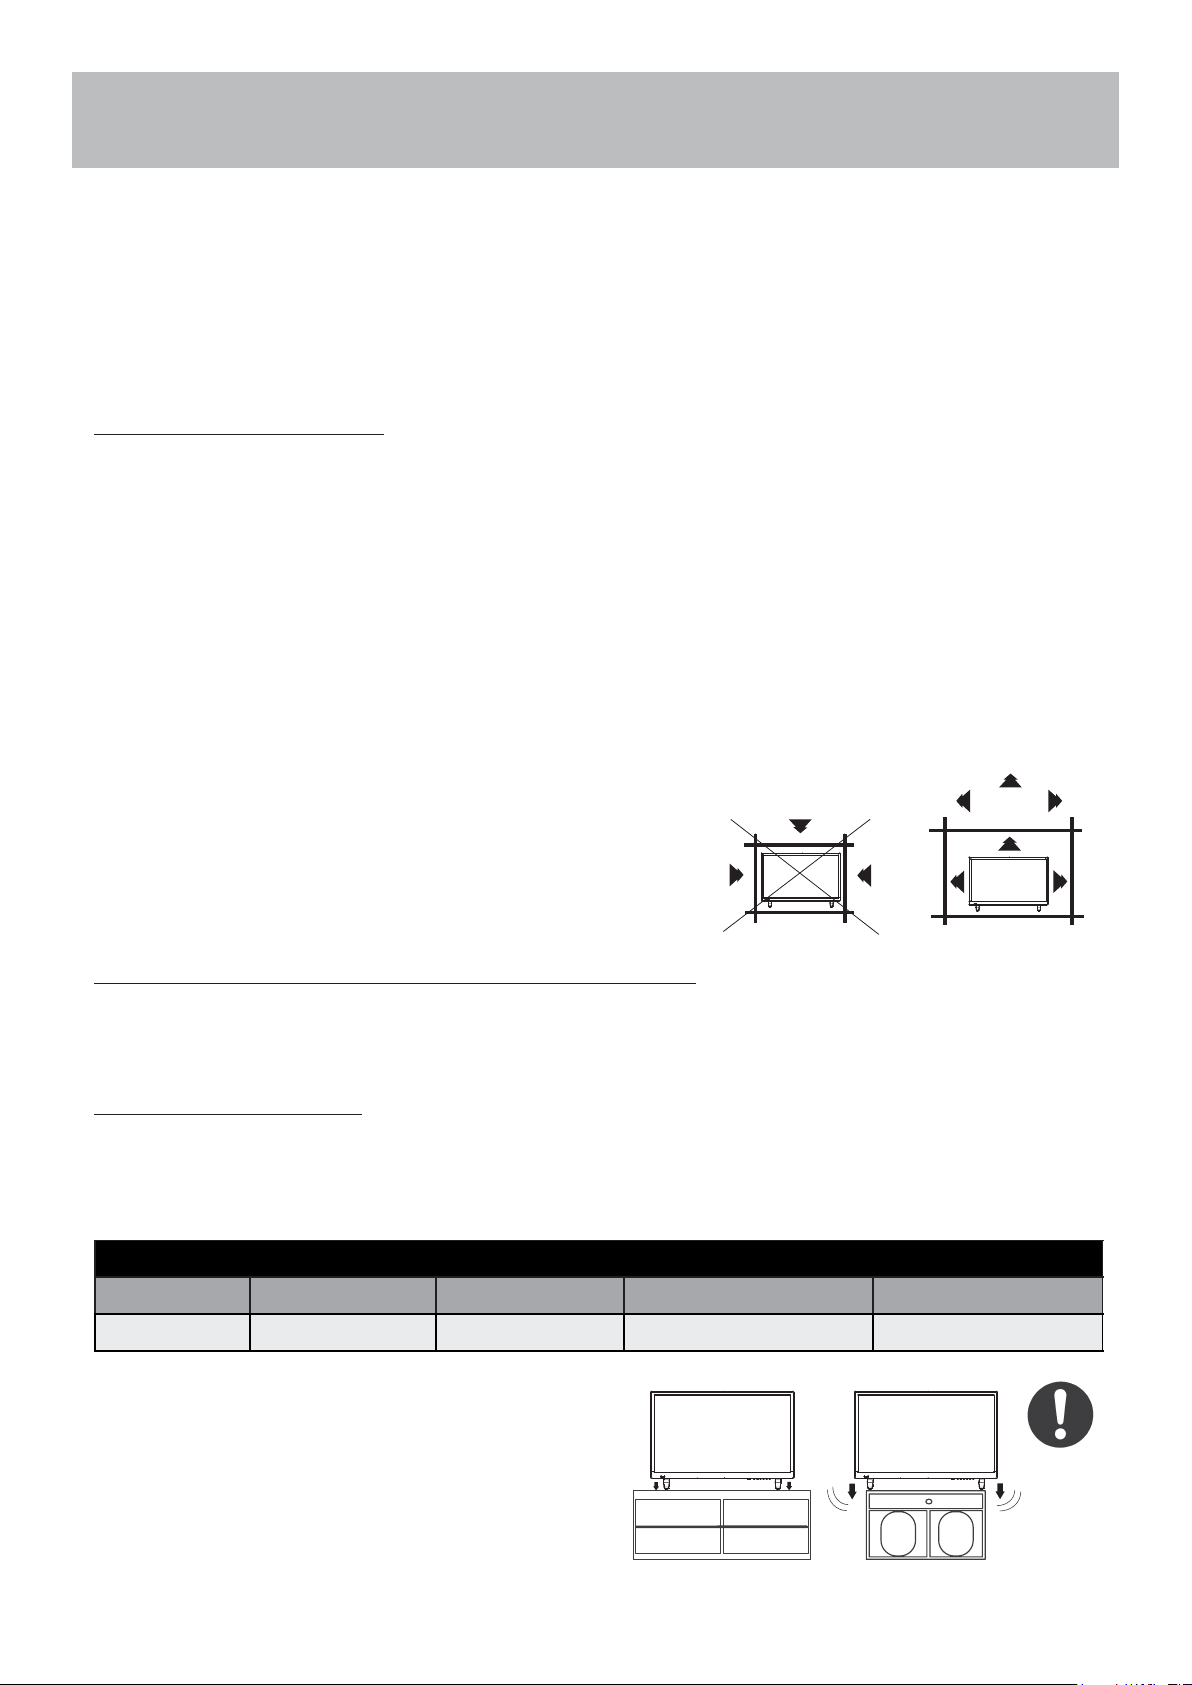
MODÈLE DE MONTAGE VESA
Modèle Largeur en mm Hauteur en mm Taille de vis Quantité
FEHS28CAA 200 100 M5*8mm 4
ATTENTION:
● N’utilisez pas ce téléviseur avec des supports muraux
qui permettent au téléviseur de s’incliner verticalement.
Les supports muraux à inclinaison verticale peuvent
endommager la structure du téléviseur.
● Utilisez UNIQUEMENT des supports muraux fixes ou
horizontaux pivotants avec ce téléviseur.
4 pouces
Non!
po c
pouc
Oui!! Non!!
pouc

5
Table of Contents
Important Safety Instructions .........................................................................................................................................1
Table of Contents ..........................................................................................................................................................5
Introduction ....................................................................................................................................................................6
Remote Control
Battery Install .................................................................................................................................................................7
Overview .......................................................................................................................................................................8
TV Overview
Front Panel ................................................................................................................................................................10
Rear Panel & Pedestal Removal ................................................................................................................................. 11
Installation
Connection to Antenna & Cable / Satellite Box ...........................................................................................................12
Connection to HDMI Input ...........................................................................................................................................13
Connection to Component YPbPr Input ......................................................................................................................14
Connection to Composite Input ...................................................................................................................................15
Connection to a Personal Computer ...........................................................................................................................16
Connection to a Home Theater System ......................................................................................................................17
TV Setup
Initial Setup Wizard .....................................................................................................................................................18
TV Provider Setup & Channel Auto Scan ....................................................................................................................19
Picture Setting
Brightness ...................................................................................................................................................................20
Contrast ......................................................................................................................................................................20
Color ............................................................................................................................................................................20
Tint ...............................................................................................................................................................................20
Sharpness ...................................................................................................................................................................20
Color Temperature. ......................................................................................................................................................20
Audio Settings
Sound Mode ................................................................................................................................................................21
Bass .............................................................................................................................................................................21
Treble ..........................................................................................................................................................................21
Balance .......................................................................................................................................................................21
Surround sound ...........................................................................................................................................................21
SPDIF Type ................................................................................................................ ...................................................21
Audio Language...........................................................................................................................................................21
Date & Time Settings...................................................................................................................................................22
Setup Settings
Menu Languages .........................................................................................................................................................23
Transparency ...............................................................................................................................................................23
Restore Default ............................................................................................................................................................23
HDMI CEC ..................................................................................................................................................................23
Closed Captions ..........................................................................................................................................................25
Parental Control ..........................................................................................................................................................26
TV Settings
Favorite .......................................................................................................................................................................2
Show / Hide .................................................................................................................................................................28
Channel Label .............................................................................................................................................................28
USB Modes
MHL Setting
.................................................................................................................................................................29
................................................................................................................................................................
30
.............................................31
Troubleshooting ..........................................................................................................................................................3
8
2
Warranty ..................................................................................................................................................................... 33
CEC................... ..........................................................................................................................................................24
6
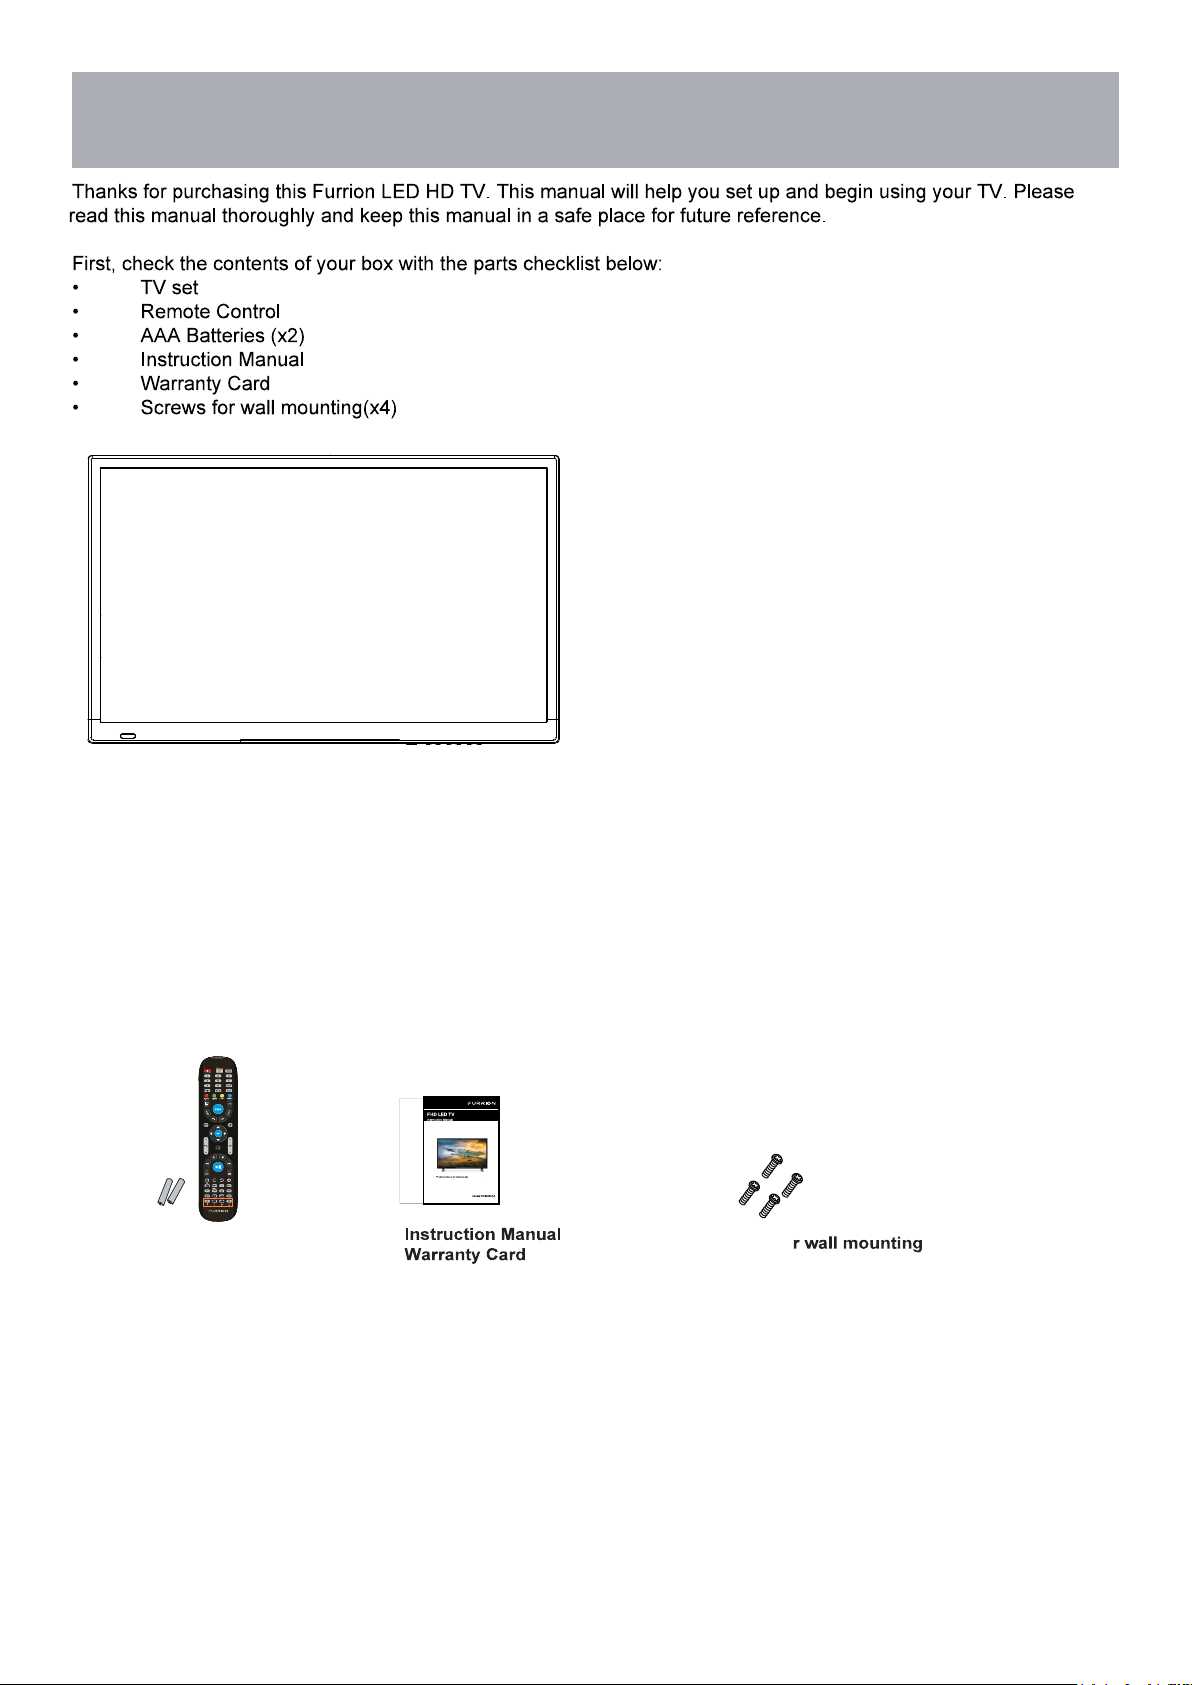
Introduction
What’s In The Box
•
•
• Remote Control
• AAA Batteries x 2
• Screws fo
Battery Install
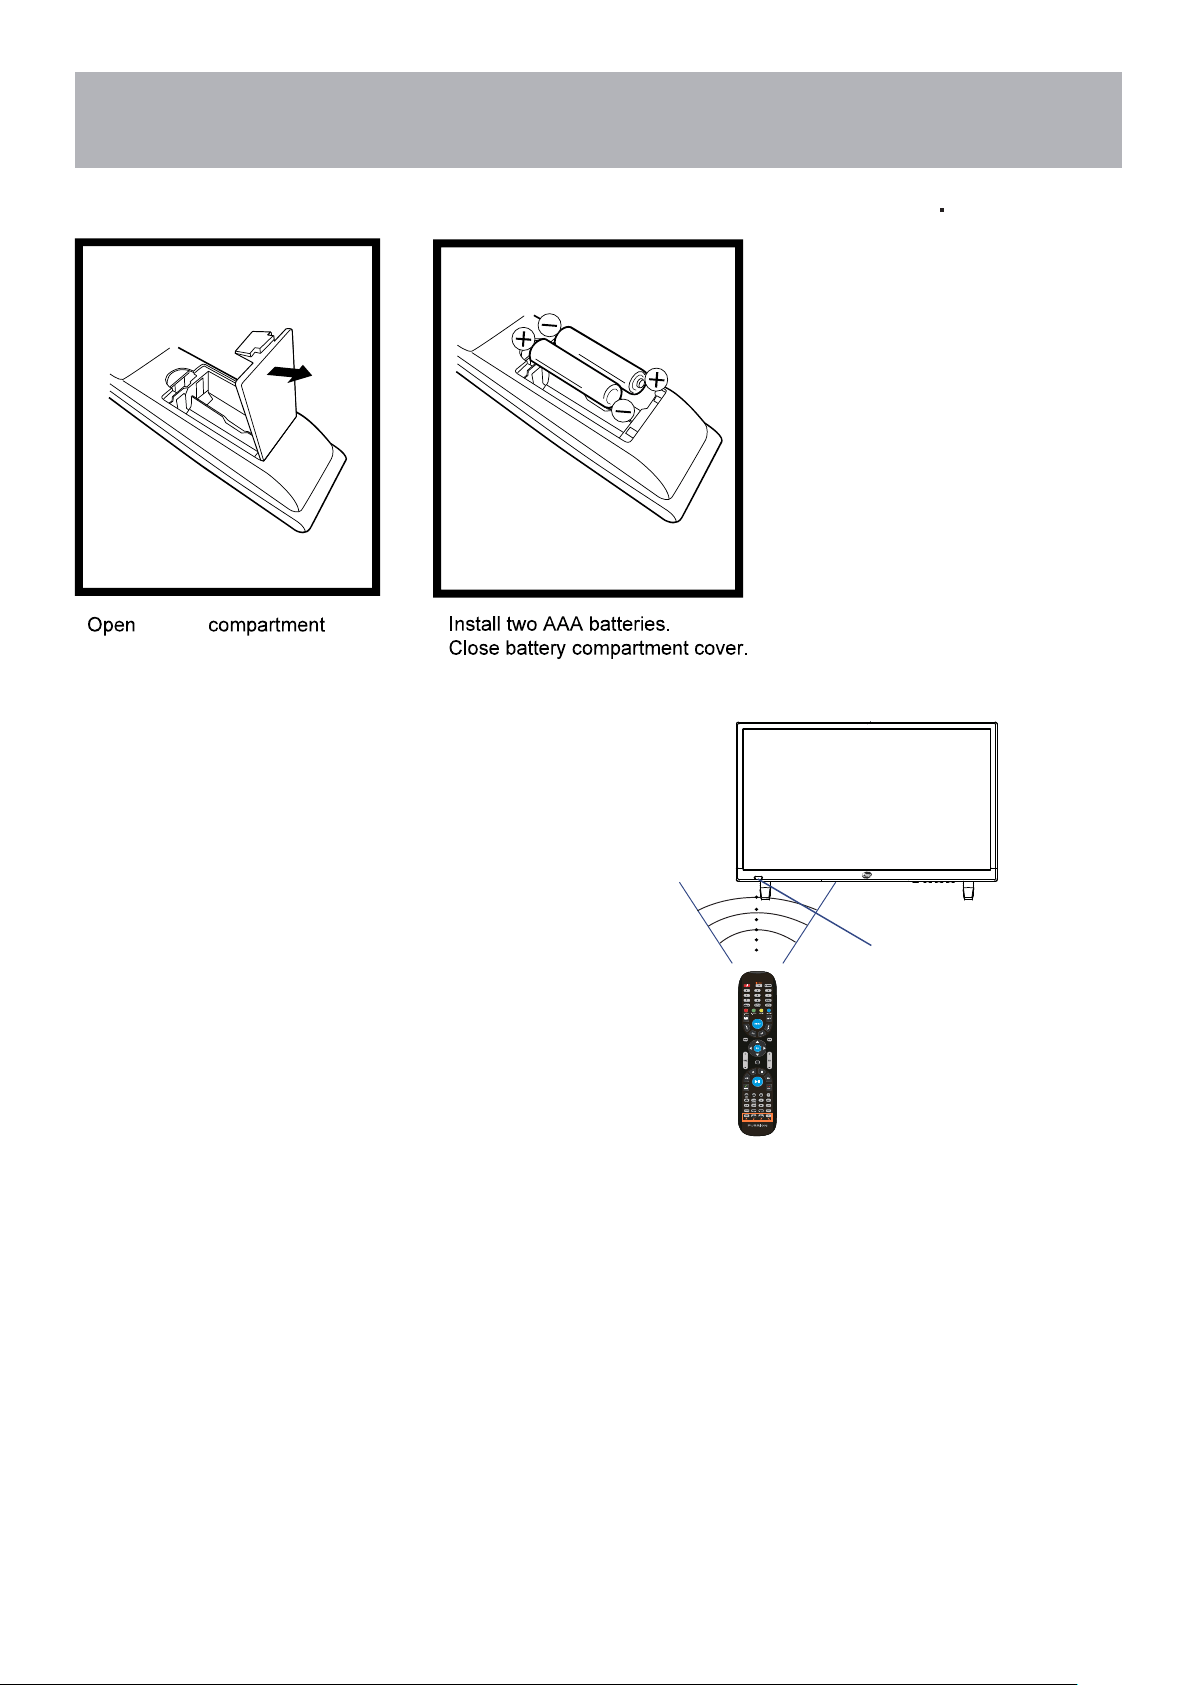
Remote Control
Your remote control handset is powered by two (2) AAA type batteries
30 30
IR Receiver
• battery cover.
• Effective remote range is approximately 16 feet at an angle
of no greater than 30° to the left / right or 20° up /down to
the IR sensor.
• To avoid possible damage from battery chemical leakage,
remove the batteries if you do not plan to use the remote for
an extended period of time. Do not mix batteries of different
age and / or type. Always discard used batteries safely.
• Do not expose the remote control to liquids, direct sun-light
or sources of excessive heat.
• The IR receiver on the TV will not work properly if the set is
in direct sunlight.
•
•
NOTE: Improper use of batteries can result in a chemical
leakage or explosion.
Cable / Satellite Remote Control Codes:
NOTE: The remote control from your Cable/Satellite provider can be programmed to operate
most of the major functions of this TV which include: POWER, INPUT / SOURCE, VOLUME +,
VOLUME - , CHANNEL +, CHANNEL - , SELECT/OK/ENTER (based on your remote), and NUMBER
buttons. For non-major TV functions not listed, use the remote control included with this TV.
To program your Cable / Satellite remote to operate this TV, follow the programming instructions
included with your providers’ remote and use the following codes.
Comcast or Direct TV : 10030
AT & T (U-verse) : 1043
Dish Network : 506
RCA Universal : 0030
7
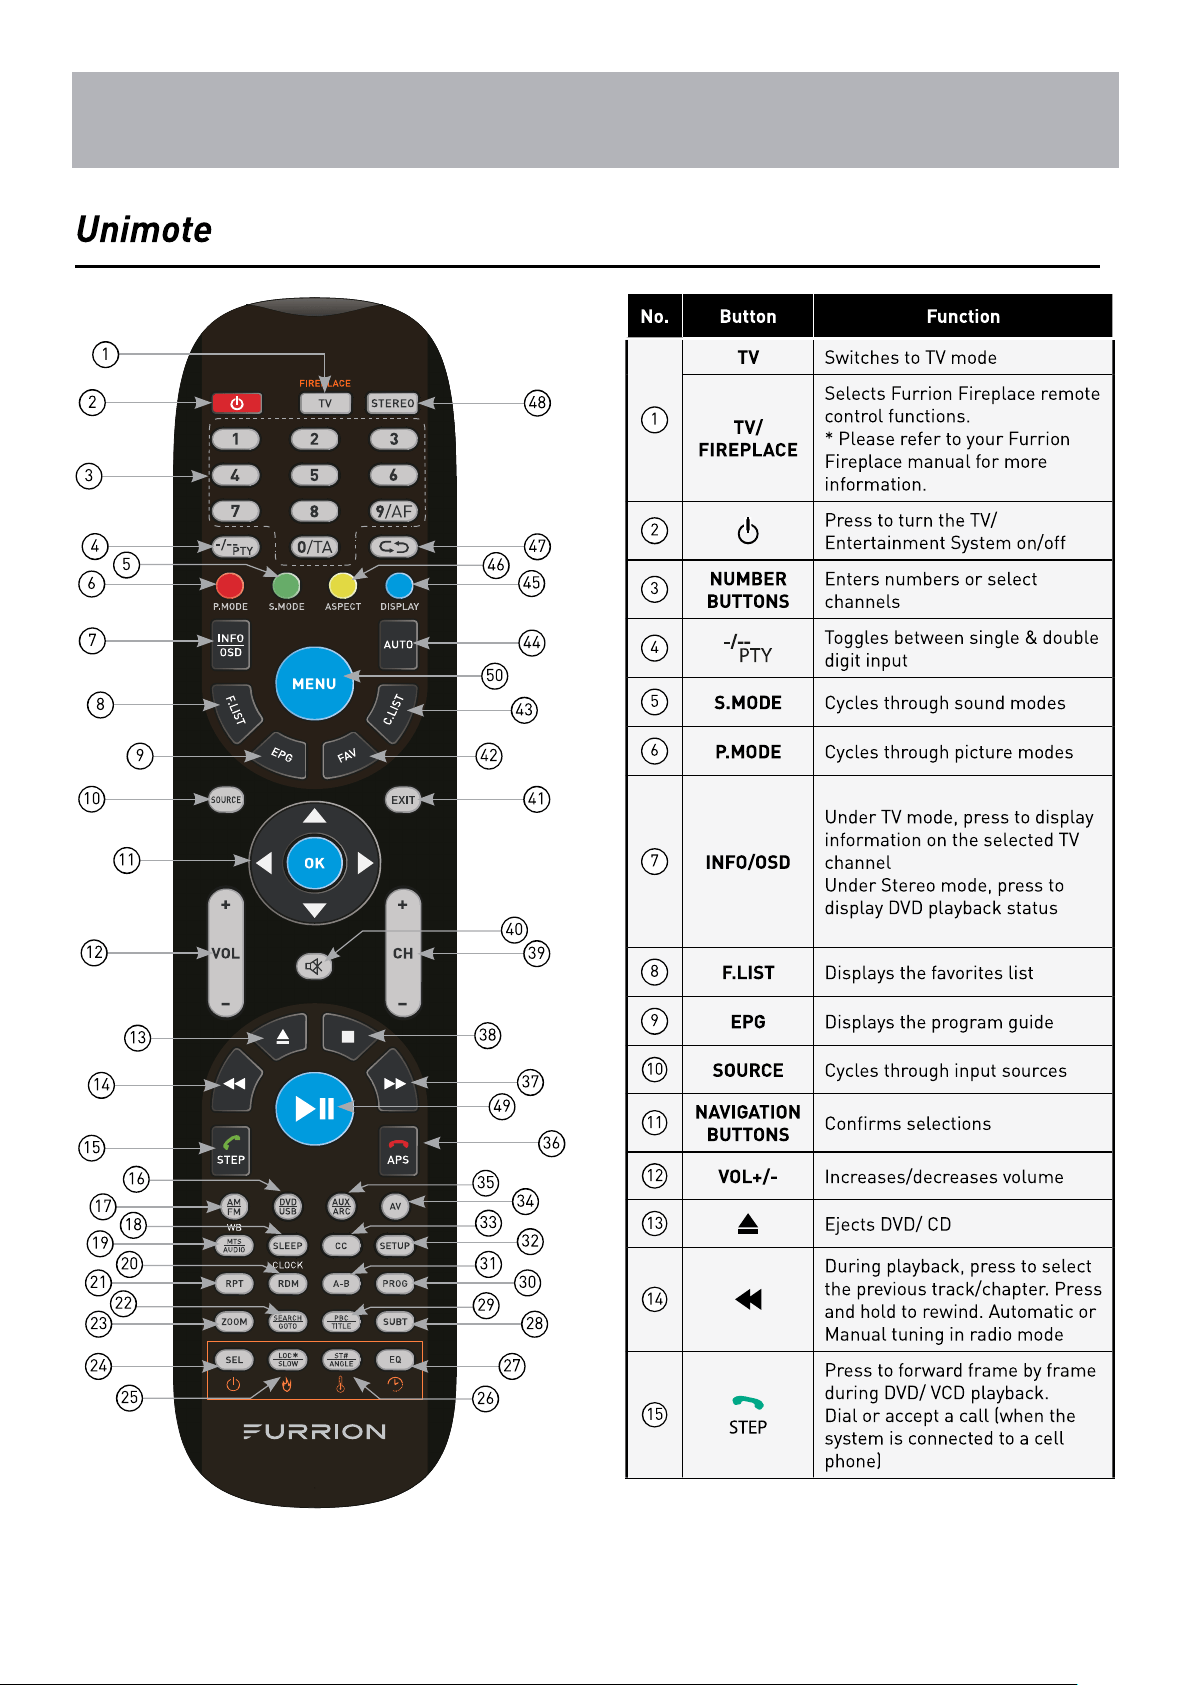
Remote Control
Overview
8
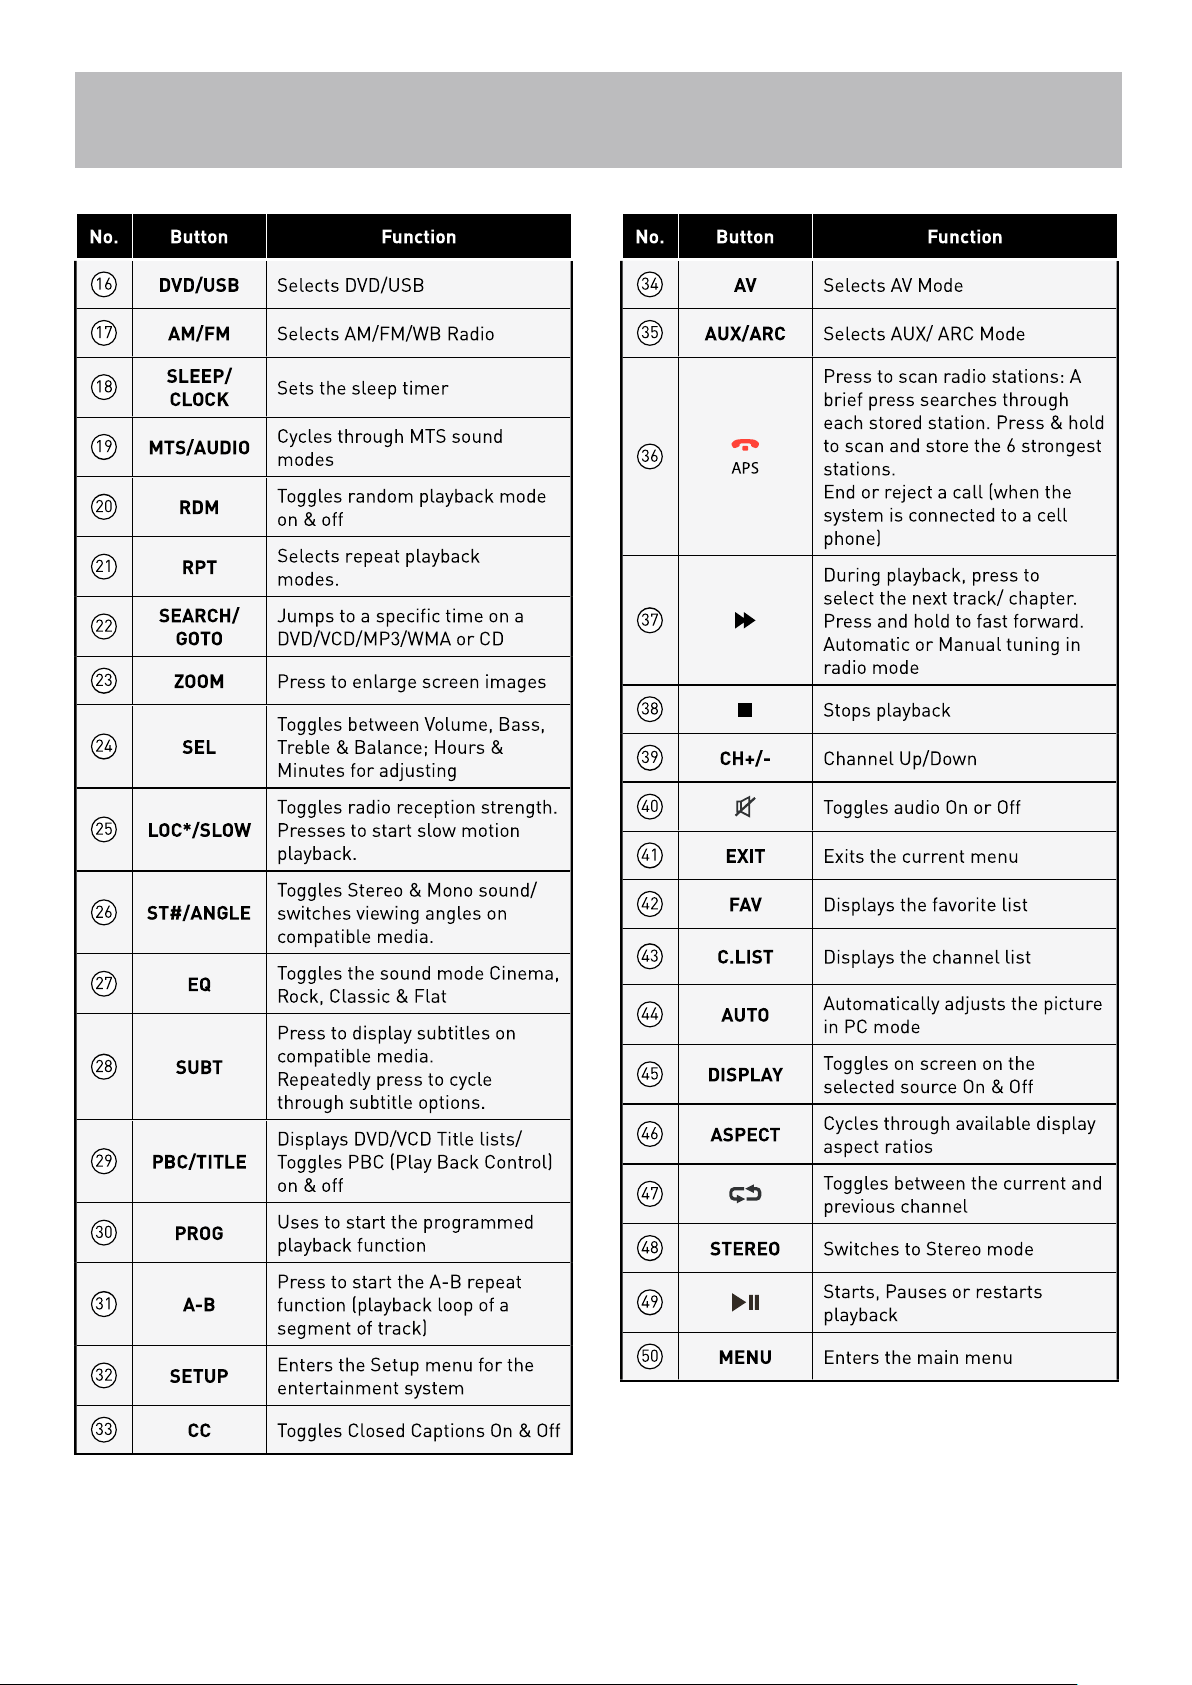
Remote Control
Overview
9
10
TV Overview
Front Panel
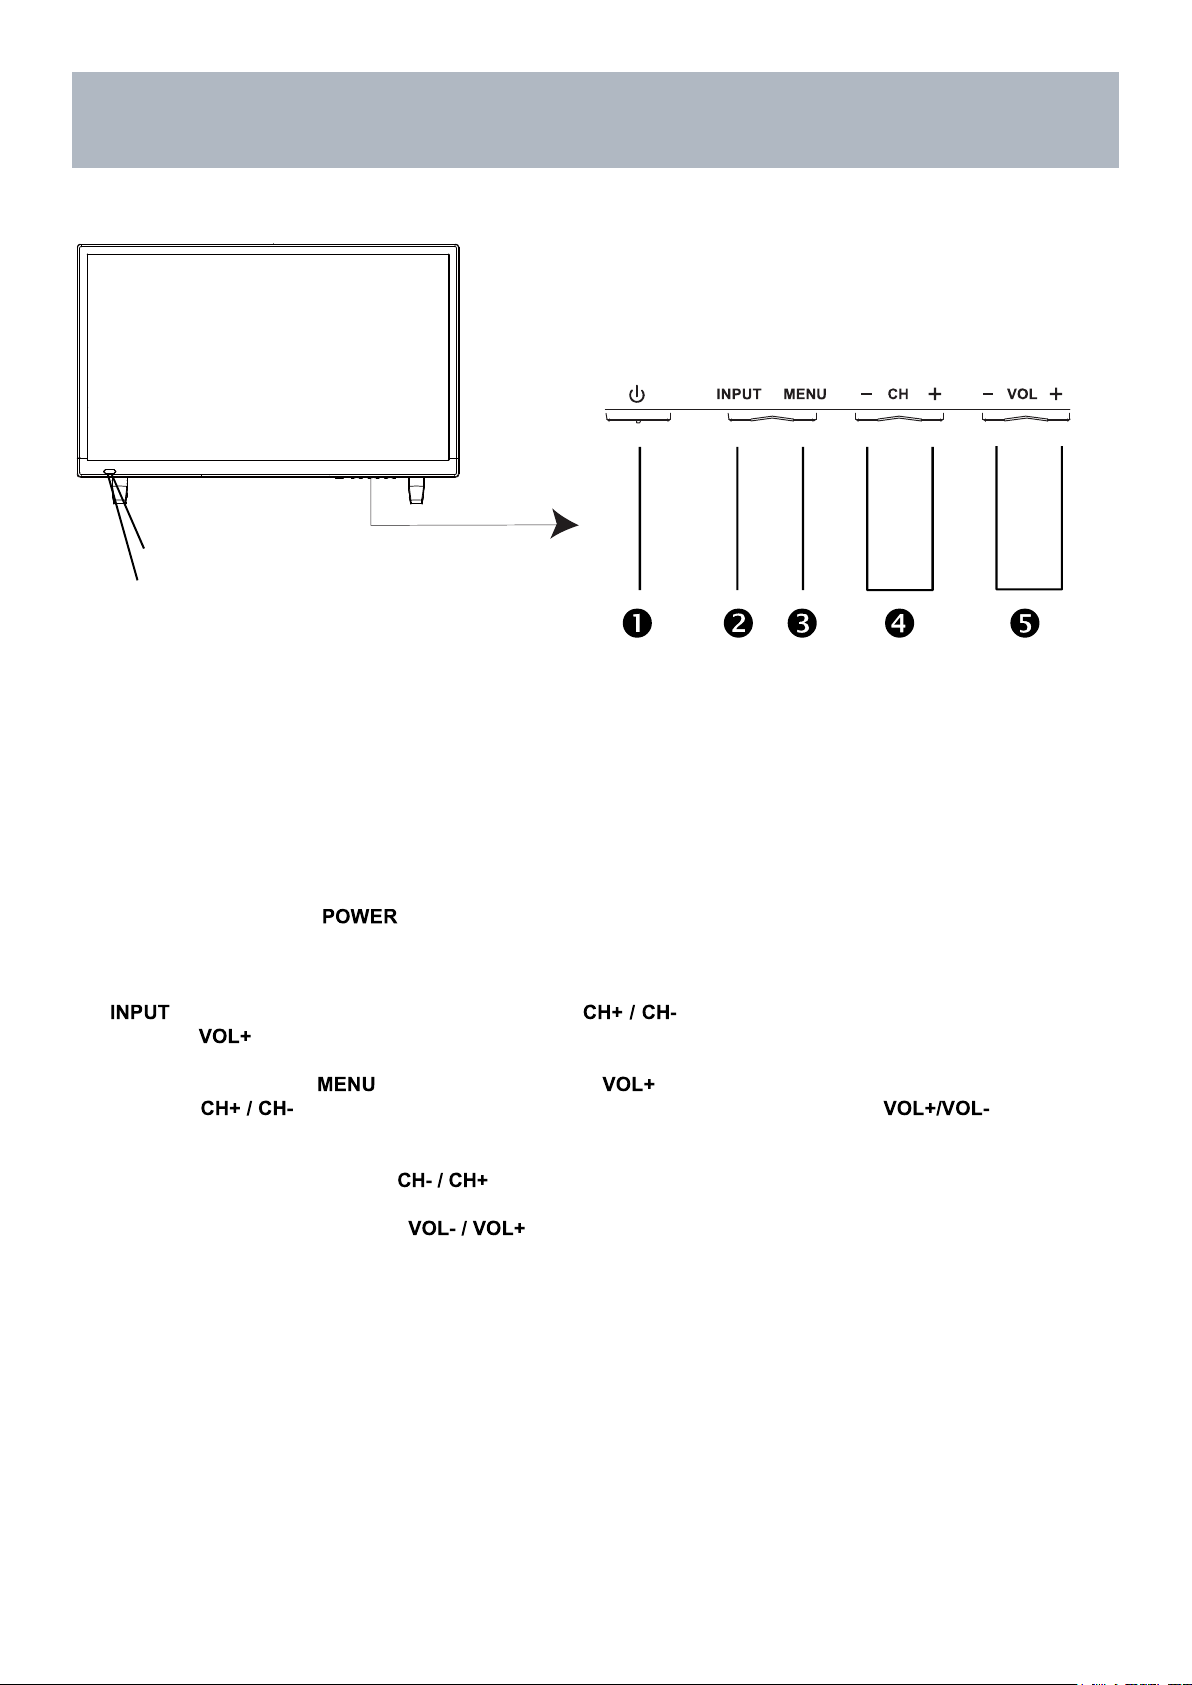
IR Receiver
A soft light illuminates when the
television power is on.
2. INPUT - After connecting your DVD, cable box, etc. select the appropriate input source to view. Press the
button to display the input options. Press the buttons to highlight the input source and
press the button to select.
3. MENU - Press the button to display. Press to select from the 6 menu options available.
Press the buttons to select a feature from the selected menu then press the buttons
to adjust the volume settings.
4. Channel (-CH+) - Press the buttons to select a channel in the TV mode.
5. Volume (-VOL+) - Press the buttons to adjust the volume up or down.
1. POWER - Press the button to turn the TV ON/ OFF (standby). The screen image will
appear within a few seconds, and the LED will turn on.
11
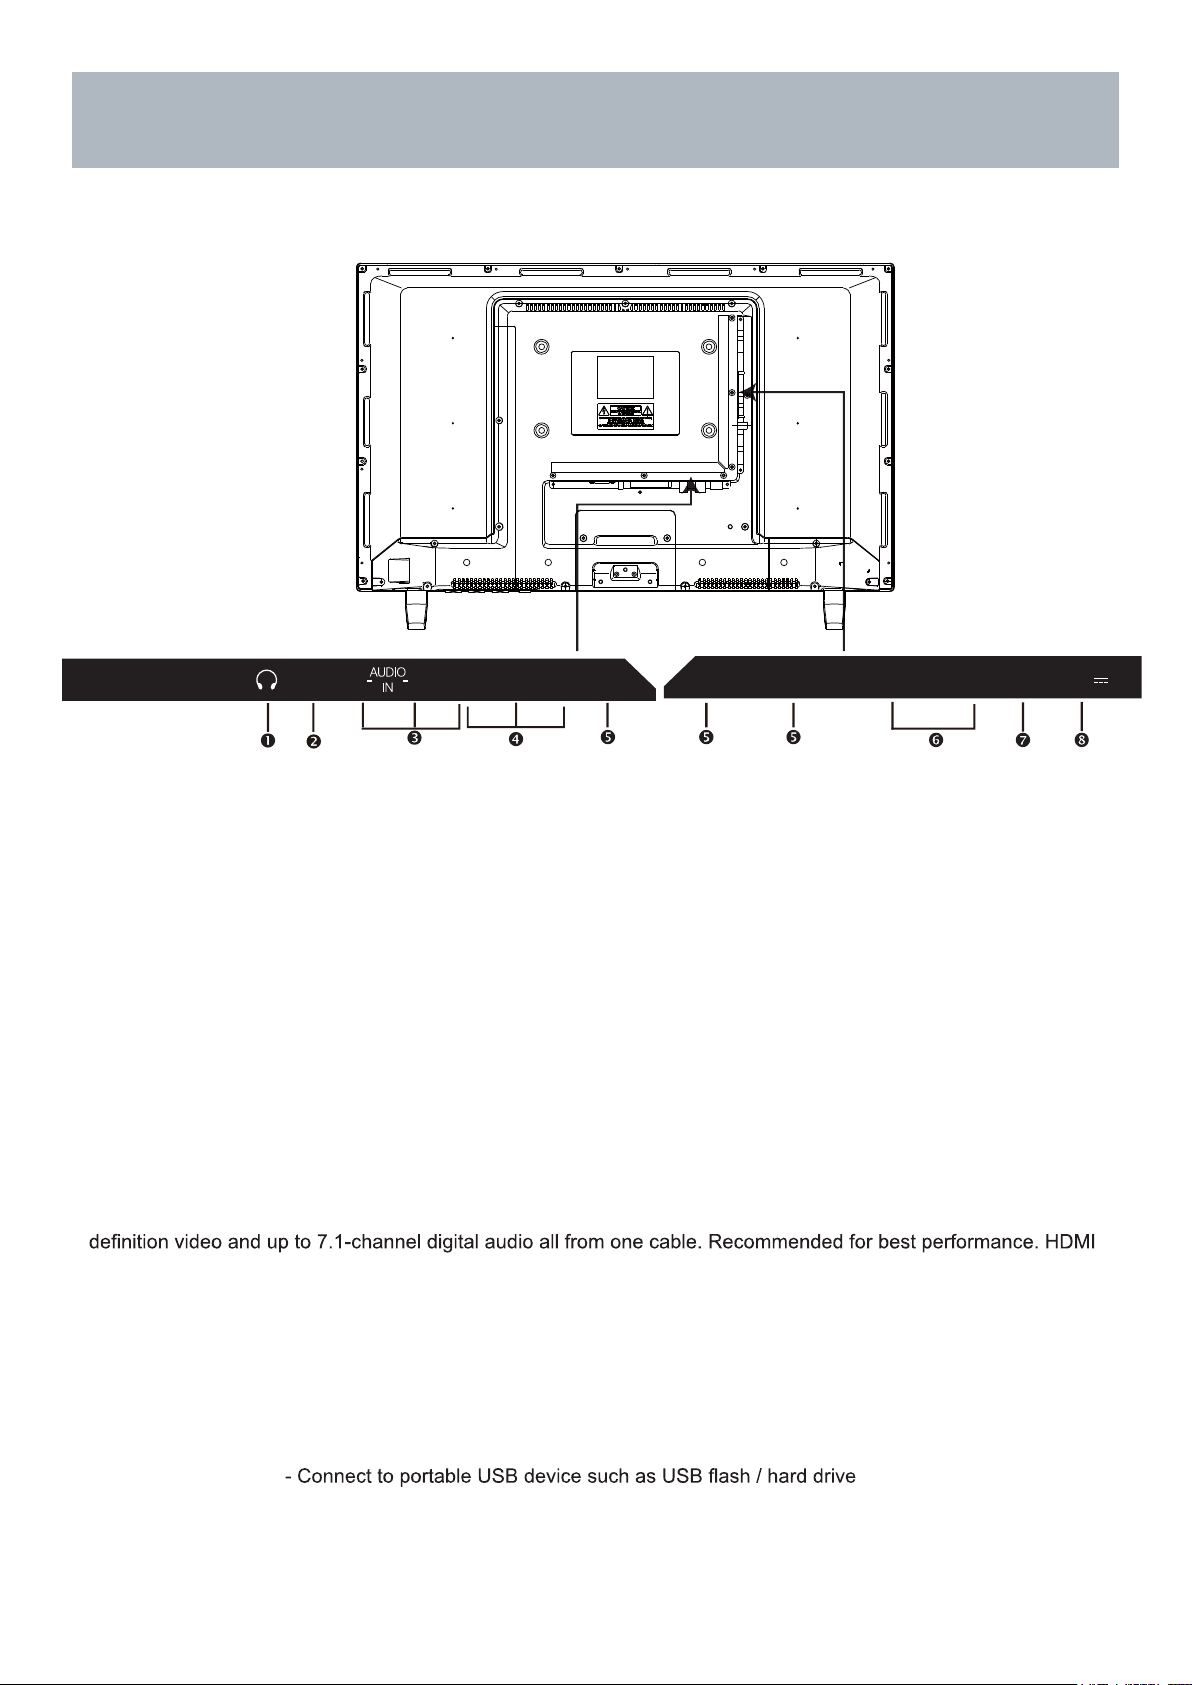
TV Overview
Rear Panel & Pedestal Removal
8. USB Input Port
supports MP3 and JPEG.
5. HDMI Input - Connects to digital AV equipment that feature HDMI connectivity. HDMI supports enhanced high
cable not included.
6. PC IN - VGA Input - Connect an optional VGA cable (not included) from your personal computer.
PC Audio Input - Audio cable (not included) for sound.
4. Component Y Pb Pr Input - Connect to an AV device that features component (Y Pb Pr) video and audio output
jacks.
7. RF Input - Connect an antenna or cable connection for television reception.
Note: Use an outdoor antenna, cable or satellite for best reception.
1. Headphone Jack - Connect a stereo headphone (not in
cluded
) for private listening.
2. SPDIF - Connect an optional coaxial digital cable (not included) through a compatible amp / receiver to enjoy
superior audio sound.
3. AV Input - Connect an external device to the composite VIDEO(Y) and AUDIO (L / R) out jacks found on most
video equipment.
NOTE: You must remove the
pedestal before wall mounting.
Wall Mounting
It is recommended that you consult a professional before mounting this TV a wall.
Use VESA 200 x 100 wall mount hardware.
,
HDMI2
IN
RF
IN
VGA
IN
H DMI 3 IN
MH L
PC AUDIO
IN
USB(2.0) IN
DC 5V
Max. 500mA
L
R V /Y
P b
HDMI1 IN
ARC
P r
COAX
OUT
12
Coaxial / RF Cable (not included)
Ant. / Cable
Wall Outlet
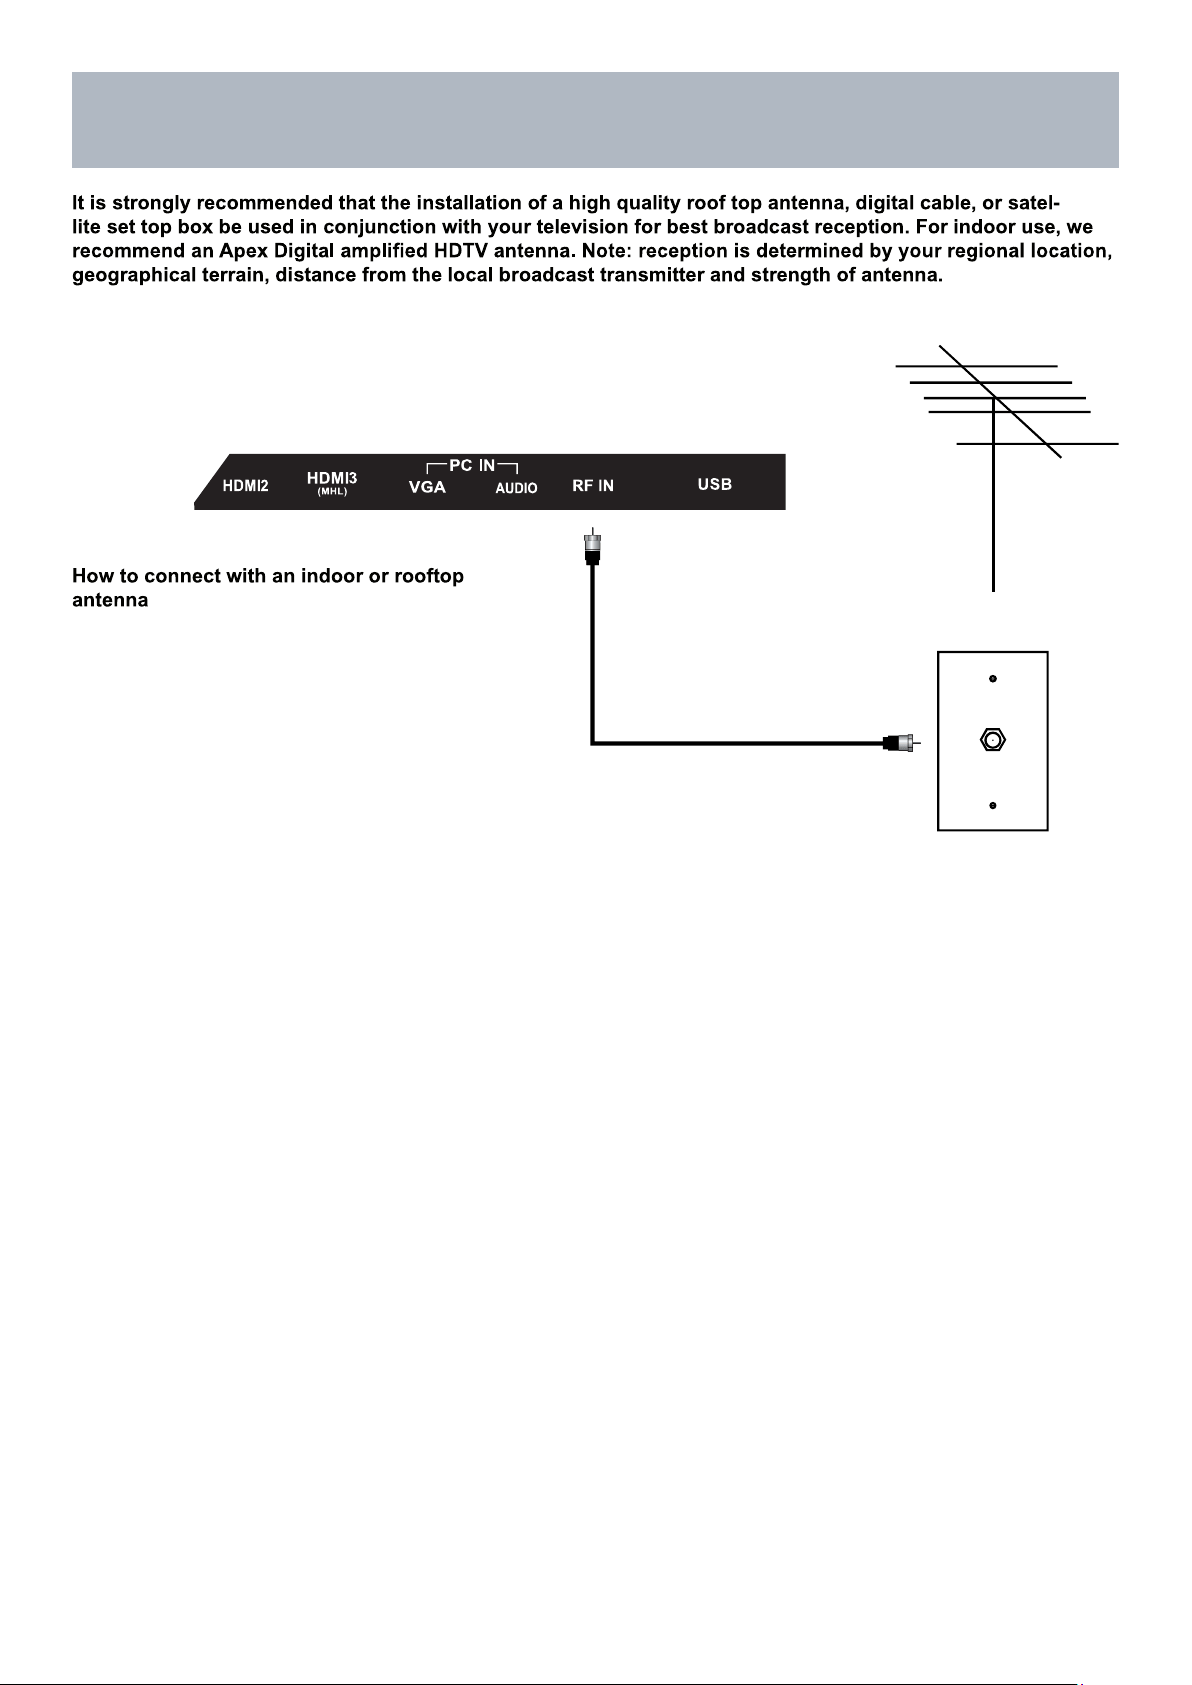
Installation
Connection to Antenna & Cable /
Satellite Box
Roof Antenna / Cable Outlet Installation
• Connect the RF coaxial (75 ohm) cable from
your existing roof top / in door antenna, or wall
outlet. Finger tighten the Coaxial / RF Cable end
to the TV input on the panel.
• Tune to TV programming directly from the
television tuner.
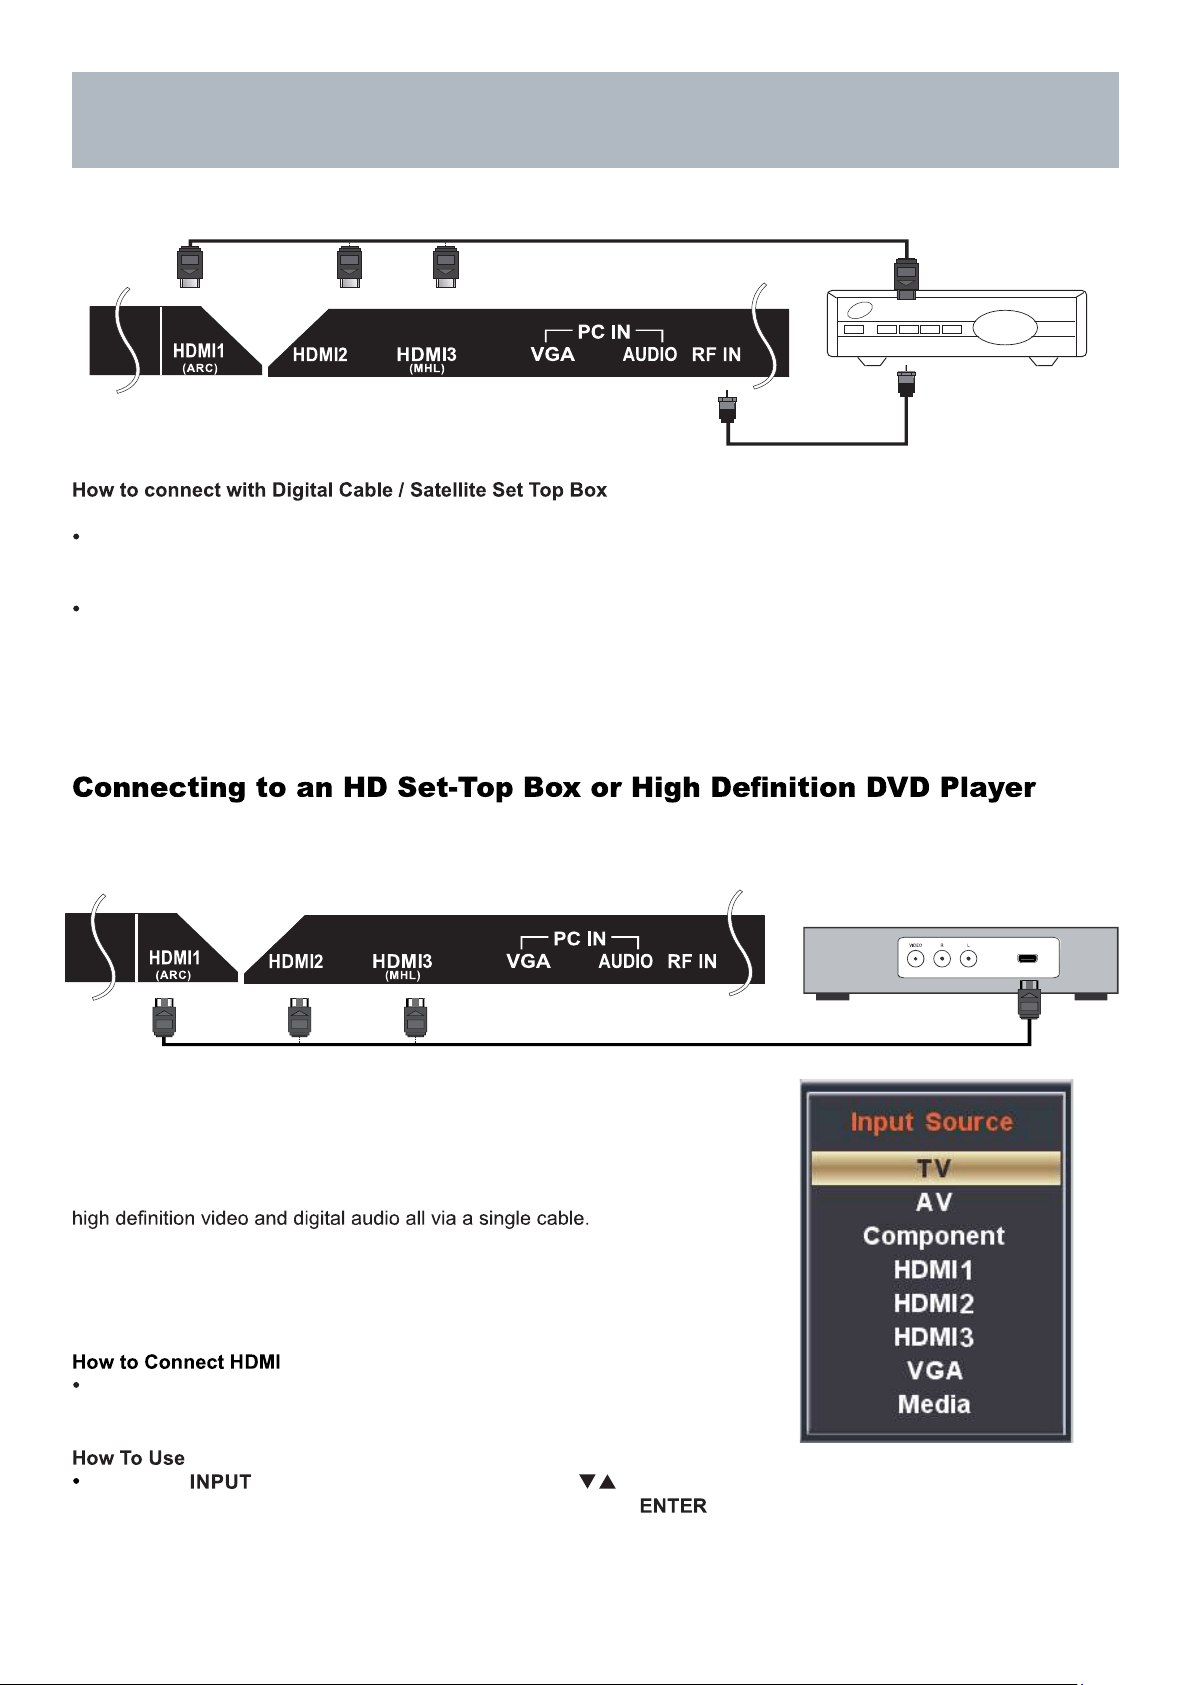
13
HDMI
Installation
Connection to HDMI Input
Using HDMI
For BEST video performance
Connect to external equipment that offers HDMI, an uncompressed, all
digital video / audio interface found on today’s HD digital set top boxes
and Blu-ray players. Use of this pure digital technology offers enhanced
There are three (3) HDMI inputs available for use with HD set top boxes,
gaming consoles and HD DVD / Blu-ray players.
From your external digital equipment, connect an HDMI cable from
the HDMI output to the HDMI input on the TV’s panel.
Press the button on the remote control. Use arrow
buttons to highlight the input to view (HDMI1,2,3 ) then press .
Coaxial / RF Cable
(not included)
HDMI cable ( not included )
Cable / Satellite
set top box
HDMI cable ( not included )
Digital set top box, gaming console,or
Blu-ray w / HDMI interface
Digital Cable / Satellite Set Top Box
Connect the RF coaxial (75 ohm) cable from the video outlet of your cable / Satellite box to the RF input on the TV’s
panel. Select Ch. 3 or 4 on the TV and select a channel.
For greater performance, if possible, use component or an HDMI installation(shown). Refer to your set top box user
manual.
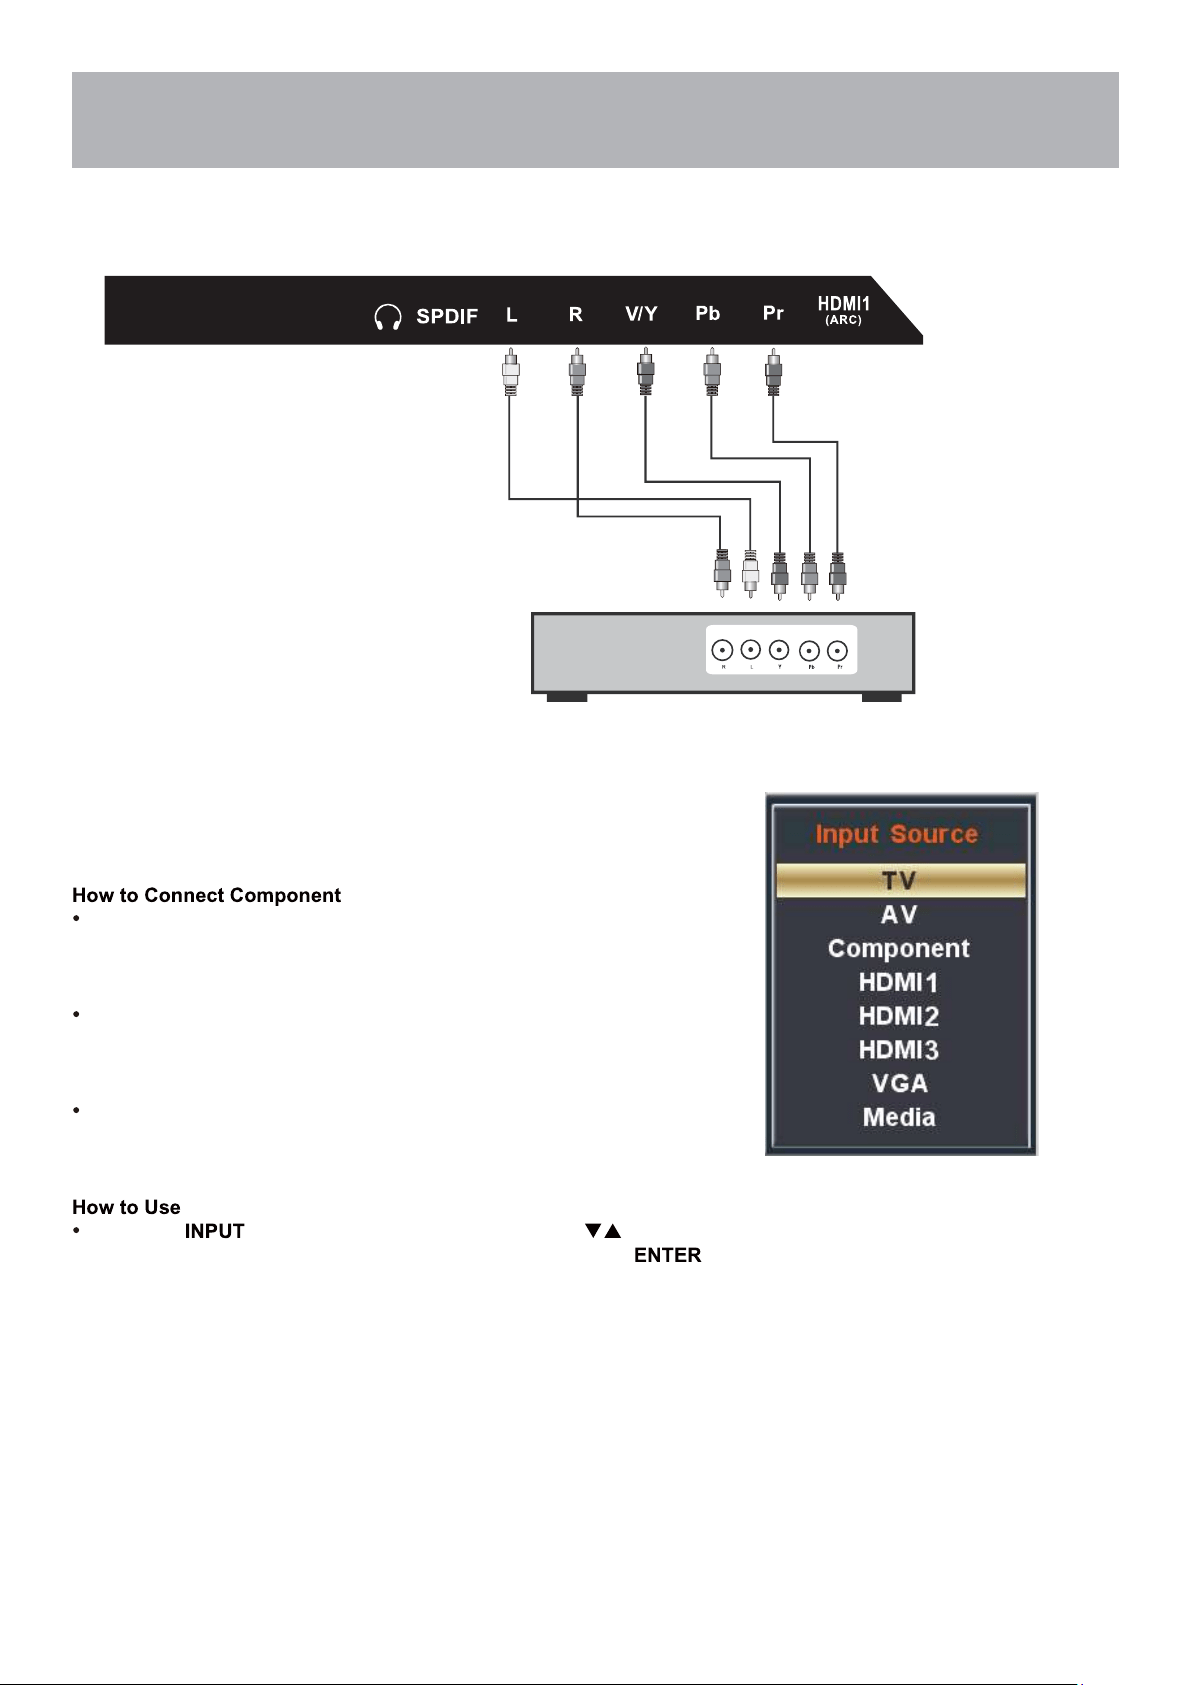
14
Installation
Connection to Component
YPbPr Input
For BETTER video performance
Connect to external equipment that features component video output
jacks for better performance. Use the Component Y Pb Pr video and
audio inputs with a set top box, gaming console or DVD player.
When connecting external equipment to your television, match the
colors of the connecting jacks (Video: Blue, Green, Red; Audio: White
/ Red ).
Connect the optional component video cables (blue, green, red) (not
included) from the video output jacks (Y, Pb, Pr) on your external
equipment to the Component Y Pb Pr input on the TV’s panel.
Connect white / red audio cables for sound from the audio (L / R)
output jacks on your external equipment to the AV L / R input jacks on
the TV’s panel.
Press the button on the TV remote control. Use arrow
buttons to highlight the input to view(Component) then press .
Connecting External Equipment to Component Video IN (Y Pb Pr)
Component cables
(not included)
Digital set top box, gaming console or DVD
15
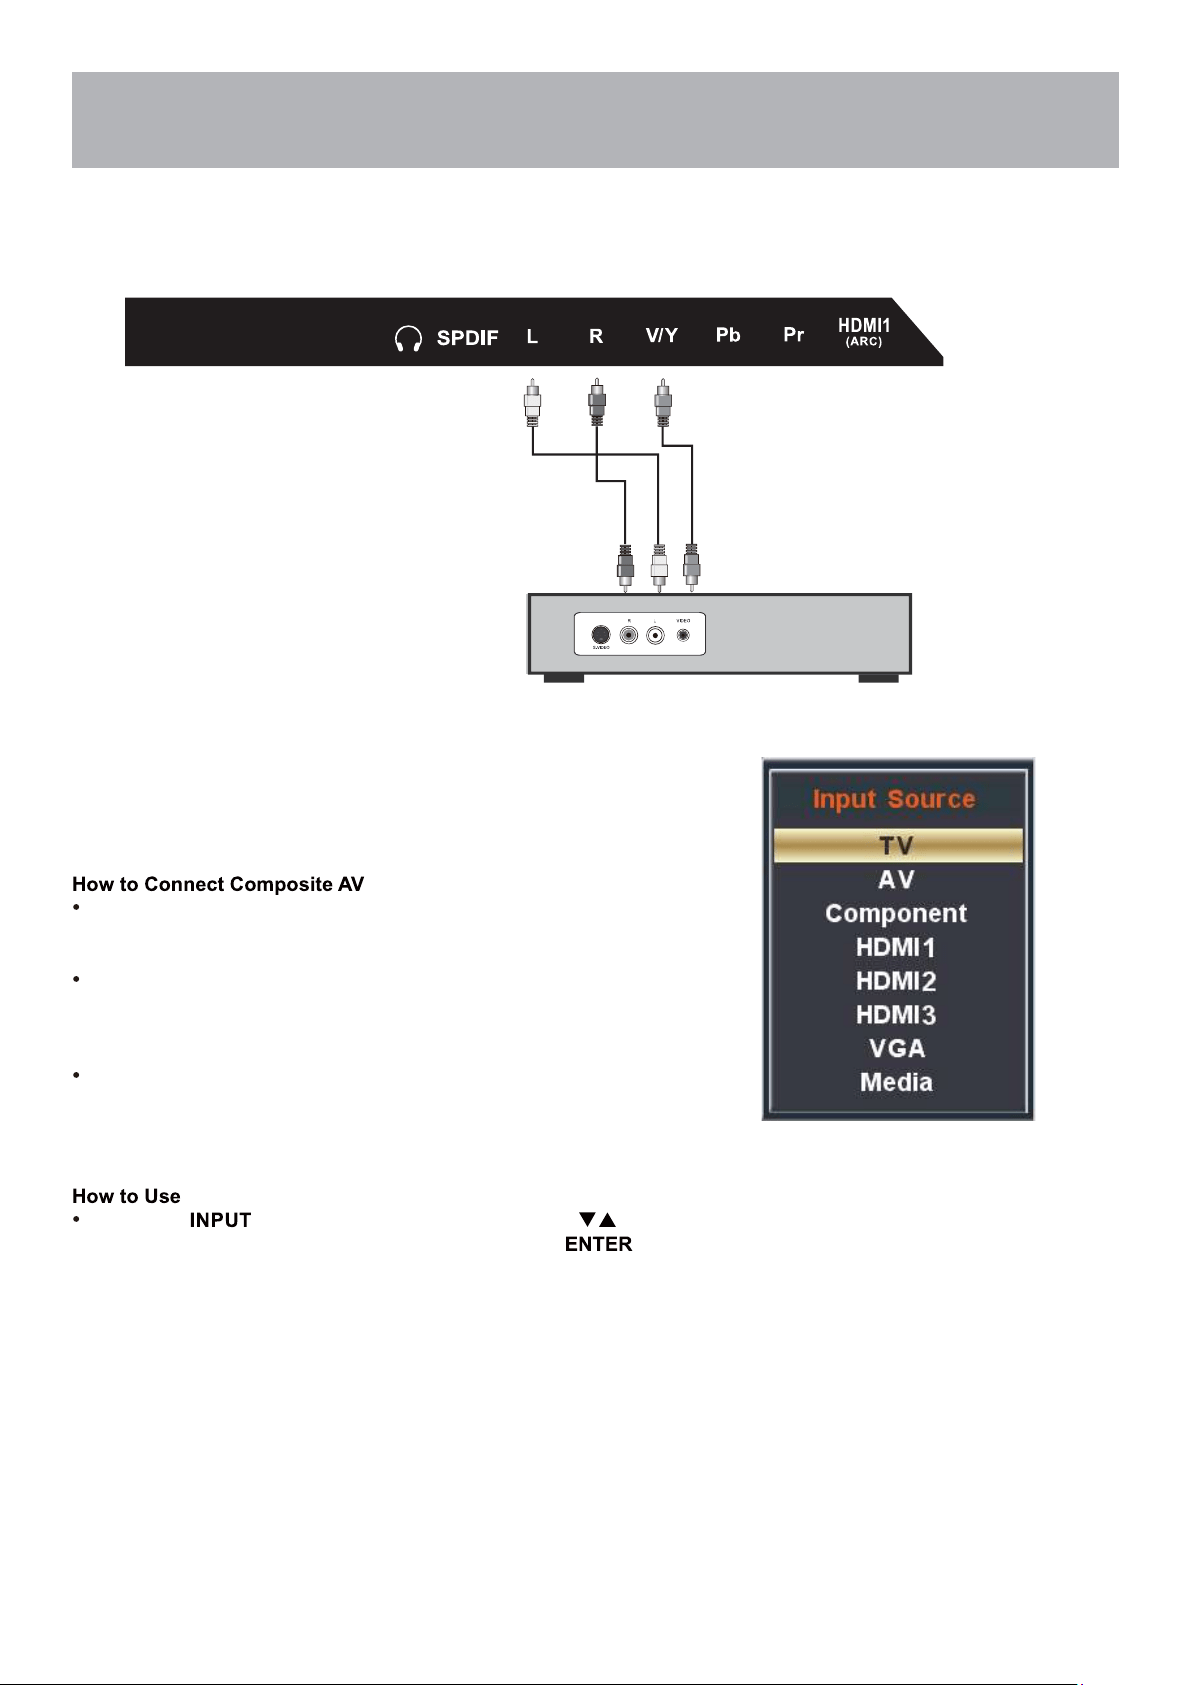
Installation
Connection to Composite Input
Connecting External Equipment to AV Composite IN on your
television
For GOOD video performance
Connect to external equipment using optional video and audio cables.
Composite output jacks are available on most set top cable / satel-
lite boxes and DVD players. (HDMI and Component connections are
recommended for the best performance.)
When connecting external equipment to your television, match the
colors of the connecting jacks (Video: Yellow Audio: White & Red).
Connect the yellow video cable from the video output jack on your
external A / V equipment (i.e.: DVD player, set top box) to AV input
on the TV’s panel.
Connect the white / red audio cables for sound from the audio (L /
R) output jacks on your external equipment ( i.e.: DVD Player, set
top box) to the AV (L / R) jacks on the TV’s panel.
Press the button on the remote control. Use arrow
buttons to highlight the input to view (AV) then press .
Audio Video Cable (not included)
Digital set top box, gaming console or DVD

16
VGA & Audio Cable (not included)
Installation
Connection to a Personal Computer
Connecting a Personal Computer with VGA to your television
Recommended computer display resolution:1366x768@60 Hz
Connect using an optional male to male VGA cable (not included) from
your PC to the VGA input on the TV’s panel.
Connect an audio cable (not included) from the
computer’s mini audio output jack to the audio input on the TV’s
panel.
Press the button on the remote control. Use the buttons
to highlight the VGA input and press the button.
NOTE: If your PC uses a standard signal mode, the screen will adjust
automatically .
17
Press the appropriate
.
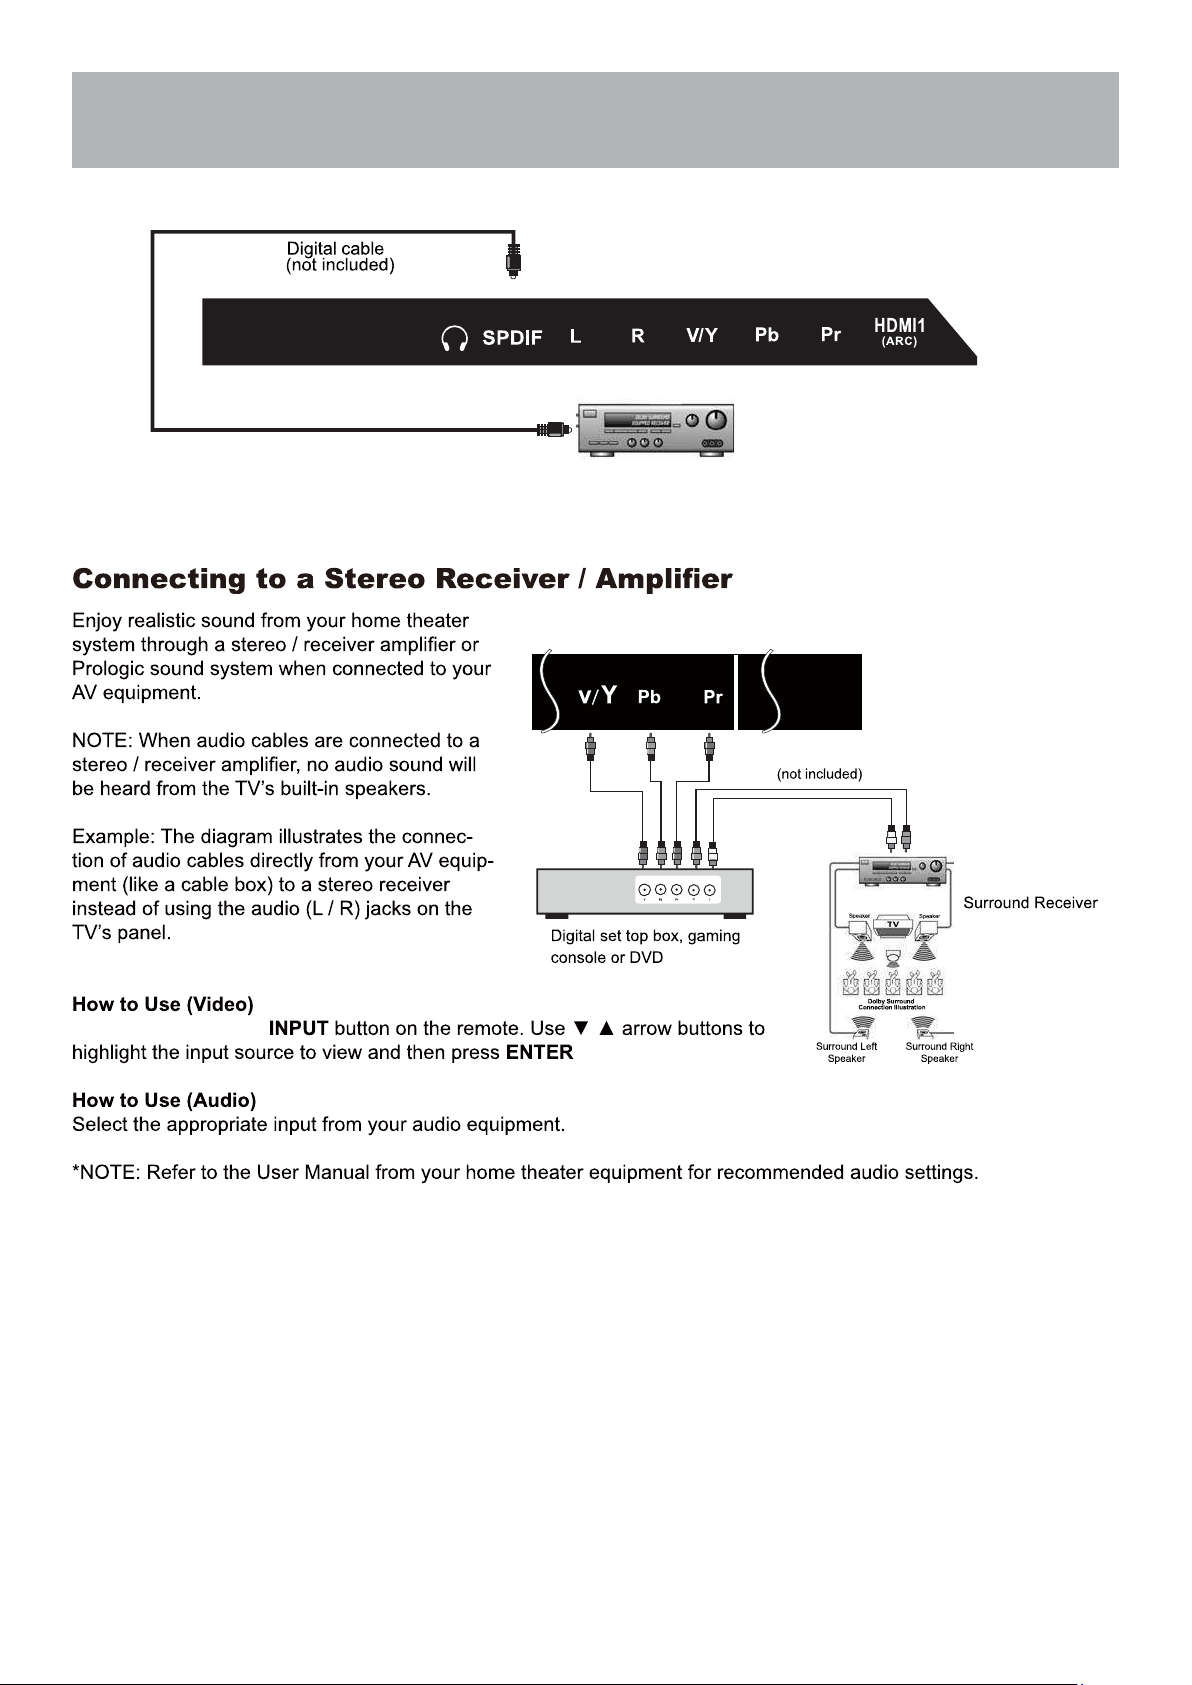
Installation
Connection to a Home
Theater System
Connection to a Home Theater Audio System
Front Left
Front Right
Center Channel
Optional cables
Dolby Prologic
18
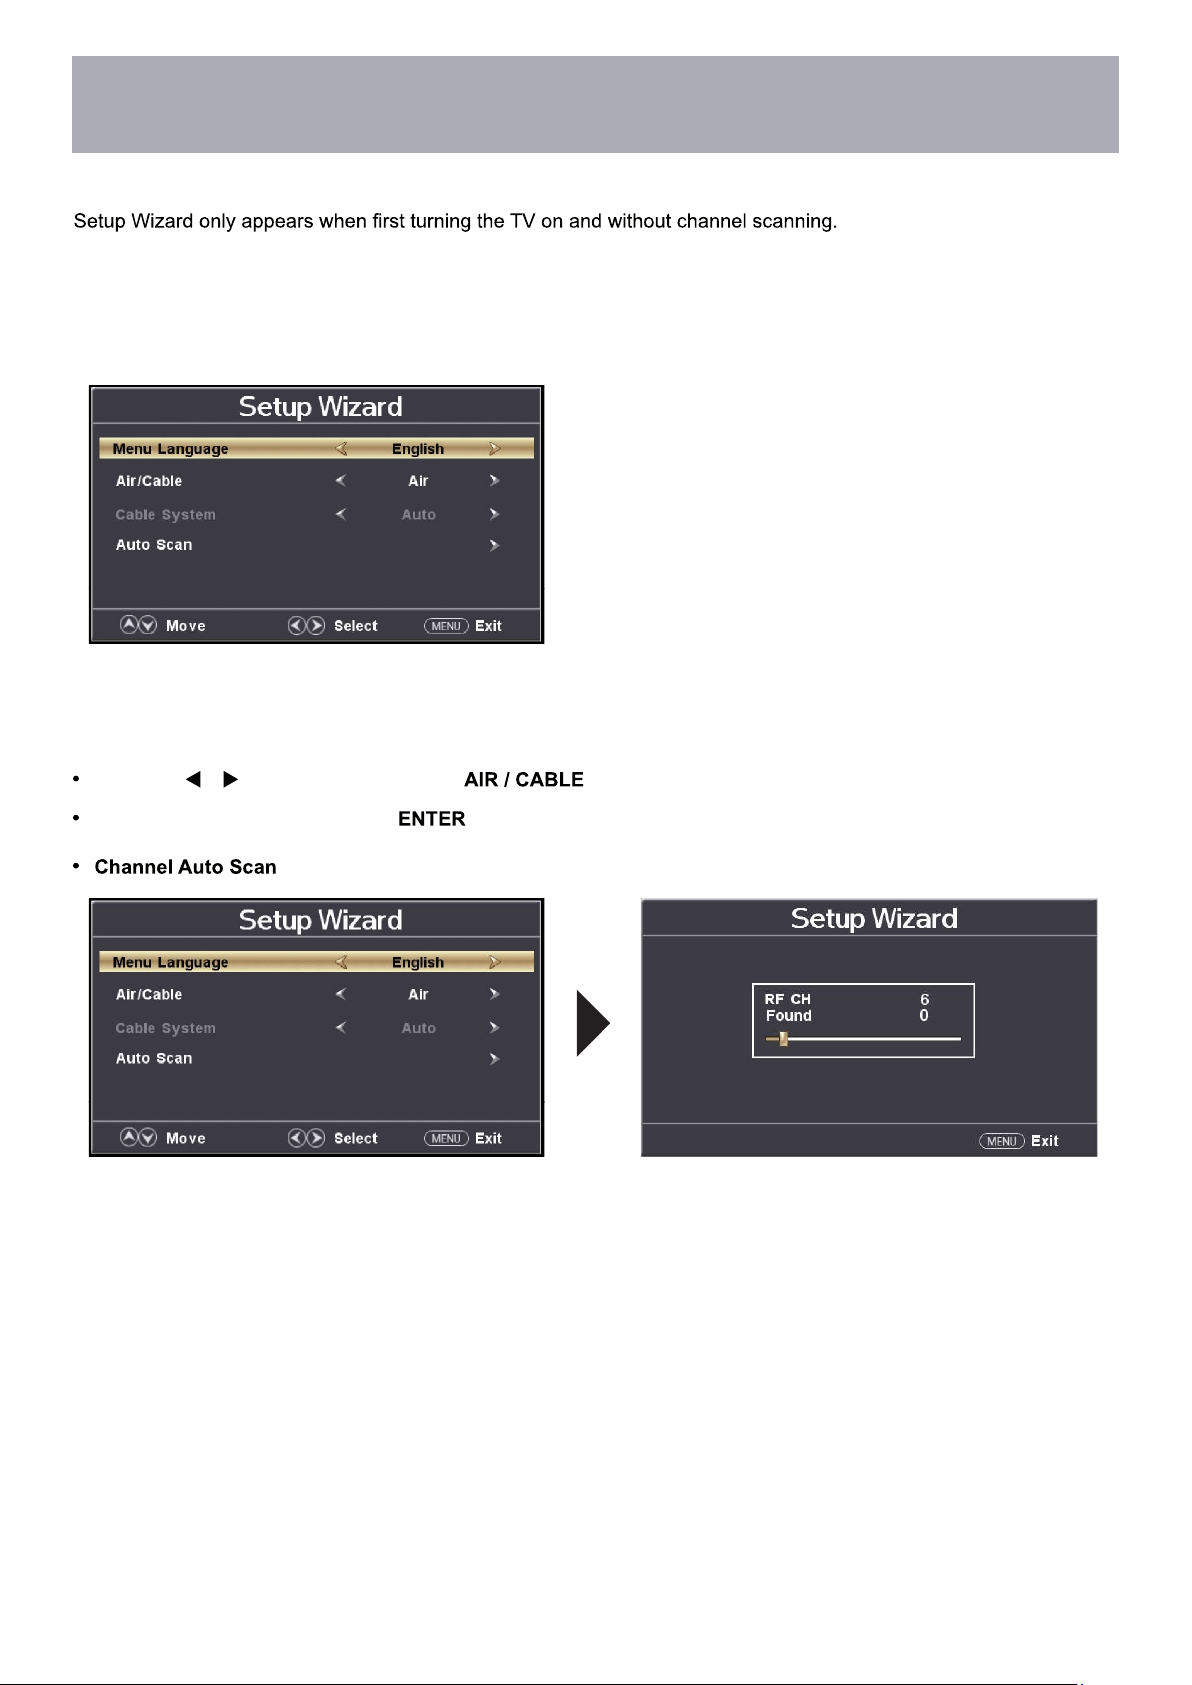
TV Setup
Initial Setup Wizard
Initial Setup Wizard
After connecting your TV antenna or cable wire, turn the television ON. The quick setup wizard will display on-screen.
Select your preferred Picture setting followed by antenna options and performing Auto Scan to receive local broadcast
channels that will be stored in the TV tuner memory.
The wizard will direct you to the TV menu to select antenna options and perform
Channel Auto Scan. Channels found will be stored into the TV tuner memory.
How to Navigate:
Press the arrow button to highlight based on your antenna connection.
Highlight Start to Scan and press .
may take several minutes to complete.
19
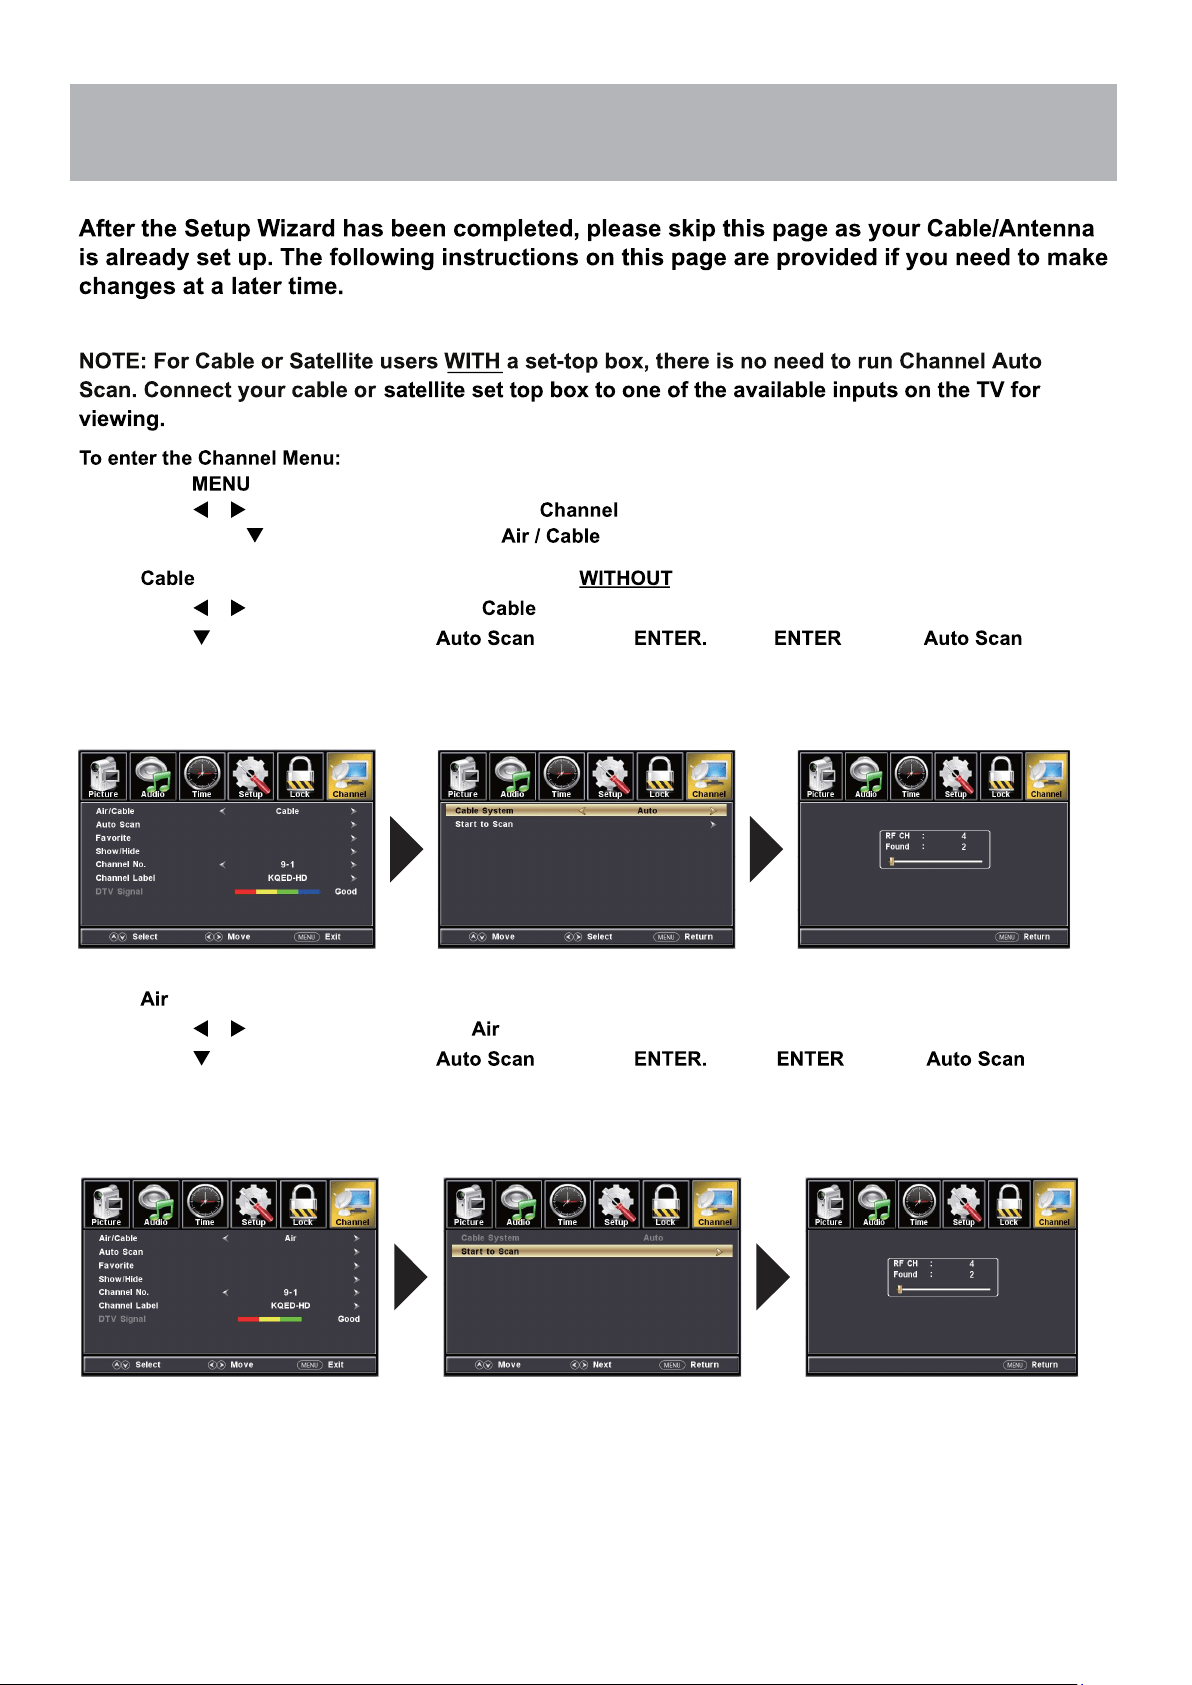
TV Settings
TV Provider Setup
& Channel Auto Scan
• Press the button
• Using the arrow buttons; scroll to highlight
• Press the down arrow buttons to highlight
Select if you subscribe to a pay television service a set top box.
• Press the arrow buttons to highlight .
•
NOTE: Channel Auto Scan may take several minutes to complete.
Cable Mode
Air Mode
Select
when TV is connected to an indoor / outdoor antenna.
• Press the arrow button to highlight .
•
NOTE: Channel Auto Scan may take several minutes to complete.
Press the arrow button to highlight and press Press to begin .
Press the arrow button to highlight and press Press to begin .
20
Menu Adjustments
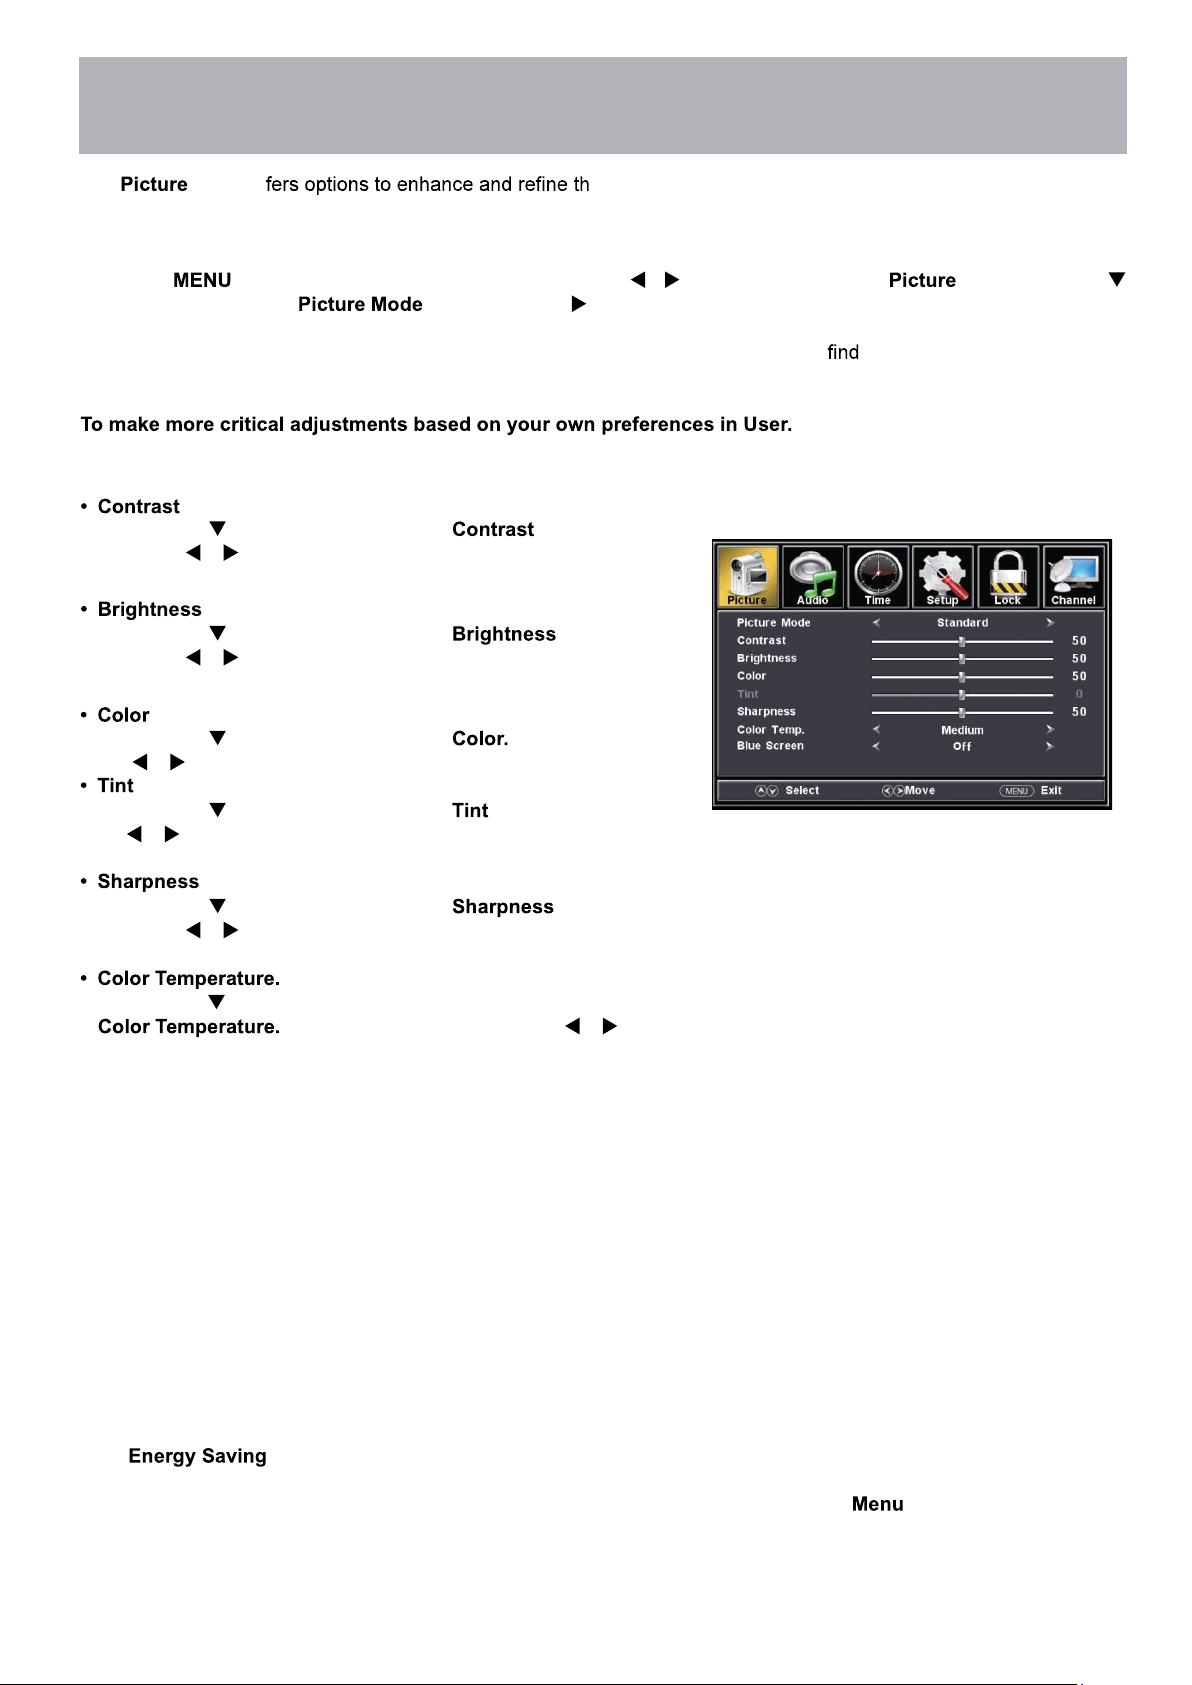
The menu of e picture displayed on your TV based on ambient room light
and personal preferences. Adjustment options include contrast, brightness, color, sharpness and color temperature.
How to Navigate:
Press the button on the remote control. Navigate using arrow buttons to select . Press the down
arrow button to highlight , then press the arrow button to select your viewing preference from 5 factory
options: EnergySaving > User > Standard > Dynamic > Mild. The Standard setting is recommended for most brightly
lit viewing environments. Depending on the ambient light level in the room, you may one of the other Picture settings
*The feature adjusts the brightness of the TV in order to save energy and reduce power consumption.
Note: When adjustments are completed, you may select another menu by pressing the
button.
Press down arrow button to highlight . Navigate
using the arrow buttons to increase or decrease overall
brightness.
Press down arrow button to highlight . Navigate
using the arrow buttons to increase or decrease contrast
intensity.
Press down
arrow button to highlight Navigate using
the arrow buttons to increase or decrease color intensity.
Press down arrow button to highlight . Navigate using
the arrow buttons to adjust colors toward green or reddish
tint.
Press down arrow button to highlight . Navigate
using the arrow buttons to soften or view crisper edges in
the picture.
Press down arrow button to highlight your
preference. Navigate using the ar-
row buttons to select Cool, Medium or Warm setting.
Picture Setting
more pleasing.
21
Menu Adjustments
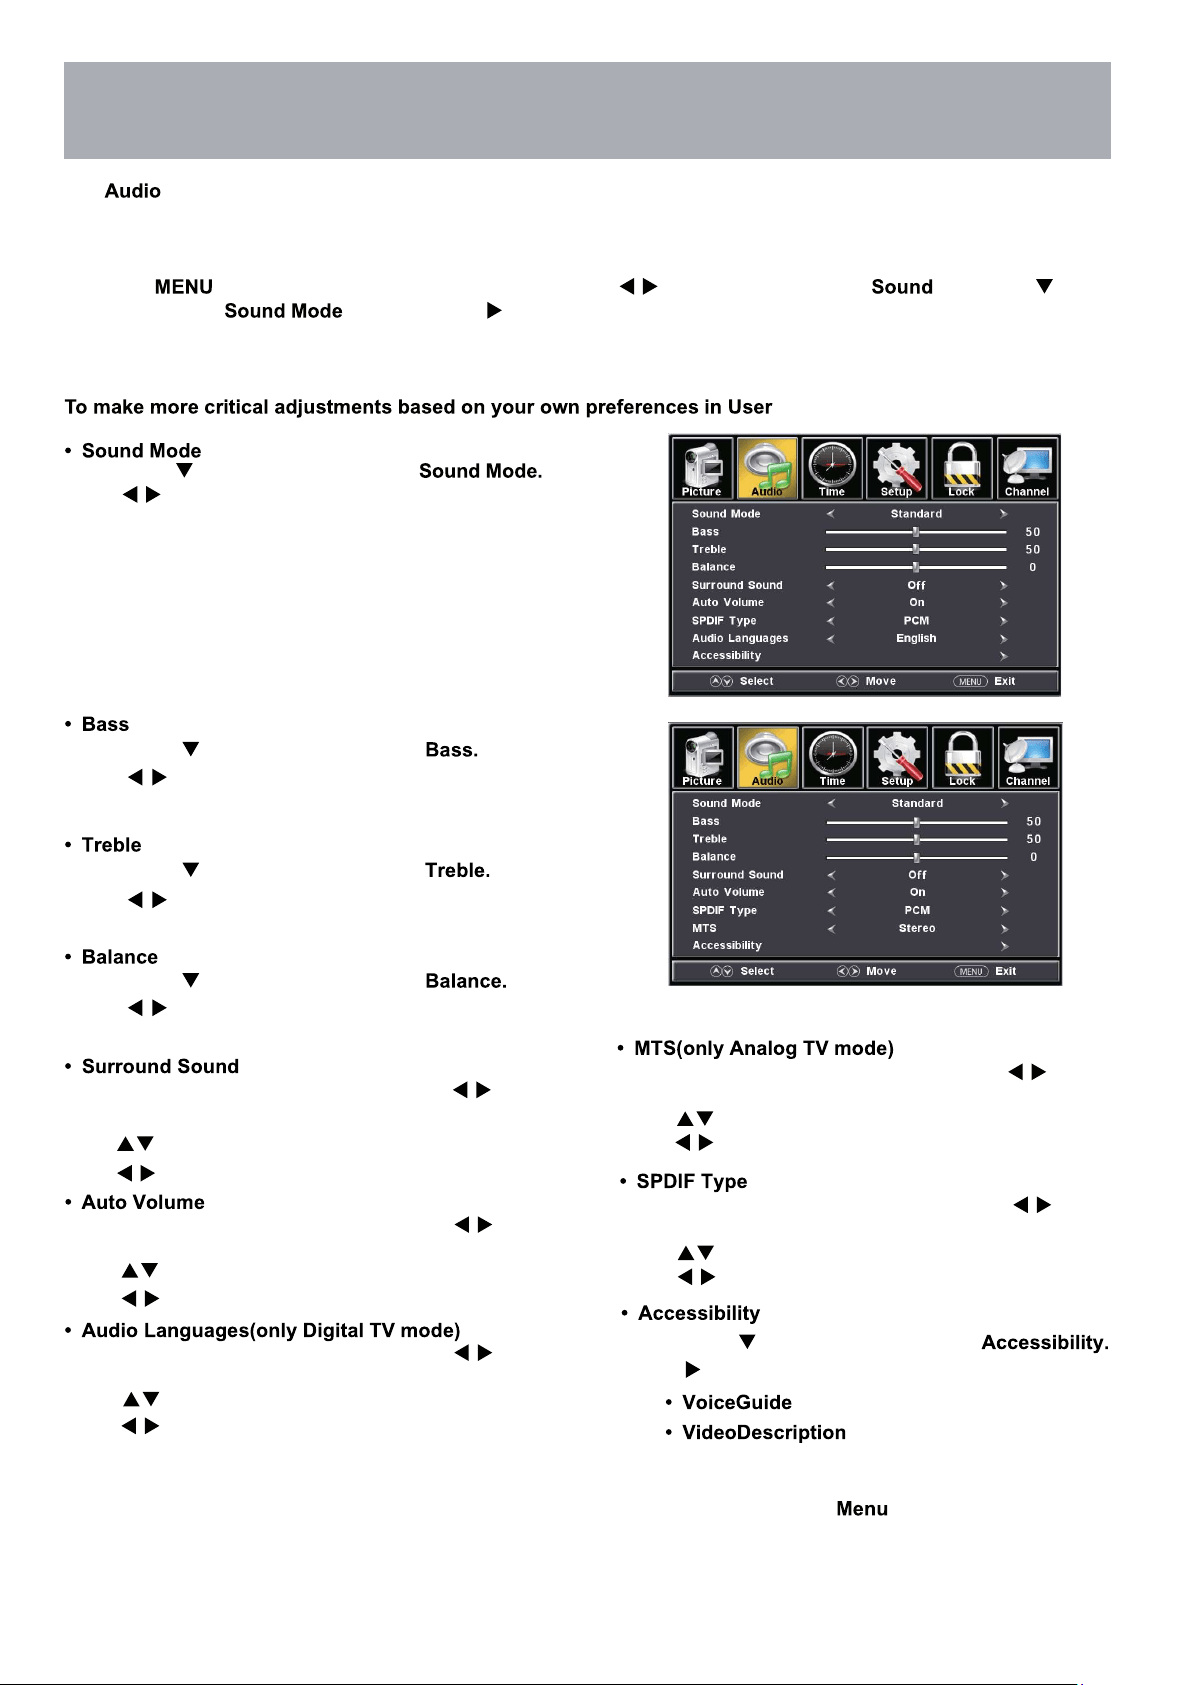
The menu offers options to make sound enhancements while listening through the built-in speakers or to
select digital audio options when connected to a Dolby Digital receiver though a (SPDIF) coaxial digital output.
How to Navigate:
Press the button on the remote control. Navigate using arrow buttons to select . Press the arrow
button to highlight , then press the arrow button to select your sound preference from 4 factory options:
Music > Movie > User > Standard .
Press down arrow button to highlight
Press
Press
button to select Music > Movie > User >
Standard .
Music Preserves the original sound. Good for musical
programs.
Movie Enhances treble and bass for a rich sound
experience .
User Select to customize audio settings.
Standard Produces a balanced sound in all environments.
Press MENU to enter the main menu, press button
to select Sound.
Press button to select among SPDIF Type.
Press button to select(RAW / Off / PCM).
Press MENU to enter the main menu, press button
to select Sound.
Press
button to select among Surround Sound.
Press
button to select(Off / On)
Note: When adjustments are completed, you may select another menu by pressing the button.
Audio Settings
Press down arrow button to highlight
Press down arrow button to highlight
Press down arrow button to highlight
Press
buttons to increase or decrease low frequency
Press
buttons to increase or decrease high frequency
intensity.
intensity.
buttons to adjust sound towards the left or right
speaker.
Press down
arrow button to highlight
Press
buttons to Enter.
Press MENU to enter the main menu, press button
to select Audio.
Press button to select among Auto Volume.
Press button to select(Off / On).
Press MENU to enter the main menu, press button
to select Audio.
Press button to select among Audio Languages.
Press button to select different Audio Languages.
Press MENU to enter the main menu, press button
to select Audio.
Press button to select among MTS.
Press button to select(Stereo / SAP / Mono).
22
Menu Adjustments
Date & Time Settings
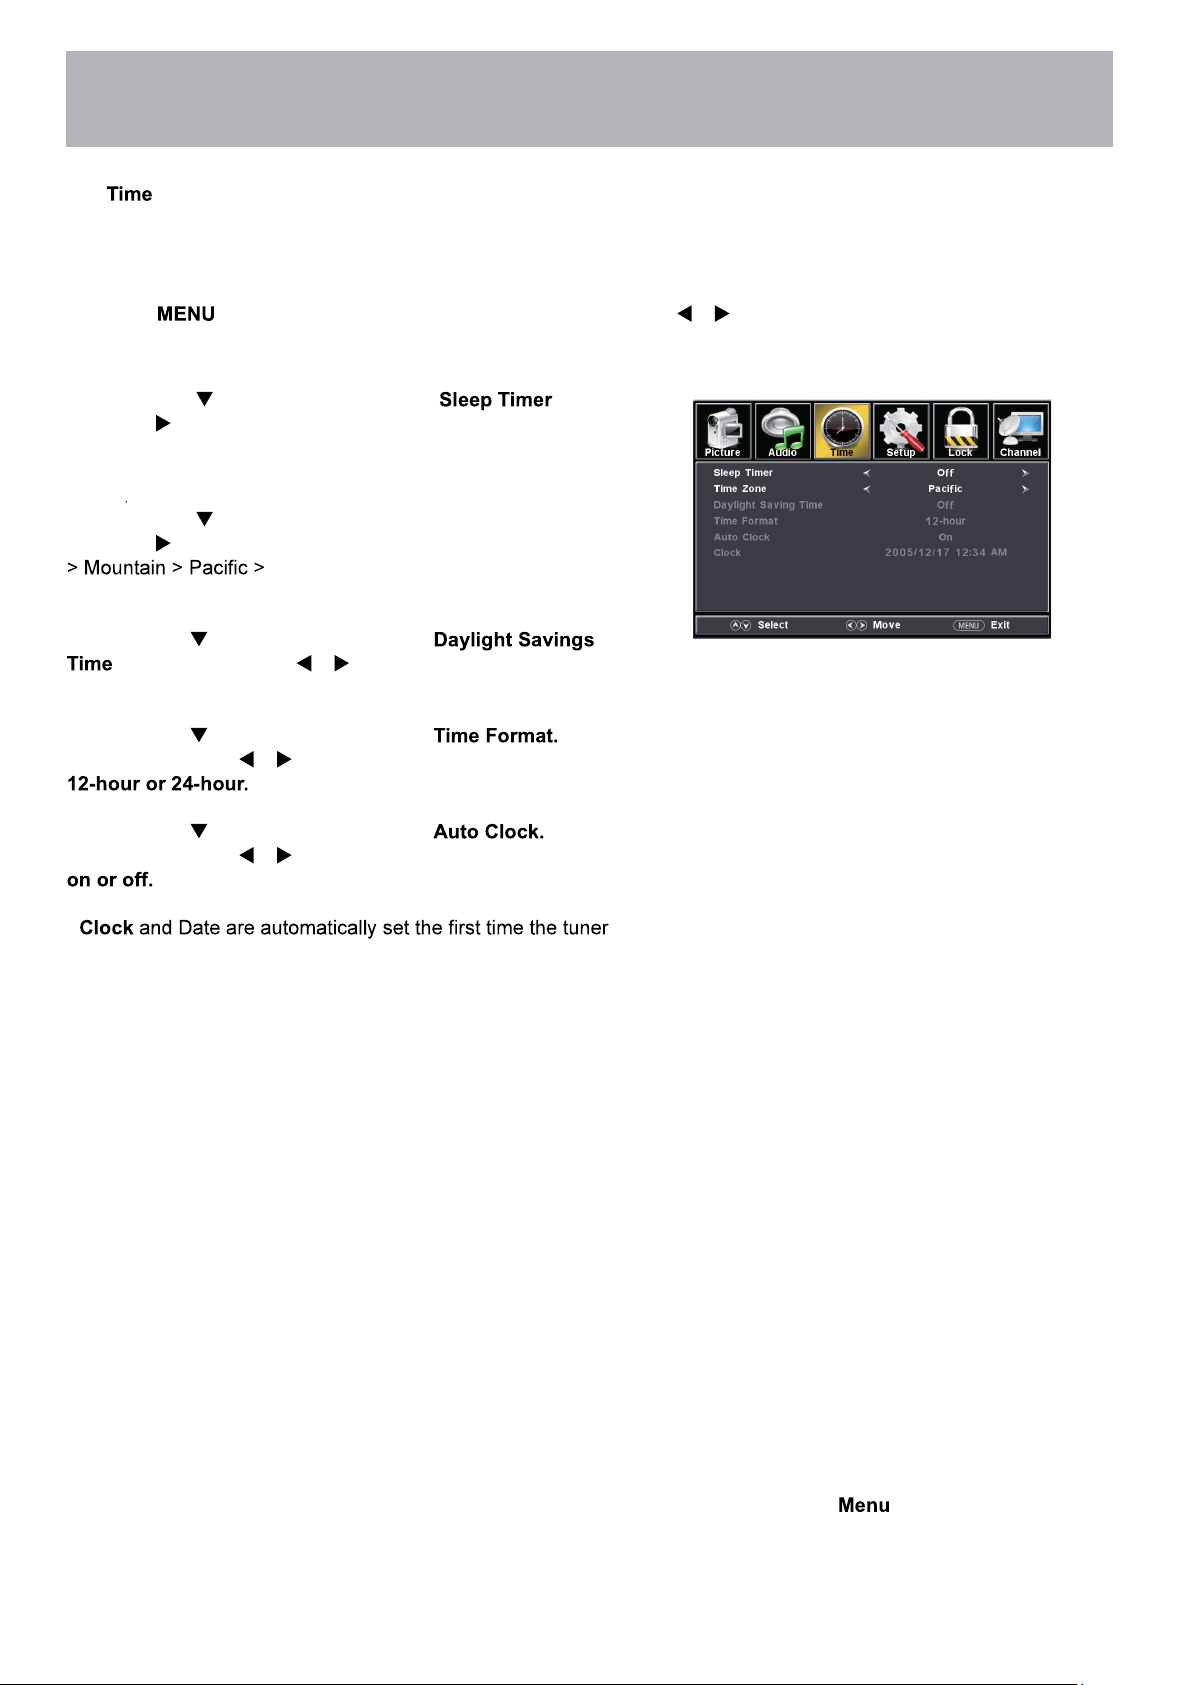
The menu includes adjustment of settings for your local time zone and daylight savings time. The clock will adjust
automatically after the initial Channel Auto Scan of available broadcast channels in your area (see page 19 for TV
Setup).
How to Navigate:
Press the button on the remote control. Navigate using arrow buttons to select Time.
• Press down
arrow button to highlight then
press the arrow button to select time to view before the
television timer turns the set off: 5 Min > 10 Min > 15 Min > 30
Min > 45 Min > 60 Min > 90 Min > 120Min > 180 Min > 240 Min
> OFF
.
• Press down arrow button to highlight Time Zone then
press the arrow button to select between: Eastern > Central
Alaska > Hawaii > Atlantic.
• Press down arrow button to highlight
. Navigate using the arrow buttons to turn this
feature on or off.
• Press down arrow button to highlight
Navigate using the arrow buttons to turn this feature
• Press down arrow button to highlight
Navigate using the arrow buttons to turn this feature
•
receives a broadcast channel.
Note: When adjustments are completed, you may select another menu by pressing the
button.

23
Menu Adjustments
In the menu you may change the initial set up of preferences that include settings for language, menu display,
computer monitoring,closed captions, enhancement of black detail in the picture and resetting your TV back to its fac-
tory default status.
Setup Settings
How to Navigate:
Press the button on the remote control. Navigate using arrow buttons to select . Gain access to
display options by pressing the down arrow button to highlight or other options, then press
arrow button on your remote to select.
NOTE: Closed Caption and Advanced are features described on the following pages.
Press the arrow button to
automatically reset all adjustments
back to their original factory settings.
Press the arrow button to
enter.
Other languages include English,
Français, Español.
Navigate using the
arrow but-
tons to turn ON/OFF
Adjust the duration of the
Zoom Mode menu.
Press
button to select.
24
Menu Adjustments
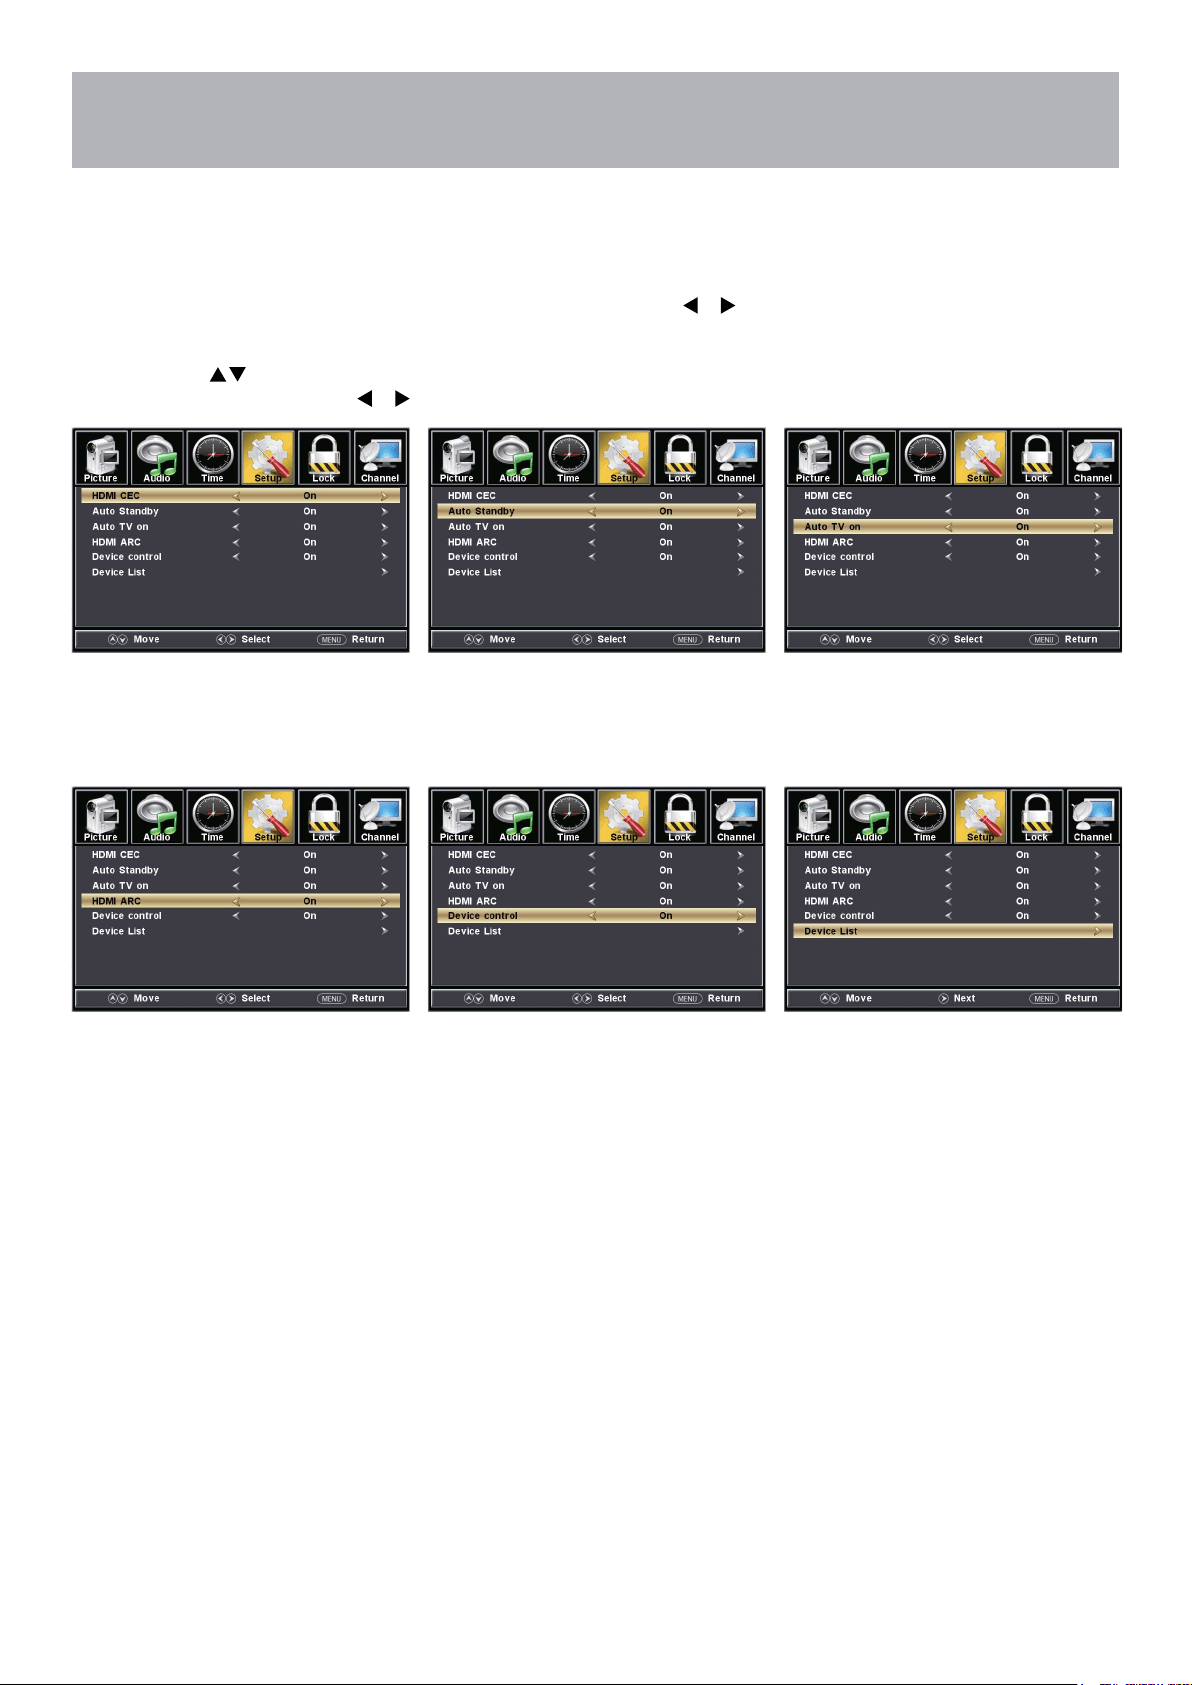
CEC
The CEC menu includes HDMI CEC \ Auto Standby \ Auto TV on \ HDMI ARC \ Device control \ Device List.
How to Navigate:
Press the MENU button on the remote control. Navigate using arrow
buttons to select Setup
• To turn the HDMI CEC option
On/Off use the
buttons to
highlight HDMI CEC then press .
• Auto Standby: the TV will turn
Off when there is No Signal on
the TV for several minutes.
• Auto TV On: TV will automatically
turn On when the connected CEC
device is turned On.
• Turn HDMI ARC ON if you want to
use the ARC function with a connected
5.1/7.1 Home Theater System.
• Device Control: allows for a
connected CEC device to be
controlled by the TV remote.
Note: When adjustments are completed, you may select another menu by pressing the Menu button.
• Device List: displays a list of
HDMI CEC devices currently
connected to the TV.
• Note: refer to the user manual of your
Home Theater System for compatibility,
instructions, and connections needed
to use the HDMI ARC feature.
• Note: refer to the user manual of your
connected CEC device for compatibility,
instructions, and connections needed
to use the HDMI CEC feature.
25
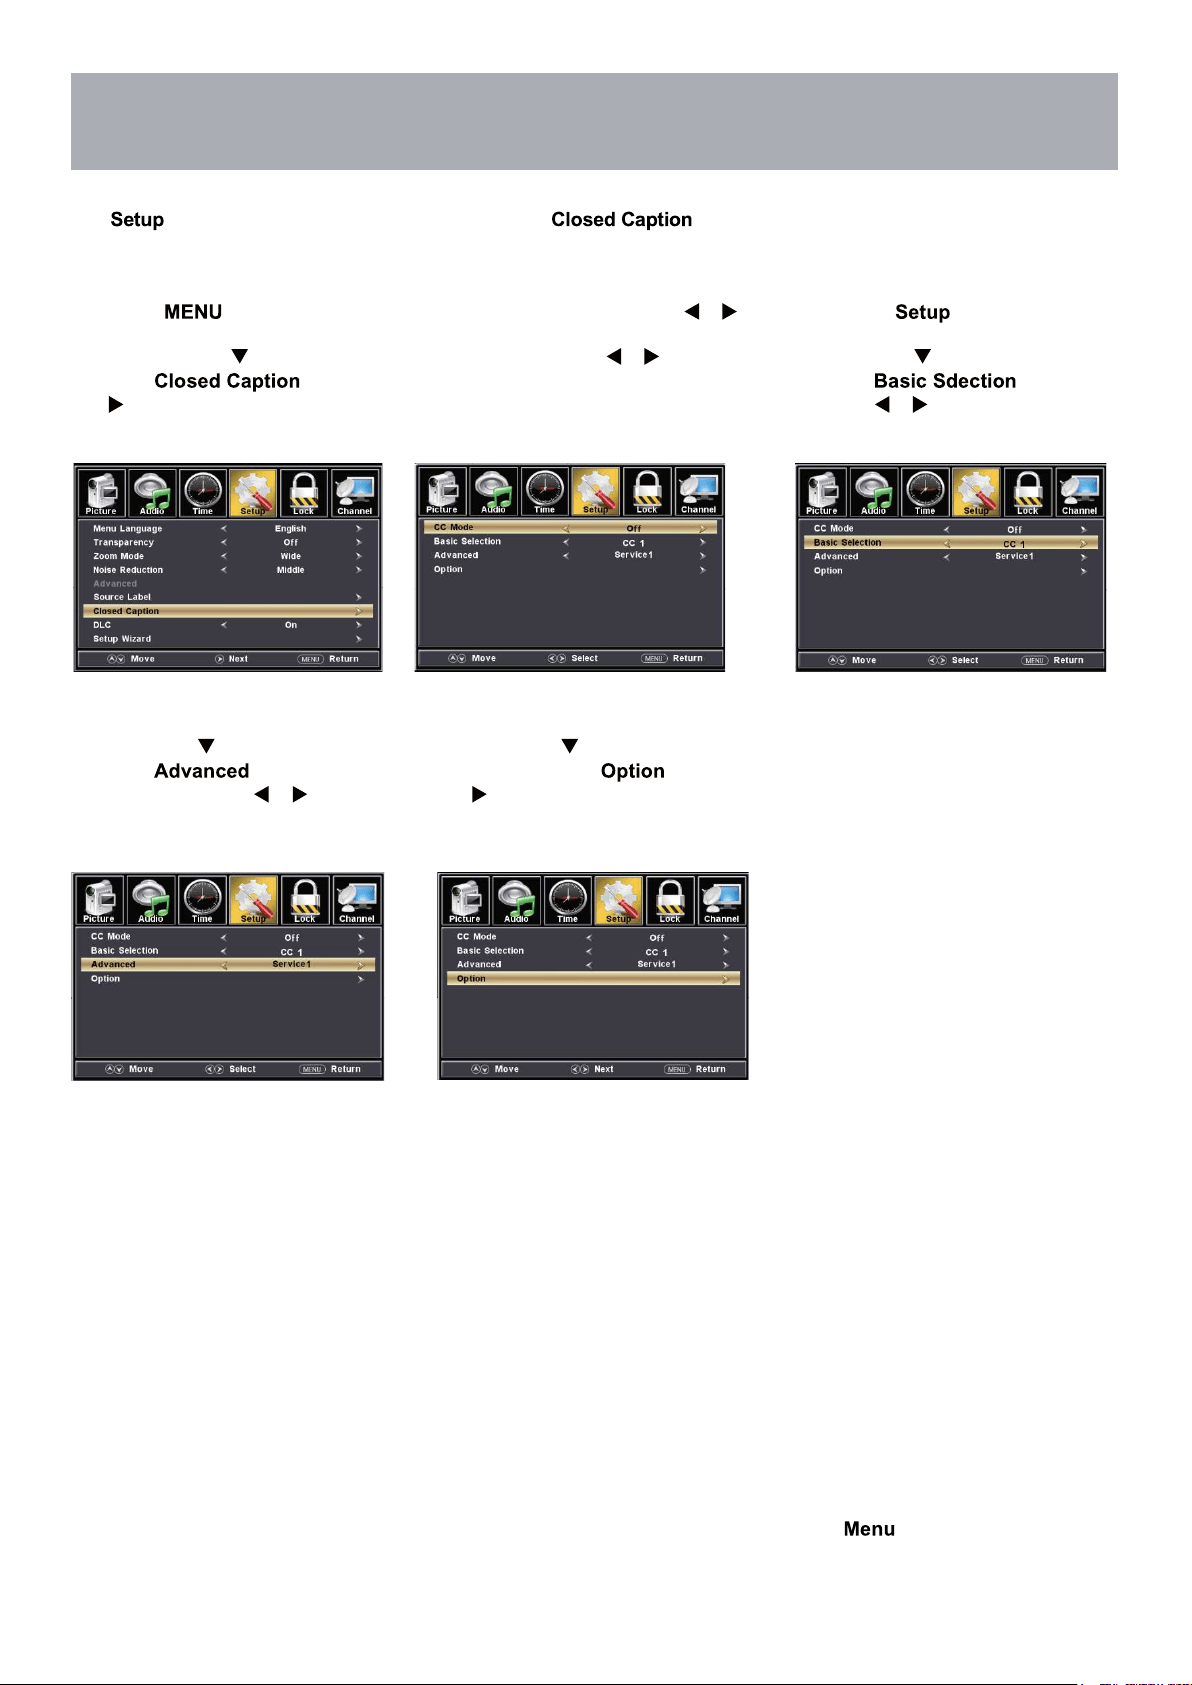
Menu Adjustments
The menu includes adjustments for activating the text feature for display on-screen and customiz-
ing CC display types and font styles.
Note: When adjustments are completed, you may select another menu by pressing the
button.
Closed Captions
How to Navigate:
Press the button on the remote control. Navigate using arrow buttons to select .
• Press the down
arrow button to
highlight then press
the arrow button to highlight CC
Mode.
• Navigate using the arrow
buttons to select Off > On >
CC On Mute.
• Press down arrow button to
highlight . Navigate
using the arrow buttons to select
CC1-4, TEXT1-4.
• Press down arrow button to
highlight .
Navigate using the arrow
buttons to select, Service 1-6.
• Press down arrow
button to highlight . Press
the arrow button to enter a menu
with options to customize text fonts,
colors and opacities.

26
Menu Adjustments
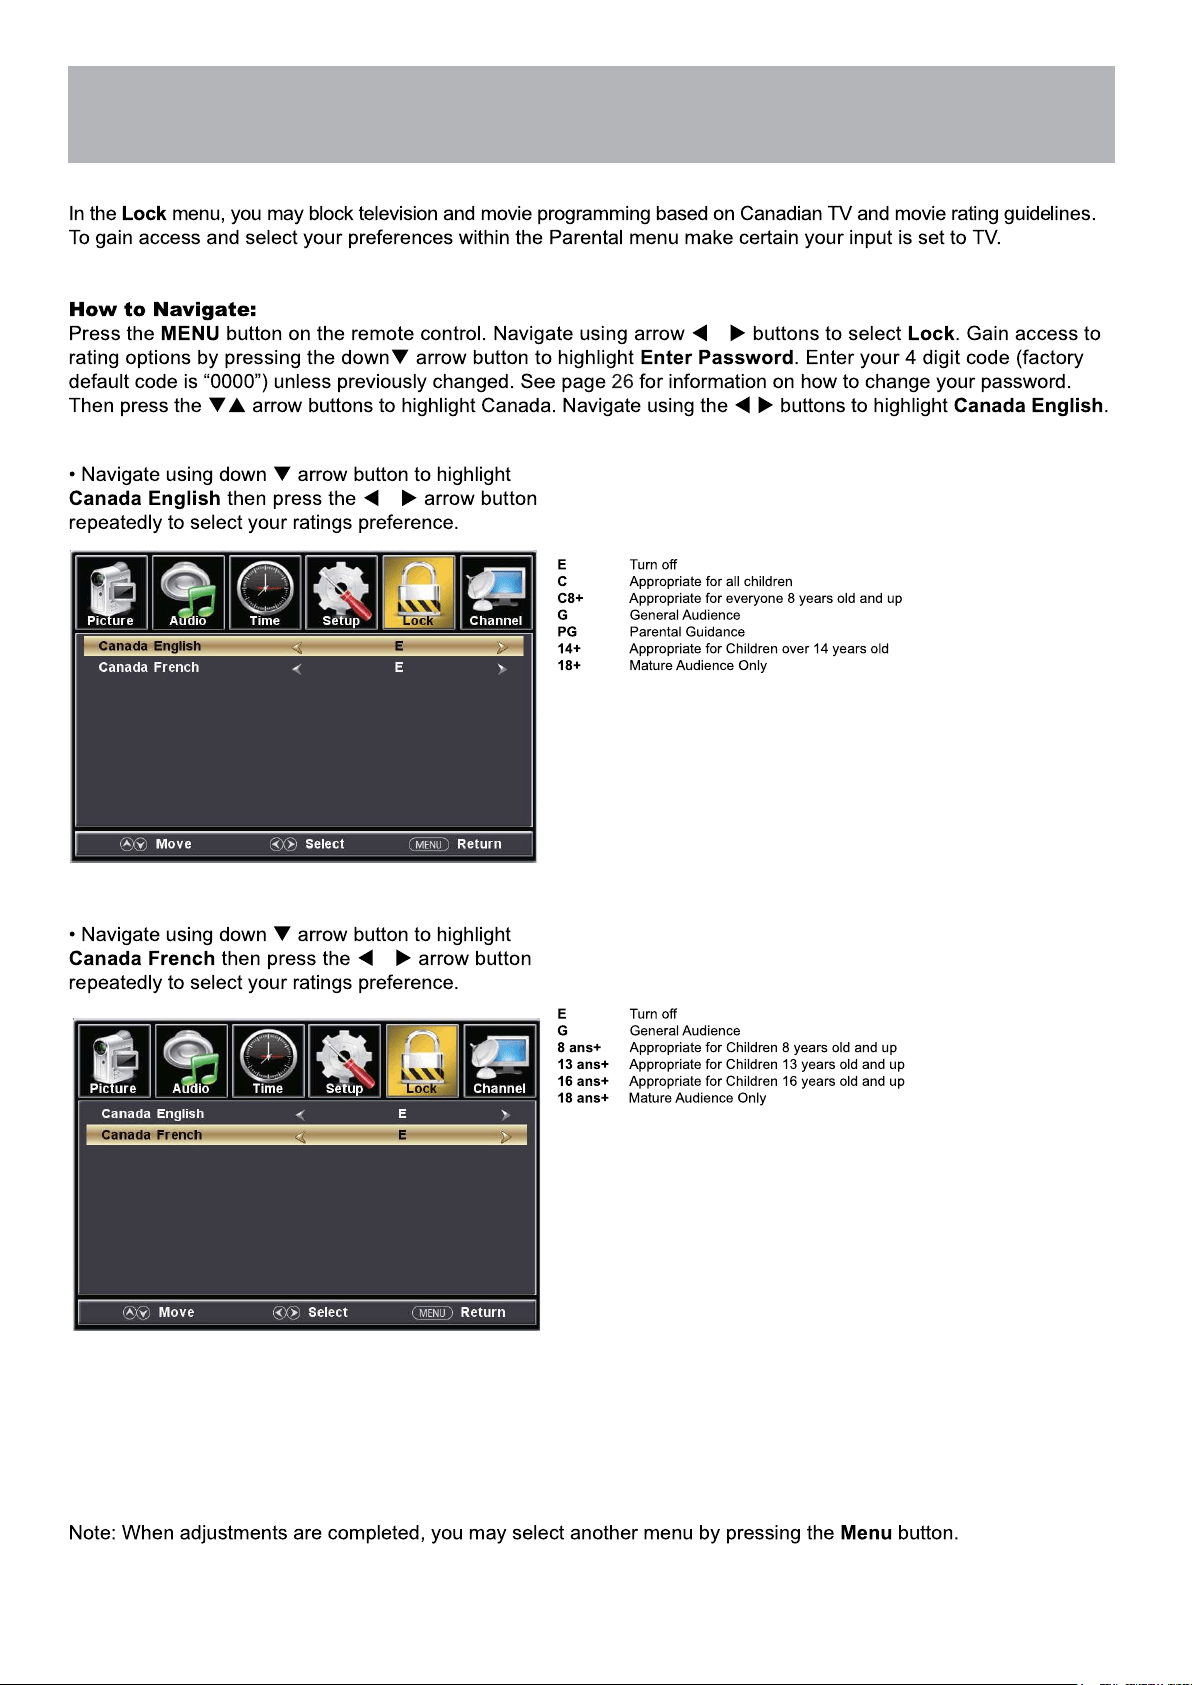
In the menu, you may block television and movie programming based on TV ratings and Motion Picture Association
guidelines. To gain access and select your preferences within the Parental menu make certain your input is set to TV.
How to Navigate:
Press the button on the remote control. Navigate using arrow buttons to select . Gain access to
parental rating options by pressing the down arrow button to highlight . Enter your 4 digit code
(factory default code is “0000”) unless previously changed.
• To make changes to parental
controls, highlight
then press the arrow button
• To set parental controls for television
programming or DVD movies, press
the arrow buttons to highlight
Navigate using the
buttons to
highlight menu.
• Highlight TV, then press the
arrow button to enter the TV Ratings
menu and select your preference.
• Highlight MPAA, then press the
arrow button repeatedly to select
your movie rating preference.
Appropriate for all children
Appropriate for all children over 7
General Audience
Parental Guidance Suggested
Parents Strongly Cautioned
Mature Audience Only
General Audience
Parental Guidance Suggested
Parents Strongly Cautioned
Restricted
No One Under 17 Permitted
Adults Only
NOTE: RRT Setting and Reset RRT are not user adjustable settings.
Parental Control
US Rating.
• To change the password, press
arrow button to display a screen
to enter your new password, then
27
Menu Adjustments
Parental Control

28
Menu Adjustments
The provides the setup / changes of your television to receive broadcast channels, store your favorite chan-
nels, add or skip channels in memory and label or name channels.(For antenna and Auto Channel Scan setup, please
refer to page 19.)
How to Navigate:
Press the button on the remote control. Navigate using arrow buttons to select . Press the
down button to highlight your preferences.
• Highlight
to add channels to your Favorites List. Navigate using the arrow buttons to select channels to be
added or deleted from your list. Press to add or delete a channel. A checkmark indicates a channel has been added.
You may also display your list of channels by pressing the button on the remote control
• Highlight to select or skip channels already in memory. Navigate using the arrow buttons to
access the list of available channels. Press to change the channels status. A checkmark indicates a channel
has been added.
• Highlight to name or rename a broadcast channel. Navigate using the arrow button to enter the
screen menu to relabel a channel. Use the arrow buttons to spell out each letter, number or character. Use
arrow buttons to advance to the next space.
TV Settings
29
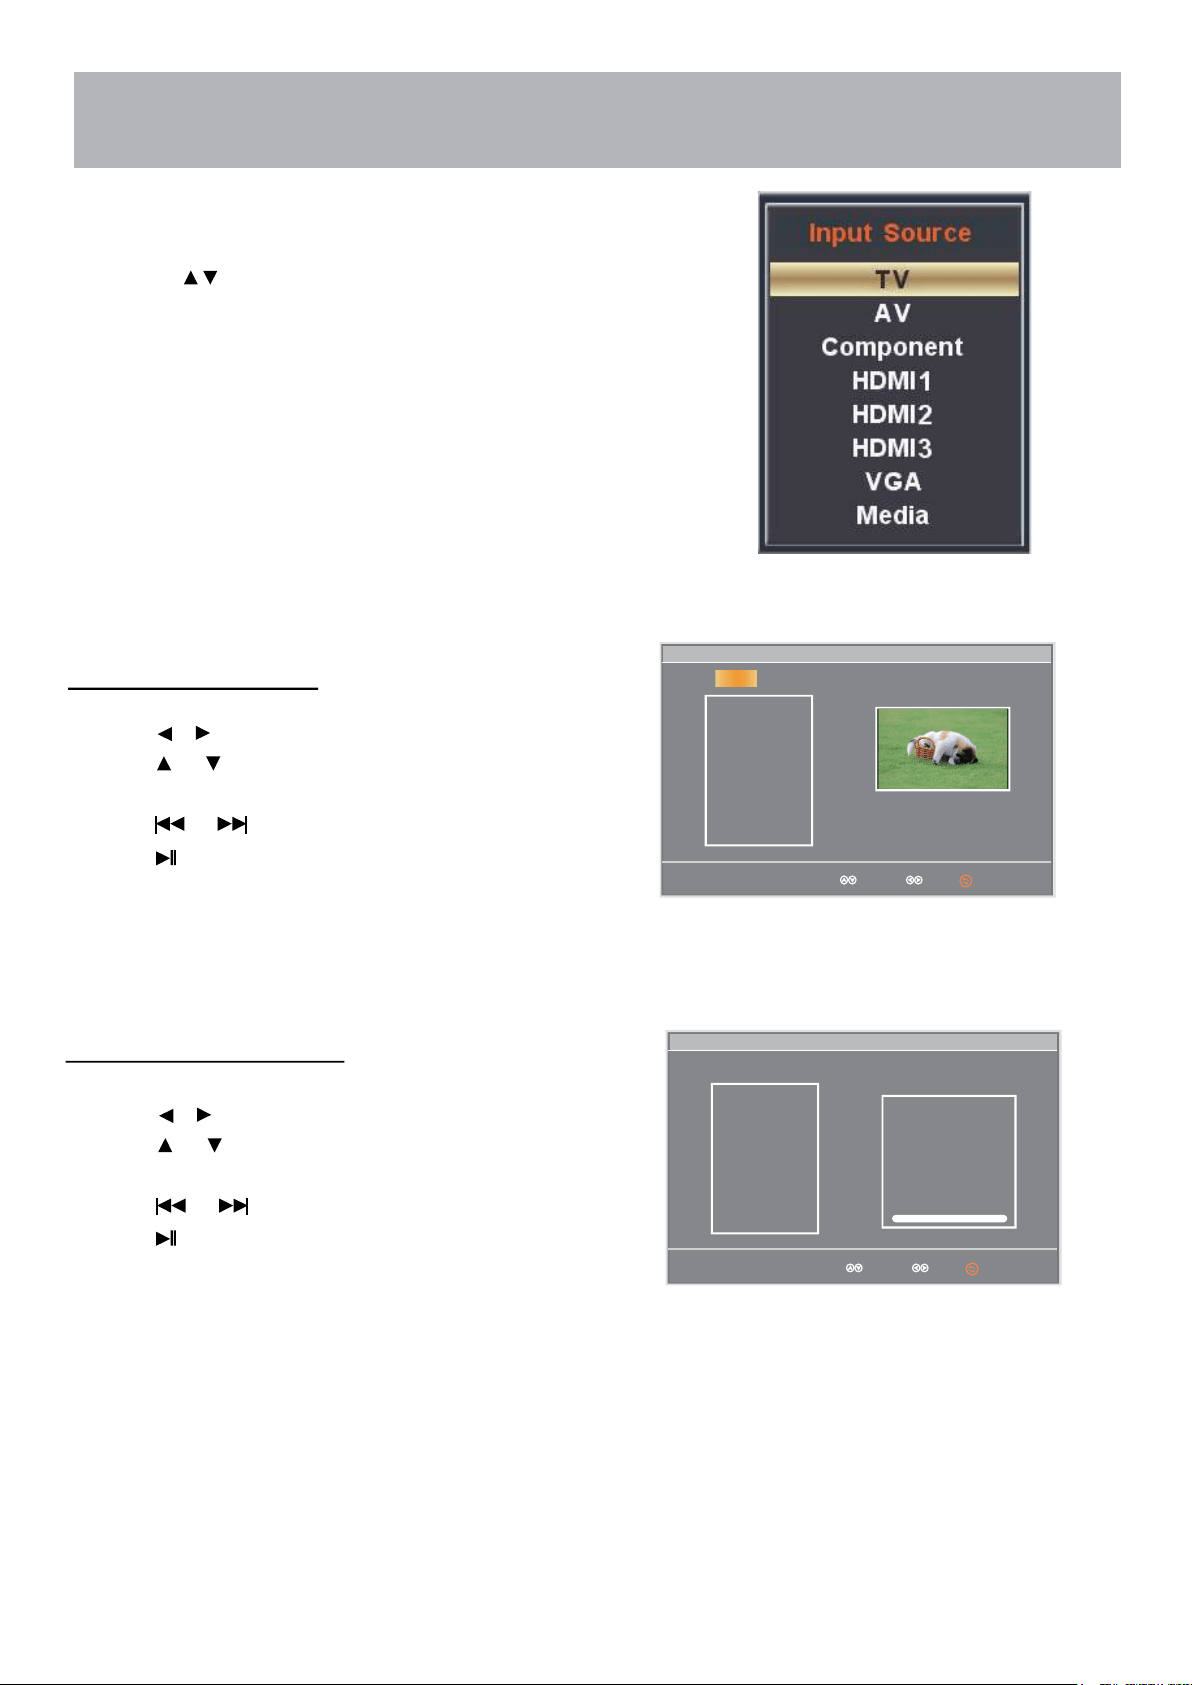
USB Modes
1. Press the INPUT button on the remote control to display the Input Menu.
2.
Press the
buttons to select MEDIA in the Source menu, and then
press the ENTER button.
Select Move
mblog.jpg
Play File:1
Total size:2.0GB
Unused size:1.8GB
001/001 534 x 800 34.3KB
Repeat
mblog.jpg
Music
C:\
C:
USB
Photo
To view Photos on the TV:
Press the
Press the button to return main menu.
Press the or button to view the next photo.
Press the buttons to select Photo.
or
button to highlight the photo you want to view.
Select Move
Photo
LOVE.mp3
Play File:1
Total size:2.0GB
Unused size:1.8GB
002/002
Repeat
LOVE.jpg
Title:
Artist:
Album:
Year
Pause
00:00 02:38
Music
C:\
C:
USB
Press ENTER to view the photo.
To Listen to Music on the TV:
Press the
Press the button to stop playback.
Press the or button to skip to the next/previous song.
Press the buttons to select Music.
or
button to highlight the song you want to hear.
Press ENTER to start playing the song.
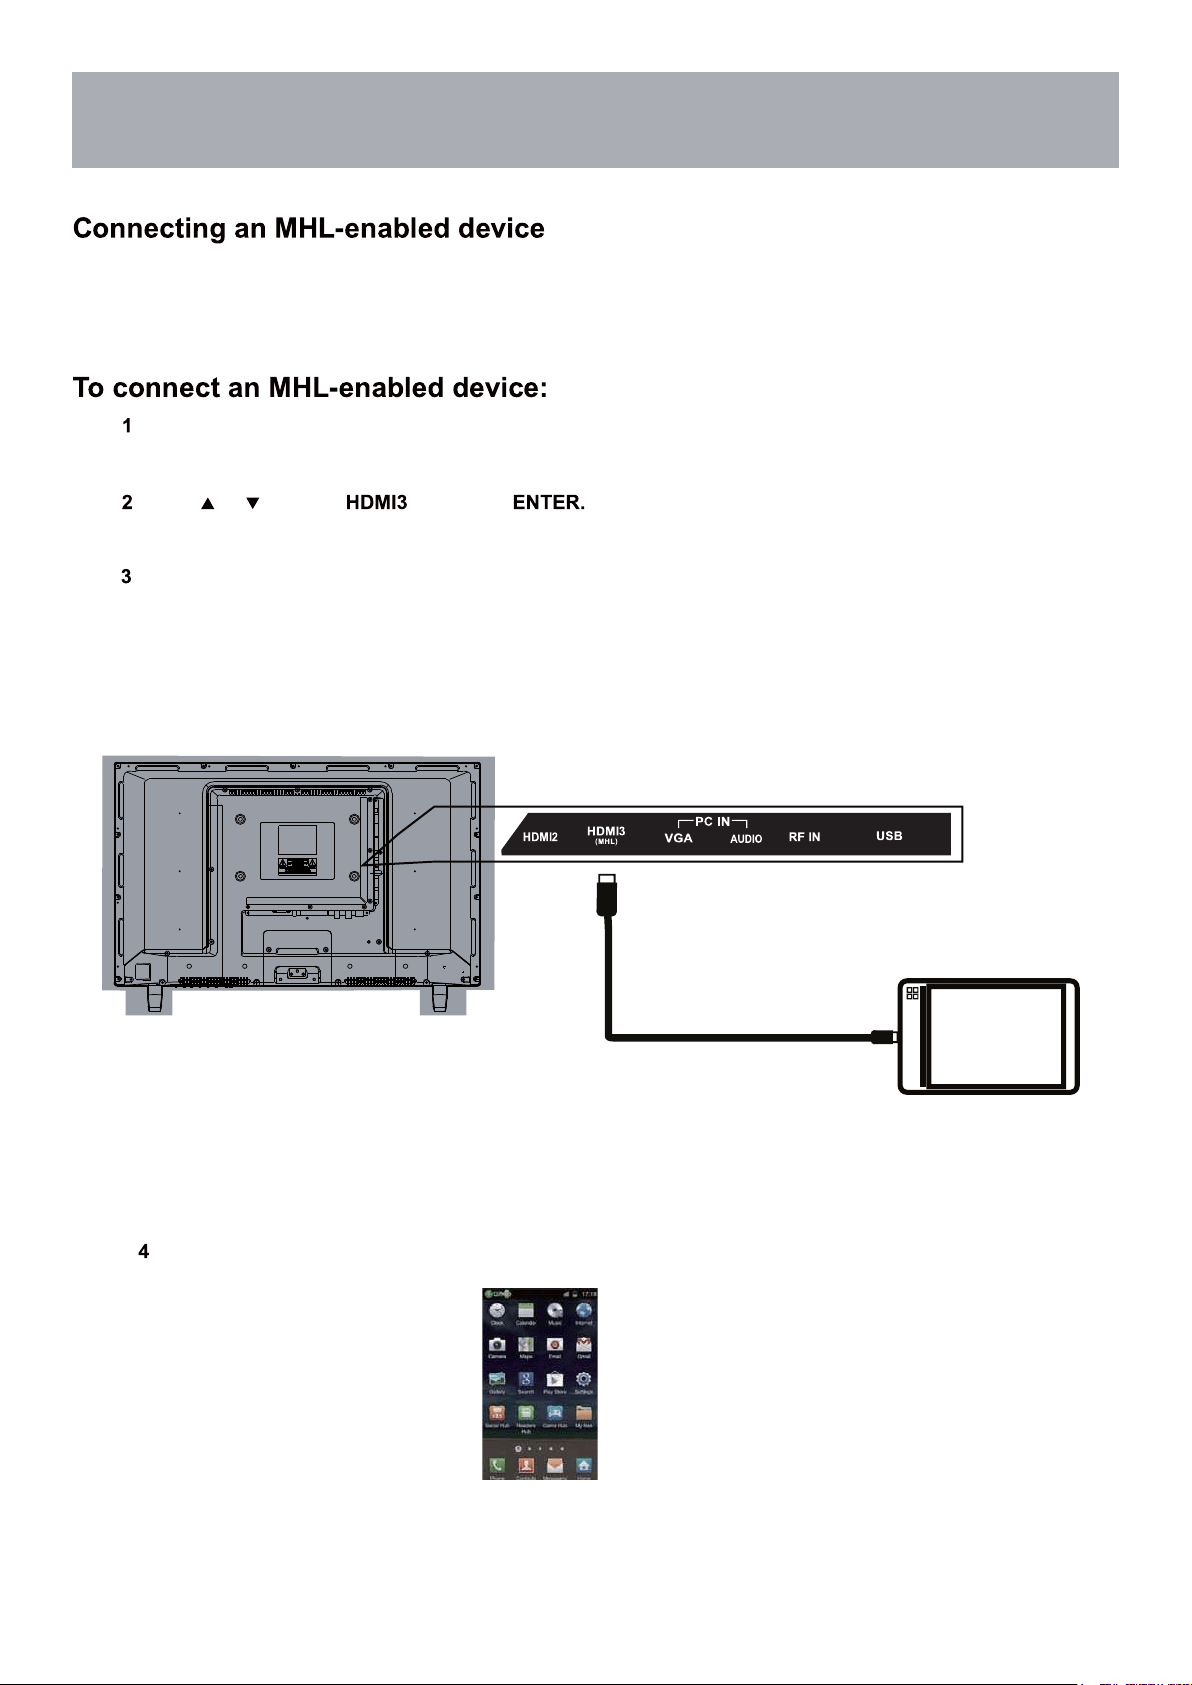
MHL Setting
You can connect an MHL-enabled device, such as a cell phone, and view your device’s screen on your TV.
Connect an MHL cable (not provided) to the micro USB port on the device, then connect the other end
of the cable to the HDMI /MHL jack on the side of your TV.
Press INPUT to open the Input Source list.
Press or to select ,then press
Your device’s menu will vary depending on the device and the apps you have loaded on the device.
MHL-Enabled Device
HDMI-to-MHL Cable
30
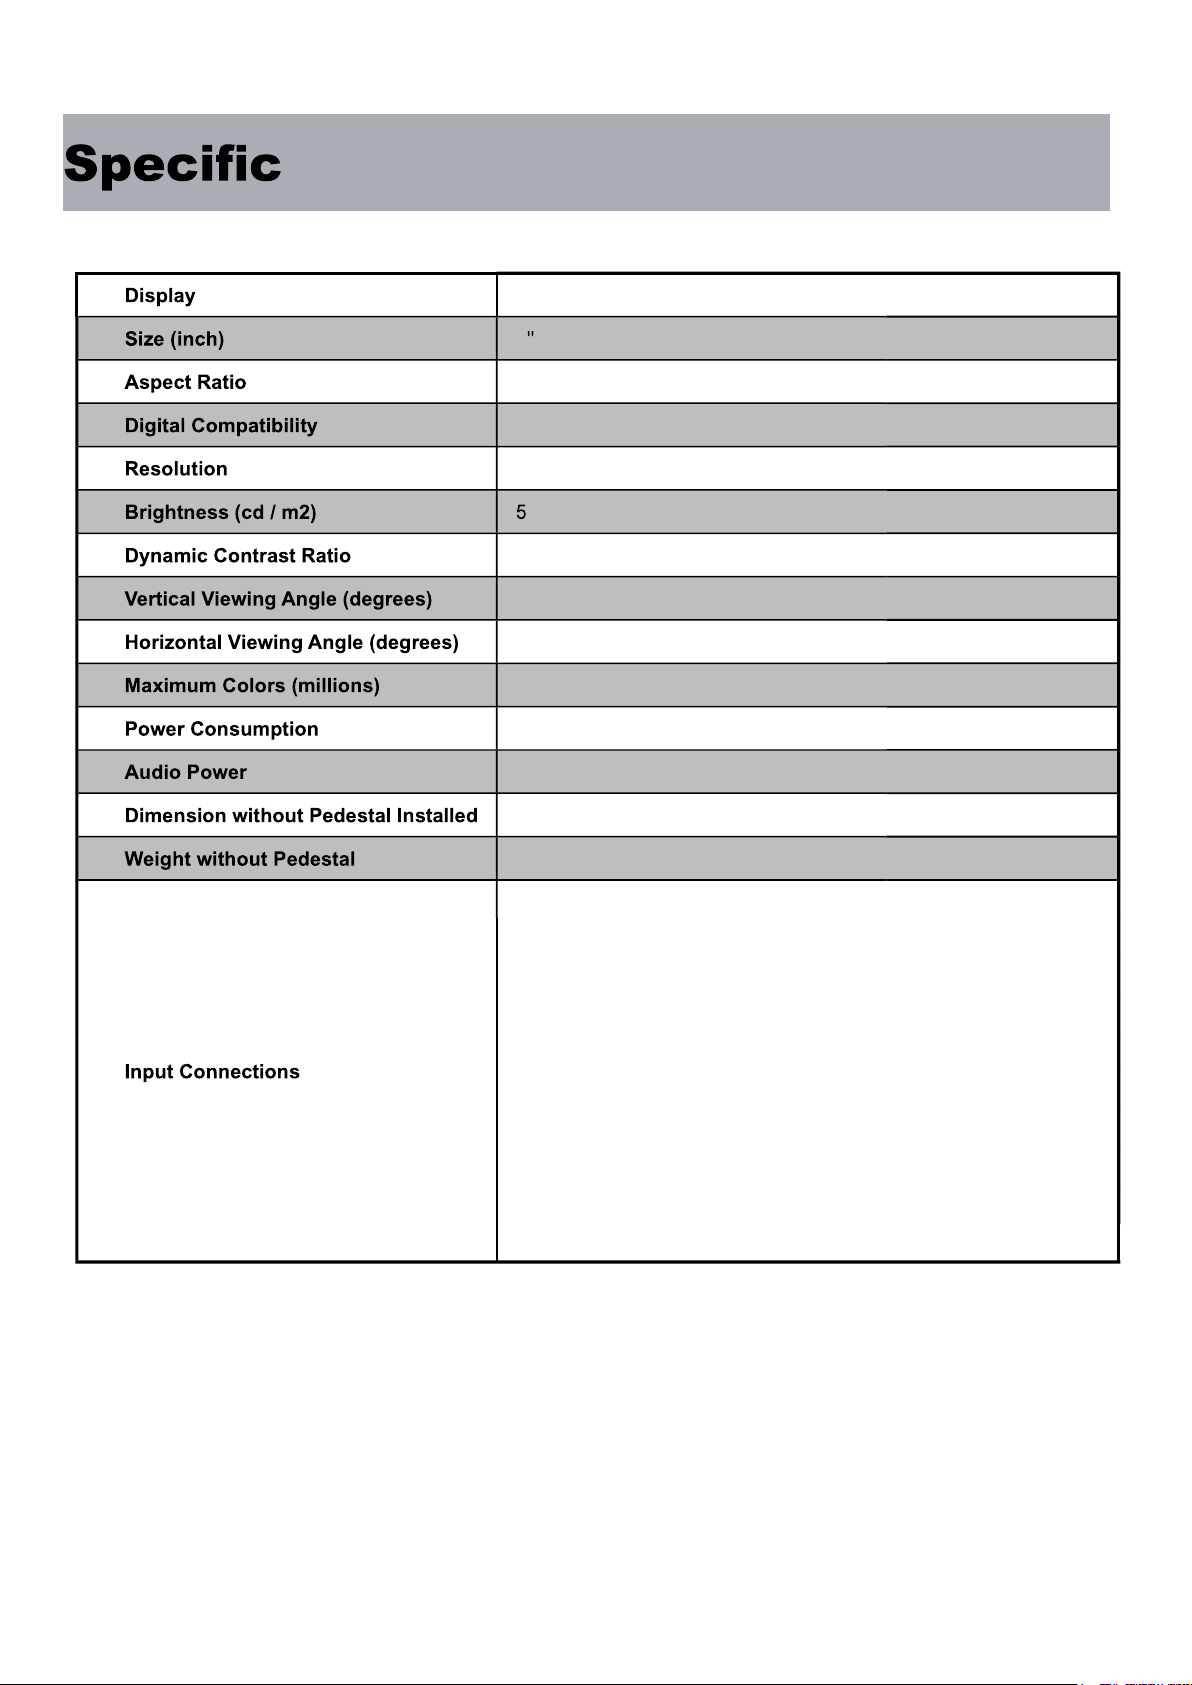
ations
LED
28
16:9
480i / 480p / 720p /1080i
1366x768
2 0
3000:1
178°
178°
16.7M
55Watts
2 X 8 W
25.3” (W) x 15.4” (H) x 3.3” (D)
7.6 lbs
)1(oediV etisopmoC
)1(rP bP Y
)3(IMDH
)1(FR
SPDIF Digital Audio Output (1)
)1(AGV / CP
)1( NI oiduA CP
Headphone Jack (1)
)1(BSU
31

Troubleshooting
32

Warranty
33