Using your TV
This section provides information on using the day-to-day features of your TV.
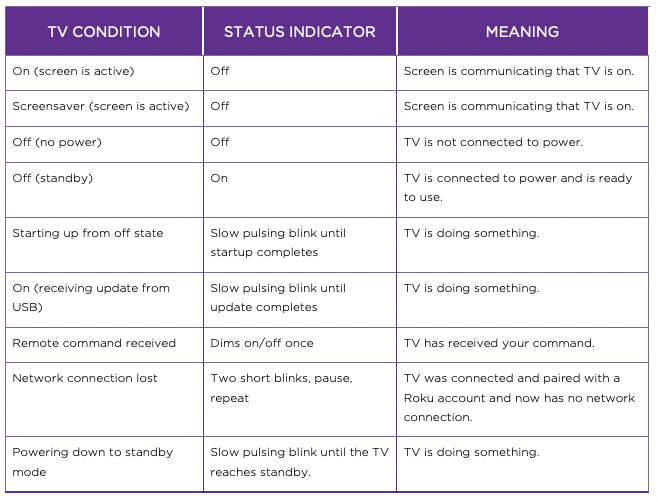
Status indicator
Your TV has a single status indicator. It goes on and off and blinks in different ways depending on the status of the TV, as shown in the following table:
Standby mode energy savings
When you turn off your TV, it remains in a higher power mode for a few minutes, after which it goes into a very low power standby mode. If you turn on the TV again before it has entered the very low power mode, it turns on immediately. After the TV goes into the lower power standby mode, it takes a few seconds longer to start up.
Only in connected mode on TVs that do not have an Energy Star® rating, you can optionally enable Fast TV start. When this option is enabled, your TV starts up almost immediately regardless of how long it has been turned off, but uses somewhat more power in standby mode. For more information, see Fast TV start.
Getting help
The Roku Tips & Tricks channel has helpful videos about many aspects of using your TV. You can access the channel in two ways:
- Select the Roku Tips & Tricks channel on the Home screen.
- Navigate from the Home screen to Settings > Help and select Launch Roku Tips & Tricks.
Opting in to Smart TV experience (U.S. only)
Only in connected mode in the United States, the first time you select Antenna TV, an HDMI input, or AV input, your TV offers to enable the Smart TV experience. If you decide to enable it at this time, you’re all set to enjoy its recommendations and features.

The Smart TV experience uses automatic content recognition (ACR) and other technology to collect information about what you watch through your Antenna TV, and on devices like media players and cable boxes connected to the HDMI or AV inputs. Opting in means that you give permission to analyze the programs you watch for the purpose of making recommendations, as well showing ads that are more relevant to you.
If you decide not to enable the Smart TV experience at this first opportunity, you can enable it later. Or, if you decide you’d rather not use the feature, you can disable it, but be aware that previously collected information is retained and not deleted.
Disable Smart TV experience
If you decide you want to disable Smart TV experience, follow these steps:
1. From the Home screen, go to Settings > Privacy > Smart TV experience.
2. Navigate to the right to highlight Use info from TV inputs.
3. Press OK on the remote to clear the check box.
Disable Auto Notifications
If you want to keep the Smart TV experience enabled, but you do not want to see notifications while you are watching shows, you can disable notifications. To do so, follow these steps:
- From the Home screen, go to Settings > Privacy > Smart TV experience.
- Navigate to the right to highlight Use info from TV inputs.
- Press DOWN on the remote to highlight Enable auto notifications.
- Press OK on the remote to clear the check box.
Note: These settings do not affect recommendations for More Ways to Watch that you see in the Smart Guide when watching Antenna TV channels. Those recommendations come from the Smart Guide and do not rely on ACR technology.
Watching Antenna TV channels
Select the Antenna TV tile in the Home screen. Your TV remembers the last channel you watched and starts with that channel playing.
Changing channels
To change channels, you can do any of the following:
- Press the UP arrow to change to the next higher channel.
- Press the DOWN arrow to change to the next lower channel.
- Press the LEFT arrow to display the channel list (in non-connected mode) or Smart Guide1 (in connected mode), and then press the arrow keys to select the channel or show you want to watch. Press REWIND and FAST FORWARD to move through the list one page at a time. When you’ve highlighted the channel or show you want to watch, press OK. (If you decide you don’t want to change channels, press the BACK button).
- Only if Live TV Pause is not enabled, press
 to jump to the previous channel. Press again to return to the channel you were watching before you pressed .
Note: If the button is not available on your remote, you can use this feature in the Roku mobile app. For more information, see Roku mobile app
Favorite Channels in non-connected mode
You can quickly change from surfing among all channels or only your favorite channels. First, you have to mark one or more channels as your favorites.
Note: In the United States, in connected mode, favorite channels appear at the top of the Smart Guide automatically after several days of watching Antenna TV channels. For details, see Smart Guide.
Mark your favorite channels
In non-connected mode, you can make any channel a favorite whenever you’re watching Antenna TV channels.
- Press the LEFT arrow to display the channel list. Notice that the words All channels appear at the top of the channel list.
- Scroll up or down to highlight a channel that you want to make a favorite.
- Press
 . At this point, you’ll see two options:
4. With Add to favorites highlighted, press OK. A  symbol appears adjacent to the channel to indicate that it is now a favorite.
5. Repeat these steps to add more favorite channels.
Surf only your favorite channels
In non-connected mode, after you’ve marked one or more channels as favorites, you can switch to your favorite channels whenever you’re watching Antenna TV channels.
- Press the LEFT arrow to display the channel list.
- Press the LEFT or RIGHT arrow once to switch to Favorites. Notice that the word Favorites appears at the top of the channel list.
- Highlight a channel and press OK to select one of the channels in the Favorites channel list, or wait a few moments until the channel list disappears.
- Press the UP or DOWN arrow to change to the previous or next favorite channel. Each channel you select in this way is a favorite channel. Your channel surfing is limited to favorite channels only.
Your favorite channel list remains in effect even if you turn off or unplug your TV, until you switch back to all channels.
Note that when you press OK to view the program information banner while watching a show, a symbol appears below the channel number.
Surf all channels again
In non-connected mode, you can switch back to all channels whenever you’re watching Antenna TV channels.
- Press the LEFT arrow to display the channel list.
- Press the LEFT or RIGHT arrow once to switch to All channels. Notice that the words All channels appear at the top of the channel list.
- Highlight a channel and press OK to select one of the channels in the All channels list, or wait a few moments until the channel list disappears.
- Press the UP or DOWN arrow to change to the previous or next channel among all your available channels. You can surf among all channels in your channel list.
Remove a channel from your favorites
In non-connected mode, you can remove a channel from your favorites whenever you’re watching the Antenna TV input.
- Press the LEFT arrow to display either channel list—All channels or Favorites.
- Scroll up or down to highlight a favorite channel that you want to remove from your favorites.
- Press on your remote. At this point, you’ll see two options:
- Remove from favorites
- Back
4. With Remove from favorites highlighted, press OK. The symbol adjacent to the channel disappears.
5. Repeat these steps to remove other channels from Favorites.
Smart Guide (U.S. only)
Only in connected mode in the United States, use the Smart Guide to find over-the-air TV shows through the Antenna TV input. The Smart Guide lets you scroll through all TV channels (except those you have hidden, if any). You can see all the shows from today, the previous 7 days, and the upcoming 14 days.
The ability to see shows that have already aired during the previous week enables you to use More Ways to Watch to catch up on missed movies or episodes by selecting them from one of the streaming channels. Your clue that there are More Ways to
Watch a show is a purple asterisk ( ) next to the program name in the guide. For example, you might turn on your TV at 10 minutes past the hour and discover you are missing the current episode of Empire. But there is a purple asterisk next to the show title, so you can press and find that there are several streaming channels where you can watch the current episode from the beginning. You also can find more episodes of Empire, and other shows that have a similar theme.
Note: A paid subscription or other payments may be required for some channels.
To view the Smart Guide, press the LEFT arrow. The Smart Guide opens showing the name of the current program highlighted, and a lot more information.
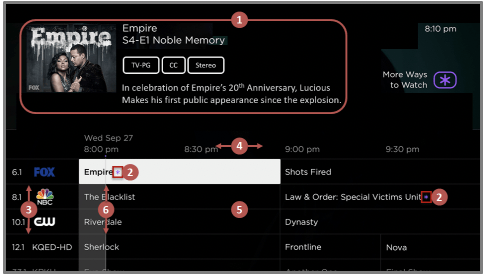
1. Program information for the highlighted show. See Viewing program information for details.
2. More Ways to Watch indicator. See More Ways to Watch for more information.
3. Channel list. Navigate with the UP and DOWN arrows.
4. Time slots. Navigate with the LEFT and RIGHT arrows. Use the FF and REW buttons to skip ahead or back a screen at a time.
5. Program list 6. Progress bar showing the approximate time with respect to the time slots.
As you navigate, notice that the Smart Guide shows a light gray background for programs and portions of programs that have already aired. It shows a black background for programs and portions of programs that have not yet aired. The line dividing these two zones is the progress bar.
Navigating the Smart Guide
- To switch to a program that is currently in progress, highlight it, and then press OK.
- To return to the current time after navigating to a different time slot, press REPLAY .
- To return to the currently airing program without causing a channel change, press BACK.
- To see More Ways to Watch, highlight any show that has a purple asterisk (), and then press
Favorite channels in the Smart Guide
The Smart Guide organizes your favorite channels at the top of the program list for convenient access. It does this automatically as you use your TV over several days. If you would prefer not to have a favorites section in the Smart Guide, you can turn this feature off.
Turn off favorite channels
- From the Home screen menu, navigate to Settings > TV inputs > Antenna TV > Favorite channels.
- Highlight Enable ‘Favorite channels’.
- Press OK to clear the check mark.
Viewing program information
You can view program information in different ways:
- Only in connected mode in the United States, view program information for any program listed in the Smart Guide. Press the LEFT arrow while watching Antenna TV to see the Smart Guide. For more information, see Smart Guide.
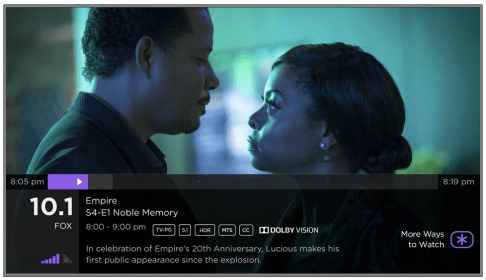
- View program information for the current program in a banner at the bottom of the screen. You can view program information in this way on both connected and non-connected TVs. The following illustration shows the information that is available

Program information banner
Program information might include any or all of the following, depending on availability within the broadcast information:
- Channel number
- Channel call sign
- Favorite channel icon
- Signal strength
- Program title and episode name/number
- Start time, end time, and graph of program length showing current position
- Content rating
- Video resolution (480i, 480p, 720p, 1080i, 1080p, 4K)
- Frame rate (24Hz, 30Hz, 60Hz for television sources, 60Hz, 70Hz, 72Hz, 75Hz for computer sources)
- Audio format (Mono, Stereo, Dolby Audio™ logo)
- Audio features (SAP/MTS)
- Only on select 4K models: HDR or Dolby Vision™ 1 logo (HDMI® and streaming sources)
- Closed captioning (CC)
- Current time
- Program description. If the entire description does not fit, press OK to expand the size of the banner and see the entire description.
Tip: If you’ve set up Live TV Pause and you’re watching Antenna TV, you’ll also see a progress bar showing the current playback position within the rolling 90-minute pause time. For more information, see Pausing Live TV
Adjusting settings while watching a show
Press to display the Options menu (except when you are viewing the program information banner). Press the UP and DOWN arrows to highlight an option, and then press the LEFT and RIGHT arrows to change the setting. The topic Adjusting TV settings explains each of the settings in detail.
Pausing Live TV
Live TV Pause gives your Roku TV the ability to pause, play, fast forward, and rewind digital Antenna TV. You can pause Antenna TV for up to 90 minutes.
Requirements
To use this feature, you need to:
1. Connect your TV to the Internet. If you didn’t connect during Guided Setup, see What if I didn’t connect my TV?.
2. Provide your own dedicated USB flash drive (thumb drive} with the following minimum specifications.
• 16 GB
• 15 Mbps read/write speed
• USB 2.0 compliant
A USB flash drive (thumb drive) meeting the minimum requirements is highly recommended over an externally-powered hard disk drive. Note that you can use any larger size drive—there is no limit to the maximum size—but using a larger drive does not extend the 90-minute pause time.
Important: After warning you and giving you a chance to cancel Live TV Pause setup, all existing content on your USB drive is erased when you enable this feature.
3. Connect your USB drive to the TV’s USB port.
Important: Some TV models have more than one USB port. You can connect your Live TV Pause USB drive to any port, but make sure that nothing is connected to other USB ports while enabling Live TV Pause. Reconnect other USB devices after you have finished enabling Live TV Pause.
4. Enable Live TV Pause, as explained in the following topic.
Enabling Live TV
Pause You can start setting up Live TV Pause in any of the following ways:
• After completing a channel scan, select Set up Live TV Pause from the available options.
• Press Play/Pause on the Roku remote while watching a digital Antenna TV channel.
• Highlight the Antenna TV tile on the Home screen, press on the remote, and then select Enable Live TV Pause
After starting setup of Live TV Pause in any of these ways, the TV prompts you through the steps needed to enable this feature. Setup takes only a few moments.
Note: Use of a USB hub is not supported. Using Live TV Pause If you have used the Roku remote to watch streaming channels, using Live TV Pause should be very familiar to you.
- • While watching a digital Antenna TV channel, press PLAY/PAUSE to pause or play the content. After the TV program has been paused for 90 minutes, the TV resumes playing.
- • After watching a channel for a while, press REWIND to jump back up to the point where you first started watching the channel, up to 90 minutes.
- • After pausing or rewinding, press FAST FORWARD to jump ahead up to the point where you are once again watching the live TV program.
• Press FAST FORWARD or REWIND repeatedly to cycle through 1x, 2x, and 3x skip speeds. Press INSTANT REPLAY to play back the last several seconds of the program.
• When the program is paused, press the LEFT and RIGHT arrows to move forward and backward through the program approximately 10 seconds per press. Small frames appear across the screen to identify your location in the program.
Note: If the button is not available on your remote, you can use the Roku mobile app. For more information, see Roku mobile app.
Whenever you use any of the Live TV Pause features, the TV momentarily displays a progress bar:
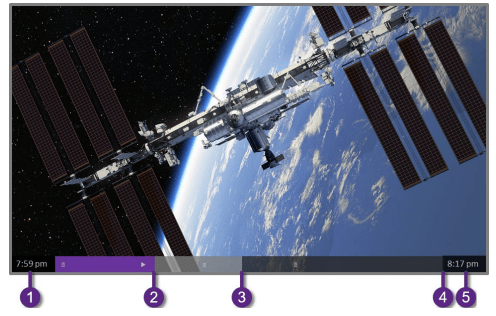
1. Time at current playback position.
2. Current playback position
3. Extent of pause time, representing the amount of time this channel has been buffered, up to 90 minutes.
4. 90-minute mark, representing the maximum extent of pause time.
5. Current time.
The progress bar also displays tick marks at each half hour point, to help you locate the boundaries where one show ends and a new one begins.
Notes about Live TV Pause
• You can use Live TV Pause only with digital broadcast and cable channels received through the TV’s ANT input (ATSC and Clear QAM channels).
• Changing channels erases and restarts the Live TV Pause buffer.
• Returning to the Home screen, selecting another input, or turning off the TV erases and resets the Live TV Pause buffer.
• Disconnecting the USB drive erases the Live TV Pause buffer.
More Ways to Watch (U.S. only)
Only in connected mode in the United States, More Ways to Watch gives you recommendations about the shows you’re watching on the Antenna TV, HDMI, or AV input. You will automatically get these recommendations in the Smart Guide and in the program information banner for Antenna TV programs. However, before you can get recommendations for shows you’re watching through the HDMI or AV inputs, you must opt into the Smart TV experience to acknowledge that you want to allow the TV to use automatic content recognition (ACR). See Opting in to Smart TV experience for details.
Not every show provides recommendations. For details about what you’ll see when a recommendation appears, see Using More Ways to Watch.
Using More Ways to Watch
As you use More Ways to Watch, be aware that you’ll only see suggestions on your TV when all of the following conditions are met:
- Your TV is operating in connected mode in the United States.
- If you are watching shows through and HDMI or AV input, you’ve enabled Smart TV experience. (If you are watching Antenna TV channels, this setting does not matter.)
- The program you’re watching contains the information needed to identify it. Note that some programs, such as the daily news, typically do not activate More Ways to Watch.
- At least one participating streaming channel offers the movie or TV show you are watching, or other episodes, or more shows like the one you are watching.
If all of these conditions are met, you can view the suggestions. More Ways to Watch recommendations appear in several places:
- When watching the HDMI and AV inputs, you’ll see a More Ways to Watch notification in the lower right corner of the screen for a few seconds unless you have disabled Enable auto notifications.
Note: After this banner disappears, you can restore the More Ways to Watch prompt by pressing OK
- For shows on Antenna TV channels, check the program information banner that appears for a few moments when you change channels or when you press OK while watching a show. If your TV has suggestions, you’ll see a More Ways to Watch notification in the banner:
- In the Smart Guide, you can view More Ways to Watch recommendations on any program that shows a purple asterisk next to its title:
 Regardless of which More
Ways to Watch prompt appears, press to see the recommendations. The options you’ll see depend on the type of show you’re watching and the available ways there are to watch, so you might see any or all of the following:

- Watch from beginning – Streaming channels on which the same TV show or movie is available. Generally, this option does not appear on first run programs, because streaming content is not available until a later date.
- More episodes – Streaming channels where you can find other episodes of the TV show you are watching. Does not apply to movies.
- More like this –TV shows or movies with a similar theme.
- View full description – Full description of the selected show.
Press the DOWN arrow to select an option, and then press the RIGHT arrow to select the channel you want to use to watch from the beginning or watch more episodes, or the other TV show or movie with a similar theme.
Assuming you’ve already added the channel and completed any required sign-in, More Ways to Watch takes you directly to the program in the streaming channel where you can select and watch the program. Otherwise, it prompts you to add the channel and, if you do, then takes you to the show
Getting the most from More Ways to Watch
• Streaming channels you’ve already installed appear first in the list of suggestions.
• When you select a streaming channel, you leave the program you are currently watching.
• If you’ve used the Live TV Pause feature to pause the program, your paused program buffer is deleted. In other words, you cannot return to an Antenna TV channel and resume watching where you left off.
Switching TV inputs
Switch TV inputs to access the device connected to that input, for example, a Blu-ray™ player. Switching inputs is as simple as highlighting the input’s tile in the
Home screen, and pressing OK. The video signal on the input, if any, plays on the screen.
Tip: To learn how to add, remove, rename, and rearrange the tiles on your Home screen, see Customizing your TV.
Auto-detecting devices
Your TV automatically detects when you connect a new device to an HDMI® input and turn on its power. The input is automatically added to the Home screen if it isn’t already present.
Adjusting audio/video settings
While watching video content on any input, press  to display the Options menu. Press the UP and DOWN arrows to highlight an option, and then press the LEFT and RIGHT arrows to change the setting. To learn about each of the audio and video settings, see Adjusting TV settings.
Setting preferred audio language for streaming channels
You can choose the preferred language for the audio played by streaming channels. If the selected language is available in the streaming content, the TV plays that language.
To set the preferred audio language:
- From the Home screen menu, navigate to Settings > Audio > Audio preferred language.
- Press RIGHT to highlight one of the languages.
- Press UP or DOWN to highlight the language you want to use.
- Press OK.
Note: Many streaming channels have an option to select the language while you are watching a program. The Audio preferred language setting sets the default for that option.
Playing content from USB storage devices
Only in connected mode, your Home screen has the Roku Media Player tile. Otherwise, the Home screen has the USB Media Player tile. You can play personal music, video, and photo files from a personal USB flash drive or hard disk connected to the TV’s USB port.
To use this feature, make sure your media files are compatible with the Roku/USB Media Player. To see the latest list of supported formats, view Help in the Media Player1 The Roku/USB Media Player displays supported file types only, and hides file types it knows it cannot play.
For more information about playing back your personal videos, music, and photos, go to the following link on the Roku web site: go.roku.com/rokumediaplayer
Auto player launch
Only in connected mode, you can set your TV to automatically open the Roku Media Player when you connect a USB drive with a recognizable file system (such as FAT16/32, NTFS, HFS+ or EXT2/3). To configure this setting, from the Home screen, navigate to Settings > System > USB media. At this point, the following options are available:
• Auto-launch – Choose Prompt, On, or Off, as desired.
o Prompt – (default) Display a prompt each time a recognized USB drive is connected. The prompt provides options to launch the Roku Media Player as well as to change future auto-play behavior.
o On – Always launch the Roku Media Player whenever you connect a recognized USB drive.
o Off – Never launch the Roku Media Player automatically.
• Launch channel – Choose the app you want to use to play back media files.
Adjusting TV settings
You can adjust most picture and sound settings while you are watching a program by pressing to open the Options menu. There are some additional picture and sound settings in the Settings menu.
In most cases, the changes you make apply only to the input you are using. Antenna TV, the separate HDMI® inputs, and the AV input each have their own settings that the TV remembers when you return to that input. The TV also separately remembers the settings you specify while viewing streaming content.
Settings menu
Use the Settings menu to adjust overall TV settings. Press  to go to the Home screen, and then navigate to Settings > TV picture settings.
You can adjust the following overall TV picture settings from the Settings screen:
- TV brightness – Provide a better viewing experience in darker or brighter rooms. Increases or decreases the TV’s general brightness across all TV inputs.
Note: This setting is identical to the TV brightness setting you can access in the Options menu while watching a program.
- HDR notification – On select models only: Controls whether the TV displays a notification in the upper right corner of the screen for a few seconds when HDR or Dolby Vision content begins to play.
o On – The TV displays a notification when HDR or Dolby Vision content begins to play.
o Off – The TV does not display a notification when HDR or Dolby Vision content begins to play.
Note: This setting does not affect the HDR or Dolby Vision notification that always appears in the program information banner. Press OK while watching a show to open the program information banner.
- Settings per input – Lists each TV input. Select an input, and then press to display the Options menu where you can adjust the input’s settings while watching a live picture and listening to the sound from that input.
Tip: You don’t have to go to the Settings menu first—you can display an input’s Options menu and adjust its settings whenever you are watching the input by pressing .
Options menu
The Options menu for each TV input provides many settings for controlling the appearance of the picture and the quality of the audio. To view the Options menu, press whenever you are watching a TV input or streaming a video (except when you are viewing the program information banner). The Options menu is a panel that appears over the left side of the screen:
 Typical Options menu
To adjust the settings on the Options menu, press the UP or DOWN arrow to highlight a setting, and then press the LEFT or RIGHT arrow to change the setting. You’ll see the changes you make right away in picture appearance or audio quality.
Tip: When you highlight a setting, the header text explains the effect of its current value. When you begin to adjust a setting, the other options are hidden so you can see more of the screen. Even though the other settings are hidden, you can move the highlight up or down to adjust the other settings. As soon as you press the UP or DOWN arrow, the other settings become visible again.
Note: Some streaming channels assign the button to a different function, meaning it will not open the Options menu. In these cases, use a different channel, such as The Roku Channel, to configure options. The selected settings remain active for all streaming channels.
Options menu settings
- Sleep timer – Sets a timer that turns off the TV after the specific amount of time. This setting remains in effect even if you stop watching the current input.
- TV brightness – Affects the overall brightness of the picture. This setting applies across the entire TV; that is, to all TV inputs and is identical to the TV brightness setting under Settings > TV picture settings.
- Picture size – Adjusts the aspect ratio of the picture, enabling you to view a picture in its original format, or zoom or stretch it to fill the screen. The Auto setting has been found to produce the best picture in most cases.
- Picture mode – Provides picture presets for various viewing preferences. This setting applies to the currently-selected input only.
- Sound mode – Adjusts the sound quality output from the TV speakers. This setting applies across the entire TV; that is, to all TV inputs. It does not affect the sound quality for headphones, HDMI (ARC), or SPDIF (TOSLINK) connectors.
- Closed captioning – Controls when you see captions. This setting is only offered for Antenna TV, the AV input, and streaming/media player videos. Any set value remains in effect across only these inputs.
o Antenna TV – Set captions to off, always on, on only when the TV sound is muted, or on only during instant replay (when Live TV Pause has been enabled).
o AV input – Set captions to off, always on, or on only when the TV sound is muted.
o Streaming video channel or media player – For streaming content that provides closed captions, set captions to off, always on, on only when the TV sound is muted, or on only during instant replay (for streaming content that supports instant replay). Note that some streaming channels have other methods for turning captions on and off. In these cases, the Closed captioning option does not appear on the Options menu.
Note: If the button is not available on your remote, you can use this feature in the Roku mobile app. For more information, see Roku mobile app.
- Captioning track – Only in Canada: Selects which caption track to display when closed captioning is on. This setting remains in effect on all inputs that provide captions.
Note: In the United States, the Captioning track setting is located under Accessibility.
- SAP – Selects whether to play a secondary audio program or multichannel television sound, and which choice to play. This setting applies only to Antenna TV on digital channels.
- Sound settings – Only on select models: Shows the Sound settings menu.
- Picture settings – Shows the Picture settings menu.
Tip: To dismiss the Options menu, just wait a few seconds without pressing any buttons. Or press again to dismiss the menu immediately.
Accessibility (U.S. only)
Only in the United States, the settings on the Accessibility menu enable you to change the TV’s accessibility settings without leaving the program you are watching. These settings are also available on the Home screen under Settings > Accessibility.

Note: Some streaming channels assign the button to a different function, meaning it will not open the Options menu. In these cases, use a different channel, such as The Roku Channel, to configure accessibility options.
Accessibility menu settings
- Audio Guide – Turn the Audio Guide on or off. The Audio Guide is a text-tospeech screen reader that helps blind and low-vision users navigate the Roku user interface and on-screen menus. When enabled, the Audio Guide reads out text, menus, and other on-screen items.
Tip: If Shortcut is enabled, you can enable or disable the Audio Guide by pressing the four times in quick succession. (The button is located directly below the directional pad on the right side of the Roku remote.)
- Speech rate – Choose the speed at which the TV speaks Audio Guide prompts.
- Volume – Set the volume of the Audio Guide in relation to the main TV volume.
- Shortcut – Enable or disable the shortcut feature. When disabled, pressing four times in quick succession does not enable or disable the Audio Guide.
- Closed captioning – Controls when you see captions. This setting is only offered for Antenna TV, the AV input, and streaming/media player videos. Any set value remains in effect across only these inputs.
o Antenna TV – Set captions to off, always on, on only when the TV sound is muted, or on only during instant replay (when Live TV Pause has been enabled).
o AV input – Set captions to off, always on, or on only when the TV sound is muted.
o Streaming video channel or media player – For streaming content that provides closed captions, set captions to off, always on, on only when the TV sound is muted, or on only during instant replay (for streaming content that supports instant replay). Note that some streaming channels have other methods for turning captions on and off. In these cases, the Closed captioning option does not appear on the Options menu.
Note: If the button is not available on your remote, you can use this feature in the Roku mobile app. For more information, see Roku mobile app.
- Captioning track – Selects which caption track to display when closed captioning is on. This setting remains in effect on all inputs that provide captions.
- SAP – Selects whether to play a secondary audio program or multichannel television sound, and which choice to play. This setting applies only to Antenna TV on digital channels.
Picture settings
The Picture settings menu for each TV input provides settings for fine tuning the appearance of the picture. All of the settings in this menu apply only to the currentlyselected input.
To use the Picture settings menu, first press to display the Options menu. Then select Picture settings.

Typical Picture settings menu
Note: Some streaming channels assign the button to a different function, meaning it will not open the Options menu. In these cases, use a different channel, such as The Roku Channel, to configure Picture settings. The selected settings remain active for all streaming channels.
Picture settings menu options
Note: Picture settings vary by brand and model. Not all settings are available on all TVs. Names of certain settings also vary by brand and might differ from the names listed here.
- Picture mode – Provides picture presets for various viewing preferences. This setting duplicates the one on the Options menu. When you change the Picture mode, other picture settings adjust accordingly. For example, setting the Picture mode to Vivid sets Brightness, Contrast, Sharpness, and other values to produce a very vibrant picture. Setting Picture mode to Movie changes the settings to produce a picture suitable for enjoying movies in a darkened room. If you make changes to the individual picture settings—for example, Contrast, or Sharpness—these settings are saved for the current input and the current picture mode. In this way, you can set HDMI 1 input’s Movie picture mode to use different settings than the HDMI 2 input’s Movie picture mode and Antenna TV’s Movie picture mode. Use Reset picture settings, described below, to return the input’s selected picture mode to its original values.
- Local dimming – Only on select models: Sets the amount of dimming applied to multiple areas of the screen’s backlight intensity. This setting can make dark areas darker without affecting the brightness of light areas.
- Dynamic contrast – Only on select models: Automatically adjusts the backlight level to achieve the optimum contrast and prevent excessive differences between light and dark areas of the screen.
- Micro contrast – Only on select models: Improves image contrast.
- Backlight - Adjusts the overall light intensity of the screen.
- Brightness – Adjusts the dark level of the picture.
- Contrast – Adjusts the white level of the picture.
- Sharpness – Adjusts the sharpness of edges in the picture.
- Color – Adjusts the saturation of colors in the picture. A setting of 0 removes all color and displays a black and white picture.
- Tint – Adjusts the color balance from green to red to obtain accurate colors in the picture.
- Color temperature – Adjusts the overall color tones in the picture from Normal to slightly more bluish (Cool) to slightly more reddish (Warm).
- Frame rate conversion – Only on select models. Each TV brand uses a different name for this option. Adjusts the amount of motion processing applied to the video signal. A higher setting results in more smoothing, but can cause undesirable picture artifacts in certain types of content. Each Picture mode has a different default setting.
- Film mode – Only on select models. Each TV brand uses a different name for this option. When enabled, this feature reduces “judder” that is often present when 24 frame-per-second movies are upscaled to 60Hz TV standards. Film mode is On by default in Movie and HDR Dark picture modes, and Off by default in other picture modes.
- Blur reduction – Only on select 120Hz models. Each TV brand uses a different name for this option. Reduces blur, especially for fast-moving images such as sports.
- Black frame insertion – Only on select models that also have the local dimming feature. Each TV brand uses a different name for this option. Reduces motion blur caused by the refresh rate of the screen. Enabling this feature inserts black frames between picture frames in a way that improves the clarity of fast moving objects. It provides an improved viewing experience for video games and sporting events, but reduces the brightness of the picture. You can choose settings of Low, Medium, High, or Off to achieve the desired picture quality.
- Game mode – Only on HDMI® and AV inputs: Controls whether Game mode is enabled. When On, the TV performs less image processing and has less input lag. When Off, the TV performs more image processing and has more input lag, which is less desirable for action games.
Only on select models: Auto Low Latency Mode (ALLM) detects when certain game consoles are connected to an HDMI input, and automatically configures the best settings for action games. When ALLM is active, the manual Game mode setting is not available.
Note: If you have paired Roku Wireless Speakers with your TV, enabling Game mode switches sound back to the internal TV speakers to avoid latency or lag in game play. Disabling Game mode switches sound back to the Roku Wireless Speakers.
- Reset picture settings – Returns all picture settings for the input’s currentlyselected Picture mode to their original values.
Tip: To dismiss the Picture settings menu, just wait a few seconds without pressing any buttons. Or press again to dismiss the menu immediately.
Sound settings
Select TV brands and models have various sound settings available in the Options menu. Variations include:
- No Sound settings
- Volume mode
- Dolby® Audio Processing
- DTS® TruSurround
- DTS® Studio Sound
- Sonic Emotion ™ Premium
Volume mode (select models only)
To access Volume mode, first press to display the Options menu, then select Advanced sound settings1

Sound settings menu for models with Volume mode
Tip: Some streaming channels assign the button to a different function, meaning it will not open the Options menu. In these cases, use a different channel, such as The Roku Channel, to set the Volume mode. The selected mode remains active for all streaming channels.
Sound settings menu - Volume mode
• Off – Volume mode are inactive and content volume is unmodified.
• Leveling – Provides a consistent volume level across different types of content, so that you need not change the volume every time you switch channels or when a commercial comes on.
• Night – Soft sounds, such as whispers, are increased while loud sounds, such as explosions, are decreased, making it easier to hear your TV at night without disturbing others.
Sound settings – Dolby® Audio Processing (select models only)
Each TV input has separate settings for fine tuning sound quality. All of the settings in this menu apply only to the currently-selected input. To access the DAP settings, first press to display the Options menu, then select Sound settings.

Sound settings menu for models with Dolby® Audio Processing
Tip: Some streaming channels assign the button to a different function, meaning it will not open the Options menu. In these cases, use a different channel, such as The Roku Channel, to configure Dolby® Audio Processing. The selected settings remain active for all streaming channels.
Sound settings menu– Dolby® Audio Processing
- Sound mode – Select from among various preset sound modes to improve speech, make music sound its best, boost bass or treble, or simulate a theater. Use Reset audio settings, described below, to return the input’s current settings to their original values.
- Virtual surround (select models only) – Options vary by TV model. Simulates surround sound that otherwise would require installation of a surround sound audio system. Sometimes, the effect interferes with dialog clarity. Use the Dialog enhancer option to compensate.
- Dialog enhancer – Improves the clarity of speech when on.
- Reset audio settings – Returns Virtual surround and Dialog enhancerlk settings to their default settings for the selected Sound mode.
Sound settings – DTS® TruSurround / DTS® Studio Sound (select models only)
Each TV input has separate settings for fine tuning sound quality. All of the settings in this menu apply only to the currently-selected input. To access the DTS® settings, first press to display the Options menu, then select Sound settings.
 Sound settings menu for models with DTS® TruSurround/Studio Sound
Tip: Some streaming channels assign the button to a different function, meaning it will not open the Options menu. In these cases, use a different channel, such as The Roku Channel, to configure DTS® Studio Sound. The selected settings remain active for all streaming channels.
Sound settings menu– DTS® TruSurround / DTS® Studio Sound
- Sound mode – Select from among various preset sound modes to improve speech, make music sound its best, boost bass or treble, or simulate a theater. Use Reset audio settings, described below, to return the input’s current settings to their original values.
- DTS TruSurround –Simulates surround sound that otherwise would require installation of a surround sound audio system. Sometimes, the effect interferes with dialog clarity. Use the Dialog clarity option to compensate.
- Dialog Clarity – Available only when DTS TruSurround is On. Choose among
- Low, Medium, and High settings to improve the clarity of dialog when you are using the TruSurround feature.
- TruVolume – Minimizes annoying volume fluctuations in programs.
- Reset audio settings – Returns DTS TruSurround, Dialog Clarity, and TruVolume settings, to their default settings for the selected Sound mode.
Sound settings – Sonic Emotion™ Premium (select models only)
Sonic Emotion™ Premium is an audio technology that enables your TV to produce a more immersive sound experience. Each TV input has separate settings for fine tuning sound quality. All of the settings in this menu apply only to the currently-selected input. To access the Sonic Emotion™ settings, first press to display the Options menu, then select Sound settings.

Sound settings menu for models with Sonic Emotion™ Premium
Tip: Some streaming channels assign the button to a different function, meaning it will not open the Options menu. In these cases, use a different channel, such as The Roku Channel, to configure Sonic Emotion™. The selected settings remain active for all streaming channels.
Sound settings menu– Sonic Emotion™ Premium
- Sound mode – Select from among various preset sound modes to improve speech, make music sound its best, boost bass or treble, or simulate a theater. Use Reset audio settings, described below, to return the input’s current settings to their original values.
- Sonic Emotion Premium – Displays a menu with individual Sonic Emotion™ audio settings, as described in Sonic Emotion settings.
- Reset audio settings – Returns Sonic emotion settings to their default settings for the selected Sound mode.
Sonic Emotion™ settings
When you select Sonic Emotion Premium from the Sound settings menu, these additional settings become available:
 Sonic Emotion settings menu for models with Sonic Emotion™ Premium
• Dialog Enhancement – Enhances your ability to hear and understand dialog in the program.
• Bass Enhancement – Enhances the low frequency sound component in the program.
• Absolute 3D Sound – Simulates sound from multiple speakers that would otherwise require installation of a surround sound audio system.