
01
Hurom Manual
Household use only(Warranty Included)
1 Read ‘Precautions for Safe Use’ (Page 05) and use the appliance properly.
2 After finish reading the manual, keep it in a convenient location for future reference.
3 Do not use it abroad which has different power supply and voltage.
4 Any quality improvements are subject to change without notice.

IMPORTANT SAFEGUARDS
1.
2.
3.
4.
5.
6.
7.
8.
9.
10
WHEN USING ELECTRICAL APPLIANCES, BASIC SAFETY PRECAUTIONS
SHOULD ALWAYS BE FOLLOWED. READ ALL INSTRUCTIONS.
TO PROTECT AGAINST RISK OF ELECTRICAL SHOCK, DO NOT PUT
THE MAIN BODY (MOTOR) IN WATER OR ANY OTHER LIQUID.
CLOSE SUPERVISION IS NECESSARY WHEN ANY APPLIANCE IS USED
NEAR CHILDREN.
UNPLUG FROM OUTLET WHEN NOT IN USE, BEFORE ASSEMBLING OR
TAKING OFF PARTS AND BEFORE CLEANING.
AVOID CONTACT WITH MOVING PARTS.
DO NOT OPERATE ANY APPLIANCE WITH A DAMAGED CORD OR PLUG,
OR AFTER THE APPLIANCE MALFUNCTIONS, OR IS DROPPED OR
DAMAGED IN ANY MANNER. RETURN APPLIANCE TO THE NEAREST
AUTHORIZED SERVICE FACILITY FOR EXAMINATION, REPAIR OR
ELECTRICAL OR MECHANICAL ADJUSTMENT.
THE USE OF ATTACHMENTS NOT RECOMMENDED OR SOLD BY THE
MANUFACTURER MAY CAUSE FIRE, ELECTRIC SHOCK OR INJURY.
DO NOT LET CORD HANG OVER EDGE OF TABLE OR COUNTER.
ALWAYS MAKE SURE CONTAINER IS SECURELY FASTENED IN PLACE
BEFORE MOTOR IS TURNED ON. DO NOT UNFASTEN CONTAINER
WHILE BLENDER IS IN OPERATION.
BE SURE TO TURN SWITCH TO OFF POSITION AFTER EACH USE OF
YOUR JUICER. MAKE SURE THE MOTOR STOPS COMPLETELY BEFORE
DISASSEMBLING.

SAVE THESE INSTRUCTIONS
11.
12.
13.
14.
15.
16.
17.
DO NOT PUT YOUR FINGERS OR OTHER OBJECTS INTO THE CONTAINER
WHILE IT IS IN OPERATION. IF FOOD BECOMES LODGED IN OPENING,
USE FOOD PUSHER OR ANOTHER PIECE OF FRUIT OR VEGETABLE TO
PUSH IT DOWN. WHEN THIS METHOD IS NOT POSSIBLE, TURN THE
MOTOR OFF AND DISASSEMBLE JUICER TO REMOVE THE REMAINING
FOOD.
DO NOT USE OUTDOORS.
DO NOT PLACE ON OR NEAR A HOT GAS OR ELECTRIC BURNER OR IN
A HEATED OVEN.
DO NOT USE APPLIANCE FOR OTHER THAN INTENDED USE.
BLADES ARE SHARP. HANDLE CAREFULLY.
ALWAYS OPERATE BLENDER WITH COVER IN PLACE.
KEEP THE CAP IN PLACE WHEN BLENDING HOT LIQUIDS.

04
CONTENTS
02 IMPORTANT SAFEGUARDS
05 Precautions for Safe Use
08 Terms of Parts
09 Dial / Standby mode
10 How to Assemble / How to Use
11 Using Blending Mode
12 Cleaning Mode
13 How to Clean
14 Cleaning and Maintenance / Before Contacting Technical Service
15 How to Trim The Ingredients / Error code
16 Product Specifications / Warranty
Thank you for using.
For proper use of this product, please read the instruction manual thoroughly before using this
product.

05
DO NOT PLUG IN NOR UNPLUG WITH WET HANDS.
It may cause electric shock or injury.
USE ONLY THE OUTLET EXCLUSIVELY FOR AC 120V RATED FOR 15A OR HIGHER AND
GROUNDED.
If the power cord is damaged, it may cause electric shock or fire. It may cause trouble
or malfunction.
PLUG THE POWER CORD CORRECTLY AND PUSH IT TIGHT IN A WALL SOCKET.
It may cause
an electric shock or a fire.
DO NOT BEND, TIE, DAMAGE, PULL, PUT NEAR ANYTHING OF HIGH TEMPERATURE, PUT
NEAR ANY HEAT SOURCE SUCH AS GAS OVEN, PUT HEAVY OBJECTS ON TOP OF IT,
SQUEEZE INTO A NARROW PLACE, OR MODIFY THE POWER CORD.
If the power cord is damaged, it may cause electric shock or fire.
NEVER MODIFY THE PRODUCT. ALSO, DO NOT DISASSEMBLE OR REPAIR THE PRODUCT
ARBITRARILY.
Do not insert foreign objects such as finger or iron pin into the gap or the hole of the
main body. It may cause fire, electric shock, injury or malfunction. Please contact HUROM customer
center for technical service and inspection.
IF THE SUPPLY CORD IS DAMAGED, IT MUST BE REPLACED BY THE MANUFACTURER’S
ITS SERVICE OR SIMILARLY QUALIFIED PERSONS IN ORDER TO AVOID A HAZARD.
If the power cord is damaged, it may cause electric shock or fire.
DO NOT SPRAY OR PUT WATER ON THE MAIN BODY.
Take cautions not to let any water or other foreign substance get into the switch of the product.
DO NOT OPERATE THE SWITCH WITH WET HANDS.
If the power cord is damaged, it may cause
electric shock or fire.
DO NOT CONNECT MULTIPLE ELECTRICAL APPLIANCES TO AN OUTLET AND USE THEM
AT THE SAME TIME. USE A DEDICATED OUTLET.
DO NOT MOVE THE PRODUCT DURING OPERATION. DO NOT PUT HAND, TOOL, OR AN
YTHING OTHER THAN INGREDIENTS INSIDE THE CONTAINER.
It may cause electric shock or
injury.
CHILDREN SHALL NOT PLAY WITH THE APPLIANCE. CLEANING AND USER MAINTE
NANCE SHALL NOT BE MADE BY CHILDREN. THIS APPLIANCE SHALL NOT BE USED BY
CHILDREN. KEEP THE APPLIANCE AND ITS CORD OUT OF REACH OF CHILDREN.
APPLIANCES CAN BE USED BY PERSONS WITH REDUCED PHYSICAL, SENSORY OR MEN
TAL CAPABILITIES OR LACK OF EXPERIENCE AND KNOWLEDGE IF THEY HAVE BEEN
GIVEN SUPERVISION OR INSTRUCTION CONCERNING USE OF THE APPLIANCE IN A SAFE
WAY AND IF THEY UNDERSTAND THE HAZARDS INVOLVED.
Precautions for safe use
1. You should read <Precautions for safe use>.
2. You should follow <Precautions for safe use>.
3. Precautions are classified as following.
Warning
When violating the labeling requirement,
it may cause serious injury or death.
Caution When violating the labeling
requirement, it may cause serious
injury or damage to the appliance.
Warning

06
Precautions for safe use
DO NOT TOUCH THE SHARP BLADE WITH YOUR HAND. PLEASE USE A CLEANING TOOL
SUCH AS A CLEANING BRUSH FOR CLEANING.
DO NOT USE THE PRODUCT WHERE THERE IS A FIRE HAZARD OR HIGH HUMIDITY.
It may cause injury, failure and electric shock or fire.
NEVER PLACE FINGERS, FORK OR SPOON, ETC. It may cause injury or product failure.
DO NOT USE THE PRODUCT OUTDOORS.
WHEN THE PRODUCT IS OPERATING, DO NOT LIFT THE CONTAINER OR OPEN THE COVER.
DO NOT IDLE THE PRODUCT. IT MAY SHORTEN THE PRODUCT’S LIFE.
Take cautions when pouring out hot contents.
PLACE THE PRODUCT ON AN EVEN AND HEATRESISTANT PLACE FOR USE.
It may cause injury or product failure.
DO NOT SUBJECT THE PRODUCT TO SEVERE IMPACT OR DROP THE PRODUCT.
It may cause injury, failure, an electric shock or fire.
TAKE CAUTIONS WHEN USE HOT CONTENTS.
ALWAYS UNPLUG THE APPLIANCE AFTER USE. Always disconnect the appliance from the supply
if it is left unattended and before assembling, disassembling or cleaning. When unplugging the power
cord, make sure to hold the power cord. Pulling the wire to unplug may cause electric shock or fire.
REMOVE THE CONTAINER ONLY AFTER THE BLENDER COMES TO A COMPLETE STOP.
DO NOT PUT WATER IN THE CONTAINER WHILE THE PRODUCT IS TURNED OFF.
THE BLADE IS NOT SEPARATED FROM THE CONTAINER. Please take cautions for safety.
THIS PRODUCT INVOLVES A PART THAT ROTATES AT A HIGH SPEED AND GENERATES
NOISE DURING OPERATION. This is a normal and does not cause a problem while in use.
DO NOT TRY TO REMOVE OR MIX THE FOOD ON THE CONTAINER WALL WHILE THE POWER
IS ON. Make sure you remove the container form the main body before trying to remove or mix food.
Caution

07
DO NOT WASH THE PRODUCT INAPPROPRIATELY. Clean the product only in the manner described in
the user’s manual by referring to p12~13 of the manual. Do not clean the product otherwise.
THE AMOUNT OF WATER AND INGREDIENTS SHOULD BE KEPT BELOW THE MAXIMUM (1,750ML)
LEVEL.
If you fill up the container with water or food ingredients above the maximum level, the contents may overflow.
BEFORE USING THE PRODUCT, MAKE SURE THAT THE MAIN BODY, CONTAINER, AND COVER ARE
ASSEMBLED CORRECTLY. It may cause injury, failure and electric shock or fire.
DO NOT PLUG OR UNPLUG THE POWER CORD WITH WET HAND. DO NOT INSTALL OR USE THE
PRODUCT IN PLACES WHERE WATER CAN GET INTO THE PRODUCT SUCH AS SINK AND BATH
ROOM. THERE IS A RISK OF SHORT CIRCUIT OR ELECTRIC SHOCK.
FOR CHILDREN, EVEN MINOR BURNS CAN BE VERY DANGEROUS. CAUTION CHILDREN TO DE
VELOP A HABIT OF TAKING CAUTIONS AGAINST HOT LIQUIDS.
DO NOT USE HOUSEHOLD PRODUCTS FOR COMMERCIAL PURPOSES.
Blending a large amount of ingredients by force may damage the parts.
Precautions for safe use
Warnin g
08
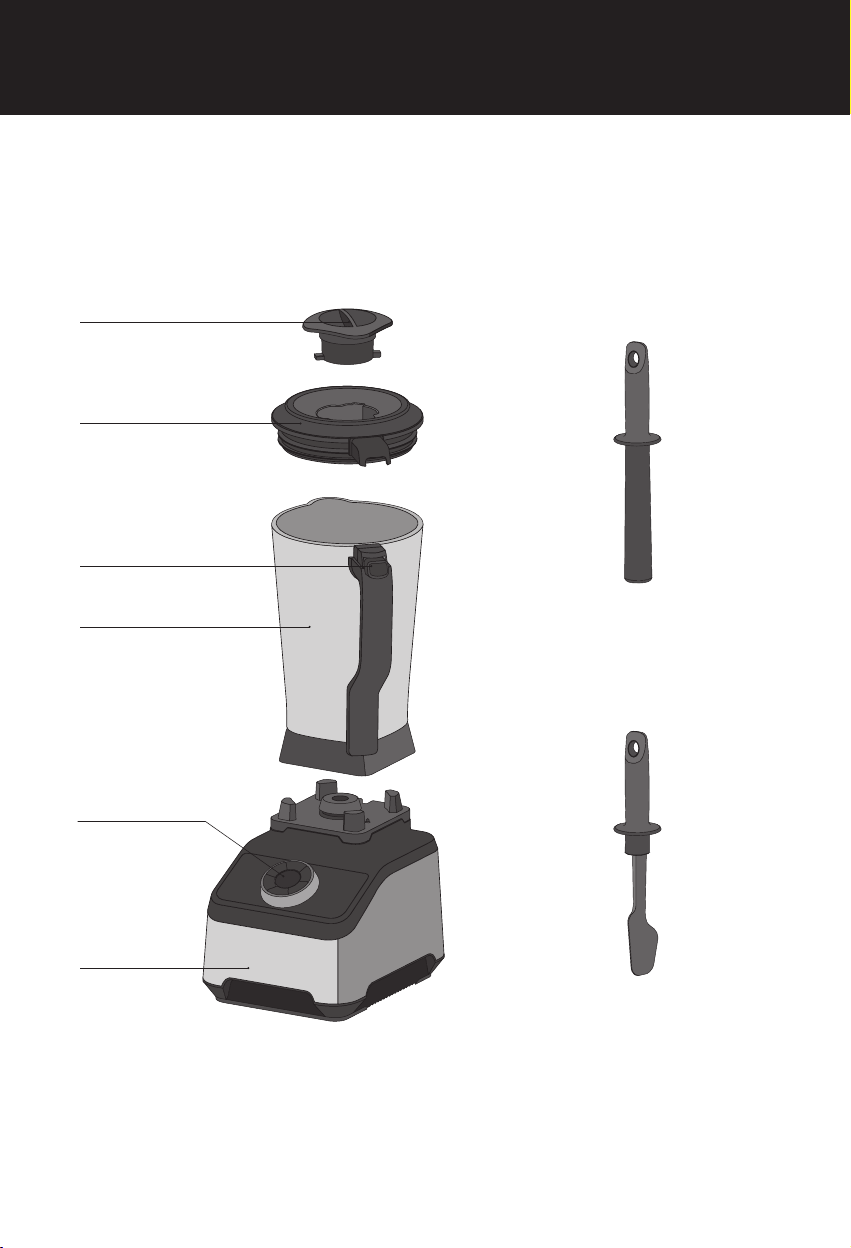
Terms of Parts
PUSH
02 Container Cover
01 Filler Cap
04 Container
03 Button for
Container Cover
06 Body
05 Button / Dial
07 Pusher
08 Spatula
09
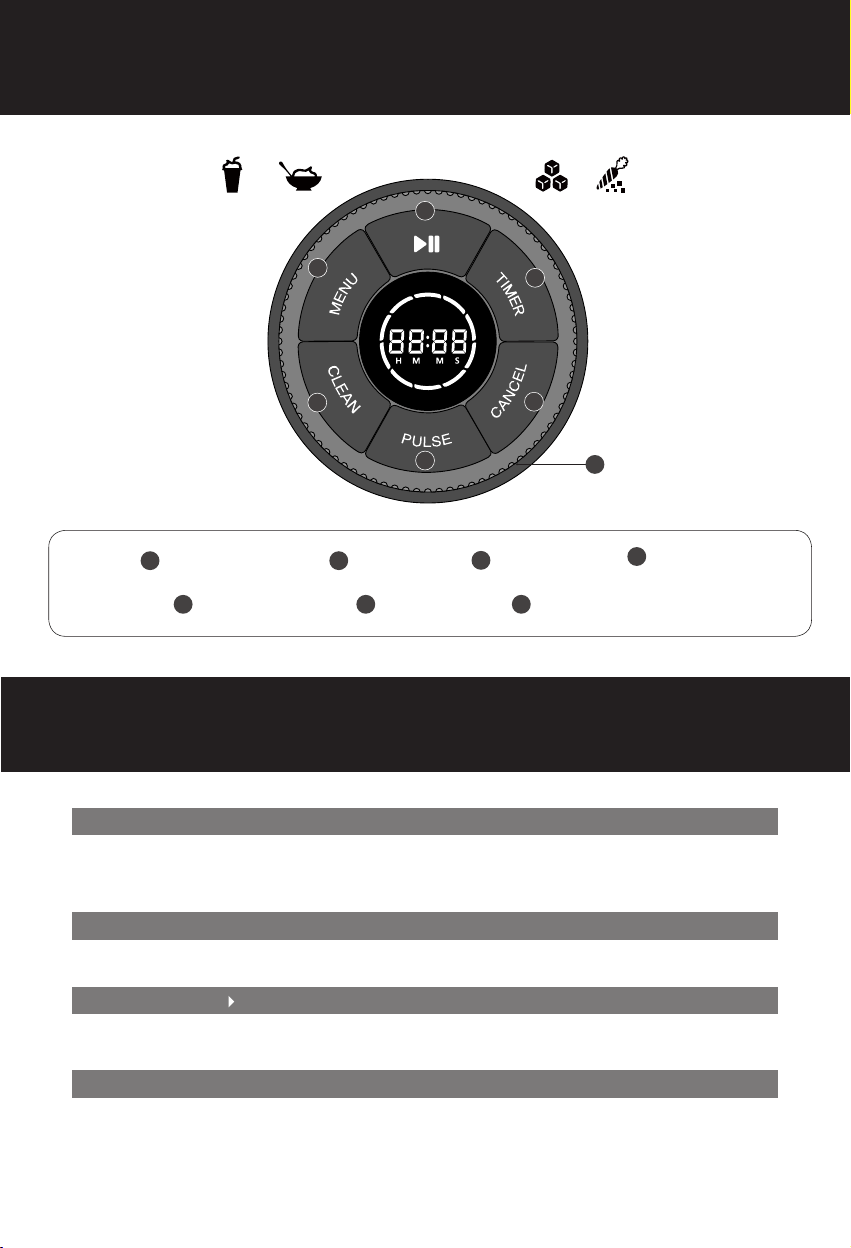
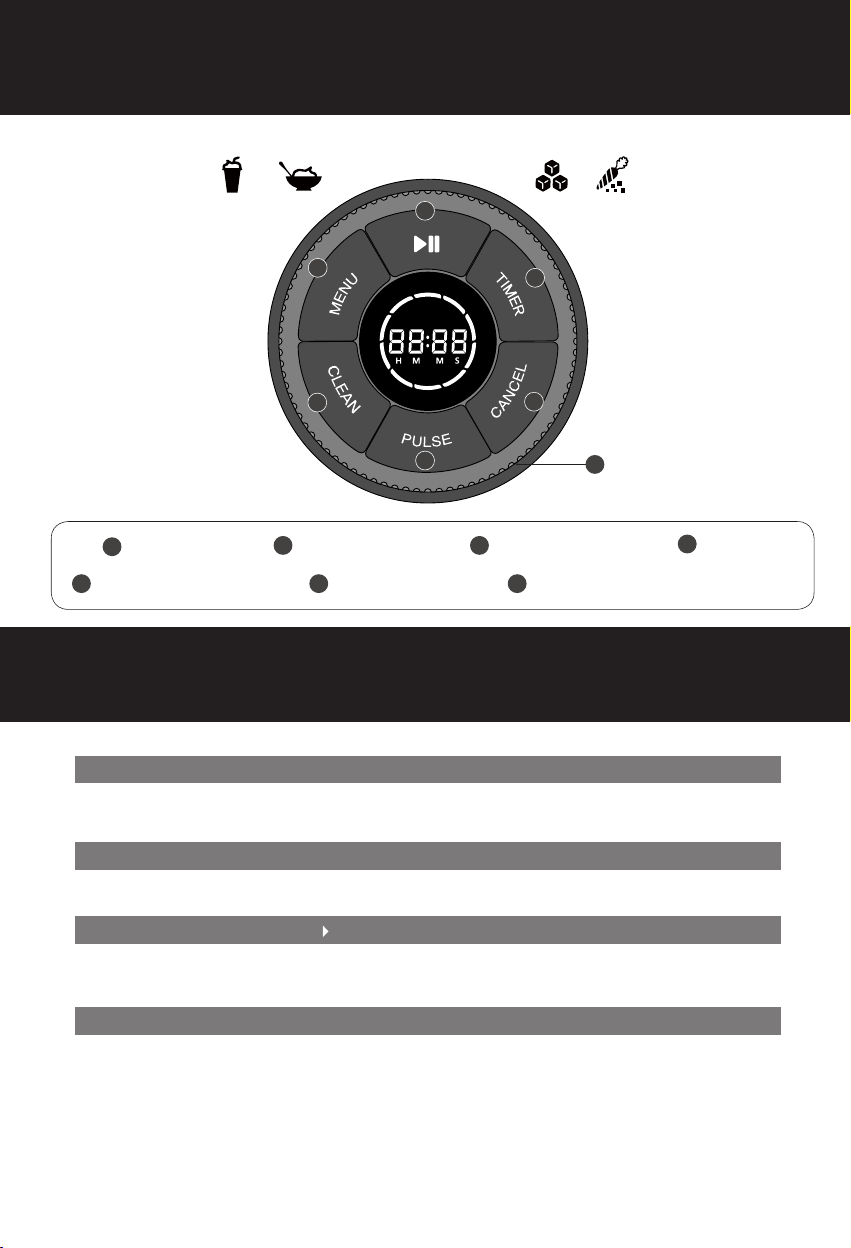
Dial
CANCEL
PULSE
CLEAN MENU
START / STOP
TIMER
SPEED / TIME DIAL
Standby Mode
Power Saving Mode
Power Saving Standby Mode
Cancel to Stand by Mode
- The blender will turn on all LEDS when the power is turned on, show [- - : - -] on the display area,
and enter standby mode.
- The blender will also enter the standby mode after cooking is completed.
- The blend will turn off all LEDs and enter the power saving mode when there is no input for 1 minute
in the initial state.
- Press any button in the power saving mode to switch to standby mode. Press the button for desired
action to operate the blender.
- Press Cancel button during operation to enter standby mode.
Standby Mode
2
3
4
5 6
7
1
2
3
4
5
6
7
1

10
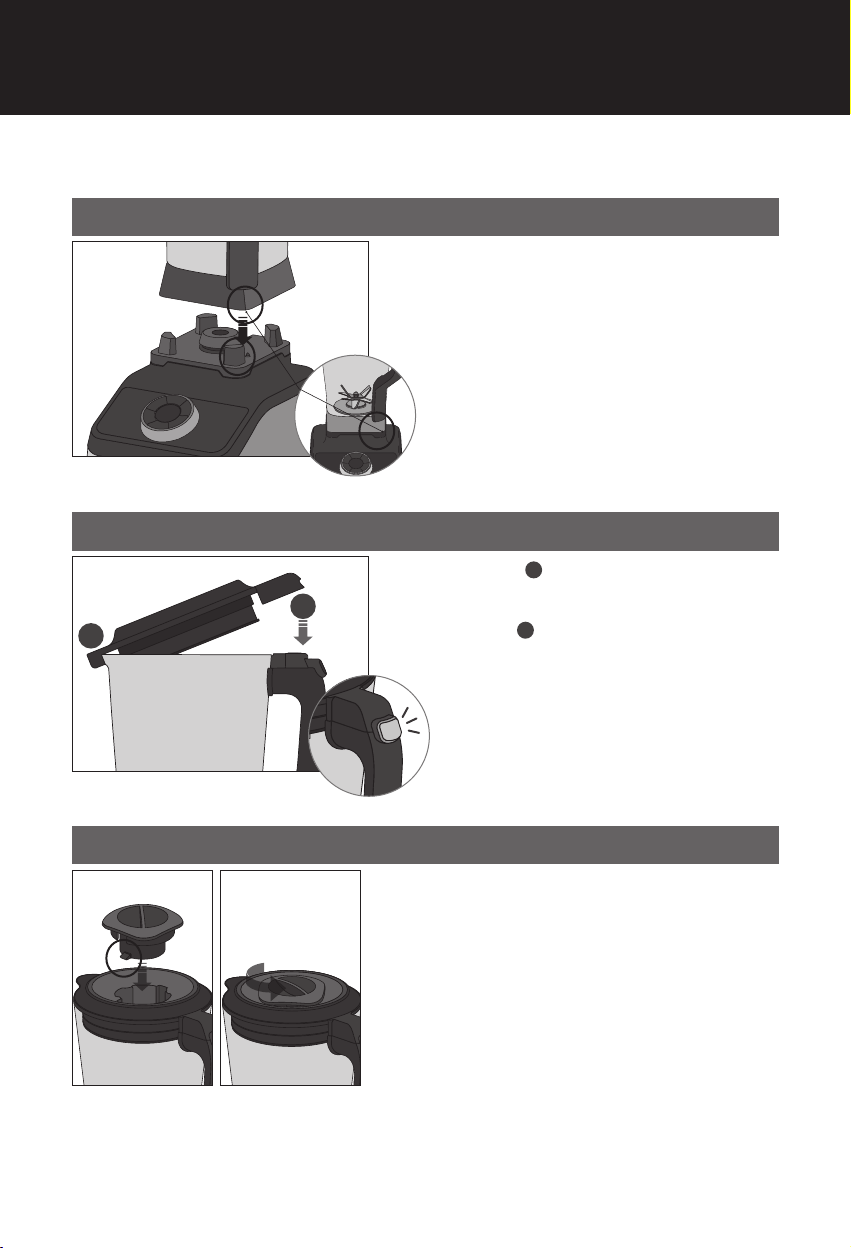
How to Assemble / How to Use
Main Body Assembly/ How to Use
Closing Container Cover
Placing Filler Cap
PUSH
PUSH
PUSH
PUSH
PUSH
- Place the container on the main body so that its handle
would come to the front right side and assemble them by
aligning the container with the bump on the main body.
- Put the desired ingredients in the container.
01. Insert the container’s hook in part of the cover.
02. Lower part of the cover and fit it into the handle’s [PUSH]
button. If you hear a click from the [PUSH] button, then it is
properly assembled to the container.
- Align to the center of the container cover and assemble it by
turning it counterclockwise.
- When the filler cap is placed, turn on the power and start
cooking in the desired mode. [For more information, see
Blender Mode (p.11)]
A
A
B
B
* When you are using this product for the first time, the heat generated during use, affecting the internal coating
of the motor, circuit board, and so on, may produce certain odor. The smell will fade away naturally while using
the product.
* The blender will work when the parts are connected in
a way that the sensor positions are aligned.
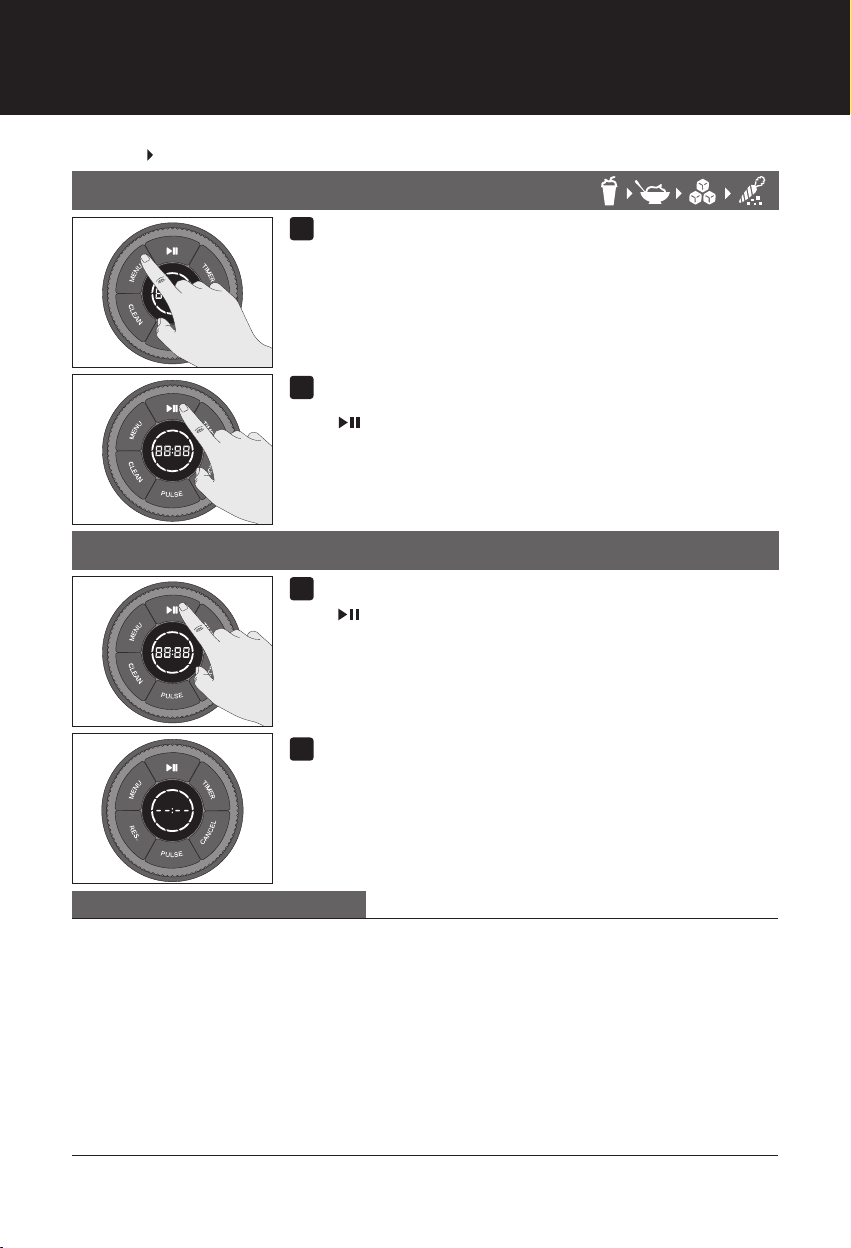
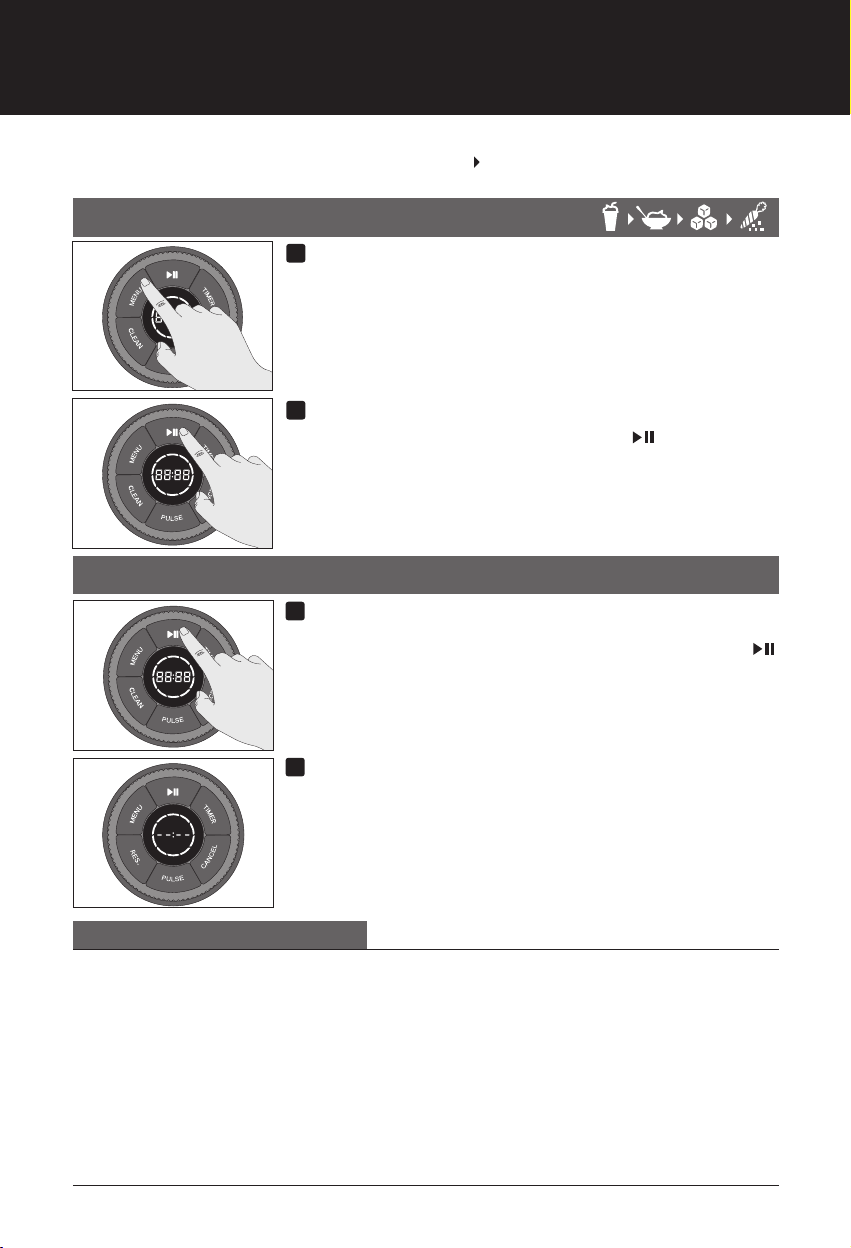
11
- Press button to run the blender in blending mode at
speed 1 for 60 seconds.
* Changing speed during operation (Adjust dial to Speeds 1 ~ 10)
* pause feature can be also used
Using Blending Mode
Recipe Mode (Auto Mode)
MENU :
Blending Mode (Manual Mode)
1
1
2
2
Menu Selection
Start/End Blending Mode
Start / End recipe mode
Standby Mode
- Speed Selection: Dial control
- Time Selection: Select TIMER button and adjust the dial (see time on LCD)
* When you grind/crush crops or dried ingredients, the crushed powder or crushed ingredient may burst
out of the container. (If you are using the blender for grinding/crushing dried ingredients consecutively, it is
recommended that you use the blender less than 7 times in a row [when used for 1 minute each time].)
* When crushing ice into flakes, make sure the size of each ice cube is 20mm or less and the weight is less than
200g.
* In blending mode, you can set the speed and time before the blending mode begins.
- Press menu button and select the recipe menu.
[ Smoothie / Puree / Ice Crushing / Chopping ]
- Press button to start auto mode. When cooking is completed,
it will indicate the completion with the alarm and turn to the standby mode.
- When blending is completed, it will indicate the completion with the
alarm and turn to the standby mode.
* Assemble the container and the body, put ingredients in the container, and assemble the container and the cover
properly. Turn on the power.
Cautions for Blending Mode
12
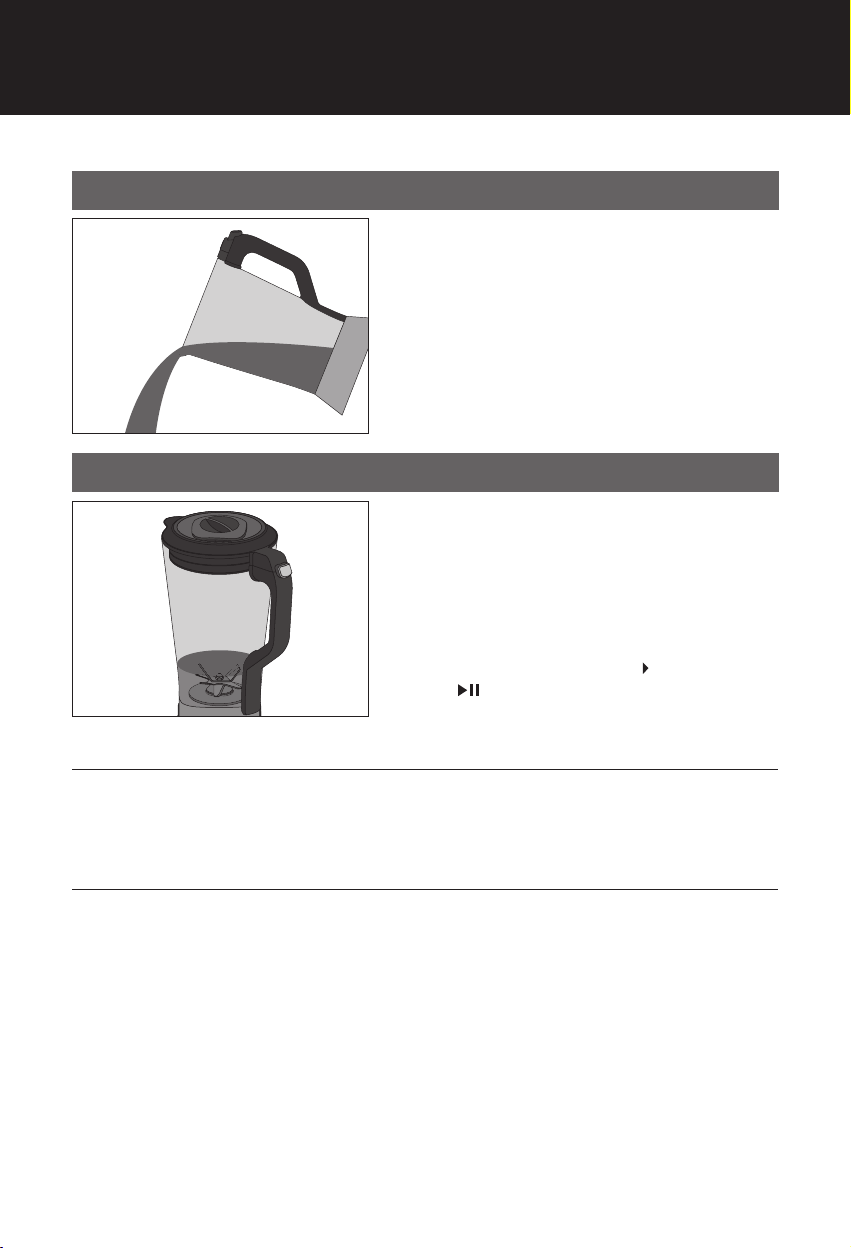
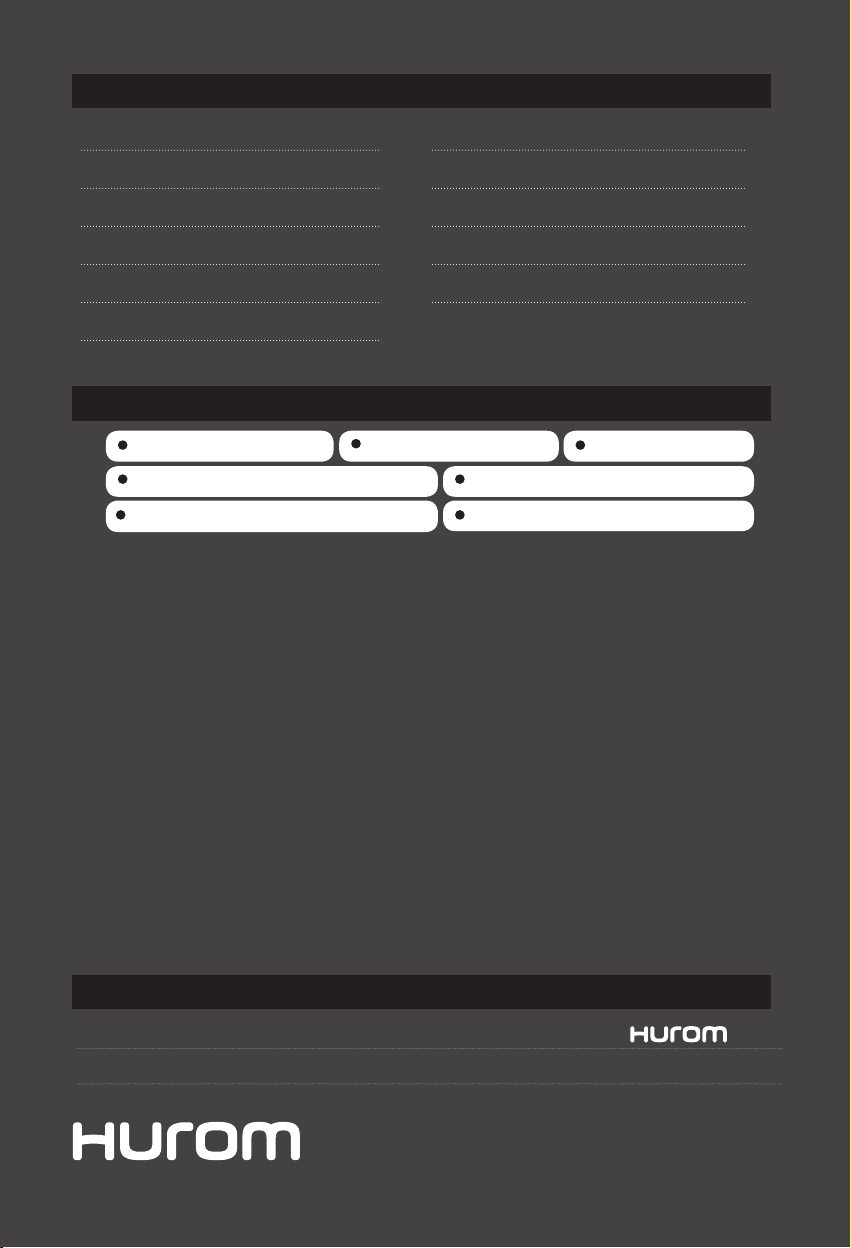
Cleaning Mode
Before using the cleaning mode
Using CLEAN mode
PUSH
Wash inside the container lightly with water.
* Take cautions not to let water get into the bottom of the
container that directly comes in contact with the main body.
* Do not immerse the container in water.
Fill the container with enough water to immerse the blade in
water. Place the container on the main body and put the container
cover and filler cap correctly.
[ Set buttons in the order of [ Select Menu Select CLEAN Mode ]
Then, press button to clean for 1 minute.
01
01
02
* If the blade is not completely cleaned after cleaning, never put your hand in the container to clean
the blade but use a cleaning tool to clean the blade.
* The blade is not separated from the container. Please take cautions for safety.

13
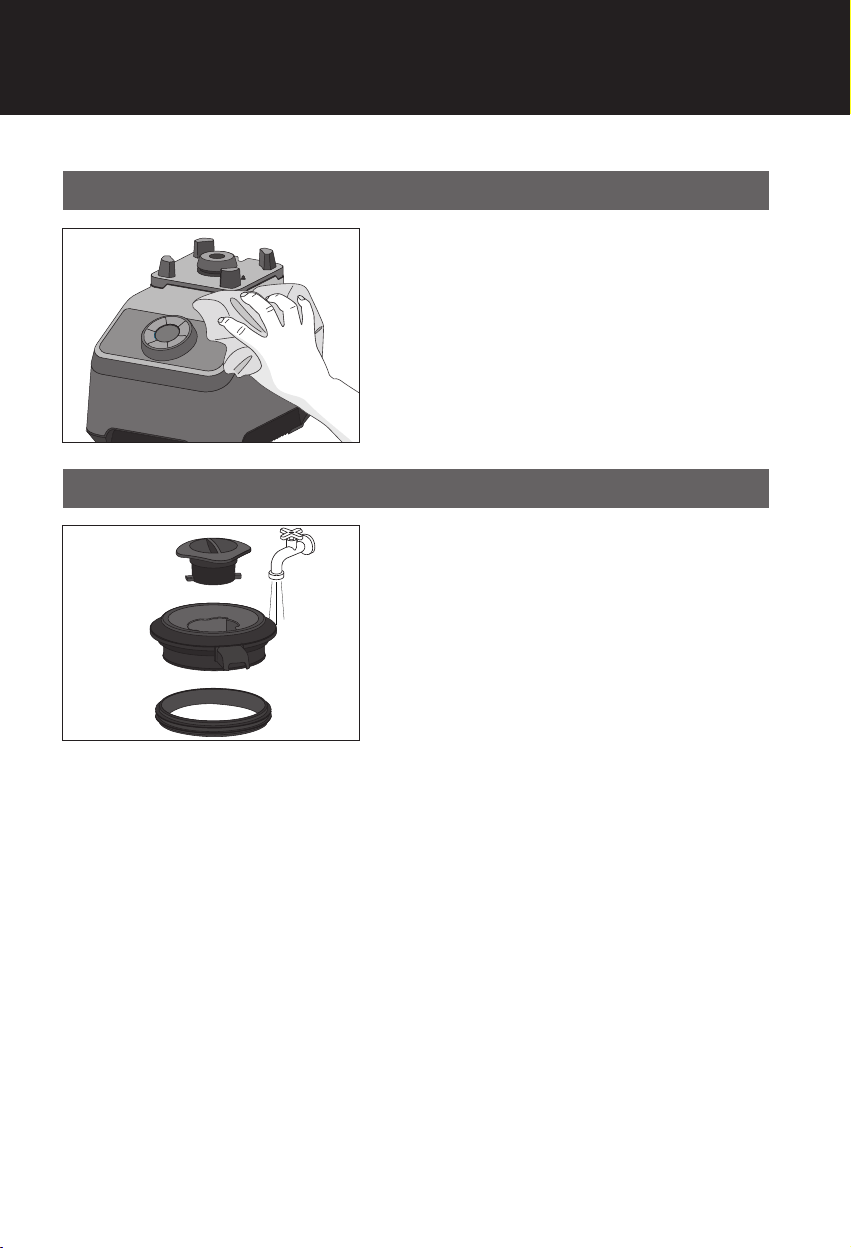
How to Clean
Cleaning the main body
Cleaning cup cover / filler cap
Unplug the power cord. Wipe the body with a dampened and
squeeze-dried cloth or a soft sponge.
* Prevent all liquids from entering the main body.
Remove and clean the container cover, filler cap, and rubber
packing. Wash, dry, and assemble.

14
Cleaning and Maintenance
- Unplug the power cord.
- Take cautions not let any liquid get into the main body or on the power cord.
- Clean the container with soft cloth or sponge.
- The rubber packing can be separated and washed.
- The container can be washed with water. In CLEAN mode, fill the container with enough
water to immerse the blade in water and run in the blending mode to clean the container.
- After washing, place the container upside down and let it dry.
- Clean the residue with a dry cloth.
Caution: Do not put your hand into the area with the blade to clean the area after auto cleaning. Make sure
you remove the power cord and use a tool such as the cleaning brush to clean inside the container. It causes
abrasions.
- Do not leave the container in water. It may rust the product or influence the performance.
Before Contacting Technical Service
- Make sure the power cord is plugged into the electrical outlet properly.
- Make sure that the container is properly positioned at the top of the main body. (Refer to P.10)
- The blender does not work if the cover is opened. Make sure that the container cover is properly connected.
- The blender may stop where there are too many ingredients or if the ingredients are too thick. Adjust the
amount / size of ingredients and try again.
- The blender may stop when the motor is overheated. Please let it rest fully and try again.
The power is not on.
The blending mode is not working.

15
- Put liquid ingredients (water, milk) and soft ingredients in the container first and hard ingredients
or ice and so on, later.
- Prepare ingredients in appropriate sizes by referring to the recipe book.
- It is recommended that you use frozen fruits after thawing.
- Do not put things that are not appropriate for eating in containers.
- If you use the blender without the filler cap, the contents may come out of the container. Place the filler cap properly
before use at all times.
- Persimmon, peach, plum, apricot, cherries (cherry, autumn olive) and prickly pear are fruits with solid seeds that are
hard to chew and swallow. Hard seeds can stop the motor and break parts. You must remove seeds before use.
- For vegetables and fruits such as watermelons, melons, oranges, grapefruits, and lemons, prepare them by taking the
peel off and cutting the flesh in appropriate sizes.
Error Code
How To Trim The Ingredients
Container cover or container is not attached : Connect container or container cover appropriately.
E11
Cord Length
Motor
Fuse
Weight
Outward Dimension
1.2m
A/C motor
10A
5.9 kg
Product Name
Model Name
Rated Voltage
Rated Frequency
Rated Power Consumption
RPM
Rated Operating Hour
Blender
BL-B01 Series
120V
60Hz
1,200W
30,000 rpm
1minute 7 times
L235xW195xH482 mm
Product Specifications
Warranty
Warranty period
Product Name
Place of purchase
Date Of Purchase
Address
Model Name
Manufacturer’s Serial Number
Customer Name
1. Important: To better protect your purchase, fill out and mail this form to a local
distributor where you purchased the appliance and keep the original receipt.
This certifies that the Hurom Power Blender is covered under warranty by Hurom to
be free from defects in material construction and workmanship.
2. This warranty does not apply to damages caused by accident, misuse, abuse,
commercial use, alteration, failure to follow operating instructions, or damage caused
by parts or service unauthorized by Hurom. Damages caused by transportation must
be claimed with carrier Hurom. disclaims all responsibilities for consequential
damages from incidental losses caused by use of this appliance.
Please check the bottom of your Hurom product for a sticker with a barcode.
This barcode sticker helps verify a genuine Hurom product and identify the product
manufacturing date. Hurom’s manufacturer’s warranty does not cover products with
missing or damaged barcode stickers. Products are to be inspected upon receipt.
For service and assistance with technical difficulty, please contact our local customer
care center.
www.hurom.com
Copyright© All Rights Reserved by HUROM
Manufacturer and Seller
Product
Warranty period
1year (household use only)
MADE IN CHINA
17
000000 _V.01
Manufacturer and Seller
Mode d’emploi de l’extracteur à jus Hurom pour usage domestique
(et garantie incluse)
1 Veuillez lire les instructions avec attention avant utilisation.
2 Veuillez conserver ces instructions à un emplacement facilement accessible.
3 Utiliser uniquement avec une alimentation électrique de 120 V.
4 La conception et le développement du produit peuvent être mis à jour sans préavis.
5 Toute amélioration de la qualité est sujet à modification sans préavis.

CONSIGNES DE SÉCURITÉ IMPORTANTES
1.
2.
3.
4.
5.
6.
7.
LES PRÉCAUTIONS DE SÉCURITÉ DE BASE SUIVANTES S’APPLIQUENT
LORS DE L’UTILISATION D’APPAREILS ÉLECTRIQUES. :
LORSQUE VOUS UTILISEZ DES APPAREILS ÉLECTRIQUES, LES
PRÉCAUTIONS DE BASE DOIVENT TOUJOURS ÊTRE PRISES. LISEZ
TOUTES LES INSTRUCTIONS.
POUR PROTÉGER CONTRE LES RISQUES DE CHOC ÉLECTRIQUE, NE
PLONGEZ PAS LE CORPS PRINCIPAL (MOTEUR) DANS L’EAU
OU TOUT AUTRE LIQUIDE.
UNE SURVEILLANCE ÉTROITE EST NÉCESSAIRE LORSQU’UN
APPAREIL EST UTILISÉ PAR DES ENFANTS.
DÉBRANCHEZ L’APPAREIL DE LA PRISE S’IL N’EST PAS UTILISÉ,
AVANT DE MONTER OU DE RETIRER DES PIÈCES, ET AVANT DE
LE NETTOYER.
ÉVITEZ TOUT CONTACT AVEC LES PIÈCES MOBILES.
N’UTILISEZ PAS UN APPAREIL AVEC UN CORDON OU UNE FICHE
ENDOMMAGÉE, OU APRÈS UN DYSFONCTIONNEMENT DE
L’APPAREIL, QUI EST TOMBÉ OU ENDOMMAGÉ DE QUELQUE FAÇON.
RETOURNEZ L’APPAREIL AU CENTRE DE SERVICE AGRÉÉ LE
PLUS PROCHE POUR UN EXAMEN, UNE RÉPARATION OU UN RÉGLAGE
ÉLECTRIQUE OU MÉCANIQUE.
L’UTILISATION D’ACCESSOIRES NON RECOMMANDÉS OU VENDUS
PAR LE FABRICANT PEUT PROVOQUER UN INCENDIE, UN
CHOC ÉLECTRIQUE OU DES BLESSURES.

NE LAISSEZ PAS LE CORDON PENDRE SUR LE BORD D’UNE TABLE OU
D’UN COMPTOIR.
ASSUREZ-VOUS QUE LE GOULOT EST TOUJOURS SOLIDEMENT FIXÉ
EN PLACE AVANT QUE LE MOTEUR NE SOIT ALLUMÉ. N’OUVREZ
PAS LE GOULOT TANDIS QUE L’EXTRACTEUR DE JUS FONCTIONNE.
ASSUREZ-VOUS DE METTRE L’INTERRUPTEUR EN POSITION D’ARRÊT
APRÈS CHAQUE UTILISATION DE VOTRE EXTRACTEUR DE JUS.
ASSUREZ-VOUS QUE LE MOTEUR SOIT COMPLÈTEMENT ARRÊTÉ
AVANT DE LE DÉMONTER.
NE METTEZ PAS VOS DOIGTS OU DES OBJETS DANS L’EXTRACTEUR
DE JUS S’IL FONCTIONNE. SI DE LA NOURRITURE SE
COINCE DANS LA PRISE, UTILISEZ LE POUSSOIR FOURNI OU UN
AUTRE MORCEAU DE FRUIT OU DE LÉGUME À POUSSER VERS LE
BAS. SI CELA EST IMPOSSIBLE, ÉTEIGNEZ LE MOTEUR ET DÉMONTEZ
L’EXTRACTEUR DE JUS POUR ÉLIMINER LA NOURRITURE
RESTANTE.
NE L’UTILISEZ PAS À L’EXTÉRIEUR.
NE PLACEZ PAS L’APPAREIL SUR OU PRÈS D’UN BRÛLEUR À GAZ OU
ÉLECTRIQUE OU DANS UN FOUR CHAUFFÉ.
N’UTILISEZ PAS L’APPAREIL AUTREMENT QUE POUR SON UTILISATION
PRÉVUE.
CONSIGNES DE SÉCURITÉ IMPORTANTES
CONSERVEZ CES INSTRUCTIONS
8.
9.
10.
11.
12.
13.
14.

20
CONTENTS
21 RECOMMANDATIONS DE SÉCURITÉ
24 Pièces et accessoires
25 Détaille de molette / Mode veille
26 Montage/ Conseille d'utilisation
27 Mode Blender
28 Mode Nettoyage
29 Méthodes de nettoyage
30 Conseille d'entretien et de maintenance /
Avant de faire votre demande de réparation
31 Ingrédients / Code d'erreur
32 Caractéristiques / Garantie
Thank you for using.
For proper use of this product, please read the instruction manual thoroughly before using this product.
21
NE BRANCHEZ OU DÉBRANCHEZ JAMAIS AVEC LES MAINS MOUILLÉES CELA PEUT
PROVOQUER UNE COMMOTION ÉLECTRIQUE OU DES BLESSURES.
N’UTILISEZ QUE LA PRISE DE 120V ÉVALUÉE À 15A OU PLUS À METTRE À LA TERRE
ÉLECTRIQUE.
Cela peut provoquer une commotion électrique, un incendie ou un dysfonctionne-
ment. En cas d’utilisation du voltage incorrect, la durée de vie du moteur peut être réduit ou peut
provoquer un dysfonctionnement.
BRANCHEZ LE CORDON D’ALIMENTATION PROFONDÉMENT, CORRECTEMENT.
Cela peut
provoquer une commotion électrique, un incendie.
LE CORDON D’ALIMENTATION NE DOIT PAS ÊTRE : SE PLIÉ, ATTACHÉ, ABIMÉ, TIRÉ,
PLACÉ À PROXIMITÉ DE HAUTE TEMPÉRATURE, PLACÉ PRÈS DU FEU OU PLACÉ SOUS
LES OBJETS LOURDS, PLACÉ DANS UN ENDROIT ÉTROIT, MODIFIÉ.
Endommagement du cordon d’alimentation peut provoquer une commotion électrique, un incendie.
NE MODIFIEZ JAMAIS LE PRODUIT. EGALEMENT NE LE DÉMONTEZ PAS OU NE LE
RÉPAREZ PAS À VOLONTÉ.
N’insérez pas d’objets tels que des doigts ou des épingles en fer dans
l’espace ou le trou du corps. Cela peut provoquer un incendie, une commotion électrique, des bless-
ures ou une panne. Veuillez contacter le centre client HUROM pour le service après-vente.
EN CAS D’ENDOMMAGEMENT DU CORDON D’ALIMENTATION, NE LE RÉPAREZ PAS OU
NE LE MODIFIEZ PAS, ET APPELEZ LE CENTRE DE SERVICE CLIENT.
Cela peut provoquer un incendie, une commotion électrique, des blessures.
NE PAS VAPORISER OU PULVÉRISER DE L’EAU SUR LE CORPS.
Veuillez à ne pas laisser l’eau ou d’autres corps étrangers entrer dans le bouton de l’appareil.
NE FAITES PAS FONCTIONNER L’INTERRUPTEUR AVEC LES MAINS MOUILLÉES.
Cela peut provoquer un incendie, une commotion électrique.
NE PAS BRANCHER PLUSIEURS APPAREILS ÉLECTRIQUES À UNE MULTIPRISE. UTILISEZ
UNE PRISE DÉDIÉE.
PENDANT LE FONCTIONNEMENT, NE DÉPLACEZ PAS L’APPAREIL, NE JAMAIS METTRE
QUELQUE CHOSE SAUF INGRÉDIENT TELS QUE DES MAINS OU DES OUTILS, À L’IN
TÉRIEUR DU CONTENANT.
Cela peut causer des blessures ou une panne.
UTILISEZ L’APPAREIL HORS DE LA PORTÉE DES ENFANTS. IL CONVIENT DE SURVEILL
ER LES ENFANTS POUR S’ASSURER QU’ILS NE JOUENT PAS AVEC L’APPAREIL. LES EN
FANTS PEUVENT FAIRE LA TOMBER OU L’UTILISER INCORRECTEMENT ET CELA PEUT
PROVOQUER DES BLESSURES OU UNE PANNE.
LES PERSONNES DÉNUÉES D’EXPÉRIENCE OU DE CONNAISSANCE NE DOIVENT PAS
L’UTILISER SEUL. CET APPAREIL N’EST PAS PRÉVU POUR ÊTRE UTILISÉ PAR DES PER
SONNES (Y COMPRIS LES ENFANTS) DONT LES CAPACITÉS PHYSIQUES OU MENTALES
SONT RÉDUITES, OU DES PERSONNES DÉNUÉES D’EXPÉRIENCE OU DE CONNAISSANCE,
SAUF SI ELLES ONT PU BÉNÉFICIER, PAR L‘INTERMÉDIAIRE D‘UNE PERSONNE RE
SPONSABLE DE LEUR SÉCURITÉ.
Recommandations de sécurité
1. Assurez-vous de lire “Consignes de sécurité importantes”.
2. Assurez-vous de suivre les “Consignes de sécurité importantes”.
3. Les précautions sont classées comme ci-dessous.
Avertissement
une utilisation non conforme qui, si elle n’est pas évitée, peut entraîner de graves blessures voire la
mort.
Avertissement

22
Recommandations de sécurité
NE TOUCHEZ PAS LE TRANCHANT DE COUTEAU AVEC LES MAINS. UTILISEZ UN OUTIL DE
NETTOYAGE COMME UNE BROSSE.
N’UTILISEZ PAS L’APPAREIL DANS UN ENDROIT OÙ IL Y A RISQUE D’INCENDIE ET À UNE
HUMIDITÉ ÉLEVÉE.
N'INSÉREZ PAS D'OBJETS TELS QUE DES BAGUETTES, DES CUILLÈRES OU DES
FOURCHETTES. Cela peut provoquer une des blessures ou une panne.
NE PAS UTILISER À L'EXTÉRIEUR.
LORSQUE LE PRODUIT FONCTIONNE, NE PAS SOULEVER LE CONTENANT OU OUVRIR LE
COUVERCLE. L’eau chaude peut être renversée.
N’UTILISEZ PAS VOTRE APPAREIL À VIDE. LA DURÉE DE VIE D’APPAREIL PEUT RÉDUITE.
UTILISEZ SUR UN PLAN DE TRAVAIL AVEC SON FOND PLAT ET RÉSISTANT À LA CHALEUR.
Cela peut causer des blessures ou une panne.
NE FAIT PAS TOMBER OU NE FORCEZ PAS L’APPAREIL.
Cela peut provoquer un incendie, une commotion électrique, un endommagement.
DÉBRANCHEZ LE CORDON D’ALIMENTATION LORSQUE VOUS N’UTILISEZ PAS L’APPAREIL.
Lors du nettoyage et du moment que vous n’utilisez pas, veuillez à débrancher le cordon d’alimenta
-
tion après éteindre le bouton. Assurez-vous également de maintenir la tête du cordon d’alimentation
lorsque vous le débranchez. Tirer sur le câble d’alimentation pour retirer la prise secteur peut entraîner
un dysfonctionnement de l’appareil, des blessures, des chocs électriques ou des incendies.
RETIREZ LE CONTENANT APRÈS L’OPÉRATION EST COMPLÉTEMENT TERMINÉE.
NE VERSEZ PAS D’EAU DANS LE CONTENANT LORSQUE L’APPAREIL EST ÉTEINT ET RE
FROIDI. Cela peut endommager le contenant.
LA LAME DE COUTEAU NE PEUT PAS ÊTRE SÉPARÉE DU CONTENANT EN VERRE.
Faites attention à la sécurité.
CET APPAREIL TOURNE À GRANDE VITESSE ET PRODUIT UN BRUIT PENDANT LA ROTA
TION. C’est normal et aucun problème pour l’utilisation.
LORSQUE L’APPAREIL EST ALLUMÉ, N’ENLEVEZ PAS OU NE MÉLANGEZ PAS DES INGRÉDI
ENTS SUR LE MUR DU CONTENANT. Assurez-vous de retirer ou de mélangez des ingrédients après
retirer le contenant depuis l’appareil.
Caution

23
N’EFFECTUEZ PAS LE NETTOYAGE INCORRECT. N’effectuez pas le nettoyage qui n’est pas indiqué dans
le mode d’emploi. Il faut absolument nettoyer en se référant la page 28 à 29 de mode d’emploi.
LA QUANTITÉ D’EAU ET LES INGRÉDIENTS SONT LIMITÉS PAR MAXIMALE (1,750 ML). Si le remplis
-
sage dépasse la quantité maximale, l’eau ou les ingrédients peuvent déborder.
AVANT D’UTILISER L’APPAREIL, VÉRIFIEZ LE CORPS, LE CONTENANT ET LE COUVERCLE SONT
TOUS CORRECTEMENT POSITIONNÉS. Cela peut causer des blessures ou une panne.
NE BRANCHEZ OU NE DÉBRANCHEZ PAS LE CORDON D’ALIMENTATION AVEC LES MAINS
MOUILLÉES. NE PAS INSTALLER OU UTILISER DANS LES ÉVIERS, LES SALLES DE BAINS OU
D’AUTRES ENDROITS OÙ L’EAU PEUT ENTRER DANS L’APPAREIL. CELA PEUT PROVOQUER UN
COURTCIRCUIT OU UNE COMMOTION ÉLECTRIQUE.
L’APPAREILS MÉNAGERS NE DOIT PAS UTILISÉE POUR LA COMMERCE.
Ne forcez pas une grande quantité des ingrédients qui peut endommager la pièce.
Recommandations de sécurité
Warnin g

24
PUSH
02 couvercle du contenant
Pièces et accessoires
01 deuxième couvercle
04 contenants
03 bouton de couvercle
du contenant
06 corps
05 bouton /
molette de commande
07
tige de pression
08
Spatule
25
Détaille de molette
BOUTON D’ANNULATION
PULSE
BOUTON DE PROGRAMMATEUR BOUTON DE COMMANDE
MARCHE / PAUSE
BOUTON DE MINUTER
MOLETTE DE RÉGLAGE : VITESSE/TEMPS
Mode veille
Mode économie d’énergie
Mode économie d’énergie Mode veille
Annulation de mode veille
- Lorsque l'appareil est allumé, toutes les LED s'allument et l'affichage montre [- -: - -]. Ici, l’appareil sera en
mode veille. - Lorsque la cuisson est terminée, elle passera en mode veille.
- S'il n'y a pas d'entrée pendant une minute au début de fonctionnement, la LED s’éteint et elle passe en mode
d'économie d’énergie.
- En mode économie d'énergie, vous pouvez passer en mode veille en appuyant sur n'importe quel bouton.
Ensuit, utilisez l'appareil en appuyant sur le bouton de fonctionnement désiré.
- En appuyant sur le bouton d'annulation, vous pouvez passer en mode veille.
Mode veille
2 3
4
5 6
7
1
2
3
4
5
6
7
1
26
01. Accrochez la partie du couvercle sur la bague du récipient
en verre.
02. Abaissez la partie du couvercle et fixez-la au bouton
[PUSH] de la poignée. Si vous entendez un clic à partir du
bouton [PUSH], le couvercle est assemblé correctement.
Montage / Conseille d'utilisation
Montage de corps / Conseille d’utilisation
Pour fermer couvercle du
Pour fermer deuxième couvercle du contenant en verre
PUSH
PUSH
PUSH
- Assurez-vous que la poignée du contenant en verre est
positionnée sur le côté droit de devant, ensuite faites le
montage sur la protubérance du corps.
- Mettez les ingrédients désirés dans le contenant en verre.
- Assemblez à partir de la rainure centrale du couvercle puis
tournez-le dans le sens inverse des aiguilles d'une montre
pour faire la combiner.
- Lorsque le deuxième couvercle est installé, allumez l'appareil
puis commencez à cuisiner en mode désiré.
(Pour plus d'informations, voir la page 27de Mode Blender)
A
A
B
B
* Lorsque ce produit est allumé pour la première fois, les revêtements internes tels que le moteurs et la plaque
de clé peuvent produire des odeurs en raison de la chaleur. Cette odeur disparaît naturellement en cours
d'utilisation.
* Il faut être adapté à la position du capteur pour
fonctionner.
PUSH
PUSH
27
- La concassage commence pendant 60 seconds en appuyant sur le bouton
* Changement de vitesse pendant le fonctionnement (en tournant la molette 1 ~ 10) est possible
* Foncions « pause » est possible.
Mode Blender
Mode Recette (Mode automatique)
Mode Concassage (Mode manuel)
1
1
2
2
Sélection de recette
Mode Recette Commencer/Terminer
Mode veille
Mode concassage
commencer/terminer
- Sélection de vitesse : réglez la molette de commande
- Sélection de temps : sélectionnez le bouton Timer et réglez la molette (Consultez l’heure de l'écran LCD)
* Lors du concassage du grain ou des ingrédients secs, la poudre ou les ingrédients concassés peuvent sortir
du contenant. (Il est recommandé d'utiliser moins de 7 concassages consécutif pour les ingrédients secs.
[à la condition d'une minute de fonctionnement])
* Pour la glace pilée, la taille et le poids de la glace doit être inférieure à 20 mm et inférieure à 200 g.
* Pour le mode de concassage, vous pouvez régler la vitesse et le temps avant le commencement de mode
cuisson.
- Sélectionnez la recette en appuyant le bouton Menu.
[Smoothie / Purée / Concassage de glace / Hâcher]
- Mode automatique commence en appuyant le bouton
Une fois la cuisson est terminée, elle passera en mode veille avec une
sonnerie en signalisant la fin d'opération.
- Une fois la cuisson est terminée, elle passera en mode veille avec une
sonnerie en signalisant la fin d'opération.
* Assemblez le contenant en verre et le corps, mettre les ingrédients dans le contenant en verre.
Installez correctement le contenant en verre et le couvercle. Mettez le bouton d’alimentation sur ON .
Précaution de mode Concassage
MENU :

28
Mode Nettoyage
Utilisation de Mode Nettoyage
Utilisation de Mode nettoyage normal
PUSH
Rincer légèrement l'intérieur de contenant avec de l'eau.
* Ne pas laisser entrer de l'eau dans le fond de contenant en
verre qui est en contact avec le corps.
* Ne mettez pas le contenant en verre dans l'eau.
Mettez la lame de couteau dans le contenant en verre avec
suffisamment d'eau pour la tremper. Placez le contenant en verre
sur le corps et fixez correctement le couvercle du contenant et le
deuxième couvercle.
[Alimentation ON Choix du menu Sélection du mode de concassage]
Après avoir sélectionné dans cet ordre, appuyez sur le bouton
puis effectuez le nettoyage pendant une minute.
01
01
02
* Malgré avec le mode Nettoyage, si les corps étrangers restent sur la lame de couteau,
utilisez un outil de nettoyage pour les enlever mais ne mettez jamais votre main dans le
contenant en verre pour le nettoyage.
* La lame de couteau ne peut pas être détachée du contenant en verre. Faites attention à la sécurité.
* Le contenu est chaud après avoir utilisé le mode de nettoyage à chaud. Faites attention pour le jeter.
29
Méthodes de nettoyage
Nettoyage de corps
Nettoyage de couvercle / deuxième couvercle
Tout d'abord, éteignez l'alimentation et débranchez le cordon
d'alimentation. Ensuite nettoyez le corps avec un chiffon doux
ou un tissu essoré.
* Veillez à ne pas laisser de l'eau dans le corps.
Retirez le couvercle du contenant, le deuxième couvercle
et l’emballage plastique pour nettoyer. Lavez, séchez et
assemblez.

30
Conseille d'entretien et de maintenance
- Débranchez le cordon d'alimentation.
- Veillez à ne pas laisser entrer de l'eau dans le corps ou le cordon d'alimentation.
- Nettoyez le contenant en verre avec un tissu ou une éponge douce.
- L'emballage plastique peut être détaché et nettoyé.
- Le contenant en verre peut être rincés avec de l'eau. Lorsque vous utilisez le mode de nettoyage normal,
remplissez l'eau suffisamment dans le contenant pour tremper la lame de couteau puis effectuez un nettoyage
en mode de concassage.
- Après le nettoyage, retournez le contenant en verre et le laisser sécher.
- Essuyez les résidus avec un tissu sec.
* Attention : ne mettez pas vos mains dans la partie de la lame de couteau après le nettoyage automatique. Après
avoir débranché le cordon d’alimentation, effectuez un nettoyage avec un outil de nettoyage comme la brosse.
Cela peut provoquer une écorchure.
- Ne pas mettre le contenant dans l'eau. La rouille peut se produire ou la qualité du produit peut être baissée.
Avant de faire votre demande de réparation
- Assurez-vous que le cordon d'alimentation est correctement branché sur une prise électrique.
- Vérifiez si le contenant en verre est correctement positionné en haut du corps pale. (Voir la page26)
- Si le couvercle du contenant est ouvert, l'appareil ne fonctionne pas.
Assurez-vous que le couvercle du contenant est correctement installé.
- Si la quantité d’'ingrédient est trop ou les ingrédients sont trop épais, l'opération peut s'arrêter.
Ajustez la quantité et la taille de l'ingrédient puis faites fonctionner à nouveau.
- Si le moteur est en surchauffe, l'opération s'arrête.
Faites fonctionner à nouveau après avoir une suffisamment de pause.
Je n'arrive pas à allumer le produit
L'opération de concassage ne fonctionne pas

31
- Mettez les ingrédients liquides -eau, lait- et les ingrédients doux dans le contenant en verre en première puis mettez
les ingrédients solides ou de la glace plus tard.
- Veuillez-vous référer au carnet de recettes et préparez les ingrédients à la taille appropriée.
- Pour les fruits surgelés, il est conseillé d'utiliser après la décongélation.
- Ne mettez pas des ingrédients qui ne conviennent pas au contenant en verre.
- Lors du mélange sans le deuxième couvercle, le contenu peut déborder. Veuillez serrer correctement ce couvercle.
- Le kaki, la pêche, la prune, la prunus mume, les cerises (ragouminiercerises, figuier des pagodes) et les opuntias
sont des fruits qui ont leurs noyaux assez durs pour l'avaler. Les noyaux peuvent provoquer un dysfonctionnement et
un endommagement du produit. Assurez-vous les enlever avant l'utilisation.
- Epluchez des légumes et des fruits tels que les pastèques, les melons, les oranges, les pamplemousses et les citrons
sont épluchés et découpez à une taille appropriée.
Code d'erreur
Ingrédients
Couvercle du contenant ou le contenant non fixé : Installez le contenant ou le couvercle du contenant
correctement. Défectuosité du capteur de température : Même après avoir bien installé le contenant ou le
couvercle du contenant, le code d’erreur E11 s’affiche toujours, contactez au service après-vente.
E11
Nom du produit
Nom du modèle
Tension nominale
Fréquence nominale
Consommation électrique
RPM
Recommandé opération hour
Blender
BL-B02 Series
120V
60Hz
1,200W
30,000 rpm
1minute 7 times
Garantie
Caractéristiques
Nom du produit
Numéro de série du fabricant Fournisseur
Adresse
Nom du modèle
Date d’achat
Nom du modèle
Important: An de mieux protéger votre achat, remplissez le présent formulaire et en-
voyez-le par voie postale au distributeur local auprès duquel vous avez acheté l’appareil et
dont vous avez conservé le reçu d’origine.
Le présent document cere que blender lent Hurom est couvert en vertu de la garane
par HUROM et ne présente aucun défaut matériel ou de main d’oe.
Hurom ore une garane de 1 ans pour les autres pièces à compter de la date d’achat par
l’acheteur d’origine. La garane n’est valide qu’avec la preuve d’achat provenant d’un dis-
tributeur local agréé. (Aucune garane internaonale n’est disponible) La présente garan-
e ne s’applique pas aux dommages provoqués par un accident, une mauvaise ulisaon,
un usage abusif, un usage commercial, une altéraon, le non-respect des instrucons
d’ulisaon ou les dommages provoqués par des pièces ou une réparaon qui ne sont
pas autorisées par HUROM.
Les dommages provoqués par le transport relèvent du transporteur. HUROM décline
toute responsabilité concernant des dommages consécufs liés à des pertes incidentes
dues à l’ulisaon de cet appareil.Un code à barres appliqué sous forme d’autocollant est
apposé sur le fond de la centrifugeuse pour idener la véritable cercaon du produit
et la date de fabricaon. Si vous ne trouvez pas l’autocollant de code à barres ou si celui-ci
est endommagé, il peut y avoir des limites dans la prestaon des services par la garane
du fabricant, à parr du moment où le cercat authenque et la date de fabricaon
n’auraient pas pu être convenablement idenés. Nous vous demandons de bien vouloir
vérier l’équee de code à barres sur le fond de la centrifugeuse lorsque vous achetez
le produit. Pour toute réparaon ou assistance en cas de problème technique, veuillez
contacter notre centre local de service clients.
Longueur du cordon
Moteur
Fusible
Poids
Dimensions extérieures
1.2m
A/C Moteur
10A
5.9 kg
L235 x W195 x H482 mm
Warranty period
www.hurom.com
Copyright© All Rights Reserved by HUROM
Manufacturer and Seller
Product
Warranty period
1year (household use only)
MADE IN CHINA