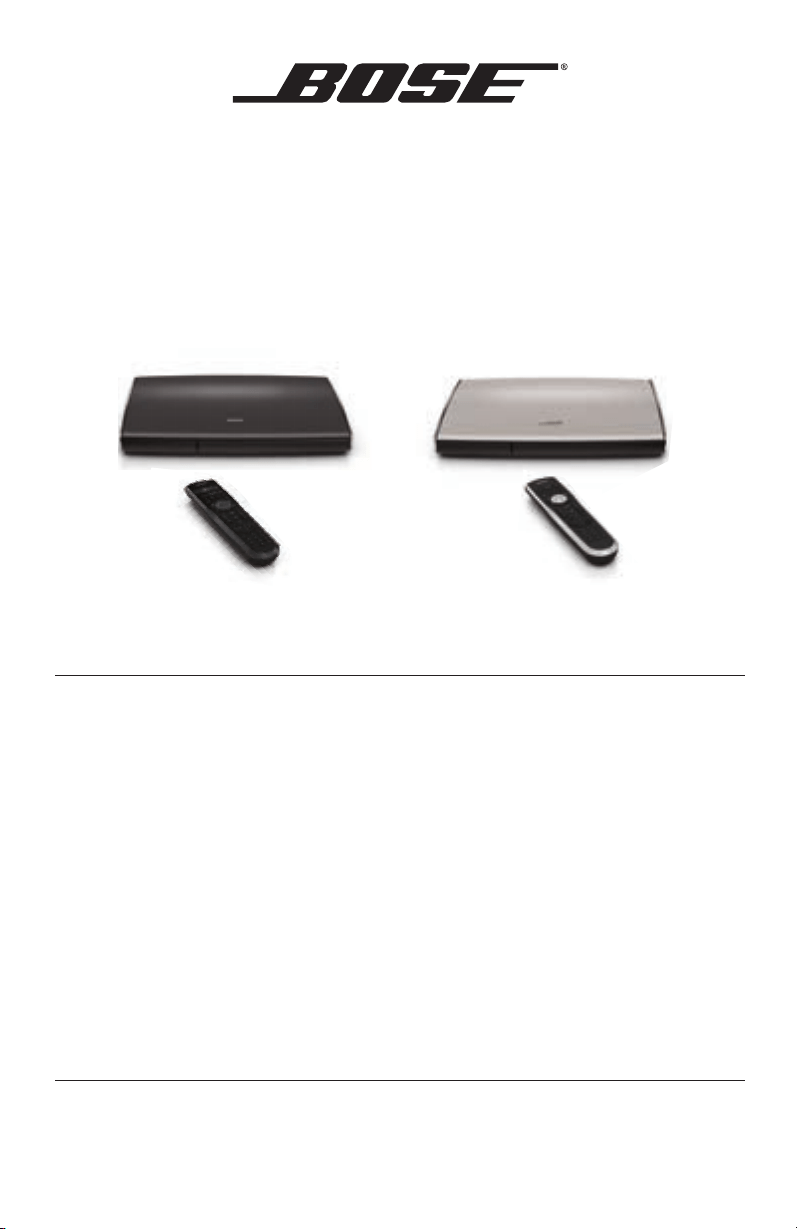
LIFESTYLE
®
535/525 series II
home entertainment systems
LIFESTYLE
®
235/135 series II
home entertainment systems
LIFESTYLE
®
520/510
home theater systems
Operating Guide | Betjeningsvejledning | Bedienungsanleitung | Bedieningshandleiding
Guía de usuario | Käyttöopas | Notice d’utilisation | Manuale d’uso | Használati útmutató
Instrukcji obsługi | Operação Guia | Bruksanvisning
Safety Information
2 - English
Please read this guide
Please take the time to follow the instructions in this owner’s guide carefully. It will help you set up and operate your
system properly and enjoy its advanced features. Please save this guide for future reference.
All Bose products must be used in accordance with local, state, federal, and industry regulations.
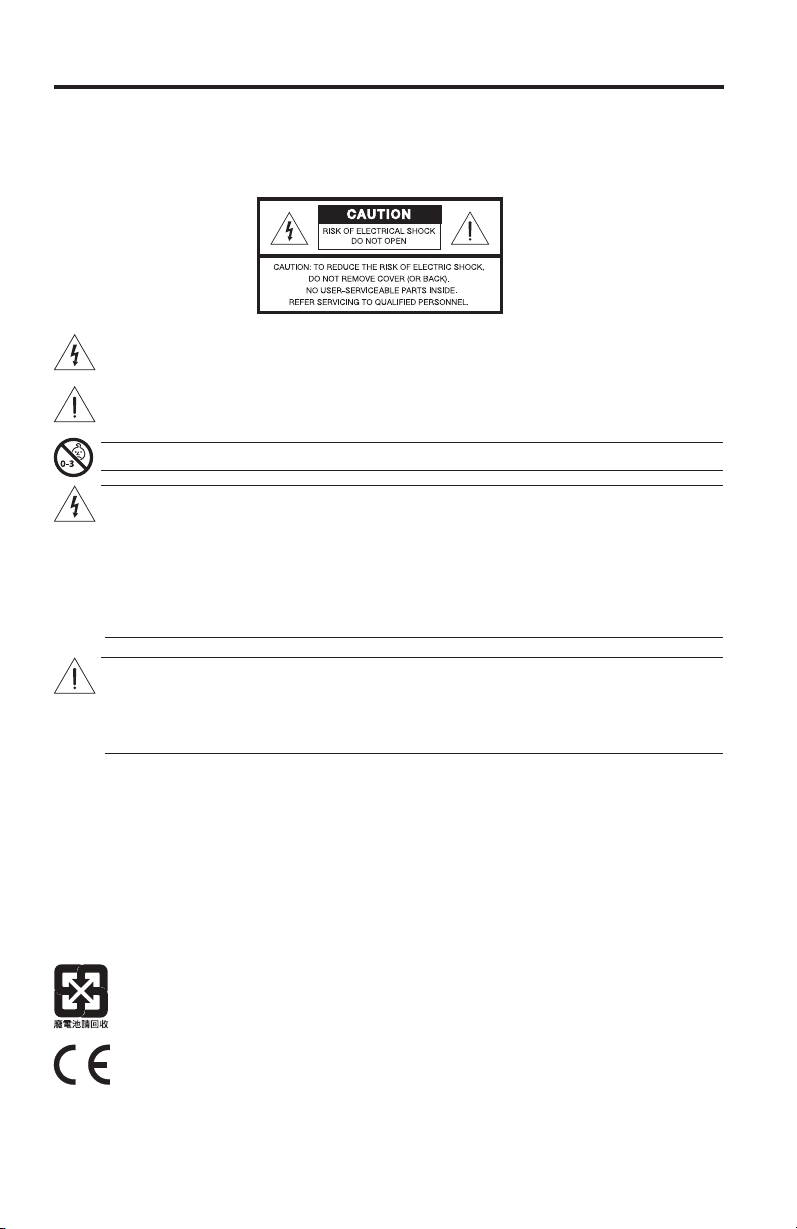
The lightning ash with arrowhead symbol within an equilateral triangle alerts the user to the presence of
uninsulated, dangerous voltage within the system enclosure that may be of sufcient magnitude to
constitute a risk of electric shock.
The exclamation point within an equilateral triangle, as marked on the system, is intended to alert the user
to the presence of important operating and maintenance instructions in this owner’s guide.
WARNING: Contains small parts which may be a choking hazard. Not suitable for children under age 3.
WARNING:
• To reduce the risk of re or electrical shock, do not expose the product to rain or moisture.
• Do not expose this apparatus to dripping or splashing, and do not place objects lled with liquids, such
as vases, on or near the apparatus. As with any electronic products, use care not to spill liquids into any
part of the system. Liquids can cause a failure and/or a re hazard.
• To prevent electric shock, match the wide blade of the line cord plug to the wide slot of the AC (mains)
receptacle. Insert fully.
• Do not place any naked ame sources, such as lighted candles, on or near the apparatus.
CAUTION:
• Make no modications to the system or accessories. Unauthorized alterations may compromise safety,
regulatory compliance, and system performance.
• Long-term exposure to loud music may cause hearing damage. It is best to avoid extreme volume when
using headphones, especially for extended periods.
Notes:
• The product label is located on the bottom or the back of the product.
• Where the mains plug or appliance coupler is used as the disconnect device, such disconnect device shall
remain readily operable.
• The product must be used indoors. It is neither designed nor tested for use outdoors, in recreation vehicles, or
on boats.
• This product is intended to be used only with the power supply provided.
• The speaker wire and interconnect cables included with the system are not approved for in-wall installation.
Please check your local building codes for the correct type of wire and cable required for in-wall installation.
Please dispose of used batteries properly, following any local regulations.
Do not incinerate.
Bose Corporation hereby declares that this product is in compliance with the essential requirements and
other relevant provisions of Directive 1999/5/EC and all other applicable EU directive requirements. The
complete declaration of conformity can be found at: www.Bose.com/compliance.

Safety Information
English - 3
Important Safety Instructions
1. Read these instructions.
2. Keep these instructions.
3. Heed all warnings.
4. Follow all instructions.
5. Do not use this apparatus near water.
6. Clean only with a dry cloth.
7. Do not block any ventilation openings. Install in accordance with the manufacturer’s instructions.
8. Do not install near any heat sources such as radiators, heat registers, stoves, or other apparatus (including
ampliers) that produce heat.
9. Do not defeat the safety purpose of the polarized or grounding-type plug. A polarized plug has two blades
with one wider than the other. A grounding type plug has two blades and a third grounding prong. The wide
blade or the third prong are provided for your safety. If the provided plug does not t into your outlet, consult
an electrician for replacement of the obsolete outlet.
10. Protect the power cord from being walked on or pinched particularly at plugs, convenience receptacles, and
the point where they exit from the apparatus.
11. Only use attachments/accessories specied by the manufacturer.
12. Use only with the cart, stand, tripod, bracket, or table specied by the manufacturer, or sold with the
apparatus. When a cart is used, use caution when moving the cart/apparatus combination to avoid
injury from tip-over
13. Unplug this apparatus during lightning storms or when unused for long periods of time.
14. Refer all servicing to qualied personnel. Servicing is required when the apparatus has been damaged in a
way, such as power-supply cord or plug is damaged, liquid has been spilled or objects have fallen into the
apparatus, the apparatus has been exposed to rain or moisture, does not operate normally, or has been
dropped.
Notice
This equipment has been tested and found to comply with the limits for a Class B digital device, pursuant to Part
15 of the FCC rules. These limits are designed to provide reasonable protection against harmful interference in a
residential installation. This equipment generates, uses, and can radiate radio frequency energy and, if not installed
and used in accordance with the instructions, may cause harmful interference to radio communications. However,
there is no guarantee that interference will not occur in a particular installation. If this equipment does cause harm-
ful interference to radio or television reception, which can be determined by turning the equipment off and on, you
are encouraged to try to correct the interference by one or more of the following measures:
• Reorient or relocate the receiving antenna.
• Increase the separation between the equipment and receiver.
• Connect the equipment to an outlet on a different circuit than the one to which the receiver is connected.
• Consult the dealer or an experienced radio/TV technician for help.
Changes or modications not expressly approved by Bose Corporation could void the user’s authority to operate
this equipment.
These devices comply with FCC and Industry Canada RF radiation exposure limits set forth for the general popula-
tion. They must not be co-located or be operating in conjunction with any other antennas or transmitters.
These devices comply with Industry Canada license-exempt RSS standard(s). Operation is subject to the follow-
ing two conditions: (1) This device may not cause interference, and (2) this device must accept any interference
received, including interference that may cause undesired operation of the device.
Safety Information
4 - English
Applicable only for:
• LIFESTYLE
®
535 and 525 series II home entertainment systems
• LIFESTYLE
®
520 and 510 home theater systems
Manufactured under license under U.S. Patent #’s: 5,956,674; 5,974,380; 6,487,535 & other
U.S. and worldwide patents issued & pending. DTS, the Symbol, & DTS and the symbol
together are registered trademarks & DTS Digital Surround and the DTS logos are
trademarks of DTS, Inc. Product includes software. ©DTS, Inc. All Rights Reserved.
Applicable only for:
LIFESTYLE
®
235 and 135 series II home entertainment systems
Manufactured under license under U.S. Patent #’s: 5,956,674; 5,974,380 and 6,487,535 &
other worldwide patents issued & pending. DTS, the DTS Symbol and DTS+the DTS Symbol
are registered trademarks & the DTS logos are trademarks of DTS, Inc. Product includes
software. ©2010 DTS, Inc. All Rights Reserved.
Names and Contents of Toxic or Hazardous Substances or Elements
Part Name
Toxic or Hazardous Substances and Elements
Lead
(Pb)
Mercury
(Hg)
Cadmium
(Cd)
Hexavalent
(CR(VI))
Polybrominated
Biphenyl (PBB)
Polybrominated
diphenylether (PBDE)
PCBs X 0 0 0 0 0
Metal parts X 0 0 0 0 0
Plastic parts 0 0 0 0 0 0
Speakers X 0 0 0 0 0
Cables X 0 0 0 0 0
0: Indicates that this toxic or hazardous substance contained in all of the homogeneous materials for this part is below the limit
requirement in SJ/T 11363-2006.
X: Indicates that this toxic or hazardous substance contained in at least one of the homogeneous materials used for this part is
above the limit requirement in SJ/T 11363-2006.
Manufactured under license from Dolby Laboratories. Dolby and the double-D symbol are
trademarks of Dolby Laboratories.
Designed with UEI Technology™ Under License from Universal Electronics Inc. ©UEI 2000-2011.
The terms HDMI and the HDMI Logo are trademarks or registered trademarks of HDMI Licensing, LLC in the
United States and other countries.
iPhone and iPod are trademarks of Apple, Inc., registered in the U.S. and other countries.
Xbox is a trademark of Microsoft Corporation.
TiVo is a trademark of TiVo, Inc. or its subsidiaries.
Other trademarks are property of their respective owners.
©2013 Bose Corporation. No part of this work may be reproduced, modied, distributed, or otherwise used without
written permission.

English - 5
Contents
Introduction
Welcome .............................................................................................................. 7
System features ................................................................................................. 7
If you need help .................................................................................................. 7
Controls and Indicators
Remote Control .................................................................................................. 8
Using the remote ....................................................................................... 8
Navigation controls ................................................................................... 9
Playback controls ....................................................................................... 9
Information display (535/525/235/135 series II systems only) ........ 10
Remote glow button .................................................................................. 10
MORE buttons .................................................................................................... 11
Activating a MORE button function ........................................................ 11
Button function definitions ..................................................................... 11
Control Console .................................................................................................. 13
Speaker Array (135 series II systems only) .................................................... 14
Acoustimass
®
Module (135 series II systems only) ..................................... 14
Power On/Off Controls
Starting your system ........................................................................................ 15
Turning on your TV ............................................................................................ 15
Shutting down your system ............................................................................ 15
Operating Your System Sources
Selecting a source ............................................................................................. 16
Watching TV ....................................................................................................... 17
Using a set-top box .................................................................................... 17
Using the tuner in your TV........................................................................ 17
Tuning to a TV station ............................................................................... 17
Playing audio/video devices ............................................................................ 18
Selecting the radio (535, 525, 235 and 135 series II systems only) ......... 19
Tuning to a station ..................................................................................... 19
Storing a preset station ............................................................................ 19
Recalling a preset station ......................................................................... 19
Deleting a preset station .......................................................................... 19
Optional radio tuner settings .................................................................. 19

6 - English
Contents
Playing content from an iPod or iPhone
(535/525/235/135 series II systems only) .................................................... 20
Using the front console inputs ....................................................................... 21
Front USB input .......................................................................................... 21
Front Analog A/V input ............................................................................. 22
Front HDMI
TM
input ..................................................................................... 22
Changing the image view................................................................................. 22
Changing System Options
Using the system OPTIONS menu.................................................................. 23
OPTIONS menu .................................................................................................. 23
Changing Your System Setup
UNIFY
®
system overview .................................................................................. 26
Using the UNIFY menu ..................................................................................... 26
Care and Maintenance
Troubleshooting ................................................................................................ 27
Resetting the system ................................................................................ 29
Pairing the remote with the console ...................................................... 29
Performing a system software update .................................................. 30
Contacting customer service .......................................................................... 30
Replacing the batteries .................................................................................... 30
Cleaning ............................................................................................................... 31
Limited warranty ............................................................................................... 31
Technical information ...................................................................................... 32
Licensing information ...................................................................................... 33
Please complete and retain for your records
Theserialandmodelnumbercanbefoundonthebottompaneloftheproduct.
LIFESTYLE
®
model:_____________________________________________________________
Controlconsoleserialnumber:____________________________________________________
Acoustimass
®
serialnumber: _____________________________________________________
Speakerarrayserialnumber(135SeriesIIsystems):_________________________________
Wesuggestyoukeepyourreceiptwiththisowner’sguide.

English - 7
Introduction
Welcome
ThankyouforchoosingaBose
®
LIFESTYLE
®
systemforyourhome.Thiselegant
andeasy-to-usesystemdeliverssuperiorperformanceforbothmusicandvideo.
BynowyoushouldhavesuccessfullysetupyoursystemusingtheUNIFY
®
intelligentintegrationsystemandcalibratedthesoundforyourroomusingthe
ADAPTiQ
®
audiocalibrationsystem.
Thisguidedescribesyournewremotecontrolandshowsyouhowtooperateyour
systemanditsconnecteddevices.
System features
Features on all systems
• UNIFYintelligentintegrationsystemhelpstoeasilyadddevicestoyoursystem
• 3Dvideocapability(requiresthatyouconnecta3D-capableTVanda
3D-capableBlu-rayDisc™player,gameconsole,cablebox,orothersource
toyourLIFESTYLE
®
system)
• ADAPTiQaudiocalibrationsystemthatoptimizessystemperformancefor
yourroom
• RFremotecontrol
• HDMI
®
connectivity
• Videoup-conversionto1080p
• PhotoviewingusingaUSBashdrive
Additional features on 535, 525, 235 and 135 series II
systems only
• AM/FMradio
• Backpanelconnectorfora30-pinaccessorydock(notincluded)compatible
withiPodandiPhonedevices
If you need help
Ifyouexperienceanyoperatingdifculties,besuretocheckthetroubleshooting
tableonpage27.Youcansolvethemostcommonoperatingproblemsusingthe
helpfultipsprovidedthere.Ifyouneedadditionalhelporserviceforyourproduct,
pleaserefertotheincludedcontactsheet.
IMPORTANT! – Please register your product right away!
Registeringyourproductenablesyoutoreceivenoticationsofsystemsoftware
updatestokeepyourproductperformingoptimally.Italsoallowsustosendyou
informationaboutnewproductsandspecialoffersfromBose.
PleasefollowtheinstructionsonyourProductRegistrationCardtoregister.Failure
toregisterwillnotaffectyourlimitedwarrantyrightsoryoureligibilitytoobtain
systemsoftwareupdates.
8 - English
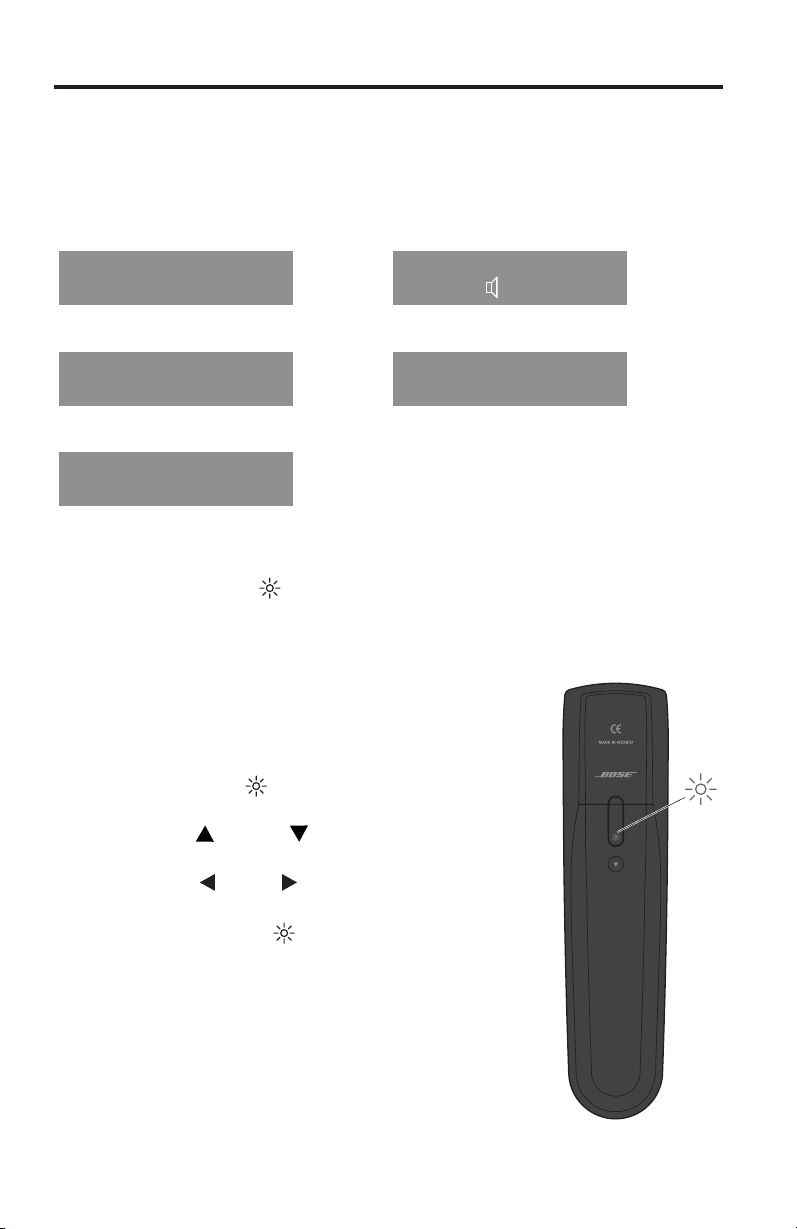
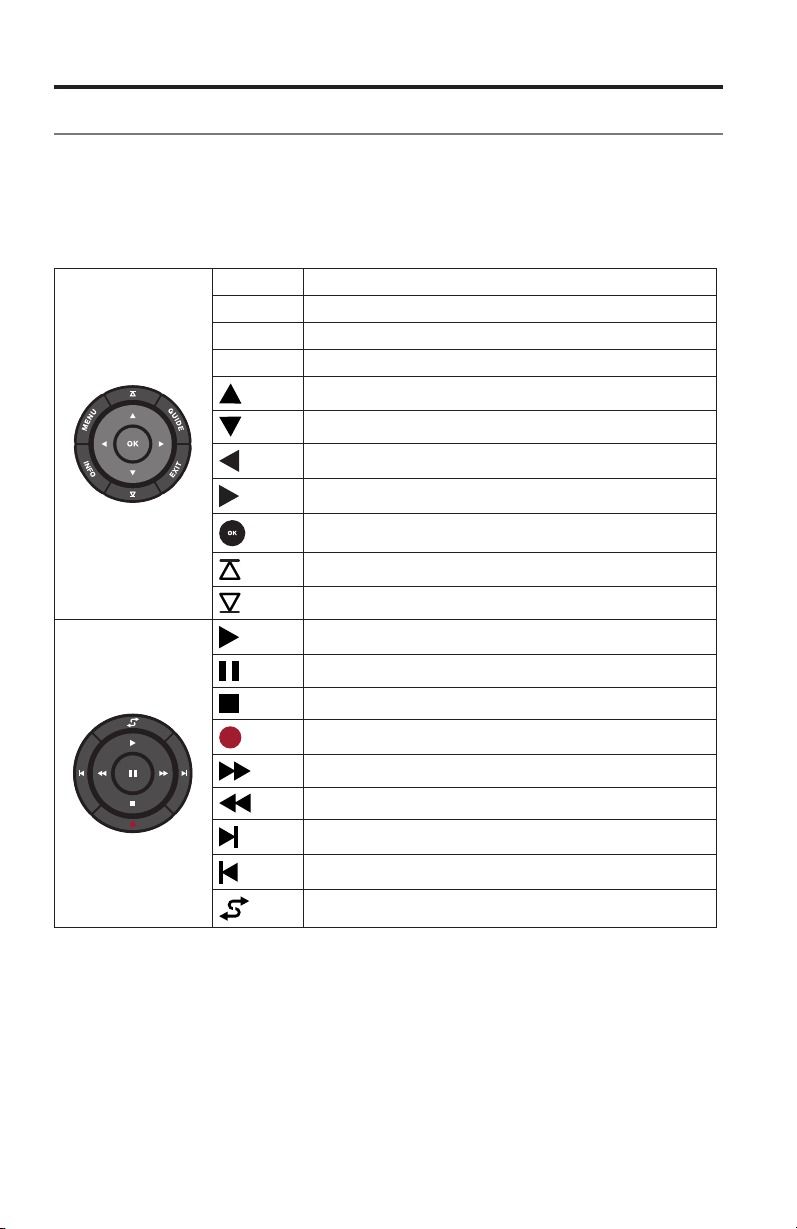
Controls and Indicators
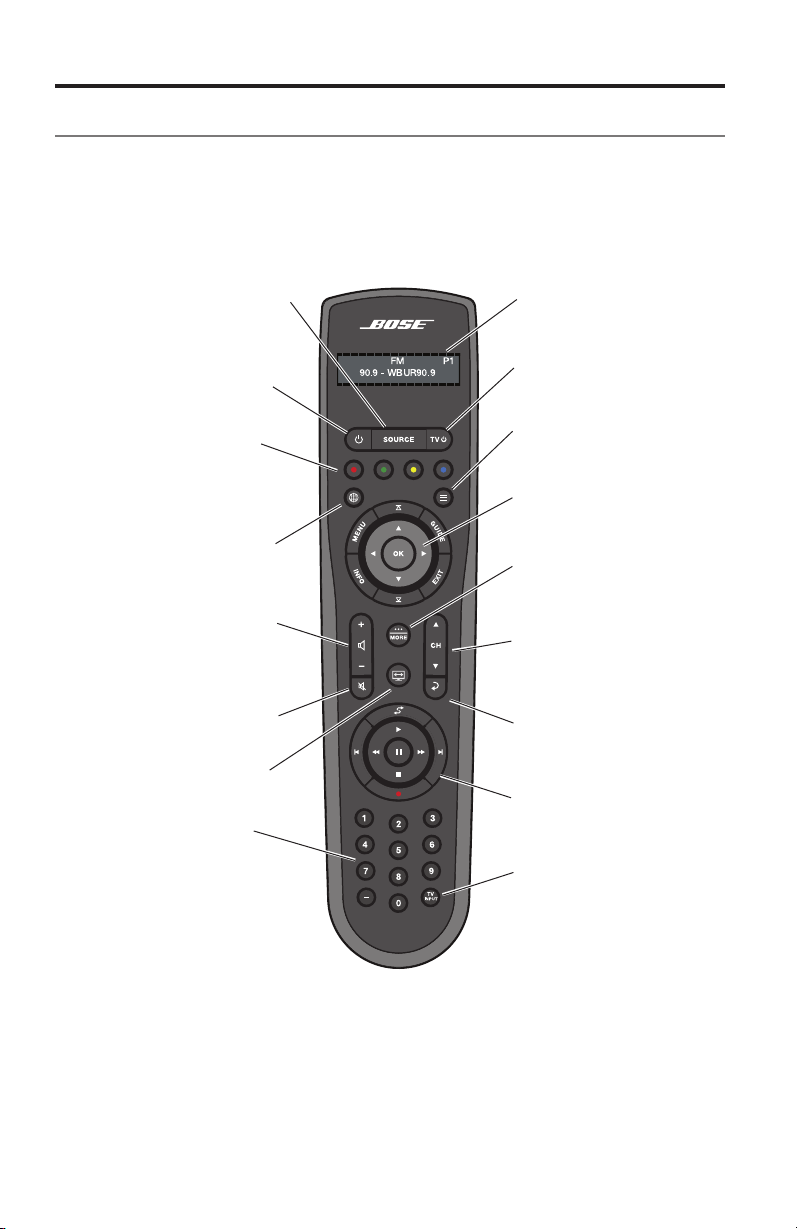
Remote Control
Using the remote
Thisadvancedradiofrequencyremoteworksthroughouttheroom.Youdonot
needtoaimitatthecontrolconsole.
SOURCE–Displaysandselects
connecteddevicesfromthe
sourcelistonyourTV
Power–Turnsyoursystemon
oroff
Volume Up/Down–Increases
(+)ordecreases(–)thesystem
volume
Mute–Mutes/unmutessystem
speakers
Image View–Changeshow
videoappears
Numeric Keypad–Allows
manualentryofchannels
andsettings
Information Display–
Seepage10
TV Power–TurnsyourTV
onoroff
Navigation Controls–
Seepage9
MORE–Displaysadditional
device-speciccontrolsand
informationonyourTV
Seepage11.
Channel Up/Down–Next
orpreviousnumbered
channelorpreset
Last Channel–Returns
tolastchannelorpreset
Playback Controls–
Seepage9
TV Input–Changes
inputsonyourTV
Internet–ActivatesInternet
accesssonthird-partydevices
suchasBlu-rayDisc™players
andset-topboxes
Teletext–TurnsTeletext
controlsonandoff
Color functions–Activates
color-relatedfunctionson
connectedsourcessuchas
Blu-rayDisc™playersandset-
topboxes,andforTeletext
Controls and Indicators
English - 9
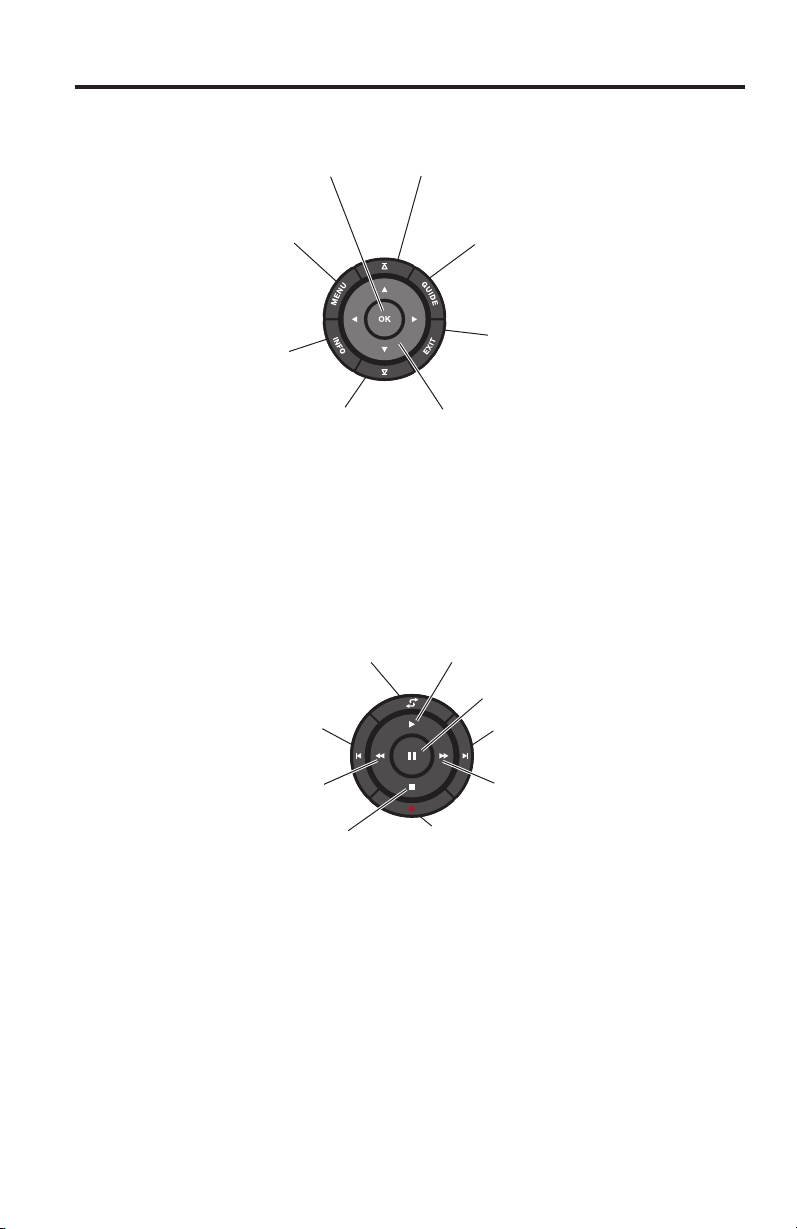
Navigation controls
MENU–Displaysthemenu
foraconnecteddevice
INFO–Displaysprogram
information
OK–Selectsorconrms
highlighteditem
Page Up–Movesto
previouspage
GUIDE–Displaysyourset-topbox
orTVprogramguide,orBlu-ray
Disc™playerpopupmenu
EXIT–Clearsamenuorguide
fromyourTVscreen
Left/Right and Up/Down–
Navigationcontrol
Page Down–Movesto
nextpage
Note: See “Operating Your System Sources” on page 16 for more details on
using navigation and playback controls with selected sources.
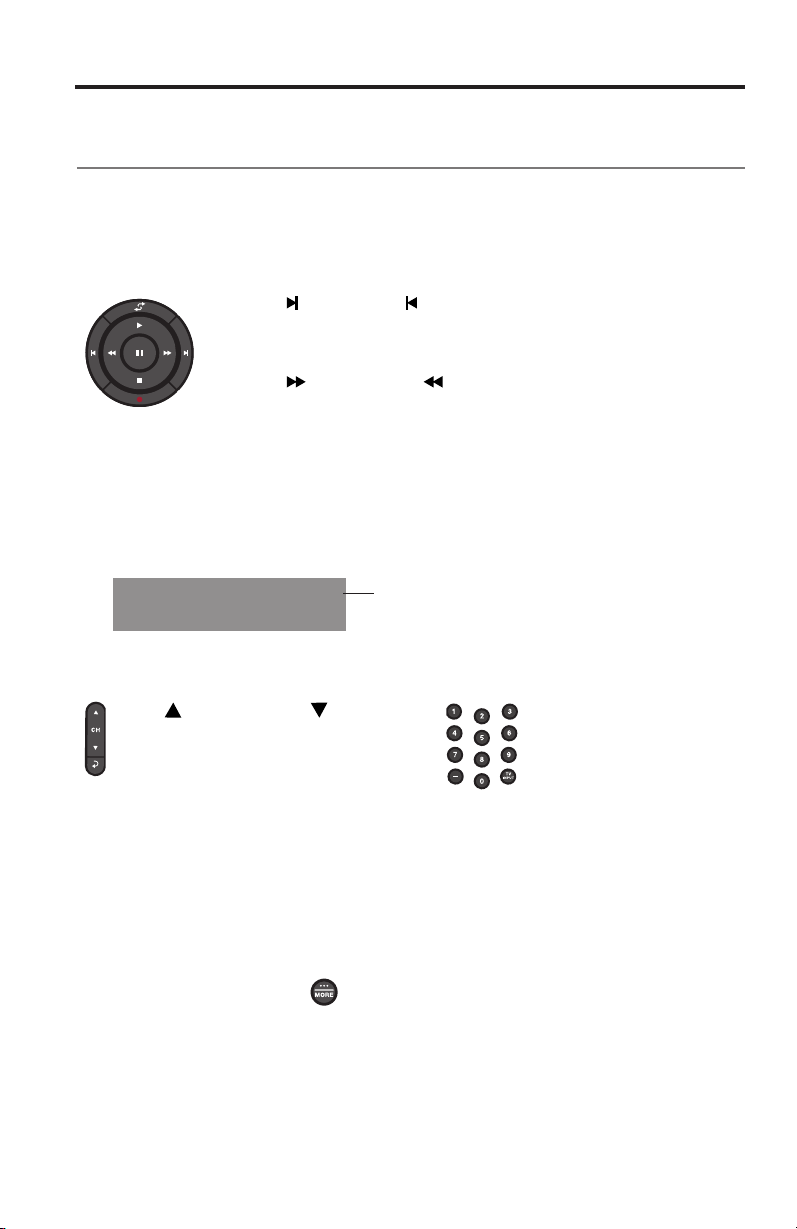
Playback controls
Shuffle
Play
Quick Skip/Skip Forward
Seek Forward/Fast Forward
RecordStop
Seek Backward/Rewind
Quick Replay/Skip Backward
Pause
Controls and Indicators
10 - English
Information display
(535/525/235/135 series II systems only)
Thedisplayprovidesoperatingandsystemstatusinformation.
Examples:
Sourceidentication
Cable
Volume
Cable
43
Radiotuner
FM
90.9 - WBUR90.9
P1
iPod
iPod
Album
Operatingprompt
Hold number key
to set preset
Remote glow button
Pressingtheglowbutton ontherearoftheremoteilluminatestheremote
buttons(andthedisplayon535/525/235/135seriesIIsystems).Thelightturns
offautomaticallyafterseveralsecondstoprolongbatterylife.
To adjust the illumination level of the display:
Note: If the currently selected source is AM or FM,
switch to any other source before making this
adjustment. This prevents unintentionally deleting
a radio preset.
1. Pressandholdthe
andOKbuttonsatthesame
timefor5seconds.
2. Presstheup
ordown navigationbuttonto
selectBrightnessorContrast.
3. Presstheleft
orright navigationbuttonto
decreaseorincreasetheilluminationlevel.
4. PresseithertheOKor
toreturntonormal
operation.
Controls and Indicators
English - 11
MORE buttons
PresstheMOREbuttontodisplayadditionalbuttonfunctionsalongthe
topofyourTVscreenforthecurrentsource.Thefunctionsthatappear
dependontheselectedsource.Only13oftheavailablebuttonscanbe
displayed.Anarrowattherightorleftofthebuttonsindicatesifadditionalbuttons
areavailable.
Whentherearemorethan13buttons,anarrowappearseithertotherightorleftof
thedisplayedbuttonstellingyoutoscrollleftorrighttoseetheotherbuttons.
Indicatesmorebuttonsto
theleft.Movehighlightleft.
Indicatesmorebuttonstothe
right.Movehighlightright.
Activating a MORE button function
1. PresstheremoteMOREbutton.
2. Presstheleft
orright navigationbuttontohighlightthefunctionyouwant
toactivate.
3. PresstheremoteOKbutton.
Button function definitions
Turnsdevicepoweron/off. SwitchesyourTVtolive
programming.
Displaysalistoffavorite
channels.
Switchesbetweenmainfeatures
(fromDVDtoVCR,forexample)on
acombodevice.
Displaysprogramguidefor
nextday.
Movestothe“Home”stateofthe
device.
Displaysprogramguidefor
previousday.
Selectsarepeatoptiononthe
currentsource.
Displaysplaylistofrecorded
programs.
Switchestunersinamulti-tuner
device.
Picture-in-picturemode. SwitchesbetweenTVandradioon
aset-topboxthatprovidesboth.
Videoondemand. Switchestunersinamulti-tuner
device.
Controls and Indicators
12 - English
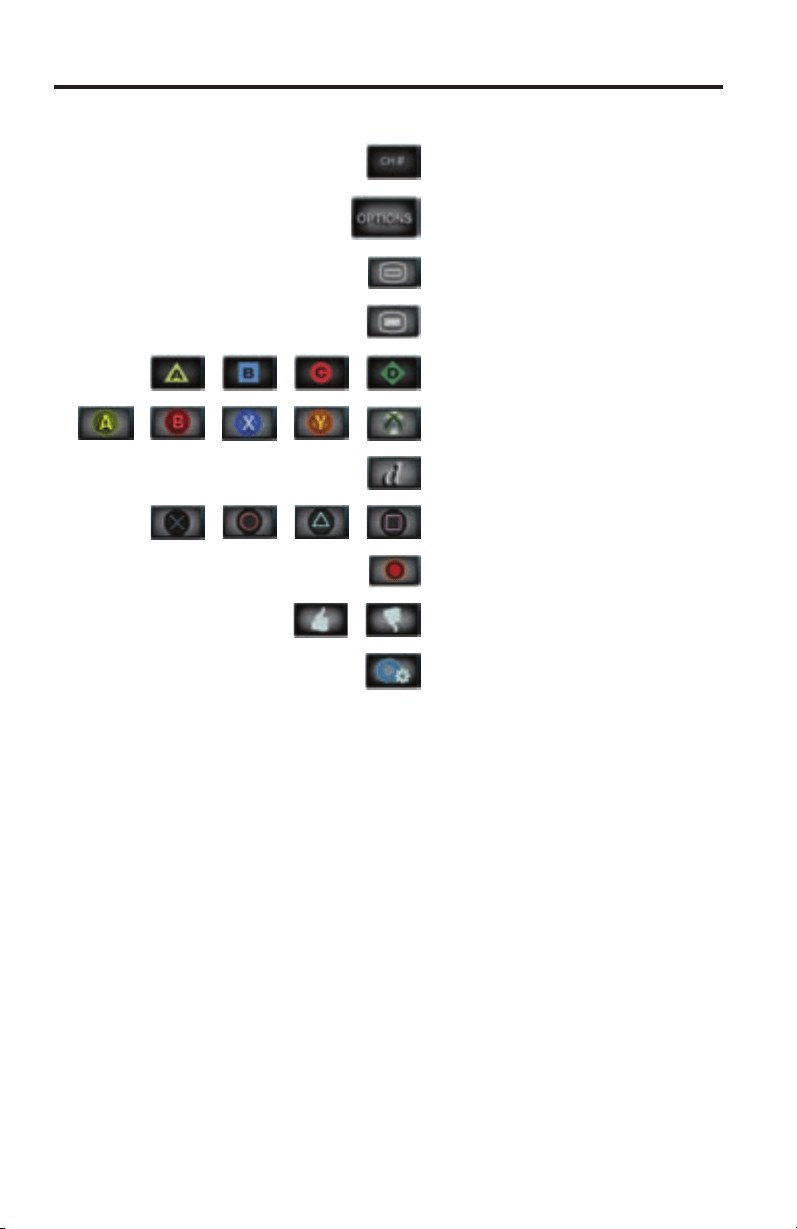
Button function definitions (continued)
Allowsyoutoentera3-digitnumber
(Japanonly).
DisplaystheOPTIONSmenu.
See“ChangingSystemOptions”
onpage23.
Accessesthesystemmenuforyour
set-topbox.
AccesstheTopMenu(orTitleMenu)
onBlu-rayDisc™players.
AccessesA,B,C,orDfunctionsinan
interactiveprogramguide.
AccessesXbox
®
functions.
Accessesdatabroadcastonatuner
device(Japanonly).
AccessesPlayStation
®
functions.
Selectsdifferenttypesofvideobroad-
cast(EUonly).
Allowsyoutoratecertaincontent,
suchasaTiVo
®
program.
Accessesspecic“tools”onBlu-ray
Disc™playersorset-topboxes.
Controls and Indicators
English - 13
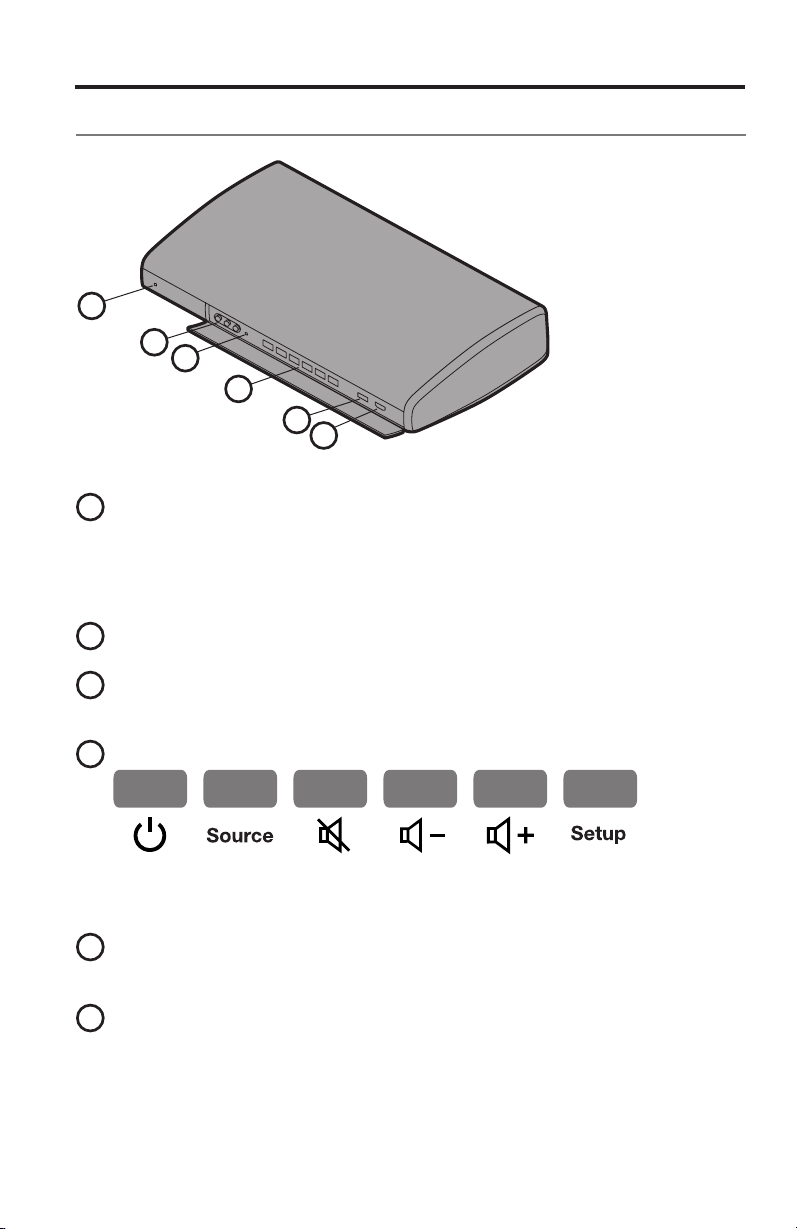
Control Console
1
2
3
4
5
6
1
System status indicator
Red......................Systemisoff(Standby)
Blinkinggreen.....Systemisstarting
Solidgreen..........Systemisonandreadytouse
Amber..................Systemisofforturningoff,andwhenchargingiPodor
iPhoneintheoptionalaccessorydock(availablefromBose)
2
Front A/V inputs
Usedfortemporarilyconnectinganaudio/videodevicesuchasacamcorder.
3
Headphones output
Acceptsstereoheadphoneswitha3.5mmstereoplug.Volumelevelissetby
thevolumecontrols.
4
Control buttons
Power
on/off
Source
selection
Mute/
unmute
Volume
down
Volume
up
UNIFY
®
menu
(page26)
5
Front USB input
UsedforviewingphotolesfromaUSBdeviceincludingadigitalcamera.
Alsousedforupdatingsystemsoftware.
6
Front HDMI
TM
input
UsedfortemporarilyconnectinganHDMIdevicesuchasavideocamera.
Controls and Indicators
14 - English
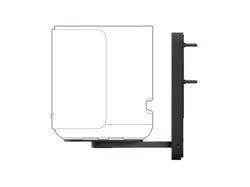
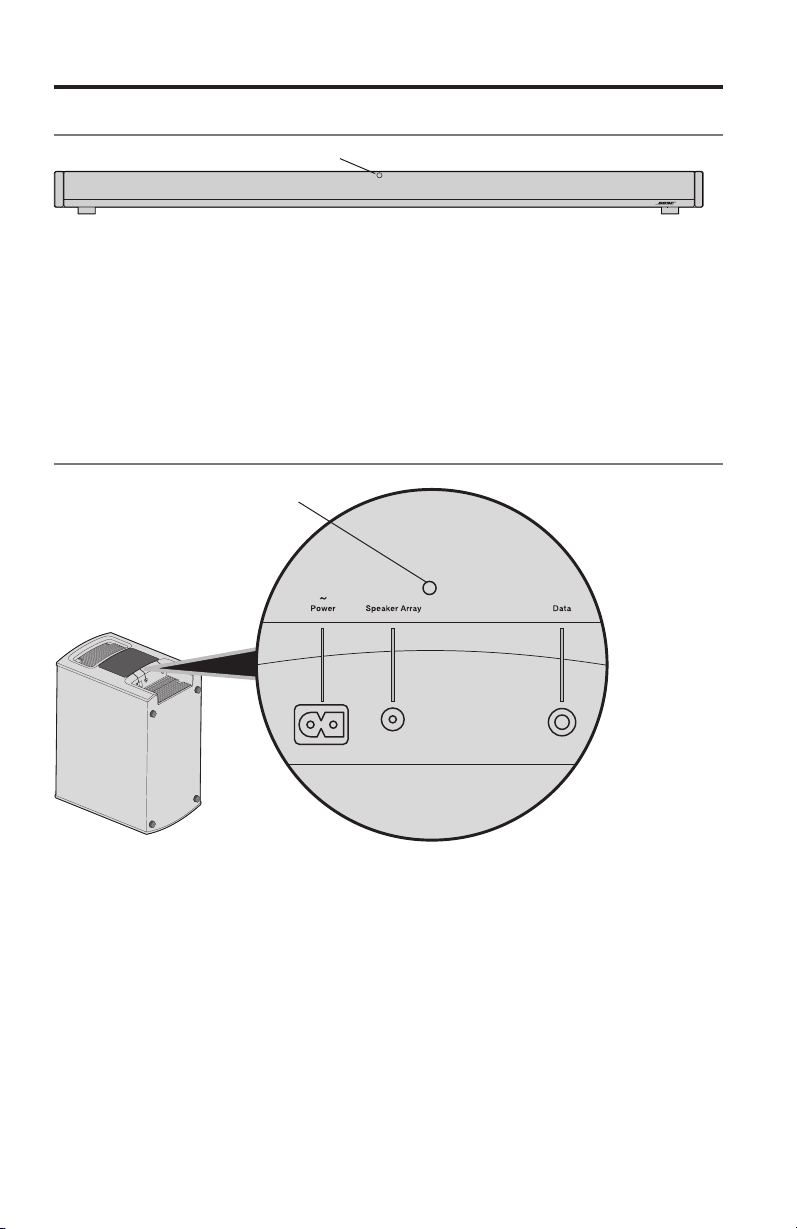
Speaker Array (135 series II systems only)
Status
Status indicator:
Off...................................SpeakerarrayandAcoustimass
®
moduleareconnected
Slowblinkingorange...... Speakerarrayisavailabletomakeawirelessconnection
Fastblinkingorange....... Speakerarrayisdisconnectedandtryingtoconnect
Solidred.........................Systemerror(CallBoseCustomerService)
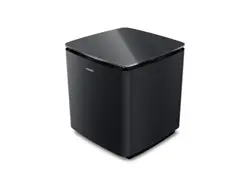
Acoustimass
®
Module
(135 series II systems only)
Status
Status indicator:
Solidorange................... SpeakerarrayandAcoustimassmoduleareconnected
Blinksevery3secs.........Acoustimassmoduleisdisconnectedfromspeakerarray
orspeakerarrayisoff(Acoustimassmodulestandby)
Slowblinkingorange...... Acoustimassmoduleisavailabletomakeawireless
connection
Solidred.........................Systemerror(CallBoseCustomerService)
English - 15
Power On/Off Controls
Starting your system
Tostartyoursystem:
PressthePowerbuttonontheremoteortheconsole.
Inseveralseconds,thesystemstatusindicatorontheconsolechangesfrom
blinkingtosolidgreen.Thesystemisnowreadytouse.
TostartyoursystemandgodirectlytotheSOURCEmenu:
PresstheSOURCEbuttonontheremotecontrol.Thisstartsyour
systemandopenstheSOURCEmenuonyourTVscreen.
TostartyoursystemandgodirectlytotheUNIFY
®
menu:
PresstheSetupbuttononthecontrolconsole.Thisstartsyour
systemandopenstheUNIFY
®
menuonyourTVscreen.
Note: To keep energy consumption to a minimum, the system operates in a power
saving mode when it is off. This is why the system may take several seconds
to start.
Turning on your TV
IfyouprogrammedyourremoteduringtheinitialsetupusingUNIFY,press
theTV PowerbuttonontheremotecontroltoturnonyourTV.Otherwise,
usetheremotethatcamewithyourTV.
Shutting down your system
PressthePowerbuttonontheremoteoronthecontrolconsole.
Thesystemwillshutdownautomaticallyafterafewseconds.
Note: If you decide to access the power controls for connected devices, automatic
shutdown is stopped and you must complete the shutdown using the
onscreen controls.
16 - English
Operating Your System Sources
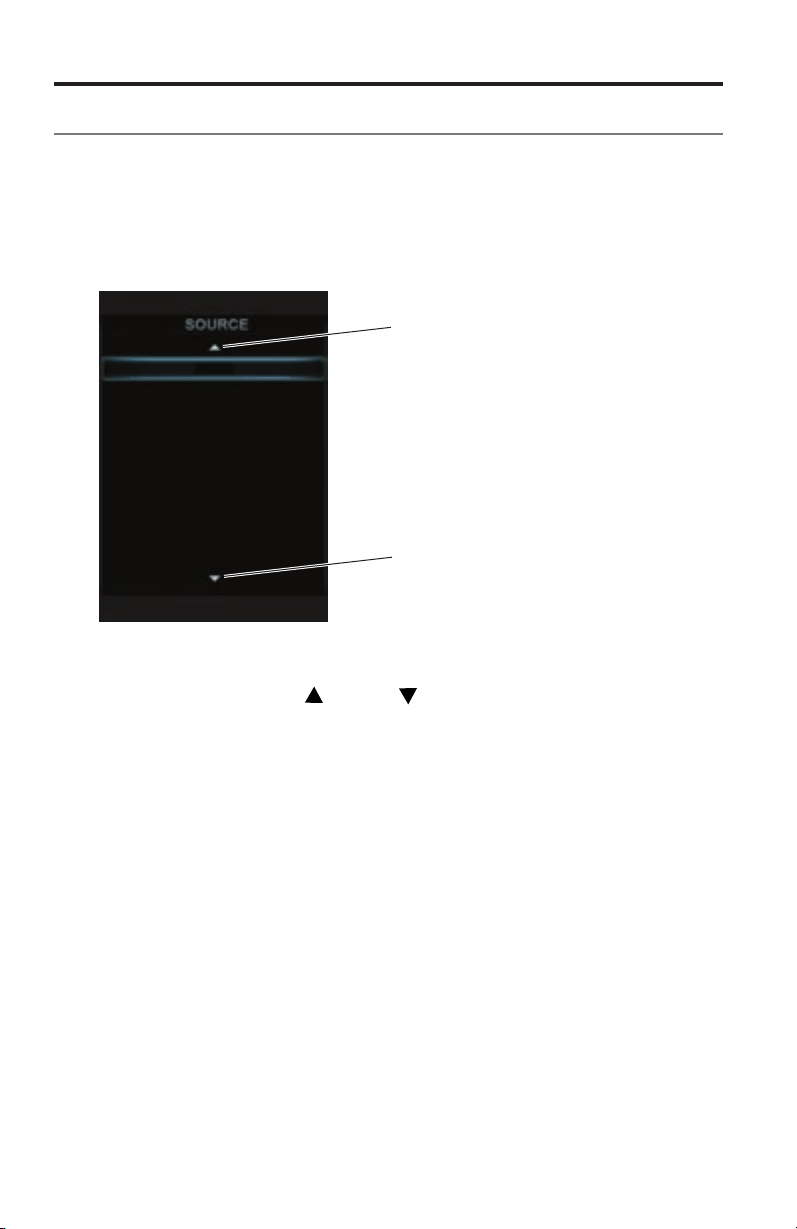
Selecting a source
TheSOURCEmenuallowsyoutoselectyoursourcesandconnecteddevices.
Themenucandisplayamaximumof10selections.Whentherearemorethan10
selections,anarrowappearseitheratthetoporbottomofthemenutellingyouto
scrollupordowntoseetheotheritems.
1. PresstheSOURCEbuttonontheremotetodisplaythelistofconnected
devicesonyourTV.
Cable
Blu-ray
DVD
Game console
FM
AM
iPod
USB
HDMI (Front)
A/V (Front)
Indicatesmoreselections
above.Movehighlightup.
Indicatesmoreselections
below.Movehighlightdown.
2. KeeppressingSOURCEtomovethehighlightdownthelistandselectthe
sourceyouwant.
• Youcanalsousetheup
ordown navigationbuttonstoselect
asource.
• Ifyounamedadeviceduringthesetupprocess,theassignednameappears
inthelist.Unnameddevicesappearasgenericinputssuchas“Input1
(HDMI)”and“Input2(HDMI).”
• Ifyouselectasourcethatisturnedoff,amessageappearsonthescreen
remindingyoutoturnonthesource.
Note: When listening to audio sources, the system automatically enters Screensaver
mode to prevent the risk of screen burn-in. Press any button on the LIFESTYLE
remote to restore the picture. To disable the screensaver, see “Changing
System Options” on page 23.
Note: The UNIFY
®
intelligent integration system sets up your LIFESTYLE
®
remote to
control each of your devices. If one or more of these devices does not respond
to the LIFESTYLE
®
remote, see “Troubleshooting” on page 27.
Operating Your System Sources
English - 17
Watching TV
YourTVmaybereceivingitsprogramcontentthroughaset-topboxorthetuner
builtintoyourTV.
Note: Since most televisions come with an IR (infrared) remote, you may need to
point the Bose
®
remote at your TV to operate it.
Using a set-top box
Ifyouconnectedacable,satellite,orotherset-topboxtoyourTV,itwillappearin
theSOURCEmenuunderthenameyouassigneditduringthesetupprocess.
1. PresstheremoteSOURCEbuttonandselectthedevicethatprovidesyour
TVprograms.
2. Tunetoastation.See“TuningtoaTVstation,”below.
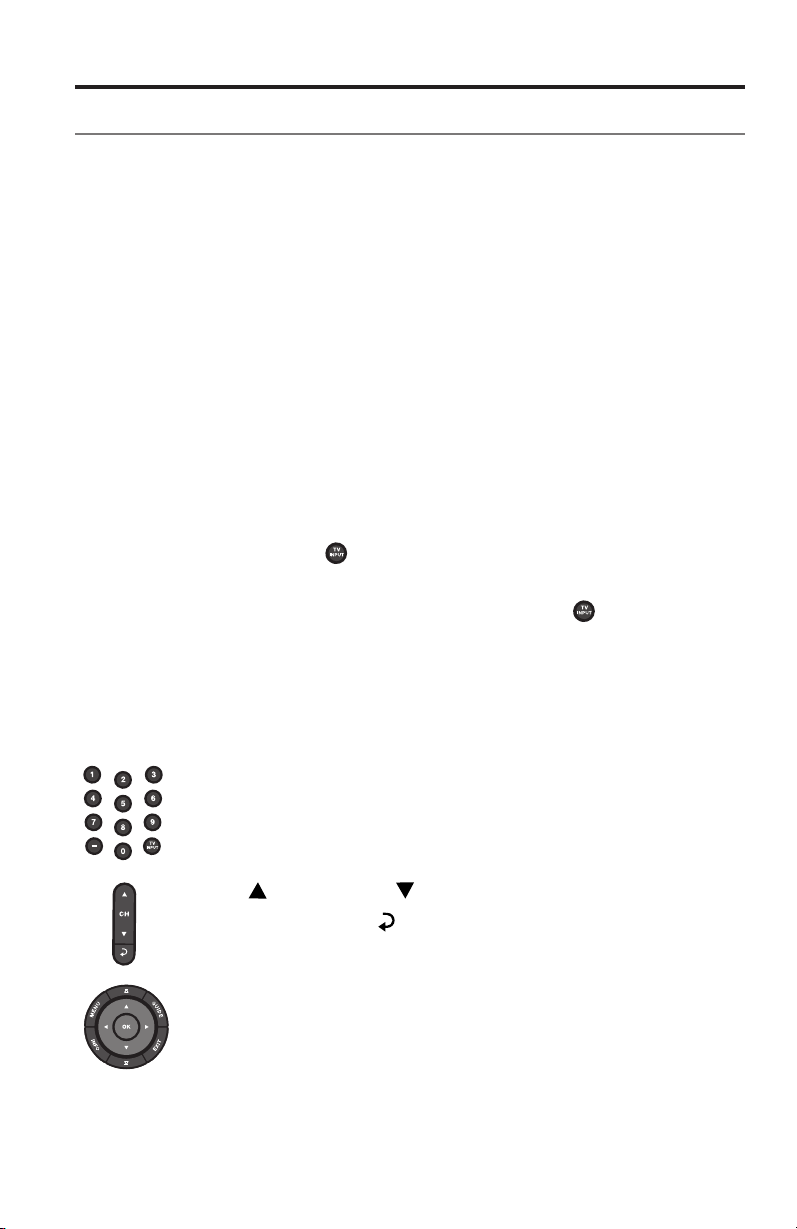
Using the tuner in your TV
IfyouareusingthetunerinyourTVtoreceiveTVprograms:
1. PresstheremoteSOURCEbuttonandselectTV.
2. PresstheTV Inputbutton
toselecttheinternaltunerinyourTV.
3. Tunetoastation.See“TuningtoaTVstation,”below.
To return to using other sources,presstheTV Inputbutton
torstselect
theinputfortheBose
®
system,thenpresstheSOURCEbuttonandselect
anothersource.
Tuning to a TV station
YoucantunetoaTVstationusinganyofthefollowingmethods:
EnterthechannelnumberonthekeypadandpressOK.Usethe
dashbuttonforchannelnumbersusingadashorperiod.
Press (channelup)or (channeldown)tochangechannels.
PresstheLastbutton
totunetolastselectedchannel.
PresstheGUIDEbutton.Usethenavigation,pageup/down,and
OKbuttonstoselectastationfromtheprogramguide.
Operating Your System Sources
18 - English
Playing audio/video devices
Duringtheinteractivesetupprocess,youmayhaveconnectedaCD,DVD,DVR,
Blu-rayDisc™player,orothersuchdevice.Thesearetypicallyconnectedto
inputs1-5.
IfyouprogrammedtheLIFESTYLE
®
remoteforthedevice,youcanusethe
followingcontrolstooperatetheselecteddevice.
MENU
Devicemenu(ifavailable)orsystemsetupmenu
GUIDE
Blu-rayDiscplayerpop-upmenu
INFO
Deviceinformation
EXIT
Exitmenu
Uponeitem
Downoneitem
Moveleft
Moveright
Select
Nextpage,channel,ordisc
Previouspage,channel,ordisc
Play
Pause
Stop
Record
Fastforwardorsearchforward
Fastrewindorsearchreverse
Quickskiporskipforward
Quickreplayorskipbackward
Shufemode
Operating Your System Sources
English - 19
Selecting the radio
(535, 525, 235 and 135 series II systems only)
1. PresstheSOURCEbutton.
2. KeeppressingtheSOURCEbuttontoselectFMorAMintheSOURCElist.
Tuning to a station
• Press (increase)or (decrease)totuneupordownthe
frequencyband.
Or,
• Press
(seeknext)or (seekprevious)tondthe
next/previousstrongstation.
Storing a preset station
Thebuilt-inradiotunercanstoreupto25FMand25AMpresetstations.
1. Tunetoaradiostation.
2. Forpresets1-9,pressandholdthenumberkey.For10-25,pressandholdthe
OKbuttontostorethestationinthenextavailablepreset.
FM
90.9 - WBUR90.9
P1
Presetnumber
Recalling a preset station
Press (channelup)or (channel
down)togotothenextorprevious
preset.
Forquickaccessto
presets1-9,pressthe
numberkeyofthepreset.
Deleting a preset station
1. Recallthepresetstationyouwanttodelete.
2. PressandholdtheOKbuttonuntilthepresetnumberdisappearsfromthe
display.
Optional radio tuner settings
1. PresstheMOREbutton andselectOPTIONS.
2. FromtheOPTIONSmenu(seepage24fordetails)youcanselect:
• CurrentStation:AllowStereo,StereoOff
• RDS:On,Off

Operating Your System Sources
20 - English
Playing content from an iPod or iPhone
(535, 525, 235, and 135 series II systems only)
YourLIFESTYLE
®
systemcanplayaudioandvideofromaniPodoriPhoneusing
the30-pinaccessorydock(notincluded)availablefromBose.
YouriPodoriPhonemenusandcontentappearontheleftsideofyourscreenas
showninthefollowingexample.The“NowPlaying”trackappearsontheright.
ThefollowingcontrolsareavailabletooperateyourconnectediPod.
MENU
Uponemenulevel(pressandholdtogototopmenu
level).Ifplayingvideo,pauseandreturntomenu
Uponepage
Downonepage
Uponemenuitem(pressandholdtoscrollquickly)
Downonemenuitem(pressandholdtoscrollquickly)
Uponemenulevel.Ifplayingvideo,pauseandreturn
tomenu
Downonemenulevel
Downonemenulevel
Play
Pause
Stop
Nexttrackoraudiobookmark
Previoustrackoraudiobookmark
Fastforward
Fastrewind
Shufemode
Operating Your System Sources
English - 21
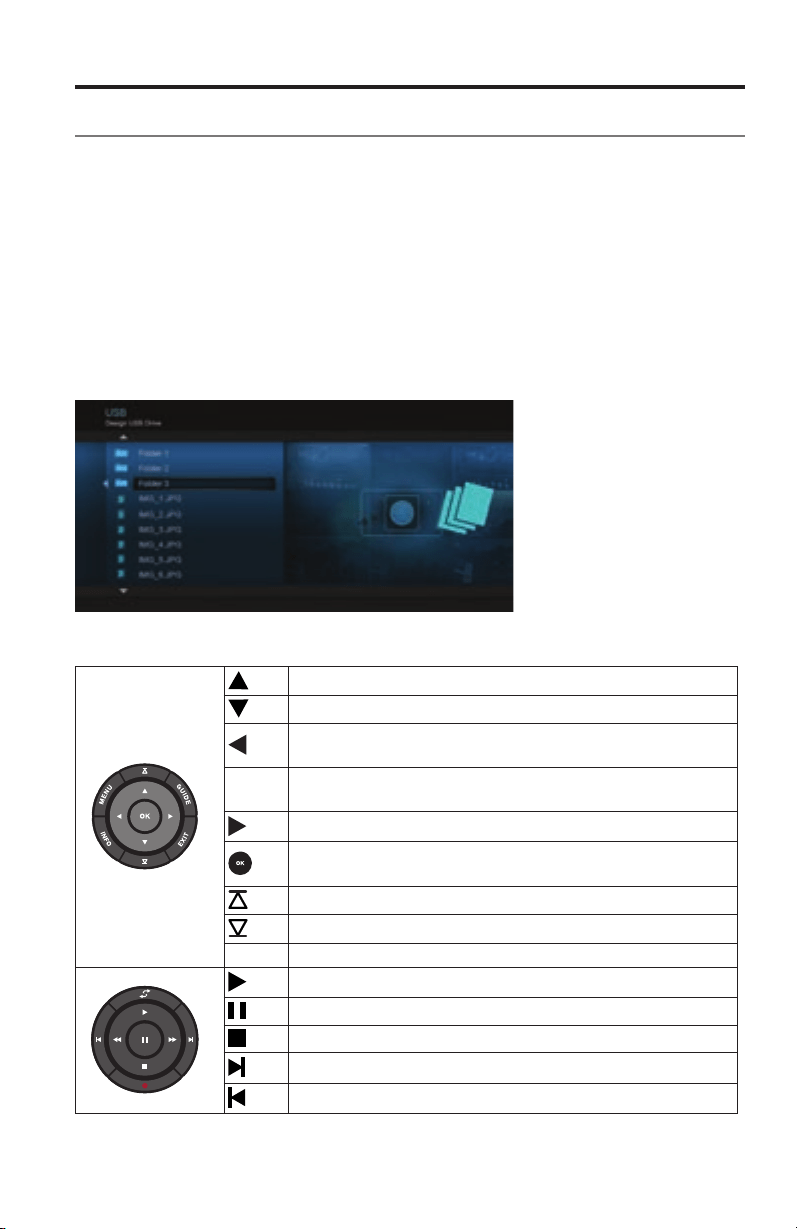
Using the front console inputs
ThefrontoftheconsoleprovidesanalogA/VinputsplusaUSBandanHDMI
®
input.TheseinputsappearintheSOURCEmenuasA/V(Front),USB,andHDMI
(Front)onlywhenadeviceisconnected.Theseinputsareprovidedfortemporarily
connectingdevicessuchasdigitalcamerasandvideocameras.
Front USB input
YourLIFESTYLE
®
systemcandisplayphotoles(.jpgor.jpegformatonly)froma
USBstoragedevice.
WhenselectingtheUSBsource,foldersappearatthetopofthelistontheleft
followedbysingleimageles.Selectingafolderdisplaysitscontents.
Usethefollowingcontrolsforviewingdigitalphotos.
Uponemenuitem(pressandholdtorepeat)
Downonemenuitem(pressandholdtorepeat)
Uponefolderlevel,orexitandreturntobrowsing
folders(ifviewingaslideshow)
MENU
Uponefolderlevel,orexitandreturntobrowsing
folders(ifviewingaslideshow)
Downonefolderlevel
Downonefolderlevel(ifafolderishighlighted),orplay
slideshow(ifaphotoleishighlighted)
Upnineitems
Downnineitems
EXIT
Exitslideshowandreturntobrowsingfolders
Playslideshowofhighlightedfolder
Pauseslideshow
Exitslideshowandreturntobrowsingfolders
Nextimage
Previousimage

Operating Your System Sources
22 - English
Front Analog A/V input
Youcanusethisinputfordevicesthathavecompositevideoandleft/rightaudio
outputs.TheBose
®
remotedoesnotcontroladeviceconnectedtothisinput.
Youneedtousethecontrolsonthedeviceitselfortheremotethatcamewithit.
Front HDMI input
YoucanusethisinputfordevicesthathaveanHDMIoutput.TheBoseremote
doesnotcontroladeviceconnectedtothisinput.Youneedtousethecontrols
onthedeviceitselfortheremotethatcamewithit.
Changing the image view
Presstheimageviewbuttontodisplayamenuofvideoformatting
choices.Continuetopressthisbuttontohighlightyourchoice.
YourTVpicturewillchangemomentarilyafteryouselectaformat.
Note: When displaying 3D video, the Image View button does not
display a menu of video formatting choices. The shape of the
video cannot be changed when watching 3D video.
Normal
Leavesoriginalvideoimageunchanged.
Auto-wide Fillswidthofthescreenwithoutcroppinganycontent.
Stretch 1
Stretchesvideoimageevenlyfromthecenter.
Stretch 2
Stretchestheedgesofthevideoimagemuchmore
thanthecenterportionoftheimage.
Zoom
Enlargesthevideoimage(presstheup/down
navigationbuttonstoverticallyoffsettheimage
onyourscreen).
Grey Bars Placesverticalgraybarsontheleftandrightofa
standard-denitionvideoimage.
English - 23
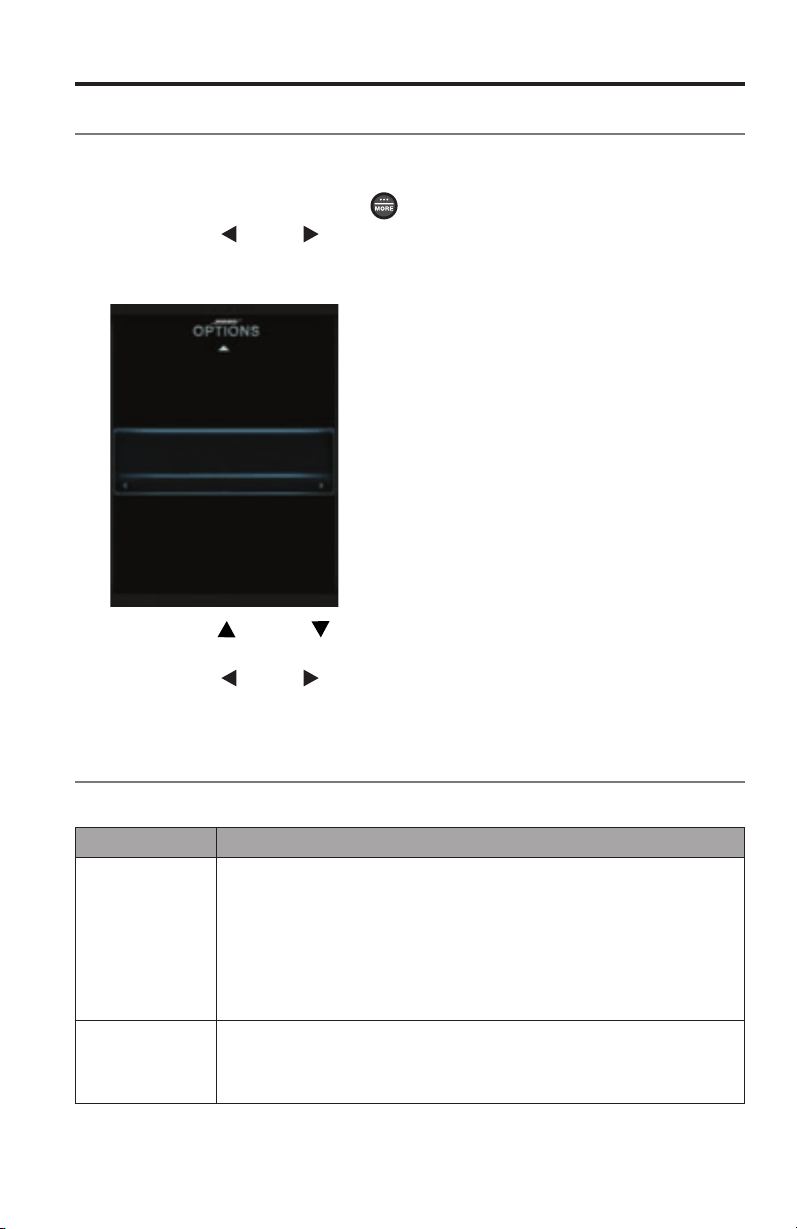
Changing System Options
Using the system OPTIONS menu
ThenumberofitemsappearingintheOPTIONSmenudependsonwhichsourceis
currentlyselected.
1. PresstheremoteMOREbutton
.
2. Presstheleft
orright navigationbuttonandhighlightOPTIONS.Press
theremoteOKbuttontodisplaytheOPTIONSmenuforthecurrentsourceas
showninthefollowingexample.
Speakers
Power Down
Screensaver
Volume on TV
Toggle volume display onTV
On
TV Speakers
Video Output
Automatic Off
3. Presstheup ordown navigationbuttonandhighlighttheoptionyou
wanttochange.
4. Presstheleft
orright navigationbuttonandselectthesetting.
5. PresstheremoteEXITbuttonwhendone.
OPTIONS menu
Factorysettingsareinboldtype.
Option Available Settings
Source Sound
(Notavailable
on235seriesII
or135seriesII
systems)
Original...................... Playsstereoaudiowhenstereoaudioisreceived
fromthesource
Recommended.........Plays5-channelaudiowhether2-or5-channel
audioisreceivedfromthesource
Alternative................. Plays5-channelaudiowheneitherstereoor
5-channelaudioisreceivedfromthesource
EnhancedMono......... Playssimulatedsurroundsoundwhenmonaural
audioisreceivedfromthesource
CurrentStation
(Notavailable
on520or510
systems)
Allow Stereo..............AllowsstereosoundfromthecurrentstereoFM
radiostation
StereoOff..................Changesthecurrentstationtomono,whichcan
helpwhentuningtoaweakradiostation

Changing System Options
24 - English
Option Available Settings
RDS
(Notavailable
on520or510
systems)
On...............................DisplaysRDSinformationontheremote
Off.............................. NoRDSinformationontheremote
GameMode On..............................Reducesvideoprocessinganddelay
Off..............................Normalperformance
Audio
Compression
Off............................... Nochangetoaudiotrack
Enhance Dialog.........Enhancessoundoutputsoyoucanhearmovie
dialogsmoredistinctly
SmartVolume............. Reducestherangeofvolumelevelsinamovie
soundtracksothedifferencebetweenextremely
loudoutburstsandsoftsoundsisless
noticeable
AudioTrack Track 1....................... Selectstrack1fromanexternalaudiostream
withmultipleaudiotracks
Track2........................Selectstrack2fromanexternalaudiostream
withmultipleaudiotracks
BothTracks................Selectstracks1and2fromanexternalaudio
stream
NotAvailable.............. Automaticallyselectedwhenonlyonetrackis
received
VolumeOffset Increasesthevolumeleveloftheselectedsourcerelativetoother
sources(0to10)
SourceOverscan
(2Donly)
On..............................Appliesvideooverscantothecurrentvideo
source
Off............................. Videosourceunaffected
Note: When a 3D source is playing, “Not Available” is displayed instead
of an overscan value.
SystemBass Adjustsbasslevel: –9toNormalto+6(AfterADAPTiQ
®
calibration)
–14toNormalto+14(NoADAPTiQcalibration)
SystemTreble
Adjuststreblelevel: –9toNormal
to+6(afterADAPTiQ
®
calibration)
–14toNormalto+14(noADAPTiQcalibration)
2D
AV Sync
(2Donly)
Adjuststheaudiodelaytosynchronizeaudiowiththe2Dvideo:
–
2toNormal
to+8
3D(3Donly) Setsthe3Dimagetodisplaycorrectlywiththeappropriate3Dglasses
Automatic................. Setsthecorrect3Dimageformatautomatically
Sidebyside................Selectsthesidebysideformat
Topandbottom......... Selectsthetop/bottomformat
3D
AV Sync
(3Donly)
Adjuststheaudiodelaytosynchronizeaudiowiththe3Dvideo
–2toNormalto+10
PowerDown Normal....................... Systemshutsdownwithoutpresentingthe
PowerDownMenu
PowerDownMenu..... SystempresentsthePowerDownMenuwhen
shuttingdown
Screensaver On......Displaysascreensaverafter20minutesofnouseractivitywhen
playingaudio-onlysources
Off......Disablesscreensavermode

Changing System Options
English - 25
Option Available Settings
RearSpeakers
(Notavailable
on235seriesII
or135seriesII
systems)
Adjuststhevolumeleveloftherearspeakersrelativetofrontspeakers:
(–10toNormalto+6)
Note: This option is unavailable if the Speakers option is set to Stereo (2)
or Front (3).
CenterSpeaker
(Notavailable
on235seriesII
or135seriesII
systems)
Adjuststhevolumelevelofthefrontcenterspeakerrelativetoother
speakers:–8toNormalto+8
Note: This option is unavailable if the Speakers option is set to Stereo (2)
Speakers
(Notavailable
on235seriesII
or135seriesII
systems)
Stereo(2).......... Activatesonlyfrontleftandrightspeakers
Front(3)............ Activatesonlyfrontleft,center,andrightspeakers
Surround (5)..... Activatesallfrontandrearspeakers
VolumeonTV On......Enablesthesystemtodisplaythevolumelevelmeterandmute
indicatoronyourTV
Off......Preventsthedisplayofthevolumelevelmeterandmute
indicator
TVSpeakers On......SendsHDMI
TM
audiotoyourTV(audiofromtheTVisnot
affectedbypluggingheadphonesintothecontrolconsoleorby
pressingMuteorVolumeontheremote)
Off.....SendsHDMIaudiototheLIFESTYLE
®
systemspeakers
VideoOutput
(2Donly)
Changestheresolution(StandardDenition/720p/1080i/1080p)ofthe
videosignalsenttoyourTV(onlysettingssupportedbyyourTVappear
asoptions)
Note: When a 3D source is playing, the output resolution always
matches the resolution of the connected 3D source. Video Output
then shows the automatically-set output resolution, and you can-
not change resolutions while a 3D source is playing.
AutomaticOff Enabled.........Thesystem,includingtheBose
®
linksecondzone,
automaticallyturnsitselfoffafterfourhoursofinactivity
(nouserinteraction)
Disabled.........Thesystemwillnotturnitselfoffautomatically
Note: The system will automatically turn off after 15 minutes after you
no longer hear audio or see video from a video source or you no
longer hear audio from an audio source. The 4-hour Automatic Off
setting does not affect this function.

26 - English
Changing Your System Setup
UNIFY
®
system overview
TheUNIFYintelligentintegrationsystemguidesyouthroughtheinitialprocessof
settingupandconguringyoursystem.Ithelpsyouchoosetherightcablesand
inputs,andprogramtheLIFESTYLE
®
remotetooperateyourconnecteddevices.
Aftercompletingtheinitialsetup,youcanusetheUNIFYsystematanytimeto
changeyoursystemsetupandconguration.
Using the UNIFY menu
TodisplaytheUNIFYmenuonyourTV,presstheSetupbuttononthefrontofthe
controlconsole.Usingthenavigationbuttonsontheremote,selectthefunction
youwantandfollowtheinstructionsonthescreen.
Menu item What you can do
Resumeinitial
setup
Ifyourinitialsetupisincomplete,youcanreturntotheUNIFYsetup
processatthelastcompletedevent.
Restartinitialsetup Ifyourinitialsetupisincomplete,youcanstarttheUNIFYsetup
processfromthebeginning.
Reconnect
Acoustimass
®
(135seriesII
systemsonly)
Followtheonscreeninstructionstoreconnectthespeakerarraywith
theAcoustimassmodule.
Language Changethelanguageoftheonscreendisplay.
ADAPTiQ
®
StarttheADAPTiQaudiocalibrationprocess.AfterADAPTiQhasbeen
run,thismenuitemallowsyoutodisableorenableADAPTiQ.
TVsetup AfteryourTVisconnectedtotheconsole,youcan:
• ProgramtheLIFESTYLE
®
remotetocontrolyourTV
• ManuallyenterremotecontrolIRdevicecodes
• ReplaceyourTV
• Add,change,orremovetheTVaudioconnection
Sourcesetup ForsourcesconnectedtoInput1-5ofthecontrolconsole,youcan:
• Changethenameofthedevice
• ProgramyourremotetocontrolthedeviceandaddtheIRemitter
• ManuallyenterremotecontrolIRdevicecodes
• Removethedevice
• Addorchangethetypeofaudioorvideoconnection
Addanewdevice Afteryourinitialsetupiscomplete,youcanaddanotherdeviceor
accessorytoyoursystem.
Update Usedtoperformasystemsoftwareupdate(see“Performingasystem
softwareupdate”onpage30formoreinformation).
Teachmode ThisitemisusedtosendIRcodestoprogramalearningremote.
ExitUNIFY ClosestheUNIFYmenuandreturnsyoutothelastsourceselected.

English - 27
Care and Maintenance
Troubleshooting
Problem What to do
Thesystemisnot
respondingtoinitial
operationofmyBose
®
remote
• Makesurethecontrolconsoleisturnedon.
• Checktoseeiftheremotebatteriesareinstalledcorrectly
orneedreplacement.See“Replacingthebatteries”on
page30.
• Resetthesystem.See“Resettingthesystem”onpage29.
• Pressanyremotekeyandwatchthesystemstatusindicator
onthecontrolconsole.Itshouldblinkwitheachpress.Ifnot,
see“Pairingtheremotewiththeconsole”onpage29
andfollowtheprocedure.
TheBoseremotedoes
notcontroladeviceI
addedduringtheinitial
setup
• Trysettingupthedeviceagain.PresstheSetupbuttonon
thecontrolconsole.Selectthedeviceoptionsandfollowthe
onscreeninstructionstosetupthedeviceagain.
• Yoursystemmayneedasoftwareupdate.See“Performinga
systemsoftwareupdate”onpage30.
Thevideoconnection
fromaconnectedsource
islessthanoptimum
Tochangeavideoconnection,presstheSetupbuttononthe
controlconsoleandselectthedevicesetupoptions.Followthe
onscreeninstructions.
Systemdoesn’tdo
anything
• MakesuretheACpowercordisinsertedsecurelyintothe
powersupply.
• MakesuretheAcoustimass
®
moduleandthepowersupply
arefullypluggedintoaliveAC(mains)outlet.
• (135seriesIIsystemsonly)Makesurethespeakerarrayis
pluggedintoaliveAC(mains)outlet.
• SelectaconnecteddevicefromtheSOURCEmenu.
• Resetthesystem.See“Resettingthesystem”onpage29.
Nosound • MakesuretheAcoustimassmoduleispluggedintoaliveAC
(mains)outlet.
• (135seriesIIsystemsonly)Makesurethespeakerarrayis
pluggedintoaliveAC(mains)outlet.
• Increasethevolume.
• PresstheMutebuttonandmakesureyoursystemisnot
muted.
• Checktheinputconnectionsonthecontrolconsole.Make
surethatyouhaveselectedtherightsource.
• Makesurethattheaudioinputcableisrmlypluggedintothe
AudioOutconnector(notBoselink)onthecontrolconsole
andtheotherendisrmlyseatedintotheMediaCenter
connectorontheAcoustimassmodule.
• (135seriesIIsystemsonly)Makesurethattheaudioinput
cableisrmlypluggedintotheAudioOutconnector(not
Boselink)onthecontrolconsoleandtheotherendisrmly
seatedintotheAudioInconnectoronthespeakerarray.
• (135seriesIIsystemsonly)Trymovinganypossiblesources
ofwirelessinterference,suchasawirelesscomputernetwork
router,anotherwirelessdevice,oramicrowaveoven,further
awayfromthesystem.
• Forradiooperation,connecttheFMandAMantennas.
• Resetthesystem.See“Resettingthesystem”onpage29.

Care and Maintenance
28 - English
Problem What to do
Soundqualityhas
changedandspeaker
arraystatusindicator
isblinkingorange(135
seriesIIsystemsonly).
PresstheSetupbuttononthecontrolconsoleandselectthe
“ReconnectAcoustimass”menuitem.Followtheonscreen
instructions.
TVdoesnotrespondto
remotecommands
(135seriesIIsystems
only)
• MakesurethespeakerarrayisnotblockingtheIRsensoron
theTV.ChangethepositionoftheTVandspeakerarrayso
thattheIRsensorisnotblocked.
• FordetailsonthelocationoftheTV’sIRsensor,refertothe
owner’sguidethatcamewithyourTV.
Intermittentbass
(135seriesIIsystems
only)
• CheckthatthestatusindicatorontheAcoustimass
®
module
isorangeandnotblinking.
• Ifthespeakerarraystatusindicatorisblinkingorange:
— CheckthattheAcoustimassmoduleispluggedintoalive
ACwalloutletandthestatusindicatorisglowingorange.
— PresstheSetupbuttononthecontrolconsoleandselect
the“ReconnectAcoustimass”menuitem.Followthe
onscreeninstructions.
— Trymovinganypossiblesourcesofwirelessinterference,
suchasawirelesscomputernetworkrouter,another
wirelessdevice,oramicrowaveoven,furtherawayfrom
thesystem.
Soundisimpairedby
aloudhumorbuzz,
whichmaybeelectrical
innature
ContactBose
®
CustomerServicetodetermineifandhow
otherelectricaldevicesintheroommaybecreatingunwanted
signals,andtoobtainpossibleremedies.
Radiodoesnotwork • Makesureantennasareconnectedproperly.
• MoveAMantennaatleast20inches(50cm)fromthecontrol
consoleandAcoustimassmodule.
• Adjustantennapositiontoimprovereception.
• MakesuretheAMantennaisinanuprightposition.
• Moveantennasfartherfromcontrolconsole,TV,orother
electronicequipment.
• Selectanotherstation.Youmaybeinanareaofweaksignal
coverageforsomestations.
FMsoundisdistorted • Adjustantennapositiontoreduceinterference.
• FullyextendtheFMantenna.
Pictureisblurrywhen
viewing3Dcontent
• Ifyour3Dglassesareoftheactivetype,makesuretheyare
turnedon.
• Trychangingthe3Dsystemoptiontoadifferentsetting.
• Iftheproblempersists,makesurethespeakerarrayisnot
blockingtheIRsensorontheTV.Changethepositionofthe
TVandspeakerarraysothattheIRsensorisnotblocked.
• FordetailsonthelocationoftheTV’sIRsensor,refertothe
owner’sguidethatcamewithyourTV.
Soundisdistorted • Makesuretheaudioinputcableisnotdamagedandthe
connectionsaresecureonbothends.
• Reducethevolumeoutputlevelfromanyexternaldevices
connectedtothecontrolconsole.
• (135seriesIIsystemsonly)Removetheprotectivelmfrom
thetrimandgrilleonthespeakerarrayandthefrontofthe
Acoustimassmodule.
Care and Maintenance
English - 29
Problem What to do
Nosoundfroma
connecteddevice
• Checktheconnections.
• Ifusingacoaxialoropticalaudioconnection,makesureyou
havenotmadebothtypesofconnectionstothesameinput
onthecontrolconsole.
• Makesurethatdeviceisturnedon.
• Refertotheowner’smanualthatcamewiththedevice.
NoTVpicture,butaudio
isheard
• ChecktheTVvideoinputselection.Makesureitiscorrectfor
thevideosource.
• Makesurevideocablesaresecurelyconnected.
Aconnecteddevice
doesnotrespond
consistentlytoremote
commands
TryconnectingtheincludedexternalIRemittertothecontrol
console.Forguidance,presstheSetupbuttononthecontrol
console.Selectthedeviceoptionsandfollowtheonscreen
instructions.
Intermittentaudiodrop-
outsheardoncoaxial
digitalaudioinputs
ContactBoseCustomerServicetorequestacompositevideo
cablethatcanbeusedforthecoaxialdigitalaudioconnection.
Resetting the system
1. PressandholdthePowerbutton onthecontrolconsolefor5seconds
oruntilthesystemstatusindicatoronthecontrolconsolechangestored.
Thesystemstatusindicatoronthecontrolconsolechangestoredwhenthe
systemshutsdown.
2. ReleasethePowerbutton
onthecontrolconsoletorestartthesystem.
Thesystemstatusindicatorchangestoblinkinggreenandthensolidgreen
whenthesystemisonandreadytouse.
3. Ifyoustillcannotoperatethesystemusingtheremote,trythenextprocedure
topairtheremotewiththecontrolconsole.
Pairing the remote with the console
Youmayneedtoperformthisprocedureifyouarereplacingaremoteorif
troubleshootinginstructionsrecommendit.
1. Makesureyoursystemison.Ifnot,pressthePowerbutton
onthe
controlconsole.
2. Holdtheremoteclosetothecontrolconsole.
3. PressandholdboththeMutebutton
onthecontrolconsoleandtheOK
buttonontheremoteatthesametimeforveseconds.Thesystemstatus
indicatorblinkswhenpairingiscomplete.
4. Pressanyremotebuttonandverifythatthesystemstatusindicatoronthe
controlconsoleblinkswitheachbuttonpress.
Care and Maintenance
30 - English
Performing a system software update
SystemsoftwareupdatesmaybeavailableperiodicallyfromBoseandcanbe
downloadedovertheInternettotheUSBdriveincludedwithyoursystem.
1. PresstheSetupbuttononthefrontofthecontrolconsoletodisplaythe
UNIFY
®
menu.
2. Usingtheremotenavigationbuttons,selectUpdate.
3. Followtheinstructionsonthescreen.
Note: To make sure your Bose remote is updated, hold the remote near the front of
the control console while it is being updated.
Contacting customer service
Foradditionalhelpinsolvingproblems,contactBose
®
CustomerService.Seethe
addresssheetincludedinthecarton.
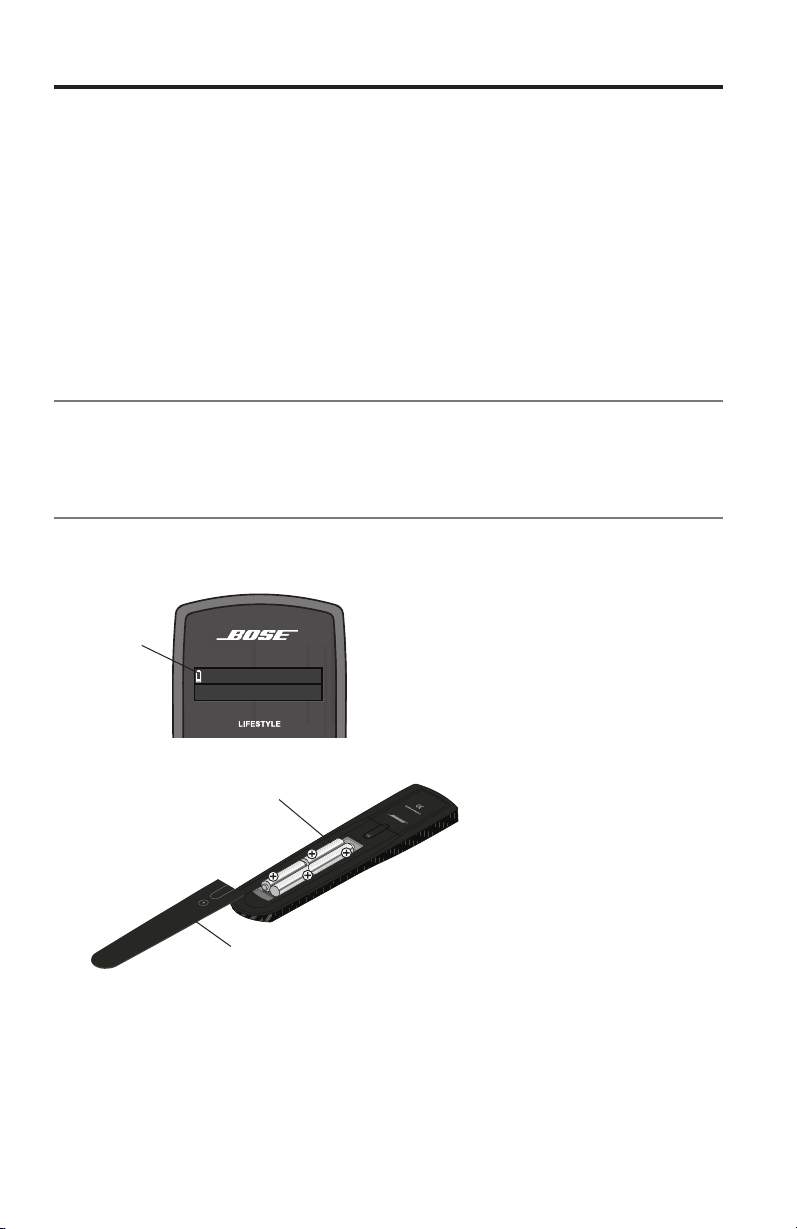
Replacing the batteries
Replaceallfourbatterieswhenyounoticeamarkeddecreaseintherangeor
responseofyourremotecontrol,orwhenyouseethelowbatteryicononthe
remotedisplay.
The Beatles
iPod 3:20
Th
e
B
iP
0
Beat
l
es
P
o
d
3:2
Cable
Lowbattery
icon
1. Slidethebatterycompartmentcoveroffthebackoftheremotecontrol.
AA(IEC-LR6)batteries(4)
Batterycompartmentcover
2. Removetheoldbatteries.
3. InstallfournewAA(IEC-LR6)1.5Vbatteries,matchingthepolarity
markings(+and–)tothemarkingsinsidethebatterycompartment.
4. Slidethebatterycoverbackintoplace.

Care and Maintenance
English - 31
Cleaning
Youcanwipetheoutsidesurfacesusingasoftdrycloth.Youcanalsolightly
vacuumthespeakergrilles.
CAUTIONS:
• DO NOT use solvents, chemicals, or sprays for cleaning.
• DO NOT allow liquids to spill or objects to drop into any openings.
Limited warranty
YourLIFESTYLE
®
systemiscoveredbyalimitedwarranty.Seeyourproductregis-
trationcardfordetails.Pleasebesuretollouttheinformationsectiononthecard
andmailittoBose.Failuretodosowillnotaffectyourlimitedwarranty.

Care and Maintenance
32 - English
Technical information
Remote control
Frequency:2.4GHz
Range:33ft(10m)
Control console power supply rating
ACinput:100-240V
50/60Hz,
DCoutput:12V
Max.
Acoustimass
®
module rating for LIFESTYLE
®
535, 525, 520, 510 and
235 series II systems
USA/Canada:100-120V
50/60Hz350W
International:220-240V
50/60Hz350W
Dualvoltage:100-120/220-240V
50/60Hz350W
Acoustimass
®
module rating for LIFESTYLE
®
135 series II systems only
ACinputpower:100-240V
50/60Hz150W
Speaker array rating for LIFESTYLE
®
135 series II systems only
ACinputpower:100-240V
50/60Hz60W
Wireless connection rating for LIFESTYLE
®
135 series II systems only
Outputpower:5mW@2400-2480MHz
Range:20ft(6.1m)
35W
1.0A(1,0A)

Care and Maintenance
English - 33
Licensing information
Thisproductcontainsoneormorefreeoropensourcesoftwareprogramsoriginat-
ingfromthirdpartiesanddistributedaspartoftheSTLinuxsoftwarepackage.Visit
www.stlinux.com/downloadforfurtherdetails.Thisfreeandopensourcesoftware
issubjecttothetermsoftheGNUGeneralPublicLicense,GNULibrary/Lesser
GeneralPublicLicense,orotherdifferentand/oradditionalcopyrightlicenses,
notices,anddisclaimers.Tounderstandyourrightsundertheselicenses,please
refertothespecictermsofthelicenses,notices,anddisclaimers,whichare
providedtoyouinanelectronicle,named“licenses.pdf,”locatedwithinthe
product’scontrolconsole.Toreadthisle,youwillneedacomputerwitha
USBportandasoftwareprogramthatcanview.pdfles.
Todownload“licenses.pdf”fromyourproduct’scontrolconsole:
1. PressandholdtheSetupbuttononthefrontofthecontrolconsoletodisplay
theSystemInformationscreen.
2. InsertaUSBdrive(thereshouldbeoneincludedinyoursystempackage)into
theUSBinputonthefrontofthecontrolconsole.
3. PresstheOKbuttonontheremotecontroltocopytheletotheUSBdrive.
Thisdownloadprocessshouldbecompletedwithin30seconds.Youmaythen
removetheUSBdrive.
4. Toreadthele“licenses.pdf,”plugtheUSBdriveintoacomputerwithaUSB
port,navigatetotheUSBrootdirectory,andopen“licenses.pdf”withasoft-
wareprogramthatcanview.pdfles.
Toreceiveacopyofthesourcecodefortheopensourcesoftwareprograms
includedinthisproduct,pleasemailyourwrittenrequestto:LicensingManager,
Mailstop6A2,BoseCorporation,TheMountain,Framingham,MA01701-9168.
BoseCorporationwilldistributesuchsourcecodetoyouonadiscforacharge
coveringthecostofperformingsuchdistribution,suchasthecostofmedia,
shippingandhandling.Alloftheabovereferencedlicenses,notices,and
disclaimersarereproducedandavailablewithsuchsourcecode.Thisoffer
isvalidforaperiodofthree(3)yearsfollowingthedateofdistributionofthis
productbyBoseCorporation.

©2013BoseCorporation,TheMountain,
Framingham,MA01701-9168USA
AM372639Rev.00