We recommend that you use a professional
electrician to install the wall outlet. For information
about electrical specications, see
Specications.
Safety
Warnings:
• RISK OF ELECTRIC SHOCK — Use only in dry
locations and only indoors.
• All cables should be routed away from the outlet
openings.
• DO NOT use with any aquarium equipment.
• DO NOT install in an outlet that is not grounded.
Notes to the installer:
• This device must be installed in accordance with
National and Local electrical codes.
• To prevent severe shock or electrocution, always
turn power OFF at the service panel before
working with wiring.
• This device should be used with copper or
copper-clad wire. DO NOT use with aluminum
wire.
• DO NOT plug this device into a shallow wall box.
The wall box must be deep enough to house the
outlet. If the box is too shallow, the outlet will not
t securely into the wall.
Features
• Replaces a standard duplex outlet
• Status LED lets you know your devices are
protected
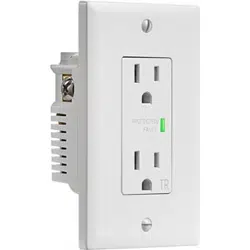
• Tamper-resistant outlets for added safety
• Provides two standard 125V power outlets
• Fireproof 1,080 joules surge protection
• Works in nearly all installations
• Compatible with your existing decora wall plate
Installing the outlet
Warning: DISCONNECT POWER. Failure to do
so can result in severe injury or death.
1 Make sure that you disconnect power to the
circuit by removing the fuse from the circuit
breaker or turning OFF the circuit breaker.
2 Remove the wall plate and mounting screws
that cover the old outlet.
3 Carefully remove the existing outlet from
the wall box.
4 Disconnect the wiring from the old outlet.
5 Connect the wires to the outlet:
• Black lead attaches to the hot wire
• White lead attaches to the neutral wire
• Green lead attaches to the ground wire
You can attach the wires by:
A Inserting straight wires into the holes.
OR
A Wrapping the wires 3/4 of the way around
the terminal screws, making sure that the
wires do not overlap.
B Tighten every screw and make sure that no
bare copper wire is exposed. When
tightening screws, use 14 pounds-per-inch
of torque.
6 Carefully insert the outlet into the wall box.
PROTECTED/
FAULT
TR
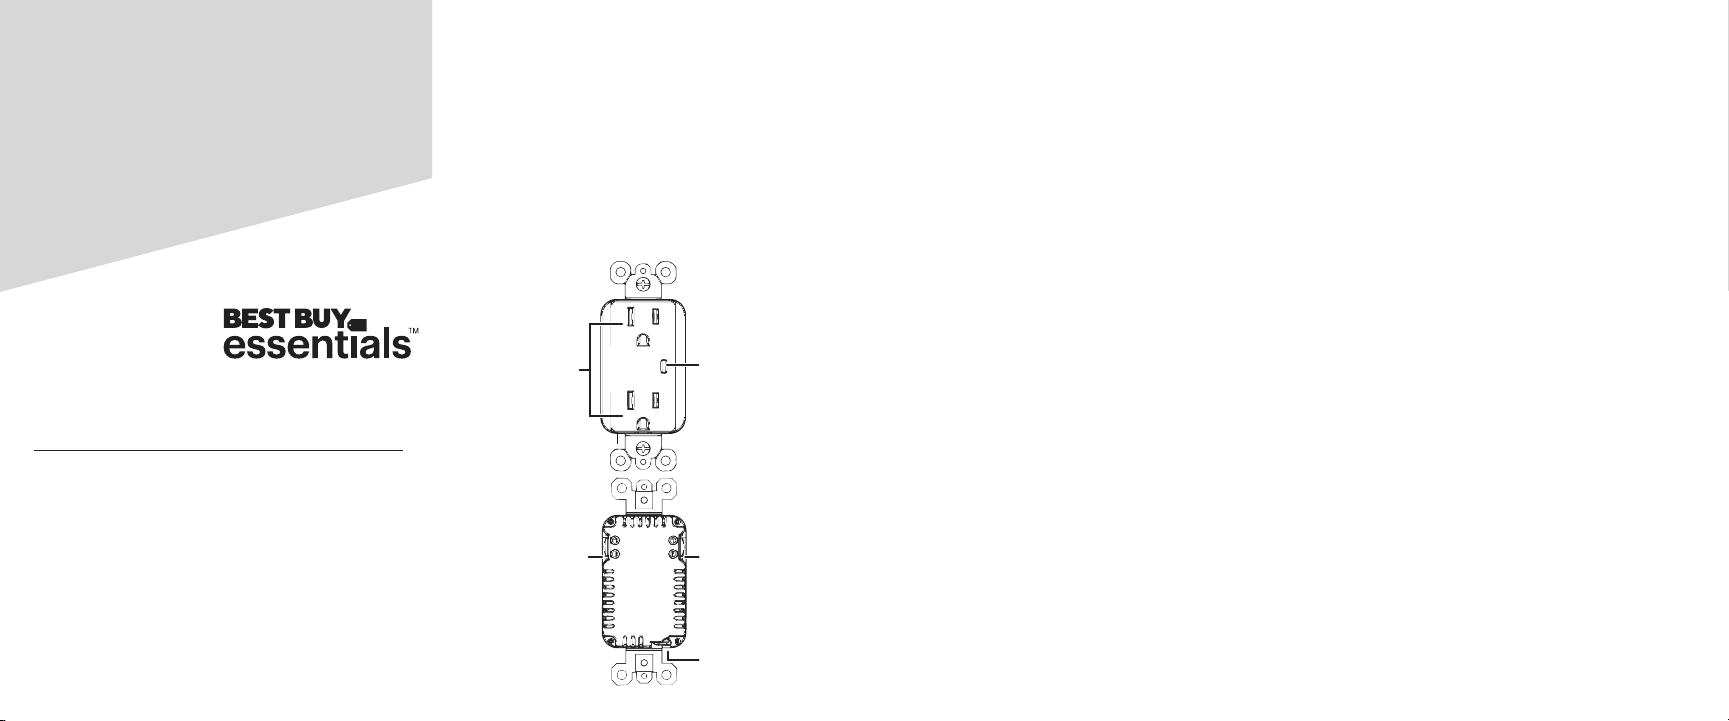
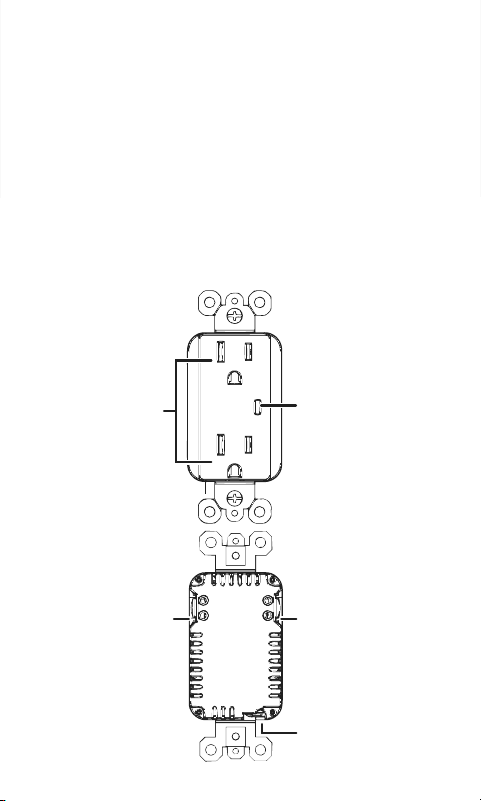
AC
outlets (2)
Indicator
LED
Ground
(green)
Neutral
(white)
Hot
(black)
Before using your new product, please read these instructions to prevent any damage.
Package contents
• 2 AC wall outlets
• White decora-style wall plate
• Screws: 2 long and 2 short
• Quick Setup Guide
2-outlet In-wall Surge
Protector
Quick Setup Guide
BE-HW120S19
Front
We recommend that you use a professional
electrician to install the wall outlet. For information
about electrical specications, see
Specications.
Safety
Warnings:
• RISK OF ELECTRIC SHOCK — Use only in dry
locations and only indoors.
• All cables should be routed away from the outlet
openings.
• DO NOT use with any aquarium equipment.
• DO NOT install in an outlet that is not grounded.
Notes to the installer:
• This device must be installed in accordance with
National and Local electrical codes.
• To prevent severe shock or electrocution, always
turn power OFF at the service panel before
working with wiring.
• This device should be used with copper or
copper-clad wire. DO NOT use with aluminum
wire.
• DO NOT plug this device into a shallow wall box.
The wall box must be deep enough to house the
outlet. If the box is too shallow, the outlet will not
t securely into the wall.
Features
• Replaces a standard duplex outlet
• Status LED lets you know your devices are
protected
• Tamper-resistant outlets for added safety
• Provides two standard 125V power outlets
• Fireproof 1,080 joules surge protection
• Works in nearly all installations
• Compatible with your existing decora wall plate
Installing the outlet
Warning: DISCONNECT POWER. Failure to do
so can result in severe injury or death.
1 Make sure that you disconnect power to the
circuit by removing the fuse from the circuit
breaker or turning OFF the circuit breaker.
2 Remove the wall plate and mounting screws
that cover the old outlet.
3 Carefully remove the existing outlet from
the wall box.
4 Disconnect the wiring from the old outlet.
5 Connect the wires to the outlet:
• Black lead attaches to the hot wire
• White lead attaches to the neutral wire
• Green lead attaches to the ground wire
You can attach the wires by:
A Inserting straight wires into the holes.
OR
A Wrapping the wires 3/4 of the way around
the terminal screws, making sure that the
wires do not overlap.
B Tighten every screw and make sure that no
bare copper wire is exposed. When
tightening screws, use 14 pounds-per-inch
of torque.
6 Carefully insert the outlet into the wall box.
PROTECTED/
FAULT
TR
AC
outlets (2)
Indicator
LED
Ground
(green)
Neutral
(white)
Hot
(black)
Before using your new product, please read these instructions to prevent any damage.
Package contents
• 2 AC wall outlets
• White decora-style wall plate
• Screws: 2 long and 2 short
• Quick Setup Guide
2-outlet In-wall Surge
Protector
Quick Setup Guide
BE-HW120S19
Front
V1 ENGLISH 21-0047
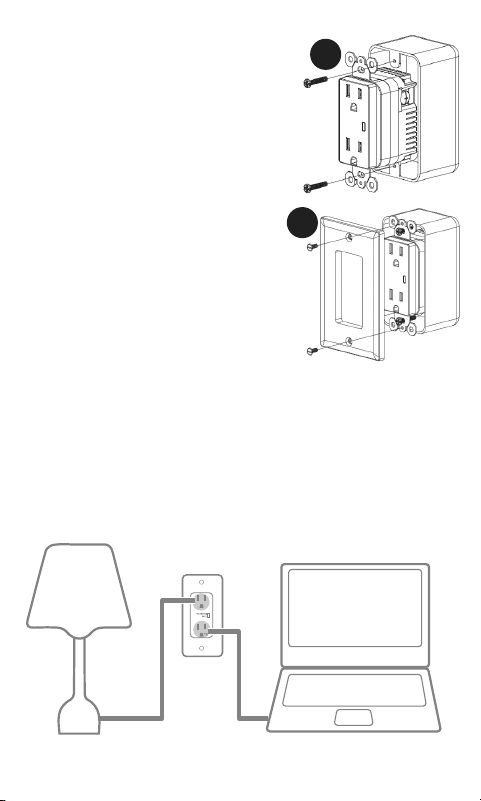
7 Secure the outlet to
the wall box with the two
long screws (provided).
8 Secure the wall plate to the
outlet with the two
short screws (provided).
9 Restore power by
replacing the fuse or
turning on the circuit
breaker. The
outlet is ready to use.
Using the wall outlet
To power electrical devices (like lamps or
laptop), plug them into the electrical outlets.
Indicator LED
• Green: surge protected
• Red: wiring fault
• LED o: not surge protected
Note: Only applicable if the outlet is receiving power.
The LED is not lit when power is shut o to outlet.
Specications
Dimensions (H× W × D)
With plate:
4.7 × 3 × 1.9 in. (120 × 76 × 47.6 mm)
Without plate:
4.2 × 1.7 × 1.9 in (106 × 44 × 47.6 mm)
Electrical
Receptacle Rating: 15 Amp, 125VAC
Line Voltage: 125V A C @ 60 Hz
Surge protection: 3 lines (L-N / L-G / N-G)
Clamping voltage: L-N / L-G / N-G = 500 volts
Maximum surge current: 45,000 amps
Maximum energy dissipation: 1,080 joules
Wire Terminals: #14-#12 AWG
UL-1449 certied
Legal notices
FCC Statement
This device complies with Part 15 of the FCC Rules. Operation is
subject to the following two conditions: (1) this device may not
cause harmful interference, and (2) this device must accept any
interference received, including interference that may cause
undesired operation. This equipment has been tested and found to
comply with the limits for a Class B digital device, pursuant to Part
15 of the FCC Rules. These limits are designed to provide reasonable
protection against harmful interference in a residential installation.
This equipment generates, uses, and can radiate radio frequency
energy and, if not installed and used in accordance with the
instructions, may cause harmful interference to radio
communications. However, there is no guarantee that interference
will not occur in a particular installation. If this equipment does
cause harmful interference to radio or television reception, which
can be determined by turning the equipment o and on, the user is
encouraged to try to correct the interference by one or more of the
following measures:
• Reorient or relocate the receiving antenna.
• Increase the separation between the equipment and receiver.
• Connect the equipment into an outlet on a circuit dierent from
that to which the receiver is connected.
• Consult the dealer or an experienced radio/TV technician for
help.
Warning: Changes or modications not expressly approved by the
party responsible for compliance could void the user's authority to
operate the equipment.
ICES-003
This Class B digital apparatus complies with Canadian ICES-003.
One-year limited warranty
Visit www.bestbuy.com/bestbuyessentials for
details.
Contact Best Buy Essentials
For customer service, call 866-597-8427 (U.S. and
Canada)
www.bestbuy.com/bestbuyessentials
Best Buy Essentials is a trademark of Best Buy and its aliated
companies.
Distributed by Best Buy Purchasing, LLC
7601 Penn Ave South, Richeld, MN 55423 U.S.A.
©2021 Best Buy. All rights reserved.
7
8

V1 ENGLISH 21-0047
7 Secure the outlet to
the wall box with the two
long screws (provided).
8 Secure the wall plate to the
outlet with the two
short screws (provided).
9 Restore power by
replacing the fuse or
turning on the circuit
breaker. The
outlet is ready to use.
Using the wall outlet
To power electrical devices (like lamps or
laptop), plug them into the electrical outlets.
Indicator LED
• Green: surge protected
• Red: wiring fault
• LED o: not surge protected
Note: Only applicable if the outlet is receiving power.
The LED is not lit when power is shut o to outlet.
Specications
Dimensions (H× W × D)
With plate:
4.7 × 3 × 1.9 in. (120 × 76 × 47.6 mm)
Without plate:
4.2 × 1.7 × 1.9 in (106 × 44 × 47.6 mm)
Electrical
Receptacle Rating: 15 Amp, 125VAC
Line Voltage: 125V A C @ 60 Hz
Surge protection: 3 lines (L-N / L-G / N-G)
Clamping voltage: L-N / L-G / N-G = 500 volts
Maximum surge current: 45,000 amps
Maximum energy dissipation: 1,080 joules
Wire Terminals: #14-#12 AWG
UL-1449 certied
Legal notices
FCC Statement
This device complies with Part 15 of the FCC Rules. Operation is
subject to the following two conditions: (1) this device may not
cause harmful interference, and (2) this device must accept any
interference received, including interference that may cause
undesired operation. This equipment has been tested and found to
comply with the limits for a Class B digital device, pursuant to Part
15 of the FCC Rules. These limits are designed to provide reasonable
protection against harmful interference in a residential installation.
This equipment generates, uses, and can radiate radio frequency
energy and, if not installed and used in accordance with the
instructions, may cause harmful interference to radio
communications. However, there is no guarantee that interference
will not occur in a particular installation. If this equipment does
cause harmful interference to radio or television reception, which
can be determined by turning the equipment o and on, the user is
encouraged to try to correct the interference by one or more of the
following measures:
• Reorient or relocate the receiving antenna.
• Increase the separation between the equipment and receiver.
• Connect the equipment into an outlet on a circuit dierent from
that to which the receiver is connected.
• Consult the dealer or an experienced radio/TV technician for
help.
Warning: Changes or modications not expressly approved by the
party responsible for compliance could void the user's authority to
operate the equipment.
ICES-003
This Class B digital apparatus complies with Canadian ICES-003.
One-year limited warranty
Visit www.bestbuy.com/bestbuyessentials for
details.
Contact Best Buy Essentials
For customer service, call 866-597-8427 (U.S. and
Canada)
www.bestbuy.com/bestbuyessentials
Best Buy Essentials is a trademark of Best Buy and its aliated
companies.
Distributed by Best Buy Purchasing, LLC
7601 Penn Ave South, Richeld, MN 55423 U.S.A.
©2021 Best Buy. All rights reserved.
7
8